Yamaha NS-1000MM El manual del propietario
- Categoría
- Altavoces
- Tipo
- El manual del propietario

CAUTIONS
Read this before using the speakers.
●
To assure the finest performance, please read this
manual carefully. Keep it in a safe place for future
reference.
●
Install the speakers in a cool, dry, clean place –
away from windows, heat sources, sources of
excessive vibration, dust, moisture and cold. Avoid
sources of humming (transformers, motors). To
prevent fire or electric shock, do not expose the
speakers to rain or water.
●
To prevent the enclosure from warping or
discoloring, do not place the speakers where they
will be exposed to direct sunlight or excessive
humidity.
●
Do not place the following objects on top of the
speakers:
• Other components, as they might cause damage
and/or discoloration on the surface of the
speakers.
• Burning objects (i.e. candles), as they might cause
fire, damage to the speakers and/or personal
injury.
• Containers with liquid in them. If the liquid spills, it
might cause electric shock to the user and/or
damage to the speakers.
●
Do not place the speakers where they are liable to
be knocked over or struck by falling objects. Stable
placement will also ensure better sound
performance.
●
Placing the speakers on the same shelf or rack as
the turntable can result in feedback.
●
Secure placement or installation is the owner’s
responsibility.
YAMAHA shall not be liable for any accident caused
by improper placement or installation of speakers.
●
Any time you note distortion, reduce the volume
control on your amplifier to a lower setting. Never
allow your amplifier to be driven into “clipping”.
Otherwise the speakers may be damaged.
NS-1000MM
Natural Sound 3-way acoustic-suspension speaker system
Thank you for selecting the Yamaha NS-1000MM speaker system.
●
When using an amplifier with a rated output power
higher than the nominal input power of the speakers,
care should be taken never to exceed the speakers’
maximum input.
●
Do not attempt to clean the speakers with chemical
solvents as this might damage the finish. Use a
clean, dry cloth.
●
Do not attempt to modify or fix the speakers.
Contact qualified YAMAHA service personnel when
any service is needed. The cabinet should never be
opened for any reasons.
G
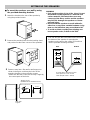
REMOVING THE FRONT COVER
The front cover is fastened to the enclosure at four
points and can be removed if desired. To remove the
cover, hold on to both sides and slowly pull straight
away from the speaker. To reattach, line up the four
holes on the inner surface of the cover with the four
corresponding pegs on the speaker and push gently.
Note
When the cover is removed, be sure not to touch
the speaker units with your hands or to exert
excessive force with tools.

SETTING UP THE SPEAKERS
■ To mount the speakers on a wall by using
the provided mounting brackets
1 Attach the bracket to the rear of the speaker by
using the provided screws.
2 Remove the provided pads from the backing sheet
and put them at the lower corners of the speakers.
WARNING
● Each speaker weighs 3.0 kg (6 lbs. 10 oz.). Do not
mount them on thin plywood or a wall with soft
surface material. If mounted, the screws may
come out of the flimsy surface and the speakers
may fall. This damages the speakers or causes
personal injury.
● Do not install the speakers to a wall with nails,
adhesives, or any other unstable hardware. Long-
term use and vibrations may cause them to fall.
● To avoid accidents resulting from tripping over
loose speaker cords, fix them to the wall.
3 Fasten screws into a firm wall or wall support as
shown in the figure, and hang the holes of the
mounting bracket on the protruding screws.
* Make sure that the screws are securely caught by
the narrow parts of the holes.
Wall/ wall
support
Tapping screw
(Available at the hardware store)
40 mm
Min.
20 mm
2 mm
Diam. 3.5 to 3.8 mm
You can also use the screw holes on the rear and
the bottom of the speaker for mounting the
speakers on the wall or the ceiling (if you will not
use the provided mounting brackets).
60 mm
64 mm
60 mm
Rear
Bottom
A screw with a diameter of 4 mm
and a pitch of 0.7 mm can be
used. (Depth of hole : 10mm)

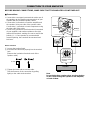
How to Connect:
1 Loosen the terminal knob.
2 Insert the bare wire end properly into the terminal
hole.
[Remove the insulation from both ends of the
speaker cable.]
3 Tighten the knob and secure the cable.
Test the firmness of the connection by pulling
lightly on the cable at the terminal.
10 mm
Speaker (R)
Speaker (L)
Note
Do not let the bare speaker wires touch each other
as this could damage the speaker or the amplifier,
or both of them.
Black (–)
Red (+)
Speaker output
terminals of the
amplifier
Amplifier
CONNECTION TO YOUR AMPLIFIER
BEFORE MAKING CONNECTIONS, MAKE SURE THAT THE AMPLIFIER IS SWITCHED OFF.
Loosen
1
2
3
■ Connections
• Connect the screw-type input terminals at the rear of
the speakers to the speaker output terminals of your
amplifier with the provided speaker cables.
• Connect the (+) terminals on both the amplifier and
the speakers using one side of the speaker cable.
Connect the (–) terminals on both components using
the other side of the cable.
• Connect one speaker to the left (marked L) terminals
of your amplifier, and another speaker to the right
(marked R) terminals, making sure not to reverse the
polarity (+, –). If one speaker is connected with
reversed polarity, the sound will be unnatural and
lack bass.
Tighten

SPECIFICATIONS
Type ......... 3-way acoustic-suspension speaker system
Magnetically shielded type
Driver................................. 12 cm (4-3/4”) cone woofer
2.5 cm (1”) dome mid-range
1.5 cm (9/16”) dome tweeter
Nominal Impedance .........................................6 ohms
Frequency Response.......................... 70 Hz – 24 kHz
Nominal Input Power............................................ 60W
Maximum Input Power ....................................... 150W
Sensitivity .......................................... 86 dB/2.83V, 1m
Dimensions (W x H x D).............. 150 x 275 x 180 mm
(5-7/8” x 10-13/16” x 7-1/16”)
Weight .................................... 3.0 kg (6 lbs. 10 oz.) x 2
Accessories ......................... Speaker cable (10 m) x 2
Mounting bracket x 2
Screw x 4
Pad x 4
* Please note that all specifications are subject to
change without notice.
* Care should be taken not to exceed the input power
values noted above.
Printed in Malaysia V706740
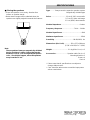
■ Placing the speakers
• Place the speakers on a sturdy, vibration-free
surface or speaker stands.
• Better stereo images will be obtained when the
speakers are slightly angled in towards the listeners.
Note
These speakers feature a magnetically shielded
design, but there is still a chance that placing
them too close to a TV set might impair picture
color. Should this happen, move the speakers
away from the TV set.
Transcripción de documentos
G NS-1000MM Natural Sound 3-way acoustic-suspension speaker system Thank you for selecting the Yamaha NS-1000MM speaker system. Read this before using the speakers. ● When using an amplifier with a rated output power higher than the nominal input power of the speakers, care should be taken never to exceed the speakers’ maximum input. ● To assure the finest performance, please read this manual carefully. Keep it in a safe place for future reference. ● Do not attempt to clean the speakers with chemical solvents as this might damage the finish. Use a clean, dry cloth. ● Install the speakers in a cool, dry, clean place – away from windows, heat sources, sources of excessive vibration, dust, moisture and cold. Avoid sources of humming (transformers, motors). To prevent fire or electric shock, do not expose the speakers to rain or water. ● Do not attempt to modify or fix the speakers. Contact qualified YAMAHA service personnel when any service is needed. The cabinet should never be opened for any reasons. CAUTIONS ● To prevent the enclosure from warping or discoloring, do not place the speakers where they will be exposed to direct sunlight or excessive humidity. ● Do not place the following objects on top of the speakers: • Other components, as they might cause damage and/or discoloration on the surface of the speakers. • Burning objects (i.e. candles), as they might cause fire, damage to the speakers and/or personal injury. • Containers with liquid in them. If the liquid spills, it might cause electric shock to the user and/or damage to the speakers. ● Do not place the speakers where they are liable to be knocked over or struck by falling objects. Stable placement will also ensure better sound performance. REMOVING THE FRONT COVER The front cover is fastened to the enclosure at four points and can be removed if desired. To remove the cover, hold on to both sides and slowly pull straight away from the speaker. To reattach, line up the four holes on the inner surface of the cover with the four corresponding pegs on the speaker and push gently. ● Placing the speakers on the same shelf or rack as the turntable can result in feedback. ● Secure placement or installation is the owner’s responsibility. YAMAHA shall not be liable for any accident caused by improper placement or installation of speakers. ● Any time you note distortion, reduce the volume control on your amplifier to a lower setting. Never allow your amplifier to be driven into “clipping”. Otherwise the speakers may be damaged. Note When the cover is removed, be sure not to touch the speaker units with your hands or to exert excessive force with tools. SETTING UP THE SPEAKERS ■ To mount the speakers on a wall by using the provided mounting brackets 1 2 Attach the bracket to the rear of the speaker by using the provided screws. Remove the provided pads from the backing sheet and put them at the lower corners of the speakers. WARNING ● Each speaker weighs 3.0 kg (6 lbs. 10 oz.). Do not mount them on thin plywood or a wall with soft surface material. If mounted, the screws may come out of the flimsy surface and the speakers may fall. This damages the speakers or causes personal injury. ● Do not install the speakers to a wall with nails, adhesives, or any other unstable hardware. Longterm use and vibrations may cause them to fall. ● To avoid accidents resulting from tripping over loose speaker cords, fix them to the wall. You can also use the screw holes on the rear and the bottom of the speaker for mounting the speakers on the wall or the ceiling (if you will not use the provided mounting brackets). Rear Bottom 64 mm 60 mm 60 mm 3 Fasten screws into a firm wall or wall support as shown in the figure, and hang the holes of the mounting bracket on the protruding screws. * Make sure that the screws are securely caught by the narrow parts of the holes. Tapping screw (Available at the hardware store) Diam. 3.5 to 3.8 mm 40 mm Min. 20 mm 2 mm Wall/ wall support A screw with a diameter of 4 mm and a pitch of 0.7 mm can be used. (Depth of hole : 10mm) CONNECTION TO YOUR AMPLIFIER BEFORE MAKING CONNECTIONS, MAKE SURE THAT THE AMPLIFIER IS SWITCHED OFF. ■ Connections • Connect the screw-type input terminals at the rear of the speakers to the speaker output terminals of your amplifier with the provided speaker cables. • Connect the (+) terminals on both the amplifier and the speakers using one side of the speaker cable. Connect the (–) terminals on both components using the other side of the cable. • Connect one speaker to the left (marked L) terminals of your amplifier, and another speaker to the right (marked R) terminals, making sure not to reverse the polarity (+, –). If one speaker is connected with reversed polarity, the sound will be unnatural and lack bass. 1 Loosen 3 Tighten Black (–) Red (+) 2 Speaker (L) Speaker (R) How to Connect: 1 Loosen the terminal knob. 2 Insert the bare wire end properly into the terminal hole. [Remove the insulation from both ends of the speaker cable.] 10 mm Speaker output terminals of the amplifier Amplifier 3 Tighten the knob and secure the cable. Test the firmness of the connection by pulling lightly on the cable at the terminal. Note Do not let the bare speaker wires touch each other as this could damage the speaker or the amplifier, or both of them. SPECIFICATIONS ■ Placing the speakers • Place the speakers on a sturdy, vibration-free surface or speaker stands. • Better stereo images will be obtained when the speakers are slightly angled in towards the listeners. Type ......... 3-way acoustic-suspension speaker system Magnetically shielded type Driver ................................. 12 cm (4-3/4”) cone woofer 2.5 cm (1”) dome mid-range 1.5 cm (9/16”) dome tweeter Nominal Impedance ......................................... 6 ohms Frequency Response .......................... 70 Hz – 24 kHz Nominal Input Power ............................................ 60W Maximum Input Power ....................................... 150W Sensitivity .......................................... 86 dB/2.83V, 1m Dimensions (W x H x D) .............. 150 x 275 x 180 mm (5-7/8” x 10-13/16” x 7-1/16”) Note These speakers feature a magnetically shielded design, but there is still a chance that placing them too close to a TV set might impair picture color. Should this happen, move the speakers away from the TV set. Weight .................................... 3.0 kg (6 lbs. 10 oz.) x 2 Accessories ......................... Speaker cable (10 m) x 2 Mounting bracket x 2 Screw x 4 Pad x 4 * Please note that all specifications are subject to change without notice. * Care should be taken not to exceed the input power values noted above. Printed in Malaysia V706740-
 1
1
-
 2
2
-
 3
3
-
 4
4


Yamaha NS-1000MM El manual del propietario
- Categoría
- Altavoces
- Tipo
- El manual del propietario
en otros idiomas
- français: Yamaha NS-1000MM Le manuel du propriétaire
- italiano: Yamaha NS-1000MM Manuale del proprietario
- English: Yamaha NS-1000MM Owner's manual
- Deutsch: Yamaha NS-1000MM Bedienungsanleitung
- русский: Yamaha NS-1000MM Инструкция по применению
- Nederlands: Yamaha NS-1000MM de handleiding
- português: Yamaha NS-1000MM Manual do proprietário
- dansk: Yamaha NS-1000MM Brugervejledning
- polski: Yamaha NS-1000MM Instrukcja obsługi
- čeština: Yamaha NS-1000MM Návod k obsluze
- svenska: Yamaha NS-1000MM Bruksanvisning
- Türkçe: Yamaha NS-1000MM El kitabı
- suomi: Yamaha NS-1000MM Omistajan opas
- română: Yamaha NS-1000MM Manualul proprietarului
Artículos relacionados
-
Yamaha NS-10MM El manual del propietario
-
-
Yamaha NX-C430 El manual del propietario
-
-
-
Yamaha NS-P210 El manual del propietario
-
Yamaha NS-7900 El manual del propietario
-
-
-