AUSDOM AW615S Manual de usuario
- Categoría
- Cámaras web
- Tipo
- Manual de usuario

1080P WebCam
User Manual
MODEL: AW615S
H
D
1
0
8
0
P
W
e
b
C
a
m
e
r
a
F
/
#
2
.
0
F
:
2
.
8
8
m
m

2. System Requirements
- IBM PC or compatible PC or laptop with USB port
- Pentium 1G or higher CPU
- Over 500MB free hard-disc space
- 256MB memory
- Support DirectX 9.0 VGA card
1. Package Contents
-1 x AW615S WebCam
-1 x User Manual
- 1 x Lightweight Tripod
EN-1
3. For HD 1080P Video Recording
- 2.4GHz Intel Core 2 Duo
- 2 GB RAM
- 1GB hard drive space
- USB 2.0 port
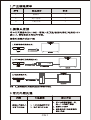
4. Product Overview
Manual swivel lens
USB Connection
Cable
1080P Camera lens
Foldable Flexible Clip
Before using,
please adjust
the lens
sharpness.

EN-2
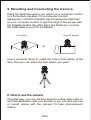
5. Mounting and Connecting the Camera
Place the WebCam where you want it on a computer monitor
or a flat surface desktop. For a computer monitor
deployment, unfold the flexible clip and place the WebCam
on your computer monitor to grip the edge of the screen with
the foldable flexible clip. After fixing the WebCam, connect
the USB cable to your PC's USB port.
6. How to use the camera
Plug and play: you can use the camera to make video calls on
any chat application with your friends, or you can take pictures
or record videos with the camera. To take photos/record
videos:
Use a universal tripod to rotate the hole in the bottom of the
item, then you can place the item where you want.
On a Desk
OR
On a PC Monitor

EN-3
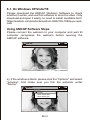
6-1. On Windows XP/Vista/7/8
Please download the AMCAP Webcam Software to check
whether it works, and use this software to record a video. Only
download and open it easily, no need to install. Available from:
https://ausdom.com/products/ausdom-AW615S-1080p-pc-web-
cam
Using AMCAP Software Steps:
Please connect the webcam to your computer and wait till
computer recognizes the webcam before opening the
AMCAP software.
AMCAP
File Devices Options Capture photo help
AMCAP
File Devices Options Capture photo help
Preview
Video capture filter...
Video capture pin...
a). If the window is blank, please click the ''Options'' and select
''preview''. And make sure you tick the webcam under
''device''.

EN-4
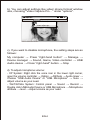
d). To adjust microphone volume:
- XP System: Right click the voice icon in the lower right corner,
open the volume controller → Option → Attribute → Audio mixer →
Choose ''USB Audio Device'' or ''USB Microphone'' → Sure →
Adjust volume as your need.
- Win7/8/Vista System: Control panel → Sound → Record →
Double click USB Audio Device or USB Microphone → Microphone
attribute → level → Adjust volume as your need.
c). If you want to disable microphone, the setting steps are as
follows:
My computer → Press ''right-hand button'' → Manage →
Device manager → Sound, Game, Video controller → USB
Audio device → Press ''right-hand'' button → Stop
b). You can adjust settings like video/ phone format/ window
size, choosing ''Video Capture Pin…'' under ''options''.
AMCAP
File Devices Options Capture photo help
Preview
Video capture filter...
Video capture pin...

EN-5
a). Please connect the webcam to your computer and wait till
computer recognizes the webcam.
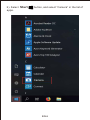
6-2. On Windows 10
- Record Videos: Capture → Start Capture → Select OK to start
capture of video sequence to save the files. You can select a
directory for saving captured videos before Starting to Capture: File
→ Set Capture Directory.
- Take Photos: Photo → Start photo
e). To record videos/ take photos:
AMCAP
File Devices Options Capture photo help
Set Capture Directory...
Set Photo Directory...
Set Captured Video AS...
Exit

EN-6
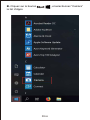
b). Select
Start
button, and select “Camera” in the list of
apps.
Camera

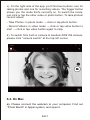
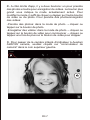
c). On the right side of the app, you'll find two buttons: one for
taking photos and one for recording videos. The bigger button
shows you the mode that's currently on. To switch the mode,
just click or tap the other video or photo button. To take photos/
record videos:
- Take Photos: in photo mode → click or tap photo button.
- Record Videos: in video mode → click or tap video button to
start → click or tap video button again to stop.
d). To switch from built-in camera to Ausdom AW615S camera,
please click ''camera switch'' at the top-left corner.
EN-7
6-3. On Mac
a). Please connect the webcam to your computer. Find out
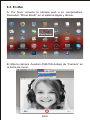
“Photo Booth” in Apple system, and open it.

EN-8
7. Warranty
The AW615S is covered by a 1-year manufacturer warranty.
For more information, visit: www.Ausdom.com
b). Choose Ausdom AW615S camera under ''Camera'' in
menu bar.
Photo Booth
FaceTime HD Camera
Enable Screen Flash
Full HD webcam
Camera

EN-9
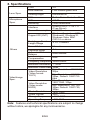
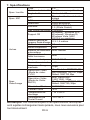
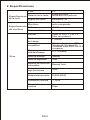
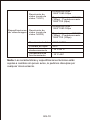
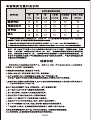
8. Specifications
Note: Features and technical specifications are subject to change
without notice, we apologize for any inconvenience.
Lens Material
Viewing Angle
F/No.
Lens Spec.
MIC.
S.P.L
Directivity
Microphone
Spec.
Power Consumption
Photo Resolution
Video/Image
Spec.
Operating Temp.
Storage Temp.
Interface
Support OS (UVC)
Focus Mode
Exposure Mode
Frequency Response
Minimum Illumination
Maximum Frame Rate
Automatic Whiteness
Balance
Low Luminance
Compensation
Manual
Auto
Auto/ Manual
Auto
300HZ-8KHZ
5Lux
30fps
Best Image Focal
Length Range
Video Resolution
(Video format:
YUY2)
Video Resolution
(Video mode:
MJPG)
Others
Film-coated glass lens
Horizontal:90o
2.0
Built-in Noise Reduction Mic
-32dB
Omni-directional
< 220MA
USB2.0/ UVC 1.1 or 1.5
(Free Driver)
Windows7, windows XP2,
Windows8, Windows10,
Windows Vista, MAC
OS10.6 or above
0.3-1.5 meters
Min. Resolution: 160*120
30fps, Default: 1280*720
8fps
Max. Resolution:1920*1080
30fps
Photo Format
1920*1080
-0˚C-45˚C
-10˚C-80˚C
Min. Resolution: 160*120,
30fps; Default: 1280*720,
30fps
Max. Resolution:
1920*1080, 30fps
JPG

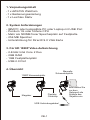
2. System Anforderungen
- IBM PC oder kompatible PC oder Laptop mit USB Port
- Pentium 1G oder höhere CPU
- Mehr als 500MB freier Speicherplatz auf Festplatte
- 256 MB Speicher
- Unterstützung für DirectX 9.0 VGA Karte
1. Verpackungsinhalt
-1 x AW615S WebCam
-1 x Bedienungsanleitung
-1 x Leichtes Stativ
DE-1
3. Für HD 1080P Video Aufzeichnung
- 2.4GHz Intel Core 2 Duo
- 2GB RAM
- 1GB Festplattenplatz
- USB 2.0 Port
4. Übersicht
1080P Kameraobjektiv
Flexibler
Gürtelclip
Manuelle
Schwenkobjektiv
Klappbar
Bitte stellen Sie
vor dem
Gebrauch die
Schärfe des
Objektivs ein.
USB Verbindungskabel

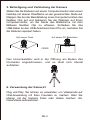
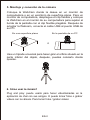
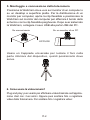
5. Befestigung und Verbindung der Kamera
Stellen Sie die Webcam auf einem Computermonitor oder einem
Desktop mit ebener Oberfläche an der gewünschten Stelle auf.
Klappen Sie bei der Bereitstellung eines Computermonitors den
flexiblen Clip auf und platzieren Sie die Webcam auf Ihrem
Computermonitor, um die Kante des Bildschirms mit dem
faltbaren flexiblen Clip zu erfassen. Schließen Sie das
USB-Kabel an den USB-Anschluss Ihres PCs an, nachdem Sie
die Webcam repariert haben.
DE-2
6. Verwendung der Kamera?
Plug und Play: Sie können es verwenden, um Videoanrufe auf
Chat-Anwendung mit Ihren Freunden zu machen. Oder Sie
können mit der Kamera Fotos oder Videos machen. Um
Fotos/Videos aufzunehmen:
ODER
Auf einem Tisch Auf einem PC Bildschirm
Das Universalstativ wird in der Öffnung am Boden des
Produktes angeschlossen, und es lässt sich überall
aufstellen.

DE-3
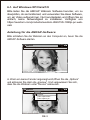
6-1. Auf Windows XP/Vista/7/8
Bitte laden Sie die AMCAP Webcam Software herunter, um zu
überprüfen, ob sie funktioniert, und verwenden Sie diese Software,
um ein Video aufzunehmen. Nur herunterladen und öffnen Sie es
einfach, keine Notwendigkeit zu installieren. Verfügbar von
https://ausdom.com/products/ausdom-AW615S-1080p-pc-web-
cam
Anleitung für die AMCAP-Software:
Bitte schließen Sie die Webcam an den Computer an, bevor Sie die
AMCAP-Software starten.
AMCAP
File Devices Options Capture photo help
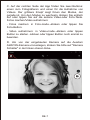
A. Wenn ein leeres Fenster angezeigt wird,öffnen Sie die „Options”
und aktivieren Sie dann die „preview”. Und vergewissern Sie sich,
dass Sie die Webcam unter "Device" ankreuzen.
AMCAP
File Devices Options Capture photo help
Preview
Video capture filter...
Video capture pin...

DE-4
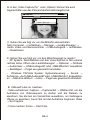
- Video aufnehmen: Capture
→
Capturestart
→
Wählen OK, um die
Aufnahme von Videosequenz zu starten und die Dateien zu
speichern. Sie können ein Verzeichnis auswählen, um Gefangene
Videos zu speichern, bevor Sie mit der Aufnahme beginnen: Datei
→
Set Capture
- Fotos machen: Fotos
→
Start Foto
E. Videos/Fotos zu machen:
D. Gehen Sie wie folgt vor, um den Mikrofonpegel zu regeln?
- XP System: Rechtsklicken auf das Voice-Symbol in der unteren
rechten Ecke, öffnen den Lautstärkeregler
→
Optionen
→
Attribute
→
Audiomixer
→
„USB-Audiogerät“ oder „USB-Mikrofon“ auswählen
→
Bestätigen
→
Pegel wie gewünscht einstellen.
- Windows 7/8/Vista System: Systemsteuerung
→
Sound
→
Aufnahme
→
Auf„USB-Audiogerät“oder „USB-Mikrofon“ doppelklick-
en
→
Mikrofon-attributr
→
Level
→
Pegel wie gewünscht einstellen.
C. Gehen Sie wie folgt vor, um das Mikrofon abzuschalten:
Mein Computer → rechtklicken → Manager → Geräte-Manager →
Audio- Video- und Gamecontroller → USB-Audiogerät → rechtklicken
→ Deaktivieren
AMCAP
File Devices Options Capture photo help
Preview
Video capture filter...
Video capture pin...
B. In den „Video Capture Pin” unter „Options” können Sie auch
Eigenschaften wie das Phone/Videoformat/Anzeigeformat.

DE-5
A. Bitte verbinden Sie die Webcam mit Ihrem Computer und
warten Sie, bis der Computer die Webcam erkennt.
6-2. Auf Windows 10
AMCAP
File Devices Options Capture photo help
Set Capture Directory...
Set Photo Directory...
Set Captured Video AS...
Exit

DE-6
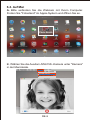
B. Wählen den Button und wählen "Kamera"
in der Liste der apps.
Camera

C. Auf der rechten Seite der App finden Sie zwei Buttons:
einen zum Fotografieren und einen für die Aufnahme von
Videos. Der größere Knopf zeigt Ihnen den Modus, der
gerade ist. Um den Modus zu wechseln, klicken Sie einfach
auf oder tippen Sie auf die andere Video-oder Foto-Taste.
Fotos machen/Video aufnehmen:
- Fotos machen: in Foto-mode
→
klicken oder tippen Sie
Foto-Button.
- Video aufnehmen: in Video-mode
→
klicken oder tippen
Button zu starten
→
klicken oder tippen Button noch einmal zu
beenden.
D. Um von der eingebauten Kamera auf die Ausdom
AW615S-Kamera umzusteigen, klicken Sie bitte auf "Kamera
Schalter" in der linken oberen Ecke.
DE-7

6-3. Auf Mac
A. Bitte verbinden Sie die Webcam mit Ihrem Computer.
Finden Sie "Fotostand" im Apple-System und öffnen Sie es.
B. Wählen Sie die Ausdom AW615S -Kamera unter "Kamera"
in der Menüleiste.
DE-8
Photo Booth
FaceTime HD Camera
Enable Screen Flash
Full HD webcam
Camera

Blickwinkel
Objektiv Material
F/No.
Objektiv
Mikrofon.
S.P.L
Ausrichtung
Mikrofon
Energieverbrauch
Fotoauflösung
Video/Einzelbild
Arbeitstemperatur
Lagertemperatur
Schnittstelle
OS Unterstützung
Fokus Modus
Belichtungsmodus
Frequenzgang
Minimale Beleuchtung
Maximale Bildrate
Automatischer
Weißabgleich
Kompensation
niedriger Leuchtdichte
Manuell
Auto
Auto/ Manuell
Auto
300HZ-8KHZ
5Lux
30fps
Bester
Bildbrennweitenbereich
Videoauflösung
(Videomo-
dus:YUY2)
Videoauflösung
(Videomodus:M-
JPG)
Andere
Horizontal: 90°
Filmbeschichtete Glaslinse
2.0
Eingebautes noise
cancelling Mikrofon
-32dB
Omni-directional
< 220MA
USB2.0/ UVC 1.1 or 1.5
(Freier Driver)
Windows7, windows XP2,
Windows8, Windows10,
Windows Vista, MAC
OS10.6 oder höher
0.3-1.5m
Min. Auflösung: 160*120
30fps, Standard: 1280*720
8fps
Max. Auflösung: 1920*1080
30fps
Fotoformat
1920*1080
-0˚C-45˚C
-10˚C-80˚C
Min. Auflösung: 160*120
30fps, Standard: 1280*720
30fps
Max. Auflösung:
1920*1080 30fps
JPG
DE-9
7. Technische Daten
Hinweis: Technische Änderungen und Irrtümer vorbehalten. Wir
entschuldigen uns für eventuelle Unannehmlichkeiten.

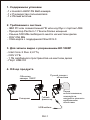
1. Содержимое упаковки
-1 x Ausdom AW615S Веб-камера
-1 x Руководство пользователя
-1 x Легкий штатив
2. Требования к системе
- IBM PC или совместимый ПК или ноутбук с портом USB
- Процессор Pentium 1 ГБ или более мощный
- Свыше 500 МБ свободного места на жестком диске
- ОЗУ 256 МБ
- VGA-карта с поддержкой DirectX 9.0
3. Для записи видео с разрешением HD 1080P
- Intel Core 2 Duo 2,4 ГГц
- ОЗУ 2 ГБ
- 1 ГБ свободного пространства на жестком диске
- Порт USB 2.0
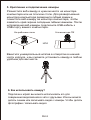
4. Обзор продукта
RU-1
Перед
использованием,
пожалуйста,
настройте резкость
изображения
объектива.
Объектив
камеры 1080P
Гибкий
фиксатор
Ручной поворот
объектива
Складная
USB-кабель

5. Крепление и подключение камеры
Разместите веб-камеру в нужном месте на мониторе
компьютера или на плоском столе. Для развертывания
монитора компьютера разверните гибкий зажим и
поместите веб-камеру на монитор компьютера, чтобы
захватить край экрана складным гибким зажимом. После
исправления веб-камеры подключите USB-кабель к
USB-порту вашего компьютера.
RU-2
6. Как использовать камеру?
Подключи и играй: вы можете использовать его для
совершения видеозвонков в чате с друзьями. Или вы можете
делать снимки или записывать видео с камеры. Чтобы делать
фотографии / записывать видео:
Ввинтите универсальный штатив в отверстие в нижней
части корпуса, и вы сможете установить камеру в любом
удобном для вас месте.
ИЛИ
На рабочем столе На мониторе ПК

RU-3
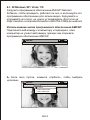
A. Если окно пустое, нажмите «Options», чтобы выбрать
«preview»,
AMCAP
File Devices Options Capture photo help
Preview
Video capture filter...
Video capture pin...
6-1. В Windows XP / Vista / 7/8
Использование шагов программного обеспечения AMCAP:
Подключите веб-камеру к компьютеру и подождите, пока
компьютер не узнает веб-камеру, прежде чем открывать
программное обеспечение AMCAP.
AMCAP
File Devices Options Capture photo help
Загрузите программное обеспечение AMCAP Webcam
Software, чтобы проверить, работает ли оно, и используйте это
программное обеспечение для записи видео. Загружайте и
открывайте его легко, не нужно устанавливать. Доступно на
https://ausdom.com/products/ausdom-AW615S-1080p-pc-webcam

RU-4
C. Если вы не хотите использовать микрофон, то выполните
следующие шаги настройки:
Мой компьютер → Щелкните правой кнопкой мыши →
Управление → Диспетчер устройств → Звуковые, игровые и
видеоустройства → USB-аудио устройства → Щелкните
правой кнопкой мыши → Остановить
D. Для регулировки громкости микрофона:
- Windows XP: щелкните правой кнопкой мыши на значке
громкоговорителя в нижнем правом углу и откройте
контроллер громкости → Параметры → Свойства → Звуковой
микшер → Выберите "Аудио устройство USB" или "Микрофон
USB" → Нажмите "Уверен" → Настройте громкость, как вам
нужно.
- Система Win7/8/Vista : Панель управления → Звук → Запись
→ Дважды щелкните USB аудио устройство или USB
микрофон → Уровни → Настройте громкость, как вам нужно.
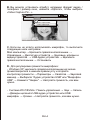
B. Вы можете установить атрибут, например формат видео /
телефона / размер окна, нажмите «Options», чтобы выбрать
«Video Capture Pin...»
AMCAP
File Devices Options Capture photo help
Preview
Video capture filter...
Video capture pin...

RU-5
A. Подключите веб-камеру к компьютеру и подождите,
пока компьютер не узнает веб-камеру.
6-2. На Windows 10
E.Чтобы записывать видео / снимать фотографии:
- Record видео: Capture →Start Capture→Выберите OK, чтобы
начать захват видеопоследовательности, чтобы сохранить
файлы. Вы можете выбрать каталог для сохранения
видеороликов перед запуском Capture,
File→Set Capture Directory
- Получить фотографии: PhotoStart фото
AMCAP
File Devices Options Capture photo help
Set Capture Directory...
Set Photo Directory...
Set Captured Video AS...
Exit

RU-6
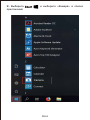
B. Выберите и выберите «Камера» в списке
приложений.
Camera

C. В правой части приложения вы найдете две кнопки:
одну для съемки фотографий и одну для записи видео.
Кнопка большего размера показывает режим, который в
данный момент включен. Чтобы переключить режим,
просто нажмите или коснитесь другой кнопки видео или
фотографии. Чтобы делать фотографии / записывать
видео:
- Получить фотографии: в режиме фотосъемки
→
нажмите
или коснитесь кнопки фото.
- Record видео: в режиме видео
→
нажмите или коснитесь
кнопки видео, чтобы начать
→
нажмите или коснитесь
кнопки видео еще раз, чтобы остановить.
D. Чтобы перейти от встроенной камеры к папке с
камерой, нажмите «переключатель камеры» в верхнем
левом углу.
RU-7

6-3. На Mac
A. Подключите веб-камеру к компьютеру. Узнайте
«Фотобумагу» в системе Apple и откройте ее.
B. Выберите папку с папкой в разделе «Камера» в
строке меню.
RU-8
Photo Booth
FaceTime HD Camera
Enable Screen Flash
Full HD webcam
Camera

Материал линзы
Угол обзора
F/число
Объектив
Микрофон
УЗД
Направленность
Mikrofon
Интерфейс
Потребляемая
мощность
Поддержка ОС (UVC)
0,3-1,5 метра
ручной
Авто
Автоматический
баланс белого
Минимальное
освещение
Максимальная
частота кадров
Компенсация
низкой яркости
Частотная
характеристика
Авто / Ручной
Авто
300 Гц-8 кГц
5 люкс
30 кадров в секунду
Наилучшее фокусное
расстояние
изображения
Режим фокусировки
Режим экспозиции
другие
стеклянная линза с
пленочным
покрытием
По горизонтали:90o
2.0
Встроенный микрофон
-32дБ
Всенаправленный
<220мА
USB2.0 / UVC 1.1 или 1.5
(бесплатный драйвер)
Windows7, Windows XP2,
Windows8, Windows10,
Windows Vista, MAC OS10.6
или выше
RU-9
9. Технические характеристики

Авто / Ручной
Авто
300 Гц-8 кГц
5 люкс
30 кадров в секунду
Спецификация
видео /
изображения
RU-10
Примечание:
Характеристики и технические характеристики
могут быть изменены без предварительного уведомления,
приносим извинения за возможные неудобства.
Разрешение
видео (режим
видео: YUY2)
Разрешение
видео (режим
видео: MJPG)
Разрешение фото 1920 * 1080
JPG
-10˚C-80˚C
-10˚C-45C
Формат фото
Температура
хранения
Рабочая темп.
Максимум. Разрешение:
1920 * 1080, 30 кадров в
секунду
Максимум. Разрешение:
1920 * 1080, 30 кадров в
секунду
Минимум Разрешение:
160 * 120, 30кадров в
секунду; По умолчанию:
1280 * 720, 30кадр / с
Минимум Разрешение:
160 * 120, 30 к / с, по
умолчанию: 1280 * 720,
8 к / с.

2. Requise de Système
- IBM PC ou PC ou ordinateur portable compatible avec
port USB
- Pentium 1G ou CPU supérieur
- Plus de 500 Mo d'espace libre sur le disque dur
- 256 Mo de mémoire
- Support Carte DirectX 9.0 VGA
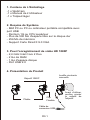
1. Contenu de L’Emballage
-1 x WebCam
-1 x Manual de L’Utilisateur
-1 x Trépied léger
3. Pour l'enregistrement de vidéo HD 1080P
- 2,4 GHz Intel Core 2 Duo
- 2 Go de RAM
- 1 Go d'espace disque
- Port USB 2.0
4. Présentation du Produit
FR-1
Objectif 1080P
Clip
Flexible
Pliable
Lentille pivotante
manuelle
Câble de
connexion USB
Avant d'utiliser,
veuillez ajuster
la netteté de
l'objectif.

5. Montage et Connexion de la Caméra
Que vous voudriez placer la webcam sur l'écran de votre
ordinateur ou que sur votre bureau, Il suffit de brancher la
webcam sur votre PC via le câble en UBS. Pour poser la
webcam sur l'écran de votre PC, dépliez le clip flexible et
placez la WebCam sur votre moniteur pour bien fix la
webcam.
FR-2
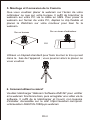
6. Comment utilisez la cméra?
Veuillez télécharger Webcam Software AMCAP pour vérifier
si la webcam fonctionne bien, puis enregister une vidéo via la
software. Il suffit de le télécharger et l'ouvrir, non besoins
d'installer. Accessible sur le site: https://ausdom.com/prod-
ucts/ausdom-AW615S-1080p-pc-webcam
OU
Sur un bureau Sur un écran d’ordinateur
Utilisez un trépied standard pour faire tourner le trou qui est
dans le bas de l'appareil ; vous pourrez alors le placer où
vous voudrez

FR-3
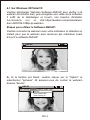
Etapes pour utiliser le Software AMCAP:
6-1 Sur Windows XP/Vista/7/8
Veuillez connecter la webcam avec votre ordinateur et attendez un
instant pour que la webcam sera reconnue par ordinateur avant
d'ouvrir le software AMCAP.
Veuillez télécharger Webcam Software AMCAP pour vérifier si la
webcam fonctionne bien, puis enregister une vidéo via la software.
Il suffit de le télécharger et l'ouvrir, non besoins d'installer.
Accessible sur le site: https://ausdom.com/products/aus-
dom-AW615S-1080p-pc-webcam
AMCAP
File Devices Options Capture photo help
A. Si la fenêtre est blank, veuillez cliquer sur le "Option" et
sélectionner "préview". Et assurez-vous de cocher la webcam
desous "device".
AMCAP
File Devices Options Capture photo help
Preview
Video capture filter...
Video capture pin...

FR-4
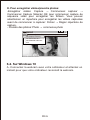
B. Ajustez les paramètres comme le format vidéo / téléphone /
taille de la fenêtre, choisissez "Video Capture Pin ..." sous
"options".
AMCAP
File Devices Options Capture photo help
Preview
Video capture filter...
Video capture pin...
C.
Si vous voulez désactiver le microphone, veuillez suivre les étapes
suivantes:Mon ordinateur→Pressez "bouton droite de souris" →Manager
→Manager de Device →Contrôleur de Son, Jeux, Vidéo → Device audio
USB → Pressez "bouton droite de souris" → Arrêter
D. Pour régler le volume de microphone:
-Système XP: cliquer sur l'icon de son dans le coin
inférieur droit avec le bouton droit de souris, ouvrez le
contrôleur de volume
→
Option
→
Attribute
→
Mixer d'audio
→
Choisissez “USB Audio Device” ou “USB Microphone”
→
Ajustez le volume selon votre besoin.
-Système Win7/8/Vista: Panêle de contrôleur
→
Son
→
Enregistrement
→
Double click sur Device Audio USB ou
microphone USB
→
Microphone attribute
→
niveau
→
Ajustez le volume selon votre besoin.

FR-5
A. Connectez la webcam avec votre ordinateur et attentez un
instant pour que votre ordinateur reconnaît la webcam.
6-2. Sur Windows 10
E. Pour enregistrer vidéos/prendre photos:
-Enregistrer vidéos: Capture
→
Commencez capturer
→
Commencez Capture Sélecter OK pour commencer capture de
séquance vidéo pour enregistrer les fichiers. Vous pouvez
sélectionner un répertoire pour enregistrer les vidéos capturées
avant de commencer à capturer: Fichier
→
Régler répertoire de
capture.
- Prendre des photos: Photo
→
commence photo
AMCAP
File Devices Options Capture photo help
Set Capture Directory...
Set Photo Directory...
Set Captured Video AS...
Exit

FR-6
B.
Cliquez sur le bouton , et selectionnez “Caméra”
le list d’Apps.
Camera

C. A côté droîte d'app, il y a deux boutons: un pour prendre
des photos et autre pour enregistrer de vidéos. Le bouton plus
grand vous indique la mode actuellement activé. Pour
modifier la mode, il suffit de cliquer ou tapper sur l'autre bouton
de vidéo ou de photo. Pour prendre des photos/enregistrer
des vidéos:
-Prendre des photos: dans la mode de photo
→
cliquez ou
tapper sur le bouton de photo.
-Enregistrer des vidéos: dans la mode de photo
→
cliquez ou
tappez sur le bouton de vidéo pour commencer
→
cliquez ou
tappez une fois de plus sur le bouton de vidéo pour stopper.
D. Pour passer de la caméra intégré d'ordinateur à Ausdom
AW615S caméra, veuillez cliquez sur "commutateur de
caméra" dans le coin supérieur gauche.
FR-7

6-3. Sur Mac
A. Veuillez connecter la webcam avec votre ordinateur.
Trouvez “Photo Booth” dans le système Apple, et l'vouvrez.
B. Choisissez Ausdom AW615S caméra sous le menu
de bar de "caméra".
FR-8
Photo Booth
FaceTime HD Camera
Enable Screen Flash
Full HD webcam
Camera

Matériau de la lentille
Angle de Vue
F/No.
Spec. Lentille
MIC.
S.P.L
Directivité
Spec. MIC
Max courant de travail
Résolution Photo
Spec.
Video/Image
Température de
TravailTravail
Température de
stockage
Interface
Support OS
Mode de mise au point
Mode d'exposition
Fréquence de réponse
Illumination minimale
Fréquence d'images
maximale
Balance de blancheur
automatique
Compensation de
faible luminance
Manuel
Auto
Auto/ Manuel
Auto
300HZ-8KHZ
5Lux
30fps
Meilleure gamme de
longueur focale d'image
Résolution Vidéo
(Mode de video:
YUY2
Résolution Vidéo
(Mode de Vidéo:
MJPG)
Autres
Lentille en verre pelliculé
Horizontal: 90o
2.0
Micro de réduction du bruit
intégré
-32dB
Omni-directional
<220mAh
USB2.0/ UVC 1.1 ou
1.5 (Pilote Gratuit)
Windows7, windows XP2,
Windows8, Windows10,
Windows Vista, MAC
OS10.6 ou supérieur.
0,3-1,5 mètres
Min. Résolution: 160*120, 30fps;
Défault: 1280*720, 8fps
Max. Résolution:1920*1080, 30fps
Format Photo
1920*1080
-0˚C-45˚C
-10˚C-80˚C
Min. Résolution: 160*120, 30fps;
Défault: 1280*720, 30fps
Max. Résolution:
1920*1080, 30fps
JPG
FR-9
7. Spécifications
Remarque:
Les caractéristiques et les spécifications techniques
sont sujettes à changement sans préavis, nous nous excusons pour
tout inconvénient.

ES-1
2. Requisitos del sistema
- PC IBM o PC u ordenador portátil compatibles con puerto USB
- Pentium 1G o CPU superior
- Más de 500 MB de espacio libre en el disco
- Memoria de 256 MB
- Compatibilidad con tarjeta VGA DirectX 9.0
1. Contenidos del paquete
-1 x cámara web
-1 x Manual del usuario
-1 x Trípode ligero
3. Para la grabación de vídeo HD 1080P
- Intel Core 2 Duo a 2,4 GHz
- 2 GB de RAM
- 1GB de espacio en el disco duro
- Puerto USB 2.0
4. Información general del producto
Clip
flexible
Lente giratoria manual
Cable de
conexión USB
Plegable
Lente de cámara 1080P
Antes de usar,
por favor ajuste
la nitidez de la
lente.

ES-2
5. Montaje y conexión de la cámara
Coloque la WebCam donde la desee en un monitor de
computadora o en un escritorio de superficie plana. Para un
monitor de computadora, despliegue el clip flexible y coloque
la WebCam en el monitor de su computadora para sujetar el
borde de la pantalla con el clip flexible plegable. Después de
arreglar la Webcam, conecte el cable USB al puerto USB de
su PC.
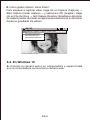
6. Cómo usar la cámara?
Plug and play: puede usarlo para hacer videollamadas en la
aplicación de chat con sus amigos. O puede tomar fotos o grabar
videos con la cámara. Para tomar fotos / grabar videos:
O
En una superficie plana En la pantalla de un PC
Usa un trípode universal para hacer girar el orificio situado en la
parte inferior del objeto, después, puedes colocarlo donde
quieras.

ES-3
Descargue el software AMCAP Webcam para verificar si funciona y
use este software para grabar un video. Solo descárguelo y ábralo
fácilmente, sin necesidad de instalarlo. Disponible en
https://ausdom.com/products/ausdom-AW615S-1080p-pc-webcam
Conecte la cámara web a su computadora y espere hasta que la
computadora reconozca la cámara web antes de abrir el software
AMCAP.
6-1. En Windows XP / Vista / 7/8
Usando los pasos del software AMCAP:
AMCAP
File Devices Options Capture photo help
A. Si la ventana está en blanco, haga clic en "Opciones" y seleccione
"vista previa". Y asegúrate de marcar la cámara web debajo de
"dispositivo".
AMCAP
File Devices Options Capture photo help
Preview
Video capture filter...
Video capture pin...

ES-4
D. Cómo ajustar el volumen del micrófono?
- Sistema XP: haga clic con el botón derecho del ratón en el icono
de voz en la parte inferior derecha, abra el control de volumen
→
Option (Opción)
→
Attribute (Atributo)
→
Audio mixer (Mezclador de
volumen)
→
Seleccione “USB Audio Device” (Dispositivo de audio
USB) o “USB Microphone" (Micrófono USB)
→
Sure (Seguro)
→
Ajuste el volumen de acuerdo con sus necesidades.
- Win7 / 8 / sistema Vista:Control panel (Panel de control)
→
Sound
(Sonido)
→
Record (Grabar)
→
Haga doble clic en USB Audio
Device (Dispositivo de audio USB) o USB Microphone (Micrófono
USB)
→
Microphone attribute (Atributo de micrófono)
→
level (Nivel)
→
Ajuste el volumen de acuerdo con sus necesidades.
B. Puede ajustar la configuración como formato de video / teléfono
/ tamaño de ventana, eligiendo "Pin de captura de video ..." en
"opciones".
C. Si no desea utilizar un micrófono, siga los pasos siguientes:
Mycomputer (Mi PC)
→
Pulse el “botón derecho del ratón”
→
Manage(Administrar)
→
Device manager (Administrador de
dispositivos)
→
Sound, Game, Video controller (Controlador de
sonido, vídeo y dispositivos de juego)
→
USB Audio device
(Dispositivo de audio USB)
→
Pulse el “botón derecho del ratón”
→
Stop (Detener)
AMCAP
File Devices Options Capture photo help
Preview
Video capture filter...
Video capture pin...

ES-5
A. Conecte la cámara web a su computadora y espere hasta
que la computadora reconozca la cámara web.
6-2. En Windows 10
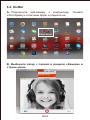
E. Cómo grabar vídeos / tomar fotos:?
Para empezar a capturar vídeo, haga clic en Capture (Captura)
→
Start Capture (Iniciar captura)
→
y seleccione OK (Aceptar). Haga
clic en File (Archivo)
→
Set Capture Directory (Establecer directorio
de captura) antes de iniciar la captura para seleccionar el directorio
donde se guardarán los vídeos.
AMCAP
File Devices Options Capture photo help
Set Capture Directory...
Set Photo Directory...
Set Captured Video AS...
Exit

ES-6
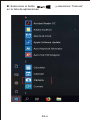
B.
Seleccione el botón , y seleccione “Camera”
en la lista de aplicaciones.
Camera

C. En el lado derecho de la aplicación, encontrará dos
botones: uno para tomar fotos y otro para grabar videos. El
botón más grande muestra el modo que está actualmente
activado. Para cambiar el modo, simplemente haga clic o
toque el otro botón de video o foto. Para tomar fotos / grabar
videos:
-Tome fotos: en modo fotografía
→
haga clic o toque el botón
de foto.
-Grabación de videos: en el modo de video
→
haga clic o
toque el botón de video para comenzar
→
haga clic o toque el
botón de video nuevamente para detener.
D. Para pasar de la cámara incorporada a la cámara Ausdom
AW615S, haga clic en “camera switch” en la esquina superior
izquierda.
ES-7

8-3. En Mac
A. Por favor conecte la cámara web a su computadora.
Descubre "Photo Booth" en el sistema Apple y ábrelo.
B. Elija la cámara Ausdom AW615S debajo de “Camera” en
la barra de menú.
ES-8
Photo Booth
FaceTime HD Camera
Enable Screen Flash
Full HD webcam
Camera

Material de la lente
Ángulo de visión
F/No.
Especificaciones
de la lente
Micrófono
S.P.L
Direccionalidad
Especificaciones
del micrófono
Interfaz
Corriente máxima
de trabajo
compatibles
0.3-1.5 metros
Manual
Auto
Balance de blancura
automático
iluminación mínima
Velocidad máxima de
cuadros
Compensación de
baja luminancia
Respuesta frecuente
Manual/ Auto
Auto
300HZ-8KHZ
5Lux
30fps
Mejor rango de distancia
focal de la imagen
Modo de enfoque
Modo de exposición
Otros
Lente de vidrio
recubierto con película
Horizontal: 90o
2.0
Micrófono de reducción de
ruido incorporado
-32dB
Omnidireccional
< 220MA
USB2.0/ UVC 1.1 or 1.5
(libre en el disco)
Windows7, windows XP2,
Windows8, Windows10,
Windows Vista, MAC OS10.6
o superior
ES-9
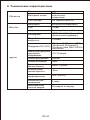
9. Especificaciones

Resolución de
vídeo (modo de
vídeo: YUY2)
Resolución de
vídeo (modo de
vídeo: MJPG)
Resolución de fotos 1920 * 1080
JPG
-10˚C-80˚C
-10˚C-45C
Formato de fotos
temperatura de
almacenamiento
Temperatura de
funcionamiento
Resolución máx.:
1920*1080 30fps
Resolución máx.:
1920*1080 30fps
Resolución mín.: 160*120
(30fps) - Predeterminada:
1280*720 (30fps)
Resolución mín.: 160*120
(30fps) - Predeterminada:
1280*720 (8fps)
Especificaciones
de vídeo/imagen
Manual/ Auto
Auto
300HZ-8KHZ
5Lux
30fps
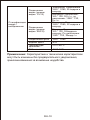
ES-10
Nota:
Las características y especificaciones técnicas están
sujetas a cambios sin previo aviso, le pedimos disculpas por
cualquier inconveniente.

IT-1
1. Contenuto della confezione
-1 x AW615S WebCam
-1 x Manuale per l’utente
-1 x Treppiede leggero
2. Requisiti di sistema
- PC IBM o PC o laptop compatibile con porta USB
- CPU Pentium 1G o superiore
- Oltre 500 MB di spazio libero su hard disk
- 256 MB di memoria
- Scheda compatibile DirectX 9.0 VGA
3. Per la videoregistrazione in HD 1080P
- 2,4 GHz Intel Core 2 Duo
- 2 GB di RAM
- 1 GB di spazio su hard disk
- Porta USB 2.0
4. Panoramica sul prodotto
Lente orientabile manuale
Clip
flessibile
Pieghevole
Obiettivo
telecamera 1080P
Cavo di
collegamento USB
Prima dell'uso,
regolare la
nitidezza
dell'obiettivo.

IT-2
5. Montaggio e connessione della telecamera
Posiziona la WebCam dove vuoi sul monitor di un computer o
su un desktop a superficie piatta. Per la distribuzione di un
monitor per computer, aprire la clip flessibile e posizionare la
WebCam sul monitor del computer per afferrare il bordo dello
schermo con la clip flessibile pieghevole. Dopo aver sistemato
la WebCam, collegare il cavo USB alla porta USB del PC.
6. Come usare la videocamera?
Plug and play: puoi usarlo per effettuare videochiamate sull'applica-
zione chat con i tuoi amici. Oppure puoi scattare foto o registrare
video dalla fotocamera. Per scattare foto / registrare video:
OPPURE
Su una scrivania Su un monitor di un PC
Usare un treppiede universale per ruotare il foro nella
parte inferiore del dispositivo, quindi posizionarlo dove
serve.

IT-3
6-1. Su Windows XP / Vista / 7/8:
Scarica il software Webcam AMCAP per verificare se funziona e
utilizzare questo software per registrare un video. Solo scaricare e
aprirlo facilmente, non è necessario installare. Disponibile da
https://ausdom.com/products/ausdom-AW615S-1080p-pc-webcam
Passaggi per usare il software AMCAP:
Connetti la webcam al computer e attendi fino a quando il computer
non riconosce la webcam prima di aprire il software AMCAP.
AMCAP
File Devices Options Capture photo help
A. Se la finestra e vuota, fare clic sulla voce “Options”per selezionare
“preview”.
AMCAP
File Devices Options Capture photo help
Preview
Video capture filter...
Video capture pin...

IT-4
Connetti la webcam al computer e attendi fino a quando il computer
non riconosce la webcam prima di aprire il software AMCAP.
D. Per regolare il volume del microfono:
- Sistema XP: fare clic con il tasto destro sull’icona della voce
nell'angolo in basso a destra,aprire il controller del volume →
Opzione → Attributo → Mixer audio → Scegliere ”Dispositivo audio
USB” o “Microfono USB” → Sicuro → Regolare il volume come si
desidera.
- Sistema Win7/8/Vista : Pannello di controllo → Sound → Record
→ Fare doppio clic su Dispositivo audio USB o Microfono USB →
Attributo microfono → livello → Regolare il volume come si desidera.
C. Se non si desidera utilizzare il microfono, procedere come segue:
Computer → Premere il pulsante destro → Gestione → Gestione
dispositivi → Controller audio, video e giochi → Dispositivo audio
USB → Premere il pulsante destro → Stop
B. Sara possibile impostare attributi come and esempio video/telefone,
formato/finestra,quindi fare clic su Options per scegliere“Video Capture
Pin...”
AMCAP
File Devices Options Capture photo help
Preview
Video capture filter...
Video capture pin...

IT-5
A. Collega la webcam al tuo computer e aspetta che il
computer riconosca la webcam.
6-2 . Su Windows 10
E. Per registrare video / scattare foto:
- Registrare video: Capture→ Start Capture → Selezionare OK per
avviare la cattura della sequenza video per salvare i file. File → Set
Capture Directory. Sarà possibile selezionare una cartella dove
salvare i video catturati prima di avviare la cattura stessa.
- Scatta le foto: foto
→
PhotoStart
AMCAP
File Devices Options Capture photo help
Set Capture Directory...
Set Photo Directory...
Set Captured Video AS...
Exit

IT-6
B.
Seleziona il pulsante e seleziona "Camera"
nell'elenco delle app.
Camera

C. Nella parte destra dell'app, troverai due pulsanti: uno per
scattare foto e uno per registrare video. Il pulsante più grande
mostra la modalità attualmente attiva. Per cambiare modalità,
basta fare clic o toccare l'altro pulsante del video o della foto.
Per scattare foto / registrare video:
- Scatta le foto: in modalità foto
→
fare clic o toccare il pulsante
Foto.
- Registrare video: in modalità video
→
clicca o tocca il tasto
video per iniziare
→
fare clic o toccare nuovamente il pulsante
video per interrompere.
D. Per passare dalla fotocamera integrata alla fotocamera
Ausdom AW615S, fare clic su "interruttore della fotocamera"
nell'angolo in alto a sinistra.
IT-7

6-3. Sul Mac
A.Si prega di collegare la webcam al tuo computer. Scopri
"Photo Booth" nel sistema Apple e aprilo.
B. Scegli fotocamera Ausdom AW615S sotto "Camera" nella
barra dei menu .
IT-8
Photo Booth
FaceTime HD Camera
Enable Screen Flash
Full HD webcam
Camera

Materiale della lente
Angolo di
visualizzazione
F/N.
lente
MIC
S.P.L
Direzione
Especificaciones
del micrófono
Interfaccia
Consumo
energetico
Supporta SO (UVC)
0,3-1,5 metri
manuale
Auto
Bilanciamento
automatico del bianco
Illuminazione
minima
Frame rate massimo
Compensazione
bassa luminanza
Risposta in frequenza
Auto / Manuale
Auto
300HZ-8KHZ
<5Lux
30fps
Migliore intervallo di
lunghezza focale
dell'immagine
Modalità di messa a
fuoco
Modalità di
esposizione
Altri
Materiale della lente,
lente di vetro rivestita
con film
Orizzontale: 90o
2.0
Microfono integrato per la
riduzione del rumore
-32dB
Omnidirezionale
<220MA
USB2.0 / UVC 1.1 o 1.5
(driver gratuito)
Windows7, Windows XP2,
Windows8, Windows10,
Windows Vista, MAC OS10.6
o successivo
IT-9
7. Specifiche tecniche

Auto / Manuale
Auto
300HZ-8KHZ
<5Lux
30fps
IT-10
Risoluzione video
(modalità video:
YUY2)
Risoluzione video
(modalità video:
MJPG)
Risoluzione foto 1920 * 1080
JPG
-10 ° C-80 ° C
-10 ° C-45 ° C
Formato foto
Temp. Di
archiviazione
Temp. Operativa
max. Risoluzione: 1920 *
1080, 30fps
max. Risoluzione: 1920 *
1080, 30fps
Min. Risoluzione: 160 *
120, 30fps; Impostazione
predefinita: 1280 * 720,
30fps
Min. Risoluzione: 160 *
120 30 fps, impostazione
predefinita: 1280 * 720
8fps
Specifiche
video/immagini
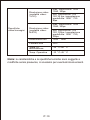
Nota:
le caratteristiche e le specifiche tecniche sono soggette a
modifiche senza preavviso, ci scusiamo per eventuali inconvenienti.

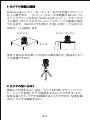
JP-1

JP-2
PC

JP-3
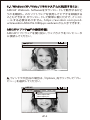
AMCAP
File Devices Options Capture photo help
AMCAP
File Devices Options Capture photo help
Preview
Video capture filter...
Video capture pin...

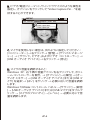
JP-4
/Vista → →
→
→ → →
AMCAP
File Devices Options Capture photo help
Preview
Video capture filter...
Video capture pin...

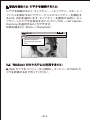
JP-5
AMCAP
File Devices Options Capture photo help
Set Capture Directory...
Set Photo Directory...
Set Captured Video AS...
Exit

JP-6
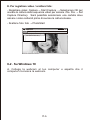
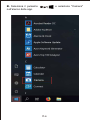
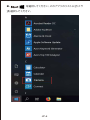
B.
[
]
Camera

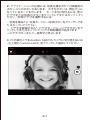
C.
2
/
-
-
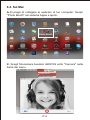
JP-7

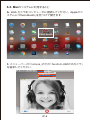
6-3. Mac
A. Web Apple
Photo Booth
JP-8
Photo Booth
FaceTime HD Camera
Enable Screen Flash
Full HD webcam
Camera

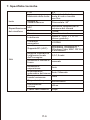
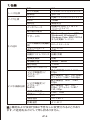
F/No.
.
S.P.L
/
300HZ 8KHZ
30fps
YUY2
MJPG
2.0
-32dB
<220mAh
USB2.0/ UVC 1.1 or 1.5
Windows7, windows XP2,
Windows8, Windows10,
Windows Vista, MAC OS10.6
JP-9

CN-1
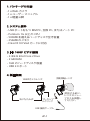
11
12
摄像头
用户指南
1
3三角支架

CN-2

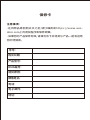
保修卡
-在将物品寄回购买点之前,请仔细阅读https://www.aus-
dom.com上的退货程序和保修政策。
- 如果您的产品保修有效,请填写该卡并将其与产品一起发送给
您的经销商。
注意事项:
序号:
购买日期:
产品型号:
RMA编号:
退货原因:
顾客姓名:
电话:
电子邮件:
地址:

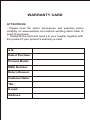
WARRANTY CARD
ATTENTIONS:
- Please read the return procedures and warranty policy
carefully on www.ausdom.com before sending items back to
point-of-purchase.
- Please fill the card and send it to your reseller together with
the product if your product's warranty is valid.
S.N:
Date of Purchase:
Product Model:
RMA Number:
Return Reason:
Customer Name:
TEL:
E-mail:
Address:

For more information, please visit our official website
www.ausdom.com
Your valuable comments and suggestions on improving
AUSDOM products are welcome!
-
 1
1
-
 2
2
-
 3
3
-
 4
4
-
 5
5
-
 6
6
-
 7
7
-
 8
8
-
 9
9
-
 10
10
-
 11
11
-
 12
12
-
 13
13
-
 14
14
-
 15
15
-
 16
16
-
 17
17
-
 18
18
-
 19
19
-
 20
20
-
 21
21
-
 22
22
-
 23
23
-
 24
24
-
 25
25
-
 26
26
-
 27
27
-
 28
28
-
 29
29
-
 30
30
-
 31
31
-
 32
32
-
 33
33
-
 34
34
-
 35
35
-
 36
36
-
 37
37
-
 38
38
-
 39
39
-
 40
40
-
 41
41
-
 42
42
-
 43
43
-
 44
44
-
 45
45
-
 46
46
-
 47
47
-
 48
48
-
 49
49
-
 50
50
-
 51
51
-
 52
52
-
 53
53
-
 54
54
-
 55
55
-
 56
56
-
 57
57
-
 58
58
-
 59
59
-
 60
60
-
 61
61
-
 62
62
-
 63
63
-
 64
64
-
 65
65
-
 66
66
-
 67
67
-
 68
68
-
 69
69
-
 70
70
-
 71
71
-
 72
72


AUSDOM AW615S Manual de usuario
- Categoría
- Cámaras web
- Tipo
- Manual de usuario
en otros idiomas
- français: AUSDOM AW615S Manuel utilisateur
- italiano: AUSDOM AW615S Manuale utente
- English: AUSDOM AW615S User manual
- Deutsch: AUSDOM AW615S Benutzerhandbuch
- русский: AUSDOM AW615S Руководство пользователя
- 日本語: AUSDOM AW615S ユーザーマニュアル