EZ-FLO 10378 Guía de instalación
- Categoría
- Artículos sanitarios
- Tipo
- Guía de instalación
Este manual también es adecuado para

These are general installation guidelines ONLY and are by no means comprehensive. Installation should be performed by a professional plumber.
EZ-FLO International Inc. bears no responsibility for the improper installation or misuse of this product. These are only general recommendations.
Estas son guías de instalación SOLAMENTE y por ningún motivo son exhaustivas. La instalación debe ser realizada por un plomero profesional.
EZ-FLO International, Inc. no se responsabiliza por la instalación inadecuada o mal uso de este producto. Estas son solo recomendaciones generales.
© 2016 EZ-FLO INTERNATIONAL, INC.
2750 E. Mission Blvd. - Ontario, California, USA 91761
10378_10379
Pull-Out Spout Kitchen Faucet
Pull-Out Spout Kitchen Faucet
Limited
LIFETIME WARRANTY
Garantía de por vida limitada
7
8
9
10
11
Tuscany
1.
2.
3.
4.
5.
6.
7.
8.
9.
10.
11.
Handle/Manija
Nut Valve/Tuerca
Diverter/Desviador
Flange/Brida
Cap/Tapa
1
2
4
5
3
6
Waterway Assembly/Conducto
de agua
Cartridge/Cartucho
Housing/Armazón
Escutcheon/Cubierta
Mounting Lock Assembly/Montura
de fijación
Inlet Hose/Manguera

1
2
Before You Begin:
Turn off water supply
Remove old faucet.
Close drain to avoid losing
small parts.
Cierre el desagüe para evitar
perder piezas pequeñas.
Antes de Comenzar:
Cierre el suministro de agua
Quite el grifo viejo.
5
cross-head
screwdriver
desarmador de
estrella
pipe joint tape
cinta adhesiva
para tubería
10" groove
joint pliers
pinzas de junta
ranurada 10”
clear silicone latex caulk
sellador silicona-latex
transparente
sponge or rag
esponja o trapo
adjustable wrench
llave inglesa
Tools and supplies you will need the following to install your new faucet
Herramientas y provisiones que necesitara para instalar su nuevo grifo
utility knife
utility knife
basin wrench
basin wrench
supply
supply
tube cutter
tube cutter
pipe wrench
pipe wrench
hacksaw
hacksaw
hex wrench
hex wrench
plumber’s putty
plumber’s putty
4
6
Attach water supply hoses or tubes to the faucet. To
avoid breaking the copper tube from the faucet, use
two wrenches (as shown) to keep from twisting the
supply tube from the faucet when you tighten the nut.
Instale en el grifo las mangueras o tubos de suministro
de agua. Para evitar dañar el tubo de cobre del grifo, use
dos llaves para mantener el tubo derecho al ajustar la
tuerca [ver ilustración].
After installing faucet, remove aerator and turn on
water to remove any left over debris. Re-assemble
aerator and tigthen.
Después de instalar el grifo, remueva el aireador y
abra el paso del agua para remover cualquier residuo.
Vuelva a armar el aireador y apriete.
Installation
Instalación
3
1
Put the faucet right on the table / Coloque el grifo en
posición recta sobre la superf icie.
Assemble rubber washer, metal washer and threaded
lock nut onto shank from underside of sink or mounting
surface. Hand tighten locknut / Por debajo del fregadero
o superf icie de montaje, ensamble la arandela de hule, la
arandela metálica y la tuerca roscada en el cuello roscado
del grifo. Apriete la tuerca manualmente.
1
Insert supply hoses, outlet hose and shank through the
hole in escutcheon with putty plate and mounting surface.
Please put the outlet hose with the diverter through the
mounting surface first, and then put the inlet hose through
the mounting surface.
Inserte las mangueras de abasto, manguera de salida y el tubo
roscado a través del orificio en la cubierta con la tapa para masilla
y la superf icie de montaje. Por favor pase primero la manguera de
salida con desviador a través de la superficie de montaje, y
posteriormente haga lo mismo con la manguera de salida.
2
2
1
2
3
For three hole / Para tres orificios
Install the screws on the putty
plate. / Instale los tornillos en la
tapa para masilla.
1
2
3
1
Use screwdriver to tighten the screws
on the faucet / Utilice un desarmador
para apretar los tornillos en el grifo.
For single hole /Para un orificio
-
 1
1
-
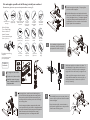 2
2


EZ-FLO 10378 Guía de instalación
- Categoría
- Artículos sanitarios
- Tipo
- Guía de instalación
- Este manual también es adecuado para
En otros idiomas
- English: EZ-FLO 10378 Installation guide