Kichler Lighting 3502NI Manual de usuario
- Tipo
- Manual de usuario

CHAIN DROP
1) Rotate arms until in line with center of fixture body.
Arms should tighten as they are turned. If arms are still
loose tighten hexnuts inside fixture body.
2) Turn off power.
3) Assemble mounting screws into threaded holes in
mounting strap.
4) Attach mounting strap to outlet box. (Screws not provided).
5) Assemble small loop to canopy with lockwasher and
hexnut. Tighten with pliers.
6) Attach chain to fixture and canopy.
7) Weave electrical wire and ground wire through chain
links no more than 3 inches apart. Pass lead wires and
ground wire from fixture through chain, loop and into
canopy.
8) Grounding instructions: (See Illus. A or B).
A) On fixtures where mounting strap is provided with a
hole and two raise dimples. Wrap ground wire from
outlet box around green ground screw, and thread
into hole.
B) On fixtures where a cupped washer is provided.
Attach ground wire from outlet box under cupped
washer and green ground screw, and thread into
mounting strap.
If fixture is provided with ground wire. Connect fixture
ground wire to outlet box ground wire with wire connector.
(Not provided.) After following the above steps. Never
connect ground wire to black or white power supply wires.
9) Make wire connections (connectors not provided.)
Reference chart below for correct connections and wire
accordingly.
10) Push fixture to ceiling, carefully passing mounting
screws through holes in canopy.
11) Secure fixture to ceiling with knurl knobs.
12) Screw hexnut on to end of threaded pipe opposite factory
installed hexnut.
13) Screw threaded pipe into bracket at bottom of socket
cluster. Secure in place by tightening hexnut against
bracket.
14) Slip large flat washer then large rubber washer over
threaded pipe and against factory installed hexnut.
15) Carefully lift glass up to fixture allowing threaded pipe to
pass through hole in glass. Secure in place using
remaining rubber washer, flat washer and hexnut.
16) Slip trim over threaded pipe and against glass. Secure
in place with finial.
ADORNO COLGANTE DE CADENA
1) Gire los brazos hasta que estén alineados con el centro
del cuerpo del artefacto. Los brazos deben apretarse a
medida que se giren. Si los brazos están flojos todavía,
apriete las tuercas hexagonales dentro del cuerpo del
artefacto.
2) Apague la alimentación de energía eléctrica.
3) Instale los tornillos de montaje en los agugeros roscados
de la placa de montaje.
4) Una la placa de montaje a la caja de salida.
(No se proveen tornillos).
5) Ensamble el anillo pequeño al escudete usando una
arandela de seguridad y tuerca hexagonal. Apriete con
alicates.
6) Una la cadena al artefacto en el escudete.
7) Pase el alambre eléctrico y el alambre de tierra a través
de los eslabones de la cadena, a espacios máximos de
3 pulgadas. Pase los hilso conductores y de conexión a
tierra del artefacto a través de la cadena, el anillo y en
el escudete.
8) Instrucciones de conexión a tierra solamente para los
Estados Unidos. (Vea la ilustraciøn A o B).\
A) En las lámparas que tienen el fleje de montaje con
un agujero y dos hoyuelos realzados. Enrollar el
alambre a tierra de la caja tomacorriente alrededor
del tornillo verde y pasarlo por el agujero.
B) En las lámparas con una arandela acopada. Fijar el
alambre a tierra de la caja tomacorriente debajo de
la arandela acoada y tornillo verde, y pasar por el
fleje de montaje.
Si la lámpara viene con alambre a tierra. Conectar el
alambre a tierra de la lámpara al alambre a tierra de la
caja tomacorriente con un conector de alambres. (No
incluido). Después de seguir los pasos anteriores.
Nunca conectar el alambre a tierra a los alambres
eléctricos negro o blanco.
9) Hacer las conexiones de los alambres (conectores no
incluidos.) Ver el cuadro más abajo para las conexiones
correctas y alambrar de acuerdo a esto.
10) Empuje el artefacto al cielorraso, pasando con cuidado
los tornillos de montaje a través de los agujeros en el
escudete.
11) Asegure el artefacto al cielorraso con perillas
moleteadas.
12) Atornille la tuerca hexagonal en el extremo del tubo
roscado opuesta a la tuerca hexagonal instalada en
fábrica.
13) Atornille el tubo roscado en el apoyo en el fondo del
racimo de casquillos. Sujete en el lugar apretando la
tuerca hexagonal contra el apoyo.
14) Resbale la arandela plana grande, luego la arandela de
caucho grande sobre el tubo roscado y contra la tuerca
hexagonal instalada en fábrica.
15) Cuidadosamente levante el vidrio hasta el artefacto
dejando que el tubo roscado pase a través del agujero
en el vidrio. Sujete en el lugar utilizando la arandela de
caucho, arandela plana y tuerca hexagonal restantes.
16) Resbale la guarnición sobre el tubo roscado y contra el
vidrio. Sujete en el lugar con el capuchón.
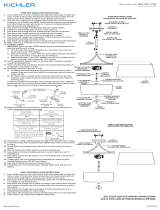
GREEN GROUND
SCREW
CUPPED
WASHER
A
B
OUTLET BOX
GROUND
FIXTURE
GROUND
DIMPLES
WIRE CONNECTOR
(NOT PROVIDED)
OUTLET BOX
GROUND
GREEN GROUND
SCREW
FIXTURE
GROUND
Connect Black or
Red Supply Wire to:
Connect
White Supply Wire to:
Black White
*Parallel cord (round & smooth)
*Parallel cord (square & ridged)
Clear, Brown, Gold or Black
without tracer
Clear, Brown, Gold or Black
with tracer
Insulated wire (other than green)
with copper conductor
Insulated wire (other than green)
with silver conductor
*Note: When parallel wires (SPT I & SPT II)
are used. The neutral wire is square shaped
or ridged and the other wire will be round in
shape or smooth (see illus.)
Neutral Wire
ARANDELA
CONCAVA
A
B
TIERRA DE LA
CAJA DE SALIDA
TORNILLO DE TIERRA,
VERDE
DEPRESIONES
TIERRA
ARTEFACTO
CONECTOR DE ALAMBRE
(NO SE PROVEE)
TIERRA DE LA
CAJA DE SALIDA
TORNILLO DE TIERRA,
VERDE
TIERRA
ARTEFACTO
Conectar el alambre de
suministro negro o rojo al
Conectar el alambre de
suministro blanco al
Negro Blanco
*Cordon paralelo (redondo y liso)
*Cordon paralelo (cuadrado y estriado)
Claro, marrón, amarillio o negro
sin hebra identificadora
Claro, marrón, amarillio o negro
con hebra identificadora
Alambre aislado (diferente del verde)
con conductor de cobre
Alambre aislado (diferente del
verde) con conductor de plata
*Nota: Cuando se utiliza alambre paralelo
(SPT I y SPT II). El alambre neutro es de forma
cuadrada o estriada y el otro alambre será de
forma redonda o lisa. (Vea la ilustracíón).
Hilo Neutral
FLUSH MOUNT
1) Remove loop from top of fixture.
2) Pass wire from fixture and threaded pipe through hole in
canopy and secure in place with lockwasher and
hexnut.
3) Turn off power.
4) Assemble mounting screws into threaded holes in
mounting strap.
5) Attach mounting strap to outlet box. (Screws not provided).
6) Grounding Instructions (Reference No. 8 from Chain Drop
Installation.)
7) Wiring Instructions Reference No. 9 from Chain Drop
Installation.)
8) Push fixture to ceiling, carefully passing mounting
screws through holes in canopy.
9) Secure fixture to ceiling with knurl knobs.
10) Screw hexnut on to end of threaded pipe opposite factory
installed hexnut.
11) Screw threaded pipe into bracket at bottom of socket
cluster. Secure in place by tightening hexnut against
bracket.
12) Slip large flat washer then large rubber washer over
threaded pipe and against factory installed hexnut.
13) Carefully lift glass up to fixture allowing threaded pipe to
pass through hole in glass. Secure in place using
remaining flat washer, rubber washer and hexnut.
14) Slip trim over threaded pipe and against glass. Secure
in place with finial.
MONTAJE A RAS
1) Quite el anillo del tope del artefacto.
2) Pase el alambre del artefacto y del tubo roscado a
través del agujero en el escudete y sujete en el lugar
con la arandela de seguridad y la tuerca hexagonal.
3) Apague la alimentación de energía eléctrica.
4) Instale los tornillos de montaje en los
agugeros roscados de la placa de montaje.
5) Una la placa de montaje a la caja de salida.
(No se proveen tornillos).
6) Instrucciones de conexión a tierra
(Referencia No. 8 de Adorno Colgante De Cadena.)
7) Instrucciones de cableado
(Referencia No. 9 de Adorno Colgante De Cadena.)
8) Empuje el artefacto al cielorraso, pasando con cuidado
los tornillos de montaje a través de los agujeros en el
escudete.
9) Asegure el artefacto al cielorraso con perillas
moleteadas.
10) Atornille la tuerca hexagonal en el extremo del tubo
roscado opuesta a la tuerca hexagonal instalada en
fábrica.
11) Atornille el tubo roscado en el apoyo en el fondo del
racimo de casquillos. Sujete en el lugar apretando la
tuerca hexagonal contra el apoyo.
12) Resbale la arandela plana grande, luego la arandela de
caucho grande sobre el tubo roscado y contra la tuerca
hexagonal instalada en fábrica.
13) Cuidadosamente levante el vidrio hasta el artefacto
dejando que el tubo roscado pase a través del agujero
en el vidrio. Sujete en el lugar utilizando la arandela
plana, arandela de caucho y tuerca hexagonal
restantes.
14) Resbale la guarnición sobre el tubo roscado y contra el
vidrio. Sujete en el lugar con el capuchón.
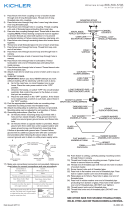
STEM
VÁSTAGO
MOUNTING
STRAP
PLACA DE
MONTAJE
MOUNTING
SCREWS
TORNILLOS DE
MONTAJE
OUTLET BOX
CAJA DE SALIDA
LOCKWASHER
ARANDELA DE
SEGURIDAD
HEXNUT
TUERCA
HEXAGONAL
CANOPY
ESCUDETE
KNURL KNOB
PERILLA
MOLETEADA
LOOP
ANILLO
SMALL LOOP
ANILLO
PEQUEÑO
CHAIN
CADENA
GLASS
VIDRIO
RUBBER WASHER
ARANDELA DE
CAUCHO
FLAT WASHER
ARANDELA PLANA
HEXNUT
TUERCA
HEXAGONAL
HEXNUT
TUERCA
HEXAGONAL
TRIM
GUARNICIÓN
FINIAL
CAPUCHON
RUBBER WASHER
ARANDELA DE
CAUCHO
FLAT WASHER
ARANDELA PLANA
THREADED PIPE
TUBO ROSCADO
BRACKET
CARTELAS
SOCKET CLUSTER
RACIMO DE
CASQUILLOS
MOUNTING
STRAP
PLACA DE
MONTAJE
MOUNTING
SCREWS
TORNILLOS DE
MONTAJE
OUTLET BOX
CAJA DE SALIDA
HEXNUT
TUERCA
HEXAGONAL
CANOPY
ESCUDETE
KNURL KNOB
PERILLA
MOLETEADA
LOCKWASHER
ARANDELA DE
SEGURIDAD
IS-3502-US
Date Issued: 10/10/03
-
 1
1
Kichler Lighting 3502NI Manual de usuario
- Tipo
- Manual de usuario
en otros idiomas
- English: Kichler Lighting 3502NI User manual
Artículos relacionados
-
 Kichler Lighting 3694NIW Manual de usuario
-
 Kichler Lighting 42035CH Manual de usuario
-
 Kichler Lighting 43641NIL18 Manual de usuario
-
 Kichler Lighting 3623NI Manual de usuario
-
 Kichler Lighting 2771NI Manual de usuario
-
 Kichler Lighting 9357BKT Manual de usuario
-
 Kichler Lighting 43748OZ Manual de usuario
-
 Kichler Lighting 43754AUB Manual de usuario
-
 Kichler Lighting 43744NBR Manual de usuario
-
 Kichler Lighting 43667NIL18 Manual de usuario


