GE Appliances JNM7196DKWW El manual del propietario
- Categoría
- Microondas
- Tipo
- El manual del propietario
Este manual también es adecuado para

Microwave Oven
49-40766 04-16 GE
JVM7195
JNM7196
Owner’s Manual
Safety Instructions
. . . . . . . . 2 -7
Operating Instructions
Oven Features . . . . . . . . . . . . . . .8-10
Power Levels . . . . . . . . . . . . . . . . . . .11
Time Features . . . . . . . . . . . . . . .12-16
Sensor Features . . . . . . . . . . . . 17, 18
Other Features . . . . . . . . . . . . . 19, 20
Microwave Terms . . . . . . . . . . . . . .21
Care and Cleaning . . . . . .22-24
Troubleshooting Tips . . . . . . 25
Things That Are Normal ........25
Consumer Support
Consumer Support ......Back Cover
Warranty ......................27
Write the model and serial
numbers here:
Model # __________________
Serial # ___________________
You can find them on a label inside the
oven.

IMPORTANT SAFETY INSTRUCTIONS.
READ ALL INSTRUCTIONS BEFORE USING.
2
To reduce risk of burns, electric shock, fire, personal injury or exposure to excessive microwave
energy.
This is the safety alert symbol. This symbol alerts you to potential hazards that can kill or hurt you and others. All safety
messages will follow the safety alert symbol and the word “DANGER”, “WARNING”, or “CAUTION”. These words are defined as:
Indicates a hazardous situation which, if not avoided, will result in death or serious injury.
Indicates a hazardous situation which, if not avoided, could result in death or serious injury.
Indicates a hazardous situation which, if not avoided, could result in minor or moderate injury.
SAFETY INFORMATION
WARNING
DANGER
CAUTION
WARNING
SAVE THESE INSTRUCTIONS
When using electrical applainces basic safety precautions should be followed, including the following:
³5HDGDQGIROORZWKHVSHFLILFSUHFDXWLRQVLQWKH
PRECAUTIONS TO AVOID POSSIBLE EXPOSURE TO
EXCESSIVE MICROWAVE ENERGY section on page 4.
³8VHWKLVDSSOLDQFHRQO\IRULWVLQWHQGHGXVHDVGHVFULEHG
in this manual. Do not use corrosive chemicals or vapors
in this appliance. This microwave oven is specifically
designed to heat, dry or cook food, and is not intended
for laboratory or industrial use.
³7KLVPLFURZDYHVKRXOGEHVHUYLFHGRQO\E\TXDOLILHG
service personnel. Contact nearest authorized service
facility for examination, repair, or adjustment.
INSTALLATION
³,QVWDOORUORFDWHWKLVDSSOLDQFHRQO\LQDFFRUGDQFHZLWK
the provided installation instructions.
³7KLVDSSOLDQFHPXVWEHJURXQGHG&RQQHFWRQO\WR
a properly grounded outlet. See the GROUNDING
INSTRUCTIONS section on page 3.
³7KLVPLFURZDYHRYHQLV8/OLVWHGIRULQVWDOODWLRQRYHUERWK
gas (less than 60,000 BTU) and electric ranges.
³7KLVXQLWLVVXLWDEOHIRUXVHDERYHJDVRUHOHFWULFFRRNLQJ
HTXLSPHQWµRUOHVVZLGH
³'RQRWRSHUDWHWKLVDSSOLDQFHLILWKDVDGDPDJHGSRZHU
cord or plug, if it is not working properly, or if it has been
damaged or dropped.
³ . H H S S R Z H U F R U G D Z D \ I U R P K H D W H G V X U I D F H V
³ ' R Q R W O H W S R Z H U F R U G K D Q J R Y H U H G J H R I W D E O H R U
counter.
³ ' R Q R W L P P H U V H S R Z H U F R U G R U S O X J L Q Z D W H U
³ ' R Q R W E O R F N R U F R Y H U D Q \ R S H Q L Q J V R Q W K H D S S O L D Q F H
³ ' R Q R W V W R U H W K L V D S S O L D Q F H R X W G R R U V ' R Q R W X V H W K L V
SURGXFWQHDUZDWHU³IRUH[DPSOHLQDZHWEDVHPHQW
near a swimming pool, near a sink or in similar location.
³'RQRWPRXQWWKLVDSSOLDQFHRYHUDVLQN
TO REDUCE THE RISK OF FIRE IN THE OVEN CAVITY
³'RQRWRYHUFRRNIRRG&DUHIXOO\DWWHQGDSSOLDQFHZKHQ
paper, plastic or other combustible materials are placed
inside the oven while cooking.
³ 5 H P R Y H Z L U H W Z L V W W L H V D Q G P H W D O K D Q G O H V I U R P S D S H U R U
plastic containers before placing them in the oven.
³ ' R Q R W V W R U H D Q \ P D W H U L D O V R W K H U W K D Q R X U U H F R P P H Q G H G
accessories, in this oven when not in use. Do not leave
paper products, cooking utensils or food in the cavity
when not in use. Microwave rack should be removed
from oven when not in use.
³ , I P D W H U L D O V L Q V L G H W K H R Y H Q L J Q L W H N H H S W K H R Y H Q G R R U
closed, turn the oven off and disconnect the power cord,
or shut off power at the fuse or circuit breaker panel.
³ ' R Q R W R S H U D W H W K H P L F U R Z D Y H Z L W K R X W I R R G L Q W K H R Y H Q
TO REDUCE THE RISK OF BURNS
³%HFDUHIXOZKHQRSHQLQJFRQWDLQHUVRIKRWIRRG8VHSRW
holders and direct steam away from face and hands.
³9HQWSLHUFHRUVOLWFRQWDLQHUVSRXFKHVRUSODVWLFEDJVWR
prevent build-up of pressure.
³ % H F D U H I X O Z K H Q W R X F K L Q J W K H W X U Q W D E O H G R R U R U Z D O O V R I
the oven which may become hot during use.
³/LTXLGVDQGFHUWDLQIRRGVKHDWHGLQWKHPLFURZDYHRYHQ
can present a risk of burn when removing them from the
microwave. The potential for a burn is greater in young
children, who should not be allowed to remove hot items
from the microwave.
OPERATING AND CLEANING
³$VZLWKDQ\DSSOLDQFHFORVHVXSHUYLVLRQLVQHFHVVDU\
when used by children.
³'RQRWVWRUHDQ\WKLQJGLUHFWO\RQWRSRIWKHPLFURZDYH
surface when the microwave oven is in operation.
³2YHUVL]HGIRRGRURYHUVL]HGPHWDOFRRNZDUHVKRXOGQRW
be used in a microwave/convection oven because they
increase the risk of electric shock and could cause a fire.
³'RQRWFOHDQZLWKPHWDOVFRXULQJSDGV3LHFHVFDQEXUQ
off the pad and touch electrical parts involving risk of
electric shock.
³'RQRWXVHSDSHUSURGXFWVLQRYHQZKHQDSSOLDQFHLV
operated in any cooking mode except microwave only.

3
IMPORTANT SAFETY INSTRUCTIONS.
READ ALL INSTRUCTIONS BEFORE USING.
SAVE THESE INSTRUCTIONS
OPERATING AND CLEANING (Continued)
³6RPHSURGXFWVVXFKDVZKROHHJJVDQGVHDOHG
FRQWDLQHUV³IRUH[DPSOHFORVHGMDUV³DUHDEOHWRH[SORGH
and should not be heated in this microwave oven.
³'RQRWFRYHUDQ\SDUWRIWKHPLFURZDYHZLWKPHWDOIRLO
This will cause overheating of the microwave.
³&RRNPHDWDQGSRXOWU\WKRURXJKO\³PHDWWRDWOHDVWDQ
INTERNAL temperature of 160°F and poultry to at least
an INTERNAL temperature of 180°F. Cooking to these
temperatures usually protects against foodborne illness.
³0DNHVXUHDOOFRRNZDUHXVHGLQ\RXUPLFURZDYHRYHQLV
suitable for microwaving. Most glass casseroles, cooking
dishes, measuring cups, custard cups, pottery or china
dinnerware which does not have metallic trim or glaze
with a metallic sheen can be used.in compliance with
cookware manufacturers’ recommendations.
³,WLVLPSRUWDQWWRNHHSWKHDUHDFOHDQZKHUHWKHGRRU
seals against the microwave. Use only mild, nonabrasive
detergents applied with a clean sponge or soft cloth.
Rinse well.
SUPERHEATED WATER
³/LTXLGVVXFKDVZDWHUFRIIHHRUWHDDUHDEOHWREH
overheated beyond the boiling point without appearing
to be boiling. Visible bubbling or boiling when the
container is removed from the microwave oven is
not always present. THIS COULD RESULT IN VERY
HOT LIQUIDS SUDDENLY BOILING OVER WHEN THE
CONTAINER IS DISTURBED OR A SPOON OR OTHER
UTENSIL IS INSERTED INTO THE LIQUID.
To reduce the risk of injury to persons:
³'RQRWRYHUKHDWWKHOLTXLG
³6WLUWKHOLTXLGERWKEHIRUHDQGKDOIZD\WKURXJKKHDWLQJLW
³'RQRWXVHVWUDLJKWVLGHGFRQWDLQHUVZLWKQDUURZQHFNV
³ $ I W H U K H D W L Q J D O O R Z W K H F R Q W D L Q H U W R V W D Q G L Q W K H
microwave oven for a short time before removing the
container.
³ 8 V H H [ W U H P H F D U H Z K H Q L Q V H U W L Q J D V S R R Q R U R W K H U X W H Q V L O
into the container.
The fan will operate automatically under certain conditions.
Take care to prevent the starting and spreading of
accidental cooking fires while the vent fan is in use.
³Clean the underside of the microwave often. Do not allow
grease to build up on the microwave or the fan filters.
³In the event of a grease fire on the surface units below
the microwave oven, smother a flaming pan on the
surface unit by covering the pan completely with a lid, a
cookie sheet or a flat tray.
³Use care when cleaning the vent fan filters. Corrosive
cleaning agents, such as lye-based oven cleaners, may
damage the filters.
³When preparing flaming foods under the microwave,
turn the fan on.
³Never leave surface units beneath your microwave
oven unattended at high heat settings. Boilovers
cause smoking and greasy spillovers that may ignite
and spread if the microwave vent fan is operating. To
PLQLPL]HDXWRPDWLFIDQRSHUDWLRQXVHDGHTXDWHVL]HG
cookware and use high heat on surface units only when
necessary.
VENT FAN
PACEMAKERS
Most pacemakers are shielded from interference from electronic products, including microwaves. However,
patients with pacemakers may wish to consult their physicians if they have concerns.
³3OXJPLFURZDYHLQWRDJURXQGHGSURQJRXWOHW
³'RQRWUHPRYHWKHJURXQGSURQJRUXVHDQDGDSWHU
³'RQRWXVHDQH[WHQVLRQFRUG
Improper use of the grounding plug can result in a
risk of electric shock.
This appliance must be grounded. In the event of an
electrical short circuit, grounding reduces the risk of electric
shock by providing an escape wire for the electric current.
7KLVDSSOLDQFHLVHTXLSSHGZLWKDSRZHUFRUGKDYLQJD
grounding wire with a grounding plug. The plug must
be plugged into an outlet that is properly installed and
grounded.
&RQVXOWDTXDOLILHGHOHFWULFLDQRUVHUYLFHWHFKQLFLDQLIWKH
grounding instructions are not completely understood,
or if doubt exists as to whether the appliance is properly
grounded.
A short power-supply is provided to reduce the risks
resulting from becoming entangled or tripping over a longer
cord. Do not use an extension cord with this appliance. If
WKHSRZHUFRUGLVWRRVKRUWKDYHDTXDOLILHGHOHFWULFLDQRU
service technician install an outlet near the appliance.
GROUNDING INSTRUCTIONS
To prevent risk of electric shock, follow these instructions:
WARNING

4
IMPORTANT SAFETY INSTRUCTIONS.
READ ALL INSTRUCTIONS BEFORE USING.
PRECAUTIONS TO AVOID POSSIBLE EXPOSURE
TO EXCESSIVE MICROWAVE ENERGY
• Do Not Attempt to operate this oven with the door
open since open-door operation can result in harmful
exposure to microwave energy. It is important not to
defeat or tamper with the safety interlocks.
• Do Not Place any object between the oven front
face and the door or allow soil or cleaner residue to
accumulate on sealing surfaces.
• Do Not Operate the oven if it is damaged. It is
particularly important that the oven door close
properly and that there is no damage to the:
(1) door (bent)
(2) hinges and latches (broken or loosened)
(3) door seals and sealing surfaces
• The Oven Should Not be adjusted or repaired by
DQ\RQHH[FHSWSURSHUO\TXDOLILHGVHUYLFHSHUVRQQHO
Contact nearest autorized service facility for
examination, repair or adjustment.
SAVE THESE INSTRUCTIONS
READ AND FOLLOW THIS SAFETY INFORMATION CAREFULLY.
FEDERAL COMMUNICATIONS COMMISSION (U.S.A.)
RADIO FREQUENCY INTERFERENCE STATEMENT
7KLVHTXLSPHQWJHQHUDWHVDQGXVHV,60IUHTXHQF\HQHUJ\
and if not installed and used properly, that is in strict
accordance with the manufacturer’s instructions, may
cause interference to radio and television reception. It has
been type tested and found to comply with limits for an
,60(TXLSPHQWSXUVXDQWWRSDUWRI)&&5XOHVZKLFKDUH
designed to provide reasonable protection against such
interference in a residential installation. However, there is
no guarantee that interference will not occur in a particular
LQVWDOODWLRQ,IWKLVHTXLSPHQWGRHVFDXVHLQWHUIHUHQFHWR
radio or television reception, which can be determined by
WXQLQJWKHHTXLSPHQWRIIDQGRQWKHXVHULVHQFRXUDJHGWR
try to correct the interference by one or more of the following:
Reorient the receiving antenna of radio or television.
Relocate the Microwave oven with respect to the receiver.
Move the microwave oven away from the receiver.
Plug the microwave oven into a different outlet so that
microwave oven and receiver are on different branch
circuits.
The manufacturer is not responsible for any radio or TV
interference cause by unauthorized modification to this
microwave oven. It is the responsibility of the user to correct
such interference.

GUARDE ESTAS INSTRUCCIONES
5
INSTRUCCIONES IMPORTANTES DE SEGURIDAD.
LEA PRIMERO TODA LAS INSTRUCCIONES.
³/HD\VLJDODVSUHFDXFLRQHVHVSHFtILFDVHQODVHFFLyQ
PRECAUCIONES PARA EVITAR UNA POSIBLE EXPOSICIÓN A UNA
EXCESIVA ENERGÍA DE MICROONDAS en la página 4.
³'pDHVWHHOHFWURGRPpVWLFRHOXVRSDUDHOFXDOIXH
diseñado únicamente, como se describe en este manual.
1RXVHSURGXFWRVTXtPLFRVFRUURVLYRVQLYDSRUHVHQHVWH
HOHFWURGRPpVWLFR(VWHKRUQRPLFURRQGDVIXHGLVHxDGR
HVSHFtILFDPHQWHSDUDFDOHQWDUVHFDURFRFLQDUFRPLGD\QR
para uso industrial o en laboratorio.
³(VWHHOHFWURGRPpVWLFRVyORGHEHUtDVHUUHSDUDGRSRUSHUVRQDO
WpFQLFRFRQFDOLILFDFLyQ(QFDVRGHQHFHVLWDUXQDHYDOXDFLyQ
UHSDUDFLyQRDMXVWHFRPXQtTXHVHFRQHOVHUYLFLRDXWRUL]DGR
más cercano.
INSTALACIÓN
³,QVWDOHRXELTXHHOHOHFWURGRPpVWLFRVyORGHDFXHUGRFRQODV
LQVWUXFFLRQHVGHLQVWDODFLyQSURYLVWDV
³(VWHHOHFWURGRPpVWLFRGHEHUiHVWDUFRQHFWDGRDWLHUUD
&RQHFWHVyORDXQWRPDFRUULHQWHFRQODDGHFXDGDFRQH[LyQ
DWLHUUD/HDODVHFFLyQ,16758&&,21(63$5$&21(;,Ï1$
TIERRA en la página 3.
³(VWHKRUQRPLFURRQGDVILJXUDHQODOLVWDGH8/SDUDVXSRVLEOH
LQVWDODFLyQWDQWRHQHVWXIDVDJDVPHQRVGH%78
FRPRHOpFWULFDV
³(VWDXQLGDGIXHGLVHxDGDSDUDXVHVREUHHTXLSDPLHQWRVGH
FRFFLyQDJDVRHOpFWULFRVGHXQDQFKRGHµRPHQRV
³1RXWLOLFHHVWHDUWHIDFWRVLSRVHHXQFDEOHRHQFKXIHGDxDGRVL
QRIXQFLRQDFRUUHFWDPHQWHRVLIXHGDxDGRRVXIULyXQDFDtGD
³ 0 D Q W H Q J D H O F D E O H G H F R U U L H Q W H D O H M D G R G H V X S H U I L F L H V F D O L H QWHV
³ 1 R S H U P L W D T X H H O F D E O H G H F R U U L H Q W H F X H O J X H G H O H [ W U H P R G H
una mesa o mostrador.
³ 1 R V X P H U M D H O F D E O H G H F R U U L H Q W H R H O H Q F K X I H H Q H O D J X D
³ 1 R E O R T X H H Q L F X E U D F X D O T X L H U D E H U W X U D G H O H O H F W U R G R P p V W L F R
³ 1 R J X D U G H H V W H H O H F W U R G R P p V W L F R D O D L U H O L E U H 1 R X V H H V W H
SURGXFWRFHUFDGHODJXDSRUHMHPSORHQXQVyWDQRK~PHGR
cerca de una piscina, cerca de un lavabo o en ubicaciones
similares.
³1RFRORTXHHVWHDUWHIDFWRVREUHXQODYDER
PARA REDUCIR EL RIESGO DE INCNDIOS EN LA CAVIDAD
DEL HORNO
³1RFRFLQHHQH[FHVRODFRPLGD3UHVWHHVSHFLDODWHQFLyQ
FXDQGRVHFRORTXHSDSHOSOiVWLFRXRWURVPDWHULDOHV
combustibles dentro del horno mientras se cocina.
³(OLPLQHFXDOTXLHUWRUFHGXUDGHOFDEOH\DVDVPHWiOLFDVGHORV
envases de papel o plástico antes de colocar estos en el horno.
³1RJXDUGHQLQJ~QPDWHULDODH[FHSFLyQGHQXHVWURV
DFFHVRULRVUHFRPHQGDGRVHQHVWHKRUQRFXDQGRQRHVWpHQ
uso No deje productos de papel, utensilios de cocina ni comida
HQHOKRUQRFXDQGRQRHVWpHQXVR(OHVWDQWHGHOPLFURRQGDV
se deberá retirar del horno cuando no se encuentre en uso.
³6LORVPDWHULDOHVGHQWURGHOKRUQRVHSUHQGHQIXHJRPDQWHQJD
la puerta del horno cerrada, apague el mismo y desconecte
el cable de la corriente, o corte la corriente desde el panel del
fusible o el disyuntor.
³1RXWLOLFHHOPLFURRQGDVVLQFRPLGDGHQWURGHOKRUQR
A FIN DE REDUCIR RIESGOS DE QUEMADURAS
³7HQJDFXLGDGRDODEULUUHFLSLHQWHVFRQFRPLGDFDOLHQWH8VHODV
manijas de las ollas y evite el contacto directo del vapor con la
cara y las manos.
³9HQWLOHSHUIRUHRFRUWHORVUHFLSLHQWHVEROVDVREROVDVSOiVWLFDV
SDUDHYLWDUODDFXPXODFLyQGHSUHVLyQ
³ 7 H Q J D F X L G D G R D O W R F D U H O S O D W R J L U D W R U L R O D S X H U W D R O D V SDUHGHV
del horno, los cuales se podrán calentar durante el uso.
³ /RVOtTXLGRV\FLHUWDVFRPLGDVFDOHQWDGDVHQHOKRUQRPLFURRQGDV
SXHGHQSUHVHQWDUHOULHVJRGHTXHPDGXUDVDOUHWLUDUORVGHOKRUQR
PLFURRQGDV/DSRVLELOLGDGGHVXIULUTXHPDGXUDVHVPD\RUHQ
QLxRVSHTXHxRVDTXLHQHVQRVHOHVGHEHUiSHUPLWLUHOUHWLURGH
tWHPVFDOLHQWHVGHOKRUQRPLFURRQGDV
FUNCIONAMIENTO Y LIMPIEZA
³$OLJXDOTXHFRQFXDOTXLHUHOHFWURGRPpVWLFRVHGHEHUiUHDOL]DU
XQDVXSHUYLVLyQGHFHUFDVLHVXVDGRSRUQLxRV
³1RJXDUGHQDGDGLUHFWDPHQWHVREUHODVXSHUILFLHGHOKRUQR
microondas cuando el mismo se encuentre en funcionamiento.
³1RVHGHEHUtDXVDUFRPLGDQLXWHQVLOLRVPHWiOLFRVGHWDPDxR
H[FHVLYRHQXQKRUQRPLFURRQGDVSRUFRQYHFFLyQ\DTXH
LQFUHPHQWDQHOULHVJRGHGHVFDUJDVHOpFWULFDV\HVWRSRGUtD
ocasionar un incendio.
³1ROLPSLHFRQDOPRKDGLOODVPHWiOLFDVSDUDIUHJDU /DVSLH]DV
SRGUiQTXHPDUODDOPRKDGLOOD\WHQHUFRQWDFWRFRQSDUWHV
HOpFWULFDV\SURGXFLUULHVJRVGHGHVFDUJDVHOpFWULFDV
³1RXVHSURGXFWRVGHSDSHOHQHOKRUQRFXDQGRHO
HOHFWURGRPpVWLFRVHDXVDGRHQFXDOTXLHUPRGRGHFRFFLyQ
H[FHSWRHQFRFFLyQSRUPLFURRQGDV
Por su seguridad, la información contenida en este manual debe seguirse para minimizar el
riesgo de incendio, explosión, descarga eléctrica, exposición a energía microondas.
eVWHHVHOVtPERORGHDOHUWDGHVHJXULGDG(OPLVPRDOHUWDVREUHSRWHQFLDOHVULHVJRVGHPXHUWHROHVLRQHVWDQWRSDUDXVWHG
FRQSDUDRWUDVSHUVRQDV7RGRVORVPHQVDMHVGHVHJXULGDGHVWDUiQDFRQWLQXDFLyQGHOVtPERORGHDOHUWDGHVHJXULGDG\FRQOD
palabra “PELIGRO”, “ADVERTENCIA” o “PRECAUCIÓN”. Estas palabras se definen como:
,QGLFDXQDVLWXDFLyQGHULHVJRTXHVLQRVHHYLWDresultará en la muerte o en lesiones graves.
,QGLFDXQDVLWXDFLyQGHULHVJRTXHVLQRVHHYLWDpuede resultar en la muerte o en lesiones graves.
,QGLFDXQDVLWXDFLyQGHULHVJRTXHVLQRVHHYLWDpuede resultar en lesiones menores o moderadas.
INFORMACIÓN DE SEGURIDAD
ADVERTENCIA
PELIGRO
PRECAUCIÓN
ADVERTENCIA
$OXVDUDUWHIDFWRVHOpFWULFRVVHGHEHUiQVHJXLUODVSUHFDXFLRQHVEiVLFDVGHVHJXULGDGLQFOX\HQGRORVLJXLHQWH

6
GUARDE ESTAS INSTRUCCIONES
INSTRUCCIONES IMPORTANTES DE SEGURIDAD.
LEA PRIMERO TODA LAS INSTRUCCIONES.
FUNCIONAMIENTO Y LIMPIEZA (Continúa)
³$OJXQRVSURGXFWRVWDOHVFRPRKXHYRVHQWHURV\HQYDVHV
sellados – por ejemplo: tarros de vidrio cerrados – pueden
explotar y por esto no se deben calentar en el horno
microondas.
³1RFXEUDHOHVWDQWHGHOPLFURRQGDVRFXDOTXLHUSDUWHGHOKRUQR
con papel de aluminio. Esto ocasionará un sobrecalentamiento
GHOKRUQRPLFURRQGDVSRUFRQYHFFLyQ
³&RFLQHODFDUQH\FDUQHGHDYHFRPSOHWDPHQWH²ODFDUQHD
por lo menos una temperatura INTERNA de 160ºF y la carne
de ave a por lo menos una temperatura INTERNA de 180ºF. La
FRFFLyQDHVWDVWHPSHUDWXUDVQRUPDOPHQWHHVXQDSURWHFFLyQ
contra las enfermedades producidas por la carne.
³$VHJ~UHVHGHTXHWRGRVORVXWHQVLOLRVXVDGRVHQHOKRUQR
microondas sean para uso en el mismo. Se pueden usar la
PD\RUtDGHODVFD]XHODVGHYLGULRSODWRVGHFRFFLyQWD]DV
graduadas, tazas para postre, vajillas de cerámica o cubiertos
GHSRUFHODQDTXHQRSRVHHQERUGHVPHWiOLFRVRYLGULDGRV
con un brillo metálico, siguiendo las recomendaciones del
fabricante.
³(VLPSRUWDQWHPDQWHQHUHOiUHDOLPSLDGRQGHODSXHUWDVHVHOOH
FRQWUDHOKRUQRPLFURRQGDV8VHVyORGHWHUJHQWHVVXDYHV\QR
abrasivos con una esponja limpia o tela suave. Enjuague bien.
AGUA SOBRECALENTADA
/RVOtTXLGRVWDOHVFRPRHODJXDFDIpRWpVHSRGUiQ
VREUHFDOHQWDUPiVDOOiGHVXSXQWRGHKHUYRUVLQTXHSDUH]FD
TXHHVWRHVWiVXFHGLHQGR1RVLHPSUHVHREVHUYDQEXUEXMDV
o hervor cuando el envase es retirado del horno microondas.
ESTO PODRÍA PROVOCAR QUE LÍQUIDOS MUY CALIENTES DE
PRONTO HIERVAN CUANDO SE MUEVA EL ENVASE O CUANDO
SE INSERTE UNA CUCHARA U OTRO UTENSILIO EN EL LÍQUIDO.
Para reducir el riesgo de lesiones personales:
³1RVREUHFDOLHQWHHOOtTXLGR
³5HYXHOYDHOOtTXLGRWDQWRDQWHVFRPRDODPLWDGGHOWLHPSR
mientras lo calienta.
³1RXVHHQYDVHVFRQODGRVUHFWRV\FXHOORVDQJRVWRV
³'HVSXpVGHFDOHQWDUGHMHUHSRVDUHOHQYDVHHQHOKRUQR
PLFURRQGDVGXUDQWHXQSHUtRGRFRUWRDQWHVGHUHWLUDUHO
mismo.
³ 7 H Q J D H [ W U H P R F X L G D G R D O L Q V H U W D U X Q D F X F K D U D X R W U R X W H Q V L OLR
en el envase.
El ventilador funcionará de forma automática bajo ciertas
FRQGLFLRQHV$VHJ~UHVHGHHYLWDUODDFWLYDFLyQ\H[WHQVLyQ
DFFLGHQWDOGHOIXHJRGHFRFFLyQPLHQWUDVHOYHQWLODGRUHVWpHQ
uso.
³/LPSLHODFDUDLQIHULRUGHOKRUQRPLFURRQGDVHQIRUPD
IUHFXHQWH1RSHUPLWDTXHVHDFXPXOHJUDVDHQHOKRUQR
microondas ni en los filtros del ventilador.
³(QFDVRGHTXHKD\DIXHJRSURGXFLGRSRUODJUDVDHQODV
unidades de la superficie debajo del horno microondas,
apague una olla llameante sobre la unidad de la superficie
cubriendo la olla completamente con una tapa, una asadera
de galletitas o una bandeja plana.
³/LPSLHFRQFXLGDGRORVILOWURVGHOYHQWLODGRU$JHQWHVGH
limpieza corrosivos, tales como los limpiadores de horno a
base de soda cáustica, podrán dañar los filtros.
³$OSUHSDUDUFRPLGDVOODPHDQWHVGHEDMRGHOKRUQRPLFURRQGDV
encienda el ventilador.
³1XQFDGHMHGHSUHVWDUDWHQFLyQDODVXQLGDGHVGHODVXSHUILFLH
debajo de su horno microondas en las configuraciones altas
de calor. Las ebulliciones producen humo y derrames de grasa
TXHSXHGHQHQFHQGHU\HVSDUFLUHOIXHJRVLHOYHQWLODGRUGHO
horno microondas está en funcionamiento. A fin de minimizar
el funcionamiento del ventilador automático, use utensilios de
tamaño adecuado y use un nivel de calor alto en las unidades
GHODVXSHUILFLHVyORFXDQGRVHDQHFHVDULR
VENTILADOR CON EXTRACTOR
MARCAPASOS
/DPD\RUtDGHORVPDUFDSDVRVSRVHHQSURWHFFLyQFRQWUDLQWHUIHUHQFLDVGHSURGXFWRVHOpFWULFRVLQFOX\HQGRPLFURRQGDV6LQ
HPEDUJRHVDFRQVHMDEOHTXHORVSDFLHQWHVFRQPDUFDSDVRVFRQVXOWHQDVXVPpGLFRVDQWHFXDOTXLHUGXGD
³(QFKXIHHOPLFURRQGDVHQXQWRPDFRUULHQWHFRQFRQH[LyQ
a tierra de 3 cables.
³1RUHWLUHHOHQFKXIHGHFRQH[LyQDWLHUUDQLXVHXQDGDSWDGRU
³1RXVHXQSURORQJDGRU
El uso inadecuado del enchufe de conexión a tierra puede
provocar riesgos de descargas eléctricas.
(VWHHOHFWURGRPpVWLFRGHEHUiHVWDUFRQHFWDGRDWLHUUD(QFDVR
GHTXHVHSURGX]FDXQFRUWRFLUFXLWRODFRQH[LyQDWLHUUDUHGXFHHO
ULHVJRGHGHVFDUJDHOpFWULFDEULQGDQGRXQFDEOHGHHVFDSHGHOD
FRUULHQWHHOpFWULFD
(VWHHOHFWURGRPpVWLFRHVWiHTXLSDGRFRQXQFDEOHGHFRUULHQWH
TXHSRVHHXQFDEOHGHFRQH[LyQDWLHUUDFRQXQHQFKXIHDWLHUUD
El enchufe se deberá colocar en un tomacorriente instalado y
conectado a tierra de forma adecuada.
Consulte a un electricista calificado o al personal del servicio
WpFQLFRHQFDVRGHTXHODVLQVWUXFFLRQHVGHFRQH[LyQDWLHUUD
no se entiendan completamente, o si tiene dudas sobre si la
herramienta está conectada a tierra de forma apropiada.
Se brinda un cable de corriente corto a fin de reducir los
riesgos asociados con enredos o tropiezos con un cable más
ODUJR1RXVHSURORQJDGRUHVFRQHVWHHOHFWURGRPpVWLFR6LHO
cable de corriente es demasiado corto, solicite a un electricista
RDSHUVRQDOGHOVHUYLFLRWpFQLFRFDOLILFDGRTXHLQVWDOHXQ
WRPDFRUULHQWHFHUFDGHOHOHFWURGRPpVWLFR
INSTRUCCIONES DE CONEXIÓN A TIERRA
Para evitar el riesgo de descargas eléctricas, siga estas instrucciones.
WARNING

7
INSTRUCCIONES IMPORTANTES DE SEGURIDAD.
LEA PRIMERO TODA LAS INSTRUCCIONES.
GUARDE ESTAS INSTRUCCIONES
DE LEER Y SEGUIR CUIDADOSAMENTE ESTA INFORMACIÓN DE SEGURIDAD.
COMISIÓN DE COMUNICACIONES FEDERALES (EE.UU.)
DECLARACIÓN DE INTERFERENCIA DE RADIO FRECUENCIA
(VWHHTXLSRJHQHUD\XVDHQHUJtDGHIUHFXHQFLD,60\VLQR
es instalado y usado de forma adecuada, en cumplimiento
estricto con las instrucciones del fabricante, se podrán
RFDVLRQDULQWHUIHUHQFLDVHQODUHFHSFLyQGHUDGLR\WHOHYLVLyQ
6HUHDOL]yXQDHYDOXDFLyQSRUWLSR\VHHQFRQWUyHQ
FXPSOLPLHQWRFRQORVOtPLWHVGHXQHTXLSR,60GHDFXHUGR
FRQODSDUWHGHODV5HJODV)&&TXHIXHURQGLVHxDGDVSDUD
EULQGDUXQDSURWHFFLyQUD]RQDEOHFRQWUDGLFKDVLQWHUIHUHQFLDV
HQXQDLQVWDODFLyQUHVLGHQFLDO6LQHPEDUJRQRVHJDUDQWL]D
TXHQRVHSUHVHQWHQLQWHUIHUHQFLDVHQXQDLQVWDODFLyQ
HQSDUWLFXODU6LHOHTXLSRSURYRFDLQWHUIHUHQFLDVHQOD
UHFHSFLyQGHUDGLRRWHOHYLVLyQORTXHVHSXHGHGHWHUPLQDU
HQFHQGLHQGR\DSDJDQGRHOHTXLSRVHDFRQVHMDDOXVXDULR
TXHLQWHQWHFRUUHJLUODLQWHUIHUHQFLDDWUDYpVGHXQDRPiVGH
las siguientes medidas:
5HRULHQWHODDQWHQDUHFHSWRUDGHUDGLRRWHOHYLVLyQ
5HXELTXHHOKRUQRPLFURRQGDVFRQUHVSHFWRDOUHFHSWRU
&RORTXHHOKRUQRPLFURRQGDVDOHMDGRGHOUHFHSWRU
Enchufe el horno microondas en un tomacorriente
GLIHUHQWHGHPRGRTXHHOKRUQRPLFURRQGDV\HOUHFHSWRU
HVWpQHQGLIHUHQWHVFLUFXLWRVGHHPSDOPHV
(OIDEULFDQWHQRHVUHVSRQVDEOHGHFXDOTXLHULQWHUIHUHQFLDGH
UDGLRR79RFDVLRQDGDSRUXQDPRGLILFDFLyQQRDXWRUL]DGD
sobre este horno microondas. Es responsabilidad del usuario
corregir dicha interferencia.
PRECAUCIONES PARA EVITAR POSIBLE EXPOSICIÓN
A UNA EXCESIVA ENERGÍA DE MICROONDAS.
(a) N o I n t e n t e operar este horno con la puerta abierta ya
TXHHVWRSRGUtDUHVXOWDUHQXQDH[SRVLFLyQDHQHUJtD
microondas dañina. Es importante no cancelar ni
manipular de forma indebida los dispositivos de
seguridad.
(b) N o S i t ú e ningún objeto entre la parte frontal del horno
\ODSXHUWDQLSHUPLWDTXHVHDFXPXOHVXFLHGDGR
UHVLGXRVOLPSLRVHQODVJRPDVGHFLHUUHKHUPpWLFR
(c) N o U s e e l h o r n o si está dañado. Es especialmente
LPSRUWDQWHTXHODSXHUWDGHOKRUQRVHFLHUUH
FRUUHFWDPHQWH\TXHQRVHGDxH
(1) la puerta (doblada),
(2) bisagras y pasadores (rotos o sueltos),
VHOORVGHODSXHUWD\JRPDVGHFLHUUHKHUPpWLFR
(d) E l h o r n o n o d e b e r í a ajustarse ni repararse por nadie
TXHQRVHDSHUVRQDOGHVHUYLFLRDGHFXDGDPHQWH
calificado.

Throughout this manual, features and appearance may vary from your model.
1000 Watts
Features of the Oven
1 Door Handle. Pull to open the door. The door must
be securely latched for the microwave to operate.
2 Door Latches.
3 Window with Metal Shield. Screen allows cooking
to be viewed while keeping microwaves confined
in the oven.
4 Charcoal Filter Door. Push down two button to
open the door. You can change charcoal filter
easily.
5 Touch Control Panel.
6 Cooktop Light.
7 Grease Filter .
8 Removable Turntable.
Turntable and support must be in place
when using the oven. The turntable may be
removed for cleaning.
9 Rating Plate.
NOTE: Oven vent(s) and oven light are located on the
inside walls of the microwave oven.
8
About the features of your microwave oven.

9
Optional Accessories
Filler Panel Kits
JVM7195 / JNM7196
JX36DWW - White
JX36DBB - Black
JX35DSS - Stainless
When replacing a 36” range hood, filler panel kits fill in the
additional width to provide a custom built-in appearance.
For installation between cabinets only; not for end-of
cabinet installation. Each kit contains two 3” wide filler
panels. Two kits are needed for a 36” opening.
Recirculating Charcoal Filter Kit
JX81J (sales number)
WB02X1124 (service number)
Filter kits are used when the microwave oven cannot be
vented to the outside.
µ&DELQHW,QVWDOODWLRQ.LW
JX15BUMPBB - Black
JX15BUMPWW - White
For use when installing with 15” depth cabinets.
Available at extra cost from your GE supplier, or see the
GE Service numbers.
Filer Panel Kits
JX81J (sales number)
WB02X1124 (service number)

You can microwave by time or with the convenience features. Not all features on all models.
Cooking Controls
Check the Convenience Guide before you begin.
10
About the features of your microwave oven.
Time Features
Press Enter
Cook Time Amount of cooking time
Express Cook Starts Immediately!
Add 30 Sec Starts Immediately!
Power Level Power level 1 to 10
Defrost Weight/Time Amount of defrosting weight/time
Melt Food 1-4
Convenience Features
Press Enter Options
Popcorn Starts immediately! 2.0/2.5/3.0/3.5 oz
Beverage Starts immediately! 4/8/6/16 oz
Reheat Food 1-4 1-3 servings
Potato Starts Immediately! 1-4
Cook
Time
Timer
On/Off
Add
30 Sec
Lock Control
Hold 3 Sec
Microwave Features
Power
Level
Display
On/Off
Set
Clock
Hold 3 Sec
Convenience Microwave
Defrost
Reheat
PotatoBeverage
Popcorn
Weight/Time

Changing the Power Level
The power level may be entered or changed
immediately after entering the feature time for
Cook Time, Time Defrost, Add 30 Sec or Express
Cook. The power level may also be changed
during the time countdown.
1. Press Cook Time.
2. Enter cooking or defrosting time
3. Press Power Level.
4. Select desired power level 1-10.
3. Press Start/Pause. Pressing Start/Pause is
not necessary for Express Cook buttons.
Variable power levels add flexibility to microwave
cooking. The power levels on the microwave oven
can be compared to the surface units on a range.
Each power level gives you microwave energy
a certain percent of the time. Power level 7 is
microwave energy 70% of the time. Power level
3 is energy 30% of the time. Most cooking will be
done on HI which gives you 100% power.
Power Level 10 will cook faster but food may
QHHGPRUHIUHTXHQWVWLUULQJURWDWLQJRUWXUQLQJ
over. A lower setting will cook more evenly and
need less stirring or rotating of the food.
Some foods may have better flavor, texture or
appearance if one of the lower settings is used.
Use a lower power level when cooking foods that
have a tendency to boil over, such as scalloped
potatoes.
Rest periods (when the microwave energy cycles
RIIJLYHWLPHIRUWKHIRRGWR´HTXDOL]HµRUWUDQVIHU
heat to the inside of the food. An example of this
is shown with power level 3³WKHGHIURVWF\FOH,I
microwave energy did not cycle off, the outside
of the food would cook before the inside was
defrosted.
Here are some examples of uses for various
power levels:
Power Level 10: Fish, bacon, vegetables, boiling
OLTXLGV
Power Level 7: Gentle cooking of meat and
poultry; baking casseroles and reheating.
Power Level 5: Slow cooking and tenderizing for
stews and less tender cuts of meat.
Power Level 2 or 3: Defrosting; simmering;
delicate sauces.
Power Level 1: .HHSLQJIRRGZDUPVRIWHQLQJ
butter.
11
Cook
Time
Power
Level
123
4
5
6
7
890
Start
Pause

12
About the time features.
Cook Time I
Allows you to microwave for any time up to 99
minutes and 99 seconds.
Power level 10 (high) is automatically set, but
you may change it for more flexibility.
1. Press Cook Time.
2. Enter cooking time.
3. Change power level if you don’t want full
power. (Press Power Level. Select a desired
power level 1–10.)
4. Press Start/Pause.
You may open the door during Cook Time
to check the food. Close the door and press
Start/Pause to resume cooking.
Cook Time II
Lets you change power levels automatically
during cooking. Here’s how to do it:
1. Press Cook Time.
2. Enter the first cook time.
3. Change the power level if you don’t want full
power. (Press Power Level. Select a desired
power level 1–10.)
4. Press Cook Time again.
5. Enter the second cook time.
6. Change the power level if you don’t want full
power. (Press Power Level. Select a desired
power level 1–10.)
7. Press Start/Pause.
At the end of Cook Time I, Cook Time II counts
down.
Cook
Time
123
4
5
6
7
890
Start
Pause

Add 30 Sec
You can use this feature two ways:
It will add 30 seconds to the time counting down each time the pad is pressed.
,WFDQEHXVHGDVDTXLFNZD\WRVHWVHFRQGVRIFRRNLQJWLPH
Express Cook
This is a quick way to set cooking time for 1 –5 minutes.
Press one of the Express Cook pads (from 1 to 5) for 1 to 5 minutes of cooking at power level 10. For
example, press the 2 pad for 2 minutes of cooking time.
The power level can be changed as time is counting down. Press POWER LEVEL and enter 1–10.
123
4
5
Add
30 Sec
13
Melt
Melt
Use the Melt feature to melt certain
preprogrammed foods:
1. Press Melt.
2. Press one of the Express Cook Pads
(from 1 to 4) to select the food you wish
to melt.
Press Pad Food to melt
1Butter
2Caramel
3 Chocolate
4Marshmallows
3. Enter an amount (from 1 to 4) for food
selected:
Press Pad Amount of food to melt
1
2
3
Butter
1/2 Stick
1 Stick
2 Sticks
1
2
3
4
Caramel
4 Oz.
8 Oz.
12 Oz.
16 Oz.
1
2
3
4
Chocolate
4 Oz.
8 Oz.
12 Oz.
16 Oz.
1
2
3
4
Marshmallows
5 Oz.
8 Oz.
10 Oz.
16 Oz.
4. Press Start/Pause to start cooking.
The amount can be changed as time is
counting down. Enter Express Cook pads
(from 1 to 4).

About the time features.
14
Weight Defrost
The Defrost Weight/Time feature gives you
two ways to defrost food.
Press Defrost Weight/Time once for
weight defrost or twice for Time Defrost.
Use Weight Defrost for meat, poultry and
fish up to 6 pounds. Use Time Defrost for
most other frozen foods.
Weight Defrost automatically sets the
defrosting times and power levels to give
even defrosting results for meats, poultry
and fish.
1. Press Defrost Weight/Time once.
2. Using the conversion guide, enter food
weight. For example, press pads 1 and 2
for 1.2 pounds (1 pound, 3 ounces).
3. Press Start/Pause.
(Time Defrost is explained in the Time
Features section.)
• Remove meat from package and place on
microwave-safe dish.
• When the oven signals, turn the food
over. Remove defrosted meat or shield
warm areas with small pieces of foil.
• After defrosting, most meats need to
stand 5 minutes to complete defrosting.
Large roasts should stand for about 30
minutes.
If the weight of food is stated in pounds and
ounces, the ounces must be converted to
tenths (.1) of a pound.
Ounces Pounds
1–2 .1
3 .2
4–5 .3
6–7 .4
8 .5
9–10 .6
11 .7
12–13 .8
14–15 .9
Conversion Guide
123
4
5
6
7
890
Start
Pause
Defrost
Weight/Time

Time Defrost allows you to defrost for a
selected length of time. See the Defrosting
Guide for suggested times. (Weight Defrost is
explained in the Auto Feature section.)
1. Press Defrost Weight/Time twice.
2. Enter defrosting time.
3. Press Start/Pause.
4. Turn food over when the oven signal.
5. Press Start/Pause.
When the oven signals, turn food over and
break apart or rearrange pieces for more even
defrosting. Shield any warm areas with small
pieces of foil. The oven will continue to defrost
if you don’t open the door and turn the food.
Power level is automatically set at 3, but
can be changed. You can defrost small
LWHPVTXLFNO\E\UDLVLQJWKHSRZHUOHYHODIWHU
entering the time. Power level 7 cuts the
total defrosting time in about half; power
level 10 cuts the total time to approximately
+RZHYHUIRRGZLOOQHHGPRUHIUHTXHQW
attention than usual.
A dull thumping noise may be heard during
defrosting. This is normal when oven is not
operating at High power.
Defrosting Tips
• Foods frozen in paper or plastic can be
defrosted in the package. Closed packages
should be slit, pierced or vented AFTER
food has partially defrosted. Plastic storage
containers should be partially uncovered.
• Family-size, prepackaged frozen dinners can
be defrosted and microwaved. If the food is
in a foil container, transfer it to a microwave-
safe dish.
• For more even defrosting of larger foods,
such as roasts, use Defrost Weight. Be sure
large meats are completely defrosted before
cooking.
• Foods that spoil easily should not be allowed
to sit out for more than one hour after
defrosting. Room temperature promotes the
growth of harmful bacteria.
• When defrosted, food should be cool but
softened in all areas. If still slightly icy, return
to the microwave very briefly, or let it stand
a few minutes counts down.
123
4
5
6
7
890
Start
Pause
Defrost
Weight/Time
15

About the time features.
Defrosting Guide
Food Time Comments
Breads, Cakes
Bread, buns or rolls (1 piece) 1 min.
Sweet rolls (approx. 12 oz.) 3 to 5 min. Rearrange after half of time.
Fish and Seafood
Fillets, frozen (1 lb.) 6 to 8 min.
Shellfish, small pieces (1 lb.) 5 to 7 min. Place block in casserole.
Turn over and break up after first half of time.
Fruit
3ODVWLFSRXFK³RU WRPLQ
(10-oz. package)
Meat
Bacon (1 lb.) 2 to 5 min.
Place unopened package in oven. Let stand 5 minutes after defrosting.
Franks (1 lb.) 2 to 5 min. Place unopened package in oven. Microwave just until franks can be
separated. Let stand 5 minutes, if necessary, to complete defrosting.
Ground meat (1 lb.) 5 to 7 min. Turn meat over after first half of time.
Roast: beef, lamb, veal, pork 12 to 16 min. per lb. Use power level Warm (1).
Steaks, chops and cutlets 5 to 7 min. per lb. Place unwrapped meat in cooking dish. Turn over after first half
of time and shield warm areas with foil. After second half of time,
separate pieces with table knife. Let stand to complete defrosting.
Poultry
Chicken, broiler-fryer, cut up 15 to 19 min. Place wrapped chicken in dish. Unwrap and turn over after first
(2
1
/2 to 3 lbs.) half of time. After second half of time, separate pieces and place in
cooking dish. Microwave 2 to 4 minutes more, if necessary. Let stand
a few minutes to finish defrosting.
Chicken, whole (2
1
/2 to 3 lbs.) 17 to 21 min. Place wrapped chicken in dish. After first half of time, unwrap
and turn chicken over. Shield warm areas with foil. To complete
defrosting, run cool water in cavity until giblets can be removed.
Cornish hen 7 to 13 min. per lb. Place unwrapped hen in oven breast-side-up. Turn over after first half
of time. Run cool water in cavity until giblets can be removed.
Turkey breast (4 to 6 lbs.) 5 to 9 min. per lb. Place unwrapped breast in microwave-safe dish breast-side-down.
After first half of time, turn breast-side-up and shield warm areas
with foil. Defrost for second half of time. Let stand 1 to 2 hours in
refrigerator to complete defrosting.
16

To use the Popcorn feature:
To use the Popcorn feature:
1. Follow package instructions, using Cook
Time if the package is less than 2.0 ounces
or larger than 3.5 ounces. Place the
package of popcorn in the center of the
microwave.
2. Press POPCORN. The oven starts
immediately.
How to Adjust the Popcorn Program to
Provide a Shorter or Longer Cook Time
If you find that the brand of popcorn you use
underpops or overcooks consistently, you
can add or subtract 20-30 seconds to the
automatic popping time.
To add time:
After pressing POPCORN, press 9 immediately
after the oven starts for an extra 20 seconds
of the cooking time.
Press 9 again to add another 10 seconds
(total 30 seconds) of additional time.
To subtract time:
After pressing POPCORN, press 1 immediately
after the oven starts for 20 seconds less
cooking time.
Press 1 again to reduce cooking time another
10 seconds (total 30 seconds) less cooking
time.
Use only with prepackaged
microwave popcorn
weighing 2.0 to 3.5 ounces
To use the Beverage feature:
The Beverage feature heats 4-16 oz of any
beverage.
Press BEVERAGE. The oven starts
immediately.
The serving size is automatically set for 4
oz. Press BEVERAGE twice for 8 oz, three
times for 12 oz, and four times for 16 oz.
Drinks heated with the Beverage feature
may be very hot. Remove the container
with care.
Popcorn
Beverage
About the sensor features.
Humidity Sensor
What happens when using the Sensor Feature:
The Sensor Features detect the increasing
humidity released during cooking. The oven
automatically adjusts the cooking time to
various types and amounts of food.
Do not use the Sensor Features twice in
VXFFHVVLRQRQWKHVDPHIRRGSRUWLRQ³LW
may result in severely overcooked or burnt
food. Be sure to let the oven cool down
for 5-10 minutes before starting the next
sensor cook.
If food is undercooked after the countdown,
use Cook Time for additional cooking time.
• The proper containers and covers are
essential for best sensor cooking.
• Always use microwave-safe containers
and cover them with lids or vented
plastic wrap. Never use tight-sealing
SODVWLFFRYHUV³they can prevent
steam from escaping and cause food to
overcook.
• Be sure the outside of the cooking
container and the inside of the microwave
oven are dry before placing food in the
oven. Beads of moisture turning into steam
can mislead the sensor.
Covered
Vented
Dry off dishes so they don’t
mislead the sensor.
17

About the sensor features.
To use the Reheat feature:
The Reheat feature reheats single servings
of previously cooked foods or a plate of
leftovers.
1. Place covered food in the oven. Press
Reheat.
2. Press one of the Express Cook pads (from
1 to 4) to select the food you wish to
reheat.
Press Pad Food to Reheat
1Plate
2Soup
3Veggies
4Pasta
3. The oven signals when steam is sensed
and the time remaining begins counting
down.
Do not open the oven door until time is
counting down. If the door is opened, close it
and press Start/Pause immediately.
After removing food from the oven, stir, if
possible, to even out the temperature. If
the food is not hot enough, use Cook Time
to reheat for more time. Reheated foods
may have wide variations in temperature.
Some areas may be extremely hot.
If food is not hot enough after the
countdown, use Cook Time for additional
reheating time.
Some Foods Not Recommended For Use
With Reheat:
It is best to use Cook Time for these foods:
• Bread products.
• Foods that must be reheated uncovered.
• Foods that need to be stirred or rotated.
• Foods calling for a dry look or crisp
surface after reheating.
Reheat
NOTE: Do not use this
feature twice in succession
RQWKHVDPHIRRGSRUWLRQ³
it may result in severely
overcooked or burnt food.
How to Change the
Automatic Settings
To reduce time by 10%:
Press 1 after the feature pad.
To add 10% to cooking time:
Press 9 after the feature pad.
Potato
1. Pierce potato skin with fork and place
potato in the oven.
2. Press Potato. the oven starts immediately.
3. The oven signals when steam is sensed
and time remaining is counting down.
Turn or stir the food if necessary.
Do not open the oven door until time is
counting down. If the door is opened, close it
and press Start/Pause immediately.
If food is undercooked after the countdown,
use Cook Time for additional cooking time.
Potato
How to Change the
Automatic Settings
To reduce time by 10%:
Press 1 after the feature pad.
To add 10% to cooking time:
Press 9 after the feature pad.
NOTE: Do not use this
feature twice in succession
RQWKHVDPHIRRGSRUWLRQ³
it may result in severely
overcooked or burnt food.
18

About other features.
19
Set Clock
Press to enter the time of day or to check the
time of day while microwaving.
1. Press Set Clock.
2. Enter time of day.
3. Press Start or Set Clock.
To check the time of day while microwaving,
press Set Clock.
Child Lock-Out
You may lock the control panel to prevent the
microwave from being accidentally started or
used by children.
To lock or unlock the controls, press and hold
Set Clock for about three seconds. When the
FRQWUROSDQHOLVORFNHG/2&.('ZLOODSSHDULQ
the display.
Start/Pause
In addition to starting many functions, Start/Pause allows you to stop cooking without opening
the door or clearing the display. Press Start/Pause again to restart the oven.
Timer On/Off
Timer On/Off operates as a minute timer and
can be used at any time, even when the oven is
operating.
1. Press TIMER ON/OFF.
2. Enter time you want to count down.
3. Press TIMER ON/OFF to start.
When time is up, the oven will signal. To turn off
the timer signal, press TIMER ON/OFF.
NOTE: The timer indicator will be lit while the
timer is operating.
Steam Clean
Use Steam Clean for easy wiping inside with
steam.
1.Press the Steam Clean button.
2 Put steam bowl with 1/4 cup of water.
3 Press the dial or Start/Pause to start.
4. After Steam Clean, remove Turntable and
Turn Table Support and wipe out inside of
oven cavity with paper towel or soft cloth
Turntable
For best cooking results, leave the turntable on. It can
be turned off for large dishes. Press TURNTABLE to
turn the turntable on or off.
Sometimes the turntable can become too hot to
touch. Be careful touching the turntable during and
after cooking.
Display On/Off
To turn the clock display on or off, press and hold Display On/Off button for about 3 seconds.
The Display On/Off feature cannot be used while a cooking feature is in use.
Cooking Complete Reminder
To remind you that you have food in the oven, the oven will display “Food is Ready” and beep
once a minute until you either open the oven door or press
Cancel/Off.
Lock Control
Hold 3 Sec
Set
Clock
Start
Pause
Steam
Clean
Turntable
On/Off
Timer
On/Off
Display
On/Off
Hold 3 Sec

About other features.
Vent Fan
The vent fan removes steam and other vapors from surface cooking.
Press Vent Fan once for boost fan speed, twice for high fan speed, a third time for low fan
VSHHGRUDIRUWKWLPHWRWXUQWKHIDQRȺ
Automatic Fan
An automatic fan feature protects the microwave from too much heat rising from the cooktop
below it. It automatically turns on at low speed if it senses too much heat.
If you have turned the fan on you may find that you cannot turn it off. The fan will
automatically turn off when the internal parts are cool. It may stay on for 30 minutes or more
after the cooktop and microwave controls are turned off.
Vent Fan
Surface Light
Press to turn the surface light on or off.
On some models, there is a night light option.
Press Surface Light once for bright light, twice for the
night light or three times to turn the light off.
Mute
The beeper sound level can be muted. Press Mute
On/Off.
Surface
Light
Mute
On/Off
Settings
Settings
Settings
Clock Mode
You can change clock 12/24hrs display mode.
1. Press Settings.
2. Press Express Cook pad 1.
3. Select 12hrs/24hrs.
1 - 12 hrs
2- 24 hrs
Display Speed
You can change display speed.
1. Press Settings.
2. Press Express Cook pad 2.
3. Select new display speed.
1 - slow
2 - normal
3 - fast
Sound Level
You can change sound level.
1. Press Settings.
2. Press Express Cook pad 3.
3. Select sound level.
0 - mute
1 - low
2 - normal
3 - loud
Reset Filter Button
The light will illuminate after approximately 6
months of alert user to replace the charcoal
filter (if used) and clean/replace the grease
filters. Reset by push and hold 3 seconds.
Filter Replace Reminder
The charcoal/grease filter should be replaced
when it is noticeably dirty / discolored(usually
after 6-12 months, depending on hood usage)
or filter replacement LED is on.
When the Filter Replace LED turned on,
replacefilter and press Reset Filter and hold for
3seconds to reset.
Reset
Filter
20

Microwave terms.
Arcing
Arcing is the microwave term for sparks in the
oven. Arcing is caused by:
• Metal or foil touching the side of the oven.
• Foil that is not molded to food (upturned
edges act like antennas).
• Metal such as twist-ties, poultry pins, gold-
rimmed dishes.
• Recycled paper towels containing small
metal pieces.
• Plates or dishes with a metallic trim or glaze
with a metallic sheen.
Covering
Covers hold in moisture, allow for more even
heating and reduce cooking time.
Venting plastic wrap or covering with wax
paper allows excess steam to escape.
Shielding
In a regular oven, you shield chicken breasts
or baked foods to prevent over-browning.
When microwaving, you use small strips of foil
to shield thin parts, such as the tips of wings
and legs on poultry, which would cook before
larger parts.
Standing
Time
When you cook with regular ovens, foods such
as roasts or cakes are allowed to stand to
finish cooking or to set.
Standing time is especially important in
microwave cooking. Note that a microwaved
cake is not placed on a cooling rack.
Venting
After covering a dish with plastic wrap, you
vent the plastic wrap by turning back one
corner so excess steam can escape.
21

Care and cleaning of the microwave oven.
Helpful Hints
An occasional thorough wiping with a solution of baking soda and water keeps the inside fresh.
Be sure the power is off before cleaning any part of this oven.
How to Clean the Inside
Walls, Floor, Inside Window, Metal and Plastic Parts on the Door
6RPHVSDWWHUVFDQEHUHPRYHGZLWKDSDSHUWRZHORWKHUVPD\UHTXLUHDGDPSFORWK5HPRYH
greasy spatters with a sudsy cloth, then rinse with a damp cloth. Do not use
abrasive cleaners or sharp utensils on oven walls.
Never use a commercial oven cleaner on any part of your microwave.
Removable Turntable and Turntable Support
To prevent breakage, do not place the turntable into water just after cooking. Wash it carefully
in warm, sudsy water or in the dishwasher. The turntable and support can be broken if dropped.
Remember, do not operate the oven in the microwave mode without the turntable and support
seated and in place.
How to Clean the Outside
We recommend against using cleaners with ammonia or alcohol, as they can damage the
appearance of the microwave oven. If you choose to use a common household cleaner, first
apply the cleaner directly to a clean cloth, then wipe the soiled area.
Case
Clean the outside of the microwave with a sudsy cloth. Rinse and then dry. Wipe the window clean
with a damp cloth.
Control Panel
Wipe with a damp cloth. Dry thoroughly. Do not use cleaning sprays, large amounts of soap and
ZDWHUDEUDVLYHVRUVKDUSREMHFWVRQWKHSDQHO³WKH\FDQGDPDJHLW6RPHSDSHUWRZHOVFDQDOVR
scratch the control panel.
Door Panel
Before cleaning the front door panel, make sure you know what type of panel you have. Refer to
the eighth digit of the model number. “S” is stainless steel, “L” is CleanSteel and “B”, “W” or “C” are
plastic colors.
Stainless Steel (on some models)
The stainless steel panel can be cleaned with Stainless Steel Magic or a similar product using a
clean, soft cloth. Apply stainless cleaner carefully to avoid the surrounding plastic parts. Do not use
appliance wax, polish, bleach or products containing chlorine on Stainless Steel finishes.
Plastic Color Panels
Use a clean, soft, lightly dampened cloth, then dry thoroughly.
Door Seal
It’s important to keep the area clean where the door seals against the microwave. Use only mild,
non-abrasive detergents applied with a clean sponge or soft cloth. Rinse well.
Bottom
Clean off the grease and dust on the bottom often. Use a solution of warm water and detergent.
T
u
r
n
t
o
S
e
l
e
c
t
P
r
e
s
s
t
o
E
n
t
e
r
Reheat
Timer
On/Off
Defrost
Weight/Time
Start
Pause
Cancel
Off
Lock Controls
Hold 3 Sec
Cook
Time
Set
Clock
Options Help
Surface
Light
Vent Fan
Popcorn
Beverage
Microwave
Express
Warm
Power
Level
Auto
Cook
Combination
Fast Bake
Convection
Roast
Turntable
Convection
Bake
T
u
r
n
t
o
S
e
l
e
c
t
P
r
e
s
s
t
o
E
n
t
e
r
Reheat
Timer
On/Off
Defrost
Weight/Time
Start
Pause
Cancel
Off
Lock Controls
Hold 3 Sec
Cook
Time
Set
Clock
Options Help
Surface
Light
Vent Fan
Warm
Power
Level
Auto
Cook
Combination
Fast Bake
Convection
Roast
Turntable
Convection
Bake
T
u
r
n
t
o
S
e
l
e
c
t
P
r
e
s
s
t
o
E
n
t
e
r
Reheat
Timer
On/Off
Defrost
Weight/Time
Start
Pause
Cancel
Off
Lock Controls
Hold 3 Sec
Cook
Time
Set
Clock
Options Help
Surface
Light
Vent Fan
Popcorn
Beverage
Microwave
Express
Warm
Power
Level
Auto
Cook
Combination
Fast Bake
Convection
Roast
Turntable
Convection
Bake
22

Care and cleaning of the microwave oven.
Cooktop Light/Nite Light
Replace with a 120 volt, 40 watt (max.)
halogen bulb. Order WB08X10051 from your
GE supplier.
1. To replace the cooktop light/nite light, first
disconnect the power at the main fuse or
circuit breaker panel, or pull the plug.
2. Remove the screw from the side of the light
compartment cover and lower the cover
until it stops.
3. Be sure the bulb is cool before removing.
Break the adhesive seal by gently
unscrewing the bulb.
4. Screw in the new bulb, then raise the light
cover and replace the screw. Connect
electrical power to the oven.
T
u
r
n
S
t
o
e
e
l
c
t
P
r
e
s
s
E
n
t
o
t
e
r
Reheat
On/Off
Timer
Defrost
Weight/Time
Paus
Start
e
Off
Cancel
Lock Controls
Hold ٣ Sec
Cook
Time Clock
Set
Options Help
Surf
Light
ace
Vent Fan
Combinatio
Fast Bake
n
Roas
Convection
t
Turntable
Bake
Convection
T
u
r
n
S
t
o
e
e
l
c
t
P
r
e
s
s
E
n
t
o
t
e
r
Reheat
On/Off
Timer
Defrost
Weight/Time
Paus
Start
e
Off
Cancel
Lock Controls
Hold ٣ Sec
Cook
Time Clock
Set
Options Help
Surf
Light
ace
Vent Fan
Popcorn
Beverage
Micr
Expr
owav
ess
e
Warm
Power
Level
Aut
Cook
o
Combinatio
Fast Bake
n
Roas
Convection
t
Turntable
Bake
Convection
Remove screw.
Vent Fan
The vent fan has two metal reusable vent filters.
Models that recirculate air back into the room
also use a charcoal filter.
T
u
r
n
t
o
S
e
l
e
c
t
P
r
e
s
s
t
o
E
n
t
e
r
Reheat
Timer
On/Off
Defrost
Weight/Time
Start
Pause
Cancel
Off
Lock Controls
Hold 3 Sec
Cook
Time
Set
Clock
Options Help
Surface
Light
Vent Fan
Popcorn
Beverage
Microwave
Express
Warm
Power
Level
Auto
Cook
Combination
Fast Bake
Convection
Roast
Turntable
Convection
Bake
Reusable Vent Filters
The metal filters trap grease released by foods
on the cooktop. They also prevent flames from
foods on the cooktop from damaging the inside
of the oven.
For this reason, the filters must always be in
place when the hood is used. The vent filters
should be cleaned once a month, or as needed.
Removing and Cleaning the Filters
To remove, slide them to the rear using the
tabs. Pull down and out.
To clean the vent filters, soak them and then
swish around in hot water and detergent. Don’t
use ammonia or ammonia products because
they will darken the metal. Light brushing can
be used to remove embedded dirt.
Rinse, shake and let dry before replacing.
To replace, slide the filters into the frame slots
on the back of each opening. Press up and to
the front to lock into place.
T
u
r
n
t
o
S
e
l
e
c
t
P
r
e
s
s
t
o
E
n
t
e
r
Reheat
Timer
On/Off
Defrost
Weight/Time
Start
Pause
Cancel
Off
Lock Controls
Hold 3 Sec
Cook
Time
Set
Clock
Options Help
Surface
Light
Vent Fan
Popcorn
B
everage
Microwave
Express
Warm
Power
Level
Auto
Cook
Combination
Fast Bake
Convection
Roast
Turntable
Convection
Bake
Reusable vent filters
(on all models).
Charcoal filter
23

Care and cleaning of the microwave oven.
Charcoal Filter
The charcoal filter cannot be cleaned. It must
be replaced. Order Part No. JX81H from your
GE supplier.
If the model is not vented to the outside,
the air will be recirculated through a disposable
charcoal filter that helps remove smoke and
odors.
The charcoal filter should be replaced when it is
noticeably dirty or discolored (usually after 6 to
12 months, depending on usage). See “Optional
.LWVµSDJHIRUPRUHLQIRUPDWLRQ
To Remove the Charcoal Filter
To remove the charcoal filter, first disconnect
power at the main fuse or circuit breaker, or pull
the plug. Push down 2 buttons on the filter door.
The charcoal filter should be replaced every
PRQWKVZKHQ/('LVRQ6HH´2SWLRQDO.LWVµ
page 7.
Lift the filter at the bottom until it comes free of
the tabs. Slide the filter down and out.
To Install the Charcoal Filter
To install a new charcoal filter, remove plastic
and other outer wrapping from the new filter.
Insert the top of the filter up. Push the bottom of
the filter in until it rests in place behind the tabs.
Close filter door.
24

Things That Are Normal With Your Microwave Oven
Steam or vapor escaping from around
the door.
Light reflection around door or outer case.
Dimming oven light and change in
the blower sound at power levels other
than high.
Dull thumping sound while oven is operating.
TV/radio interference might be noticed while
using the microwave. Similar to
the interference caused by other small
appliances, it does not indicate a problem with
the microwave. Plug the microwave into a
different electrical circuit, move the radio or TV
as far away from the microwave as possible,
or check the position and signal of the TV/radio
antenna.
Troubleshooting Tips.
Oven will not
start
Floor of the oven is
warm, even when
the oven has not
been used
´/2&.('µDSSHDUV
on display
You hear an
unusual, low-tone
beep
“SENSOR ERROR”
appears on display
Food amount too
large for Sensor
Reheat
Problem Possible Cause What to Do
A fuse in your home • Replace fuse or reset circuit breaker.
may be blown or the
circuit breaker tripped.
Power surge. • Unplug the microwave oven, then plug
it back in.
Plug not fully inserted • Make sure the 3-prong plug on the into
wall outlet. oven is fully inserted into wall outlet.
Door not securely closed. • Open the door and close securely.
Heat from the cooktop • This is normal.
light may make the oven
floor get warm.
The control has been • Press and hold SET CLOCK for
locked. about 3 seconds to unlock the control.
You have tried to start
• Start over and enter a valid time
the Reminder without
of
day.
a valid time of day.
You have tried to change
• Many of the oven’s features are preset
the
power level when it is
and
cannot be changed.
not allowed.
When using a Sensor • Do not open door until steam is
feature, the door was sensed and time is shown counting
opened before steam down on display.
could
be detected.
Steam not detected
•
Use Time Cook to heat for more time.
in maximum amount
of time.
Sensor Reheat is for • Use Time Cook for large amounts
single servings of of food.
recommended foods.
25

Notes.
26

27
GE Microwave Oven Warranty.
All warranty service provided by our Factory Service Centers, or an
authorized Customer Care
®
technician during normal working hours.
To schedule service, on-line, 24 hours a day, visit us at GEAppliances.
com, or call 800.GE.CARES (800.432.2737). Please have serial and
model numbers available when calling for service.
This warranty is extended to the original purchaser and any succeeding owner for products purchased for home use within the USA. If the
product is located in an area where service by a GE Authorized Servicer is not available, you may be responsible for a trip charge or you
may be required to bring the product to an Authorized GE Service Location for service. In Alaska, the warranty excludes the service calls to
your home.
Some states do not allow the exclusion or limitation of incidental or consequential damages. This warranty gives you specific legal
rights, and you may also have other rights which vary from state to state. To know what your legal rights are, consult your local or state
consumer affairs office or your state’s Attorney General.
Warrantor: General Electric Company. Louisville, KY 40225
Staple your receipt here.
Proof of the original purchase
date is needed to obtain
service under the warranty.
(;&/86,212),03/,(':$55$17,(6³<RXUVROHDQGH[FOXVLYHUHPHG\LVSURGXFWUHSDLUDVSURYLGHGLQWKLV/LPLWHG
Warranty. Any implied warranties, including the implied warranties of merchantability or fitness for a particular purpose,
are limited to one year or the shortest period allowed by law.
What GE Will Not Cover:
Service trips to your home to teach you how to use the
product.
Improper installation, delivery or maintenance. If you have
an installation problem, contact your dealer or installer.
<RXDUHUHVSRQVLEOHIRUSURYLGLQJDGHTXDWHHOHFWULFDO
exhausting, and other connecting facilities.
Failure of the product or damage to the product if it is
abused, misused (for example, cavity arcing from wire rack
or metal/foil), or used for other than the intended purpose
or used commercially.
Replacement of house fuses or resetting of circuit breakers.
Damage to the product caused by accident, fire, floods or
acts of God.
,QFLGHQWDORUFRQVHTXHQWLDOGDPDJHFDXVHGE\SRVVLEOH
defects with this appliance.
Damage caused after delivery.
3URGXFWQRWDFFHVVLEOHWRSURYLGHUHTXLUHGVHUYLFH
Service to repair or replace light bulbs, except for LED
lamps.
Damage to the finish, such as surface rust, tarnish, or
small blemishes not reported within 48 hrs of delivery.
For The Period Of: GE Will Choose to Replace or Service:
One Year
From the date of original
purchase
In the event of service, GE will provide any part of the microwave oven which fails due to a defect
in materials or workmanship. During this limited one-year warranty, GE will also provide, free
of charge, all labor and related service costs to replace the defective part when the unit is
serviced.

Printed in Malaysia
Consumer Support.
GE Appliances Website
GEAppliances.com
+DYHDTXHVWLRQRUQHHGDVVLVWDQFHZLWK\RXUDSSOLDQFH"7U\WKH*($SSOLDQFHV:HEVLWHKRXUVDGD\
any day of the year! For greater convenience and faster service, you can now download Owner’s Manuals,
order parts, catalogs, or even schedule service on-line. You can also “Ask Our Team of Experts
™
”
\RXUTXHVWLRQVDQGVRPXFKPRUH«
Real Life Design Studio GEAppliances.com
*(VXSSRUWVWKH8QLYHUVDO'HVLJQFRQFHSW³SURGXFWVVHUYLFHVDQGHQYLURQPHQWVWKDWFDQEHXVHGE\
people of all ages, sizes and capabilities. We recognize the need to design for a wide range of physical and
mental abilities and impairments. For details of GE’s Universal Design applications, including kitchen design
ideas for people with disabilities, check out our Website today. For the hearing impaired, please call 800.TDD.
GEAC (800.833.4322).
Parts and Accessories GEApplianceparts.com
,QGLYLGXDOVTXDOLILHGWRVHUYLFHWKHLURZQDSSOLDQFHVFDQKDYHSDUWVRUDFFHVVRULHVVHQWGLUHFWO\WRWKHLUKRPHV
(VISA, MasterCard, and Discover cards are accepted). Order on-line today, 24 hours every day or
by phone at 800.626.2002 during normal business hours.
Instructions contained in this manual cover procedures to be performed by any user.
GE does not support any servicing of this microwave oven, except as described by the Consumer Support
section of this manual. Do not attempt to service the microwave oven yourself. If service is desired, then
this appliance should be serviced only by qualified service personnel. Contact the nearest authorized service
facility for examination, repair or adjustment.
Contact Us GEAppliances.com
If you are not satisfied with the service you receive from GE, contact us on our Website with all the details
including your phone number, or write to: General Manager, Customer Relations
GE Appliances, Appliance Park
/RXLVYLOOH.<

Horno Microondas
49-40766 04-16 GE
JVM7195
JNM7196
Manual del
propietario
GEAppliances.com
Instrucciones
de Seguridad . . . . . . . . . . . . . 2 – 4
Instrucciones
de Funcionamiento
Términos del Microondas .......18
Funciones del Horno ..........5-8
Otras Funciones ............16, 17
Funciones del Sensor ......14, 15
Funciones del
Temporizador . . . . . . . . . . . . . .9-13
Cuidado y Limpieza . . . . .19-21
Consejos para Solucionar
Problemas . . . . . . . . . . . . . . . . . . . 2 2
Cosas que son Normales . . . . . . . 22
Soporte al Cliente
Soporte al Cliente . . . . . . Contratapa
Warranty ......................23
Escriba los números de modelo
y de serie aquí:
Nº de Modelo ______________
Nº de Serie ________________
Los encontrará en una etiqueta dentro
del horno.

2
GUARDE ESTAS INSTRUCCIONES
INSTRUCCIONES IMPORTANTES DE SEGURIDAD.
LEA PRIMERO TODA LAS INSTRUCCIONES.
³/HD\VLJDODVSUHFDXFLRQHVHVSHFtILFDVHQODVHFFLyQ
PRECAUCIONES PARA EVITAR UNA POSIBLE EXPOSICIÓN A UNA
(;&(6,9$(1(5*Ë$'(0,&5221'$6HQODSiJLQD
³'pDHVWHHOHFWURGRPpVWLFRHOXVRSDUDHOFXDOIXH
diseñado únicamente, como se describe en este manual.
1RXVHSURGXFWRVTXtPLFRVFRUURVLYRVQLYDSRUHVHQHVWH
HOHFWURGRPpVWLFR(VWHKRUQRPLFURRQGDVIXHGLVHxDGR
HVSHFtILFDPHQWHSDUDFDOHQWDUVHFDURFRFLQDUFRPLGD\QR
para uso industrial o en laboratorio.
³(VWHHOHFWURGRPpVWLFRVyORGHEHUtDVHUUHSDUDGRSRUSHUVRQDO
WpFQLFRFRQFDOLILFDFLyQ(QFDVRGHQHFHVLWDUXQDHYDOXDFLyQ
UHSDUDFLyQRDMXVWHFRPXQtTXHVHFRQHOVHUYLFLRDXWRUL]DGR
más cercano.
INSTALACIÓN
³,QVWDOHRXELTXHHOHOHFWURGRPpVWLFRVyORGHDFXHUGRFRQODV
LQVWUXFFLRQHVGHLQVWDODFLyQSURYLVWDV
³(VWHHOHFWURGRPpVWLFRGHEHUiHVWDUFRQHFWDGRDWLHUUD
&RQHFWHVyORDXQWRPDFRUULHQWHFRQODDGHFXDGDFRQH[LyQ
DWLHUUD/HDODVHFFLyQ,16758&&,21(63$5$&21(;,Ï1$
7,(55$HQODSiJLQD
³(VWHKRUQRPLFURRQGDVILJXUDHQODOLVWDGH8/SDUDVXSRVLEOH
LQVWDODFLyQWDQWRHQHVWXIDVDJDVPHQRVGH%78
como eléctricas.
³(VWDXQLGDGIXHGLVHxDGDSDUDXVHVREUHHTXLSDPLHQWRVGH
FRFFLyQDJDVRHOpFWULFRVGHXQDQFKRGHµRPHQRV
³1RXWLOLFHHVWHDUWHIDFWRVLSRVHHXQFDEOHRHQFKXIHGDxDGRVL
QRIXQFLRQDFRUUHFWDPHQWHRVLIXHGDxDGRRVXIULyXQDFDtGD
³ 0 D Q W H Q J D H O F D E O H G H F R U U L H Q W H D O H M D G R G H V X S H U I L F L H V F D O L H QWHV
³ 1 R S H U P L W D T X H H O F D E O H G H F R U U L H Q W H F X H O J X H G H O H [ W U H P R G H
una mesa o mostrador.
³ 1 R V X P H U M D H O F D E O H G H F R U U L H Q W H R H O H Q F K X I H H Q H O D J X D
³ 1 R E O R T X H H Q L F X E U D F X D O T X L H U D E H U W X U D G H O H O H F W U R G R P p V W L F R
³ 1 R J X D U G H H V W H H O H F W U R G R P p V W L F R D O D L U H O L E U H 1 R X V H H V W H
SURGXFWRFHUFDGHODJXDSRUHMHPSORHQXQVyWDQRK~PHGR
FHUFDGHXQDSLVFLQDFHUFDGHXQODYDERRHQXELFDFLRQHV
similares.
³1RFRORTXHHVWHDUWHIDFWRVREUHXQODYDER
PARA REDUCIR EL RIESGO DE INCNDIOS EN LA CAVIDAD
DEL HORNO
³1RFRFLQHHQH[FHVRODFRPLGD3UHVWHHVSHFLDODWHQFLyQ
cuando se coloque papel, plástico u otros materiales
combustibles dentro del horno mientras se cocina.
³(OLPLQHFXDOTXLHUWRUFHGXUDGHOFDEOH\DVDVPHWiOLFDVGHORV
HQYDVHVGHSDSHORSOiVWLFRDQWHVGHFRORFDUHVWRVHQHOKRUQR
³1RJXDUGHQLQJ~QPDWHULDODH[FHSFLyQGHQXHVWURV
accesorios recomendados, en este horno cuando no esté en
XVR1RGHMHSURGXFWRVGHSDSHOXWHQVLOLRVGHFRFLQDQLFRPLGD
en el horno cuando no esté en uso. El estante del microondas
se deberá retirar del horno cuando no se encuentre en uso.
³6LORVPDWHULDOHVGHQWURGHOKRUQRVHSUHQGHQIXHJRPDQWHQJD
ODSXHUWDGHOKRUQRFHUUDGDDSDJXHHOPLVPR\GHVFRQHFWH
el cable de la corriente, o corte la corriente desde el panel del
IXVLEOHRHOGLV\XQWRU
³1RXWLOLFHHOPLFURRQGDVVLQFRPLGDGHQWURGHOKRUQR
A FIN DE REDUCIR RIESGOS DE QUEMADURAS
³7HQJDFXLGDGRDODEULUUHFLSLHQWHVFRQFRPLGDFDOLHQWH8VHODV
PDQLMDVGHODVROODV\HYLWHHOFRQWDFWRGLUHFWRGHOYDSRUFRQOD
cara y las manos.
³9HQWLOHSHUIRUHRFRUWHORVUHFLSLHQWHVEROVDVREROVDVSOiVWLFDV
SDUDHYLWDUODDFXPXODFLyQGHSUHVLyQ
³ 7 H Q J D F X L G D G R D O W R F D U H O S O D W R J L U D W R U L R O D S X H U W D R O D V SDUHGHV
del horno, los cuales se podrán calentar durante el uso.
³ /RVOtTXLGRV\FLHUWDVFRPLGDVFDOHQWDGDVHQHOKRUQRPLFURRQGDV
SXHGHQSUHVHQWDUHOULHVJRGHTXHPDGXUDVDOUHWLUDUORVGHOKRUQR
PLFURRQGDV/DSRVLELOLGDGGHVXIULUTXHPDGXUDVHVPD\RUHQ
niños pequeños, a quienes no se les deberá permitir el retiro de
tWHPVFDOLHQWHVGHOKRUQRPLFURRQGDV
FUNCIONAMIENTO Y LIMPIEZA
³$OLJXDOTXHFRQFXDOTXLHUHOHFWURGRPpVWLFRVHGHEHUiUHDOL]DU
XQDVXSHUYLVLyQGHFHUFDVLHVXVDGRSRUQLxRV
³1RJXDUGHQDGDGLUHFWDPHQWHVREUHODVXSHUILFLHGHOKRUQR
PLFURRQGDVFXDQGRHOPLVPRVHHQFXHQWUHHQIXQFLRQDPLHQWR
³1RVHGHEHUtDXVDUFRPLGDQLXWHQVLOLRVPHWiOLFRVGHWDPDxR
H[FHVLYRHQXQKRUQRPLFURRQGDVSRUFRQYHFFLyQ\DTXH
LQFUHPHQWDQHOULHVJRGHGHVFDUJDVHOpFWULFDV\HVWRSRGUtD
ocasionar un incendio.
³1ROLPSLHFRQDOPRKDGLOODVPHWiOLFDVSDUDIUHJDU /DVSLH]DV
podrán quemar la almohadilla y tener contacto con partes
HOpFWULFDV\SURGXFLUULHVJRVGHGHVFDUJDVHOpFWULFDV
³1RXVHSURGXFWRVGHSDSHOHQHOKRUQRFXDQGRHO
HOHFWURGRPpVWLFRVHDXVDGRHQFXDOTXLHUPRGRGHFRFFLyQ
H[FHSWRHQFRFFLyQSRUPLFURRQGDV
Por su seguridad, la información contenida en este manual debe seguirse para minimizar el
riesgo de incendio, explosión, descarga eléctrica, exposición a energía microondas.
eVWHHVHOVtPERORGHDOHUWDGHVHJXULGDG(OPLVPRDOHUWDVREUHSRWHQFLDOHVULHVJRVGHPXHUWHROHVLRQHVWDQWRSDUDXVWHG
FRQSDUDRWUDVSHUVRQDV7RGRVORVPHQVDMHVGHVHJXULGDGHVWDUiQDFRQWLQXDFLyQGHOVtPERORGHDOHUWDGHVHJXULGDG\FRQOD
SDODEUD´3(/,*52µ´$'9(57(1&,$µR´35(&$8&,Ï1µ(VWDVSDODEUDVVHGHILQHQFRPR
,QGLFDXQDVLWXDFLyQGHULHVJRTXHVLQRVHHYLWDresultaráHQODPXHUWHRHQOHVLRQHVJUDYHV
,QGLFDXQDVLWXDFLyQGHULHVJRTXHVLQRVHHYLWDpuedeUHVXOWDUHQODPXHUWHRHQOHVLRQHVJUDYHV
,QGLFDXQDVLWXDFLyQGHULHVJRTXHVLQRVHHYLWDpuede resultar en lesiones menores o moderadas.
INFORMACIÓN DE SEGURIDAD
ADVERTENCIA
PELIGRO
PRECAUCIÓN
ADVERTENCIA
$OXVDUDUWHIDFWRVHOpFWULFRVVHGHEHUiQVHJXLUODVSUHFDXFLRQHVEiVLFDVGHVHJXULGDGLQFOX\HQGRORVLJXLHQWH

3
INSTRUCCIONES IMPORTANTES DE SEGURIDAD.
LEA PRIMERO TODA LAS INSTRUCCIONES.
GUARDE ESTAS INSTRUCCIONES
FUNCIONAMIENTO Y LIMPIEZA (Continúa)
³$OJXQRVSURGXFWRVWDOHVFRPRKXHYRVHQWHURV\HQYDVHV
VHOODGRV²SRUHMHPSORWDUURVGHYLGULRFHUUDGRV²SXHGHQ
H[SORWDU\SRUHVWRQRVHGHEHQFDOHQWDUHQHOKRUQR
microondas.
³1RFXEUDHOHVWDQWHGHOPLFURRQGDVRFXDOTXLHUSDUWHGHOKRUQR
con papel de aluminio. Esto ocasionará un sobrecalentamiento
GHOKRUQRPLFURRQGDVSRUFRQYHFFLyQ
³&RFLQHODFDUQH\FDUQHGHDYHFRPSOHWDPHQWH²ODFDUQHD
por lo menos una temperatura INTERNA de 160ºF y la carne
GHDYHDSRUORPHQRVXQDWHPSHUDWXUD,17(51$GH)/D
FRFFLyQDHVWDVWHPSHUDWXUDVQRUPDOPHQWHHVXQDSURWHFFLyQ
FRQWUDODVHQIHUPHGDGHVSURGXFLGDVSRUODFDUQH
³$VHJ~UHVHGHTXHWRGRVORVXWHQVLOLRVXVDGRVHQHOKRUQR
microondas sean para uso en el mismo. Se pueden usar la
PD\RUtDGHODVFD]XHODVGHYLGULRSODWRVGHFRFFLyQWD]DV
JUDGXDGDVWD]DVSDUDSRVWUHYDMLOODVGHFHUiPLFDRFXELHUWRV
GHSRUFHODQDTXHQRSRVHHQERUGHVPHWiOLFRVRYLGULDGRV
FRQXQEULOORPHWiOLFRVLJXLHQGRODVUHFRPHQGDFLRQHVGHO
IDEULFDQWH
³(VLPSRUWDQWHPDQWHQHUHOiUHDOLPSLDGRQGHODSXHUWDVHVHOOH
FRQWUDHOKRUQRPLFURRQGDV8VHVyORGHWHUJHQWHVVXDYHV\QR
DEUDVLYRVFRQXQDHVSRQMDOLPSLDRWHODVXDYH(QMXDJXHELHQ
AGUA SOBRECALENTADA
/RVOtTXLGRVWDOHVFRPRHODJXDFDIpRWpVHSRGUiQ
VREUHFDOHQWDUPiVDOOiGHVXSXQWRGHKHUYRUVLQTXHSDUH]FD
TXHHVWRHVWiVXFHGLHQGR1RVLHPSUHVHREVHUYDQEXUEXMDV
RKHUYRUFXDQGRHOHQYDVHHVUHWLUDGRGHOKRUQRPLFURRQGDV
ESTO PODRÍA PROVOCAR QUE LÍQUIDOS MUY CALIENTES DE
PRONTO HIERVAN CUANDO SE MUEVA EL ENVASE O CUANDO
SE INSERTE UNA CUCHARA U OTRO UTENSILIO EN EL LÍQUIDO.
3DUDUHGXFLUHOULHVJRGHOHVLRQHVSHUVRQDOHV
³1RVREUHFDOLHQWHHOOtTXLGR
³5HYXHOYDHOOtTXLGRWDQWRDQWHVFRPRDODPLWDGGHOWLHPSR
mientras lo calienta.
³1RXVHHQYDVHVFRQODGRVUHFWRV\FXHOORVDQJRVWRV
³'HVSXpVGHFDOHQWDUGHMHUHSRVDUHOHQYDVHHQHOKRUQR
PLFURRQGDVGXUDQWHXQSHUtRGRFRUWRDQWHVGHUHWLUDUHO
mismo.
³ 7 H Q J D H [ W U H P R F X L G D G R D O L Q V H U W D U X Q D F X F K D U D X R W U R X W H Q V L OLR
HQHOHQYDVH
(OYHQWLODGRUIXQFLRQDUiGHIRUPDDXWRPiWLFDEDMRFLHUWDV
FRQGLFLRQHV$VHJ~UHVHGHHYLWDUODDFWLYDFLyQ\H[WHQVLyQ
DFFLGHQWDOGHOIXHJRGHFRFFLyQPLHQWUDVHOYHQWLODGRUHVWpHQ
uso.
³/LPSLHODFDUDLQIHULRUGHOKRUQRPLFURRQGDVHQIRUPD
IUHFXHQWH1RSHUPLWDTXHVHDFXPXOHJUDVDHQHOKRUQR
PLFURRQGDVQLHQORVILOWURVGHOYHQWLODGRU
³(QFDVRGHTXHKD\DIXHJRSURGXFLGRSRUODJUDVDHQODV
XQLGDGHVGHODVXSHUILFLHGHEDMRGHOKRUQRPLFURRQGDV
DSDJXHXQDROODOODPHDQWHVREUHODXQLGDGGHODVXSHUILFLH
cubriendo la olla completamente con una tapa, una asadera
GHJDOOHWLWDVRXQDEDQGHMDSODQD
³/LPSLHFRQFXLGDGRORVILOWURVGHOYHQWLODGRU$JHQWHVGH
OLPSLH]DFRUURVLYRVWDOHVFRPRORVOLPSLDGRUHVGHKRUQRD
EDVHGHVRGDFiXVWLFDSRGUiQGDxDUORVILOWURV
³$OSUHSDUDUFRPLGDVOODPHDQWHVGHEDMRGHOKRUQRPLFURRQGDV
HQFLHQGDHOYHQWLODGRU
³1XQFDGHMHGHSUHVWDUDWHQFLyQDODVXQLGDGHVGHODVXSHUILFLH
GHEDMRGHVXKRUQRPLFURRQGDVHQODVFRQILJXUDFLRQHVDOWDV
GHFDORU/DVHEXOOLFLRQHVSURGXFHQKXPR\GHUUDPHVGHJUDVD
TXHSXHGHQHQFHQGHU\HVSDUFLUHOIXHJRVLHOYHQWLODGRUGHO
KRUQRPLFURRQGDVHVWiHQIXQFLRQDPLHQWR$ILQGHPLQLPL]DU
HOIXQFLRQDPLHQWRGHOYHQWLODGRUDXWRPiWLFRXVHXWHQVLOLRVGH
WDPDxRDGHFXDGR\XVHXQQLYHOGHFDORUDOWRHQODVXQLGDGHV
GHODVXSHUILFLHVyORFXDQGRVHDQHFHVDULR
VENTILADOR CON EXTRACTOR
MARCAPASOS
/DPD\RUtDGHORVPDUFDSDVRVSRVHHQSURWHFFLyQFRQWUDLQWHUIHUHQFLDVGHSURGXFWRVHOpFWULFRVLQFOX\HQGRPLFURRQGDV6LQ
HPEDUJRHVDFRQVHMDEOHTXHORVSDFLHQWHVFRQPDUFDSDVRVFRQVXOWHQDVXVPpGLFRVDQWHFXDOTXLHUGXGD
³(QFKXIHHOPLFURRQGDVHQXQWRPDFRUULHQWHFRQFRQH[LyQ
a tierra de 3 cables.
³1RUHWLUHHOHQFKXIHGHFRQH[LyQDWLHUUDQLXVHXQDGDSWDGRU
³1RXVHXQSURORQJDGRU
El uso inadecuado del enchufe de conexión a tierra puede
provocar riesgos de descargas eléctricas.
Este electrodoméstico deberá estar conectado a tierra. En caso
GHTXHVHSURGX]FDXQFRUWRFLUFXLWRODFRQH[LyQDWLHUUDUHGXFHHO
ULHVJRGHGHVFDUJDHOpFWULFDEULQGDQGRXQFDEOHGHHVFDSHGHOD
corriente eléctrica.
Este electrodoméstico está equipado con un cable de corriente
TXHSRVHHXQFDEOHGHFRQH[LyQDWLHUUDFRQXQHQFKXIHDWLHUUD
(OHQFKXIHVHGHEHUiFRORFDUHQXQWRPDFRUULHQWHLQVWDODGR\
FRQHFWDGRDWLHUUDGHIRUPDDGHFXDGD
&RQVXOWHDXQHOHFWULFLVWDFDOLILFDGRRDOSHUVRQDOGHOVHUYLFLR
WpFQLFRHQFDVRGHTXHODVLQVWUXFFLRQHVGHFRQH[LyQDWLHUUD
no se entiendan completamente, o si tiene dudas sobre si la
KHUUDPLHQWDHVWiFRQHFWDGDDWLHUUDGHIRUPDDSURSLDGD
6HEULQGDXQFDEOHGHFRUULHQWHFRUWRDILQGHUHGXFLUORV
ULHVJRVDVRFLDGRVFRQHQUHGRVRWURSLH]RVFRQXQFDEOHPiV
ODUJR1RXVHSURORQJDGRUHVFRQHVWHHOHFWURGRPpVWLFR6LHO
cable de corriente es demasiado corto, solicite a un electricista
RDSHUVRQDOGHOVHUYLFLRWpFQLFRFDOLILFDGRTXHLQVWDOHXQ
tomacorriente cerca del electrodoméstico.
INSTRUCCIONES DE CONEXIÓN A TIERRA
Para evitar el riesgo de descargas eléctricas, siga estas instrucciones.
WARNING

4
INSTRUCCIONES IMPORTANTES DE SEGURIDAD.
LEA PRIMERO TODA LAS INSTRUCCIONES.
GUARDE ESTAS INSTRUCCIONES
DE LEER Y SEGUIR CUIDADOSAMENTE ESTA INFORMACIÓN DE SEGURIDAD.
COMISIÓN DE COMUNICACIONES FEDERALES (EE.UU.)
DECLARACIÓN DE INTERFERENCIA DE RADIO FRECUENCIA
(VWHHTXLSRJHQHUD\XVDHQHUJtDGHIUHFXHQFLD,60\VLQR
HVLQVWDODGR\XVDGRGHIRUPDDGHFXDGDHQFXPSOLPLHQWR
HVWULFWRFRQODVLQVWUXFFLRQHVGHOIDEULFDQWHVHSRGUiQ
RFDVLRQDULQWHUIHUHQFLDVHQODUHFHSFLyQGHUDGLR\WHOHYLVLyQ
6HUHDOL]yXQDHYDOXDFLyQSRUWLSR\VHHQFRQWUyHQ
FXPSOLPLHQWRFRQORVOtPLWHVGHXQHTXLSR,60GHDFXHUGR
FRQODSDUWHGHODV5HJODV)&&TXHIXHURQGLVHxDGDVSDUD
EULQGDUXQDSURWHFFLyQUD]RQDEOHFRQWUDGLFKDVLQWHUIHUHQFLDV
HQXQDLQVWDODFLyQUHVLGHQFLDO6LQHPEDUJRQRVHJDUDQWL]D
TXHQRVHSUHVHQWHQLQWHUIHUHQFLDVHQXQDLQVWDODFLyQ
HQSDUWLFXODU6LHOHTXLSRSURYRFDLQWHUIHUHQFLDVHQOD
UHFHSFLyQGHUDGLRRWHOHYLVLyQORTXHVHSXHGHGHWHUPLQDU
HQFHQGLHQGR\DSDJDQGRHOHTXLSRVHDFRQVHMDDOXVXDULR
TXHLQWHQWHFRUUHJLUODLQWHUIHUHQFLDDWUDYpVGHXQDRPiVGH
ODVVLJXLHQWHVPHGLGDV
5HRULHQWHODDQWHQDUHFHSWRUDGHUDGLRRWHOHYLVLyQ
Reubique el horno microondas con respecto al receptor.
&RORTXHHOKRUQRPLFURRQGDVDOHMDGRGHOUHFHSWRU
(QFKXIHHOKRUQRPLFURRQGDVHQXQWRPDFRUULHQWH
GLIHUHQWHGHPRGRTXHHOKRUQRPLFURRQGDV\HOUHFHSWRU
HVWpQHQGLIHUHQWHVFLUFXLWRVGHHPSDOPHV
(OIDEULFDQWHQRHVUHVSRQVDEOHGHFXDOTXLHULQWHUIHUHQFLDGH
UDGLRR79RFDVLRQDGDSRUXQDPRGLILFDFLyQQRDXWRUL]DGD
sobre este horno microondas. Es responsabilidad del usuario
FRUUHJLUGLFKDLQWHUIHUHQFLD
PRECAUCIONES PARA EVITAR POSIBLE EXPOSICIÓN
A UNA EXCESIVA ENERGÍA DE MICROONDAS.
(a) N o I n t e n t e operar este horno con la puerta abierta ya
TXHHVWRSRGUtDUHVXOWDUHQXQDH[SRVLFLyQDHQHUJtD
microondas dañina. Es importante no cancelar ni
PDQLSXODUGHIRUPDLQGHELGDORVGLVSRVLWLYRVGH
VHJXULGDG
(b) N o S i t ú e QLQJ~Q REMHWRHQWUHODSDUWHIURQWDOGHOKRUQR
y la puerta ni permita que se acumule suciedad o
UHVLGXRVOLPSLRVHQODVJRPDVGHFLHUUHKHUPpWLFR
(c) N o U s e e l h o r n o si está dañado. Es especialmente
importante que la puerta del horno se cierre
FRUUHFWDPHQWH\TXHQRVHGDxH
ODSXHUWDGREODGD
ELVDJUDV\SDVDGRUHVURWRVRVXHOWRV
VHOORVGHODSXHUWD\JRPDVGHFLHUUHKHUPpWLFR
(d) E l h o r n o n o d e b e r í a DMXVWDUVHQLUHSDUDUVHSRUQDGLH
TXHQRVHDSHUVRQDOGHVHUYLFLRDGHFXDGDPHQWH
FDOLILFDGR

5
Es posible que las funciones y apariencias varíen con relación a su modelo a lo largo del manual.
1000 Watts
Funciones del Horno
1. Manija de la Puerta.(PSXMHSDUDDEULUODSXHUWD
/DSXHUWDGHEHUiHVWDUDVHJXUDGDFRQODWUDEDSDUD
TXHODVPLFURRQGDVVHDFWLYHQ
2. Pestillos de la Puerta.
3. Ventana con Protector Metálico. SLa pantalla
SHUPLWHTXHODFRFFLyQSXHGDVHUREVHUYDGD
mientras se mantienen las microondas dentro del
horno.
4 Puerta del Filtro de Carbón 3UHVLRQHHOERWyQGRV
SDUDDEULUODSXHUWD8VWHGSXHGHFDPELDUHOILOWUR
GHFDUEyQGHPDQHUDIiFLO
5. Pantalla del Panel de Control Táctil.
6. Luz de la Placa de Cocción.
7. Filtro de Grasa.
8. Plato Giratorio Extraíble.
(OSODWRJLUDWRULR\HOVRSRUWHGHEHQHVWDUHQOD
XELFDFLyQFRUUHFWDDOXVDUHOKRUQR(OSODWRJLUDWRULR
se podrá retirar para la limpieza.
9. Placa de Calificación
NOTA: /DYHQWLODFLyQHVGHOKRUQR\ODOX]GHOKRUQR
están ubicadas en las paredes interiores del horno
microondas.
Acerca de las funciones de su horno microondas

6
Accesorios Opcionales
Kits del Panel de Relleno
JVM7195 / JNM7196
JX36DWW - Blanco
JX36DBB - Negro
JX35DSS - Acero Inoxidable
$OUHHPSOD]DUXQDFDPSDQDGHHVWXIDGHµORVNLWVGHO
SDQHOGHUHOOHQRFRPSOHWDQHODQFKRDGLFLRQDODILQGH
EULQGDUXQDVSHFWRGHFRQVWUXFFLyQDPHGLGD
6yORSDUDLQVWDODFLyQHQWUHJDELQHWHVQRDSWRSDUDOD
LQVWDODFLyQDOILQDOGHOJDELQHWH&DGDNLWFXHQWDFRQGRV
SDQHOHVGHUHOOHQRGHµGHDQFKR6RQQHFHVDULRVGRV
NLWVSDUDXQDDEHUWXUDGHµ
Kit del Filtro de Carbón con Recirculación
JX81J (número de venta)
WB02X1124 (número del servicio técnico)
/RVNLWVGHOILOWURVHXWLOL]DQFXDQGRHOKRUQRPLFURRQGDV
QRSXHGHVHUYHQWLODGRKDFLDHOH[WHULRU
Kit de Instalación del Gabinete de 15”
JX15BUMPBB - Negro
JX15BAMPW - Blanco
3DUDXVRDOLQVWDODUFRQJDELQHWHVGHµGHSURIXQGLGDG
'LVSRQLEOHSRUXQFRVWRDGLFLRQDODWUDYpVGHVX
SURYHHGRUGH*(RFRQVXOWHORVQ~PHURVGHO6HUYLFLRGH
GE.
Kits del Panel de Relleno
JX81J (número de venta)
WB02X1124 (número del servicio técnico)

Puede usar el horno microondas por tiempo o con funciones convenientes. No todos los modelos cuentan con todas las
funciones.
Controles de Cocción
Consulte la Guía de Acciones Convenientes antes de comenzar.
Acerca de las funciones de su horno microondas.
Funciones del Temporizador
Presionar Presentar
Tiempo de Cocción &DQWLGDGGHWLHPSRGHFRFFLyQ
Cocción Express ¡Comienza de inmediato
Agregar 30 segundos ¡Comienza de inmediato
Nivel de Potencia 1LYHOGHSRWHQFLDGHD
Descongelar por Peso/ Tiempo &DQWLGDGGHWLHPSRGHGHVFRQJHODFLyQ
Derretir 6HOHFFLRQHHOWLSRGHFRPLGDDGHUUHWLU
Funciones Convenientes
Presionar Presentar Opciones
Palomitas de Maíz ¡Comienza de inmediato RQ]DV
Bebida ¡Comienza de inmediato RQ]DV
Recalentar ¡Comienza de inmediato 1 a 3 Porciones
Papa ¡Comienza de inmediato 1-4
Cook
Time
Timer
On/Off
Add
30 Sec
Lock Control
Hold 3 Sec
Microwave Features
Power
Level
Display
On/Off
Set
Clock
Hold 3 Sec
Convenience Microwave
Defrost
Reheat
PotatoBeverage
Popcorn
Weight/Time
7

Acerca de las funciones de su horno microondas.
Cómo Modificar el Nivel de Potencia
(OQLYHOGHSRWHQFLDVHSRGUiLQJUHVDURPRGLILFDU
GHIRUPDLQPHGLDWDOXHJRGHLQJUHVDUHOWLHPSR
para Time Cook (Tiempo de Cocción), Time
Defrost (Tiempo de Descongelación), Add 30 Sec
(Agregar 30 Segundos) o Express Cook (Cocción
Express)(OQLYHOGHSRWHQFLDWDPELpQVHSXHGH
PRGLILFDUGXUDQWHODFXHQWDUHJUHVLYD
1. Presione Cook Time (Cocción por Tiempo).
,QJUHVHHOWLHPSRGHFRFFLyQR
GHVFRQJHODFLyQ
3. Presione Power Level (Nivel de Potencia).
6HOHFFLRQHHOQLYHOGHSRWHQFLDGHVHDGRGH1
a 10.
5. Presione Start/ Pause (Inicio/ Pausa).
Presionar Start/ Pause (Iniciar/ Pausar)
QRQHFHVDULDPHQWHDFWLYDORVERWRQHVGH
Express Cook (Cocción Express).
/RVQLYHOHVGHSRWHQFLDYDULDEOHVVXPDQ
IOH[LELOLGDGDODFRFFLyQHQHOPLFURRQGDV/RV
QLYHOHVGHSRWHQFLDGHOKRUQRPLFURRQGDVVH
SXHGHQFRPSDUDUFRQODVXQLGDGHVGHVXSHUILFLH
GHXQDFRFLQD&DGDQLYHOGHSRWHQFLDOHEULQGD
HQHUJtDGHPLFURRQGDVXQFLHUWRSRUFHQWDMH
del tiempo. El Nivel de Potencia 7HVHQHUJtD
de microondas el 70% del tiempo. El Nivel de
Potencia 3HVHQHUJtDHOGHOWLHPSR/D
PD\RUtDGHODVFRFFLRQHVVHKDUiQHQ+,$OWROR
cual le brinda el 100% de potencia.
Power level 10 1LYHOGHSRWHQFLDKDUi
ODFRFFLyQPiVUiSLGRSHURVHUiQHFHVDULR
UHYROYHUURWDURGDUYXHOWDODFRPLGDFRQPD\RU
IUHFXHQFLD8QDFRQILJXUDFLyQLQIHULRUKDUiOD
FRFFLyQPiVSDUHMD\VHQHFHVLWDUiUHYROYHU\
rotar menos la comida.
$OJXQDVFRPLGDVSRGUiQWHQHUPHMRU
VDERUWH[WXUDRDVSHFWRVLVHXVDXQDGH
ODVFRQILJXUDFLRQHVLQIHULRUHV8VHXQQLYHO
GHSRWHQFLDLQIHULRUDOFRFLQDUFRPLGDVFRQ
WHQGHQFLDDKHUYLUWDOHVFRPRSDSDVHQ
escalope.
/RVSHUtRGRVGHGHVFDQVRFXDQGRORVFLFORVGH
HQHUJtDGHPLFURRQGDVILQDOL]DQEULQGDQWLHPSR
SDUDTXHODFRPLGD´HTXLSDUHµRWUDQVILHUD
FDORUDVXLQWHULRU8QHMHPSORGHHVWRVH
muestra con el nivel de potencia 3 - el ciclo de
GHVFRQJHODPLHQWR6LODHQHUJtDGHOPLFURRQGDV
QRILQDOL]yHOFLFORODSDUWHH[WHUQDGHOD
comida se cocinará antes de que el interior esté
GHVFRQJHODGR
Estos son algunos ejemplos de usos de diferentes
niveles de potencia:
Nivel de Energía 10: 3HVFDGRWRFLQRYHUGXUDV
OtTXLGRVHQKHUYRU
Nivel de Energía 7: &RFFLyQVXDYHGHFDUQH\
DYHFDFHURODVSDUDKRUQHDU\UHFDOHQWDU
Nivel de Energía 5: &RFFLyQOHQWD\
DEODQGDPLHQWRSDUDJXLVDGRV\FRUWHVGHFDUQH
menos tiernos.
Nivel de Potencia 2 o 3: 'HVFRQJHODUKHUYLUD
IXHJROHQWRSODWRVGHOLFDGRV
Nivel de Energía 1: 0DQWHQHUODFRPLGDFDOLHQWH
ablandar la manteca.
Cook
Time
Power
Level
123
4
5
6
7
890
Start
Pause
8

Acerca de las funciones del temporizador.
Tiempo de Cocción I
Le permite cocinar en el horno microondas
por cualquier tiempo hasta 99 minutos y 99
VHJXQGRV
3RZHUOHYHO1LYHOGHSRWHQFLDVH
FRQILJXUDGHIRUPDDXWRPiWLFDSHURORSXHGH
PRGLILFDUSDUDXQDPD\RUIOH[LELOLGDG
1. Presione Cook Time (Tiempo de Cocción).
,QJUHVHHOWLHPSRGHFRFFLyQ
0RGLILTXHHOQLYHOGHSRWHQFLDVLQRGHVHD
TXHHVWpHQHOQLYHOPi[LPR3UHVLRQHNivel
de Potencia6HOHFFLRQHHOQLYHOGHSRWHQFLD
GHVHDGRGHD
4. Presione Start/ Pause (Iniciar/ Pausar).
3XHGHDEULUODSXHUWDGXUDQWH&RRN7LPH
7LHPSRGH&RFFLyQSDUDFRQWURODUODFRPLGD
Cierre la puerta y presione Start/ Pause
(Iniciar/ Pausar)SDUDUHDQXGDUODFRFFLyQ
Tiempo de Cocción II
/HSHUPLWHFDPELDUORVQLYHOHVGHHQHUJtDGH
IRUPDDXWRPiWLFDGXUDQWHODFRFFLyQ$VtHV
FRPRIXQFLRQD
3UHVLRQH&RRN7LPH7LHPSRGH&RFFLyQ
,QJUHVHHOSULPHUWLHPSRGHFRFFLyQ
0RGLILTXHHOQLYHOGHSRWHQFLDVLQRGHVHD
TXHHVWpHQHOQLYHOPi[LPR3UHVLRQHNivel
de Potencia6HOHFFLRQHHOQLYHOGHSRWHQFLD
GHVHDGRGHD
3UHVLRQHQXHYDPHQWHTime Cook (Tiempo de
Cocción).
,QJUHVHHOVHJXQGRWLHPSRGHFRFFLyQ
0RGLILTXHHOQLYHOGHSRWHQFLDVLQRGHVHD
TXHHVWpHQHOQLYHOPi[LPR3UHVLRQHNivel
de Potencia6HOHFFLRQHHOQLYHOGHSRWHQFLD
GHVHDGRGHD
7. Presione Start/ Pause (Iniciar/ Pausar).
$OILQDOL]DU7LPH&RRN,7LPH&RRN,,&RFFLyQ
SRU7LHPSR,&RFFLyQSRU7LHPSR,,VHUHDOL]D
ODFXHQWDUHJUHVLYD
Cook
Time
123
4
5
6
7
890
Start
Pause
9

Acerca de las funciones del temporizador.
Agregar 30 segundos
Puede usar esta función de dos formas:
$JUHJDUiVHJXQGRVDODFXHQWDUHJUHVLYDFDGDYH]TXHODWHFODVHSUHVLRQH
6HSXHGHXVDUFRPRIRUPDUiSLGDSDUDFRQILJXUDUVHJXQGRVGHFRFFLyQ
Cocción Express
Ésta es una forma rápida de configurar el tiempo de cocción entre 1 y 6 minutos.
Presione una de las teclas de Express Cook (Cocción Express)GHDSDUDXQDFRFFLyQGHHQWUH
y 6 minutos en power level 10 (nivel de potencia 10)3RUHMHPSORSUHVLRQHODWHFODSDUDXQWLHPSR
GHFRFFLyQGHPLQXWRV
(OQLYHOGHSRWHQFLDVHSXHGHPRGLILFDUPLHQWUDVVHHVWiUHDOL]DQGRODFXHQWDUHJUHVLYD3UHVLRQH
Power Level (Nivel de Potencia) HLQJUHVHXQDRSFLyQGHODO
123
4
5
Add
30 Sec
Melt
10
Derretir
8VHODIXQFLyQMelt (Derretir)SDUDGHUUHWLUFLHUWDVFRPLGDVSUHSURJUDPDGDV
1. Presione Melt (Derretir).
3UHVLRQHXQDGHODVWHFODVGH([SUHVV&RRN&RFFLyQ([SUHVVGHDSDUDVHOHFFLRQDUOD
comida que desea derretir.
,QJUHVHXQDFDQWLGDGGHDSDUDODFRPLGDVHOHFFLRQDGD
Presione
la Tecla
Cantidad de comida a derretir
1
2
3
Manteca
%DUUD
1 Barra
2 Barras
1
2
3
4
Caramelo
4 onzas.
8 onzas
12 onzas
16 onzas
4. Presione la tecla Start/Pause (Iniciar/ Pausar) SDUDLQLFLDUODFRFFLyQ
/DFDQWLGDGVHSXHGHPRGLILFDUPLHQWUDVVHHVWiUHDOL]DQGRODFXHQWDUHJUHVLYD,QJUHVHODV
WHFODV([SUHVV&RRN&RFFLyQ([SUHVVGHD
Presione
la Tecla
Cantidad de comida a derretir
1
2
3
4
Chocolate
4 onzas
8 onzas
12 onzas
16 onzas
1
2
3
4
0DOYDYLVFRV
5 onzas
8 onzas
10 onzas
16 onzas
Presione
la Tecla
Cantidad de comida a derretir
1Manteca
2Caramelo
3 Chocolate
4Marshmallows

Acerca de las funciones del temporizador.
11
Descongelación por Peso
/DIXQFLyQGHGHVFRQJHODFLyQSRUWLHPSR
FRQILJXUDDXWRPiWLFDPHQWHORVWLHPSRV
GHGHVFRQJHODFLyQ\ORVQLYHOHVGH
SRWHQFLDSDUDSURGXFLUUHVXOWDGRVSDUHMRV
GHGHVFRQJHODFLyQFRQFDUQHVDYHV\
pescados que pesen hasta seis libras.
1. Presione Defrost Weight/ Time
(Descongelación por Peso/ Tiempo) una
YH]
8VDQGRODJXtDGHFRQYHUVLyQLQJUHVHHO
SHVRGHODFRPLGD3RUHMHPSORSUHVLRQH
ODVWHFODV\SDUDOLEUDVOLEUD
RQ]DV
3. Presione Start/ Pause (Iniciar/ Pausar).
7LPH'HIURVW'HVFRQJHODFLyQSRU7LHPSR
VHH[SOLFDHQODVHFFLyQ7LPH)HDWXUHV
)XQFLRQHVGHO7HPSRUL]DGRU
• Retire la carne del paquete y coloque la
PLVPDHQHOSODWRGHFRFFLyQVHJXUDHQHO
microondas.
&XDQGRHOKRUQRGpODVHxDOGpYXHOWD
ODFRPLGD5HWLUHODFDUQHGHVFRQJHODGD
o cubra las partes calientes con trozos
pequeños de papel de aluminio.
/XHJRGHGHVFRQJHODUODPD\RUtD
de las carnes necesitan reposar
durante 5 minutos para completar la
GHVFRQJHODFLyQ$ODVDUGXUDQWHWLHPSR
SURORQJDGRVHGHEHUtDGHMDUUHSRVDUSRU
unos 30 minutos.
Si el peso de la comida se expresa el libras
y onzas, las onzas se deberán convertir a
décimas (.1)
Onzas Libras
1–2 .1
3 .2
4–5 .3
6–7 .4
8 .5
9–10 .6
11 .7
12–13 .8
14–15 .9
Guía de Conversión
123
4
5
6
7
890
Start
Pause
Defrost
Weight/Time

12
Acerca de las funciones del temporizador.
7LPH'HIURVW'HVFRQJHODFLyQSRU7LHPSROH
SHUPLWHGHVFRQJHODUGXUDQWHXQSHUtRGRGH
tiempo seleccionado. Consulte los tiempos
VXJHULGRVHQOD*XtDGH'HVFRQJHODFLyQ
:HLJKW'HIURVW'HVFRQJHODFLyQSRU3HVRVH
H[SOLFDHQODVHFFLyQ$XWR)HDWXUH)XQFLyQ
$XWRPiWLFD
1. Presione Defrost Weight/ Time
(Descongelación por Peso/ Tiempo) dos
YHFHV
,QJUHVHHOWLHPSRGHGHVFRQJHODFLyQ
3. Presione Start/ Pause (Iniciar/ Pausar).
'pYXHOWDODFRPLGDFXDQGRHOKRUQRGpOD
señal.
5. Presione Start/ Pause (Iniciar/ Pausar).
&XDQGRHOKRUQRGpODVHxDOGpYXHOWDOD
comida y separe o reordene los trozos para
XQDGHVFRQJHODFLyQPiVSDUHMD&XEUD
cualquier área caliente con trozos pequeños
de papel de aluminio. El horno continuará
GHVFRQJHODQGRVLQRDEUHODSXHUWD\GD
YXHOWDODFRPLGD
(OQLYHOGHSRWHQFLDVHFRQILJXUDGHIRUPD
automática en 3, pero se puede cambiar.
3XHGHGHVFRQJHODUSURGXFWRVSHTXHxRV
GHIRUPDUiSLGDLQFUHPHQWDQGRHOQLYHOGH
SRWHQFLDOXHJRGHLQJUHVDUHOWLHPSR3RZHU
OHYHO1LYHOGHSRWHQFLDUHGXFHHOWLHPSR
GHGHVFRQJHODFLyQWRWDODSUR[LPDGDPHQWHD
ODPLWDGSRZHUOHYHOQLYHOGHSRWHQFLD
UHGXFHHOWLHPSRWRWDODDSUR[LPDGDPHQWH
6LQHPEDUJRVHUiQHFHVDULRSUHVWDU
PD\RUDWHQFLyQDODFRPLGDTXHORXVXDO
(VSRVLEOHTXHVHHVFXFKHQUXLGRVGHJROSHV
VHFRVGXUDQWHODGHVFRQJHODFLyQ(VWRHV
QRUPDOFXDQGRHOKRUQRQRHVWiIXQFLRQDQGR
HQHOQLYHOGHSRWHQFLD+LJK$OWR
Consejos para la Descongelación
/DVFRPLGDVFRQJHODGDVHQSDSHORSOiVWLFR
VHSRGUiQGHVFRQJHODUHQHOSDTXHWH
Los paquetes cerrados se deberán cortar,
SHUIRUDURYHQWLODU/8(*2GHTXHODFRPLGD
VHKD\DGHVFRQJHODGRSDUFLDOPHQWH/RV
HQYDVHVGHSOiVWLFRVHGHEHUiQGHVFXEULUHQ
IRUPDSDUFLDO
/DVFRPLGDVGHWDPDxRIDPLOLDU
SUHHPSDTXHWDGDVVHSRGUiQGHVFRQJHODU\
cocinar en el horno microondas. Si la comida
VHHQFXHQWUDHQHOHQYDVHGHSDSHOGH
aluminio, traslade la misma a un plato para
XVRVHJXURHQHOKRUQRPLFURRQGDV
3DUDXQDGHVFRQJHODFLyQPiVSDUHMDGH
FRPLGDVPiVJUDQGHVWDOHVFRPRDVDGR
XVH:HLJKW'HIURVW'HVFRQJHODFLyQSRU
3HVR$VHJ~UHVHGHTXHODVFDUQHVTXHGHQ
WRWDOPHQWHGHVFRQJHODGDVDQWHVGHFRFLQDU
• Las comidas que se echan a perder con
IDFLOLGDGQRVHGHEHUiQGHMDUUHSRVDU
SRUPiVGHXQDKRUDOXHJRGHOD
GHVFRQJHODFLyQ/DWHPSHUDWXUDDPELHQWH
HVWLPXODHOGHVDUUROORGHEDFWHULDVQRFLYDV
8QDYH]GHVFRQJHODGDODFRPLGDGHEHUtD
HVWDUIUtDSHURDEODQGDGDHQWRGDVODViUHDV
6LD~QHVWiXQSRFRFRQJHODGDYXHOYDD
colocarla en el horno microondas muy
EUHYHPHQWHRGHMHUHSRVDUODPLVPDSRU
unos pocos minutos.
123
4
5
6
7
890
Start
Pause
Defrost
Weight/Time

Acerca de las funciones del temporizador.
Guía de Descongelación
Comida Tiempo Comentarios
Panes, Tortas
3DQHVEXxXHORVRSDQHFLOORVWUR]R PLQ
3DVWHOLWRVR]DSUR[ DPLQ 5HRUGHQHOXHJRGHODPLWDGGHOWLHPSR
Pescado y Mariscos
/RPRVFRQJHODGRVOE DPLQ &RORTXHHOEORTXHHQODFDFHUROD
0DULVFRVWUR]RVSHTXHxRVOE DPLQ &RORTXHHOEORTXHHQODFDFHUROD
Fruta
%ROVDGHSOiVWLFR³R DPLQ
SDTXHWHGHR]
Carne
7RFLQROE DPLQ
&RORTXHHOSDTXHWHFHUUDGRHQHOKRUQR'HMHUHSRVDUSRUPLQXWRVOXHJR
GHODGHVFRQJHODFLyQ
6DOFKLFKDV7LSR)UDQNIXUWOE DPLQ &RORTXHHOSDTXHWHFHUUDGRHQHOKRUQR&RFLQHHQHOKRUQRPLFURRQGDV
KDVWDTXHODVVDOFKLFKDVWLSR)UDQNIRUWVHSXHGDQVHSDUDU'HMHUHSRVDU
SRUPLQXWRVGHVHUQHFHVDULRSDUDFRPSOHWDUODGHVFRQJHODFLyQ
&DUQHSLFDGDOE DPLQ 'pYXHOWDOXHJRGHODSULPHUDPLWDGGHWLHPSR
$VDU%LIHFRUGHURWHUQHUDFHUGR DPLQSRUOE 8VHHOQLYHOGHSRWHQFLD:DUPFDOLHQWH
%LVWHFVFKXOHWDV WRPLQSHUOE &RORTXHODFDUQHD~QHQYXHOWDHQHOSODWRGHFRFFLyQ'pYXHOWD
GHFHUGR\FRUGHUR YXHOWDOXHJRGHODSULPHUDPLWDGGHWLHPSR\FXEUDODViUHDV
FDOLHQWHVFRQSDSHOGHDOXPLQLR/XHJRGHODVHJXQGDPLWDGGHWLHPSR
separe los trozos con un cuchillo de mesa. Espere hasta que se complete
ODGHVFRQJHODFLyQ
Ave
3ROORSDULOODIUHLGRUDFRUWH DPLQ &RORTXHHOSROORHQYXHOWRHQHOSODWR'HVHQYXHOYD\GpYXHOWDOXHJR
óDOLEUDV GHODSULPHUDPLWDGGHWLHPSR/XHJRGHODVHJXQGDPLWDGGHWLHPSR
VHSDUHORVWUR]RV\FRORTXHORVPLVPRVHQXQSODWRGHFRFFLyQ&RFLQHHQ
HOKRUQRPLFURRQGDVHQWUH\PLQXWRVPiVVLHVQHFHVDULR'HMH
UHSRVDUSRUXQRVSRFRVPLQXWRVSDUDILQDOL]DUODGHVFRQJHODFLyQ
3ROORHQWHURóDOEV DPLQ &RORTXHHOSROORHQYXHOWRHQHOSODWR/XHJRGHODSULPHUDPLWDGGH
WLHPSRGHVHQYXHOYD\GpYXHOWDHOSROOR&XEUDODVSDUWHVFDOLHQWHVFRQ
SDSHOGHDOXPLQLR3DUDFRPSOHWDUODGHVFRQJHODFLyQGHMHFRUUHUDJXD
IUtDHQODFDYLGDGKDVWDTXHVHSXHGDQUHWLUDUORVPHQXGRV
*DOOLQDGHFRUQXDOOHV DPLQSRUOE &RORTXHODJDOOLQDVLQGHVHQYROYHUHQHOKRUQRFRQODSHFKXJDKDFLD
DUULED'pYXHOWDOXHJRGHODSULPHUDPLWDGGHWLHPSR'HMHFRUUHUDJXD
SRUODFDYLGDGKDVWDTXHVHSXHGDQTXLWDUORVPHQXGRV
3HFKXJDGHSDYRDOLEUDV DPLQSRUOE &RORTXHODSHFKXJDVLQGHVHQYROYHUHQHOSODWRSDUDXVRVHJXURHQKRUQR
PLFURRQGDVFRQODSHFKXJDKDFLDDEDMR/XHJRGHODSULPHUDPLWDGGH
WLHPSRGpYXHOWDODSHFKXJDKDFLDDUULED\FXEUDODVSDUWHVFDOLHQWHV
FRQSDSHOGHDOXPLQLR'HVFRQJHOHGXUDQWHODVHJXQGDPLWDGGHOWLHPSR
'HMHUHSRVDUHQWUH\KRUDVHQHOUHIULJHUDGRUSDUDFRPSOHWDUOD
GHVFRQJHODFLyQ
13

Acerca de las funciones del Sensor.
Para usar la función Popcorn (Palomitas de Maíz):
6LJDODVLQVWUXFFLRQHVGHOSDTXHWHXVDQGR
Cook Time (Cocción con Temporizador)
si el paquete pesa menos de 2.0 onzas o
supera las 3.5 onzas. Coloque el paquete
GHSDORPLWDVGHPDt]HQHOFHQWURGHO
microondas.
2. Presione POPCORN (Palomitas de Maíz). El
horno se inicia de inmediato.
Cómo Ajustar el Programa de Cocción de
Palomitas de Maíz para Brindar un Tiempo
de Cocción Más Corto o Más Largo
Si encuentra que la marca de palomitas de
PDt]TXHXVDQROOHJDDFRFLQDURFRFLQDGH
PiVODVPLVPDVGHIRUPDFRQVLVWHQWHSXHGH
VXPDURUHVWDUHQWUH\VHJXQGRVDO
WLHPSRGHSUHSDUDFLyQDXWRPiWLFR
Para agregar tiempo:
/XHJRGHSUHVLRQDUPOPCORN (Palomitas
de Maíz), presione 9 LQPHGLDWDPHQWHOXHJR
GHTXHHOKRUQRVHLQLFLHSDUDDJUHJDU
VHJXQGRVDGLFLRQDOHVDOWLHPSRGHFRFFLyQ
automática.
9XHOYDDSUHVLRQDU9 para sumar otros 10
VHJXQGRVWRWDOL]DQGRVHJXQGRVGHWLHPSR
adicional.
Para restar tiempo:
/XHJRGHSUHVLRQDU POPCORN (Palomitas
de Maíz), presione 1LQPHGLDWDPHQWHOXHJR
de que el horno se inicie, para restar 20
VHJXQGRVDOWLHPSRGHFRFFLyQ
9XHOYDDSUHVLRQDU1 para reducir el tiempo
GHFRFFLyQRWURVVHJXQGRVWRWDOL]DQGR
VHJXQGRVPHQRVGHWLHPSRGHFRFFLyQ
Para usar la función Beverage (Bebida):
/DIXQFLyQ%HYHUDJH%HELGDFDOLHQWD
HQWUHRQ]DVLQGLYLGXDOHVGHFXDOTXLHU
bebida.
Presione la tecla BEVERAGE (Bebida). El
horno se inicia de inmediato.
El tamaño de las porciones está
FRQILJXUDGRDXWRPiWLFDPHQWHHQRQ]DV
Presione BEVERAGE (Bebida) GRVYHFHV
SDUDRQ]DVWUHVYHFHVSDUDRQ]DV\
FXDWURYHFHVSDUDRQ]DV
Las bebidas calentadas con la función
Beverage (Bebida) pueden quedar muy
calientes. Retire el envase con cuidado.
Popcorn
Beverage
14
6HQVRU)HDWXUHV)XQFLRQHVGHO6HQVRU
detectan la humedad creciente liberada
GXUDQWHODFRFFLyQ(OKRUQRDMXVWDGH
IRUPDDXWRPiWLFDHOWLHPSRGHFRFFLyQD
GLIHUHQWHVWLSRV\FDQWLGDGHVGHFRPLGD
1RXVH6HQVRU)HDWXUHV)XQFLRQHVGHO
6HQVRUGRVYHFHVVHJXLGDVHQODPLVPD
SRUFLyQGHFRPLGDHVWRSRGUiKDFHUTXHOD
FRPLGDVHVREUHFDOLHQWHGHIRUPDH[FHVLYD
RTXHVHTXHPH$VHJ~UHVHGHGHMDUTXHHO
KRUQRVHHQIUtHHQWUH\PLQXWRVDQWHV
GHLQLFLDUODVLJXLHQWHFRFFLyQFRQVHQVRU
6LODFRPLGDQRWHUPLQDGHFRFLQDUVHOXHJR
GHODFXHQWDUHJUHVLYDXVH Cook Time
(Tiempo de Cocción) para adicionar tiempo
GHFRFFLyQ
(VHVHQFLDOFRQWDUFRQHQYDVHV\
FREHUWRUHVSDUDXQDPHMRUFRFFLyQFRQ
sensor.
• Siempre utilice envases de uso seguro
en el horno microondas y cubra los
mismos con tapas o envoltorios de
plástico ventilados. Nunca use envases
de plástico sellados – pueden impedir la
VDOLGDGHYDSRU\KDFHUTXHODFRPLGDVH
sobrecaliente.
• Asegúrese de que la parte exterior de los
envases de cocción y el interior del horno
microondas estén secos antes de colocar
FRPLGDHQHOKRUQR/DVJRWDVGHKXPHGDG
TXHVHFRQYLHUWHQHQYDSRUSXHGHQDOWHUDUHO
IXQFLRQDPLHQWRGHOVHQVRUU
Cubierto
Ventilado
Seque los platos de modo que no
DOWHUHQHOIXQFLRQDPLHQWRGHOVHQVRU
8VHVyORFRQSDORPLWDVGHPDt]
preempaquetadas para hornos
de microondas que pesen entre
2.0 y 3.5 onzas.

Acerca de las funciones del Sensor.
Reheat
Papa
3HUIRUHODSLHOGHODSDSDFRQXQWHQHGRU\
coloque la misma en el horno.
2. Presione Potato (Papa). El horno se inicia
de inmediato.
3. El horno emite una señal cuando se
SURGXFHYDSRU\HOWLHPSRUHVWDQWH
FRPLHQ]DODFXHQWDUHJUHVLYD6LHV
QHFHVDULRJLUHRUHYXHOYDODFRPLGD
No abra la puerta del horno hasta que se
HVWpUHDOL]DQGRODFXHQWDUHJUHVLYD6LVHDEUH
la puerta, cierre la misma y presione Start/
Pause (Iniciar/ Pausar) de inmediato.
6LODFRPLGDQRWHUPLQDGHFRFLQDUVHOXHJRGH
ODFXHQWDUHJUHVLYDXVH Cook Time (Tiempo
de Cocción) SDUDDGLFLRQDUWLHPSRGHFRFFLyQ
Potato
15
Cómo Cambiar las
Configuraciones Automáticas
Para reducir el tiempo en un
10%:
3UHVLRQHOXHJRGHODWHFODGH
IXQFLyQ
Para sumar un 10% al tiempo
de cocción:
3UHVLRQHOXHJRGHODWHFODGH
IXQFLyQ
NOTA: 1RXVHHVWDIXQFLyQ
GRVYHFHVVHJXLGDVHQOD
PLVPDSRUFLyQGHFRPLGDHVWR
podrá hacer que la comida se
VREUHFDOLHQWHGHIRUPDH[FHVLYD
o que se queme.
NOTA: 1RXVHHVWDIXQFLyQ
GRVYHFHVVHJXLGDVHQOD
PLVPDSRUFLyQGHFRPLGD
esto podrá hacer que la
comida se sobrecaliente
GHIRUPDH[FHVLYDRTXHVH
queme.
Cómo Cambiar las
Configuraciones Automáticas
Para reducir el tiempo en un
10%:
Presione 1OXHJRGHODWHFODGH
IXQFLyQ
Para sumar un 10% al tiempo
de cocción:
Presione 9OXHJRGHODWHFODGH
IXQFLyQ
Para usar la función Reheat (Recalentar):
/DIXQFLyQ5HKHDW5HFDOHQWDUYXHOYH
a calendar las porciones de comidas
FRFLQDGDVSUHYLDPHQWHRXQSODWRFRQ
restos de comida.
1. Coloque la comida cubierta en el horno.
Presione Reheat (Recalentar). El horno se
inicia de inmediato.
2. 3UHVLRQHXQDGHODVWHFODVGH([SUHVV
&RRN&RFFLyQ([SUHVVGHDSDUD
seleccionar la comida que desea
recalentar.
Presione
la Tecla
Cantidad de comida a
Recalentar
1Plato
2Sopa
3Verduras
4Pasta
3. El horno emite una señal cuando se
SURGXFHYDSRU\HOWLHPSRUHVWDQWHLQLFLD
ODFXHQWDUHJUHVLYD
No abra la puerta del horno hasta que se
HVWpUHDOL]DQGRODFXHQWDUHJUHVLYD6LVHDEUH
la puerta, cierre la misma y presione Start/
Pause (Inicio/ Pausa) de inmediato.
Luego de retirar la comida del horno,
revuelva, si es posible, para emparejar la
temperatura. Si la comida no se calentó
lo suficiente, use Cook Time (Tiempo
de Cocción) para recalentar durante
más tiempo. Las comidas recalentadas
podrán tener amplias variaciones de
temperatura. Algunas partes de la comida
podrán estar extremadamente calientes.
6LODFRPLGDQRVHFDOHQWyORVXILFLHQWH
OXHJRGHODFXHQWDUHJUHVLYDXVHODIXQFLyQ
&RRN7LPH7LHPSRGH&RFFLyQSDUD
adicionar tiempo de recalentamiento.
Algunas Comidas No Recomendadas para
Uso con la Función de Recalentamiento:
(VPHMRUXVDU&RRN7LPH7LHPSRGH
&RFFLyQSDUDHVWDVFRPLGDV
• Productos con pan.
• Comidas que se deben recalentar sin estar
cubiertas.
&RPLGDVTXHVHGHEHQUHYROYHURJLUDU
• Comidas que deben tener un aspecto
VHFRRXQDVXSHUILFLHFURFDQWHOXHJRGH
recalentar.

Acerca de otras funciones.
Recordatorio de Cocción Completa
3DUDUHFRUGDUOHTXHFRORFyFRPLGDHQHOKRUQRHVWH~OWLPRPRVWUDUi´(QGµ)LQ\HPLWLUiXQ
SLWLGRXQDYH]SRUPLQXWRKDVWDTXHDEUDHOKRUQRRSUHVLRQHHOERWyQCancel/ Off (Cancelar/
Apagar).
Configurar el Reloj
3UHVLRQHSDUDLQJUHVDUODKRUDGHOGtDRSDUD
YHUODKRUDGHOGtDPLHQWUDVFRFLQDFRQHOKRUQR
microondas.
1. Presione Set Clock (Configurar el Reloj).
,QJUHVHODKRUDGHOGtD
3. Presione Start (Iniciar) o Set Clock
(Configurar el Reloj).
3DUDFRQWURODUODKRUDGHOGtDPLHQWUDVFRFLQD
en el horno microondas, presione la tecla Set
Clock (Configurar el Reloj).
Bloqueo para Niños
3XHGHEORTXHDUHOSDQHOGHFRQWUROSDUDHYLWDU
TXHHOPLFURRQGDVVHLQLFLHGHIRUPDDFFLGHQWDO
o sea usado por niños.
Para bloquear o desbloquear los controles,
PDQWHQJDSUHVLRQDGR6HW&ORFN&RQILJXUDUHO
5HORMGXUDQWHXQRVWUHVVHJXQGRV&XDQGRHO
SDQHOGHFRQWUROHVWpEORTXHDGRVHYLVXDOL]DUi
HQODSDQWDOOD/2&.('%ORTXHDGR
Limpieza al Vapor
8VHODIXQFLyQ6WHDP&OHDQ/LPSLH]DDO9DSRU
SDUDOLPSLDUODSDUWHLQWHUQDFRQYDSRUGH
IRUPDIiFLO
3UHVLRQHHOERWyQSteam Clean (Limpieza al
Vapor).
&RORTXHHOUHFLSLHQWHGHYDSRUFRQGH
WD]DGHDJXD
3. Presione el dial o Start/Pause (Iniciar/
Pausar) para comenzar.
/XHJRGHXVDU6WHDP&OHDQ/LPSLH]DDO
9DSRUUHWLUHHO3ODWR*LUDWRULR\HO6RSRUWH
del Plato Giratorio y limpie la parte interna de
ODFDYLGDGGHOKRUQRFRQXQDWRDOODGHSDSHO
RWHODVXDYH
Pantalla Encendida/ Apagada
3DUDHQFHQGHURDSDJDUODSDQWDOODGHOUHORMPDQWHQJDSUHVLRQDGRHOERWyQDisplay On/Off
(Pantalla Encendida/ Apagada)SRUXQRVVHJXQGRV/DIXQFLyQDisplay On/ Off (Pantalla
Encendida/ Apagada) QRSXHGHVHUXVDGDPLHQWUDVXQDIXQFLyQGHFRFFLyQHVWpHQXVR
Lock Control
Hold 3 Sec
Set
Clock
Start
Pause
Steam
Clean
Turntable
On/Off
Timer
On/Off
Display
On/Off
Hold 3 Sec
Iniciar/ Pausar
$GHPiVGHLQLFLDUPXFKDVIXQFLRQHVStart/ Pause (Iniciar/ Pausar) OHSHUPLWHGHMDUGHFRFLQDU
sin abrir la puerta ni borrar la pantalla. Presione Start/ Pause (Iniciar/ Pausar)QXHYDPHQWHSDUD
reiniciar el horno.
Plato Giratorio
3DUDREWHQHUPHMRUHVUHVXOWDGRVHQVXFRFFLyQGHMH
HOSODWRJLUDWRULRHQFHQGLGR/RSRGUiDSDJDUDOXVDU
SODWRVPiVJUDQGHV3UHVLRQHTURNTABLE (Plato
Giratorio)SDUDHQFHQGHURDSDJDUHOSODWRJLUDWRULR
A veces, es posible que el plato giratorio se caliente
demasiado como para que se pueda tocar. Se
GHEHUiWHQHUFXLGDGRGHQRWRFDUHOSODWRJLUDWRULR
GXUDQWH\OXHJRGHODFRFFLyQ.
Temporizador de Encendido/ Apagado
Timer On/ Off (Temporizador Encendido/
Apagado)IXQFLRQDFRPRXQWHPSRUL]DGRU
por minutos y puede ser usado en cualquier
momento, incluso cuando el horno está
IXQFLRQDQGR
1. Presione TIMER ON/OFF (Temporizador
Encendido/ Apagado).
,QJUHVHHOWLHPSRGHFXHQWDUHJUHVLYDTXH
desee.
3. Presione TIMER ON/OFF (Temporizador
Encendido/ Apagado) para comenzar.
Cuando el tiempo concluya, el temporizador
HPLWLUiXQDVHxDO3DUDDSDJDUODVHxDO
del temporizador, presione TIMER ON/OFF
(Temporizador Encendido/ Apagado).
NOTA: El indicador de tiempo se iluminará
PLHQWUDVHOWHPSRUL]DGRUHVWpIXQFLRQDQGR
16

17
Acerca de otras funciones.
Ventilador Extractor
(OYHQWLODGRUH[WUDFWRUHOLPLQDHOYDSRU\RWURVYDSRUHVGHODFRFFLyQVREUHODVXSHUILFLH
3UHVLRQH9HQW)DQ9HQWLODGRU([WUDFWRUXQDYH]SDUDLQFUHPHQWDUODYHORFLGDGGHOYHQWLODGRUGRVYHFHV
SDUDDFWLYDUORHQYHORFLGDGDOWDWUHVYHFHVSDUDDFWLYDUORHQYHORFLGDGEDMD\XQDFXDUWDYH]SDUDDSDJDU
el mismo.
Ventilador Automático
/DIXQFLyQGHOYHQWLODGRUDXWRPiWLFRSURWHJHHOKRUQRPLFURRQGDVGHXQDHOHYDFLyQGHFDORU
H[FHVLYRSURYHQLHQWHGHODFRFLQDGHEDMRGHpVWH6HHQFLHQGHGHIRUPDDXWRPiWLFDHQEDMD
YHORFLGDGVLHOVHQVRUGHWHFWDGHPDVLDGRFDORU
6LHQFHQGLyHOYHQWLODGRUHVSRVLEOHTXHREVHUYHTXHQRORSXHGHDSDJDU(OYHQWLODGRUVHDSDJDUi
GHIRUPDDXWRPiWLFDXQDYH]TXHODVSDUWHVLQWHUQDVHVWpQDSDJDGDV3RGUiSHUPDQHFHU
HQFHQGLGRSRUPLQXWRVRPiVOXHJRGHTXHORVFRQWUROHVGHODFRFLQDRGHOKRUQRPLFURRQGDV
HVWpQDSDJDGRV
Vent Fan
Luz de la Superficie
3UHVLRQHHVWDWHFODSDUDHQFHQGHURDSDJDUODOX]GHO
horno.
$OJXQRVPRGHORVFXHQWDQFRQODRSFLyQGHOX]
nocturna.
Presione Surface Light (Luz de la Superficie) XQDYH]
SDUDDFWLYDUODOX]EULOODQWHGRVYHFHVSDUDDFWLYDUOD
OX]QRFWXUQDRWUHVYHFHVSDUDDSDJDUODOX]
Mudo
(OQLYHOGHVRQLGRGHOSLWLGRVHSXHGHXELFDUHQPXGR
Presione Mute On/ Off (Mudo Encendido/ Apagado).
Surface
Light
Mute
On/Off
Settings
Settings
Settings
Modo de Reloj
3XHGHPRGLILFDUODSDQWDOODGHOUHORMDORV
modos de 12 hrs. o 24 hrs.
3UHVLRQH6HWWLQJV&RQILJXUDFLRQHV
3UHVLRQHODWHFODGH([SUHVV&RRN&RFFLyQ
([SUHVV
6HOHFFLRQHVKUVKUV
1 - 12 hrs
2- 24 hrs
Velocidad de la Pantalla
3XHGHPRGLILFDUODYHORFLGDGGHODSDQWDOOD
3UHVLRQH6HWWLQJV&RQILJXUDFLRQHV
3UHVLRQHODWHFODGH([SUHVV&RRN&RFFLyQ
([SUHVV
6HOHFFLRQHHOQXHYRWLSRGHYHORFLGDG
1 - lento
2 - normal
3 - rápido
Nivel del Sonido
3XHGHPRGLILFDUHOQLYHOGHOVRQLGR
3UHVLRQH6HWWLQJV&RQILJXUDFLRQHV
3UHVLRQHODWHFODGH([SUHVV&RRN&RFFLyQ
([SUHVV
6HOHFFLRQHHOQLYHOGHVRQLGR
0 - mudo
1EDMR
2 - normal
3 - alto
Reinicie Botón del Filtro
/DOX]VHLOXPLQDUiOXHJRGHDSUR[LPDGDPHQWH
PHVHVDILQGHDOHUWDUDOXVXDULRVREUHHO
UHHPSOD]RGHOILOWURGHFDUEyQVLVHXVD\VREUHOD
OLPSLH]DUHHPSOD]RGHORVILOWURVGHJUDVD5HLQLFLH
PDQWHQLHQGRSUHVLRQDGRGXUDQWHVHJXQGRV
Recordatorio de Reemplazo del Filtro
(OILOWURGHFDUEyQJUDVDGHEHUiVHUUHHPSOD]DGR
FXDQGRHVWpQRWRULDPHQWHVXFLRGHVFRORULGR
QRUPDOPHQWHOXHJRGHHQWUH\PHVHV
GHSHQGLHQGRGHOXVRGHODFDPSDQDRFXDQGRVH
HQFLHQGDODOX]/('GHUHHPSOD]RGHOILOWUR
&XDQGRODOX]/('GH)LOWHU5HSODFH5HHPSOD]RGHO
)LOWURVHHQFLHQGDUHHPSODFHHOILOWUR\PDQWHQJD
SUHVLRQDGR5HVHW)LOWHU5HLQLFLDUHO)LOWURGXUDQWH
VHJXQGRVSDUDUHDOL]DUHO
reinicio.
Reset
Filter

Términos del Microondas.
Arco
Eléctrico
Arco eléctrico es el término que se usa
para definir la producción de chispas en el
horno microondas. Los arcos eléctricos son
producidos por:
• Metal o papel de aluminio en contacto con el
costado del horno.
• Papel de aluminio no moldeado a la comida
(los extremos doblados actúan como antenas).
• Metales, tales como precintos, pinchos de ave,
o platos con rebordes dorados.
• Toallas de papel reciclable que contengan
pequeños trozos de metal.
• Platos o vajillas con bordes metálicos o con
una capa de brillo metálico.
Tapa
Las tapas retienen la humedad, permiten
calentar de forma más pareja y reducen el
tiempo de cocción.
Ventilar los envoltorios de plástico o tapas
con papel para alimentos permite la salida de
vapor excesivo.
Cubrir
En un horno normal, usted cubre las pechugas
de pollo o comidas asadas para evitar que
se doren en exceso. Al cocinar en el horno
microondas, deberá usar pequeñas tiras de
papel de aluminio para cubrir partes pequeñas,
tales como puntas de alas y patas de aves,
que se podrían cocinar antes que las partes
grandes.
Tiempo de
Inactividad
Al cocinar con hornos regulares, las comidas
asadas o las tortas se pueden dejar hasta
finalizar la cocción o el tiempo programado.
El tiempo en espera es especialmente
importante en la cocción en el horno
microondas. Se debe observar que una torta
cocinada en un horno microondas no se coloca
en un estante de refrigeración.
Ventilación
Luego de cubrir un plato con un envoltorio
plástico, este último se ventila dando vuelta un
extremo de modo tal que el vapor pueda salir.
18

Cuidado y limpieza del horno microondas.
Consejos Útiles
8QDOLPSLH]DFRPSOHWDGHIRUPDRFDVLRQDOFRQXQDVROXFLyQGHELFDUERQDWR\DJXDPDQWLHQHHO
LQWHULRUIUHVFR
Desenchufe el cable antes de limpiar cualquier parte del horno.
Cómo Limpiar el Interior
Paredes, Piso, Ventana Interior, Partes Metálicas y Plásticas de la Puerta
$OJXQDVVDOSLFDGXUDVVHSXHGHQHOLPLQDUFRQXQDWRDOODGHSDSHORWUDVSXHGHQUHTXHULUXQDWHOD
K~PHGD(OLPLQHVDOSLFDGXUDVGHJUDVDFRQXQDWHODFRQMDEyQ\OXHJRHQMXDJXHFRQXQDWHOD
K~PHGD1RXVHOLPSLDGRUHVDEUDVLYRVQLXWHQVLOLRVSXQWLDJXGRVVREUHODVSDUHGHVGHOKRUQR
Para limpiar la superficie del horno y la superficie del horno que se une al cerrar, use sólo
jabones suaves y no ásperos o detergentes con una esponja o tela suave. Enjuague con una
tela húmeda y seca.
Nunca use un limpiador para hornos comerciales en ninguna parte de su horno
microondas.
Plato Giratorio y Soporte Giratorio Extraíbles
3DUDHYLWDUURWXUDVQRFRORTXHHOSODWRJLUDWRULRHQDJXDOXHJRGHFRFLQDU/DYHHOPLVPR
FXLGDGRVDPHQWHFRQDJXDWLELD\MDEyQRHQHOODYDYDMLOODV(OSODWRJLUDWRULR\HOVRSRUWHVHSXHGHQ
URPSHUHQFDVRGHFDtGD5HFXHUGHTXHQRVHGHEHXVDUHOKRUQRVLHOSODWRJLUDWRULR\HOVRSRUWHQR
VHHQFXHQWUDQHQVXOXJDU
1 2 3
4 5 6
7 8 9
Power
0
Level
Set
Clock
Turntable
Cook
Time
Timer
On/Off
Add
30 Sec
Clock Display
Express Cook
Sensor Cooking
Defrost
Reheat
Vegetable
PotatoBeverage
Popcorn
Weight/Time
Cancel
Off
Start
Pause
Cómo Limpiar el Área Exterior
No use limpiadores que contengan amoníacos o alcohol en el horno microondas. El
amoníaco o el alcohol pueden dañar el aspecto del horno microondas.
Cubierta Superior
/LPSLHHOiUHDH[WHULRUGHOKRUQRPLFURRQGDVFRQXQDWHODFRQMDEyQ(QMXDJXHFRQXQDWHOD
K~PHGD\OXHJRVHTXH/LPSLHODYHQWDQDFRQXQDWHODK~PHGD
Panel de Control y Puerta
/LPSLHFRQXQDWHODK~PHGD6HTXHWRWDOPHQWH1RXVHHVSUiLVOLPSLDGRUHVJUDQGHVFDQWLGDGHV
GHDJXD\MDEyQREMHWRVDEUDVLYRVRSXQWLDJXGRVVREUHHOSDQHO\DTXHORSXHGHQGDxDU$OJXQDV
toallas de papel también pueden rayar el panel de control.
Superficie de la Puerta
Es importante mantener el área limpia donde la puerta se selle contra el horno microondas. Use
VyORGHWHUJHQWHVVXDYHV\QRDEUDVLYRVFRQXQDHVSRQMDOLPSLDRWHODVXDYH(QMXDJXHELHQ
Cable de Corriente
6LHOFDEOHVHHQVXFLDGHVHQFKXIH\ODYHFRQXQDWHODK~PHGD(QFDVRGHPDQFKDVGLItFLOHVGH
TXLWDUVHSRGUiXVDUDJXDFRQMDEyQSHURDVHJ~UHVHGHHQMXDJDUFRQXQDWHODK~PHGD\GHVHFDU
completamente antes de conectar el cable en el tomacorriente.
Acero Inoxidable (en algunos modelos)
No use virutas de acero; éstas dañarán la superficie.
3DUDOLPSLDUODVXSHUILFLHGHDFHURLQR[LGDEOHXVHXQDWHODFDOLHQWH\K~PHGDFRQXQGHWHUJHQWH
VXDYHDGHFXDGRSDUDVXSHUILFLHVGHDFHURLQR[LGDEOH8VHXQDWHODOLPSLDFDOLHQWH\K~PHGDSDUD
HOLPLQDUHOMDEyQ6HTXHFRQXQDWHODOLPSLD\VHFD6LHPSUHIULHJXHODVXSHUILFLHHQODGLUHFFLyQGHO
YHWHDGR
T
u
r
n
t
o
S
e
l
e
c
t
P
r
e
s
s
t
o
E
n
t
e
r
Reheat
Timer
On/Off
Defrost
Weight/Time
Start
Pause
Cancel
Off
Lock Controls
Hold 3 Sec
Cook
Time
Set
Clock
Options Help
Surface
Light
Vent Fan
Popcorn
Beverage
Microwave
Express
Warm
Power
Level
Auto
Cook
Combination
Fast Bake
Convection
Roast
Turntable
Convection
Bake
T
u
r
n
t
o
S
e
l
e
c
t
P
r
e
s
s
t
o
E
n
t
e
r
Reheat
Timer
On/Off
Defrost
Weight/Time
Start
Pause
Cancel
Off
Lock Controls
Hold 3 Sec
Cook
Time
Set
Clock
Options Help
Surface
Light
Vent Fan
Warm
Power
Level
Auto
Cook
Combination
Fast Bake
Convection
Roast
Turntable
Convection
Bake
19

Cuidado y limpieza del horno microondas.
Luz de la Cocina/ Luz Nocturna
Reemplace por lámparas halógenas de 120
voltios y 40 watts (máximo). Ordene la pieza
WB08X10051 a su proveedor de GE.
3DUDUHHPSOD]DUODOX]GHODFRFLQDOX]
nocturna, primero desconecte el encendido
GHOIXVLEOHSULQFLSDORGHOSDQHOGHO
GLV\XQWRURGHVHQFKXIHHOFDEOH
2. Retire el tornillo del costado de la tapa del
FRPSDUWLPLHQWRGHODOX]\EDMHODWDSD
KDVWDTXHVHGHWHQJD
$VHJ~UHVHGHTXHODOiPSDUDVHHQIUtH
antes de retirar la misma. Rompa el sello
DGKHVLYRGHVHQURVFDQGRODOiPSDUDGH
IRUPDVXDYH
(QURVTXHODQXHYDOiPSDUDOXHJROHYDQWH
ODWDSDGHODOX]\YXHOYDDFRORFDUHO
tornillo. Conecte el cable de electricidad del
horno.
T
u
r
n
S
t
o
e
e
l
c
t
P
r
e
s
s
E
n
t
o
t
e
r
Reheat
On/Off
Timer
Defrost
Weight/Time
Paus
Start
e
Off
Cancel
Lock Controls
Hold ٣ Sec
Cook
Time Clock
Set
Options Help
Surf
Light
ace
Vent Fan
Combinatio
Fast Bake
n
Roas
Convection
t
Turntable
Bake
Convection
T
u
r
n
S
t
o
e
e
l
c
t
P
r
e
s
s
E
n
t
o
t
e
r
Reheat
On/Off
Timer
Defrost
Weight/Time
Paus
Start
e
Off
Cancel
Lock Controls
Hold ٣ Sec
Cook
Time Clock
Set
Options Help
Surf
Light
ace
Vent Fan
Popcorn
Beverage
Micr
Expr
owav
ess
e
Warm
Power
Level
Aut
Cook
o
Combinatio
Fast Bake
n
Roas
Convection
t
Turntable
Bake
Convection
Remove screw.
Ventilador
(OYHQWLODGRUFXHQWDXQILOWURGHJUDVDPHWiOLFR
reusable.
Los modelos que hacen recircular el aire
QXHYDPHQWHKDFLDODKDELWDFLyQWDPELpQ
XVDQXQILOWURGHFDUEyQ
T
u
r
n
t
o
S
e
l
e
c
t
P
r
e
s
s
t
o
E
n
t
e
r
Reheat
Timer
On/Off
Defrost
Weight/Time
Start
Pause
Cancel
Off
Lock Controls
Hold 3 Sec
Cook
Time
Set
Clock
Options Help
Surface
Light
Vent Fan
Popcorn
Beverage
Microwave
Express
Warm
Power
Level
Auto
Cook
Combination
Fast Bake
Convection
Roast
Turntable
Convection
Bake
Filtro de Grasa Rehusable
(OILOWURGHJUDVDUHKXVDEOHDWUDSDODJUDVD
liberada por las comidas en la placa de
FRFFLyQ7DPELpQHYLWDTXHODVOODPDVGH
ODVFRPLGDVHQODSODFDGHFRFFLyQGDxHQHO
interior del horno microondas.
3RUHVWDUD]yQORVILOWURV6,(035(GHEHQ
HVWDUHQHOOXJDUFRUUHFWRFXDQGRVHXVHOD
FDPSDQD/RVILOWURVGHJUDVDGHEHUtDQVHU
OLPSLDGRVXQDYH]SRUPHVRFXDQGRVHD
necesario..
Retiro y Limpieza de los Filtros
Para retirarlos, deslice los mismos sobre la
SDUWHWUDVHUDXVDQGRODVOHQJHWDV(PSXMH
KDFLDDEDMR\DIXHUD
3DUDOLPSLDUORVILOWURVGHODYHQWLODFLyQPRMH
ORVPLVPRV\OXHJRDJtWHORVHQDJXDFDOLHQWH
\GHWHUJHQWH1RXVHDPRQtDFRQLSURGXFWRV
GHDPRQtDFR\DTXHRVFXUHFHUiQHOPHWDO
6HSRGUiFHSLOODUVXDYHPHQWHSDUDUHWLUDUOD
suciedad incrustada.
(QMXDJXHVDFXGD\GHMHVHFDUDQWHVGHUHDOL]DU
el reemplazo.
Para volver a colocarlos, GHVOLFHORVILOWURVSRU
las ranuras de la estructura en la parte trasera
de cada abertura. Presione hacia arriba y hacia
HOIUHQWHSDUDTXHTXHGHQEORTXHDGRV
T
u
r
n
t
o
S
e
l
e
c
t
P
r
e
s
s
t
o
E
n
t
e
r
Reheat
Timer
On/Off
Defrost
Weight/Time
Start
Pause
Cancel
Off
Lock Controls
Hold 3 Sec
Cook
Time
Set
Clock
Options Help
Surface
Light
Vent Fan
Popcorn
B
everage
Microwave
Express
Warm
Power
Level
Auto
Cook
Combination
Fast Bake
Convection
Roast
Turntable
Convection
Bake
Reusable vent filters
(on all models).
Charcoal filter
20

Cuidado y limpieza del horno microondas.
Filtro de Carbón
(OILOWURGHFDUEyQQRSXHGHVHUOLPSLDGR
Debe ser reemplazado. Ordene la Pieza Nº
-;-Q~PHURGHYHQWDR:%;
Q~PHURGHOVHUYLFLRDVXSURYHHGRUGH*(
6LHOPRGHORQRWLHQHYHQWLODFLyQKDFLD
DIXHUDHODLUHVHUiUHFLUFXODGRDWUDYpVGH
XQILOWURGHFDUEyQGHVFDUWDEOHTXHD\XGHD
retirar el humo y los olores.
(OILOWURGHFDUEyQGHEHUtDVHUUHHPSOD]DGR
cuando esté notoriamente sucio o
GHVFRORULGR(OILOWURGHFDUEyQGHEHUiVHU
reemplazado cada 6 meses o cuando la luz
/('HVWpHQFHQGLGD3DUDPiVLQIRUPDFLyQ
FRQVXOWH´.LWV2SFLRQDOHVµHQODSiJLQD
Para Retirar el Filtro de Carbón
3DUDUHWLUDUHOILOWURGHFDUEyQSULPHUR
GHVFRQHFWHODFRUULHQWHGHVGHHOIXVLEOH
SULQFLSDORGLV\XQWRURHPSXMHHOFDEOH
$EUDODSXHUWDGHOILOWURSUHVLRQDQGRORV
2 botones que se encuentran en la parte
VXSHULRUGHOKRUQRPLFURRQGDVMXVWRVREUHOD
SXHUWDGHOILOWUR
(PSXMHHOILOWURHQODSDUWHLQIHULRUKDVWDTXH
VHOLEHUHGHODVOHQJHWDVGHEORTXHR'HVOLFH
HOILOWURKDFLDDEDMR\DIXHUD
Para Instalar el Filtro de Carbón
3DUDLQVWDODUXQQXHYRILOWURUHWLUHHOSOiVWLFR
\RWURVHQYROWRULRVH[WHUQRVGHOQXHYRILOWUR
,QVHUWHHOILOWURHQHOODGRL]TXLHUGRGHOD
DEHUWXUDIURQWDOVXSHULRUGHOKRUQRFRPR
VHPXHVWUD'HVFDQVDUiHQXQiQJXORVREUH
OHQJHWDVGHVRSRUWHODWHUDO\IUHQWHDOD
OHQJHWDWUDVHUDGHUHFKD&LHUUHODSXHUWDGHO
ILOWUR
21

Cosas que son Normales de su Horno Microondas
Cosas que son Normales de su Horno
Microondas
5HIOHMRGHOX]DOUHGHGRUGHODSXHUWDRODFXELHUWD
H[WHULRU
Luz del horno tenue y cambio del sonido del
SLWLGRHQQLYHOHVGHSRWHQFLDTXHQRVRQDOWRV
5XLGRGHJROSHVVHFRVPLHQWUDVHOKRUQRHVWiHQ
IXQFLRQDPLHQWR
6HSRGUiQREVHUYDULQWHUIHUHQFLDVGH79UDGLR
PLHQWUDVXVDHOKRUQRPLFURRQGDV'HIRUPD
VLPLODUDODLQWHUIHUHQFLDFDXVDGDSRURWURV
electrodomésticos pequeños, esto no indica que
H[LVWDXQSUREOHPDFRQHOKRUQRPLFURRQGDV
(QFKXIHHOKRUQRPLFURRQGDVHQXQFLUFXLWR
HOpFWULFRGLIHUHQWHDOHMHODUDGLRROD79WDQWR
como sea posible del horno microondas, o
FRQWUROHODSRVLFLyQ\ODVHxDOGHODDQWHQDGHOD
79UDGLR
Consejos para Solucionar Problemas.
Problema Causa Posible Qué Hacer
El horno no se inicia Es posible que un fusible de
su hogar se haya quemado
o que el disyuntor se haya
desconectado.
5HHPSODFHHOIXVLEOHRUHLQLFLHHOGLV\XQWRU
Pico de tensión. 'HVHQFKXIHHOKRUQRPLFURRQGDVOXHJRYXHOYDD
HQFKXIDUOR
El enchufe no está totalmente
insertado en el tomacorriente.
$VHJ~UHVHGHTXHHOFDEOHGHSDWDVGHOKRUQR
esté completamente insertado en el tomacorriente.
La puerta no está cerrada de
forma segura.
$EUDODSXHUWD\FLHUUHODPLVPDGHIRUPDVHJXUD
El piso del horno está
caliente, incluso cuando el
KRUQRQRIXHXVDGR
El calor de la luz de la placa de
cocción podrá hacer que el piso
del horno se caliente.
Esto es normal.
´/2&.('µ%ORTXHDGR
aparece en la pantalla
El control fue bloqueado. 0DQWHQJDSUHVLRQDGR6(7&/2&.&RQ¿JXUDUHO
5HORM
SRUXQRVVHJXQGRVSDUDGHVEORTXHDUHO
control.
(VFXFKDXQDWtSLFRSLWLGR
HQWRQREDMR
Intentó iniciar el Recordatorio
sin una hora del día válida.
&RPLHQFHQXHYDPHQWHHLQJUHVHXQDKRUDGHOGtD
YiOLGD
Intentó cambiar el nivel
de potencia cuando no es
permitido.
0XFKDVGHODVIXQFLRQHVGHOKRUQRHVWiQ
SUHFRQILJXUDGDV\QRVHSXHGHQPRGLILFDU
´6(1625(5525µ(UURU
GHO6HQVRUDSDUHFHHQOD
pantalla.
Al usar una función de Sensor, la
puerta fue abierta antes de que
se pudiera detectar el vapor.
1RDEUDODSXHUWDKDVWDTXHVHVLHQWDHOYDSRU\
HOWLHPSRVHPXHVWUHHQFXHQWDUHJUHVLYDHQOD
pantalla.
No se detectó vapor en una
cantidad de tiempo máxima.
8VH7LPH&RRN&RFFLyQSRU7LHPSRSDUDFDOHQWDU
durante más tiempo.
Cantidad de comida
GHPDVLDGRJUDQGHSDUDHO
Sensor
Sensor Reheat (Recalentar
con Sensor) es para porciones
individuales de comidas
recomendadas.
8VH7LPH&RRN&RFFLyQSRU7LHPSRSDUDJUDQGHV
cantidades de comida.
22

23
Garantía del Horno Microondas de GE.
Todo el servicio de garantía es provisto por nuestros Centros de
Servicio de Fabricación, o un técnico autorizado de Customer Care®
durante el horario comercial. Para programar una consulta del servicio
técnico a través del Internet, las 24 horas, visítenos en GEAppliances.
com, o llame al 800. GE.CARES (800.432.2737). Cuando llame para
solicitar el servicio, tenga los números de serie y modelo disponibles.
Esta garantía se extiende al comprador original y a cualquier dueño subsiguiente de productos comprados para uso hogareño dentro
de EE.UU. Si el producto se encuentra en un área donde no se encuentra disponible el servicio técnico de un Proveedor de Servicios de
GE Autorizado, usted será responsable por el costo de un viaje o se podrá requerir que traiga el producto a una Ubicación del Servicio
Técnico de GE Autorizado para recibir el servicio. En Alaska, la garantía excluye las llamadas del servicio a su hogar.
Algunos estados no permiten la exclusión o limitación de daños fortuitos o consecuentes. Esta garantía le da derechos legales
específicos y es posible que tenga otros derechos legales que varían entre un estado y otro. Para conocer cuáles son sus derechos
legales, consulte a la oficina de asuntos del consumidor local o estatal o al Fiscal de su estado.
Garante: General Electric Company. Louisville, KY 40225
Abroche su recibo aquí. Para
acceder al servicio técnico
de acuerdo con la garantía
deberá contar con la prueba
de la fecha original de compra.
(;&/86,Ï1'(*$5$17Ë$6,03/Ë&,7$6³6X~QLFD\H[FOXVLYDDOWHUQDWLYDHVODUHSDUDFLyQGHOSURGXFWRFRPRVHLQGLFDHQ
la Garantía Limitada. Las garantías implícitas, incluyendo garantías implícitas de comerciabilidad o conveniencia sobre
un propósito particular, se limitan a un año o al período más corto permitido por la ley.
Viajes del técnico del servicio a su hogar para enseñarle
sobre cómo usar el producto.
Instalación, entrega o mantenimiento inadecuados. Si
tiene un problema con la instalación, comuníquese con su
vendedor o instalador. Usted es responsable de brindar
instalaciones adecuadas de conexión eléctrica, escape u
otras instalaciones de conexión.
Falla del producto o daño sobre el producto si se produce un
abuso, uso inadecuado (por ejemplo: arco eléctrico en una
cavidad de la rejilla o metal/ papel de aluminio), o uso diferente
para el cual fue diseñado o uso comercial.
Reemplazo de fusibles de la casa o reinicio de disyuntores.
Daños ocasionados sobre el producto por accidente,
incendio, inundaciones o catástrofes naturales.
Daños consecuentes o incidentales causados por posibles
defectos sobre este producto.
Daño causado después de la entrega.
Producto no accesible para brindar el servicio requerido.
Solicite el servicio técnico para reparar o reemplazar las
lámparas, excepto las lámparas LED.
Daños sobre el acabado, tales como óxido sobre la superfi-
cie, deslustres o manchas pequeñas no informadas dentro
de las 48 horas luego de la entrega.
Qué No Cubrirá GE:
Por el Período de: GE Reemplazará o Brindará Servicio Técnico:
Un año
Desde la fecha de la
compra original
Si es necesario el servicio técnico, GE reemplazará cualquier parte del horno microondas que
IDOOHGHELGRDXQGHIHFWRHQORVPDWHULDOHVRODIDEULFDFLyQ Durante esta garantía limitada de un
año*(WDPELpQSURYHHUiVLQFRVWRWRGRHOWUDEDMR\ORVFRVWRVGHOVHUYLFLRUHODFLRQDGRFRQHO
UHHPSOD]RGHODSDUWHTXHSUHVHQWHGHIHFWRV

Impreso en Malaysia
Soporte al Cliente.
Sitio Web de Electrodomésticos de GE
GEAppliances.com
¢'HVHDUHDOL]DUXQDFRQVXOWDRQHFHVLWDD\XGDFRQVXHOHFWURGRPpVWLFR"£,QWHQWHDWUDYpVGHO6LWLR:HEGH
(OHFWURGRPpVWLFRVGH*(ODVKRUDVGHOGtDFXDOTXLHUGtDGHODxR3DUDPD\RUFRQYHQLHQFLD\XQVHUYLFLRPiV
UiSLGRDKRUDSXHGHGHVFDUJDUHO0DQXDOGHO3URSLHWDULRRUGHQDUSLH]DVFDWiORJRVRLQFOXVRXQVHUYLFLRSURJUDPDGR
DWUDYpVGH,QWHUQHW7DPELpQSXHGHKDFHUVXVSUHJXQWDVD´$VN2XU7HDPRI([SHUWVµ3UHJ~QWHOHD1XHVWUR(TXLSR
GH([SHUWRV\PXFKRPiV«
Estudio de Diseño de la Vida Real GEAppliances.com
*(DSR\DHOFRQFHSWRGH'LVHxR8QLYHUVDO²SURGXFWRVVHUYLFLRV\DPELHQWHVTXHSXHGHQVHUXVDGRVSRUSHUVRQDVGH
WRGDVODVHGDGHVWDPDxRV\FDSDFLGDGHV5HFRQRFHPRVODQHFHVLGDGGHUHDOL]DUGLVHxRVSDUDXQDDPSOLDJDPDGH
KDELOLGDGHVHLQFDSDFLGDGHVItVLFDV\PHQWDOHV3DUDPiVGHWDOOHVVREUHODVDSOLFDFLRQHVGH'LVHxR8QLYHUVDOGH*(
LQFOX\HQGRLGHDVGHGLVHxRGHFRFLQDVSDUDSHUVRQDVFRQLQFDSDFLGDGHVYLVLWHQXHVWURVLWLRZHEKR\6REUHFDVRVGH
LQFDSDFLGDGDXGLWLYDFRPXQtTXHVHDO7''*($&*($&
Piezas y Accesorios GEApplianceparts.com
,QGLYLGXRVFDOLILFDGRVSDUDUHDOL]DUHOVHUYLFLRWpFQLFRGHVXVSURSLRVHOHFWURGRPpVWLFRVSRGUiQVROLFLWDUHOHQYtRGH
SLH]DVRDFFHVRULRVGLUHFWDPHQWHDVXVKRJDUHVVHDFHSWDQODVWDUMHWDV9,6$0DVWHU&DUG\'LVFRYHU2UGHQHKR\D
WUDYpVGH,QWHUQHWODVKRUDVGHOGtDRHQIRUPDWHOHIyQLFDOODPDQGRDOGXUDQWHHOKRUDULRFRPHUFLDO
habitual.
Las instrucciones que figuran en este manual cubren los procedimientos que serán realizados por cualquier
usuario. GE no respalda ningún servicio técnico sobre este horno microondas, excepto como se describe en la
sección de Soporte al Consumidor de este manual. No intente reparar el horno microondas usted mismo. Si es
necesario reparar el electrodoméstico, entonces el servicio deberá ser realizado por una persona calificada del
servicio técnico. Comuníquese a una sucursal autorizada del servicio técnico para cualquier control, reparación o
ajuste.
Contáctenos GEAppliances.com
6LQRVHHQFXHQWUDVDWLVIHFKRFRQHOVHUYLFLRTXHUHFLELyGH*(FRPXQtTXHVHFRQQRVRWURVDWUDYpVGHQXHVWURVLWLR
ZHEFRQWRGRVORVGHWDOOHVLQFOX\HQGRVXQ~PHURWHOHIyQLFRRHVFULEDD
*HQHUDO0DQDJHU&XVWRPHU5HODWLRQV
*($SSOLDQFHV$SSOLDQFH3DUN
/RXLVYLOOH.<
-
 1
1
-
 2
2
-
 3
3
-
 4
4
-
 5
5
-
 6
6
-
 7
7
-
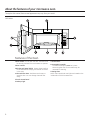 8
8
-
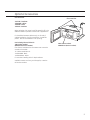 9
9
-
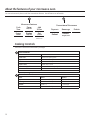 10
10
-
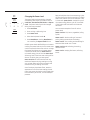 11
11
-
 12
12
-
 13
13
-
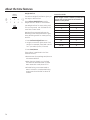 14
14
-
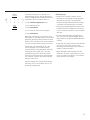 15
15
-
 16
16
-
 17
17
-
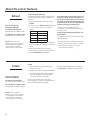 18
18
-
 19
19
-
 20
20
-
 21
21
-
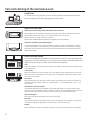 22
22
-
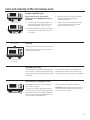 23
23
-
 24
24
-
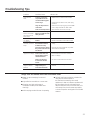 25
25
-
 26
26
-
 27
27
-
 28
28
-
 29
29
-
 30
30
-
 31
31
-
 32
32
-
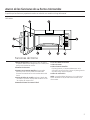 33
33
-
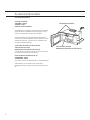 34
34
-
 35
35
-
 36
36
-
 37
37
-
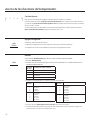 38
38
-
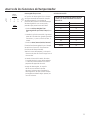 39
39
-
 40
40
-
 41
41
-
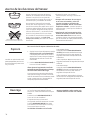 42
42
-
 43
43
-
 44
44
-
 45
45
-
 46
46
-
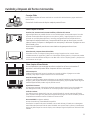 47
47
-
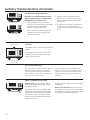 48
48
-
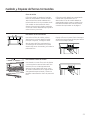 49
49
-
 50
50
-
 51
51
-
 52
52


GE Appliances JNM7196DKWW El manual del propietario
- Categoría
- Microondas
- Tipo
- El manual del propietario
- Este manual también es adecuado para
