
Receiver
User Guide
EN

TABLE OF CONTENTS
BEFORE USE 6
Please read first........................................................................................6
About this product and manual.. ..............................................................................................................................................6
Input sources playable with this product......................................................7
Compatible input sources.. .......................................................................................................................................................7
Compatibility with MusicCast....................................................................................................................................................8
Accessories.. ............................................................................................ 9
Checking the accessories.. ........................................................................................................................................................9
NAMES OF PARTS AND THEIR FUNCTIONS 11
Unit.......................................................................................................11
Front panel............................................................................................................................................................................... 11
Front display.. ..........................................................................................................................................................................14
Rear panel.. ..............................................................................................................................................................................16
Remote control.......................................................................................18
Remote control.. ......................................................................................................................................................................18
PREPARATION 21
Preparing the remote control....................................................................21
How to insert batteries, and its operating range.. .................................................................................................................21
Connecting external devices.....................................................................22
Connecting audio devices.. .....................................................................................................................................................22
Connecting speakers................................................................................23
Connecting speakers.. .............................................................................................................................................................23
Making bi-wiring connections.. ...............................................................................................................................................26
Connecting a subwoofer.......................................................................................................................................................... 27
Connecting radio antennas.......................................................................28
Connecting an FM antenna...................................................................................................................................................... 28
Connecting an AM antenna.. ...................................................................................................................................................29
Connecting a DAB/FM antenna.. .............................................................................................................................................30
Preparing a network connection................................................................31
To make a network connection...............................................................................................................................................31
Connecting a network cable (wired connection).. .................................................................................................................32
Preparing the wireless antenna (wireless connection)..........................................................................................................33
2
TABLE OF CONTENTS

Turning the product ON............................................................................34
Plugging the power cord into an outlet..................................................................................................................................34
Turning the power ON.. ...........................................................................................................................................................35
Configuring MusicCast settings (connecting to a network).. .......................... 37
Registering with the MusicCast network.. ..............................................................................................................................37
PLAYBACK 38
Basic operations......................................................................................38
Selecting the output speakers.. ..............................................................................................................................................38
Selecting an input source........................................................................................................................................................39
Adjusting the volume...............................................................................................................................................................40
Switching the front display.. ...................................................................................................................................................41
Adjusting the sound to your preference......................................................42
Enjoying Pure Direct playback (PURE DIRECT)....................................................................................................................... 42
Adjusting bass and treble (BASS/TREBLE).............................................................................................................................. 43
Adjusting left/right volume balance (BALANCE).. ..................................................................................................................44
Making it easier to hear bass and treble at low volumes (LOUDNESS).................................................................................45
Listening to the radio...............................................................................46
Preparing to listen to the radio.. .............................................................................................................................................46
Selecting a radio station.......................................................................................................................................................... 49
Displaying the Radio Data System information.. ...................................................................................................................50
Displaying the DAB information..............................................................................................................................................51
Auto-registering FM radio stations (auto preset).. .................................................................................................................52
Registering radio stations manually.. .....................................................................................................................................53
Recalling a registered radio station.. ......................................................................................................................................54
Removing the registration of a radio station.......................................................................................................................... 55
Playing via a Bluetooth® connection...........................................................56
Playing the audio of a Bluetooth device on this product (audio reception).........................................................................56
Playing this product’s audio through Bluetooth speakers/headphones (audio transmission).. ........................................57
Listening to music via AirPlay.. ................................................................. 59
Playing music via AirPlay.........................................................................................................................................................59
Listening to internet radio........................................................................60
Selecting an internet radio station.. .......................................................................................................................................60
Listening to streaming services.................................................................61
Listening to streaming services............................................................................................................................................... 61
Playing music on a USB device...................................................................62
Playing music on a USB device................................................................................................................................................62
Playing songs on media servers (PC/NAS)....................................................64
Playing songs on media servers (PC/NAS)..............................................................................................................................64
3
TABLE OF CONTENTS

Option menu (settings for each input source)..............................................66
Basic operation of the Option menu.......................................................................................................................................66
List of Option menu.. ...............................................................................................................................................................67
Correcting volume difference between input sources...........................................................................................................68
Displaying audio signal information.......................................................................................................................................69
Performing an initial scan for DAB radio reception................................................................................................................70
Checking reception strength of each DAB channel label....................................................................................................... 71
Setting volume interlock with this product when playing an AirPlay/Bluetooth device.. ...................................................72
Setting auto playback..............................................................................................................................................................73
USEFUL FUNCTIONS 74
Preset functions......................................................................................74
Registering your favorite content to presets..........................................................................................................................74
Recalling content registered to a preset................................................................................................................................. 76
Sleep timer function................................................................................77
Configuring the time for the sleep timer.. ..............................................................................................................................77
SETTINGS 78
Menus....................................................................................................78
Menu structure.........................................................................................................................................................................78
Setup menu (changing function settings)....................................................79
Basic operation of the Setup menu.. ......................................................................................................................................79
List of Setup menu items.........................................................................................................................................................80
Configuring a network.. ...........................................................................................................................................................81
Configuring Bluetooth.. ...........................................................................................................................................................86
Configuring the volume.. .........................................................................................................................................................87
Configuring auto power standby.. ..........................................................................................................................................88
Setting the product to ECO mode.. .........................................................................................................................................89
Advanced Setup menu (changing system settings).......................................90
Basic operation of the Advanced Setup menu.. .....................................................................................................................90
List of Advanced Setup menu items........................................................................................................................................91
Switching speaker impedance.. ..............................................................................................................................................92
Configuring the Remote ID.. ....................................................................................................................................................93
Changing the FM/AM tuning frequency setting.. ....................................................................................................................94
Initializing settings...................................................................................................................................................................95
UPDATING 96
Checking the version of firmware..............................................................96
Checking the version of firmware.. .........................................................................................................................................96
4
TABLE OF CONTENTS

Updating the firmware.............................................................................97
Updating the firmware.. ..........................................................................................................................................................97
Updating the firmware via your network.. .............................................................................................................................98
Updating firmware via USB flash drive.. .................................................................................................................................99
TROUBLESHOOTING 101
If you think there is a problem.................................................................101
If you think there is a problem, the 1st step is checking the following.. .............................................................................101
Problems with power, system, and/or remote control........................................................................................................ 102
Problems with the audio.. .....................................................................................................................................................104
Problems with FM radio.........................................................................................................................................................106
Problems with AM radio.........................................................................................................................................................107
Problems with DAB radio....................................................................................................................................................... 108
Problems with USB.. ..............................................................................................................................................................109
Problems with network.. .......................................................................................................................................................110
Problems with Bluetooth.. ....................................................................................................................................................113
Errors shown on the front display.........................................................................................................................................114
APPENDIX 116
Product care.........................................................................................116
Taking care of this product....................................................................................................................................................116
Making wireless network connections......................................................117
Selecting the wireless method of connecting to the network............................................................................................. 117
Using the WPS button to make a wireless connection.. ......................................................................................................118
Making a wireless connection with your iPhone (WAC).. .....................................................................................................119
Making a wireless connection manually...............................................................................................................................120
Supported devices and formats............................................................... 121
Supported Bluetooth devices.. .............................................................................................................................................121
Supported USB devices.. .......................................................................................................................................................122
Supported file formats on this product (network/USB).. ....................................................................................................123
Trademarks..........................................................................................124
Trademarks.. ..........................................................................................................................................................................124
Specifications.. ..................................................................................... 125
Specifications......................................................................................................................................................................... 125
5
TABLE OF CONTENTS

BEFORE USE
Please read first
About this product and manual
Thank you very much for purchasing this Yamaha product. This product is a network-compatible receiver for
home use. It can play radio broadcasts and network content, as well as analog and digital audio input.
This manual (guide) is organized as follows. Please be sure to read each of the guides that came with the
product and keep them handy for easy reference.
Safety Guide (Included with the Product)
Lists important safety precautions that should be read prior to use.
Quick Guide (Included with the Product)
This guide explains things from basic connections up through playing Internet radio.
User Guide (This Guide)
This provides explanations of all functions, such as information that is not addressed in the Quick Guide.
(The User Guide primarily explains operations using the included remote control.
(In the User Guide, iPhone, iPad, and iPod touch are referred to collectively as “iPhone”. Unless indicated
within an explanation, references to “iPhone” mean iPhone, iPad, and iPod touch.
(Symbols used in the User Guide
(CAUTION is used with information about potential injuries.
(NOTICE is used with information for preventing product failure, damage or malfunction, and/or loss of
data.
(NOTE is used with supplementary information that is helpful to know.
([Search tag] are keywords for searching.
You can download the latest manuals from the following website.
https://download.yamaha.com/
6
BEFORE USE > Please read first

Input sources playable with this product
Compatible input sources
As illustrated below, this product supports playing a variety of input sources.
VOLUME
PURE DIRECT
RETURN
CONNECT
PUSH - ENTER
TUNINGPRESET
BAND
MEMORY CLEAR
BASSINPUT
5V
1A
BALANCE
L R
TREBLE
LOUDNESS
FLAT
-30dB
DIMMER MODE
DISPLAY
SELECT
PHONES
SPEAKERS
A B
Built-in Radio
Input: AirPlay/Bluetooth/Various Streaming Services
Audio from Smartphone/Tablet
USB Device (USB flash drive)
CD Player, etc.
Turntable
Computer
NAS
Streaming Service/Internet Radio
Audio from Audio System
Audio from Networked Device (Content)
Wi-Fi/LAN
Input: Net Radio/Server/MC LINK/
Various Streaming Services
MusicCast Compatible Devices
Wi-Fi/Bluetooth
Smartphone/Tablet
Audio from Radio
Input: Tuner
Input: USB
USB Device Audio
Input: CD/PHONO/LINE/OPTICAL/COAXIAL
Media Server
Wireless LAN Router
Related links (for connection)
(“Connecting external devices”(p.22)
(“Connecting radio antennas”(p.28)
(“To make a network connection”(p.31)
Related links (for playback)
(“Selecting an input source”(p.39)
(“Listening to the radio”(p.46)
(“Playing via a Bluetooth® connection”(p.56)
(“Listening to music via AirPlay”(p.59)
(“Listening to internet radio”(p.60)
(“Listening to streaming services”(p.61)
(“Playing music on a USB device”(p.62)
(“Playing songs on media servers (PC/NAS)”(p.64)
7
BEFORE USE > Input sources playable with this product

Compatibility with MusicCast
This product is compatible with MusicCast. This makes it possible to share music with MusicCast-compatible
devices located in multiple rooms. Its dedicated app, “MusicCast Controller”, is easy to use and allows users
to enjoy music from smartphones, media servers (PC/NAS), Internet radio and streaming services from
anywhere in the home.
For details on MusicCast and compatible devices, please visit the Yamaha website. For more information
about the app, search “MusicCast Controller” in the App Store or Google Play.
8
BEFORE USE > Input sources playable with this product

Accessories
Checking the accessories
This product comes with the following accessories. Check and make sure that you have all of the included
accessories.
£ DAB/FM antenna (Models for U.K., Europe, Russia and Australia)
£ AM antenna (Models for U.S.A., Canada, China, Korea, Asia, Taiwan and for Central and South America)
£ FM antenna (Models for U.S.A., Canada, China, Korea, Asia, Taiwan and for Central and South America)
* One of the above is supplied depending on the region of purchase.
£ Remote control
£ Batteries (AA, R6, UM-3) (×2)
£ Safety Guide
9
BEFORE USE > Accessories

£ Quick Guide
10
BEFORE USE > Accessories

NAMES OF PARTS AND THEIR FUNCTIONS
Unit
Front panel
The following are the names of parts on the front of the unit and an explanation of their functions.
VOLUME
PURE DIRECT
RETURN
CONNECT
PUSH - ENTER
TUNINGPRESET
BAND
MEMORY CLEAR
BASSINPUT
5V
1A
BALANCE
L R
TREBLE
LOUDNESS
FLAT
-30dB
DIMMER MODE
DISPLAY
SELECT
PHONES
SPEAKERS
A B
n wp vq x
mc i lhgfeda b j k
o r s t u
az (Power) Switch
Turns this product ON (O)/OFF (N) (p.35).
With the power ON, press the z (Power) key on the remote control to switch the power between ON and Standby.
This product also goes into Standby in the following situations.
(When the Auto Power Standby function is activated (p.88)
NOTE
The remote control does not work if the power is OFF. This product cannot also be linked with a Bluetooth device, a network
device, or MusicCast Controller App.
bPower Indicator
Lights up as follows to indicate the state of power.
Power ON: Indicator lights up.
Power in Standby: Indicator is faintly lit.
Power OFF: Indicator is off.
NOTE
When the indicator is flashing, it means the protective circuit has been activated and the power will not turn ON, in order to
protect the product. Please contact an authorized Yamaha service center to have it repaired.
cRemote control signal receiver
Receives the signal (infrared) from the remote control (p.21).
11
NAMES OF PARTS AND THEIR FUNCTIONS > Unit

dDIMMER
Changes the brightness of the front display. The brightness changes between 5 levels each time it is pressed.
eDISPLAY
Switches the information shown on the front display panel (p.41).
fMODE
Switches the FM Radio reception mode (Stereo/Mono) (p.49).
gMEMORY
For registering radio stations (presets) (p.53). Internet radio stations, songs from media servers, and the song
currently playing when USB input is selected can also be registered (p.74).
hCLEAR
Removes a previously registered (preset) radio station (p.55).
iBAND
Switches the radio tuner band (p.49).
jPRESET
Used for recalling registered (preset) radio stations (p.54) and registered songs/Internet radio stations (p.76).
kTUNING
Used for selecting a radio station (p.49).
lFront Display
Displays various information and menus (p.14).
mPURE DIRECT/Indicator
Switches the Pure Direct function ON/OFF (p.42). When this is ON, the indicator lights up, and the front display turns
off.
nPHONES jack
For plugging in headphones (compatible with standard stereo phone plugs).
NOTE
Audio cannot be output to speakers connected to this product when headphones are plugged in.
oSPEAKERS A and B
For selecting the speakers to play from. Toggles Speakers A or B ON/OFF each time it is pressed (p.38).
pUSB port
For connecting a USB device (p.62).
qINPUT
Selects the input source (p.39).
rBASS
Adjusts the volume of the low-frequency range (p.43).
12
NAMES OF PARTS AND THEIR FUNCTIONS > Unit

sTREBLE
Adjusts the volume of the high-frequency range (p.43).
tBALANCE
Adjusts the left/right balance of the volume (p.44).
uLOUDNESS
Adjusts to make it easier to hear bass and treble even at low volumes (p.45).
vSELECT (PUSH-ENTER)
Used for things like operating the menus on the front display. Turn this to select an item, and press it to confirm the
selection.
wRETURN/CONNECT
Used for things like operating the menus on the front display.
Also used when registering this product on the MusicCast Network (p.37).
xVOLUME
Adjusts the volume.
Related links
“Taking care of this product”(p.116)
13
NAMES OF PARTS AND THEIR FUNCTIONS > Unit

Front display
The following is an explanation of what is shown on the front display.
VOL.
MUTE
TUNEDSTEREO
A
SLEEP
B
a if
j
b c g hed
j
aInformation display
Various information is shown, such as the name of the input source.
Press DISPLAY on the front panel to switch the information shown (p.41).
NOTE
Only single-byte alphanumeric characters and some symbols are displayed.
bSTEREO indicator
Lights up when FM radio is received in stereo.
cTUNED indicator
Lights up when a radio station is received.
dWireless LAN indicator
Lights up when the product is connected wirelessly to a network.
eBluetooth indicator
Lights up when connected to a Bluetooth device.
fSpeaker indicators
The indicator(s) of the speakers (A/B) from which audio is playing light up.
gSLEEP indicator
Lights up when the sleep timer has been set (p.77).
hMUTE indicator
Flashes when the audio is muted.
iVolume indicator
Shows the volume setting of the product.
jCursor indicators
These light up when the cursor keys of the remote control can be used to control the product.
14
NAMES OF PARTS AND THEIR FUNCTIONS > Unit


Rear panel
The following are the names of parts on the rear of the unit and an explanation of their functions.
A
B
SPEAKERS
NETWORK
COAXIAL
OPTICAL
FM AM
75Ω
ANTENNA
SUBWOOFER
OUT
PHONO
IN
1
IN
OUT
2
1
2
1
2
IN
CD
LINE
OUT
3
SERVICE
GND
a eb fc hd g
kj li
aPHONO IN jacks
GND jack
For connecting to a turntable (p.22).
bOPTICAL 1-2 IN jacks
For connecting to external devices with an optical digital output (p.22).
cANTENNA jack
For connecting to a radio antenna (p.28).
dCOAXIAL 1-2 IN jacks
For connecting to external devices with a coaxial digital output (p.22).
eSERVICE port
These are service ports that are used when performing repairs, etc. Do not plug anything into them.
fNETWORK jack
For connecting a network cable when connecting this product to a wired network (p.32).
gWireless antenna
For connecting this product to a wireless network (Wi-Fi) (p.33). It is also used for Bluetooth connections (p.56).
hPower cord
Connects to an electrical outlet (p.34).
iLINE 1-3 jacks
For connecting external devices that have analog audio inputs/outputs (p.22).
16
NAMES OF PARTS AND THEIR FUNCTIONS > Unit


Remote control
Remote control
The following are the names of the parts of the remote control and explanations of their functions.
VOLUME
PHONO
SLEEP
COAX 1 COAX 2
BLUETOOTH
OPT 1 OPT 2 CD
LINE 1 LINE 2 LINE 3
TUNER
HOME RETURN
SETUP OPTION
NOW PLAYING MUTE
NET USB
TUNING
REPEAT SHUFFLE
ENTER
BAND
PRESET
MEMORY
A B
SPEAKERS
ENTER
g
f
c
b
d
e
a
h
k
m
l
i
j
o
n
aRemote control signal transmitter
Sends the remote control signal (infrared).
18
NAMES OF PARTS AND THEIR FUNCTIONS > Remote control

bSPEAKERS A and B keys
For switching the output speakers. Toggles Speakers A or B ON/OFF each time it is pressed (p.38).
cInput source selection keys
Selects the input source to play (p.39).
NOTE
Pressing the NET key repeatedly switches between the network sources.
dBAND key
Switches the radio tuner band (p.49).
TUNING keys
Used for selecting a radio station (p.49).
eMEMORY key
For registering radio stations (presets) (p.53). Internet radio stations, songs from media servers, and the song
currently playing when USB input is selected can also be registered (p.74).
PRESET keys
Used for recalling registered (preset) radio stations (p.54) and registered songs/Internet radio stations (p.76).
fHOME key
Moves to the top level when selecting music files, folders, etc.
gSETUP key
Opens the Setup menu (p.79).
hNOW PLAYING key
Displays song information when selecting music files, folders, etc.
iz (Power) key
Switches the power of this product between ON and Standby (p.35).
jSLEEP key
Sets the sleep timer (p.77).
kMenu operation keys
Cursor keys (qwer), ENTER key, and RETURN key
For operating the menus.
lOPTION key
Opens the Option menu (p.66).
mMUTE key
Mutes the sound. Pressing it again returns the volume to its previous level.
nVOLUME +/- keys
Adjusts the volume (p.40).
19
NAMES OF PARTS AND THEIR FUNCTIONS > Remote control

oPlayback keys
REPEAT key, r/d (Play/Pause) key, SHUFFLE key, f/h (Skip/Rewind) key, ■ (Stop)
key, j/g (Fast-Forward/Skip) key
For operating playback, such as a media server, Internet radio, or Bluetooth.
20
NAMES OF PARTS AND THEIR FUNCTIONS > Remote control

PREPARATION
Preparing the remote control
How to insert batteries, and its operating range
Put the included batteries into the remote control facing the correct way (+/-).
The operating range of the remote control is as illustrated.
Point the remote control at the remote control signal (infrared) receiver when operating it.
Within 6 m (20 ft)
30° 30°
21
PREPARATION > Preparing the remote control

Connecting external devices
Connecting audio devices
This explains connecting audio devices, such as a CD player, to the product.
Use the type of cable appropriate for the jacks of the device to be connected, such as an RCA cable, optical
fiber cable, or coaxial cable, which are commercially available.
A
B
SPEAKERS
NETWORK
COAXIAL
OPTICAL
FM AM
75Ω
ANTENNA
SUBWOOFER
OUT
PHONO
IN
1
IN
OUT
2
1
2
1
2
IN
CD
LINE
OUT
3
SERVICE
GND
PHONO
GND
R
L
COAXIAL
OPTICAL
R
L
PHONO
GND
COAXIAL
OPTICAL
1
2
1
2
IN
1
R
L
R
L
CD
IN
LINE
OUT
3
R
L L
R
L
R
L
R
C C
O O
L
R
L
R
L
R
L
R
Rear panel Digital Input Jacks
Audio outputs (either optical digital, coaxial digital,
or analog stereo)
Audio device
PHONO jacks
Turntable
Ground wire
Audio OUT (PHONO)
Audio Device (CD Recorder, etc.)
LINE 1 IN,
CD Jack
Audio IN (Analog Stereo)
LINE 2 and 3
Jacks
Audio OUT (Analog Stereo)
LINE IN
LINE OUT
NOTE
(The digital inputs (OPTICAL/COAXIAL) of this product only support PCM signals (2-channel).
(The PHONO jacks of this product are compatible with MM cartridges. Use a step-up transformer or the like if connecting a turntable
equipped with an MC (low-output) cartridge.
(For some turntables, connecting to the GND terminal of this product may reduce noise. However, there are also some turntables
that have less noise if they are not connected to the GND jack.
(The GND terminal is not an electrical ground for safety purposes.
Related links
“Rear panel”(p.16)
22
PREPARATION > Connecting external devices

Connecting speakers
Connecting speakers
Use speaker cable (commercially available) to connect speakers to the product.
NOTE
(Use the speakers with an impedance of at least 4-ohm.
(When connecting 2 sets of speakers (Speaker A and Speaker B), use the speakers with an impedance of at least 8-ohm.
(When connecting 4-ohm (4-ohm or more but less than 8-ohm) speakers, change the speaker impedance on the Advanced Setup
menu.
A
B
SPEAKERS
NETWORK
COAXIAL
OPTICAL
FM AM
75Ω
ANTENNA
SUBWOOFER
OUT
1
2
1
2
CD
SERVICE
GND
+ –+ –
+ –
– +
Rear panel
Speaker A
(Right channel)
Speaker A
(Left channel)
Speaker B
(Right channel)
Speaker B
(Left channel)
1Peel off about 10 mm of insulation on the end of the speaker cable and twist its
core tightly.
10 mm
10 mm
(3/8”)
23
PREPARATION > Connecting speakers

2Turn the knob of the speaker jack to the left to loosen it, then insert the core of the
speaker cable into the hole in the jack.
3Turn the knob back to the right to tighten it.
NOTICE
(When preparing the speaker cable, do so far away from the product. Pieces of the core wires of the speaker cable may fall inside
the product and cause a short circuit, resulting in malfunction.
(Do not allow the core wires of a speaker cable to touch the core wires of another speaker cable or any metal parts of the
product. Doing so may damage the product and/or the speakers.
NOTE
Be sure to connect to the jacks correctly: left channel (L), right channel (R) and + (red), - (black). If connected incorrectly, no audio may
be output from the speakers. Also, if the polarity is wrong, the audio may sound strange.
nConnecting via banana plug (Models for U.S.A., Canada, Australia, Taiwan and for
Central and South America)
When using a banana plug, tighten the knob of the speaker jack and insert a banana plug into the end of the
jack.
Banana plug
24
PREPARATION > Connecting speakers


Making bi-wiring connections
Bi-wiring allows output to the speaker woofers (low frequency) and the tweeter/mid-range (mid to high-
frequency) to be split and driven separately. Speakers compatible with bi-wiring are required for these
connections.
1Remove the short bar or bridge attached to the jacks of the speakers.
2Connect the product and the speakers as illustrated.
The illustration shows connecting the left channel. Connect the right channel in the same way.
Swapping the connections between speaker jacks A and B is OK.
A
B
SPEAKERS
Rear panel
Speaker
NOTE
(If the system is connected with bi-wiring, turn ON both Speakers A and B by pressing the SPEAKERS A and SPEAKERS B keys when
the power is ON.
(Use speakers with an impedance of at least 4-ohm and that are compatible with bi-wiring connections.
Related links
“Selecting the output speakers”(p.38)
26
PREPARATION > Connecting speakers

Connecting a subwoofer
To use a subwoofer, connect it to the product with a monaural pin cable (RCA) (commercially available).
Subwoofer (with built-in amplifier)
A
B
SPEAKERS
NETWORK
COAXIAL
OPTICAL
FM AM
75Ω
ANTENNA
SUBWOOFER
OUT
PHONO
IN
1
IN
OUT
2
1
2
1
2
IN
CD
LINE
OUT
3
SERVICE
GND
Rear panel
27
PREPARATION > Connecting speakers

Connecting radio antennas
Connecting an FM antenna
Model For
U.S.A., Canada, China, Korea, Asia, Taiwan, Central and South America
Connect the included FM antenna to the product.
After connecting the FM antenna, secure it to a wall.
A
SPEAKERS
NETWORK
OPTICAL
FM AM
75Ω
ANTENNA
PHONO
IN
1
IN
OUT
2
1
2
1
SERVICE
GND
Rear panel
FM antenna
28
PREPARATION > Connecting radio antennas

Connecting an AM antenna
Model For
U.S.A., Canada, China, Korea, Asia, Taiwan, Central and South America
Connect the included AM antenna to the product.
Put the AM antenna in a flat location after connecting it.
Rear panel
AM antenna
A
B
SPEAKERS
NETWORK
COAXIAL
OPTICAL
FM AM
75Ω
ANTENNA
SUBWOOFER
OUT
1
2
1
2
CD
SERVICE
GND
Assembly and connection of the AM antenna
ReleaseHold down Insert
NOTE
(Only unwind as much wire from the antenna unit as is required for wiring.
(The cord of the AM antenna does not have polarity.
29
PREPARATION > Connecting radio antennas

Connecting a DAB/FM antenna
Model For
U.K., Europe, Russia and Australia
Connect the included DAB/FM antenna to the product.
Fix the antenna ends to a wall.
A
B
SPEAKERS
NETWORK
COAXIAL
OPTICAL
DAB/FM
ANTENNA
SUBWOOFER
OUT
PHONO
IN
1
IN
OUT
2
1
2
1
2
IN
3
SERVICE
GND
75Ω
Rear panel
DAB/FM antenna
NOTE
(The antenna should be stretched out horizontally.
(If you cannot obtain good reception on the radio, adjust the height, direction or placement of the DAB/FM antenna.
30
PREPARATION > Connecting radio antennas

Preparing a network connection
To make a network connection
This product supports both wired and wireless connections.
Select the connection method according to your network environment.
Connecting to a network allows you to play Internet radio stations and music files stored on media servers
such as computers or network-attached storage (NAS).
NOTICE
(When connecting the product to the Internet, be sure to connect via a router to ensure security. Set up an appropriate
password for the router that it goes through. Do not connect directly to communication lines (including public LANs) of
telecommunications carriers (mobile communication companies, fixed-line providers, Internet providers, etc.)
Related links
(“Connecting a network cable (wired connection)”(p.32)
(“Preparing the wireless antenna (wireless connection)”(p.33)
31
PREPARATION > Preparing a network connection

Connecting a network cable (wired connection)
Use a network cable (CAT-5 or higher straight cable) (commercially available) to connect the product to the
router.
If the router is compatible with DHCP servers, network settings do not have to be configured for this product.
NETWORK
FM AM
ANTENNA
PHONO
1
SERVICE
GND
LAN
WAN
Network Attached Storage (NAS)
Internet
Router Computer
Network cable
Rear panel
NOTE
(If the router is not compatible with DHCP servers, or if you want to configure the network parameters manually, you must
configure the network settings.
(Use STP (Shielded Twisted Pair) cable to prevent electromagnetic interference.
Related links
“Configuring a network”(p.81)
32
PREPARATION > Preparing a network connection

Preparing the wireless antenna (wireless connection)
To use a wireless or Bluetooth connection, flip up the wireless antenna.
A
B
SPEAKERS
NETWORK
SERVICE
NETWOR
NETWOR
K
K
SERVICE
SERVICE
SERVICE
SERVICE
SERVICE
SERVICE
SERVICE
SERVICE
NOTICE
(When purchased, the wireless antenna is fixed with tape. Gently peel off the tape and flip up the wireless antenna as illustrated.
(Do not exert excessive force on the wireless antenna when you flip it up. Doing so may damage it.
Related links
(“Registering with the MusicCast network”(p.37)
(“Selecting the wireless method of connecting to the network”(p.117)
33
PREPARATION > Preparing a network connection

Turning the product ON
Plugging the power cord into an outlet
After making all the connections, connect the power cord to an outlet.
A
B
SPEAKERS
Rear panel
Connect to a power
outlet
NOTE
Be sure to unplug this product from the power outlet when it will not be used for a long time. This product consumes a small amount
of electricity even when its power is in Standby.
34
PREPARATION > Turning the product ON

Turning the power ON
Turn the product ON.
1Press the z (Power) Switch on the front panel.
The power comes ON and the Power Indicator lights up.
BASSINPUT
5V
1A
DIMMER
DISPLAY
PHONES
SPEAKERS
A B
Power Indicator
Power Switch
2When the following message is shown on the front display, press RETURN on the
front panel.
When you connect this product to the router with a network cable (wired connection), this
operation is skipped.
It may take about 30 seconds for the message to be shown. The portion marked with “*” varies
depending on the device.
R-N600A XXXXXX
*
VOLUME
PURE DIRECT
RETURN
CONNECT
PUSH - ENTER
TUNING
LOUDNESS
FLAT
-30dB
SELECT
RETURN
CONNECT
Front panel
35
PREPARATION > Turning the product ON

“WAC” Display
(The WAC (Wireless Accessory Configuration) function is for applying the wireless settings of an iOS device to another device and
wirelessly connecting to the network. The steps for connecting to a network using MusicCast Controller are explained in the
chapter “PREPARATION”. Therefore, how to cancel WAC is explained here.
(The WAC message is displayed the first time you use the product and after it is initialized.
NOTE
(It takes several seconds from turning the power ON until audio is played.
(After turning the power OFF, do not try to turn it ON again for at least 10 seconds. Doing so may generate some noise.
Related links
“Making a wireless connection with your iPhone (WAC)”(p.119)
nOperating the power with the remote control
When the z (Power) Switch on the front panel is ON, the product switches between ON/Standby each time
the z (Power) key on the remote control is pressed.
NOTE
When the product's power is in Standby, to turn the power ON without using the remote control, press the z (Power) Switch to turn it
OFF momentarily, and then press it again to turn it ON again.
36
PREPARATION > Turning the product ON

Configuring MusicCast settings (connecting to a
network)
Registering with the MusicCast network
Register the product to the MusicCast network. You can configure network connection settings for the
product at the same time. The dedicated app “MusicCast Controller” for mobile devices is required for
making settings. Find “MusicCast Controller” (free) in the App Store or Google Play and install it.
1Start “MusicCast Controller” on your mobile device(s) and tap “Setup”.
2Follow the instructions provided by “MusicCast Controller”.
VOLUME
PURE DIRECT
RETURN
CONNECT
PUSH - ENTER
TUNING
LOUDNESS
FLAT
-30dB
SELECT
RETURN
CONNECT
Front panel
NOTE
(To connect to the network wirelessly, ensure that you have the SSID and security key of the wireless LAN router (access point) you
wish to use.
(To configure a second and subsequent MusicCast-compatible devices, tap “Settings” > “Add New Device” in “MusicCast
Controller”.
Related links
“Configuring a network”(p.81)
37
PREPARATION > Configuring MusicCast settings (connecting to a network)

PLAYBACK
Basic operations
Selecting the output speakers
Press the SPEAKERS A key and/or SPEAKERS B key to select the speakers to output to. You can check which
speakers are selected via the speaker indicator on the front display.
VOLUME
PHONO
SLEEP
COAX 1 COAX 2
BLUETOOTH
OPT 1 OPT 2 CD
LINE 1 LINE 2 LINE 3
TUNER
HOME RETURN
SETUP OPTION
NOW PLAYING MUTE
NET USB
TUNING
REPEAT SHUFFLE
ENTER
BAND
PRESET
MEMORY
A B
SPEAKERS
ENTER
PHONO
SLEEP
COAX 1 COAX 2
BLUETOOTH
OPT 1 OPT 2 CD
LINE 1 LINE 2 LINE 3
TUNER NET USB
A B
SPEAKERS
PHONO
SLEEP
COAX 1
COAX
2
BLUETOOTH
OPT
1 O
PT
2 C
D
LINE
1 L
INE
2 L
INE
3
TUNER
NET
USB
SPEAKERS A and B
Each press of the SPEAKERS A or SPEAKERS B keys switches the corresponding speakers ON/OFF.
Speaker
Indicators Output Speakers
A
Outputs from Speakers A.
B
Outputs from Speakers B.
A B
Outputs from Speakers A and Speakers B.
No output from either Speakers A or Speakers B.
NOTE
(You can also select the speakers by pressing SPEAKERS A or SPEAKERS B on the front panel.
(If the speakers are connected with bi-wiring, turn both Speakers A and Speakers B ON.
(When headphones are plugged in, audio cannot be output from speakers.
38
PLAYBACK > Basic operations

Selecting an input source
To play music, select the desired input source.
1Turn ON an external device.
2Press an input source selection key to select an input source.
Selects the input source from the following.
(PHONO key: turntable audio input via the PHONO input jacks
(COAX 1/2 keys: audio input via COAXIAL 1 or 2 input jack
(BLUETOOTH key: audio from a device, such as a smartphone, connected via Bluetooth.
(OPT 1/2 keys: audio input via OPTICAL 1 or 2 input jack
(CD key: audio input via CD input jacks
(LINE 1-3 keys: audio input via LINE 1, 2, or 3 input jacks
(TUNER key: audio from a radio station.
(NET key: audio input via the NETWORK jack or wirelessly.
(USB key: audio input via the USB port.
VOLUME
PHONO
SLEEP
COAX 1 COAX 2
BLUETOOTH
OPT 1 OPT 2 CD
LINE 1 LINE 2 LINE 3
TUNER
HOME RETURN
SETUP OPTION
NOW PLAYING MUTE
NET USB
TUNING
REPEAT SHUFFLE
ENTER
BAND
PRESET
MEMORY
A B
SPEAKERS
ENTER
PHONO
SLEEP
COAX 1 COAX 2
BLUETOOTH
OPT 1 OPT 2 CD
LINE 1 LINE 2 LINE 3
TUNER NET USB
SLEEP
Input source selection
keys
3Operate an external device to start playback, or select a radio station with this
product.
NOTE
(You can also turn INPUT on the front panel to select the input source.
(For information on operating your external device, refer to its operating manual.
39
PLAYBACK > Basic operations

Adjusting the volume
Press the VOLUME +/− keys to adjust the volume.
VOLUME
PHONO
SLEEP
COAX 1 COAX 2
BLUETOOTH
OPT 1 OPT 2 CD
LINE 1 LINE 2 LINE 3
TUNER
HOME RETURN
SETUP OPTION
NOW PLAYING MUTE
NET USB
TUNING
REPEAT SHUFFLE
ENTER
BAND
PRESET
MEMORY
A B
SPEAKERS
ENTER
VOLUME
HOME RETURN
SETUP OPTION
NOW PLAYING MUTE
REPEAT SHUFFLE
HOME
RETURN
SETU
P O
PTION
NOW PLAYIN
REPEAT
SHUFFL
E
VOLUME +/-
MUTE
NOTE
(You can also turn VOLUME on the front panel to adjust it.
(Pressing the MUTE key mutes the sound. Pressing it again returns the volume to its previous level.
(You can adjust the sound to your preference with BASS, TREBLE, BALANCE and LOUDNESS on the front panel.
Related links
(“Adjusting bass and treble (BASS/TREBLE)”(p.43)
(“Adjusting left/right volume balance (BALANCE)”(p.44)
(“Making it easier to hear bass and treble at low volumes (LOUDNESS)”(p.45)
40
PLAYBACK > Basic operations

Switching the front display
The information shown on the front display can be changed depending on the current input source.
Press DISPLAY on the front panel repeatedly to select the item you wish to display.
Track
A
The selected information is displayed after 3 seconds.
Track #1
A
The following display items are available.
Currently input source Displayed item
TUNER (FM/AM)
Frequency
(Models for U.K., Europe, and Russia) Radio Data System data is also available when this
product is tuned into a Radio Data System broadcasting station. For details, see the
following:
(“Displaying the Radio Data System information”(p.50)
TUNER (DAB)
(Models for U.K., Europe, Russia, and Australia)
For details, see the following:
(“Displaying the DAB information”(p.51)
Bluetooth
Streaming services* Track, Artist, Album
Server
AirPlay
USB
Track, Artist, Album, Time
Net Radio Track, Album, Time, Station
* The display can only be switched for some streaming services.
41
PLAYBACK > Basic operations

Adjusting the sound to your preference
Enjoying Pure Direct playback (PURE DIRECT)
Pure Direct stops various processes and circuitry except for the basic ones for playback, letting you enjoy
higher quality sound with reduced noise.
After pressing PURE DIRECT to turn it ON, the PURE DIRECT indicator lights up.
NOTE
(When using Pure Direct, the following functions are disabled.
(The various adjustment functions: BASS, TREBLE, BALANCE, and LOUDNESS
(Operation of Option menu and Setup menu
(Indications on the front display (when no operations performed)
(When using Pure Direct, transmissions to the MusicCast Network are not available, except the audio of network content and
Bluetooth devices.
42
PLAYBACK > Adjusting the sound to your preference

Adjusting bass and treble (BASS/TREBLE)
You can adjust the level of high-frequency range (Treble) and low-frequency range (Bass) individually.
BASS TREBLE
nAdjusting the bass
When the bass feels too weak, turn BASS to the right to increase it. When it feels too strong, turn BASS to the
left to reduce it.
It has flat characteristics when set to the middle.
Setting range: -10 dB to 0 to +10 dB (20 Hz)
nAdjusting the treble
When the treble feels too weak, turn TREBLE to the right to increase it. When it feels too strong, turn TREBLE
to the left to reduce it.
It has flat characteristics when set to the middle.
Setting range: -10 dB to 0 to +10 dB (20 kHz)
NOTE
When Pure Direct is used, the settings are disabled (left and right channels are fixed at 0 dB).
43
PLAYBACK > Adjusting the sound to your preference

Adjusting left/right volume balance (BALANCE)
Any unbalance in volume due to positioning of the speakers and/or conditions in the room can be corrected
by adjusting the balance of the volume between the left and right speakers.
BALANCE
L R
Turn BALANCE left or right to adjust the left channel (L) or the right channel (R). When turned all the way to
the left or right, it mutes the opposite channel.
NOTE
When Pure Direct is used, the setting is disabled (left and right channels are fixed at 0 dB).
44
PLAYBACK > Adjusting the sound to your preference

Making it easier to hear bass and treble at low volumes
(LOUDNESS)
It lowers the volume of the midrange and allows the listener to enjoy natural sound even at low volumes by
compensating for the human auditory characteristic that makes it difficult to hear bass and treble at low
volumes.
CAUTION
(If Pure Direct is turned ON after adjusting the LOUDNESS, the input signal bypasses the loudness control function and the
volume increases suddenly. To protect your ears and your speakers from damage, always check the state of LOUDNESS before
turning ON Pure Direct. If it is set to any position other than FLAT, turn the volume down.
LOUDNESS
FLAT
-30dB
1Put LOUDNESS to the FLAT position.
2Turn VOLUME up to the maximum level at which you normally listen to music.
3Turn LOUDNESS counterclockwise to a moderate volume.
LOUDNESS
FLAT
-30dB
NOTE
(When Pure Direct is used, the settings are disabled (equivalent to the FLAT position).
(After making the settings, if the loudness effect is too strong (or weak) when played at your desired volume, adjust it again.
45
PLAYBACK > Adjusting the sound to your preference

Listening to the radio
Preparing to listen to the radio
Setting the frequency steps
Model For
Asia, Taiwan, Central and South America
Set the radio tuning frequency steps of this product depending on your country or region.
At the factory, the frequency step setting is set to 50 kHz for FM and 9 kHz for AM. Depending on your country
or region, set the frequency steps to 100 kHz for FM and 10 kHz for AM.
1Push the z (Power) Switch on the front panel to turn the power OFF.
2While pressing RETURN on the front panel, push the z (Power) Switch.
3Turn SELECT on the front panel to choose “TU (Frequency Step)”.
4Press SELECT to choose “FM100/AM10”.
5Push the z (Power) Switch to turn it OFF.
6Push the z (Power) Switch again to turn it back ON.
This completes the settings.
NOTE
Preset (registered radio stations) and frequency will be initialized if you change the radio tuning frequency steps.
Related links
“Changing the FM/AM tuning frequency setting”(p.94)
46
PLAYBACK > Listening to the radio

Preparing the DAB tuning
Model For
U.K., Europe, Russia and Australia
Before listening to DAB (Digital Audio Broadcasting) radio, perform an initial scan to register the DAB radio
stations automatically.
1Switch the input to “TUNER”.
2Press the BAND key to select the DAB band.
Initiate Scan
After 3 seconds, the initial scan starts. When the initial scan finishes, this product
automatically tunes in to the first DAB radio station in order by frequency.
NOTE
(DAB uses digital signals for clearer sound and more stable reception compared to analog signals. This product can also receive
DAB+ (an upgraded version of DAB) that allows for more stations using MPEG-4 HE-AAC v2 audio codec, which has a more efficient
transmission method.
(Be sure to check the DAB coverage in your area in that not all areas are currently being covered. For a list of nationwide DAB
statuses and worldwide DAB frequencies, check WorldDMB online at http://www.worlddab.org/.
(If no DAB radio stations are found by an initial scan, the front display will change to “Off Air”.
(To perform an initial scan again after some DAB radio stations are stored, select “Init Scan (Initial Scan)” in the Option menu. If you
perform an initial scan again, the DAB radio stations currently registered to the preset numbers will be cleared.
(You can check reception strength of each DAB channel label. Select “Tune AID” in the Option menu.
Related links
(“Checking reception strength of each DAB channel label”(p.71)
(“Performing an initial scan for DAB radio reception”(p.70)
nDAB frequency information
This product supports Band III (174 to 240 MHz) only.
Frequency Channel label
174.928 MHz 5A
176.640 MHz 5B
178.352 MHz 5C
180.064 MHz 5D
181.936 MHz 6A
183.648 MHz 6B
185.360 MHz 6C
187.072 MHz 6D
188.928 MHz 7A
47
PLAYBACK > Listening to the radio

Frequency Channel label
190.640 MHz 7B
192.352 MHz 7C
194.064 MHz 7D
195.936 MHz 8A
197.648 MHz 8B
199.360 MHz 8C
201.072 MHz 8D
202.928 MHz 9A
204.640 MHz 9B
206.352 MHz 9C
208.064 MHz 9D
209.936 MHz 10A
211.648 MHz 10B
213.360 MHz 10C
215.072 MHz 10D
216.928 MHz 11A
218.640 MHz 11B
220.352 MHz 11C
222.064 MHz 11D
223.936 MHz 12A
225.648 MHz 12B
227.360 MHz 12C
229.072 MHz 12D
230.784 MHz 13A
232.496 MHz 13B
234.208 MHz 13C
235.776 MHz 13D
237.488 MHz 13E
239.200 MHz 13F
48
PLAYBACK > Listening to the radio

Selecting a radio station
You can use the this product’s built-in tuner to listen to the radio.
1Switch the input to “TUNER”.
2Press the BAND key to switch to the next reception band.
(FM/AM (Models for U.S.A., Canada, China, Korea, Asia, Taiwan and for Central and South
America)
(DAB/FM (Models for U.K., Europe, Russia and Australia)
3Select a radio station.
(To specify a frequency to select a radio station, press the TUNING key repeatedly. You can
also press and hold the TUNING key to automatically select a station.
VOL.
TUNEDSTEREO
A
FM 82.5 MHz
The TUNED indicator lights up when a radio station is being received.
If in stereo, the STEREO indicator also lights up.
NOTE
The FM radio reception method (stereo or mono) can be switched by pressing MODE on the front panel repeatedly. When reception of
an FM radio is unstable, it may help to switch to mono reception.
Related links
(“Auto-registering FM radio stations (auto preset)”(p.52)
(“Registering radio stations manually”(p.53)
49
PLAYBACK > Listening to the radio

Displaying the Radio Data System information
Model For
U.K., Europe and Russia
Radio Data System is a data transmission system used by FM stations. This product can receive various types
of data, such as “Program Service”, “Program Type”, “Radio Text” and “Clock Time”, when it is tuned in to a
Radio Data System broadcasting station.
1Tune in to the desired Radio Data System broadcasting station.
2Press DISPLAY on the front panel to select between the various display items.
The information appears on the front display.
Frequency Frequency
Program Service Program service name
Program Type Current program type
Radio Text Information on the current program
Clock Time Current time
NOTE
(“---” is displayed in “Program Service”, “Program Type”, “Radio Text”, and “Clock Time” if the radio station does not provide the
Radio Data System service.
(We recommend using “Auto Preset” to tune in to the Radio Data System broadcasting stations.
Related links
“Auto-registering FM radio stations (auto preset)”(p.52)
50
PLAYBACK > Listening to the radio

Displaying the DAB information
Model For
U.K., Europe, Russia and Australia
This product can receive various types of DAB information when it is tuned into a DAB radio station.
1Tune in to the desired DAB radio station.
2Press DISPLAY on the front panel to select between the various display items.
The information appears on the front display.
Service Label
TUNED
Service Label Station name
Dynamic Label Information on the current station
Ensemble Label Ensemble name
Program Type Station genre
Date And Time Current date and time
Audio Mode Audio mode (monaural/stereo) and bit rate
CH Label/Freq.
(Frequency) Channel label and frequency
Signal Quality Signal reception quality (0 [none] to 100 [best])
NOTE
Some information may not be available depending on the selected DAB radio station, and “---” is displayed.
51
PLAYBACK > Listening to the radio

Auto-registering FM radio stations (auto preset)
This function automatically registers the FM stations with the strongest signal to preset numbers.
1Switch the input to “TUNER”.
2Press the OPTION key.
3Select “Auto Preset” with the cursor keys (q/w) and then press the ENTER key.
To specify a preset number to start auto-presetting, use the PRESET or the cursor keys (▲/▼)
to select the preset number within 5 seconds and then press the ENTER key.
Auto presetting begins and “SEARCHING” is shown during the auto preset process.
Once auto preset is complete, “FINISHED” is displayed and the Option menu closes automatically.
NOTE
(A maximum of 40 radio stations can be registered.
(To cancel auto preset, press the RETURN key.
((Models for U.K., Europe and Russia) Only Radio Data System broadcasting stations are registered automatically by the Auto Preset
function.
Related links
(“Selecting a radio station”(p.49)
(“Registering radio stations manually”(p.53)
(“Recalling a registered radio station”(p.54)
52
PLAYBACK > Listening to the radio

Registering radio stations manually
You can select a radio station and register it manually to a preset number.
1Select a radio station.
2Press the MEMORY key.
VOL.
A
01:Empty
TUNEDSTEREO
3Select the preset number to register with the PRESET key.
4Press the MEMORY key.
VOL.
A
01:FM 82.5 MHz
TUNEDSTEREO
This completes the registration.
NOTE
(A maximum of 40 radio stations can be registered.
(To register a radio station to the next empty number from the previously preset number, press the MEMORY key for 3 seconds or so
while on the desired radio station.
(To go back to the original display without registering, press the RETURN key.
(After 30 seconds of inactivity, the display automatically returns to the previous display.
Related links
(“Selecting a radio station”(p.49)
(“Auto-registering FM radio stations (auto preset)”(p.52)
(“Recalling a registered radio station”(p.54)
53
PLAYBACK > Listening to the radio

Recalling a registered radio station
This recalls a radio station (preset station) that is registered to preset number.
1Switch the input to “TUNER”.
2Press the PRESET key to select the preset number.
The registered radio station is recalled.
NOTE
(Any preset numbers without anything registered are skipped.
(If no radio stations are registered, “No Presets” is shown on the front display.
54
PLAYBACK > Listening to the radio

Removing the registration of a radio station
This explains how to remove the registration of a preset radio station.
1Switch the input to “TUNER”.
2Press the OPTION key.
3Select “Clear Preset” with the cursor keys (q/w) and then press the ENTER key.
4Use the PRESET key or cursor keys (q/w) to select the preset number to be
removed and then press the ENTER key.
Once the registration is removed, “Cleared” is displayed and the next registered preset
number is displayed.
5To remove another preset number, repeat step 4.
6Press the OPTION key.
This completes removal of the registration.
NOTE
Registered radio stations (preset stations) can also be removed using the front panel. Press CLEAR on the front panel and then use
PRESET to select the preset number you wish to remove. Next press SELECT or CLEAR to remove the preset.
55
PLAYBACK > Listening to the radio

Playing via a Bluetooth® connection
Playing the audio of a Bluetooth device on this product (audio
reception)
This product can play music files and the like saved on a Bluetooth device (such as a smartphone).
CAUTION
(If you adjust the volume on the Bluetooth device, it may get unexpectedly loud and cause damage to your hearing and/or
equipment. If the volume becomes too loud during playback, stop playback immediately.
Bluetooth device
(smartphone, etc.)
This product
1Switch the input to “Bluetooth”.
2Select this product (network name of this product) on the Bluetooth device.
If a passkey is required, enter the number “0000”.
3Play the audio of the Bluetooth device.
NOTE
(If a paired Bluetooth device is detected, the input switches and the device is connected automatically. To connect to a different
Bluetooth device, first disconnect the current connection.
(You can use the r/d (Play/Pause) key and ■ (Stop) key to control playback of your Bluetooth device.
(The volume on this product can be controlled from the Bluetooth device while it is playing.
(To disconnect the Bluetooth device, do any of the following.
(Perform a disconnect operation on the Bluetooth device.
(Press the BLUETOOTH key for 3 seconds (it may take some time to disconnect).
(Switch the input of this product to anything other than “Bluetooth”.
(Switch “Bluetooth” on the Setup menu to “Off”.
(The Bluetooth indicator on the front display lights up when a Bluetooth device is connected.
(Repeatedly pressing DISPLAY on the front panel during playback allows you to switch the playback information shown on the front
display.
Related links
(“Configuring Bluetooth”(p.86)
(“Setting volume interlock with this product when playing an AirPlay/Bluetooth device”(p.72)
(“Switching the front display”(p.41)
56
PLAYBACK > Playing via a Bluetooth® connection

Playing this product’s audio through Bluetooth speakers/
headphones (audio transmission)
You can output the audio playing on this product to Bluetooth speakers/headphones.
Only connect to Bluetooth speakers/headphones that have volume adjustment. This product cannot adjust
their volume.
Bluetooth speakers/
headphones
This product
1Select an input other than “Bluetooth”.
2Put the Bluetooth speakers/headphones that you wish to connect into pairing
mode.
3Select the input source with the MusicCast Controller app.
4Tap the Settings icon on the playback screen.
5Tap “Bluetooth Transmission” on the Sound Settings screen.
6Turn “Bluetooth transmission” on from the Bluetooth Transmission settings
screen.
7Select the Bluetooth speakers/headphones to send to.
Once the connection is complete, audio is output from the Bluetooth speakers/headphones.
NOTE
(Adjust the volume on the connected Bluetooth device.
(The audio being played is also output from the speakers connected to this product.
(AirPlay, DSD, and PCM audio exceeding 192 kHz cannot be transmitted.
(When using Pure Direct, audio of input sources other than network content cannot be transmitted.
(Audio cannot be sent and received at the same time via the Bluetooth function.
(To disconnect the Bluetooth device, do any of the following.
(Perform a disconnect operation on the Bluetooth device.
(Switch the input of this product to “Bluetooth”.
(Switch “Bluetooth” on the Setup menu to “Off”.
(The Bluetooth indicator on the front display lights up when a Bluetooth device is connected.
57
PLAYBACK > Playing via a Bluetooth® connection


Listening to music via AirPlay
Playing music via AirPlay
You can play music and other content on this product via AirPlay. Tap (or click) the AirPlay icon on your
iPhone or iTunes/Music and then select this product as the output destination.
CAUTION
(The volume may become louder than expected when adjusting it on your AirPlay device, which can cause damage to your
hearing and/or your device. If the volume becomes too loud during playback, stop playback immediately.
Explanation of key operations: playback keys
(r/d (Play/Pause) key: starts or pauses playback.
(■ (Stop) key: stops playback.
(f/h (Skip) or the j/g (Skip) keys: Use to skip to the beginning of the current song or to the
beginning of the next.
(REPEAT key: changes the playback mode to Repeat.
(SHUFFLE key: changes the playback mode to Shuffle.
Explanation of key operations: playback info
(DISPLAY (Front Panel): Pressing repeatedly during playback allows you to switch the playback information
shown on the front display.
NOTE
(You can set this product to turn ON automatically when your AirPlay device starts playing.
(You can change the network name of this product that is displayed on your AirPlay device.
(You can control the volume of this product from your AirPlay device during playback.
(The product is compatible with AirPlay 2.
(For information about AirPlay, see Apple’s official website.
(AirPlay audio cannot be transmitted to the MusicCast Network.
Related links
(“Configuring a network”(p.81)
(“Setting volume interlock with this product when playing an AirPlay/Bluetooth device”(p.72)
(“Switching the front display”(p.41)
59
PLAYBACK > Listening to music via AirPlay

Listening to internet radio
Selecting an internet radio station
When this product is connected to a network, you can select and play Internet radio stations.
1Press the NET key on the remote control repeatedly to switch the input to “Net
Radio”.
2Select the content with the cursor keys and press the ENTER key.
It starts playing.
Explanation of key operations: playback keys
(r/d (Play/Pause) key: starts playback (cannot pause).
(■ (Stop) key: stops playback.
Explanation of key operations: playback info
(NOW PLAYING key: shows playback information for the Internet radio station on the front display.
(DISPLAY (Front Panel): Pressing repeatedly during playback allows you to switch the playback information
shown on the front display.
Explanation of key operations: content-related
(Cursor keys: Use to select categories, such as Internet radio station or genres.
(ENTER key: Press when an Internet radio station is selected to start playing it. When a category is selected,
press to move down one level.
(RETURN key: displays one level up.
(HOME key: displays the very top level.
NOTE
(You can register your favorite content to presets and then recall it easily.
(Some Internet radio stations may not be available at all times.
(This function uses the airable.Radio service. airable is a service provided by the company airable GmbH. This service is subject to
change, suspension, or termination without notice. Please note that the Yamaha Corporation is in no way responsible for this.
Related links
(“To make a network connection”(p.31)
(“Registering your favorite content to presets”(p.74)
(“Switching the front display”(p.41)
60
PLAYBACK > Listening to internet radio

Listening to streaming services
Listening to streaming services
When this product is connected to a network, you can play content distributed by the various streaming
services.
For information on supported streaming services, go to the product information pages of the Yamaha
website or refer to the MusicCast Controller.
The following website also provides supplementary information about different streaming services.
https://manual.yamaha.com/av/mc/ss/
NOTE
(Some streaming services require a subscription to their paid services. For details on each service provider, see its official website.
(Streaming services are subject to change, suspension, or termination without notice. Please note that the Yamaha Corporation is
in no way responsible for this.
Related links
(“Configuring a network”(p.81)
(“Registering with the MusicCast network”(p.37)
61
PLAYBACK > Listening to streaming services

Playing music on a USB device
Playing music on a USB device
This explains how to play music files saved on a USB device on this product.
BASSINPUT
5V
1A
TREBLE
PHONES
SPEAKERS
A B
Front panel
USB device (USB flash drive)
1Plug the USB device into the USB port.
2Switch the input to “USB”.
Blues
A
VOL.
3Select the content with the cursor keys and press the ENTER key.
Once you select a song, it starts playing.
Explanation of key operations: playback keys
(r/d (Play/Pause) key: starts or pauses playback.
(■ (Stop) key: stops playback.
(f/h (Skip) or the j/g (Skip) keys: Use to skip to the beginning of the current song or to the
beginning of the next.
(REPEAT key: changes the playback mode to Repeat. Check the settings on the front display.
(Off: disables Repeat mode.
(One: plays the current song repeatedly.
(All: plays all the songs on the album (or in the folder) repeatedly.
62
PLAYBACK > Playing music on a USB device

(SHUFFLE key: changes the playback mode to Shuffle. Check the settings on the front display.
(Off: disables Shuffle mode.
(On: plays all the songs on the album (or in the folder) in random order.
Explanation of key operations: playback info
(NOW PLAYING key: shows playback information on the front display for the song that is playing.
(DISPLAY (Front Panel): Pressing repeatedly during playback allows you to switch the playback information
shown on the front display.
Explanation of key operations: content-related
(Cursor keys: for selecting music files, folders, etc.
(ENTER key: press when a folder is selected to move one level down. Press when a music files is selected to
start playing it.
(RETURN key: displays one level up.
(HOME key: displays the very top level.
NOTE
(When there are a lot of files, it may take time to load them. In such case, “Loading...” is shown on the front display.
(Some text characters may not be available, and “_” is displayed.
(Up to 500 songs can be played. The maximum number of songs may be lower, depending on the folder structure.
(Take care to stop playback before removing the USB device.
(USB devices should be connected directly to the USB port of the product. Do not use extension cables, etc.
(Power is not supplied to the USB device while the product is in standby. The USB port is not for charging devices.
(You can register your favorite content to presets and then recall it easily.
(When a USB device is connected to this product for the first time, the first song in the uppermost folder (root folder) is played
automatically.
Related links
(“Supported USB devices”(p.122)
(“Supported file formats on this product (network/USB)”(p.123)
(“Setting auto playback”(p.73)
(“Switching the front display”(p.41)
(“Registering your favorite content to presets”(p.74)
63
PLAYBACK > Playing music on a USB device

Playing songs on media servers (PC/NAS)
Playing songs on media servers (PC/NAS)
When this product is connected to a network, it can play music files saved on a media server connected to
the same server.
NOTE
It is necessary to enable the media sharing setting on each device or media server software ahead of time. For more details, refer to
the user's manual of each device and software.
1Press the NET key on the remote control repeatedly to switch the input to
“Server”.
NAS A
A
2Select a media server with the cursor keys and then press the ENTER key.
3Select the content with the cursor keys and press the ENTER key.
Once you select a song, it starts playing.
Explanation of key operations: playback keys
(r/d (Play/Pause) key: starts or pauses playback.
(■ (Stop) key: stops playback.
(f/h (Skip) or the j/g (Skip) keys: Use to skip to the beginning of the current song or to the
beginning of the next.
(REPEAT key: changes the playback mode to Repeat. Check the settings on the front display.
(Off: disables Repeat mode.
(One: plays the current song repeatedly.
(All: plays all the songs on the album (or in the folder) repeatedly.
(SHUFFLE key: changes the playback mode to Shuffle. Check the settings on the front display.
(Off: disables Shuffle mode.
(On: plays all the songs on the album (or in the folder) in random order.
Explanation of key operations: playback info
(NOW PLAYING key: shows playback information on the front display for the song that is playing.
(DISPLAY (Front Panel): Pressing repeatedly during playback allows you to switch the playback information
shown on the front display.
Explanation of key operations: content-related
(Cursor keys: for selecting music files, folders, etc.
64
PLAYBACK > Playing songs on media servers (PC/NAS)

(ENTER key: press when a folder is selected to move one level down. Press when a music files is selected to
start playing it.
(RETURN key: displays one level up.
(HOME key: displays the very top level.
NOTE
(You can configure it so this product turns ON automatically when you start playing music on the media server.
(If the audio is cut off when connected to a wireless network, connect to a wired network.
(Playback can be controlled from a digital media controller (DMC).
(You can register your favorite content to presets and then recall it easily.
Related links
(“Setting auto playback”(p.73)
(“Configuring a network”(p.81)
(“Registering your favorite content to presets”(p.74)
(“Supported file formats on this product (network/USB)”(p.123)
(“Switching the front display”(p.41)
65
PLAYBACK > Playing songs on media servers (PC/NAS)

Option menu (settings for each input source)
Basic operation of the Option menu
You can set playback-related functions to suit the source that is currently playing. The basic operating
methods of the Option menu are as follows.
1Press the OPTION key.
VOL.
A
Volume Trim
2Use the cursor keys (q/w) to select an item and press the ENTER key.
To go back a level of the menu, press the RETURN key.
3Select the desired setting with the cursor keys (e/r).
4Press the OPTION key.
This completes the configuration.
Related links
(“Menu structure”(p.78)
(“List of Option menu”(p.67)
66
PLAYBACK > Option menu (settings for each input source)

List of Option menu
The following settings are available in the Option menu.
Item Page
Volume Trim In. Trim (Input Trim) 68
Signal Info. FORMAT 69
SAMPLING 69
Auto Preset 52
Clear Preset 55
Init Scan (Initial Scan) 70
Tune AID 71
Vol. Interlock (Volume Interlock) 72
Auto Playback 73
NOTE
The settings available on the Option menu vary with the input source. Only the items that can be configured are shown on the front
display.
67
PLAYBACK > Option menu (settings for each input source)

Correcting volume difference between input sources
You can correct volume difference between input sources. If it bothers you when the volume becomes
louder/quieter when you change the input source, use this setting to fine tune them.
Option menu
“Volume Trim” > “In. Trim (Input Trim)”
Setting value
-10.0 dB to +10.0 dB (0.5 dB intervals)
Default value
0.0 dB
NOTE
Each input source can be set individually.
Related links
“Basic operation of the Option menu”(p.66)
68
PLAYBACK > Option menu (settings for each input source)

Displaying audio signal information
nDisplaying format information
You can display format information for the audio signal that is playing.
Option menu
“Signal Info.” > “FORMAT”
Related links
“Basic operation of the Option menu”(p.66)
nDisplaying the sampling frequency
You can display the sampling frequency of the audio signal that is playing.
Option menu
“Signal Info.” > “SAMPLING”
Related links
“Basic operation of the Option menu”(p.66)
69
PLAYBACK > Option menu (settings for each input source)

Performing an initial scan for DAB radio reception
Model For
U.K., Europe, Russia and Australia
Performs an initial scan for searching DAB radio stations.
Option menu
“Init Scan (Initial Scan)”
1Select “TUNER” as the input source.
2Press the BAND key to select the DAB band.
3Press the OPTION key.
4Use the cursor keys to select “Init Scan (Initial Scan)” and press the ENTER key.
5Press the ENTER key to start an initial scan.
When the initial scan finishes, this product automatically tunes in to the first DAB radio station
in order by frequency.
NOTE
(If you perform an initial scan again, the DAB radio stations currently registered to the preset numbers will be cleared.
(If no DAB radio stations are found by an initial scan, press the ENTER key to start an initial scan again.
Related links
“Basic operation of the Option menu”(p.66)
70
PLAYBACK > Option menu (settings for each input source)

Checking reception strength of each DAB channel label
Model For
U.K., Europe, Russia and Australia
You can check reception strength of each DAB channel label.
Option menu
“Tune AID”
1Select “TUNER” as the input source.
2Press the BAND key to select the DAB band.
3Press the OPTION key.
4Use the cursor keys to select “Tune AID” and press the ENTER key.
5Use the cursor keys to select the desired DAB channel label.
The reception strength of DAB channel label is displayed in 0 (none) to 100 (best).
6Press the OPTION key.
This completes the checking.
Related links
“Basic operation of the Option menu”(p.66)
71
PLAYBACK > Option menu (settings for each input source)

Setting volume interlock with this product when playing an
AirPlay/Bluetooth device
When selecting an AirPlay/Bluetooth input, you can set whether to link the volume with this product. If set to
anything other than Off, the volume of this product can be adjusted by the AirPlay or Bluetooth device.
Option menu
“Vol. Interlock (Volume Interlock)”
Setting value
Off Disables volume control from AirPlay and Bluetooth devices.
Ltd Enables volume control to mute and within the range of -96.5 to -40.0 dB.
Full Enables volume control to mute and within the range of -96.5 to 0.0 dB.
Default value
Ltd
NOTE
Volume interlock is not available on all Bluetooth devices.
Related links
“Basic operation of the Option menu”(p.66)
72
PLAYBACK > Option menu (settings for each input source)

Setting auto playback
This function sets whether or not to play the content on media servers and USB devices automatically.
Option menu
“Auto Playback”
Setting value
Off Disables auto playback.
On When the power is turned ON or the input is switched, the content that was last played
starts playing automatically.
Default value
On
NOTE
(Auto playback can only be set if the input is “Server” or “USB”.
(Auto playback may not work with some inputs or content.
Related links
“Basic operation of the Option menu”(p.66)
73
PLAYBACK > Option menu (settings for each input source)

USEFUL FUNCTIONS
Preset functions
Registering your favorite content to presets
You can easily recall your favorite content later (such as music on media servers or USB devices, or Internet
radio stations) by registering it as presets.
nPreset registration
Content that can be registered includes “TUNER”, “Server”, “Net Radio”, “USB”, and some streaming
services.
1Select the radio stations you want to register, or play songs or Internet radio
stations.
2Press the MEMORY key.
TUNING
ENTER
BAND
PRESET
MEMORY
ENTER
TUNING
BAN
D
PRESET
ENTE
ENTE
R
R
VOLUME
PHONO
SLEEP
COAX 1 COAX 2
BLUETOOTH
OPT 1 OPT 2 CD
LINE 1 LINE 2 LINE 3
TUNER
HOME RETURN
SETUP OPTION
NOW PLAYING MUTE
NET USB
TUNING
REPEAT SHUFFLE
ENTER
BAND
PRESET
MEMORY
A B
SPEAKERS
ENTER
MEMORY
The preset number and content to register are shown on the front display. “Empty” is shown if
not registered.
3Select the preset number to register with the PRESET key.
4Press the MEMORY key.
The registered preset numbers and “MEMORIZED” or “Memorized” are shown.
This completes the registration.
74
USEFUL FUNCTIONS > Preset functions

NOTE
(By pressing the MEMORY key for 3 seconds or longer, you can register empty preset numbers automatically. When the input is on
“TUNER”, however, the radio station will be registered to the next empty number from the previously preset number.
(To go back to the original display without registering, press the RETURN key.
(When network input or USB input is selected, up to 40 different songs or stations that are being played can be registered.
(The type of content that can be registered may vary for streaming services and “Net Radio” according to the selected radio station
or the service.
75
USEFUL FUNCTIONS > Preset functions

Recalling content registered to a preset
Select the content you want to listen to from the content registered to presets (such as music on media
servers or USB devices, or Internet radio stations).
nRecalling a preset
1Press the TUNER key, NET key, or USB key.
VOLUME
PHONO
SLEEP
COAX 1 COAX 2
BLUETOOTH
OPT 1 OPT 2 CD
LINE 1 LINE 2 LINE 3
TUNER
HOME RETURN
SETUP OPTION
NOW PLAYING MUTE
NET USB
TUNING
REPEAT SHUFFLE
ENTER
BAND
PRESET
MEMORY
A B
SPEAKERS
ENTER
PHONO
SLEEP
COAX 1 COAX 2
BLUETOOTH
OPT 1 OPT 2 CD
LINE 1 LINE 2 LINE 3
TUNER NET USB
PHONO
SLEEP
COAX 1
COAX
2
BLUETOOTH
OPT
1 O
PT
2 C
D
LINE
1 L
INE
2 L
INE
3
NET
TUNER
USB
2Press the PRESET key to select the content you want to listen to.
VOLUME
PHONO
SLEEP
COAX 1 COAX 2
BLUETOOTH
OPT 1 OPT 2 CD
LINE 1 LINE 2 LINE 3
TUNER
HOME RETURN
SETUP OPTION
NOW PLAYING MUTE
NET USB
TUNING
REPEAT SHUFFLE
ENTER
BAND
PRESET
MEMORY
A B
SPEAKERS
ENTER
TUNING
ENTER
BAND
PRESET
MEMORY
ENTER
TUNING
BAN
D
MEMORY
ENTE
ENTE
R
R
PRESET
3Press the ENTER key.
The selected content starts playing.
NOTE
(If no presets at all have been registered, “No Presets” is displayed on the front display.
(You can use MusicCast Controller to view a list of or delete registered content (song name or radio station name).
(“TUNER” presets can only be recalled when the input is on “TUNER”. Some presets, such as “USB”, “Server”, “Net Radio” and/or
streaming services, can only be recalled if the input is on “USB” or “NET” (which can be selected by the NET key).
(Presets can only be recalled when the power is turned ON.
76
USEFUL FUNCTIONS > Preset functions

Sleep timer function
Configuring the time for the sleep timer
Once the specified time elapses, the product goes into Standby.
1Press the SLEEP key repeatedly to set the desired time for the sleep timer.
You can choose OFF, 120, 90, 60 or 30 minutes.
SLEEP
VOLUME
PHONO
SLEEP
COAX 1 COAX 2
BLUETOOTH
OPT 1 OPT 2 CD
LINE 1 LINE 2 LINE 3
TUNER
HOME RETURN
SETUP OPTION
NOW PLAYING MUTE
NET USB
TUNING
REPEAT SHUFFLE
ENTER
BAND
PRESET
MEMORY
A B
SPEAKERS
ENTER
PHONO
SLEEP
COAX 1 COAX 2
BLUETOOTH
OPT 1 OPT 2 CD
LINE 1 LINE 2 LINE 3
TUNER NET USB
A B
SPEAKERS
PHONO
COAX 1
COAX
2
BLUETOOTH
OPT
1 O
PT
2 C
D
LINE
1 L
INE
2 L
INE
3
TUNER
NET
USB
A B
A B
A B
A B
A B
A B
A B
A B
SPEAKERS
VOL.
A
Sleep 120min.
SLEEP
The SLEEP indicator on the front display flashes while a sleep timer setting is being made.
Once a setting is made, the SLEEP indicator lights up.
NOTE
(To cancel the sleep timer, select OFF.
(If you put this product into Standby, it cancels the sleep timer setting.
77
USEFUL FUNCTIONS > Sleep timer function

SETTINGS
Menus
Menu structure
This product has the following menus, depending on the use.
Setup menu:
For detailed configuration of the functions of the product. Make settings with the remote control while
looking at the front display.
Advanced Setup menu:
For configuring the product’s system settings, etc. Can only be operated from the front panel.
NOTE
Play-related settings and information can be managed from the Option menu.
Related links
(“List of Option menu”(p.67)
(“List of Setup menu items”(p.80)
(“List of Advanced Setup menu items”(p.91)
78
SETTINGS > Menus

Setup menu (changing function settings)
Basic operation of the Setup menu
For detailed configuration of the functions of the product. The basic operating methods of the Setup menu
are as follows.
1Press the SETUP key.
Network
A
2Use the cursor keys (q/w) to select an item and press the ENTER key.
To go back a level of the menu, press the RETURN key.
3Select the desired setting value with the cursor keys.
4Press the SETUP key.
This completes the configuration.
Related links
(“Menu structure”(p.78)
(“List of Setup menu items”(p.80)
79
SETTINGS > Setup menu (changing function settings)

List of Setup menu items
Items in the Setup menu are as follows.
Item Page
Network
Connection
81
Information
IP Address
DMC Control
Network Stdby (Network Standby)
Network Name
Network Update
MC Pwr Intlock (MusicCast Power Interlock)
Bluetooth Bluetooth 86
Standby (Bluetooth Standby)
Volume Max Volume 87
Initial Volume
AutoPowerStdby (Auto Power Standby) 88
ECO Mode 89
80
SETTINGS > Setup menu (changing function settings)

Configuring a network
nSetting the method of connecting (wired/wireless) to a network
This sets the method of connecting this product to a network.
Setup menu
“Network” > “Connection”
Setting value
Wired Connects via a network cable.
Wireless Connects via Wi-Fi.
Related links
(“To make a network connection”(p.31)
(“Selecting the wireless method of connecting to the network”(p.117)
(“Basic operation of the Setup menu”(p.79)
nChecking network information
Displays networking information of this product.
Setup menu
“Network” > “Information”
NEW FW Firmware update available or not
STATUS State of network jack connections
MC NET State of MusicCast Network preparations
MAC MAC address of this product (The MAC address is different depending on whether the
connection to the network is wired or wireless)
SSID Access point this product is connected to (only displayed for Wi-Fi connections)
IP IP address of this product
SUBNET Subnet mask
GATEWAY IP address of the default gateway
DNS P IP address of primary DNS server
DNS S IP address of secondary DNS server
Related links
“Basic operation of the Setup menu”(p.79)
nAuto-configuration of network information (DHCP function)
This function automatically configures the network information (IP address, subnet mask, default gateway,
etc.) of this product using a DHCP server.
81
SETTINGS > Setup menu (changing function settings)

Setup menu
“Network” > “IP Address” > “DHCP”
Setting value
Off DHCP server not used.
Configures the network information manually.
On DHCP server used.
Configures the network information automatically.
Default value
On
Related links
“Basic operation of the Setup menu”(p.79)
nConfiguring network information manually
This explains how to configure the network information (IP address, subnet mask, default gateway, etc.) of
this product manually.
Setup menu
“Network” > “IP Address”
1Select “Off” for “DHCP”.
2Select “Manual Setting” and press the ENTER key.
3Select item you want to set with the cursor keys (q/w).
4Use the cursor keys (e/r) to move the cursor position and the cursor keys (q/w)
to set the network information.
5Press the ENTER key.
6To set a different item, repeat steps 2 to 4.
7Press the SETUP key.
This completes the configuration.
Related links
“Basic operation of the Setup menu”(p.79)
82
SETTINGS > Setup menu (changing function settings)

nConfiguring operations from a digital media controller
This configures whether this product can be controlled from a digital media controller (DMC). When enabled,
playback of this product can be controlled from a DMC on the same network as the product.
Setup menu
“Network” > “DMC Control”
Setting value
Disable Disables control from a DMC.
Enable Enables control from a DMC.
Default value
Enable
Related links
“Basic operation of the Setup menu”(p.79)
nConfiguring network standby
This sets whether the power of this product can be turned ON from a network device.
Setup menu
“Network” > “Network Stdby (Network Standby)”
Setting value
Off Disables network standby.
On Enables network standby.
This consumes more energy than when it is “Off”.
Auto
Enables network standby.
When in network standby, if “Standby (Bluetooth Standby)” in “Bluetooth” is set to “Off”
and the network is disconnected for a certain period of time, the product goes into power
save mode to save energy.
Default value
Auto
NOTE
(When “Network Stdby (Network Standby)” is set to “Off”, “Standby (Bluetooth Standby)” in “Bluetooth” is disabled.
(When in the power save mode, this product cannot be turned ON from a network device, even if it is connected via a network cable.
Turn the power of this product ON manually.
83
SETTINGS > Setup menu (changing function settings)

Related links
(“Configuring Bluetooth”(p.86)
(“Basic operation of the Setup menu”(p.79)
nSetting the network name of this product
You can change the network name of this product that is displayed on the network.
Setup menu
“Network” > “Network Name”
1Press the ENTER key.
2Use the cursor keys (e/r) to move the cursor position and the cursor keys (q/w)
to edit the name.
Press the PRESET (>) key to insert characters and the PRESET (<) key to delete them.
3Press the ENTER key.
4Press the SETUP key.
This completes the configuration.
Related links
“Basic operation of the Setup menu”(p.79)
nUpdating the firmware
Firmware is updated to add functionality to this product and/or resolve problems.
You can download the latest firmware from the Yamaha website. For details, check the information provided
with the firmware when you update it.
Setup menu
“Network” > “Network Update”
Options
Perform Update Update firmware via the network.
This item is only displayed when new firmware is available.
Version Displays the version of the firmware.
ID Displays the unique System ID of this product.
NOTE
(When there is an update notification for the latest firmware, press the ENTER key to update the firmware.
(Do not execute this other than when updating the firmware. Before executing an update, check the information provided with the
firmware.
84
SETTINGS > Setup menu (changing function settings)

Related links
(“Updating the firmware”(p.97)
(“Basic operation of the Setup menu”(p.79)
nConfiguring power interlock with MusicCast-compatible devices and this product
This function allows you to set whether MusicCast-compatible devices (slave) turn ON in tandem with this
product (master) when it is turned ON.
Setup menu
“Network” > “MC Pwr Intlock (MusicCast Power Interlock)”
Setting value
Off Does not link the power of this product and that of MusicCast-compatible devices.
On Links the power of this product and that of MusicCast-compatible devices.
Default value
Off
Related links
“Basic operation of the Setup menu”(p.79)
85
SETTINGS > Setup menu (changing function settings)

Configuring Bluetooth
nConfiguring to use Bluetooth
This sets whether or not to use the Bluetooth function.
Setup menu
“Bluetooth” > “Bluetooth”
Setting value
Off Disables Bluetooth functions.
On Enables Bluetooth functions.
Default value
On
Related links
(“Playing via a Bluetooth® connection”(p.56)
(“Basic operation of the Setup menu”(p.79)
nConfiguring Bluetooth Standby
This sets whether the power of this product can be turned ON from a Bluetooth device. When set to “On”,
this product is turned ON automatically when a connection is made with a Bluetooth device.
Setup menu
“Bluetooth” > “Standby (Bluetooth Standby)”
Setting value
Off Disables the Bluetooth Standby function.
On Enables the Bluetooth Standby function.
This consumes more energy than when set to “Off”.
Default value
On
NOTE
This setting is not available when “Network Stdby (Network Standby)” in the Setup menu is set to “Off”.
Related links
(“Configuring a network”(p.81)
(“Basic operation of the Setup menu”(p.79)
86
SETTINGS > Setup menu (changing function settings)

Configuring the volume
nSetting the maximum volume
This sets the maximum volume that can be set via the VOLUME keys of the remote control, etc.
Setup menu
“Volume” > “Max Volume”
Setting value
-50.0 dB to 0.0 dB (5.0 dB intervals)
Default value
0.0 dB
Related links
“Basic operation of the Setup menu”(p.79)
nSetting the power-ON volume
This sets the volume for when the power is turned ON.
Setup menu
“Volume” > “Initial Volume”
Setting value
Off Uses the volume from the last time the power went into Standby.
Mute Mutes the volume.
-96.5 dB to 0.0 dB (0.5 dB
intervals)
Uses the specified volume.
Enabled only when the volume is set lower than “Max Volume”.
Default value
Off
Related links
“Basic operation of the Setup menu”(p.79)
87
SETTINGS > Setup menu (changing function settings)

Configuring auto power standby
This setting is for making the power of this product go into Standby automatically.
Setup menu
“AutoPowerStdby (Auto Power Standby)”
Setting value
Off Does not go into Standby automatically.
On
Goes into Standby when any of the following conditions is met.
(When the product has not been operated for 8 hours
(When the input is “NET” (which can be selected by the NET key), “Bluetooth” or “USB”
and it has not been played for 20 minutes
Default value
On
Related links
“Basic operation of the Setup menu”(p.79)
88
SETTINGS > Setup menu (changing function settings)

Setting the product to ECO mode
Sets the product to the ECO mode (power-saving function).
When the setting has been changed, press the ENTER key to restart the product. The new setting is applied
after restarting.
Setup menu
“ECO Mode”
Setting value
Off Disables the ECO mode.
On Enables the ECO mode.
The front display may become dark.
Default value
Off
Related links
“Basic operation of the Setup menu”(p.79)
89
SETTINGS > Setup menu (changing function settings)

Advanced Setup menu (changing system settings)
Basic operation of the Advanced Setup menu
For changing system settings for the product. Operate as follows from the front panel.
1If the power of the product is ON, press the z (Power) Switch to turn it OFF.
2Press the z (Power) Switch while holding down RETURN.
The Advanced Setup menu opens on the front display.
SP IMP.••8¬MIN
3Turn SELECT to select a setting item.
4Press SELECT to choose a setting value.
5Press the z (Power) Switch to turn OFF the power.
6Press the z (Power) Switch again to turn the power back ON.
The changes to settings are reflected.
Related links
(“Menu structure”(p.78)
(“List of Advanced Setup menu items”(p.91)
90
SETTINGS > Advanced Setup menu (changing system settings)

List of Advanced Setup menu items
Items in the Advanced Setup menu are as follows.
Item Page
SP IMP. (Speaker Impedance) 92
REMOTE ID 93
TU (Frequency Step) 94
INIT (Initialization) 95
UPDATE (Firmware Update) 99
NOTE
Only the items that can be configured are shown on the front display.
91
SETTINGS > Advanced Setup menu (changing system settings)

Switching speaker impedance
Changes this product setting to match the impedance of the connected speakers.
Advanced Setup menu
“SP IMP. (Speaker Impedance)”
Setting value
4ΩMIN For speakers with an impedance of 4-ohm or more but less than 8-ohm.
8ΩMIN For speakers with an impedance of 8-ohm.
Default value
8ΩMIN
Related links
“Basic operation of the Advanced Setup menu”(p.90)
92
SETTINGS > Advanced Setup menu (changing system settings)

Configuring the Remote ID
This changes the Remote ID of the main unit of this product. Normally you should set it to “ID1”.
Advanced Setup menu
“REMOTE ID”
Options
ID1 Sets the Remote ID to ID1.
AUTO Assigns the Remote ID automatically. Use this setting when operating the product using
the remote control that is included with some Yamaha CD/network players.
Default value
ID1
Related links
“Basic operation of the Advanced Setup menu”(p.90)
93
SETTINGS > Advanced Setup menu (changing system settings)

Changing the FM/AM tuning frequency setting
Model For
Asia, Taiwan, Central and South America
Sets the FM/AM tuning frequency setting of this product depending on your country or region.
Advanced Setup menu
“TU (Frequency Step)”
Setting value
FM100/AM10 Adjusts the FM frequency by 100-kHz steps and AM by 10-kHz steps.
FM50/AM9 Adjusts the FM frequency by 50-kHz steps and AM by 9-kHz steps.
NOTE
Preset (registered radio stations) and frequency will be initialized if you change the radio tuning frequency steps.
Related links
(“Preparing to listen to the radio”(p.46)
(“Basic operation of the Advanced Setup menu”(p.90)
94
SETTINGS > Advanced Setup menu (changing system settings)

Initializing settings
Initializes (resets) the various settings of the product.
Advanced Setup menu
“INIT (Initialization)”
Options
ALL Initializes all settings.
NETWORK Initializes network-related settings.
CANCEL Cancels initialization.
Default value
CANCEL
Related links
“Basic operation of the Advanced Setup menu”(p.90)
95
SETTINGS > Advanced Setup menu (changing system settings)

UPDATING
Checking the version of firmware
Checking the version of firmware
The version of this product’s firmware can be checked from the Setup menu. Do so as follows.
1Press the SETUP key.
2Select “Network” with the cursor keys (q/w) and then press the ENTER key.
3Then select “Network Update” and press the ENTER key.
4Confirm the version of firmware in “Version”.
The version of firmware appears on the front display.
To close the Setup menu, press the SETUP key.
NOTE
The version of firmware can also be checked from the MusicCast Controller menu.
Related links
(“Configuring a network”(p.81)
(“Updating the firmware”(p.97)
96
UPDATING > Checking the version of firmware

Updating the firmware
Updating the firmware
Updated firmware is provided to add functionality to this product and/or resolve problems. For details about
firmware, please visit the Yamaha website. The firmware can be updated either via the Internet or by using
USB flash drive.
Related links
(“Updating the firmware via your network”(p.98)
(“Updating firmware via USB flash drive”(p.99)
97
UPDATING > Updating the firmware

Updating the firmware via your network
If this product is connected to the Internet and it is ready for a new firmware update, the following message
appears when you turn this product ON.
Start [ENTER]
Update the firmware as follows over the network from this message. If you want to update later, press the
RETURN key to cancel updating.
NOTICE
(Do not operate the product or unplug its power cord or network cable during the updating process. If the process is interrupted,
this product may become unusable. If that happens, please contact an authorized Yamaha service center to have it repaired.
1Press the ENTER key.
“Perform Update” is displayed on the front display.
2Press the ENTER key.
Updating of the firmware starts.
3Once “Update Success” is shown on the front display, press the z (power) switch
on the unit.
This completes the firmware update.
NOTE
(It takes about 10 minutes to update the firmware.
(Updating firmware may fail if there is a problem with the network connection. If this happens, wait a while and try again, or use
USB flash drive for updating.
(You can check whether there are any new firmware updates by selecting the following menu items in order: Setup menu >
“Network” > “Information” > “NEW FW”.
(When new firmware is available, you can perform the update via Setup menu > “Network” > “Network Update”.
Related links
(“Configuring a network”(p.81)
(“Updating the firmware”(p.97)
98
UPDATING > Updating the firmware

Updating firmware via USB flash drive
You can download the latest firmware from the Yamaha website, and the firmware can be updated by using a
USB flash drive. For the information about the firmware, please visit the product information pages of the
Yamaha website.
NOTICE
(Do not operate the product, unplug the power cord, or remove the USB flash drive while updating the firmware. If the process is
interrupted, this product may become unusable. If that happens, please contact an authorized Yamaha service center to have it
repaired.
About the USB flash drive used
Use the USB flash drive that meets the following conditions.
(Compatible with USB Mass Storage Class
(Formatted in FAT16 or FAT32
(No encryption functionality
(The absence of any data (Empty)
nFirmware update procedure
Update the firmware as follows. Operate as follows from the front panel.
1Download the firmware.
For the information about the firmware, please visit the product information pages of the
Yamaha website.
2Extract (uncompress) the downloaded compressed files.
3Save the firmware (binary file format) on the USB flash drive.
Save it at the head of the top-level folder (root folder) on the USB flash drive. When saving, do
not change the file name.
4Plug the USB flash drive into the USB port of this product.
5If the power of the product is ON, press the z (Power) Switch to turn it OFF.
6Press the z (Power) Switch while holding down RETURN.
The Advanced Setup menu is shown on the front display.
7Turn SELECT to select “UPDATE……USB”.
8Press DISPLAY.
Updating of the firmware starts. Once the update is made, “UPDATE SUCCESS”, “PLEASE…”,
and “POWER OFF” is shown in sequence. (This message will disappear after about 10 seconds.)
99
UPDATING > Updating the firmware

9Press the z (Power) Switch to turn it OFF, and then, remove the USB flash drive
from the USB port of this product.
This completes the firmware update.
NOTE
The version of this product’s firmware can be checked from the Setup menu.
nIf the product does not start up normally after the firmware update
Update the firmware again as follows.
1Unplug the power cord of this product from an outlet, and press the z (Power)
Switch to turn it ON.
2Plug the USB flash drive in which you saved the firmware into the USB port of this
product.
3Plug the power cord into an outlet while holding down DIMMER.
4After “USB UPDATE” is shown on the front display, stop holding down DIMMER.
Updating of the firmware starts. Once the update is made, “UPDATE SUCCESS”, “PLEASE…”,
and “POWER OFF” is shown in sequence. (This message will disappear after about 10 seconds.)
5Press the z (Power) Switch to turn it OFF, and then, remove the USB flash drive
from the USB port of this product.
Related links
(“Updating the firmware”(p.97)
(“Checking the version of firmware”(p.96)
(“Errors shown on the front display”(p.114)
100
UPDATING > Updating the firmware

TROUBLESHOOTING
If you think there is a problem
If you think there is a problem, the 1st step is checking the
following
If the product stops working normally while you are using it, check the following items first.
(The power plugs of the product and audio device(s) (CD player, etc.) are firmly plugged into their outlets.
(The power of the product, the subwoofer and audio devices (CD player, etc.) is turned on.
(The cables between devices are securely plugged into the jacks.
101
TROUBLESHOOTING > If you think there is a problem

Problems with power, system, and/or remote control
Power fails to turn ON
(The protective circuit has been activated 3 times in a row.
If the Power Indicator on the front panel flashes when you try to turn the power ON, it fails to come on in
order to protect the product. Please contact an authorized Yamaha service center to have it repaired.
Power fails to turn OFF
(The built-in microcomputer has frozen due to an external electrical shock (such as from lightning
or excessive static electricity) or a drop in electrical voltage.
Turn OFF the power using the z (Power) Switch on the front panel, wait at least 15 seconds, then turn
the power ON.
Power turns OFF right away
(You may be trying to turn ON the power while the speaker cables are shorted.
Firmly twist the core wires of each of the speaker cables and then reconnect them to this product and
the speakers. For more details, refer to the following.
(“Connecting speakers”(p.23)
Power switches to standby automatically
(The sleep timer activated.
Turn the power back ON and start playback. For more details, refer to the following.
(“Configuring the time for the sleep timer”(p.77)
(The Auto Power Standby function was activated as the set period of time elapsed without
operating the product.
To disable the Auto Power Standby function, set “AutoPowerStdby (Auto Power Standby)” to “Off” from
the Setup menu. For more details, refer to the following.
(“Configuring auto power standby”(p.88)
(Due to a short in the speaker cables, the protective circuit was activated.
Firmly twist the core wires of each of the speaker cables and then reconnect them to this product and
the speakers. For more details, refer to the following.
(“Connecting speakers”(p.23)
(The volume was increased too high, activating the protective circuit.
Lower the volume.
The product does not respond to controls
(The built-in microcomputer has frozen due to an external electrical shock (such as from lightning
or excessive static electricity) or a drop in electrical voltage.
Turn OFF the power using the z (Power) Switch on the front panel, wait at least 15 seconds, then turn
the power ON.
102
TROUBLESHOOTING > If you think there is a problem

This product cannot be operated with the remote control
(The z (Power) Switch on the front panel is OFF.
Turn the z (Power) Switch on the front panel ON.
(It is outside the operating range.
Try using it within the operating range. For more details, refer to the following.
(“How to insert batteries, and its operating range”(p.21)
(Its batteries are dead.
Replace with new batteries.
(Strong light or sunlight is hitting the remote control signal receiver on the main unit.
Change the lighting or the orientation of the unit.
The front display is OFF
(Pure Direct is ON.
When using Pure Direct, the front display turns OFF. After turning OFF, the display comes back ON when
the remote control or front panel is operated.
103
TROUBLESHOOTING > If you think there is a problem

Problems with the audio
No sound
(A different input is selected.
Use the input source selection key to select the correct input. For more details, refer to the following.
(“Selecting an input source”(p.39)
(The product is receiving an input signal that it cannot play.
This product cannot play some digital audio formats. Make sure the signal is in a format that this product
can play. See the following for information on supported file formats and decoding formats.
(“Supported file formats on this product (network/USB)”(p.123)
(“Specifications”(p.125)
(A cable connecting this product and an audio device is damaged.
If you check the connections and they seem fine, replace the cable with a different one.
(The output speakers are not set correctly.
Press the SPEAKERS A or SPEAKERS B key corresponding to the jacks to which the speakers are
connected to turn their output ON. For more details, refer to the following.
(“Selecting the output speakers”(p.38)
(The audio is muted.
Press the MUTE key to cancel muting.
(Headphones are plugged into the PHONES jack.
Unplug the headphones.
(This product was put into Standby by the Auto Power Standby function.
Set “AutoPowerStdby (Auto Power Standby)” to “Off” from the Setup menu. For more details, refer to
the following.
(“Configuring auto power standby”(p.88)
Volume cannot be increased
(The maximum volume is set too low.
Adjust the maximum value via “Max Volume” in “Volume” in the Setup menu. For more details, refer to
the following.
(“Configuring the volume”(p.87)
(The power of the external device connected to the output jacks of this product is OFF.
Turn all corresponding devices ON.
(The volume interlocks between each device and this product have not been configured for
Bluetooth/AirPlay playback from a Bluetooth device or AirPlay device.
Configure the volume interlocks of each device via “Vol. Interlock (Volume Interlock)” on the Option
menu. For more details, refer to the following.
(“Setting volume interlock with this product when playing an AirPlay/Bluetooth device”(p.72)
(LOUDNESS is set too low.
First, lower the volume with VOLUME, then return LOUDNESS to the FLAT position and readjust the
volume.
104
TROUBLESHOOTING > If you think there is a problem

No sound is output from a particular speaker
(BALANCE is set to the maximum for either left or right.
Adjust BALANCE so sound comes out of the left and right speakers.
(A cable connecting this product and the corresponding speaker is damaged.
Check the connections of each jack on the speaker(s) and this product, and if no problem exists with the
connections, the cable may be broken. Replace the cable with a different one.
(The corresponding speaker may be damaged.
You can check this by replacing it with a different speaker that is functioning normally. If sound does not
come from the replacement speaker either, this product may be faulty.
No sound is output from the subwoofer
(The volume of the subwoofer is extremely low.
Adjust the volume on the subwoofer itself.
(The auto standby function of the subwoofer (automatically turning the power OFF) was activated.
Disable auto-standby or adjust its operating sensitivity on the subwoofer itself.
Noise is being output
(Digital and/or high frequency equipment is located near this product.
Increase the distance between this product and such devices.
(A cable connecting this product and an audio device is damaged.
If you check the connections and they seem fine, replace the cable with a different one.
Sound is distorted
(The volume is too loud.
Lower the volume.
105
TROUBLESHOOTING > If you think there is a problem

Problems with FM radio
Radio reception is poor or has noise
(It is receiving multipath (multiple reflections) or other interference.
Change the height, orientation, and/or location of the FM antenna.
(The radio station is being received from a distant region.
Press MODE on the front panel and switch to Mono reception. For more details, refer to the following.
(“Selecting a radio station”(p.49)
Automatic selection of FM radio stations is not possible
(The FM radio stations are being received from distant regions.
Manually select stations. For more details, refer to the following.
(“Selecting a radio station”(p.49)
Alternatively, use an outdoor antenna (commercially-available) .
Cannot select radio stations by pressing the PRESET key
(No radio stations are registered.
If no radio stations at all have been registered, “No Presets” is displayed on the front display when the
PRESET key is pressed. Register radio stations to preset numbers. For more details, refer to the
following.
(“Registering radio stations manually”(p.53)
Auto presets can also be used for FM radio stations. For more details, refer to the following.
(“Auto-registering FM radio stations (auto preset)”(p.52)
If the signals of FM radio stations are weak, no stations at all may be registered when auto preset is
performed. In that case, register them manually.
(The input is on something other than “TUNER”.
Press the TUNER key. “TUNER” presets can only be recalled when the input is on “TUNER”.
106
TROUBLESHOOTING > If you think there is a problem

Problems with AM radio
AM radio reception is poor or has noise
(It is picking up noise from sources like fluorescent lights, motors, etc.
It is difficult to completely eliminate noise from the environment. However, using a commercially-
available outdoor antenna may help reduce the noise.
Automatic selection of AM radio stations is not possible
(The AM radio signal is weak.
Change the direction of the AM antenna.
Manually select stations. For more details, refer to the following.
(“Selecting a radio station”(p.49)
Cannot register (preset) any AM radio stations
(The auto registration function (auto preset) is being used.
Auto preset only works with FM radio stations. Please register AM radio stations manually. For more
details, refer to the following.
(“Registering radio stations manually”(p.53)
Cannot select radio stations by pressing the PRESET key
(No radio stations are registered.
If no radio stations at all have been registered, “No Presets” is displayed on the front display when the
PRESET key is pressed. Register radio stations to preset numbers. For more details, refer to the
following.
(“Registering radio stations manually”(p.53)
(The input is on something other than “TUNER”.
Press the TUNER key. “TUNER” presets can only be recalled when the input is on “TUNER”.
107
TROUBLESHOOTING > If you think there is a problem

Problems with DAB radio
No DAB radio reception
(An initial scan has not been performed.
Perform an initial scan to receive DAB radio. For details, see the following:
(“Preparing the DAB tuning”(p.47)
No DAB radio reception even after performing an initial scan
(Reception strength of DAB radio is poor.
Check reception strength via “Tune AID” on the Option menu, and adjust the antenna height or
orientation, or place it in a different location. For details, see the following:
(“Preparing the DAB tuning”(p.47)
(There is no DAB coverage in your area.
Check with your dealer or WorldDMB online at “http://www.worlddab.org” for a listing of the DAB
coverage in your area.
DAB radio reception is poor or has noise
(There is multi-path interference.
Check reception strength via “Tune AID” on the Option menu, and adjust the antenna height or
orientation, or place it in a different location. For details, see the following:
(“Preparing the DAB tuning”(p.47)
(Your area is too far from the DAB station transmitter.
Use an outdoor antenna. We recommend using a sensitive multi-element antenna.
DAB information is not available or is inaccurate
(The selected DAB radio station may be temporarily out of service or may not provide information.
Contact the DAB broadcaster.
No DAB radio sound
(The selected DAB radio station may be temporarily out of service.
Try the station later or select another station.
108
TROUBLESHOOTING > If you think there is a problem

Problems with USB
The USB device is not recognized
(The USB device is not plugged into the USB port correctly.
Turn OFF this product and then plug the USB device in again.
(The USB device being used is in a format other than FAT16/32.
Use a FAT16/32 formatted USB device.
The folders and/or files are not displayed
(The data on the USB device is protected via an encryption function.
Use a USB device that is not encrypted.
The content on the USB device fails to play when its preset number is selected
(A USB device other than the one at the time of registration is plugged in.
Connect the USB device registered to the preset number.
(The registered content (files) was moved to a different folder.
Register the content again.
(Other music files were added to or deleted from the folder.
It may not be possible to recall registered content. Register the content again.
Files on the USB device fail to play consecutively
(The selected folder contains files that cannot be played on the product.
Do not put files that cannot be played on the product into the folder to be played. Refer to the following
for the music file formats supported by this product.
(“Supported file formats on this product (network/USB)”(p.123)
(The selected folder contains 500 or more songs.
Up to 500 songs can be played. The maximum number of songs may be lower, depending on the folder
structure.
109
TROUBLESHOOTING > If you think there is a problem

Problems with network
Network functions cannot be used
(Network information (IP address) was not acquired properly.
Enable the DHCP server function of the router. Set “DHCP” to “On” from the Setup menu of this product.
For more details, refer to the following.
(“Configuring a network”(p.81)
If you configure the network information manually instead of using the DHCP server, make sure the IP
address of this product is not the same as any other network devices.
(It is connected to an IPv6 type of router.
Some network functions of this product are not supported in IPv6 networks. Connect to an IPv4 network.
Cannot connect to the Internet via a wireless LAN router (access point)
(The power of the wireless LAN router is OFF.
Turn the wireless LAN router ON.
(This product is too far from the wireless LAN router.
Move the wireless LAN router and/or this product closer to each other.
(There is an obstacle between this product and the wireless LAN router.
Remove the obstacle between this product and the wireless LAN router.
(The wireless LAN router (access point) is configured to use Channel 14.
Change the wireless LAN router (access point) settings so it uses one of the channels between 1 and 13.
(The MAC address filter of the wireless LAN router (access point) is enabled.
Set the MAC address filter of the wireless LAN router (access point) to disabled.
Cannot find the wireless network
(Electromagnetic waves from a microwave oven or other wireless devices are interfering with
wireless communication.
Turn those devices OFF, or move them away from this product and the wireless LAN router. Also, if your
wireless LAN router supports the 5 GHz frequency band, switch the connection to the 5 GHz band.
(Access to the network is restricted by the firewall settings of the wireless LAN router.
Check the firewall settings of your wireless LAN router.
Cannot detect a media server (PC/NAS)
(The share settings of the media server are not correct.
Change the share settings of the media server so this product can access the folders on the media server.
(Access to the media server is restricted by security software settings, etc.
Check the security software settings of the media server and/or router.
(This product is not connected to the same network as the media server.
Check the network connections and/or the router settings, and connect this product with the media
server over the same network (router).
110
TROUBLESHOOTING > If you think there is a problem

Media server (PC/NAS) files will not display (or play)
(This product or the media server are using unsupported file format(s).
Use file formats that are supported by both this product and the media server. Refer to the following for
the music file formats supported by this product.
(“Supported file formats on this product (network/USB)”(p.123)
Media server (PC/NAS) content cannot be played when its preset number is selected
(The power of the media server (PC/NAS) is OFF.
Make sure the power of the media server (PC/NAS) is ON.
(Not connected to the network.
Check the network connections and/or the router settings.
(The registered content (files) was moved to a different folder.
Register the content again.
(Other music files were added to or deleted from the folder.
It may not be possible to recall registered content. Register the content again.
Cannot play Internet radio
(Not connected to the Internet.
In order to use Internet radio, this product must be connected to the Internet. Check and make sure the
network information (IP address) was acquired properly. For more details, refer to the following.
(“Configuring a network”(p.81)
(The selected Internet radio station service is not currently available.
It may not be possible to receive the radio station due to a network error on the radio station side, or the
service may currently be stopped. Wait for a while and try playing it again, or select a different radio
station.
(The selected Internet radio station is broadcasting silence.
Some radio stations broadcast silence at some times. In such a case, no sound plays even if the station is
being received. Wait for a while and try playing it again, or select a different radio station.
(Access to the network is restricted by the firewall settings of the router or network devices.
Check the firewall settings. Note that Internet radio can only be played via the port specified by each
radio station. The port number differs depending on the radio station.
When using AirPlay, this product is not detected by the iPhone
(You are using a router that supports multi SSID.
The network isolating function of your wireless LAN router (access point) may be preventing access to
this product. When connecting your iPhone, use an SSID that allows access to this product (try
connecting to the primary SSID).
Music doesn’t play via AirPlay
(You are trying to listen to music that cannot be played on your iPhone.
Make sure the files are playable. If you cannot play it even on your iPhone itself, the music data and/or
storage area may be damaged.
111
TROUBLESHOOTING > If you think there is a problem

This product is not detected by the dedicated app on the mobile device
(This product is not connected to the same network as the mobile device.
Check the network settings and/or the router settings and connect to the same network.
(You are using a router that supports multi SSID.
The network isolating function of your wireless LAN router (access point) may be preventing access to
this product. When connecting your mobile device, use an SSID that allows access to this product (try
connecting to the primary SSID).
Unable to update the firmware via the network
(Your network connection is poor.
Wait a while and try again. Otherwise, use USB flash drive for updating.
112
TROUBLESHOOTING > If you think there is a problem

Problems with Bluetooth
Cannot connect with a Bluetooth device
(The wireless antenna of this product is not up.
Stand the wireless antenna upright.
(The Bluetooth function of this product is disabled.
Enable the Bluetooth function with “Bluetooth” on the Setup menu. For more details, refer to the
following.
(“Configuring Bluetooth”(p.86)
(The Bluetooth function of the Bluetooth device is OFF.
Turn ON the Bluetooth function of the Bluetooth device.
(This product is connected to a different Bluetooth device.
Terminate the current Bluetooth connection and connect to the desired Bluetooth device. For more
details, refer to the following.
(“Playing via a Bluetooth® connection”(p.56)
(This product and the Bluetooth device are too far apart.
Move this product and the Bluetooth device closer together.
(Interference from device(s) (microwave oven, wireless LAN, etc.) using the 2.4 GHz frequency
band is impeding wireless communications.
Move this product and/or the Bluetooth device away from those devices. Also, if your wireless LAN router
supports the 5 GHz frequency band, switch the connection to the 5 GHz band.
(The Bluetooth device you are using does not support the A2DP and/or AVRCP profiles.
Use a Bluetooth device that supports the A2DP and/or AVRCP profiles.
(The connection information registered to the Bluetooth device is not functioning properly for
some reason.
Delete the connection information of the Bluetooth device and then reconnect this product to the
Bluetooth device. For more details, refer to the following.
(“Playing via a Bluetooth® connection”(p.56)
When connected via Bluetooth®, there is no sound, or the sound is intermittently
discrupted
(The volume of the Bluetooth device is too low.
Turn up the volume of the Bluetooth device.
(The output-switching of the Bluetooth device is not set to this product.
Set the output-switching of the Bluetooth device to this product.
(The Bluetooth connection was cut off.
Reconnect the Bluetooth. For more details, refer to the following.
(“Playing via a Bluetooth® connection”(p.56)
(They are too far apart.
Move the Bluetooth device closer to this product.
113
TROUBLESHOOTING > If you think there is a problem

Errors shown on the front display
When an error is shown on the front display, check it in the following table.
Message Contents Solution
Check SP Wires The speaker cable(s) are
shorted.
Firmly twist the core wires of each of the speaker cables and then
reconnect them to this product and the speakers. For more details, refer
to the following.
(“Connecting speakers”(p.23)
Access denied The media server (PC/NAS) is
denying access.
Change the share settings of the media server (PC/NAS) so this product
can access the folders on the media server.
Access error
Cannot access the USB
device.
Turn OFF this product and then plug the USB device in again. If the
message is still displayed, move the music files to a different USB device
and play them.
There is a problem with the
network.
Check whether the router and/or modem are ON and whether this
product is connected properly with the router (or hub). For more details,
refer to the following.
(“Connecting a network cable (wired connection)”(p.32)
(“Preparing the wireless antenna (wireless connection)”(p.33)
No content
No files that the product can
play are in the selected
folder.
Select a folder that contains files that the product can play.
Please wait
The product is making
necessary preparations for
connecting to a network.
Wait until the message disappears. If it fails to disappear after 3
minutes, turn the power OFF and then back ON.
Unable to play
Music files on the USB device
fail to play.
Make sure the files are playable on this product. Refer to the following
for the music file formats supported by this product.
(“Supported USB devices”(p.122)
(“Supported file formats on this product (network/USB)”(p.123)
If the music data cannot be played on any other device, it may be
corrupted.
Music files on a media server
(PC/NAS) fail to play.
Make sure the files are playable on this product. Refer to the following
for the music file formats supported by this product.
(“Supported file formats on this product (network/USB)”(p.123)
If the file(s) are supported by this product but still cannot be played, the
network may be overloaded.
USB
Overloaded
Too much current flowing to
the USB device.
Turn OFF this product and then plug the USB device in again. If the
message is still displayed, move the music files to a different USB device
and play them.
Not Found
No firmware file is stored in
the USB flash drive while
updating the firmware.
Verify that the latest firmware is stored in your USB flash drive. For more
details, refer to the following.
(“Updating firmware via USB flash drive”(p.99)
Version error Error in updating the
firmware.
Try updating the firmware again. For more details, refer to the following.
(“Configuring a network”(p.81)
(“Updating the firmware”(p.97)
114
TROUBLESHOOTING > If you think there is a problem

Message Contents Solution
Update failed. Error in updating the
firmware.
Try updating the firmware again. Update by using the USB flash drive
instead of updating via your network. For more details, refer to the
following.
(“Updating firmware via USB flash drive”(p.99)
115
TROUBLESHOOTING > If you think there is a problem

APPENDIX
Product care
Taking care of this product
Check the following before cleaning the product.
(Do not use chemicals such as benzene, thinner, or rubbing alcohol on the product. To avoid scratching the
surface, wipe it dry with a soft cloth.
116
APPENDIX > Product care

Making wireless network connections
Selecting the wireless method of connecting to the network
Select the connection method suiting your network environment.
1Press the SETUP key.
2Select “Network” with the cursor keys (q/w) and then press the ENTER key.
3Then select “Connection” and “Wireless” in that order and press the ENTER key.
Select the method of setting up a wireless connection from the following.
(“Using the WPS button to make a wireless connection”(p.118)
(“Making a wireless connection with your iPhone (WAC)”(p.119)
(“Making a wireless connection manually”(p.120)
NOTE
Network settings can also be made when registering this product to the MusicCast Network. We recommend this method when using
MusicCast.
Related links
“Registering with the MusicCast network”(p.37)
117
APPENDIX > Making wireless network connections

Using the WPS button to make a wireless connection
Pressing the WPS button on your wireless LAN router is a simple way to configure a wireless connection.
Setup menu
“Network” > “Connection” > “Wireless”
1Select “WPS” with the cursor keys (q/w) and then press the ENTER key.
2Once “Connect[ENTER]” is shown on the front display, press the ENTER key.
3Once “Connecting” is shown on the front display, press the WPS button on the
wireless LAN router (access point).
Once the connection is made, “Completed” is shown and the Wireless LAN indicator lights up
on the front display.
If “Not connected” is displayed, either repeat the process from step 1 or try a different
connection method.
This completes the wireless connection process.
NOTE
This product cannot connect to a wireless LAN router (access point) using the WEP encryption method. In such case, try a different
connection method.
What is WPS?
WPS (Wi-Fi Protected Setup) is a standard developed by the Wi-Fi Alliance. WPS make it easy to set up a wireless network.
Related links
“Selecting the wireless method of connecting to the network”(p.117)
118
APPENDIX > Making wireless network connections

Making a wireless connection with your iPhone (WAC)
Apply the network settings of your iPhone (iOS device) to this product to set up a wireless connection.
Before starting setup, check and make sure your iPhone is connected to the wireless LAN router (access
point).
Setup menu
“Network” > “Connection” > “Wireless”
1Select “Share Setting” with the cursor keys (q/w).
2Select “Wireless (WAC)” with the cursor keys (q/w).
3Open the Wi-Fi setting screen on your iPhone (iOS device) and set this product as an
AirPlay speaker.
4Select the wireless network (access point) which is shared with this product.
After the sharing operation is complete, this product will connect automatically to the
selected wireless network (access point).
Also, the Wireless LAN indicator lights up on the front display.
This completes the wireless connection process.
NOTE
(The following settings are initialized.
(Network settings
(Bluetooth settings
(Content registered to presets (songs from a media server, Internet radio stations, etc.)
(Account information of the various music services
(Repeat/shuffle settings
(This product cannot connect to a wireless LAN router (access point) using the WEP encryption method. In such case, try a different
connection method.
(A warning message is displayed if a network cable is connected to this product. Unplug the network cable before operating the
product.
(If an AirPlay password has been set up, cancel it temporarily and connect using WAC.
Related links
“Selecting the wireless method of connecting to the network”(p.117)
119
APPENDIX > Making wireless network connections

Making a wireless connection manually
Enter the required information and set up a wireless connection. You will have to configure the SSID
(network name), encryption method and security key manually.
Setup menu
“Network” > “Connection” > “Wireless”
1Select “Manual Setting” with the cursor keys (q/w).
2Enter the necessary information as indicated on the front display.
To enter text, use the cursor keys (e/r) to move the cursor, and then the cursor keys (q/w)
to change the character. Press the PRESET (>) key to insert characters and the PRESET (<) key
to delete them.
3Select “Connect[ENTER]” with the cursor keys (q/w) and then press the ENTER
key.
“Connect[ENTER]” is only shown when there are no problems with the settings.
Once the connection is made, “Completed” is shown and the Wireless LAN indicator lights up
on the front display.
If “Not connected” is displayed, either repeat the process or try a different connection
method.
This completes the wireless connection process.
Related links
“Selecting the wireless method of connecting to the network”(p.117)
120
APPENDIX > Making wireless network connections

Supported devices and formats
Supported Bluetooth devices
Check the following for the Bluetooth devices that can connect to this product.
(Bluetooth devices that support A2DP and AVRCP profiles can be connected.
(Connection to all Bluetooth devices is not guaranteed.
121
APPENDIX > Supported devices and formats

Supported USB devices
Check the following to see if your USB device is supported by this product.
(USB flash drive formatted in FAT16 or FAT32 is supported.
Do not plug in any other USB devices.
(USB devices with an encryption function cannot be used.
(There is no guarantee that all USB devices can be connected.
122
APPENDIX > Supported devices and formats

Supported file formats on this product (network/USB)
The following file formats can be played on this product.
File Sampling frequency
(kHz)
No. of
quantization bits
(bit)
Bit rate (kbps) No. of channels
Gapless
Playback
Support
WAV* 32/44.1/48/88.2/96/
176.4/192/352.8/384 16/24/32 - 2 )
MP3 32/44.1/48 - 8 to 320 2 -
WMA 32/44.1/48 - 8 to 320 2 -
MPEG-4 AAC 32/44.1/48 - 8 to 320 2 -
FLAC 32/44.1/48/88.2/96/
176.4/192/352.8/384 16/24 - 2 )
ALAC 32/44.1/48/88.2/96 16/24 - 2 )
AIFF 32/44.1/48/88.2/96/
176.4/192/352.8/384 16/24/32 - 2 )
DSD
2.8 MHz (DSD64)/
5.6 MHz (DSD128)/
11.2 MHz (DSD256)
1 - 2 )
* linear PCM format only. Files in 32-bit float cannot be played.
(The file formats that can be played vary with the server software installed on the media server (PC/NAS).
For more details, refer to the user's manual of the server software.
(Files protected by DRM (Digital Rights Management) cannot be played.
123
APPENDIX > Supported devices and formats

Trademarks
Trademarks
The trademarks used in this manual are as follows.
This Receiver is compatible with AirPlay 2. iOS 11.4 or later is required.
Use of the Works with Apple badge means that an accessory has been designed to work specifically with the technology
identified in the badge and has been certified by the developer to meet Apple performance standards.
Apple, AirPlay, Apple TV, Apple Watch, iPad, iPad Air, iPad Pro, iPhone, Lightning, and iTunes are trademarks of Apple Inc.,
registered in the U.S. and other countries and regions.
App Store
App Store is a service mark of Apple Inc., registered in the U.S. and other countries.
Android Google Play
Android and Google Play are trademarks of Google LLC.
The Wi-Fi CERTIFIED™ Logo and Wi-Fi Protected Setup Logo are registered trademark of Wi-Fi Alliance®.
Wi-Fi, Wi-Fi CERTIFIED, Wi-Fi Protected Setup and WPA2 are trademarks or registered trademarks of Wi-Fi Alliance®.
The Bluetooth® word mark and logos are registered trademarks owned by Bluetooth SIG, Inc. and any use of such marks by
Yamaha Corporation is under license. Other trademarks and trade names are those of their respective owners.
MusicCast is a trademark or registered trademark of Yamaha Corporation.
GPL/LGPL
This product utilizes GPL/LGPL open-source software in some sections. You have the right to obtain, duplicate, modify, and
redistribute this open-source code only. For information on GPL/LGPL open source software, how to obtain it, and the GPL/
LGPL license, refer to the Yamaha Corporation website
(https://download.yamaha.com/sourcecodes/musiccast/).
Licenses
For information on the licenses of the third-party software in this product, refer to the following.
http://(IP address of this product*)/licenses.html
* IP address of this product is checked with MusicCast Controller.
124
APPENDIX > Trademarks

Specifications
Specifications
The specifications of this unit are as follows.
Input jacks
Analog Audio
(Audio x 5 (including PHONO)
Digital Audio
(Optical x 2 (PCM only) (Supported frequencies: 32 kHz/44.1 kHz/48 kHz/88.2 kHz/96 kHz/176.4 kHz/192 kHz)
(Coaxial x 2 (PCM only) (Supported frequencies: 32 kHz/44.1 kHz/48 kHz/88.2 kHz/96 kHz/176.4 kHz/192 kHz)
Other jacks
(USB x 1 (Type-A)
(NETWORK (Wired) x 1 (100Base-TX/10Base-T)
Output jacks
Analog Audio
(Speaker Out x 4 (A L/R, B L/R)
(Subwoofer Out x 1 (monaural)
(Headphone x 1
(Audio x 2
TUNER
Analog Tuner
([Models for U.K., Europe and Russia]
DAB/FM with Radio Data System x 1 (TUNER)
([Model for Australia]
DAB/FM x 1 (TUNER)
([Models for U.S.A., Canada, China, Korea, Asia, Taiwan and for Central and South America]
FM/AM x 1 (TUNER)
Bluetooth
Sink Function
(Source Device to this product (ex. Smartphone/Tablet)
(Supported profile
(A2DP v1.3, AVRCP v1
(Supported codec
(SBC, AAC
125
APPENDIX > Specifications

Source Function
(This product to Sink Device (ex. Bluetooth Headphone)
(Supported profile
(A2DP v1.3
(Supported codec
(SBC
(Capable of Play/Stop Operation from Sink Device
Bluetooth version
(Ver. 4.2
Wireless output
(Bluetooth Class 2
Network
media servers (PC/NAS)
AirPlay 2
Internet Radio
music streaming service
MusicCast
(Controlled by MusicCast Controller App.
(MusicCast Link function*
* The following audio distribution is restricted.
(PCM (352.8 kHz/384 kHz) and DSD
(AirPlay
Wi-Fi function
(Capable of WPS by PIN Method and Push-Button-Method
(Available Security Method: WEP, WPA2-PSK (AES), Mixed Mode
(Wireless LAN Standards: IEEE 802.11 a/b/g/n/ac*
* 20 MHz channel bandwidth only
(Radio Frequency: 2.4/5 GHz
Audio Section
80 W + 80 W
Rated Output Power (2-channel driven)
(20 Hz to 20 kHz, 0.07% THD)
( 8 Ω
Dynamic power (IHF)
(8 Ω 105 W + 105 W
(6 Ω 125 W + 125 W
(4 Ω 150 W + 150 W
(2 Ω 175 W + 175 W
126
APPENDIX > Specifications

IEC Output Power (1 kHz, 0.07% THD, 8 Ω)
([Models for U.K. and Europe] 85 W + 85 W
Maximum Effective Output Power (JEITA, 1 kHz, 10% THD)
([Models for U.S.A., Canada, China, Korea, Australia, U.K., Europe, Russia and for Central and South America]
115 W + 115 W
( 8 Ω
Power Bandwidth (2-channel driven, 0.06% THD, 40 W/8 Ω) 10 Hz to 50 kHz
Damping Factor (1 kHz, 8 Ω) 150 or more
Input Sensitivity / Input Impedance (1 kHz, 100 W/8 Ω)
(PHONO (MM) 3.5 mVrms/47 kΩ
(CD etc. 200 mVrms/47 kΩ
Maximum Input Signal Voltage
(PHONO (MM) (1 kHz, 0.003% THD) 60 mVrms
(CD/LINE1/LINE2/LINE3 (1 kHz, 0.5% THD) 2.2 Vrms
Rated Output Voltage / Output Impedance (CD etc. Input 1 kHz, 200 mV)
(LINE OUT 200 mV/1.0 kΩ
(SUBWOOFER OUT (30 Hz) 4.0 Vrms/1.2 kΩ
Headphone Jack Rated Output Power (1 kHz, 200 mV, 8 Ω load) 410 mV/470 Ω
Frequency Response
(CD etc. (20 Hz to 20 kHz) 0±0.5 dB
(CD etc. (10 Hz to 100 kHz, Pure Direct ON) 0±1.0 dB
RIAA Equalization Deviation (Pure Direct ON)
(PHONO (MM) ±0.5 dB
Total Harmonic Distortion Plus Noise (2-channel driven) (Pure Direct ON)
(PHONO (MM) to LINE OUT (3 Vrms) 0.025% or less
(CD etc. to SP OUT (40 W/8 Ω) 0.015% or less
Signal to Noise Ratio (IHF-A Network) (Pure Direct ON)
(PHONO (MM) (Input shorted, 5 mV) 87 dB
(CD etc. (Input shorted, 200 mV) 100 dB
Residual Noise (IHF-A Network) (Pure Direct ON)
(SP OUT 30 μVrms
Channel Separation (JEITA, 1 kHz/10 kHz) (Pure Direct ON)
(CD/LINE1/LINE2/LINE3 65 dB/50 dB or more
127
APPENDIX > Specifications

Tone Control Characteristics
(Bass Boost/Cut 20 Hz/±10 dB
(Bass Turnover Frequency 350 Hz
(Treble Boost/Cut 20 kHz/±10 dB
(Treble Turnover Frequency 3.5 kHz
Continuous Loudness Control (Attenuation 1 kHz) -30 dB
Gain Tracking Error (+16.5 dB to -80 dB) 0.5 dB or less
FM Section
Tuning Range
([Models for U.S.A. and Canada] 87.5 MHz to 107.9 MHz
([Models for Asia, Taiwan and for Central and South America] 87.5/87.50 MHz to 108.0/108.00 MHz
([Models for U.K., Europe, Russia, Australia, China, Korea] 87.50 MHz to 108.00 MHz
50 dB Quiet Sensitivity (IHF, 1 kHz, 100% MOD.)
(Monaural 3 μV (20.8 dBf)
Signal to Noise Ratio (IHF)
(Monaural 65 dB
(Stereo 64 dB
Harmonic Distortion
(Monaural 0.5%
(Stereo 0.6%
Antenna Input 75 Ω unbalanced
AM Section (Models for U.S.A., Canada, China, Korea, Asia, Taiwan and for Central and
South America)
Tuning Range
([Models for U.S.A. and Canada] 530 kHz to 1710 kHz
([Models for Asia, Taiwan and for Central and South America] 530/531 kHz to 1710/1611 kHz
([Models for China and Korea] 531 kHz to 1611 kHz
Antenna Input Loop Antenna
DAB Section (Models for U.K., Europe, Russia and Australia)
Tuning Range
174.928 MHz to 239.200 MHz (Band III)
128
APPENDIX > Specifications

Support Audio Format
MPEG 1 Layer II/MPEG-4 HE-AAC v2 (aacPlus v2)
Antenna Input 75 Ω unbalanced
General
Power Supply
([Models for U.S.A. and Canada] AC 120 V, 60 Hz
([Model for Taiwan] AC 110 V, 60 Hz
([Models for Central and South America] AC 110 to 120 V, 60 Hz
([Model for China] AC 220 V, 50 Hz
([Model for Korea] AC 220 V, 60 Hz
([Model for Australia] AC 230 to 240 V, 50 Hz
([Models for U.K., Europe and Russia] AC 230 V, 50 Hz
([Model for Asia] AC 220 to 240 V, 50/60 Hz
Power Consumption 190 W
Standby Power Consumption*
(Network Standby ON, Bluetooth Standby ON
(Wi-Fi (5 GHz) 2.3 W
(Wired 2.0 W
(Network Standby ON, Bluetooth Standby OFF
(Wi-Fi (5 GHz/2.4 GHz) 2.0 W
(Wired 1.8 W
(Network Standby OFF, Bluetooth Standby OFF 0.2 W
(Power OFF (the z (Power) Switch on the front panel is OFF) 0.2 W
* This product in Standby may download the new firmware via the network. In this case, the standby power consumption
is increased than the shown value.
Maximum Power Consumption (1 kHz, 8 Ω, 10% THD)
([Models for Taiwan and for Central and South America] 380 W
Dimensions (W x H x D)
435 x 151 x 392 mm
(17-1/8” x 6” x 15-3/8”)
Reference Dimensions (with wireless antenna upright)
* Including legs and protrusions
435 x 225 x 392 mm
(17-1/8” x 8-7/8” x 15-3/8”)
129
APPENDIX > Specifications

Weight
9.8 kg (21.6 lb)
* The contents of this manual apply to the latest specifications as of the publishing date. To obtain the latest manual, access
the Yamaha website then download the manual file.
130
APPENDIX > Specifications

Yamaha Global Site
https://www.yamaha.com/
Yamaha Downloads
https://download.yamaha.com/
© 2023 Yamaha Corporation
Published 11/2023 NV-C0
AV22-0002
Layout Folder: YMH_PDF_Manual_A5_AV
Stylesheet Name: 01_YMH_PDF_Manual_A5_AV_En-Multi
Stylesheet Version: 2022.12.12
-
 1
1
-
 2
2
-
 3
3
-
 4
4
-
 5
5
-
 6
6
-
 7
7
-
 8
8
-
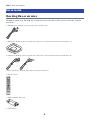 9
9
-
 10
10
-
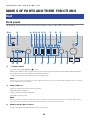 11
11
-
 12
12
-
 13
13
-
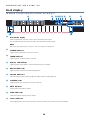 14
14
-
 15
15
-
 16
16
-
 17
17
-
 18
18
-
 19
19
-
 20
20
-
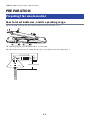 21
21
-
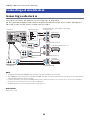 22
22
-
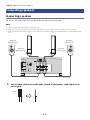 23
23
-
 24
24
-
 25
25
-
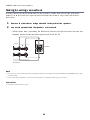 26
26
-
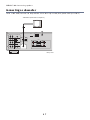 27
27
-
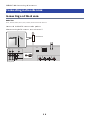 28
28
-
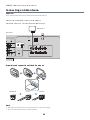 29
29
-
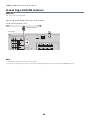 30
30
-
 31
31
-
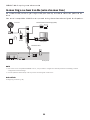 32
32
-
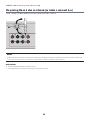 33
33
-
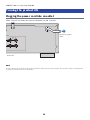 34
34
-
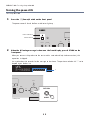 35
35
-
 36
36
-
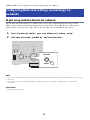 37
37
-
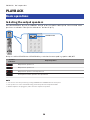 38
38
-
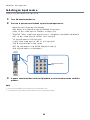 39
39
-
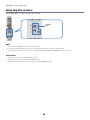 40
40
-
 41
41
-
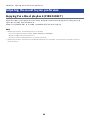 42
42
-
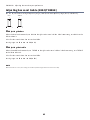 43
43
-
 44
44
-
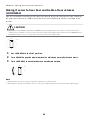 45
45
-
 46
46
-
 47
47
-
 48
48
-
 49
49
-
 50
50
-
 51
51
-
 52
52
-
 53
53
-
 54
54
-
 55
55
-
 56
56
-
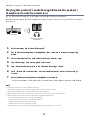 57
57
-
 58
58
-
 59
59
-
 60
60
-
 61
61
-
 62
62
-
 63
63
-
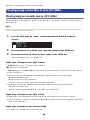 64
64
-
 65
65
-
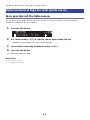 66
66
-
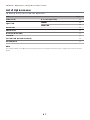 67
67
-
 68
68
-
 69
69
-
 70
70
-
 71
71
-
 72
72
-
 73
73
-
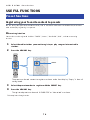 74
74
-
 75
75
-
 76
76
-
 77
77
-
 78
78
-
 79
79
-
 80
80
-
 81
81
-
 82
82
-
 83
83
-
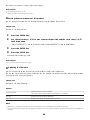 84
84
-
 85
85
-
 86
86
-
 87
87
-
 88
88
-
 89
89
-
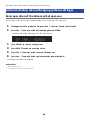 90
90
-
 91
91
-
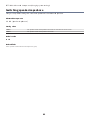 92
92
-
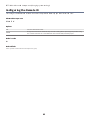 93
93
-
 94
94
-
 95
95
-
 96
96
-
 97
97
-
 98
98
-
 99
99
-
 100
100
-
 101
101
-
 102
102
-
 103
103
-
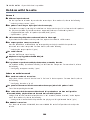 104
104
-
 105
105
-
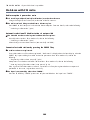 106
106
-
 107
107
-
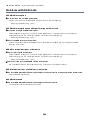 108
108
-
 109
109
-
 110
110
-
 111
111
-
 112
112
-
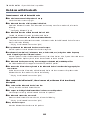 113
113
-
 114
114
-
 115
115
-
 116
116
-
 117
117
-
 118
118
-
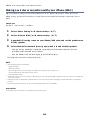 119
119
-
 120
120
-
 121
121
-
 122
122
-
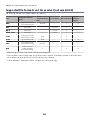 123
123
-
 124
124
-
 125
125
-
 126
126
-
 127
127
-
 128
128
-
 129
129
-
 130
130
-
 131
131


En otros idiomas
- français: Yamaha R-N600A Mode d'emploi
- italiano: Yamaha R-N600A Guida utente
- English: Yamaha R-N600A User guide
- Deutsch: Yamaha R-N600A Benutzerhandbuch
- Nederlands: Yamaha R-N600A Gebruikershandleiding
- dansk: Yamaha R-N600A Brugervejledning
- svenska: Yamaha R-N600A Användarguide
- suomi: Yamaha R-N600A Käyttöohjeet