
4-Shelf Shelving
Storage Unit
Atornille las patas niveladoras (E) en la parte inferior del poste inferior. Snap
el plástico Se engancha (D) en las ranuras de los postes inferiores (C) en la
misma posición yasegúrese de que la flecha de los clips de plástico apunte
hacia arriba.
Asegúrese de tener la parrilla de alambre (A) en la posición correcta. (El
el espacio en el cuello debe quedar hacia abajo) Sostenga el estante de lado
y deslice la parte superiorde cuatro postes inferiores a través de la parte
inferior de cada estante en sus esquinas hasta que hayaes un ajuste perfecto.
Después de que 4 polos hayan sido
se deslizó a través de los orificios
del collar del estante, coloque el
estante en posición vertical.
Mantenga el espacio en el cuello hacia abajo
arriba abajo
Flecha de clips de plástico
debería señalar
1
Consulte el Paso 1 para encajar los clips de plástico en las ranuras de cuatro
piezas de baje los postes en la posición deseada y deslice hacia abajo la
parrilla de alambre desde el la parte superior de cada poste inferior hacia
abajo sobre los clips de plástico.
*Para asegurar la
estabilidad de la
estantes, hacer
seguro que los 4
clips son adjunto
amisma capa en
El polo.
*
3
Consulte el Paso 3 para encajar los clips de plástico en las mismas ranuras
de cada poste en la siguiente posición deseada para ensamblar los otros 3
estantes de alambre.
5Empuje firmemente hacia abajo en cada estante de alambre en sus esquinas
con un mazo de goma para asegúrese de que todos los estantes estén
colocados correctamente sobre los clips de plástico. Para lograr nivelación
adecuada, atornille las patas niveladoras hacia adentro o hacia afuera.
6
Atornille los postes superiores (B) en los postes inferiores utilizando los
conectores de ambos extremos.
4
2
!
Assembly Instructions
For additional support, email:
or visit:
https://efineusa.com/pages/contact-us
Efine USA ("Efine") warrants to the original purchaser ("Purchaser") of a EFINE
NSF Shelf Unit ("Product") that each Product will be free from defects in workman-
ship and materials for a period 1 year from date of original purchase. Efine's
obligations under this warranty are limited to repairing or replacing the product
during the warranty period, or to provide reasonable compensation for the product,
at Efine's option not to exceed the purchase price of the product. All replacement
parts and products become the property of Efine and must be returned to Efine.
This warranty does not cover normal wear and tear of the product and its parts, as
well as damage caused by negligent use or abuse of the product, use contrary to
this user manual, or modification by anyone other than Efine. The one-year
warranty period is not extended or renewed for product repair or replacement or
compensation. Any warranties implied by applicable law are limited to one year
from the date of purchase and are subject to the same conditions and limitations
as our express warranties.
Except as provided in this Agreement and to the extent applicable, this product
provides no warranties, express or implied, and Efine disclaims all warranties,
including, but not limited to, implied warranties of merchantability, infringement, or
fitness for a particular purpose. Any individual, company No warranty or guarantee
given by any entity or entity with respect to this product shall be binding on Efine.
If your product is defective or needs repair or parts, please contact Efine Customer
Service email at [email protected]. Please list out the model you purchased, date
of purchase and product issues. Your service request must be accompanied by a
copy of the original sales receipt.
Efine Shelving Units: 1 Year Limited Warranty

Assembly InstructionsAssembly Instructions
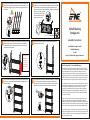
Parts List
Wire Shelf
No.
Name
Parts
Qty
A B C D E
Upper Pole Lower Pole Plastic Clip Leveling Foot
4PCS 4PCS 4PCS 40PCS 4PCS
Screw the Leveling Feet (E) into the bottom of Lower Pole. Snap the Plastic
Clips (D) into the pole grooves of lower poles(C) at the same position and
make sure that the arrow of plastic clips are pointing up.
Please make sure that you have the wire shelf (A) the correct way up. (The
gap in collar shall be faced down) Hold the shelf on its side and slide the top
of four lower poles through the bottom of each shelf at its corners until there
is a snug fit. After 4 poles have been
slid through the shelf collar holes,
set the shelf upright.
Keep the gap in collar face down
Raise Lower
Plastic Clips’ arrow
should point up
1
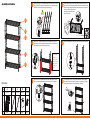
Refer to Step 1 to snap the plastic clips on the grooves of four pieces of
lower poles at your desired position and slide down the wire shelf from the
top of each lower pole down onto the plastic clips.
*To ensure the
stability of the
shelves, make
sure all 4 clips are
attached to the
same layer on
the pole.
*
3
Refer to the Step 3 to snap the plastic clips on the same grooves of each
pole on your next desired position to assemble the other 3 wire shelves.
5Push firmly down on every wire shelf at its corners with a rubber mallet to
ensure all the shelves are properly in place over the plastic clips. To attain
proper leveling, screw the leveling feet inwards or outwards.
6
Screw upper poles(B) into lower poles using the connectors from both ends.
4
2
!
A
B
C
D
E
-
 1
1
-
 2
2


