
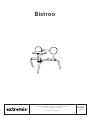
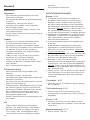
MANUAL
LAB142
Assembly instructions, how to use, useful tips for keeping
your tool for togetherness in shape.
EN – NL – DE – FR – IT – ES
Bistroo

Tools for togetherness
© All our designs are original creations and protected by intellectual property rights.

IMPORTANT! RETAIN FOR FUTURE
REFERENCE: READ CAREFULLY.
BELANGRIJK! LEES DIT DOCUMENT
AANDACHTIG EN BEWAAR HET VOOR
TOEKOMSTIGE RAADPLEGING!
WICHTIG! AUFHEBEN, UM SPÄTER
ETWAS NACHSEHEN ZU KÖNNEN:
SORGFÄLTIG DURCHLESEN!
IMPORTANT! LISEZ ATTENTIVEMENT
CE MANUEL ET CONSERVEZ-LE POUR
RÉFÉRENCE ULTÉRIEURE!
IMPORTANTE! CONSERVARE COME
RIFERIMENTO PER IL FUTURO:
LEGGERE ATTENTAMENTE!
¡IMPORTANTE! CONSÉRVELO PARA
FUTURA REFERENCIA: LÉALO
ATENTAMENTE!

Do not use
power tools!

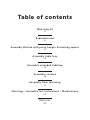
Table of contents
Mounting kit
6
Exploded view
8
Assembly Bistroo with purse hanger & stacking spacer
10
Assembly table tray
15
Assembly extended tabletop
15
Assembly cushion
16
Assembly floor fastening
17
Warnings – Assembly text instructions – Maintenance
20
Parts list
32

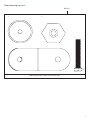
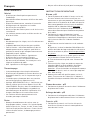
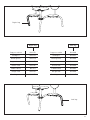
6
Mounting kit
x 4
x 4
x 4x 4
scale 1:1
scale 1:1
scale 1:1
M6x10 din 7984
M8x20 din 7984
M8x30 din 7984
BIS345
BIS344
BIS346
2x
VRS703
BIS347
Mounting kit to fix tabletop
to centre leg
Mounting kit to
fix centre leg
support to
centre leg
Mounting kit to fix legs & back
support to centre leg support
x 4
M6 din 137b
x 4
x 6
x 4
x 6
scale 1:1 scale 1:1
M6 din 137b
M6 din 137b
M6x12 din 7984
M6x12 din 7984
Mounting kit to fix seat
to leg
Mounting kit to fix backrest
to back support
M8 din 985

7
Floor fastening (optional)
x 3
x 3 x 3
x 3
scale 1:1
M8x50 iso 4017
Mounting kit to fix floor fastening to legs
BIS024

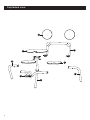
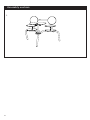
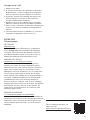
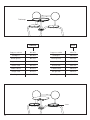
8
1
8
3
6
5
2
4
7
Exploded view

9

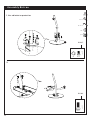
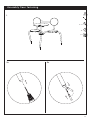
2.
10
N° 13
N° 4 - 5
35’
scale 1:2scale 1:2
BIS345
BIS344
p 14
1. Use a blanket as protection
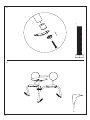
Assembly Bistroo
x 4 x 4
x 4
M6 M6x10
M8x20
1
3
2

3b.
11
3a.
On the
outside
Insert
bolts
scale 1:2
BIS347
x 4x 4
M8x30M8
4

12
4b.
4a.
6
5
1. Insert
all nuts
2. Tighten
both sides
scale 1:2
BIS347
x 4x 4
M8x30M8

13
x 4
5.
x 8 x 8
scale 1:2
M6 M6x12
VRS703
1
2
3
8 Nm
4kg/8,8lb
MAX!
4
8 Nm
7

14
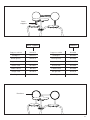
6.
x 6 x 6
scale 1:2
M6 M6x12
BIS346
8
8 Nm
4kg/8,8lb
MAX!

15
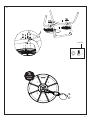
Assembly table tray
1.
Assembly extended tabletop
1.

16
Assembly cushion
1.

17
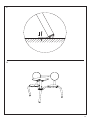
2a.
N° 34
10’
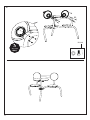
Assembly floor fastening
1.
p 15
2b.

18
4.
3.
x 3

19
6.
5.

20
English
WARNINGS
General
• Do not use any sharp tools to open the packaging.
• We strongly advise against using power tools.
• Tripping hazard, mind your step.
• Do not put out cigarettes on the table.
• Not grafitti proof.
• Do not leave children unattended whilst playing on
the chair.
• Colours can dier over years and from batch to
batch.
Product
• Do not disassemble the seats unless they need to
be replaced.
• Anchoring the product has to be done by qualified
people.
• For anchoring: use suitable bolts or screws from a
specialized store depending on the material your
terrace is made of.
• Stackable up to 4 pieces.
• Always stack the tables with 2 people.
• Only use Extremis accessories.
• Do not sit on the tabletop.
• Do not stand or jump on the seat or the tabletop.
• Max. 1 person or 120 kg per seat.
Powder-coating
• White powder-coating requires more
maintenance.
• Do not use abrasive scouring powders or scourers
as they will scratch the surface.
• Colour can fade to some extent when exposed to
UV.
• Flame retarding - NEN-EN13501-1 A2-sl -
Satisfying the same criteria as Class B for the
SBI-test according to EN13823. In addition, under
conditions of a fully developed fire these products
will nog significantly contribute to the fire load
and fire growth.
• Dark colors can get very hot in sunny weather.
Felt
• Stains should be removed immediately with a
clean, soft cloth, particularly in case of dark-
coloured liquids such as wine, ink, coee coke,
oild and bird droppings. If left to dry, these liquids
may cause permanent damage!
• Do not bleach to clean.
ASSEMBLY INSTRUCTIONS
Bistroo - p10
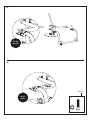
1. Lay the tabletop upside down on the ground with
the holes facing upwards and use a blanket for
protection. Position the centre leg on the tabletop
so that the holes align and attach it with 4 M6
wave washers and 4 M6x10 bolts. Caution: make
sure that the cut-out of the centre leg is on the
same side as the cut-out of the tabletop.
2. Position the logo frame in the central leg as shown
in the drawing, with the rubber stacking caps
facing upwards and fasten with 4 M8x20 bolts.
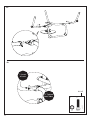
3. a. Next, position the backrest on the logo frame.
b. NoInsert the M8x30 bolts through the holes of
the logo frame and the backrest so that it stays in
position. Do not use any nuts yet.
4. a. Now slide the left and right leg over the bolts, as
shown in the drawing.
b. Fasten them with 2 M8 nuts each.
5. Attach the seats to the legs, each with 4 M6x12
bolts and 4 M6 wave washers as shown in the
drawing. Caution: Tighten the bolts diagonally as
shown in the drawing, but not too hard! Max. 8Nm
or 4 kg / 8,8 lb.
6. Turn the table over so that it is standing on 3 legs.
Attach the 2 backrests to the back support using 3
M6 wave washers and 3 M6 bolts.
Table tray - p15
1. Position the table tray in the cut-out of the
tabletop.
Extended tabletop - p15
1. Position the extended tabletop in the cut-out of the
tabletop as shown in the drawing.
Cushion - p16
1. Position the cushion on the seat so that the
silicone plug of the cushion fits into the hole of
the seat.
Floor fastening - p17
1. Turn the table upside down.
2. a. Drill a hole in the plastic cap.
b. Now pull the plastic cap out using a screwdriver
as shown in the drawing.
3. Assemble the ground anchoring set as shown in
the drawing. Do not completely tighten the bolt
Warnings – Assembly text instructions – Maintenance

21
yet.
4. Mark the places on the ground where the
anchoring is to be located and drill at the
indicated points.
5. Use the most appropriate fasteners for the surface
on which the Bistroo is to stand.
6. Tighten all the bolts by tightening the plastic cap
with a key 34.
MAINTENANCE
Powder-coating
CLEANING
Regularly
Use Extremis Multicleaner, a 100% biodegradable
detergent or common kitchen cleaning products.
Avoid using aggressive products. These surfaces are
best cleaned with a neutral cleaning product diluted
in water.
REMOVING STAINS
Only if nothing else helps
The magic eraser gets rid of most stubborn stains
without eort. Only if stubborn stains remain visible
after treatment according to the instructions, you
can use the Extremis Magic Eraser sponge. This
sponge is made of melamine resin and wears away
with use. The sponge is very easy to use and gives
results up to 26 times faster than a traditional
microfibre cloth. The magic sponge is the solution
for getting rid of stubborn stains such as felt-tip
pens, grease, scu marks, limescale marks or coee
and tea stains. The magic sponge can be used
on tarpaulin fabric, plastic profiles, glass, steel,
chrome, aluminium, porcelain, artificial leather and
many types of floor.
REPAIRING DAMAGED POWDER-COATING
When damaged
The impact of sharp objects can damage the
coating. Scratches or dents can be touched up with
our paint pens. However this only camouflages the
scratches without removing them.
Watch the maintenance video on
our website:
www.extremis.com/maintenance

22
Nederlands
WAARSCHUWINGEN
Algemeen
• Gebruik geen scherp gereedschap om de
verpakking te openen.
• Het gebruik van elektrisch gereedschap wordt ten
zeerste afgeraden.
• Struikelgevaar, let op waar u loopt.
• Doof geen sigaretten uit op de tafel.
• Niet bestand tegen grati.
• Laat kinderen niet onbewaakt achter wanneer ze
op de stoel spelen.
• Kleuren kunnen van jaar tot jaar en van partij tot
partij verschillen.
Product
• Demonteer de zitjes niet tenzij ze aan vervanging
toe zijn.
• Het product moet worden verankerd door
gekwalificeerde personen.
• Voor verankering: gebruik geschikte bouten
of schroeven uit een gespecialiseerde winkel,
afhankelijk van het materiaal waarvan uw terras is
gemaakt.
• Stapelbaar tot maximaal 4 stuks.
• Stapel de tafels altijd met 2 personen.
• Gebruik alleen Extremis-accessoires.
• Ga niet op het tafelblad zitten.
• Ga niet op het zitje of het tafelblad staan of spring
er niet op.
• Max. 1 persoon of 120 kg per zitje.
Poedercoating
• Witte poedercoating vereist meer onderhoud.
• Gebruik geen schuurpoeders of schuursponsjes
omdat deze krassen op het oppervlak
veroorzaken.
• De kleur kan in zekere mate vervagen bij
blootstelling aan uv-straling.
• Vlamvertragend - NEN-EN13501-1 A2-sl - Voldoet
aan dezelfde criteria als klasse B voor de SBI-
test volgens EN13823. Bovendien zullen deze
producten onder omstandigheden van een
volledig ontwikkelde brand geen significante
bijdrage leveren aan de brandbelasting en
brandgroei.
• Donkere kleuren kunnen bij zonnig weer zeer heet
worden.
Vilt
• Vlekken moeten onmiddellijk met een schone,
zachte doek worden verwijderd, vooral bij
donkere vloeistoen zoals wijn, inkt, koe, cola,
olie of vogelpoep. Indien opgedroogd kunnen
deze vloeistoen blijvende schade veroorzaken!
• Niet bleken om te reinigen.
MONTAGE INSTRUCTIES
Bistroo - p10
1. Leg het tafelblad omgekeerd op de grond met
de gaten naar boven gericht, en gebruik hierbij
een deken als bescherming. Positioneer de
centrale poot op het tafelblad zodat de gaten
overeenkomen en bevestig deze met 4 gegolfde
veerringen M6 en 4 bouten M6x10. Let op: zorg
ervoor dat de uitsparing van de centrale poot
aan dezelfde kant is van de uitsparing van het
tafelblad.
2. Positioneer het logo-frame in de centrale poot
zoals vermeld op de tekening, met de rubberen
stapeldopjes naar boven gericht en bevestig deze
met 4 bouten M8x20.
3. a. Vervolgens positioneer je de rugsteun aan het
logo-frame.
b. Steek nu de bouten M8x30 door de de gaatjes
van het logo-frame en de rugleuning zodat deze in
positie blijft liggen. Gebruik nog geen moeren.
4. a. Schuif nu de linker en rechter poot over de
bouten zoals vermeld op de tekening.
b. Bevestig deze nu met telkens 2 moeren M8.
5. Bevestig nu de zitjes aan de poten met telkens 4
bouten M6x12 en 4 gegolfde veerringen M6 zoals
vermeld op de tekening.
Let op: Draai de bouten diagonaal aan zoals
vermeld op de tekening maar niet te hard! Max.
8Nm of 4 kg.
6. Draai de tafel om zodat deze op de 3 poten staat.
Bevestig nu de 2 rugleuningen aan de rugsteun
d.m.v. telkens 3 gegolfde veerringen M6 en 3
bouten M6.
Dienblad - p15
1. Positioneer het dienblad in de uitsparing van het
tafelblad.
Tafelblad uitbreiding - p15
1. Positioneer de tafelblad uitbreiding in de
uitsparing van het tafelblad zoals vermeld op de
tekening.
Kussen - p16
1. Positioneer het kussen op het zitje zodat de
siliconen plug van het kussen in het gaatje van het
zitje past.

23
Grondverankering - p17
1. Draai de tafel om.
2. a. Boor een gat in de kunststof dop.
b. Trek nu de kunststof dop eruit door een
schroevendraaier te gebruiken zoals op de
tekening.
3. Monteer nu het grondverankeringssetje zoals
vermeld op de tekening. Span de bout nog niet
volledig aan.
4. Markeer de plaatsen op de vloer waar de
verankeringen moeten komen en boor op de
aangeduide punten.
5. Gebruik hiervoor de bevestigingsmiddelen die
meest geschikt zijn voor de ondergrond waarop
de Bistroo moet staan.
6. Span nu alle bouten aan door de kunststof dop
aan te draaien met een sleutel 34.
ONDERHOUD
Poedercoating
REINIGEN
Geregeld
Gebruik Extremis Multi Cleaner, een 100%
biologisch afbreekbaar schoonmaakmiddel, of een
gewoon schoonmaakmiddel zoals je in de keuken
gebruikt. Gebruik geen agressieve producten. Voor
deze oppervlakken gebruik je het best een neutraal
schoonmaakmiddel, verdund met water.
VLEKKEN VERWIJDEREN
Alleen als laatste redmiddel
Het wondersponsje verwijdert moeiteloos de
meeste hardnekkige vlekken. Je mag het Extremis
wondersponsje alleen gebruiken als hardnekkige
vlekken na een normale schoonmaakbeurt volgens
de instructies zichtbaar blijven. Dit sponsje is
gemaakt van melaminehars en slijt naarmate het
wordt gebruikt. Het sponsje is zeer eenvoudig in
gebruik en geeft tot 26x sneller resultaat dan een
traditionele microvezeldoek. Het wondersponsje is
de oplossing voor het verwijderen van hardnekkige
vlekken zoals stiftvlekken, vet, schoenstrepen,
kalkresten of koe- en theevlekken. Het
wondersponsje mag worden gebruikt op zeildoek,
kunststofprofielen, glas, staal, chroom, aluminium,
porselein, kunstleer en diverse vloeren.
BESCHADIGDE POEDERLAK HERSTELLEN
Indien beschadigd
Door impact van scherpe voorwerpen kan de lak
beschadigd raken. Krassen of putjes kunnen worden
bijgewerkt met onze verfstiften. Hiermee kun je
echter alleen krassen camoufleren, de kras blijft
echter.
Bekijk de onderhoudsvideo’s op
onze website:
www.extremis.com/maintenance

24
Deutsch
WARNUNG
Allgemeines
• Zum Önen der Verpackung keine scharfen
Werkzeuge verwenden.
• Wir raten dringend davon ab, Elektrowerkzeuge
zu nutzen.
• Stolpergefahr, Vorsicht beim Gehen!
• Zigaretten nicht auf dem Tisch ausdrücken.
• Nicht gratibeständig.
• Lassen Sie Kinder beim Spielen auf dem Stuhl
nicht unbeaufsichtigt.
• Farben können über die Jahre und von Charge zu
Charge variieren.
Produkt
• Sitzflächen nur zum Austausch demontieren.
• Die Verankerung des Produkts muss von
qualifizierten Personen durchgeführt werden.
• Zur Verankerung: Verwenden Sie je nach Material,
aus dem Ihre Terrasse besteht, geeignete
Schrauben oder Bolzen aus dem Fachhandel.
• Stapelbar bis zu 4 Stück.
• Stapeln Sie die Tische immer mit 2 Personen.
• Verwenden Sie nur Extremis-Zubehör.
• Setzen Sie sich nicht auf die Tischplatte.
• Auf dem Sitz oder der Tischplatte weder stehen
noch springen.
• Max. 1 Person oder 120 kg pro Sitz.
Pulverbeschichtung
• Weiße Pulverbeschichtung erfordert mehr
Wartung.
• Verwenden Sie keine scheuernden
Reinigungsmittel oder Topfreiniger, da diese die
Oberfläche verkratzen.
• Die Farbe kann unter UV-Belastung bis zu einem
gewissen Grad verblassen.
• Flammhemmend - NEN-EN13501-1 A2-sl - Erfüllt
die gleichen Kriterien wie Klasse B für die SBI-
Prüfung nach EN13823. Darüber hinaus werden
diese Produkte bei einem voll entwickelten
Feuer nicht wesentlich zur Brandlast und zur
Brandverbreitung beitragen.
• Dunkle Farben können bei sonnigem Wetter sehr
heiß werden.
Filz
• Flecken sollten sofort mit einem sauberen,
weichen Tuch entfernt werden, insbesondere
bei dunkel gefärbten Flüssigkeiten wie Wein,
Tinte, Kaee, Cola, Öl und Vogelkot. Wenn
sie eintrocknen, können irreparable Schäden
entstehen.
• Zum Reinigen nicht bleichen.
MONTAGEANWEISUNGEN
Bistroo - S. 10
1. Tischplatte mit den Löchern nach oben auf
den Boden legen, Decke zum Schutz nutzen.
Mittelbein so auf Tischplatte platzieren, dass
die Löcher übereinstimmen und mit 4 gewellten
M6-Federringen und 4 M6x10-Imbusschrauben
befestigen. Achtung: Achten Sie darauf, dass sich
die Aussparung des Mittelbeins auf derselben
Seite wie die Aussparung der Tischplatte befindet!
2. Logo-Rahmen im Mittelbein wie in der Zeichnung
abgebildet - mit den Gummi-Stapelkappen nach
oben - positionieren und diese mit 4 M8x20-
Imbusschrauben befestigen.
3. a. Anschließend Rückenlehne am Logo-Rahmen
anbringen.
b. M8x30-Imbusschrauben durch Löcher des
Logo-Rahmens und der Rückenlehne stecken,
damit diese an Ort und Stelle bleibt. Verwenden
Sie noch keine Muttern.
4. a. Schieben Sie nun das linke und rechte Bein über
die Schrauben, wie in der Zeichnung abgebildet.
b. Jeweils mit 2 M8-Muttern befestigen.
5. Befestigen Sie die Sitze mit je 4 M6x12-
Imbusschrauben und 4 gewellten M6-Federringen
an den Beinen, wie in der Zeichnung abgebildet.
Vorsicht: Ziehen Sie die Schrauben diagonal, wie
in der Zeichnung abgebildet, aber nicht zu fest an!
Max. 8 Nm oder 4 kg.
6. Drehen Sie den Tisch so, dass er auf den 3 Beinen
steht. Befestigen Sie nun die 2 Rückenlehnen mit
jeweils 3 gewellten M6-Federringen und 3 M6-
Schrauben.
Tischtablett - S. 15
1. Platzieren Sie das Tischtablett in die Aussparung
der Tischplatte.
Tischeerweiterung - S. 15
1. Platzieren Sie die Tischeerweiterung in die
Aussparung der Tischplatte wie in der Zeichnung
abgebildet.
Kissen - S. 16
1. Platzieren Sie das Kissen so auf dem Sitz, dass
der Silikonstopfen des Sitzpolsters in das Loch des
Sitzes passt.
Bodenverankerung - S. 17
1. Drehen Sie den Tisch um.

25
2. a. Bohren Sie ein Loch in die Kunststokappe.
b. Ziehen Sie nun die Kunststokappe mit
einem Schraubendreher wie in der Zeichnung
abgebildet.
3. Montieren Sie nun den Bodenverankerungssatz,
wie in der Zeichnung abgebildet. Ziehen Sie die
Schraube noch nicht ganz fest an.
4. Markieren Sie die Position der Bodenverankerung
auf dem Fußboden und bohren Sie an den
markierten Stellen.
5. Verwenden Sie die, für die Oberfläche
des Fußbodens, am besten geeigneten
Befestigungselemente, auf der der Bistroo stehen
muss.
6. Ziehen Sie jetzt alle Schrauben fest, indem Sie
die Kunststokappe mit einem Schlüssel 34
festziehen.
PFLEGE
Pulverbeschichtung
REINIGEN
Regelmäßig
Verwenden Sie den zum 100 % biologisch
abbaubaren Extremis-Multireiniger oder einen
herkömmlichen Allesreiniger. Keine aggressiven
Reiniger verwenden. Am besten eignet sich ein
neutrales Reinigungsmittel in Wasser.
FLECKEN ENFERNEN
Nur dann, wenn sonst nichts hilft
Das Wunderschwämmchen entfernt mühelos auch
die hartnäckigsten Flecken. Verwenden Sie das
Wunderschwämmchen von Extremis nur, wenn nach
der Reinigung gemäß Anleitung noch Flecken zu
sehen sind. Der Schwamm besteht aus Melaminharz
und löst sich bei der Reinigung auf. Die Handhabung
ist denkbar einfach und die Wirkung tritt 26
Mal schneller ein als bei einem herkömmlichen
Mikrofasertuch. Das Wunderschwämmchen
ist die Lösung bei hartnäckigen Flecken, zum
Beispiel von Filzstiften und Fett, Scheuerstellen,
Kalkablagerungen, Tee oder Kaee. Der Schwamm
kann für Planensto, Kunststoprofile, Glas, Stahl,
Chrom, Aluminium, Porzellan, Kunstleder und viele
Bodenbeläge verwendet werden.
Sehen Sie sich die
Wartungsvideos auf unserer
Website an:
www.extremis.com/maintenance

26
Français
AVERTISSEMENTS
Général
• N’utilisez pas d’outils pointus pour ouvrir
l’emballage.
• Nous déconseillons fortement d’utiliser des outils
électriques.
• Risque de trébuchement, attention à la marche.
• N’éteignez pas de cigarettes sur la table.
• Ne résiste pas aux gratis.
• Ne laissez pas des enfants jouer sur la chaise sans
surveillance.
• Les couleurs peuvent varier au fil des années ou
d’un lot à l’autre.
Produit
• Ne démontez pas les sièges, sauf s’ils doivent être
remplacés.
• Le produit doit être fixé par des gens qualifiés.
• Pour la fixation : utilisez des boulons ou des vis
adaptés provenant d’un magasin spécialisé en
fonction du matériau qui compose votre terrasse.
• Empilable jusqu’à 4 pièces.
• Empilez toujours les tables à 2 personnes.
• N’utilisez que les accessoires Extremis.
• Ne vous asseyez pas sur le plateau de table.
• Ne vous tenez pas debout, ne sautez pas sur le
siège ou le plateau de table.
• Max. 1 personne ou 120 kg par siège.
Thermolaquage
• Le thermolaquage nécessite plus d’entretien.
• N’utilisez pas de poudres à récurer abrasives ou
de produits abrasifs, car ils risquent de rayer la
surface.
• La couleur peut s’estomper dans une certaine
mesure lorsqu’elle est exposée aux UV.
• Ignifuge- NEN-EN13501-1 A2-sl - Satisfaisant aux
mêmes critères que la classe B pour l’essai SBI
selon EN13823. De plus, dans les conditions d’un
feu complètement développé, ces produits ne
contribueront pas de manière significative à la
charge calorifique et à la croissance du feu.
• Les couleurs foncées peuvent devenir très
chaudes par temps ensoleillé.
Feutre
• Nettoyez immédiatement les taches avec un
linge propre et doux, surtout s’il s’agit de liquide
foncé tel que le vin, l’encre, le café, le coca-cola,
l’huile et les déjections d’oiseaux. Si vous laissez
sécher de telles taches, le dommage peut être
permanent!
• Ne pas utiliser d’eau de javel pour le nettoyage.
INSTRUCTIONS DE MONTAGE
Bistroo - p10
1. Posez le plateau de la table à l’envers sur le sol,
les trous orientés vers le haut et utilisez une
couverture en guise de protection. Positionnez le
pied central sur le plateau de la table afin que les
trous correspondent et fixez-le avec 4 rondelles
ondulées M6 et 4 boulons M6x10. Attention :
veillez à ce que l’évidement du pied central se
trouve du même côté que l’évidement du plateau
de la table.
2. Positionnez le cadre du logo dans le pied
central comme indiqué sur le schéma, avec les
capuchons d’empilage en caoutchouc orientés
vers le haut et fixez-le à l’aide de 4 boulons
M8x20.
3. a. Positionnez ensuite le dossier sur le cadre du
logo.
b. À présent, insérez les boulons M8x30 dans les
orifices du cadre du logo et du dossier afin que ce
dernier reste bien en place. N’utilisez pas encore
les écrous.
4. a. Faites ensuite glisser les pieds gauche et droit
sur les boulons comme illustré sur le dessin.
b. Fixez maintenant les pieds avec 2 écrous M8
chacun.
5. Fixez ensuite les sièges aux pieds au moyen de
4 boulons M6x12 et de 4 rondelles élastiques
ondulées M6, comme illustré sur le dessin.
Attention : Vissez les boulons en diagonale comme
illustré sur le dessin, mais ne serrez pas trop fort !
Max. 8Nm ou 4 kg.
6. Retournez la table afin qu’elle repose sur les 3
pieds. Fixez ensuite les 2 dossiers à l’aide de 3
rondelles élastiques ondulées M6 et de 3 boulons
M6.
Plateau de service - p15
1. Positionnez le plateau de service dans l’évidement
du plateau de la table.
Rallonge de table - p15
1. Positionnez le rallonge de table dans l’évidement
du plateau de la table comme illustré sur le dessin.
Coussin - p16
1. Positionnez le coussin sur l’assise afin que la
cheville en silicone du coussin corresponde au
trou dans de l’assise.

27
Ancrage au sol - p17
1. Retournez la table.
2. a. Percez un trou dans le capuchon en plastique.
b. Maintenant, retirez le capuchon en plastique
avec un tournevis comme indiqué sur le dessin.
3. A présent, montez l’ensemble d’ancrage au sol
comme indiqué sur le dessin. Ne serrez pas
encore complètement le boulon.
4. Marquez sur le sol les endroits où les ancrages
doivent se trouver et percez aux points indiqués.
5. Pour ce faire, utilisez les fixations qui conviennent
le mieux à la base sur laquelle la Bistroo doit se
trouver.
6. Serrez maintenant tous les boulons en serrant le
capuchon en plastique avec une clé. 34.
ENTRETIEN
Thermolaquage
NETTOYAGE
Régulièrement
Utilisez de l’Extremis Multicleaner, un détergent
100% biodégradable ou un produit de nettoyage
classique. Evitez d’utiliser des produits agressifs.
Il est préférable de nettoyer ces surfaces avec un
produit de nettoyage neutre dilué dans l’eau.
ENLEVER DES TACHES
Uniquement si rien d’autre ne marche
Le magic eraser éliminer la plupart des taches
tenaces sans eort. N’utilisez l’éponge Extremis
Magic Eraser que si des taches tenaces subsistent
après avoir nettoyé selon les instructions. Cette
éponge en résine de mélamine s’use à l’usage. Elle
est très facile d’utilisation et donne des résultats
jusqu’à 26 fois plus rapides qu’un linge microfibre
classique. L’éponge magique est la solution pour
se débarrasser des taches tenaces (marqueur,
graisse, éraflures, calcaire, café ou thé). L’éponge
magique peut être utilisée sur de la toile, des profilés
en plastique, du verre, de l’acier, du chrome, de
l’aluminium, de la porcelaine, du similicuir et de
nombreux types de sol.
RÉPARER DU MOBILIER
Si le revêtement poudré est endommagé
L’impact d’objets contondants peut endommager le
revêtement. Les éraflures et les entailles peuvent être
retouchées avec nos marqueurs de peinture. Cela
ne fait toutefois que camoufler, et non éliminer le
problème. Voir les vidéos d’entretien sur
notre site web:
www.extremis.com/maintenance

28
Italiano
AVERTENZE
Generale
• Non utilizzare attrezzi o utensili alati per aprire
la confezione.
• Si sconsiglia vivamente l’uso di utensili elettrici.
• Attenzione, pericolo di inciampo.
• Non spegnere le sigarette sul tavolo.
• Non a prova di grato.
• Non consentire ai bambini di giocare sul tavolo in
assenza del monitoraggio di un adulto.
• I colori possono variare negli anni e da una serie
all’altra.
Prodotti
• Non smontare le sedi, a meno che non sia
necessario sostituirle.
• L’ancoraggio del prodotto deve essere eettuato
da personale qualificato.
• Per l’ancoraggio: utilizzare viti e bulloni adatti
acquistandoli presso un negozio specializzato
in base al materiale in cui è realizzato il proprio
terrazzo.
• Impilabile fino a 4 pezzi.
• Impilare sempre i tavoli in coppia.
• Utilizzare esclusivamente gli accessori Extremis.
• Non sedersi sul piano del tavolo.
• Non salire o saltare sulla seduta o sul piano del
tavolo.
• Massimo 1 persona o 120 kg per seduta.
Verniciatura a polvere
• La verniciatura a polvere bianca richiede una
maggiore manutenzione.
• Non utilizzare polveri abrasive o spugne abrasive,
poiché possono graare la superficie.
• Se esposto ai raggi UV, il colore può sbiadire.
• Ritardante di fiamma - NEN-EN13501-1 A2-sl -
Soddisfa gli stessi criteri della Classe B per il
test SBI conformemente alla norma EN13823.
Inoltre, in condizioni di incendio completamente
sviluppato, questi prodotti non contribuiscono in
modo significativo ad alimentare e propagare le
fiamme.
• I colori scuri possono diventare molto caldi se
esposti direttamente ai raggi solari.
Feltro
• Rimuovere immediatamente le macchie con
un panno morbido e pulito, in particolar modo
in caso di liquidi di colore scuro come vino,
inchiostro, caè, cola, olio ed escrementi di
uccelli. Se lasciati seccare, questi liquidi possono
causare danni permanenti!
• Non usare la candeggina per pulire.
INSTRUZIONI PER IL MONTAGGIO
Bistroo - p10
1. Poggiare il tavolo sul pavimento in posizione
capovolta con i fori rivolti verso l’alto, utilizzando
una coperta come protezione. Posizionare la
gamba centrale sul piano del tavolo, in modo
tale che i fori corrispondano, e fissarla con 4
rondelle elastiche ondulate M6 e 4 bulloni M6x10.
Attenzione: assicurarsi che l’incavo della gamba
centrale corrisponda all’incavo del piano del
tavolo.
2. Collocare la cornice del logo nella gamba
centrale come mostrato in figura, con i distanziali
di impilaggio in gomma rivolti verso l’alto, e
fissarla con 4 bulloni M8x20.
3. a. Quindi, posizionare lo schienale sulla cornice
del logo.
b. Inserire i bulloni M8x30 attraverso i fori della
cornice del logo e dello schienale in modo che
quest’ultimo resti in posizione. Non utilizzare
ancora i dadi.
4. a. Far scorrere la gamba sinistra e destra sui
bulloni come indicato nel disegno.
b. Serrare ciascuna gamba con 2 dadi M8.
5. Fissare ora i sedili alle gambe con 4 bulloni
M6x12 e 4 rondelle elastiche ondulate M6 come
indicato in figura. Attenzione: serrare i bulloni
diagonalmente come indicato in figura, senza
stringerli eccessivamente! Max. 8Nm o 4 kg.
6. Capovolgere il tavolo in modo che poggi sulle
3 gambe. Montare ora i 2 schienali al supporto
utilizzando per ciascuno 3 rondelle elastiche
ondulate M6 e 3 bulloni M6.
Tavolino vassioi - p15
1. Posizionare il vassoio da tavolo del piano del
tavolo.
Esensione del ripiano - p15
1. Posizionare il estensione del ripiano del piano del
tavolo come indicato in figura.
Cuscino - p16
1. Posizionare il cuscino sul sedile in modo che il
tappo del cuscino in silicone si inserisca nel foro
del sedile.
Fissaggio a terra - p17
1. Capovolgere il tavolo.
2. a. Praticare un foro nel cappuccio di plastica.

29
b. Ora estrai il cappuccio di plastica con un
cacciavite come mostrato nel disegno.
3. Fissare il set di ancoraggio al suolo come
mostrato nel disegno. Non serrare completamente
il bullone.
4. Segnare sulla superficie i punti in cui andranno
fissati gli ancoraggi, quindi eettuare dei fori nei
punti contrassegnati utilizzando un trapano.
5. Per questa operazione utilizzare i dispositivi di
fissaggio più appropriati al tipo di superficie su
cui posizionare il Bistroo.
6. Quindi, serrare tutti i bulloni e serrare il
cappuccio di plastica con una chiave 34.
MANUTENZIONE
Verniciatura a polvere
PULIRE
Regolarmente
Usa il multidetergente Extremis, un detergente
biodegradabile al 100% o i comuni prodotti di
pulizia. Evita di utilizzare prodotti aggressivi. Queste
superfici si puliscono meglio con un prodotto di
pulizia neutro diluito in acqua.
RIMUOVERE LA MACCHIE
Solo se non ci sono altre soluzioni
La spugnetta magica elimina le macchie tenaci
senza sforzo. Solo se restano macchie tenaci
dopo trattamento secondo le istruzioni, in tal caso
puoi usare la spugnetta magica Extremis. Questa
spugnetta è composta di una resina melamminica
che si consuma con l’uso. La spugnetta, molto facile
da utilizzare, agisce fino a 26 volte più velocemente
rispetto a un comune panno in microfibra. La
spugnetta magica è la soluzione ideale per eliminare
le macchie tenaci come quelle di pennarelli, grasso,
segni di strisciate, tracce di calcare o macchie di
caè e tè. La spugnetta magica si può utilizzare
su tela cerata, profilati di plastica, vetro, acciaio,
cromo, alluminio, porcellana, pelle sintetica e molti
altri rivestimenti.
RIPARARE UN RIVESTIMENTO
Quando è danneggiato
Gli oggetti taglienti possono danneggiare il
rivestimento. Gra o ammaccature si possono
ritoccare con i nostri bastoncini di vernice. In ogni
caso, i gra vengono coperti ma non eliminati.
dopo l’uso impedisce ai liquidi di penetrare a fondo
nel legno. Guarda i video di manutenzione
sul nostro sito web:
www.extremis.com/maintenance

30
Español
ADVERTENCIAS
General
• No utilice ningún objeto cortante para abrir el
embalaje.
• Recomendamos encarecidamente no usar
herramientas eléctricas.
• Peligro de tropiezo, preste atención al caminar.
• No apague cigarrillos sobre la mesa.
• No es resistente a pintadas.
• No deje a los niños sin supervisión mientras
juegan sobre la mesa.
• Los colores pueden variar con el paso de los años,
así como de un lote a otro.
Producto
• No desmonte los asientos a menos que necesiten
ser reemplazados.
• El anclaje del producto debe ser realizado por
personal cualificado.
• Para el anclaje: utilice pernos o tornillos
adecuados, procedentes de una tienda
especializada, dependiendo del material con el
que esté construida su terraza.
• Apilables hasta un máximo de 4 unidades.
• Apile siempre la mesa con la ayuda de otra
persona.
• Utilice únicamente los accesorios Extremis.
• No se siente sobre el tablero de la mesa.
• No se suba ni salte sobre el asiento o el tablero de
la mesa.
• Máx. 1 persona o 120 kg por asiento.
Recubrimiento en polvo
• El recubrimiento en polvo de color blanco
requiere mayor mantenimiento.
• No use polvos abrasivos o estropajos, ya que
rayarían la superficie.
• Al estar expuesto a la luz UV, el color puede
desteñir hasta cierto punto.
• Retardante de llama - NEN-EN13501-1 A2-
sl - Cumple los mismos criterios que Clase B
para el ensayo SBI según EN13823. Además,
en condiciones de incendio completamente
desarrollado, estos productos no contribuirán de
manera significativa a la carga y al crecimiento
del fuego.
• Los colores oscuros pueden alcanzar
temperaturas muy elevadas con tiempo soleado.
Fieltro
• Las manchas deben eliminarse inmediatamente
con un paño limpio y suave, especialmente en el
caso de que se derramen líquidos de color oscuro
como vino, tinta, café, cola, aceite o excrementos
de pájaros. Si se dejan secar, ¡estos líquidos
pueden causar daños permanentes!
• No limpiar con lejía.
INSTRUCCIONES DE MONTAJE
Bistroo - p10
1. Coloque el tablero de la mesa boca abajo en el
suelo con los orificios hacia arriba, y utilizando
una manta como protección. Coloque la pata
central sobre el tablero de la mesa de manera que
los orificios coincidan y fíjela con 4 arandelas
de resorte onduladas M6 y 4 tornillos M6x10
Atención: asegúrese de que la hendidura de
la pata central esté en el mismo lado que la
hendidura del tablero de la mesa.
2. Coloque el marco del logotipo en la pata central
tal y como muestra el diagrama, con los tapones
de goma hacia arriba y fíjelo con 4 tornillos
M8x20.
3. a. A continuación, coloque el respaldo en el
marco del logotipo.
b. Ahora, inserte los tornillos M8x30 a través de
los orificios del marco del logotipo y del respaldo
para que permanezca en su lugar. No use aún
ninguna tuerca.
4. a. Deslice las patas izquierda y derecha sobre los
tornillos, como se muestra en el diagrama.
b. Fije cada una de ellas con 2 tuercas M8.
5. Ahora fije los asientos a las patas con 4 tornillos
M6x12 y 4 arandelas de resorte onduladas M6
cada uno, tal y como muestra el diagrama. Tenga
en cuenta: Debe apretar los tornillos en diagonal,
como se muestra en el diagrama, ¡no los apriete
demasiado! Máx. 8Nm of4 kg.
6. Dé la vuelta a la mesa de modo que quede sobre
3 patas. Fije los 2 respaldos al soporte trasero,
utilizando 3 arandelas de resorte onduladas M6 y
3 tornillos M6 para cada uno.
Bandeja de mesa - p15
1. Coloque la bandeja en la ranura del tablero de la
mesa.
Tablero de extensión - p15
1. Coloque el tablero de extensión en la ranura
del tablero de la mesa como se muestra en el
diagramma.
Cojín - p16
1. Coloque el cojín en el asiento de manera que el
tapón de silicona del cojín encaje en el agujero
del asiento.

31
Anclaje al suelo - p17
1. De vuelta la mesa.
2. a. Perfore un agujero en la tapa de plástico.
b. Ahora saque la tapa de plástico con un
destornillador como se indica en el dibujo.
3. A continuación, monte el conjunto de anclaje
a tierra como se indica en el dibujo. No apriete
completamente el perno todavía.
4. Marque los lugares en el suelo donde se colocará
el anclaje y taladre los puntos indicados.
5. Utilice las sujeciones más adecuadas para la
superficie en la que se colocará el Virus.
6. Apriete a continuación todos los pernos
apretando la tapa de plástico con una llave 34.
MANTENIMIENTO
Recubrimiento en polvo
LIMPIEZA
Regularmente
Utiliza el Extremis detergente multifuncional, un
detergente 100% biodegradable o productos de
limpieza comunes para la cocina. Evita el uso de
productos agresivos. Estas superficies se limpian
mejor con un producto de limpieza neutro diluido
en agua.
ELIMINACIÓN DE MANCHAS
Solo si nada más ayuda
La Goma Mágica, o borrador mágico, elimina las
manchas más difíciles sin esfuerzo. Solo si las
manchas persistentes permanecen visibles después
del tratamiento según las instrucciones, puedes
usar la esponja Extremis Magic Eraser. Esta esponja
está hecha de resina de melamina y se desgasta
con el uso. La esponja es muy fácil de usar y ofrece
resultados hasta 26 veces más rápidos que un paño
de microfibra tradicional. La esponja mágica es la
solución ideal para deshacerse de manchas difíciles
como manchas de rotuladores, grasa, rozaduras,
marcas de cal o manchas de café y té. La esponja
mágica se puede usar sobre tejidos encerados,
perfiles de plástico, vidrio, acero, cromo, aluminio,
porcelana, cuero artificial y muchos tipos de suelos.
REPARACIÓN DEL RECUBRIMIENTO
Cuando está dañado
El impacto de objetos afilados puede dañar el
recubrimiento. Los rasguños o abolladuras se
pueden retocar con nuestros lápices de pintura. Sin
embargo, esto solo camufla los arañazos, no los
elimina. Vea los videos de mantenimiento
en nuestro sitio web:
www.extremis.com/maintenance

32
Centre leg Centre leg support
Parts list
Papyrus white
Verdigris
Reed green
Copper brown
Black red
Cobalt blue
Beige red
Bottle green
Papyrus white
Verdigris
Reed green
Copper brown
Black red
Cobalt blue
Beige red
Bottle green
BIS388
BIS389
BIS390
BIS391
BIS392
BIS393
BIS394
BIS395
BIS396
BIS397
BIS398
BIS399
BIS400
BIS401
BIS402
BIS403
Centre leg
Centre leg
support

33
Right leg Left leg
Papyrus white
Verdigris
Reed green
Copper brown
Black red
Cobalt blue
Beige red
Bottle green
Papyrus white
Verdigris
Reed green
Copper brown
Black red
Cobalt blue
Beige red
Bottle green
BIS372
BIS373
BIS374
BIS375
BIS376
BIS377
BIS378
BIS379
BIS380
BIS381
BIS382
BIS383
BIS384
BIS385
BIS386
BIS387
Right leg
Left leg

34
Tabletop
Tabletop
Papyrus white
Verdigris
Reed green
Copper brown
Black red
Cobalt blue
Beige red
Bottle green
BIS168
BIS169
BIS170
BIS171
BIS172
BIS173
BIS174
BIS175
Seat
Seat
Papyrus white
Verdigris
Reed green
Copper brown
Black red
Cobalt blue
Beige red
Bottle green
VRS173
VRS180
VRS163
VRS370
VRS371
VRS372
VRS373
VRS374

35
Back support Backrest
Papyrus white
Verdigris
Reed green
Copper brown
Black red
Cobalt blue
Beige red
Bottle green
Papyrus white
Verdigris
Reed green
Copper brown
Black red
Cobalt blue
Beige red
Bottle green
BIS356
BIS357
BIS358
BIS359
BIS360
BIS361
BIS362
BIS363
BIS364
BIS365
BIS366
BIS367
BIS368
BIS369
BIS370
BIS371
Back
support
Backrest

www.extremis.com
Our headquarters:
Couthoflaan 20b
B-8972, Poperinge
info@extremis.com
+ 32 57 346020
Connect with us:
All rights reserved. Unless otherwise specified, all designs and photographs contained in this publication are copyright protected
and are the property of Extremis. No part of this publication may be copied or distributed without Extremis’ prior written consent.
The names of the authors of photographs to which we do not hold rights are mentioned here. We have done our utmost to provide a
comprehensive list of names. In the event of an alleged breach, please contact the editorial sta. © Extremis
20230327
-
 1
1
-
 2
2
-
 3
3
-
 4
4
-
 5
5
-
 6
6
-
 7
7
-
 8
8
-
 9
9
-
 10
10
-
 11
11
-
 12
12
-
 13
13
-
 14
14
-
 15
15
-
 16
16
-
 17
17
-
 18
18
-
 19
19
-
 20
20
-
 21
21
-
 22
22
-
 23
23
-
 24
24
-
 25
25
-
 26
26
-
 27
27
-
 28
28
-
 29
29
-
 30
30
-
 31
31
-
 32
32
-
 33
33
-
 34
34
-
 35
35
-
 36
36


en otros idiomas
- français: Extremis Bistroo Manuel utilisateur
- italiano: Extremis Bistroo Manuale utente
- English: Extremis Bistroo User manual
- Deutsch: Extremis Bistroo Benutzerhandbuch
- Nederlands: Extremis Bistroo Handleiding