LG LDS5811BB-01 El manual del propietario
- Categoría
- Lavaplatos
- Tipo
- El manual del propietario
Este manual también es adecuado para

1-800-243-0000
24 HOURS A DAY, 7 DAYS A WEEK FOR LG CUSTOMER SERVICE
Dishwasher
MODEL :LDS5811WW/ LDS5811BB/ LDS5811ST
Please read this manual carefully. It provides
instructions on safe installation, use and maintenance.
Retain it for future reference.
Record the model and serial numbers of your machine
and report this information to your dealer if your machine
requires service.
To obtain nearest authorized service center or sales dealer,
or to obtain product, customer, or service assistance, call
1-800-243-0000 (24 hours a day, 7 days per week) and choose
the appropriate prompt from the menu and have your product type,
model number, serial number and Zip code; or visit our web site
at http://www.lgservice.com or http://us.lgservice.com

_iill _ i iii
iiil i i_ i
ISHWASHER FEATURES
• Ultra Big Capacity
........."_:7_?_-t_--_> _.................
If you raise the Upper Rack, you can load large dishes in the Lower Rack.
(Max. 14 in.)
The tall tub provides large dishes loading as well as large capacity.
LG dishwashers let you load oversized items in the Lower and Upper Rack.
• Slim Direct Inverter Motor
Newly introduced Slim Direct Inverter motor is inverter-controlled. Speed is
controlled based on program selection. It also offers high energy efficiency to
minimize energy loss.
• Hybrid Drying System
Dry
Air
Mixed
Air
Air
This is one of the best performance solutions for drying dishes because it
minimizes venting humid air to the outside of the dishwasher. In addition, this
system ensures better drying results compared to the condensing drying
system.
• Vario Spray System
1
Because of alternating water spray between the Upper and Lower
Rack, the water pressure allows superior performance and reduced
consumption of water and electricity.
• Self Cleaning Filter
SoilSensor For best wash results, the self-cleaning filter system continuously cleans the
water as it circulates. Your LG dishwasher has a self-cleaning filter that grinds
food into small particles before it goes down the drain.
Fine Mesh
2

PART 1, IMPORTANT SAFETY INSTRUCTIONS ................................................... 4_8
PART 2. PARTS OF YOUR DISHWASHER ................................................................. 9
OPERATING INSTRUCTIONS
PART 3. FUNCTIONS OF CONTROL PANEL ..................................................... 10~11
PART 4. USING YOUR DISHWASHER ................................................................ 12~16
PART 5. CARE & MAINTENANCE ............................................................................. 17
PART 6. OPERATING SEQUENCE ........................................................................... 18
PART 7. PROGRAM ................................................................................................... 19
PART 8. TROUBLESHOOTING ................................................................................. 20

READ ALL INSTRUCTIONS BEFORE USE
For your safety, the information in this manual must be followed to minimize
of life.
Your safety and the safety of others is very important.
We have provided many important safety messages in this manual and on
your appliance. Always read and obey all safety messages.
This is the safety alert symbol.
This symbol alerts you to potential hazards that can killor hurt you and others.
All safety messages will follow the safety alert symbol and either the word DANGER or WARNING.
These words mean:
You can be killed or seriously injured ifyou don't immediately follow
instructions.
You can be killed or seriously injured ifyou don't follow instructions.
All safety messages will tell you what the potential hazard is,tell you how the reduce the chance of injury, and
tell you what can happen if the instructions are not followed.
WARNING Tip Over Hazard
Do not put excessive downward force on the open door prior to installation as this could cause damage to
the unit or cause it to tip over. The dishwasher should not be used before installation has been completed
in accordance with the instructions in the installation manual.
WARNING Electrical Shock Hazard
Not following these instructions can result in death, fire, or electrical shock.
The dishwasher MUST be grounded.
Connect the ground wire to green ground connector in terminal box.
Do not use an extension cord.
iiiiii__i_i/i_i_i_
iii!i __!i_if!J/illi i

ii
READ ALL INSTRUCTIONS BEFORE USE
For your safety, the information in tl
IAWARNING o reduce the risk of firel electric shock, orinjurY to persons when using this
applian_! follow basic precautions , including the following:
f
WARNING - When using your dishwasher, follow basic precautions, including the following:
a) Read all instructions before using the dishwasher.
b) Use the dishwasher only for its intended function.
c) Use only detergents or wetting agents recommended for use in a dishwasher and keep them out
of the reach of children.
d) When loading items to be washed:
1) locate sharp items so that they are not likely to damage the door seal; and
2) load sharp knives with the handles up to reduce the risk of cut-type injuries.
e) Do not wash plastic items unless they are marked "dishwasher safe" or the equivalent. For plastic
items not so marked, check the manufacturer's recommendations.
Note : This statement may be omitted for an appliance that employs a heating element that is
located or guarded such that melted plastic items are not likely to contact it.
f) Do not touch the heating element during or immediately after use.
g) Do not operate your dishwasher unless all enclosure panels are properly in place.
h) Do not tamper with the controls.
i) Do not abuse, sit on, or stand on the door or dish rack of the dishwasher.
j) To reduce the risk of injury, do not allow children to play in or on the dishwasher.
k) Under certain conditions, hydrogen gas may be produced in a hot-water system that has not been
used for two weeks or more. HYDROGEN GAS IS EXPLOSIVE. If the hot-water system has not
been used for such a period, before using the dishwasher turn on all hot-water faucets and let the
water flow from each for several minutes. This will release any accumulated hydrogen gas. As the
gas is flammable, do not smoke or use an open flame during this time.
I) Remove the door to the washing compartment when removing an old dishwasher from service or
discarding it.

i:i iii i _ ii
IAWARNING oreduce the risk of firel electric shock, or inju_ to persons when using this
appliance !follow basic precautions ! includin_ the following .
_Pp
.... J
ko_i
The dishwasher is designed
for standard household
current (120 Volts AC, 60
Hz.) Before connecting the
dishwasher, ensure the
outlet or cable is properly
!use_an_gr°un_e_"..................
Not being grounded may
cause breakdowns or electric
shocks.
Do not install or store the
dishwasher where it will be
exposed to the weather.
ii_aycauseaneieciiic...............
shock, fire, malfunction and
damage.
Do not grasp the power
cord or switch with wet
hands. Do not use a
damaged power cord, plug
or socket.
It may cause electric
shock.
Most installations are hard-wired. This will
imply it is acceptable for the customer to set up
the dishwasher as a portable appliance. This
would apply only in cases where the dishwasher
is plugged in to an outlet under the sink.
Do not damage the power F
cord itself or place heavy
o.!_ o,!,,_ _o,....................._. -,
owercorddnemy
cause fire and electric shock.
Place the dishwasher on ...........................................................................................................................................................................................
even and solid floor.
Uneven surface may cause
abnormal noise.
Disassembly or repair
should be conducted by
experienced service
persons.
Improper disassembly or repair
could lead to product failure or
electrical shock.
After installation, recheck
the water supply
connections.
Loose connections could leak
resulting in property damage.
I Fora permanentlyconnecteddishwasher: 1
This appliancemustbe connectedto agroundedmetal,permanentwiringsystemor anequipment-groundingconductormust
be runwith thecircuitconductorsandconnectedto theequipment-groundingterminalorleadonthe appliance.
iiiiii__i_i/i_i_i_
:ii _iii iii
iii;: _!i_if!J/illi i
Detailed installation instructions are contained in the installation instruction manual included with your
dishwasher. Be sure to read and observe all instructions in the installation manual.

X
IAWARNING Toreduce the risk of firel electric shock, orinju_ to persons when using this
appliance !follow basic precautions! including the following.
F --, Do not allow children or pets
to play on the door or inside
the dishwasher as this could
cause injury to the child or
pet, or damage the
dishwasher.
...........
injured. Children or pets
could be injured by interior
parts or suffocate inside
"' dishwasher.
, ...2_°.!_e......._.c°,ho............................
Do not store or use
combustible materials,
gasoline or other flammable
vapors and liquids in or
around dishwasher.
This could cause a fire.
Do not splash water on the
controls or on the exterior
of the dishwasher.
This could cause fire or
electric shock.
When dishwasher is not in
use for a long time, shut off
the water supply.
Property damage could result
if a connection fails.
Hand Detergents
\ J
Use only detergents or
wetting agents
recommended for use in a
dishwasher and keep them
out of the reach of children.
Improper detergents may
cause malfunctions, electric
shock, or fire due to
excessive suds.
_,_,, Don't leave racks out of
j dishwasher, except when
removed for washing large
!t.e...n?....s......................................................
Children could play inside the
dishwasher or fall on the rack
and be injured.
f
\
Keep the dishwasher away
from heat sources
Excessive heatcould cause
melting of plasticparts or fire.
Dishwasher should be
unpacked and moved by 2
or more persons due to its
of heavy weight.
Dropping the product may
cause injury to people or
damage to the dishwasher.
f
Do not press the buttons
with hard or sharp objects.
Use only your finger tips.
Damage or electric shock
could result.

iiiiii i/i i i
IAWARNING Toreduce the risk of firel electric shock, or inju_ to persons when using this
appliance !follow basic precautions ! includin_ the following . )
WARNING ChildSafety
• Controls may be locked using CHILD LOCK mode to prevent settings from being changed by children.
• Keep children away from detergents and rinse-aids. Store chemicals properly and safely.
• Do not allow children to operate the dishwasher.
• Young children should be supervised to ensure that they do not play with the appliance.
WARNING Concerning the Power Cord
Most appliances should be connected to a dedicated circuit; that is, a single outlet circuit which powers
only that appliance and has no additional outlets or branch circuits. Check the specification page of this
owner's manual to be certain. Do not overload wall outlets. Overloaded wall outlets, loose or damaged wall
outlets, extension cords, frayed power cords, or damaged or cracked wire insulation are dangerous.
Periodically examine the cord of your appliance, and if its appearance indicates damage or deterioration,
unplug it, discontinue use of the appliance, and have the cord replaced with an exact replacement part by
an authorized service person. Protect the power cord from physical or mechanical abuse, such as being
twisted, kinked, pinched, closed in a door, or walked upon. Pay particular attention to plugs, wall outlets,
and the point where the cord exits the appliance. Any of these conditions could result in electric shock or
fire.
f
Properly dispose of the
box, packaging, plastic
bags, and extruded
polystyrene.
Children playing with packing
material and plastic bags
could be injured or suffocate.
.....J
When the product has
reached the end of its
useful life and is to be
discarded, remove the door,
cut the power cord and
disable the control panel.
Children could climb into the
tub and become trapped and
suffocate. Attempts to reuse
the product could cause injury
or property damage.
SAVE THESE INSTRUCTIONS
8

@
O Control Panel
O Front Display
O Door Handle
O Power Button
O Front Cover
O Lower Cover
O Leveling Foot
O Side Cabinet
• Base
_) Top Spray Arm
• Upper Spray Arm
O Removable Tines
_) Lower Spray Arm
_) Detergent & Rinse Aid Dispenser
O Vapor Vent Cover
@ Upper Rack
• Cutlery Basket
@ Lower Rack
Specifications
• Power supply: 120V, 60Hz AC only, minimum 15A circuit breaker.
• Water Pressure: 20 - 120 psi (140 - 830 kPa)
• Size (WxDxH): 23 7/8" x 25" x 33 7/8"
(606mm x 635mm x 860mm)
• Inlet Water Temperature: 120°F (49_C)
• Weight: 110 Ibs. (50kg)
The appearance and specifications are subject to change without
manufacturer' s notice.
Jllll#

• Repeated pressing of the
Spray button will select
i i i
ii_iii__iiiii_iiii_iiii_i!_i!_i!_i!_i!_i!_i!_i!_i!_i!_i!_i!_i!_i!_i_
Soak
Power Scrub
Normal
Delicate
Quick Wash
Rinse Only
This program is for very heavily soiled loads including pots,
pans and casserole dishes which may have dry food residue.
This program is for very heavily soiled loads
This program is for normally soiled everyday loads.
This program is for washing delicate items like glasses.
This program is for that quick wash of lightly soiled recently
used dishes and cutlery.
This program is for very lightly soiled loads.
• Lock the control buttons
to prevent the settings
from being changed.
• To lock!unlock, press
Spray and Rinse buttons
simultaneously for 3
seconds.
of the Rinse
Rinse or both.
' If you Seiect the Sanitary FUnCtionl
Sanitary Light blinks when the
water temperature meet sanitary
Temp and ilIuminates at the end of
CYcle when conditions have been
met to achieve sanitization.
additional rinse Cycle is added!
• In case of a small load; use the
upper or i0Wer rack only t0 save
butto n cycles between upper
rack only and lower rac k only i
• If you don't press Half Load;
the dishwaSher runs n0rmallyi
i :e, operation of upper and
lower spray _m alternating
periodicaliyi
These high temperature rinse sanitizes dishware and glassware in accordance with NSFIANSI Standard 184for
Residential Dishwashers. Certified residential dishwashers are not intended for licensed food establishments.
10

12il _iii _i__i_ i
• Child lock: Lamp will turn
on when Child Lock
setting is onl
' RinSe Aid lRefill with
Rinse aid when Lamp turns
onl
' Current program
phase is indicated;
• Before starting, the display window shows
the running time Of the selected prOgrami
• After starting; the display windOw shoWs
the remaining timel
, If the dishwasher has a trouble, the trouble
type is disp!ayedi
• If you want to de!aYthe start of • To cancei a, Press the , F0r operating; press this
a selected pr0graml press the running pr0graml program that button first for p0Wer 0nl
Delay Start butt0nl press and hold corresponds to. After operating l the p0wer
• Each press of Dday Start Wi!i the Normal and your deSired aut0maica!iy Switches off
delay the start of the cyc!e by Delicate butt0ns wash cYc!el for safety _d ec0n0myi
' In case of an unusual Power
• The delay start time can be surge or disturbance, the
adjusted from i to i2 h0UrSin power may be automatically
one.hour increment. turned off for safetyi
Only sanitary cycle have been designed to meet the requirements of performance for soil removal and sanitization
efficacy. There is no intention, either directly or indirectly, that all cycle on a certified machine have passed the
sanitization performance test.
ii_iiiii _!ii%11!_
iii i i
ii i i

i:iill i
i
:ii _iii iii
iii;: (_ ii!;]ii i i
Before using the dishwasher, please
read Important Safety Instructions.
Water supply temperature should be 120°F (49°0)
for better washing and reasonable cycle time.
For this reason, use hot water faucet only.
It is also important that the dishwasher is loaded
according to instructions for the effective cleaning.
When loading your dishwasher, make sure that
insoluble items such as bones, toothpicks and
pieces of paper have been removed.
When loading the dishwasher, observe the
following general guidelines;
1. Deep based items should be placed at an
angle to help water run off and dry properly.
2. Remove solid, burnt-on scraps from dishes
prior to loading in the dishwasher.
3.Load only items which are dishwasher safe.
Please avoid utensils that are non-heat
resistant, metal decorated, etc.
Loading the Lower Rack
This lower rack allows max. 14 in. plates, pans or
any utensils which mean the size of rack is bigger
and is higher than industry standard thanks to
super big tub capacity.
Do not obstruct the rotation of the spray
arms. Make sure large items do not prevent
the detergent dispenser from opening.
The lower rack is best loaded with dinner plates,
soup bowls, dishes, pots, pans, lids and even a
grill tray. Plates should be positioned upright and
facing the center of the rack. Pots, pans and
large dishes must be turned upside down.
Basically, the lower rack is not meant to load
small items like cups, wine glasses or small
plates. These items should be loaded on the
upper rack for proper distribution.
i ..... fh_[[
:k/i_,,J*_d':',J,)Ji,O,_j',jy_
f 'i'' ' i I I 1_
I }!, i I v
12 place setting, lower rack
Cutlery Basket
Racks are designed to hold even the most
delicate items securely in place as well as tall
items. In addition, our extra cutlery and knife rack
has separators to avoid scratching and tarnishing
of your delicate cutlery. Basket can be divided
into three separate baskets which can be used on
both the upper and lower levels. If you only have
a small load of cutlery, the baskets can be
removed leaving extra space for other plates.
10 place setting, lower rack
WARNING
Be careful when loading and unloading
sharp-edged items. Load sharp knives
with the handles up in order to reduce the
risk of injury.
12

Removable Tines
If you need to wash large items, you can remove
these tines from the main rack.
Loading the Upper Rack
The upper rack is best loaded with more delicate
items, small plates, cutlery basket, cups, glasses
and dishwasher safe plastic items. Plates should
be positioned upwards with the plate bottom
facing the front of the rack. Cups, glasses and
bowls must be positioned upside down. Extra
cups or cooking utensils can be laid on the fold
down cup racks which may also provide support
for long stem glasses. Take care not to obstruct
the rotation of the spray arm under the upper
rack.
Adjustable angular tines
The plate supports in the lower and upper racks
can be folded down. Based on the size and
shape of the dishes, you can adjust the angle of
the tines to five different levels.
10 place setting, upper rack
12 place setting, upper rack
i i ii_
Be careful when adjusting angular tines and apply
gentle force.

Height Adjustable Upper Rack for 14 in.
loading(on some models)
LG dishwasher proudly introduces the ability to
load 14 in. dishes. An upper rack that moves up
and down lets you put tall and oversized items on
it. LG dishwashers adjust enough to allow 14 in.
dinner plates on the lower and 12 in. plates on the
upper rack.
To adjust the rack
1. Pull the upper rack out.
2. Reinsert the upper rack in the chosen position.
CAUTION
Non DishwasherSafe Items
The combination of high water temperature
and dishwasher detergents may damage
particular items, therefore we do not recommend
using the dishwasher to wash the following items:
• Hand painted silver or gold leaf crockery
• Wood or bone handled utensils
• Iron or non-rustproof utensils
• Plastic items which are not dishwasher safe.
Half Loading Option
In case you do not have enough dishes for a full load
you can simply load dishes in the upper rack or in
the lower rack only. You can then wash either rack
separately by selecting half load option.
This will bring about a savings in hot water, electricity
and time.
Always remove dishes from the upper rack before
removing the rack.
After adjusting, check that the spray arm isfree to rotate
without being stopped by dishes loaded on the upper
rack. Do not adjust racks when dishes are loaded.
iiiiili_i/iii_
iii!i _ !i_ii!Jiiiil l

i i ii_
Adding detergent to dispenser
• Detergentmust be put intothedetergentchamber
before startingevery programexcept the Pre-
Wash.
• Please follow the manufacturer's instructions
printed in the manual when determining the
correct amount of detergent.
• If your dishes are only moderately dirty, you may
be able to use less detergent than recommended.
• The detergent chamber holds 1.4 oz (40g) max.
• The amount of detergent depends on the program
and dish loads. Refer to the guide table.
Filling the dispenser
1. Push latch to open.
2. Add detergent to the main wash compartment.
(See the table for the amount of detergent.)
PROGRAM AMOUNT OF DETERGENT
Soak 0.9oz (25g)
Power Scrub 0.9oz (25g)
Normal 0.7oz (20g)
Delicate 0.7oz (20g)
Quick Wash 0.7oz (20g)
Rinse Only No detergent
Do not add detergent for a rinse cycle.
Formainwash I
CAUTION
3. If needed, add detergent to pre-wash
compartment.
Detergent Information
Use only the detergent intended for household
dishwashers or the dishwasher may fill with suds
during operation. Suds may reduce washing
performance and could cause the unit to leak.
(Hand- Wash detergent is not allowed for this
dishwasher.)
For pre-wash
4. Close the cover. (You can hear cover latch click.)
Too much detergent can leave afihn on dishes.
iiii i
i _i i i

iiiiii i/i i i
iii!i __!i_if!J/illi i
Adding Rinse Aid to dispenser
The purpose of rinse aids is to prevent possible
spots on dishes formed from droplets during drying
operation. By removing them, drying performance
will be increased.
Only liquid rinse aids can be used for this dishwasher.
• Filling Rinse Aid
1. Rotate the round cap counterclockwise and
remove it.
• Rinse Aid Amount Setting
The factory setting is at level 3 which is where you
can expect the best performance under a normal
condition. After a cycle is done, ifyou notice some
spots, streaks or water marks on the dishes, adjust
to a higher setting. If you notice foam present on the
bottom of the glasses or tub bottom, change to a
lower setting.
1. Remove the cap.
2. Rotate adjuster to the desired setting.
Rinse-Aid : "_©1
Indicator 0
_ Adjust Lever
(Rinse)
2. Add a liquid rinse aid to the maximum level.
(Max. 4.8 oz (145ml))
• Refilling Rinse Aid
4.8 oz (145ml) is the capacity of the rinse aid
dispenser. The refilling period totally depends on
your washing habits such as the number of washes
per month and which rinse aid setting you adjust to
your washing conditions. The indicator light will
inform you when there is insufficient rinse aid in the
dispenser. The indicator light will stay on when you
close the door to start a cycle.
3. Replace and lock the cap.
4. Rinse aid will be automatically dispensed during
the final rinse cycle.
In hard water areas where it is not economical or
practical to install a water softener, use GLASS MAGIC
with each load to increase the effectiveness of the
detergent.
Pour 1/4 cup (4 tbsp) of GLASS MAGIC into the bottom
of your dishwasher each time the dishwasher is used
except Rinse Only.
To remove film on dishwasher recommend that use
White Vinegar and operate product at about 20m1(4 tbsp)
or use the Tub clean detergent.

r' AR & MAINTENANCE
For best results, it is important to periodically check and care for the filters and spray arms.
,&WARNING •To prevent any possible injury during care and maintenance / cleaning, be sure to wear
globes or protective clothing.
Cleaning metallicparts
Clean the dishwasher with a cloth or sponge.
If your dishwasher has a stainless steel door panel, we
recommend the use of a quality stainless steel cleaner.
The stainless steel tub has a tendency to build up
cloudy film on its surface, especially when using hard
water.
To remove filming on the interior surfaces, add 1/4 to
1/2 cup of white vinegar to the tub and run a normal
cycle. If stronger cleaning is needed, use Glisten or
similar cleaning agent which can usually be found
wherever detergents are sold.
CleaningSpray Arms
- Lower Spray Arm
• Check that the water jet holes are not blocked by
food particles.
• When cleaning is necessary, remove the Spray arm
by pulling up.
• Clean the spray arm and replace it pushing down.
- Top Spray Arm
• Make sure the water jet holes are not blocked by
food particles.
• When cleaning is necessary, remove the arm by
disassembling the hook from the bracket which
holds the Top Spray Arm assembly to the tub.
• Clean the spray arm and replace it.
- Upper Spray Arm
• Pull the upper rack forward. Make sure the water
jet holes are not blocked by food particles.
• When cleaning is necessary, remove the arm by
unscrewing the nut.
• Clean the spray arm and replace it in the reverse
order. Make sure the nut is tight!
Seasonal Maintenance and Storage
- During the summer season, if you will be absent for
extended periods of time, it is recommended that you
close the water valve and unplug power cord or shut
off the circuit breaker.
- During the winter season, if there isa possibility of
freezing temperatures, it is recommended that you
winterize the water supply lines and the product
itself.

11% IT_
iiiiii__i_i/i_i_i_
iii!i __!i_ii!//iii i i
•
Press the power button•
Press the power button to see the default
setting.
2. Check rinse-aid level and
open the door.
The indicator lights will illuminate if refilling
is necessary.
7. Close the door•The dishwasher
will start automatically•
8. At the end of the Program•
End is displayed on the digital display for a
few seconds and a tone will sound
signaling the program completion. The
dishwasher automatically switches off for
safety and energy savings.
•
•
Load the dishes after first
removing any scraps of food.
Remove any scraps of food in advance.
Pull the lower rack out and load the dishes
and cutlery in and push it all the way back.
Pull the upper rack out and load the cups,
glasses, etc.
Ensure that the spray arms
can rotate freely•
_cAuTIoN
U_i__i/_i_i(_i_i_i_/_i_I_i!_i!_ii_i_ii__i_i_i__i_I/ii_i_iii_/iiiii__I_I_iiii_!_ii_i_i_i__i!ilii_ii_!_i__i_ii_i_iii_ii_ii!_ii_iiii_ii_i
Empty the lower rack first and then the upper
one, this will avoid water dripping from the
upper rack onto the dishes in the lower one. ....
5. Measure detergent•
Add the required amount of detergent into
the dispenser. Close the detergent
dispenser lid.
6. Setting the program•
Select desired program and options. Before
starting, the display window will show the
estimated running time of the selected
program. If the number of dishes only fill
one rack, you can use the Half Load option.
For example, if you load dishes only on the
upper rack, you adjust the half load button
to the upper rack.
Remember to load all dishes into the
selected rack,
The estimated remaining time will be
displayed. If the door is opened during
operation, the dishwasher stops. Once the
door is closed, the program will restart from
the point where it's stopped.
Care shou d be taken when opening the door
immediately following the cycle, as steam may
escape,

Program
WASH
i
Pre-Wash:Main
Wash
494 60~654
131~145=F
55~63_
45~604
113~120°F
45~504
115°F
46°O
Rinse1
RINSE
Rinse2 Rinse3
Heating
Rinse
162"F
724
154"F
684
149"F
654
154"F
684
140"F
60°O
DRY
Water
(gal/L)
5.5~9.2/
21~35
5.5~9.2/
21~35
2.6~6.9/
10~26
5.5~6.9/
21~26
5.5/ 21
1.3/5
Time
(min)
143~191
123~171
101~135
103~120
74
14
Soak .... Delicate
This program is for very heavily soiled
loads including pots, pans and casserole
dishes which may have dry food residue.
......Power Scrub
This program is for very heavily soiled
loads.
This program is for washing delicate
items like glasses.
.... Quick Wash
This program is to wash lightly soiled
dishes and cutlery and wash them
immediately after use.
.... Normal
This program is for normally soiled
everyday loads.
Rinse Only
This program is for very lightly soiled
loads.

iiiill i_ _ ii_ i i i_ii_ II ii
_iiill ii _ ii
iiilIIi__i_i_ii_ii__i_i_
iiiiib i
:ii _iii iii
iii!i : <_ii!_i£iii i
Doorisnotcompletelyclosed.
Cycleisnotselected.
Powersupplyisnotconnected,
Waterisnotsupplied,
Fuseisblownout.
Coldwaterissupplied.
Remainingwaterinsidefromthelastcycle
Drainhoseisbentorclogged.
Impropercycleselection
Watertemperatureislow.
Dishwashingdetergentwasnotused,
Lowinletwaterpressure
Waterjetholesofsprayarmsblocked,
Improperdishloading
Lowwatertemperature
Toomuchdetergentused
Overloading
Improperloading
Insufficientwaterpressure
Insufficientdetergent
Rinseaiddispenserempty,
Extremlyhardwater
Extremelyhardwater
Thisisnormal.
YourDishwasherisn'thorizontal.
Nozzlearmknocksagainstthe dishes,
Combinationofexcessivedetergentandsoft
water.
Aluminumitemsrubdishesduringcycle,
Coffeeorteasoils
Checkthedooriscompletelyclosedandlatched.
Selectthe desiredcycle.
Connectpowersupplyproperly.
Checkwaterfaucet.
Replacefuseorresetcircuitbreaker,
Checkhotwaterfaucetisconnected
(Heatingwatertakesit longer).
OperateQuickWashcyclewithdetergentswithoutloadingdishes,
Straighthose,
Selectrightcyclebasedondishtypesandsoiltoughness.
Usehotwaterfaucet,
Userecommendeddetergents.
Waterpressureshouldrangebetween20~ 120psi.
Cleanthe arm.
Dishesshouldn'tinterruptarmrotationanddetergentdispensing.
Suppliedwatertemperatureshouldbeminimum120°Ffor
thebestwashingperformance,
Reducedetergentamount.Seepage15.
Loadtheproperamountofdishes.
Rearrangedishesreferringto photosonpages12and13.
Checkwaterpressureisabove20PSI.
Increasethedetergentamount.Seepage15.
Refilltherinseaiddispenser.
Installhomewatersofteneror useGlassMagic(page16).
Followinstructionsofpages16and17fordetergentuseand
tubcleaning.
Detergentcoveropening.
DrainageSoundattheearlystage.
Repositionyourdishwasher.
Repositionyourdishes.
Underloadthedishwasherandusea rinseaidtominimizethis
process.
Removealuminummarkingswithamildcleaner.
Eliminatethesoil byusingastainremovalproduct.
Rinseagentdispenserempty. Checkandrefillthe rinseagentif empty.
Poweris notconnected, Connectpowersupply,
Fuseisblownoutorcircuitbreakeristripped, Replacefuseandrepaircircuitbreaker,
Theholesofsprayarmsisblockedby food Cleanthe holesofthesprayarms,
particles.
tei i _ Rackispoorlyadjusted. Adjustthe upperrackproperlyreferringto page12.

Waterinlettrouble
Drainagetrouble
Excessivewatersupplied
Waterleakagetrouble
HeaterCircuitFailure
Thermistortroubleorveryhighinletwater
temperature.(over194°F)
Checkcloggingofwaterinlethose(orhosetwistorfreezing).
Checkwatersupply.
Checkcloggingofwaterdrainhose(ortwistorfreezing).
PleasecallyourAuthorizedServiceCenteror
LGECustomerServiceat1-800-243-0000.
Ifyoucan'tfixproblemswiththeaboveactionsoryouhavedifferentproblemswhicharenotmentionedinthemanual,
pleasecallLGECustomerServiceat1-800-243-0000.

_iill _ i iii
iiil i i_ i
@
Your LG Dishwasher will be repaired or replaced, at LG's option, if it proves to be defective in material or
workmanship under normal use, during the warranty period ("Warranty Period") set forth below, effective from the
date ("Date of Purchase") of original consumer purchase of the product. This warranty is good only to the original
purchaser of the product and effective only when used in the United States, including Alaska, Hawaii and U.S.
Territories.
WARRANTY PERIOD:
LABOR: One Year from the Date of Purchase.
PARTS (except as listed below): 2 Years from the Date of
Purchase.
Electronic Control Board: 5 Years from the Date of
Purchase.
Dishwasher Rack: 5 Years from the Date of Purchase.
Stainless Steel Door Liner and Tub: Lifetime (as long
as owned by the original purchaser)
Replacement Units and Repair Parts may be new or
factory remanufactured.
Replacement Units and Repair Parts are warranted for the
remaining portion of the original unit's warranty period.
HOW SERVICE IS HANDLED:
In-Home Service: Please retain dealer's dated bill
of sale or delivery ticket as evidence of the Date of
Purchase for proof of warranty, and submit a copy
of the bill of sale to the service person at the time
warranty service is provided.
Please call 1-800-243-0000 and choose the
appropriate option to locate your nearest LG
Authorized Service Center.
Or visit our website at • http://www.lgservice.com.
THIS WARRANTY IS IN LIEU OF ANY OTHER WARRANTY, EXPRESS OR IMPLIED, INCLUDING WITHOUT
LIMITATION, ANY WARRANTY OF MERCHANTABILITY OR FITNESS FOR A PARTICULAR PURPOSE. TO
THE EXTENT ANY IMPLIED WARRANTY IS REQUIRED BY LAW, IT IS LIMITED IN DURATION TO THE
EXPRESS WARRANTY PERIOD ABOVE. NEITHER THE MANUFACTURER NOR ITS U.S. DISTRIBUTOR
SHALL BE LIABLE FOR ANY INCIDENTAL, CONSEQUENTIAL, INDIRECT, SPECIAL, OR PUNITIVE
DAMAGES OF ANY NATURE, INCLUDING WITHOUT LIMITATION, LOST REVENUES OR PROFITS, OR
ANY OTHER DAMAGE WHETHER BASED IN CONTRACT, TORT, OR OTHERWISE. Some states do not allow
the exclusion or limitation of incidental or consequential damages or limitations on how long an implied warranty
lasts, so the above exclusion or limitation may not apply to you. This warranty gives you specific legal rights and
you may also have other rights that vary from state to state.
THIS LIMITED WARRANTY DOES NOT APPLY TO:
• Service trips to your home to deliver, pick up, and/or install the product, instruct, or replace house fuses or
correct wiring, or correction of unauthorized repairs.
• Damages or operating problems that result from misuse, abuse, operation outside environmental specifications
or contrary to the requirements of precautions in the Operating Guide, accident, vermin, fire, flood, improper
installation, acts of God, unauthorized modification or alteration, incorrect electrical current or voltage, or
commercial use, or use for other than intended purpose.
The cost of repair or replacement under these excluded circumstances shall be borne by the consumer.
CUSTOMER INTERACTIVE CENTER NUMBERS
To obtain Customer Assistance, Product Call 1-800-243-0000 (24 hours a day, 365 days per
Information. Or Dealer or Authorized Service year) and select the appropriate option from the menu.
Center location. Or visit our website at : http://www.lgservice.com
TO CONTACT LG ELECTRONICS BY MAIL:
LG Customer Interactive Center
P.O. Box 240007
201 james Record Road
Huntsville, Alabama 35824
ATTN: CIC
22


LG Electronics Inc.
P/No.: 3828DD3002Q

1-800-243-0000
para el Servicio LG (Atencion al Cliente) 24 horas al dia, 7 dias a la semana
LAVAVAJILLAS
MODELO : LDS5811WW/ LDS5811BB/ LDS5811ST
Le rogamos que lea con mucha atencion el presente manual.
Contiene instrucciones para instalarlo y realizar su mantenimiento
de forma segura. Conservelo para futuras consultas. Guarde el
modelo y numeros de seriede su aparato e indique esta
informacion a su vendedor si tuviera que repararlo.
Para conocer el centro de reparaciones o distribuidor mas cercano
a su domicilio, o para obtener ayuda con respecto al producto,
clientes o funcionamiento, Ilame al 1-800-243-0000 (24 horas al dia,
7 dias a la semana) y elija la opcion correspondiente del menu.
Tenga a mano el tipo de producto, nt_mero de modelo, numero de
serie y codigo postal o visite nuestro sitio web en
http://Igservice.com o http://us.lgservice.com

iiil i i_ i
ARACTERiSTICAS DE SU LAVAVAJILLAS
• Gran capacidad
........."_J7_?_-t_--_> _.................
Si levanta la bandeja superior, podra lavar platos grandes en la bandeja
inferior (max. 14 in.). Esta cubeta alta permite lavar platos grandes, asi como
gran cantidad de vajilla. Los lavavajillas de LG le permiten lavar vajilla de gran
tamafio tanto en la bandeja inferior como en la superior.
• Motor de propulsion directa de pequefio tamafio (DD)
Nuestro motor de propulsion directa de pequefio tamafio (DD) de reciente
introduccion, esta controlado mediante propulsores inversos. Las revoluciones
se pueden controlar segun los programas. Tambien posee una gran eficacia
energetica para minimizar las perdidas de energia.
• Sistema de secado hibrido
Aire
Aire
Es una de las soluciones de mayor rendimiento para secar los platos porque
minimiza la salida de aire humedo fuera del lavavajillas. Ademas, este
sistema garantiza mejores resultados en el secado en comparacion con el
sistema de secado mediante condensacion.
Aire
mezclado
• Sistema vario-spray
¢% i
Gracias a la alternancia de agua pulverizada entre la Bandeja Superior y la
Inferior, la alta presion del agua permite un mayor rendimiento y aprovecha la
reduccion del consumo de electricidad y agua del lavado a gran velocidad.
Malla fina
• Filtro auto-limpiable
Sensor de suciedad Para que el lavado sea aun mejor, el sistema de filtro auto-limpiable limpia
progresivamente el agua a medida que circula. El lavavajillas de LG limpia
con filtro auto-limpiable y posee un mecanismo de rejillas que pulveriza los
alimentos antes de que entren en el sistema de desagOe.

NDICE
PARTE1. INSTRUCCIONES IMPORTANTES DE SEGURIDAD ............................ 4~8
PARTE2. PARTES DEL LAVAVAJILLAS .................................................................... 9
PARTE3. FUNCIONES DEL PANEL DE CONTROL ........................................... 10~11
PARTE4. USO DEL LAVAVAJILLAS .................................................................... 12~16
PARTE5. MANTENIMIENTO Y CUIDADOS ............................................................... 17
PARTE6. SECUENCIA DE FUNCIONAMIENTO ....................................................... 18
PARTE7. PROGRAMA ................................................................................................ 19
PARTE8. GUiA DE RESOLUCION DE PROBLEMAS ............................................... 20
ii_iiiii _!IITI !_

LEA TODAS LA INSTRUCClONES ANTES DE USAR
AADVERTENClA
Porsu s_urida& debe s_uir la info_aci6n indicada en este manua! para
minimizar el riesgo de incendio 0 explosi6n, descarga electrica, o _ra prevenir
dafios a la propiedad, lesiones personales o muerte.
SU SEGURIDAD Y LA DE LOS DEMAS SON DE SUMA IMPORTANCIA.
En este manual y en su electrodomestico figuran muchos mensajes
importantes de seguridad. Lea y cumpla siempre con todos los mensajes de
seguridad.
€:stees el simbolo de alerta de seguridad.
El mismo alerta sobre potenciales riesgos de muerte o heridas tanto para usted como para otras
personas.
Todos los mensajes de seguridad estar#.n a continuaci6n del simbolo de alerta de seguridad y con
la palabra PELIGRO o ADVERTENCIA.
Estas palabras significan:
Corre riesgo de muerte o de sufrir heridas serias si no sigue las
instrucciones inmediatamente.
Corre riesgo de muerte o de sufrir heridas serias si no sigue las
instrucciones
Todos los mensajes de seguridad le indicar4tn cu#.les el riesgo potencial, le dirb.ncomo reducir las
posibilidades de sufrir heridas y que puede suceder si no se siguen las instrucciones.
ADVERTENClATrucosparaevitar peligros
Nofuercedemasiado haciaabajo lapuertacuando esteabierta •podria dafiarlao romperla.Utiliceel lavavajillass61ocuando
Iohaya instaladoporcompleto.
ADVERTENClAPeligro de choque electrico
Si no sigue estas instrucciones, podria sufrir dafios, incendios o un choque electrico.
Lavavajillas con toma de tierra electrica.
Conecte el cable de toma de tierra al conector de tierra de color verde de la caja de terminales.
No utilice extensiones electricas.
iiiiii__i_i/i_i_i_
iii!i __!i_if!J/illi i

LEA TODAS LA INSTRUCClONES ANTES DE USAR
AADVERTENClA
Por su s_urida& debe seguir la informaci6n indicada en este manual para
minimizar el riesgo de incendio Oexplosi6n, de_rga el_ric& o pa[a preveni r
daSos a la propiedad, lesiones personales o muerte.
AADVERTENClA
f
ADVERTENClA - AI utilizar el lavaplatos siga estas instrucciones de seguridad ba.sicas:
a) Lea todas las instrucciones antes de utilizar el lavaplatos.
b) Utilice el lavaplatos solo para el uso para el que esta. diseSado.
c) Utilice solo detergentes o similares recomendados para lavaplatos y mantengalos fuera del
alcance de los niSos.
d) AI cargar el lavaplatos:
1) coloque los objetos puntiagudos de forma que no daSen el sellado de la puerta; y
2) coloque los cuchillos con el mango hacia arriba para reducir el riesgo de cortarse.
e) No lave pla.stico a no ser que tengan la marca de "lavable en lavaplatos" o similar. En el caso de
pla.sticos sin esta marca, siga las recomendaciones del fabricante.
Nota: El anterior punto puede omitirse en el caso de que el aparato contenga una pieza
calentadora colocada de forma que el pla.stico no pueda Ilegar a ella.
f) No toque la pieza calentadora durante o despues del uso.
g) No utilice el lavaplatos si los paneles de cierre no esta.n todos en su sitio.
h) No manipule los controles.
i) No se siente encima, no se apoye en la puerta ni en la bandeja de platos del lavaplatos, haga un
mal uso del lavavajillas.
j) Para reducir el riesgo de daSos personales, no permita que los niSos jueguen dentro o encima del
lavaplatos.
k) Bajo ciertas condiciones, podria aparecer gas de hidrogeno en un sistema de agua caliente que
no se ha utilizado en un par de semanas o mas. EL GAS DE HIDROGENO ES EXPLOSIVO. Si
el sistema de agua caliente no se ha utilizado en este periodo de tiempo, antes de utilizar el
lavaplatos, abra todos los grifos de agua caliente y deje que salga agua durante unos minutos.
Asi se liberara, un posible gas de hidrogeno acumulado. Ya que el gas es inflamable, no fume o
deje una hornilla abierta durante este tiempo.
I) Saque la puerta del compartimiento de lavado mientras se haga un servicio o se deseche el
producto.
Para minimizar el riesg0 de in_ndio o explosi6n, descarga el_'tri_,
o para prevenir lesiones personales cuando use electrodom6sti_s, se deben
seguir precauciones b&sicas de seguridad, incluyendo las siguientes,

AADVERTENCIA
Para minimizar el riesgo de incendio o explosi6nl descarga electric&
o para prevenir lesiones personales cuando use electrodomesticos, se deben
seguir precauciones b&sicas de seguridad, incluyendo las siguientes.
", El lavavajillas funciona
unicamente a 120 V.
Antes de conectar el cable
de alimentacion,
compruebe que esta
conectado a tierra y a un
.c.ort.o.c!.!.cu!!o:..................................
La ausencia de conexiones a
tierra pueden ocasionar
averias o choques electricos. ,,
No instale o almacene el
lavavajillas en lugares
expuestos a las _-4_r_-
...........
Puede causar choque =__
electrico, incendio, mal
funcionamiento o
deformaci6n.
^
\ ............................................. J
" No dafie el cable ni coloque "
e.nc!.m.a.o !etos ........ C_ I
Si se dafia el cable, pueden
producirse incendios o
;_4; choque electrico. _\
Coloque el lavavajillas en
una superficie lisa y solida.
Evitar_tque se produzcan
ruidos y vibraciones
anormales.
J
No agarre el cable ni el
enchufe con las manos
mojadas, y no utilice
cables, enchufes ni tomas
que se encuentren
dafiados.
Puede sufrir choque electrico.
El desmontaje y las
revisiones deben ser
realizados por expertos.
Si desmonta o repara de
manera incorrecta el aparato,
podrian producirse fallos o
descargas electricas.
Luego de la instalacion,
revise las conexiones de
todos los manguitos.
Si la conexion estA suelta, el
agua se escaparia,
ocasionando graves dafios.
I En el caso de lavavajillas que vayan a estar conectados permanentemente • |
h
Este electrodomestico debe estar conectado a un sistema de cableado o equipo permanentes. El conductor
de toma de tierra debe funcionar con los conductos de circuito y conectarse a la terminal o carga de toma de
tierra del aparato.
iiiii)_i_i/i_i_i_
iii!i __!i_if!frilli i
Encontrarti instrucciones detalladas de instalaci6n en el manual de instrucciones incluido con su electrodom_stico.
Asegt_rese de leer atentamente todas las instrucciones del manual de instalaci6n.

AADVERTENCIA
Para minimizar el riesgo de in_ndio o explosi6n, descarga electric& 1
0 para prevenir lesiones personales cuando use electrodomesticos, se deben
seguir precauciones ba,sicas de seguridad, incluyendo las siguientes.
_..g.o!pe.a.r!e..s..cuelguendelencimaanima]esnifiospuertaLosLosNoNodejedejelavavajillas,animalesnifiospuedenp_odriadequequedomesticospuedendella..........................................loslosdomesticospuertaasa,resultarceder,ni_osni_os,caerse,porqueOabrirseheridosdentrosejuegueno oloslalosypor _"--°%_i'%_ ..........................................................................................................................................................
las partes giratorias, o asfixiarse
== . dentro del tambor.
No almacene ni utilice
materiales combustibles,
gasolina u otros vapores y
liquidos inflamables junto
al electrodomestico.
Podria causar un incendio.
Gasoline Alcohol ,. ......................................................................................................................................................................,,j
,,o_,
........... J
No salpique agua al
lavavajillas.
Puede producir un incendio o
un choque electrico.
\ ...................................................................... J
Si no va a utilizar el
lavavajillas durante un
largo periodo de tiempo,
cierre la valvula del agua.
Si cierra la v_tlvula, evitar_t
desperdicio de agua,
\,
Utilice solamente detergentes o agentes
humectantes recomendados para uso en
lavavajillas y mantengalos alejados del
alcance de los ni_os.
Los detergentes normales pueden hacer que
el electrodomestico funcione mal, ocasionar
un choque
electrico o incendio debido al exceso de
espuma.
No saque las bandejas del
lavavajillas.
Los nifios podrian ponerse a
jugar dentro del lavavajillas.
Los nifios pueden resultar
lesionados jugando con los
estantes.
Mantenga el lavavajillas
alejado de estufas
electricas, velas o cualquier
elemento inflamable.
Algunas de las piezas se
podrian fundir, o prender fuego.
Debido a su elevado peso,
el lavavajillas deberia ser
desembalado y movido por
mas de dos personas.
Dejar caer o tirar al piso el
producto puede causar
lesiones a personas o romper
el lavaplatos.
No apriete los botones con
objetos puntiagudos, como
destornilladores o agujas.
Puede producirse un choque
electrico o mal
funcionamiento.

iiiii)i/i i i
IA ADVERTENCIAPara minimizar el riesgo de in_ndio o explosi6nl descarga el6ct[ic&
o para prevenir lesiones personales cuando use electrodomesticos, se deben
seguir precauciones ba.sicas de seguridad, incluyendo las siguientes. )
ADVERTENCIASeguridad para ni_os
• Se pueden bloquear los mandos utilizando la modalidad Child Lock (Bloqueo para nifios) con el fin de
evitar que los nifios cambien los par&metros del lavavajillas.
• Mantenga los detergentes fuera del alcance de los nifios.
• No permita que los nifios manejen el lavavajillas.
• Se debe controlar a los nifios pequefios para asegurarse de que no juegan con el electrodomestico
ADVERTENCIAcon respecto al cable de alimentacion
La mayoria de los aparatos recomiendan que se les coloque en un circuito dedicado, es decir:
un circuito con una sola salida que alimente unicamente a ese aparato y no tenga otras salidas o
derivaciones. Compruebe la p&gina de especificaciones de este manual de instrucciones para
asegurarse. No cargue demasiado los enchufes de las paredes. Los enchufes sobrecargados, sueltos o
dafiados, el uso de extensiones electricas, cables deshilachados, rotos o dafiados son peligrosos. Si
sucediera cualquiera de estas situaciones, se podria producir un choque electrico o un incendio.
Examine peri6dicamente el cable del aparato, y si por su aspecto piensa que podria estar dafiado o
deteriorado, desenchufelo, deje de usar el aparato y haga que un tecnico autorizado cambie el cable por
otro exactamente igual. Proteja el cable del abuso fisico o mec&nico, para que no se enrolle, se
pellizque, se quede trabado con una puerta o sea pisoteado. Preste una especial atenci6n a enchufes,
tomas de corriente y el punto por donde sale el cable del electrodomestico.
f
Deseche el embalaje del
producto, como el vinilo o
poliestireno para evitar
peligros.
Con esto se previene la
muerte por asfixia por el vinilo
o el poliestireno.
.....J
Corte el cable del enchufe y
separe las partes de los
botones.
Asi se evita la reutilizaci6n de
estas partes.
GUARDE ESTAS INSTRUCCIONES
8

ARTES DEL LAVAVAJILLAS
@
O
@
O Panel de control @ Brazo pulverizador supremo
0 Vista frontal • Brazo pulverizador superior
• Asa de la puerta 0 Separadores desmontables
• Boton de encendido _) Brazo pulverizador inferior
• Tapa delantera @ Distribuidor auxiliar de detergente y
aclarado
• Tapa inferior 0 Tapa de ventilacion de vapor
0 Pata ajustable @ Bandeja superior
• Armario lateral • Cesta para cubiertos
• Base @ Bandeja inferior
Especificaciones
• Alimentacion: solamente 120V, 60Hz AC
• Presion del agua: 20 - 120 psi (140 - 830 kPa)
• TamaSo (WxDxH): 23 7/8" x 25" x 33 7/8"
(606mm x 635mm x 860mm)
• Temperatura del agua de entrada: 120°F (49'C)
• Peso: 110 Ibs. (50 kgs)
El aspecto y las especificaciones estb.n sujetos a cambios sin
necesidad de que el fabricante Io autorice.
iii i i
ii i i
ii iII_

5_
UNClONES DEL PANEL DE CONTROL
• Pulse Strong (fuerte);
(suave) para seleccionar el
grado de pulverizacidn
iii iii_ /_i i i
Soak
(Prelavado)
Powerscrub
(Intensivo)
Normal
Delicate
(Delicado)
Quick Wash
(Rfipido)
Rinse only
(S61oaclarado)
Este programa es para cargas muy sucias, como ollas, sartenes
y cacerolas, que pueden tener residuos secos de comida.
Este programa es para la vajilla muy sucia.
Este programa es para la vajilla diaria con suciedad normal.
Este programa es para lavar elementos delicados, como vasos.
Este programa permite lavar rfipidamente platos y cubiertos
poco sucios y recidn utilizados.
Este programa es para vaiillas muy poco sucias.
I
iiiiiiiiiiiiiiiiiii!!
o Strong
o Medium OSanitary o Upper
o Soft o Extra o Lower
Rinse
• Bloquea los botones
de control para evitar
que se cambien los
parfimetros.
• Para bloquear /
desNoquear, pulse
Spay y Rinse a_
mismo tiempo durante
3 segundos.
• Cada vez que pulse el boten Rinse
(aclarado) podrfi elegir entre Sanitary
(higidnico _,Extra Rinse (Extra
aclarado) o ambos.
° Si usted selecciona Funcien Sanitario.
la luz parpadea cuando la temperatura
de agua alcanza a la temperatura de
Sanitario y ilumina en el final del ciclo
cuando termina Funcien de Sanitario.
• Si selecciona Extra Rinse (Aclarado
extra) se afiadirfi un ciclo de aclarado
mils.
• En caso de cargas pequefias, utilice
solamente la bandeja superior o ia
inferior, para ahorrar energ/a.
° Cada vez que pulse el boten Half
Load (Media carga), elegirfi
solamente la bandeja superior o
solamente la inferior.
° Si no pulsa Half Load. el lavavaj illas
funcionarfi normalmente, es decir, que
se alternarfi periddicamente el
funcionamiento de los brazos
pulverizadores superior e inferior.
La alta temperatura enjuaga, desinfecta plato y cristaleria de acuerdo con la norma NSF/ANSI STANDARD 184
para Lavavajillas Residenciales. La lavavajillas Residenciales Cert_ficados are not intended for licensed food
establishments.
10

• Child lock Lamp will turn
on when "Child Lock"
Setting is
• Rinse Aid : Refill with
Rinse aid when Lamp turns
on.
• current pr0gr_
phase is indicatedl
• Before starting; the display window
shows the running time of the selected
program
• After stating; the diSplaywindOW
shows the remaining time,
• If the dishwasher has a trouble, the
trouble type is disp!ayed.
I 1
j-
\
iiiiillliiii ll ii liiliiiiii
Delay Start
Soak Power Normal Delicate Quick Rinse Power
• Si desea retras_ eI iniCio, cuando desee •Pulse ei, Par a que eI e!ectrodom6stico
deI pr0grama selecCi0nadol detener e! pr0gr_a que se p0nga e! marcha; pulse
pulse Delay Start p_a que iavavajilIas; c0rresp0nda aI primer0 este bot6nl
i I n Ciclo de Iavado • Terminado el programa, el
se retrase ei inicio deI ciclo, pu se os boto es
• Cada vez que pulse Dday =" r 1 ue desee electrodom6stico se
l'_o ma y q _ " " _ i
Start;seretrasar_elinicio ;" _ , desconectaautom_tcamente,
1,encate at ._ .
. . por segurmac_ y economla.
dei cici01 m_smo tlempo , En caso de Subida repentina de
durante 3 I _ n r
• EI tiempo de retraso dei a tens'6 ;u 0t ot'po de
cic!0 se puede ajust_ desde segundos: prob!emal ei electrodom6stico
a !2 horas, en se PUede desconect_
incrementos de 1 h0ral automfiticamente por mmiv0s
de seguridad:
Solo el Ciclo de Sanitario esta dise_ada para satisfacer eliminaci6n de tierra y eficacia en sanitarizacion. No tiene
intenci6n directa o indirecta de que todos los ciclos de la mdquina certificada ha pasado prueba de ejecici6n.
iii i i
ii i i

SO DEL LAVAVAJILLAS
Rogamoslea atentamente las
Instruccionesde SeguridadImportantes
antes de utilizar su lavavajillas.
Para Iograroptimos resuttadosen et lavadode la vajitla,
el agua deberb,tener una temperatura de 120°F(49°0) al
entrar en la lavavajillas. Por este motivo,
recomendamos utiticesotamente et grifo del agua
catiente. Tambien es importante que lteneet lavavajittas
segt]n las instrucciones para una timpieza eficaz.
Antes de tlenar et lavavajitlas,compruebe que los platos,
cuencos etc., no tienen etementosindisotubles,
como huesos, cascaras, patittos,etc.
Cuandocargue el lavavajittas,observe las pautas
generates:
1. Losobjetos hondos deberian cotocarse en anguto,
para queet aguapueda satir y se sequen
adecuadamente.
2. Retire los restos solidos o quemados de los objetos
antes de meterlosen et lavavajitlas.
3. Meta en et lavavajittast]nicamente objetos aptos para
lavavajiltas.
Evite introducir utensilios /1oresistentes al calor, que
lleven decoraciones de metal, etc.
Cargade la bandeja inferior
La bandeja inferior admite como platos,sartenes u otros
utensitiosde 14 in.como mb.ximo,Ioque significa que su
tama_o y attura es mayorde Io normalgracias a su
cubeta st]per grande.
No obstruya la rotaci6n de los brazespulverizadores.
Compruebe que no hay objetos largos que impidan
la apertura del dispensador de detergente.
Losobjetos que se deben cotocaren la cesta inferiorson
losptatos llanos,cuencos para sopa, ptatoshondos,
cazuetas, sartenes, tapas e inctusotarejitla det homo.
Los platos debencotocarseen posicion vertical y
mirando haciaet centrode ta bandeja. Lascazuetas,
sartenes y platos grandes deben cotocarseen posicion
invertida.
Ba.sicamente,la bandeja inferior no estb.destinada a ta
carga de objetos peque_os, como tazas, vasos de vino o
platitos, queestara.nmejor cotocados enla bandeja
su )erior.
12 servicios colocados en la bandeja inferior
La cesta para cubiertos
Las bandejasesta.ndise_adas para sujetar incluso los
etementos mas deticadosde forma segura en su sitio, asi
como platos altos, cuencos, tazas, etc. Ademas, nuestra
bandeja paracubiertos y cuchittosdispone de
separadores que impidenque la cuberteria delicada se
ratteo deslustre. La cesta se puede dividir en tres cestas
independientes,que se pueden utitizar tanto en la
bandeja superior comoen la inferior, y si solamente tiene
que lavar unos pocos cubiertos, las cestas se pueden
sacar para dejar espacio libre para mas ptatos.
iiiiii i/i i i
iii!i : _!i_ii!_/iiii i
10 servicios colocados en la bandeja inferior.
12
ADVERTENCIA
Tenga cuidado cuando meta y saque objetos
afilados. Los cuchillos afilados deben colocarse
con el mango hacia arriba, para reducir el
riesgo de cortarse.

DEL LAVAVAJILLAS
Separadores desmontables
Si desea lavar muchos platos grandes, podra,hacerlo
sacando los separadores de la bandeja principal.
Carga de la bandeja superior
Es mejor cargar la bandeja superior con los objetos mas
deticados, ptatospequefios, cubiertos de gran tamafio,
tazas, vasos y objetos de plastico aptos para tavavajillas.
Los platos deben set cotocados en posici6n vertical con
la parte inferior de los mismos mirando hacia et frente de
la bandeja. Lastazas, vasos y cuencos deben cotocarse
boca abajo. Las tazas y los utensilios de cocina extra se
pueden poner en lossoportes plegables para tazas, que
tambien pueden servirde apoyo para los vasos altos.
Tenga cuidado de no obstruir ta rotaci6n det brazo
rociador que se encuentra debajo de la bandeja superior.
Separadores angulares ajustables
Los soportes para ptatos detasbandejas superior e
inferior se pueden plegar. Segt]n el tamafio y las
formas de los platos, podr#,ajustar el angutode 5
posiciones de losseparadores.
10 servicios colocados en la bandeja superior
12 servicios colocados en la bandeja superior
Tengacuidado cuando ajuste los separadores angulares; no
losfuerce demasiado.

DEL LAVAVAJILLAS
Bandejasuperiorde alturaajustablepara
platos de 14 in. (en algunos modelos).
EtlavavajiltasLGtiene et orgutlode indicarle c6mo meter
platos de 14 in. La bandeja superior se mueve arriba y
abajo para poder colocar objetos altos y de tamafio
considerable. Lostavavajitlas LG se ajustan 1osuficiente
para quequepan ptatosde 14 in. en la bandeja inferior,
y de 12 in. en la bandeja superior.
Para ajustar la cesta
1. Empuje la bandeja hacia fuera.
2. Vuelva a encajar la bandeja superior en la
posici6n que desee.
ATENCION
Objetosque no se puedenintroducir en el
lavavajillas
La combinaci6n de altas temperaturas y
detergente para lavavajillas podria dafar
determinados objetos, por Io que recomendamos
no introducir en el lavavajillas Iosiguiente :
• Vajillas pintadas a mano con la.minas de oro o
plata
• Utensilios de madera o hueso
• Utensilios de hierro o de un material facilmente
oxidable
• Objetos de plastico no aptos para e
lavavajillas.
Opcionde media carga
Si no tiene suficientes platos para poner una
lavavajillas completo, cargue los platos solo en una
de las bandejas, y lavelos seleccionado la opcion de
media carga.
Los lavavajillas de LG proporcionan laopcion de
media carga, que pulveriza agua solamente en la
bandeja superior o solo en la inferior. Resulta muy
ventajoso para ahorrar agua, electricidad y tiempo.
Q
No retire la bandeja superior si tiene platos dentro. Su
peso elevado puede hacer que se le
eaiga la bandeja, asi que vaeiela antes de retirarla.
Despu_s de ajustar la bandeja, compruebe que el brazo
pulverizador puede girar libremente, sin que lo paten los
platos eoloeados en la bandeja superior. No ajuste las
bandejas euando tengan platos dentro.
iiiiili_iiiiii_

DEL LAVAVAJILLAS
Adicion de detergente en el dosificador
•Sedebe poneretdetergenteen sucompartimentoantes
de iniciarcualquierprograma,exceptoconetPretavado.
• Paradeterminarlacantidadadecuadade detergente,
rogamossigaasinstruccionesdetfabricante,que
aparecenen etmanual.
• Si losptatosnoestanexcesivamentesucios,podrautilizar
menosdetergentedetrecomendado.
• Elcompartimentodetdetergenteadmitecomoma.ximo1.4
oz (40g).
• Lacantidaddedetergentedependedetprogramaydet
n0merode ptatos.Consultela tablaguia.
Como Ilenarel dosificador
1. Tire del pasador para abrir el compartimento.
2. Eche el detergente adecuado en el
compartimento principal. (consulte la tabla
para conocer la cantidad de detergente.)
PROGRAMA CANTIDAD DE DETERGENTE
Soak 0.9oz (25g)
Power Scrub 0.9oz (25g)
Normal 0.7oz (20g)
Delicate 0.7oz (20g)
Quick Wash 0.7oz (20g)
Rinse Only Sin detergente
No agtada detergente en el ciclo de aclarado.
Paraellavadoprincipal]
ADVERTENCIA
3. Si es necesario, afiada detergente en el
compartimento de prelavado.
Informacion sobre el detergente
Utilicesolamenteel detergenteindicadoparalavavajillas
domesticos,de Iocontrario,el lavavajiLlaspuedeIlenarse
deespumaduranteelfuncionamiento.La espumapuede
reducirel rendimientode lavadoy, sihubieramucha
espumadentrodellavavajillas,esta sederramarb,y
mojara,el suelo.(Nose debeutilizarundetergente
corrienteparalasmanos.)
Paraelprelavado
4. Cierre la tapa.(escuchara un clic)
Si pone demasiado detergente, el cristal no se limpiar6
del todo.
iiii i
i _i i i

iiiii) i
iii!i :_!i_ii!Ji:il
DEL LAVAVAJILLAS
Adicion de abrillantador en el dosificador
El abrillantador ayuda a conseguir platos sin las
manchas que surgen al secarse las gotas de agua.
Si estas se eliminan, mejorara la calidad del secado.
Este lavavajillas admite (micamente abrillantador liquido.
• Para Ilenar de abrillantador
1. Gire la tapa redonda en el sentido contrario alas
agujas del reloj y retirela.
2. Llene el compartimento hasta el nivel maximo con
un abrillantador (maximo 4.8 oz (145ml)).
3. Vuelva a colocar la tapa y cierrela.
• Ajuste de la cantidad de abrillantador
El ajuste de la dosis viene fijado de fabrica en 3
niveles que ofrecen el mayor rendimiento en
condiciones normales.
Si, tras el lavado, observa unas manchas borrosas,
rayas o marcas de agua en su cristaleria, podria ser
necesario aumentar el ajuste. Si detecta la
presencia de espuma en la parte inferior del vaso o
en la base de la maquina, seleccione un ajuste
inferior.
1. Retire la tapa.
2. Gire la flecha del indicador a la posici6n que desee.
Indicadorde
abrillantador L....................................G_;:_,
U -,,y<, o/
Nivel de ajuste
_, (a_rillantador)
• Para rellenar de abrillantador
El dosificador de abrillantador tiene una capacidad de
4.8 oz (145ml). La configuraci6n de fabrica es de 3
para esos 4.8 oz (145ml). La frecuencia de rellenado
dependera de sus habitos de lavado, como el
numero de lavados al mes o el ajuste que haya
seleccionado.
Pero no tiene que preocuparse gracias al indicador
de rellenado, que le informa de cua.ndo tiene que
hacerlo. Si hay poco abrillantador, la luz del indicador
se encendera, cuando cierra la puerta del lavavajillas.
4. El abrillantador se dispensa autom&ticamente
durante el ciclo de aclarado final.
En dreas con agua dura dome no resulta econ6mico ni
practico para instalar ablandadores de agua, agtada
GLASS MAGIC a cada carga para aumentar la eficacia
limpiadora de su lavavajillas.A gtada 1/4 de taza (4
cucharadas) de GLASS MAGIC en el interior del
lavavajillas cada vez que lo utilice, excepto con la
funci6n "S61o enjuagar." Para eliminar restos de
detergente de la vajilla recomendamos el uso de vinagre
blanco; aKada aproximadamente 20 ml (4 cucharadas)
o utilice su lavavajillas habitual.

Para obtener los mejores resultados, es importante comprobar y ocuparse peri6dicamente de los filtros y
brazos pulverizadores
Paraprevenircualquierda_oo accidenteal momento derealizarlalimpieza0
I,_ ADVER'rENGIA mantenimientodel lavavajillas;asegL_resede usarguantes:
Limpieza de las piezas
metalicasAIgunaspiezasexterioreso interioresse pueden
limpiarconuntrapoo una esponja.Sisu tavaptatoscuentacon
un panelen lapuertade aceroinoxidabte,recomendamosusar
un timpiadordebuenacatidadespecializadoen estematerial.
Latinade aceroinoxidabtetienetendenciaa acumutarempa_o
en lasuperficie,especiatmenteconunapresionfuertedetagua.
Paraetiminarrestosde detergentedetassuperficiesinteriores,
a_adade 1/4a 1/2taza devinagreblancoen etinteriory
ejecuteun ciclonormal.Si requiereunalimpiezamb.sabrasiva,
utiliceGlisteno un productosimilar,quenormalmentepuede
encontrarseen cuatquiertiendade ventadeproductos
detergentes.
Limpieza de los brazos pulverizadores
- Brazopulverizadorinferior
• Compruebeque losagujerosde proputsbn deaguano han
sidobtoqueadoscontrozosdecomida.
• Situvieraquelimpiarlo,saqueetbrazoputverizadortirando
de 61haciaarriba.
• Limpieet brazopulverizadory vuetvaa cotocarlo,empujando
haciaabajo.
- Brazopulverizadorsupremo
• Compruebeque losagujerosde propulsionde aguano
hansidobloqueadoscontrozosde comida.
• Situvieraquelimpiarlo,saqueetbrazopulverizador
desmontandoetganchodetsoporteque fijaelconjuntodel
brazoputverizadorsupremoalacubeta.
• Limpieet brazoputverizadory vuetvaa
cotocarlo.
i_ ii i II_
- Brazopulverizadorsuperior
• Empujelabandejasuperiorhaciadelante.Compruebeque
losagujerosde propulsionde aguanohansido
btoqueadoscontrozosde comida.
• Situvieraquetimpiarlo,saqueetbrazoputverizador
desenroscandotatuerca.
• Limpieet brazoputverizadory vuelvaacotocarloen
sentidoinverso.
• Compruebeque ha apretadolatuercafirmemente!
Mantenimiento de temporada
- Duranteetverano,sino vaa estarencasa duranteun
largoperiodode tiempo,recomendamosquecierrela
vatvutadetagua,y quedesenchufeetaparato.
- Duranteetinvierno,sila temperaturaambientedetlugar
dondeseencuentraetlavavajillastlegacasi atgradode
congetacbn,recomendamosque acondicioneparaet
invternotasviasde suministrodeaguayprotejasu
etectrodomestico.

ECUENClA DE FUNClONAMIENTO
•
=
=
=
=
=
iiiii)_i__ii_i_i_i_i_
iii!i __!i_if!frilli i
Pulse el boton de "encendido."
Pulse el boton "encendido" para ver el programa
seleccionado por defecto.
7. Cierre la puerta. El lavavajillas se
pondr,_en marcha
automaticamente.
Compruebesi tiene abrillantadory
abra la puerta.
Las luces del indicador correspondiente se
iluminaran si fuera necesario rellenar el deposito.
Meta los platos y retire los restos
de comida.
8. AI finalizar el programa.
Tras acabar el programa, aparecer_t End (fin) en la
pantalla digital durante unos segundos y un
zumbido le comunicara que el programa ha
finalizado. El lavavajillas se apagara
autom,Cticamente por motivos de seguridad y para
ahorrar energia.
Primero, quite los restos de comida. Saque la
bandeja inferior y coloque los platos y la vajilla en
la bandeja, empujandola hacia atras. Saque la
bandeja superior y ordene las tazas, vasos, etc. en
la misma.
Asegurese de que los brazos
pulverizadores pueden girar sin
obstrucciones.
/_ PRECAUCION
Vacie la bandeja inferior en primer lugar y, a
continuacion, la bandeja superior. Con esto,
evitara, el goteo de agua desde la bandeja
superior sobre los platos situados en la inferior.
Medida del detergente.
Afiada la cantidad necesaria de detergente en el
dosificador. Cierre la tapa del dosificador de
detergente.
Seleccion del programa.
Seleccione el programa y las opciones que desee.
Antes de la puesta en marcha, la ventana de la
pantalla muestra el tiempo de funcionamiento
previsto del programa seleccionado. Si la cantidad
de vajilla cabe solamente en una bandeja, puede
seleccionar la opcion de Media Carga. Por
ejemplo, si carga platos solamente en la bandeja
superior, ajuste el boton de media carga a la
bandeja superior.
No se olvide de meter todos los objetos en
la bandeja seleccionada.
El tiempo que aparece en la ventana de la pantalla
empezara a disminuir de minuto en minuto. Si se
abriera la puerta durante la ejecucion del
programa, el lavavajillas se detendra. Una vez que
se haya cerrado la puerta, se reanudara el
programa en el punto en que se interrumpio.
ADVERTENCIA
En terminos generales, no es aconsejable abrir
la puerta mientras el aparato se encuentre en
funcionamiento; no obstante, si se abre la
puerta, un dispositivo de seguridad hace que el
aparato se detenga. Hay que tener mucho
cuidado si se abre la puerta durante la fase de
calor o inmediatamente despues de terminar
un programa, puesto que se podria liberar
vapor.
Apagadoautomatico

ROGRAMA
Programa
iiii__iiiiiil_I_H_ii]_i_]_it_""ii!i_'_i_;iii]_S _ ii''_'i;''i'iiikii_i_i_:iiii!!i!i_ii!
iiiiiiiiiiii[iiiiii_ii_iii!iiiiiii_i!i"iI_iiii_iiii;_iJ'i'il;iiiiiiiiiii/i_,_ i_i_!iii;;;;iiiiii/D_iiiii'iii;:ii_iiiiiii_iii....
...... Tii
I_ iiii_'_'_i_'ii,ii_,,,_i¸
iiiiiiHiiiiiilHiiiiiiiiiiiiiiiii[!_Wiliill_iliiiiiiiiliiliiliiiii!i!i__!i,WJ,ii_,i!iii_
iiiiiiiii_/iiiiii;iiiiiiiiiiiii_ii'_''''_'_''_i_J_i_¸¸¸_|__iiliii_'_¸¸¸_¸_¸¸_i¸iiiii;¸¸¸i¸¸__ iiii!
}
iiiiiiii!tli!iiiii_;iii'iiiiii/]i!ii;Ii!!ii'iiii_ii_ii_ii:!:i_iiiiiiiiilliiii_illiiililHiiii]Hiliiiiiiiiiii!
LAVADO
Prelavad; Lavado
o ',principal
I
120"F ',140~149"F
49o0:60~65o0
I
i 113~120"F
', 45~50°C
I
ACLARADO
; ; ; Aclarado
Aclarado1:Aclarado2:Aclarado3:encaliente
I I I
I I I
, , , 162°F
72°0
154"F
I
I
I
I
I
I
I
I
I
I
I
I
I
I
I
i
,,
I
I
I
I
I
I
I
I
i
I
I
I
I
I
I
I
I
I
i
I
I
I
I
I
I
I
I
I
I
I
I
I
I
I
I
I
, 68°0
I
i
I
, 149"F
I
, 65oO
I
i
', 154"F
I
I
, 68°0
I
i
' 140"F
I
SECA Agua
DO (t)
I
I
I
I
I
I
I
I
I
I
, 60oO
I
I
I
I
5.5~9.2/
21~35
5.5~9.2/
21~35
2.6~6.9/
10~26
5.5~6.9/
21~26
5.5/ 21
1.3/5
Tiempo
(min)
143~191
123~171
101~135
103~120
74
14
.....Soak (Prelavado) .... Delicate (Delicado)
Este programa es para cargas muy
sucias, como ollas, sartenes y cacerolas,
que pueden tener residuos secos de
comida.
.... Power Scrub (Intensivo)
Este programa es para la vajilla muy
sucia.
.... Normal
Este programa es para la vajilla diaria con
suciedad normal.
Este programa es para lavar elementos
delicados, como vasos.
Quick Wash (R6pido)
Este programa permite lavar r&pidamente
platos y cubiertos poco sucios y recien
utilizados.
Rinse Only (Sblo Aclarado)
Este programa es para vajillas muy
poco sucias.
iii i i
i _i i i

_iiillii _ ii
iiilIIi__i_i_ii_ii__i_i_
UJADE RESOLUClON DE PROBLEMAS
i
Lapuertanoestacerradadeltodo.
Nosehaseleccionadounciclo.
Nosehaconectadolaalimentacionelectrica.
Nohayagua.
Elfusiblehasaltado.
Estafuncionandoconaguafria.
Quedaaguadentro,delaOltimavez.
LamangueradedesagQeesta
dobladaoatascada.
Eleccioninadecuadadelprograma.
Latemperaturadelaguaes baja.
Nosehautilizadodetergentelavavajillas.
Bajapresiondelaguadeentrada.
Losagujerosdepropulsiondelaguadelos
brazospulverizadoresestanbloqueados.
Losplatossehancolocadodeforma
incorrecta.
Bajatemperaturadelagua.
Sehautilizadodemasiadodetergente.
Sobrecarga.
Cargamalrepartida.
Presiondelaguainsuficiente.
Detergenteinsuficiente.
Eldosificadordeabrillantadorestavacio.
Aguademasiadodura.
Aguademasiadodura.
Esnormal.
Ellavavajillasnoestaenposicionhorizontal.
Elbrazodela boquillagolpeacontralos
platos.
Combinaciondeexcesode detergentey
aguablanda.
Compruebeque lapuertaestacompletamentecerradayconel
pestillo.
Seleccioneel cicloquedesee.
Conectecorrectamentelacorriente.
Compruebeel grifodelagua.
Cambieelfusibleoreajusteelcortocircuito.
Compruebequeel grifodelagua
estaconectado(calentaraguaIlevamastiempo).
Utiliceel programadesoloaclaradohastaquehayametidotodos
losplatos.
Pongaderechalamanguera.
Seleccioneel programacorrecto,dependiendodeltipodevajilla
yde Ioagarradaclueestelasuciedad.
Utiliceel grifodeaguacaliente.
Utilicelosdetergentesrecomendados.
Lapresiondelaguadeberiaoscilarentre20-120psi.
Limpieel brazo.
Losplatosnodeberianinterrumpirlarotaciondelbrazo,ni la
aperturadeldosificadordedetergente.
Latemperaturadelaguadeberiaserde120°F(49°C)
paraobtenerlosmejoresresultados.
Reduzcala cantidaddedetergenteempleado.
Consultela pagina15.
Metalacantidaddeplatosadecuada.
Reorganicelosplatosconsultandoeldibujodelas
paginas12y 13.
Ajustelapresiondelaguaentre20y 120psi.
Aumentelacantidaddedetergenteempleado.
Consultela pagina15.
Relleneeldosificadordeabrillantador.
InstaleunablandadordeaguaoutiliceGlassMagic(pagina16).
Sigalas instruccionesde laspaginas17y 19parael usodel
detergentey lalimpiezadelinterior.
Aperturade latapadeldetergente.
SonidodeldesagQeensuprimerafase.
Coloquedenuevoel lavavajillas.
Coloquedenuevolos platos.
Vacieel lavaplatosy utiliceunabrillantadorparaminimizareste
proceso.

UJADE RESOLUClON DE PROBLEMAS
Losobjetosdeahminiohanralladolosplatos Eliminelasmarcasde ahminioconunlimpiadorsuave.
duranteelprograma.
Manchasdecafeote. Eliminela manchaconunproductoquitamanchas.
Eldepositodeabrillantadorestavacio. Compruebey relleneel depositodeabrillantadorsiestavacio.
Lacorrientenoestaconectada.Elfusibleha Conectela corriente.Sustituyael fusibleyrepareelcortocircuito.
saltadoo se haactivadoelcortocircuito.
Elmontajedelbrazopulverizadoresta Limpielosagujerosdelos brazospulverizadores.
bloqueadoporparticulasdecomida.
Labandejaestamalajustada. Ajustela bandejasuperiorcorrectamente,consultandola pagina
12.
Problemasconla entradadeagua. Compruebequenosehataponadolamangueradeentradade
agua(oestaretoroida,ocongelada).Compruebesi nosedebea
uncortedelsuministrodeagua.
Problemasde drenaje. Compruebequenosehataponadolamangueradesalidadeagua
(oestaretorcida,ocongelada).
Sesuministrademasiadaagua.
Problemasconfugasdeagua.
FallodelCircuitodelCalentador.
Problemasconel termostato.
Llamealserviciotecnico.(1-800-243-0000)
Si no puedesotucionar etproblema mediante estos consejos, o si tiene problemas diferentes a los mencionados en este
manual, Itamealservicio tecnico.(1-800-243-0000)
iii i i
i _i i i

_iill _ i iii
iiil i i_ i
ARANTiA
Su Lavajillas LG ser#. reparada o reemplazada, a consideraci6n de LG, si prueba ser defectuosa en material o en
ejeduci6n dentro de un uso normal, dentro del periodo de garantia ("periodo de garantia") descrito en la parte
inferior, efectivo desde la fecha ("fecha de compra") de la compra del producto por el consumidor. Esta garantia
limitada es efectiva Qnicamente para el comprador original del producto, y efectivo Qnicamente si ha sido usado
en los Estados Unidos, incluyendo Alaska, Hawai y territorio norteamericano.
PERIODO DE GARANTIA:
Vigencia: 1 a_o desde la fecha de compra.
PARTES (esceptuando la siguiente lista): 2 a_o desde
la fecha de compra.
Piezas para el panel de control electronico: 5 a_o
desde la fecha de compra.
Piezas para el bastidor del lavavajillas: 5 a_o desde
la fecha de compra.
Piezas para el revestimiento de la puerta de acero
inoxidable o la Cubeta: La vida.
Las unidades reemplazadas y reparadas pueden ser
nuevas o refabricadas por la fabrica.
Las unidades reemplazadas y reparadas tienen la
misma porci6n de garantia que la compra del producto
durante el mismo periodo.
COMO SE MANEJA EL SERVIClO :
Servicio a domicilio: Por favor conserve el
recibo del lugar donde reliz6 su compra como
evidencia de la fecha en que el producto rue
adquirido para validar el periodo de garantia, y
tenga una copia del recibo para la persona de
servicio que la atienda en el momento en que
necesite aplicar su garantia.
Por favor ilame al 1-800-243-0000 y escoja la
opcion apropiada para Iocalizar el Centro de
Servicio Autorizado LG mas cercano a usted
O visite nuestra p&gina de internet en
http ://www.lgservice.com.
ESTA GARANTIA REEMPLAZA CUALQUIER OTRA GARANTIA, EXPRESA O IMPLICITA, INCLUYENDO SIN
LIMITACION CUALQUIER GARANTIA DE VENTA DE MERCANCIA O CONVENIENCIA PARA PROPOSITOS
PARTICULARES. EN EL EXTENDIDO CUALQUIER GARANTIA IMPLICITA ES REQUERIDA POR LEY, ES
LIMITADA EN DURACION AL PERIODO DE GARANTIA EXPRESA EN LA PARTE INFERIOR. NI EL
FABRICANTE NI SUS DISTRUBUIDORES EN LOS EUA PUEDEN SER RESPONSABLES DE NINGUN DANO
INCIDENTAL. CONSECUENCIAL, INDIRECTO, ESPECIAL O PUNITIVO DE NINGUNA NATURALEZA,
INCLUYENDO SIN LIMITACION, PI_RDIDAS DE GANANCIAS O CUALQUIER OTRO DANO AUNQUE ESTE
BASADO EN CONTRATO O AGRAVIO. AIgunos estados no permiten la exclusi6n o limitaci6n de da_os
incidentales o consecuenciales en el tiempo valido de la garantia asi que la exclusi6n mencionada en la parte de
arriba puede que no aplique para usted. Esta garantia le da derechos legales especificos y puede que usted
tenga otros derechos ademas de los mencionados que varian de estado en estado.
ESTA GARANTIA LIMITADA NO APLICA A:
• Viajes de Servicio a su casa para ilevar, recoger y/o instalar el producto, instruir o reponer fusibles o conectar
correctamente cables, o la correcci6n de piezas desautorizadas; y
• DaSos o problemas operacionales como resultado de un mal uso, abuso, operaci6n dentro de un ambiente no
especificado o contrario a los requerimientos o precauciones en la Guia Operacional accidente, plagas,
incendios, inundaciones, instalaci6n inapropiada, actos de Dios, alteraciones o modificaciones desautorizadas,
voltaje incorrecto, uso comercial, o para el uso de otros fines que no sean los prop6sitos intencionados.
El costo de reparaciones o reemplazos que son excluidos de estas circunstancias, deben ser asumidos por el
consumidor.
NUMEROS CENTRALES INTERATIVOS PARA EL CLIENTE
Para obtener Asistencia al Consumidor Informaci6n
de Producto, O centros de Servicio Autorizados.
Llame al 1-800-243-0000 (24 horas por dia, 365 dias
por aSo) y seleccione la opcion apropiada del men&
0 visite nuestra pagina de internet en
http://www.lg service.com
PARA CONTACTAR A LG Electronics POR MAIL:
LG Customer Interactive Center
P.O. Box 240007
201 james Record Road
Huntsville, Alabama 35824
ATTN: ClC
22


LG Electronics Inc.
N° de Ref.: 3828DD3002Q
-
 1
1
-
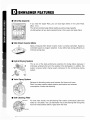 2
2
-
 3
3
-
 4
4
-
 5
5
-
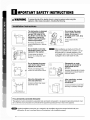 6
6
-
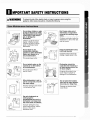 7
7
-
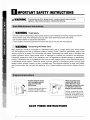 8
8
-
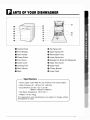 9
9
-
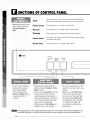 10
10
-
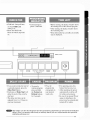 11
11
-
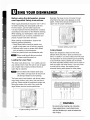 12
12
-
 13
13
-
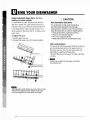 14
14
-
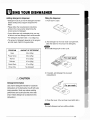 15
15
-
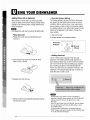 16
16
-
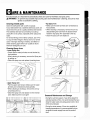 17
17
-
 18
18
-
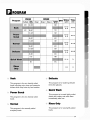 19
19
-
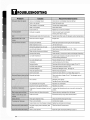 20
20
-
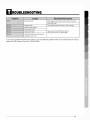 21
21
-
 22
22
-
 23
23
-
 24
24
-
 25
25
-
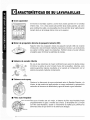 26
26
-
 27
27
-
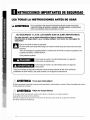 28
28
-
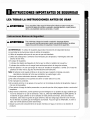 29
29
-
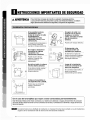 30
30
-
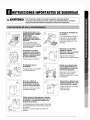 31
31
-
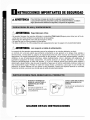 32
32
-
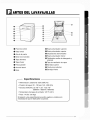 33
33
-
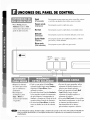 34
34
-
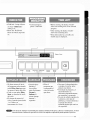 35
35
-
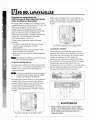 36
36
-
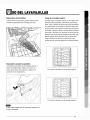 37
37
-
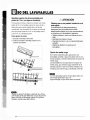 38
38
-
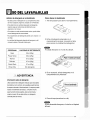 39
39
-
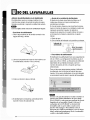 40
40
-
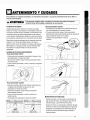 41
41
-
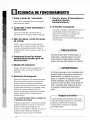 42
42
-
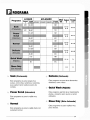 43
43
-
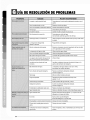 44
44
-
 45
45
-
 46
46
-
 47
47
-
 48
48


LG LDS5811BB-01 El manual del propietario
- Categoría
- Lavaplatos
- Tipo
- El manual del propietario
- Este manual también es adecuado para
en otros idiomas
- English: LG LDS5811BB-01 Owner's manual
Artículos relacionados
-
LG LDS5811BB El manual del propietario
-
LG LD-6300TB El manual del propietario
-
LG LDF9810ST El manual del propietario
-
LG Electronics LDF9810ST Manual de usuario
-
LG LDF8812ST El manual del propietario
-
LG LSDF9962ST El manual del propietario
-
-
LG LDS4821WW El manual del propietario