Haier HLF11E El manual del propietario
- Categoría
- Secadoras
- Tipo
- El manual del propietario


Electric
Dryer
User Manual-
Guide de l’Utilisateur-
Manual del Usuario-
Model #
Modèle
Para Modelo de
HLF11E
Sèche-Linge
Électrique
Secador-Eléctrico
IMPORTANT SAFETY INSTRUCTIONS
Warning –
To reduce the risk of fire, electric shock, or injury
to persons when using your appliance, follow basic
precautions, including the following:
1. Read all instructions before using the appliance.
2. Do not dry articles that have been previously cleaned in, washed in,
soaked in, or spotted with gasoline, dry-cleaning solvents, or other
flammable or explosive substances, as they give off vapors that
could ignite or explode.
3. Do not allow children to play on or in the appliance. Close supervision
of children is necessary when the appliance is used near children.
4. Before the appliance is removed from service or discarded, remove the
door to the drying compartment.
5. Do not reach into the appliance if the drum is moving.
6. Do not install or store this appliance where it will be exposed to water
and/or to the weather.
7. Do not tamper with controls.
8. Do not repair or replace any part of the appliance or attempt any
servicing unless specifically recommended in the user-maintenance
instructions or in published user-repair instructions that you understand
and have skills to carry out.
9. Do not use fabric softeners or products to eliminate static unless
recommended by the manufacturer of the fabric softener or product.
10. Do not use heat to dry articles containing foam rubber or similarly
textured rubber-like materials.
11. Clean lint screen before or after each load.
12. Keep area around the exhaust opening and adjacent surrounding
areas free from the accumulation of lint, dust and dirt.
13. The interior of the appliance and the exhaust duct should be cleaned
periodically by qualified service personnel.
14. Do not place items exposed to cooking oils in your dryer. Items
contaminated with cooking oils may contribute to a chemical
reaction that could cause a load to catch fire.
15. If material has been used with any flammable liquids or solids it should
not be used in the dryer until all traces of the flammable liquids and its
fumes have been removed.
1
English
Downloaded from www.Manualslib.com manuals search engine

2
16. This dryer must be properly installed in accordance with the
installation instructions before it is used. See grounding instructions
in the installation section.
17. Proper grounding must be ensured to reduce the risk of electric shock
and fire. Check with a qualified electrician or service personnel if you
are in doubt as to whether the dryer is properly grounded.
18. Use the dryer only for its intended purpose, drying clothes.
19. Always disconnect dryer from electrical supply before attempting any
service. Disconnect power cord by grasping the plug, not the cord.
20. Replace worn power cords and/or loose plugs.
21. To reduce the risk of electric shock or fire, do not use extension cords or
adapters to connect dryer to electrical power source.
SAVE THESE INSTRUCTIONS
For Future Use
English
Downloaded from www.Manualslib.com manuals search engine

3
English
As dry cleaning solvents, gasoline, vegetable and cooking oils are highly
hazardous materials, items soaked in or spotted with such should not be used in
the dryer. Items may still contain a substantial amount of the hazardous material
after being washed. When such items are exposed to heat they could ignite. As
clothes are stacked and piled up in the dryer the heat cannot escape. Due to this,
items become hot enough to possibly ignite. Washing in hot water with extra
detergent would reduce but not eliminate the risk of fire.
WARNING
Thank you for using our Haier
product. This easy-to-use manual will
guide you in getting the best use of
your dryer.
Remember to record the model and
serial number. They are on a label in
back of the dryer.
Model number
Serial number
Date of purchase
Staple your receipt to your manual. You will need it to obtain
warranty service.
DANGER
Risk of child entrapment. Before you throw away your old
dryer, take off the door so that children may
not easily get trapped inside.
Downloaded from www.Manualslib.com manuals search engine

Table Of Contents
PAGE
Safety Instructions............................................................................1
OPERATING INSTRUCTIONS............................................................5
Features ................................................................................................5
Other Features ......................................................................................7
Operations ............................................................................................8
Normal Operating Sounds ......................................................................9
Tips ......................................................................................................9
Care and Cleaning Guide ............................................................10
Troubleshooting..............................................................................11
INSTALLATION INSTRUCTIONS ....................................................12
Tools and Materials Required ................................................................12
Electrical Requirements ........................................................................12
Unpacking Your Dryer ..........................................................................12
Exhaust System Connections ......................................................13
Requirements and Instructions ..............................................................13
Materials ............................................................................................14
Location of Your Dryer..........................................................................16
Installation in Mobile Home ..................................................................17
Electrical Connections ....................................................................18
Requirements and Instructions ..............................................................18
3-Wire Cord Connections ....................................................................19
4-Wire Cord Connections ....................................................................20
Warranty ........................................................................................22
4
English
Downloaded from www.Manualslib.com manuals search engine

5
English
Features
Control Knob:
1. Dry Timer: Lets you set the time to dry your clothes, depending on the
fabric type and depending on the load size. This is designed for you to
set the number of minutes needed to dry the clothes. This cycle provides
up to 100 minutes of drying time at the temperature selection of your
choice. Drying time varies depending on size and dampness of the
load, weight and fabric type. Room temperature, humidity, type of
installation and electric voltage can also affect drying time.
2. Auto Dry: Lets you set the dryer to a preset dry cycle. This is designed
for the casual cottons. E.g. Jeans, etc. This cycle is best for regular and
permanent press items that can be tumble-dried. Drying time is
determined automatically at the temperature selection of your choice.
Here the cycle works better when items of similar fabric, weight and
construction are dried together.
OPERATING INSTRUCTIONS
WARNING: To reduce the risk of of fire, electric shock or injury to persons, read
the IMPORTANT SAFETY INSTRUCTIONS before operating this dryer.
Downloaded from www.Manualslib.com manuals search engine

6
English
Temperature Knob:
Temperature Setting Control: To set the heat drying temperature, of the
dryer load, depending on the fabric type.
• Low Heat: for knitted and delicate clothes.
• Med. Heat: for permanent press, synthetic clothes.
• High Heat: for regular clothes.
Always follow directions on fabric care labels.To avoid fire do not use
heat to dry items containing feathers, foam rubber or similar textured
rubber-like material.
Start Knob:
Start Button / Power On: Push Start button for 2 seconds to power on the
Dryer after loading. Unit will automatically stop once the dryer door is
opened. The start button must be once again pushed to resume operation
once the door is closed.
Downloaded from www.Manualslib.com manuals search engine

Table Of Contents
PAGE
Safety Instructions............................................................................1
OPERATING INSTRUCTIONS............................................................5
Features ................................................................................................5
Other Features ......................................................................................7
Operations ............................................................................................8
Normal Operating Sounds ......................................................................9
Tips ......................................................................................................9
Care and Cleaning Guide ............................................................10
Troubleshooting..............................................................................11
INSTALLATION INSTRUCTIONS ....................................................12
Tools and Materials Required ................................................................12
Electrical Requirements ........................................................................12
Unpacking Your Dryer ..........................................................................12
Exhaust System Connections ......................................................13
Requirements and Instructions ..............................................................13
Materials ............................................................................................14
Location of Your Dryer..........................................................................16
Installation in Mobile Home ..................................................................17
Electrical Connections ....................................................................18
Requirements and Instructions ..............................................................18
3-Wire Cord Connections ....................................................................19
4-Wire Cord Connections ....................................................................20
Warranty ........................................................................................22
4
English
Downloaded from www.Manualslib.com manuals search engine

10
English
Care and Cleaning Guide
• Lint filter needs to be cleaned before and after each use for your unit to
operate at optimum efficiency. The filter can be slid out, by pulling on
the tab located on the inside of the dryer door. The filter may be
washed or vacuumed. Remove the excess water from the filter by
gently shaking the filter. This will remove dust and particles trapped in
the filter. Lint build-up in screen restricts airflow, which causes longer
drying times. After cleaning, slide the filter back in place. DO NOT
USE YOUR DRYER WITHOUT THE LINT FILTER.
• Do not use any type of spray cleaner when cleaning the interior.
Hazardous fumes or electric shock could occur. If dryer drum becomes
stained, clean the drum with a damp cloth. Remove any residue before
drying the next load.
• Clean cabinet with mild soap and water. Do not use harsh or abrasive
cleaners, this could damage the dryer.
• Clean the duct and the vent on a regular basis to avoid clogging which
could affect the efficiency of the dryer.
lint filter
Downloaded from www.Manualslib.com manuals search engine

11
English
Dryer does not operate:
• Check if unit is plugged in. The plug may have come loose.
• Check if the electrical wall receptacle is of proper voltage.
• Check if the circuit breaker needs to be reset or if the fuse
needs to be replaced.
• Check if the unit is in “Off” mode. Press Start button again.
• Check if door is open.
Dryer is working but not drying the clothes:
• Unit may be over loaded. The dryer drum should only be half full.
• Check exhaust ducts and vent. Vent should be free of all obstructions.
• Duct should be lint and dust free. Ducts should be cleaned regularly.
• Dryer load needs to be resorted. Heavy clothes may need to
be separated from regular clothes.
• Bulky clothes may require repositioning.
• If clothes dry unevenly a higher dry setting may be required or
clothes in the dryer may need to be resorted.
Dryer making noise when drying:
• Coins, loose change, buttons and other heavy objects could make noise.
• Dryer may need to be leveled evenly.
Read Operating Guide – Normal Operating Sounds.
Static:
• Caused by over drying. Adjust for shorter drying time.
• Mixed with synthetic fabric. Sort and separate different fabrics.
• Use a fabric softener.
TroubleShooting
Downloaded from www.Manualslib.com manuals search engine

12
English
Select a suitable location for the dryer on a hard even surface away from direct
sunlight or heat source e.g. radiators, baseboard heaters, cooking appliances etc.
Any floor unevenness should be corrected with the leveling legs located on the
bottom of the dryer.
• Phillips head and flathead screwdrivers
• Channel-lock adjustable pliers
• 1/2 inch open end wrench
• Carpenter’s level
• Measuring tape (12ft. min.)
• Duct tape
• Rigid or flexible metal 4 inch (10.2 cm) duct
• Vent hood
Power Supply:
3 or 4 wire, 240 Volt, 30 Amp, 60Hz, 1 Phase
Power Supply Cord Kit: (not supplied when sold in the United States)
The dryer MUST employ a 3-conductor power supply cord NEMA 10-30
type SRDT rated at 240 Volt AC minimum, 30 Amp., with 3 open end
spade lug connectors with upturned ends or closed loop connectors and
marked for use with clothes dryers. If being installed in a manufactured
(mobile) home, the dryer MUST employ a 4-conductor power supply cord
NEMA 14-30 type SRDT or ST (as required) rated at 240 Volt AC
minimum, 30 Amp., with 4 open end spade lug connectors with
upturned ends or closed loop connectors and marked for use with clothes
dryers. See Electrical Connections for A 4-Wire System.
1. Remove all packaging material. This includes the foam base and all
adhesive tape holding the dryer accessories inside and outside.
2. Inspect and remove any remains of packaging, tape or printed
materials before using the dryer.
Tools and Materials Required
Electrical Requirements
INSTALLATION INSTRUCTIONS
Unpacking Your Dryer
Downloaded from www.Manualslib.com manuals search engine

English
The following are specific requirements for proper and safe
operation of your dryer. Failure to follow these instructions
can create excessive drying times and fire hazards.
WARNING
1. Do not use plastic flexible duct to exhaust the dryer. Excessive lint can build up
inside exhaust system and create a fire hazard and restrict air flow. Restricted air
flow will increase dryer times. If your present system is made up of plastic duct or
metal foil duct, replace it with a rigid or flexible metal duct. Ensure present duct
is free of any lint prior to installing dryer duct.
2. If the dryer is not exhausted out doors, some fine lint will be expelled
into the laundry area. An accumulation of lint in any area of the home can
create a health and fire hazard. To reduce risk of fire, dryer MUST BE
EXHAUSTED OUTDOORS.
3. Do not allow combustible material (for example: clothing,
draperies/curtains, paper) to come in contact with exhaust system. The dryer
must not be exhausted into a chimney, a wall, a ceiling, or any concealed space
of a building which can accumulate lint, resulting in a fire hazard.
4. Exceeding the length of duct pipe or number of elbows allowed in
the “Maximum Length” charts can cause an accumulation of lint in
the exhaust system. Plugging the system could create a fire hazard,
as well as increase drying times.
5. Do not screen the exhaust ends of the vent system, nor use any screws
or rivets to assemble the exhaust system. Lint can become caught in the screen,
on the screws or rivets, clogging the duct work and creating a fire hazard as well
as increasing drying times. Use an approved vent hood to terminate the duct out-
doors, and seal all joints with duct tape. All male duct pipe fittings must be
installed downstream with the flow of air.
Explosion hazard:
Do not install the dryer where gasoline or other flammables are kept or stored.
If the dryer is installed in a garage, it must be minimum of 18 inches (45.7 cm)
above the floor. Failure to do so can result in death, explosion, fire or burns.
13
Exhaust System Connections
Requirements and Instructions
Downloaded from www.Manualslib.com manuals search engine

14
English
Materials
Use only 4 inch (10.2 cm) diameter (minimum) rigid or flexible metal duct and
approved vent hood which has a swing-out damper hat open when the dryer is in
operation. When the dryer stops, the dampers automatically close to prevent drafts
and the entrance of insects and rodents. To avoid restricting the outlet, maintain a
minimum of 12 inches (30.5 cm) clearance between the vent hood and the ground
or any other obstruction. The vent flap should be able to move freely.
MAXIMUM EXHAUST LENGTH
Downloaded from www.Manualslib.com manuals search engine

15
English
After installation is completed, the following method must be used to
determine if the exhaust system is acceptable:
1. Connect an inclined or digital manometer between the dryer and the
point the exhaust connects to the dryer.
2. Set the dryer timer and temperature to air fluff (cool down)
and start the dryer.
3. Read the measurement on the manometer.
4. The system back pressure must not be higher than 0.75 inches
of water column. If the system back pressure is less than 0.75
inches of water column, the system is acceptable. If the manometer
reading is higher than 0.75 inches of water column, the system is too
restrictive and the installation is unacceptable.
Although vertical orientation of the exhaust system is acceptable, certain
extenuating circumstances could affect the performance of the dryer:
1. Only the rigid metal duct work should be used.
2. Venting vertically through a roof may expose the exhaust system to
down drafts causing an increase in vent restriction.
3. Running the exhaust system through an area not insulated may cause
condensation and faster accumulation of lint.
4. Compression or crimping of the exhaust system will cause an increase
in vent restriction.
The exhaust system should be inspected and cleaned a minimum of every
18 months with normal usage. The more the dryer is used, the more often
you should check the exhaust system and vent hood for proper operation.
Downloaded from www.Manualslib.com manuals search engine

16
English
Do Not Install Your Dryer:
• In an area exposed to dripping water or outside weather conditions.
• In an area where it will come in contact with curtains, drapes, or
anything that will obstruct the flow of combustion and ventilation air.
• On carpet. Floor must be solid with a maximum slope of
1inch (2.54 cm).
Installation in Recess or Closet:
• A dryer installed in a bedroom, bathroom, recess or closet, must be
exhausted outdoors.
• Your dryer needs the space around it for proper ventilation.
• A minimum of 120 square inches (774.2 square cm) of opening,
equally divided at the top and bottom of the door, is required. Air
openings are required to be unobstructed when a door is installed. A
louvered door with equivalent air openings for the full length of the
door is acceptable.
Location of Your Dryer
ROUGH-IN DIMENSIONS
DOOR OPEN 90˚
36"
(91.5 cm)
13 1/2"
(34.3cm)
27"
(68.6cm)
3 1/4"
(8.3 cm)
50 3/5"
(128.5 cm)
28"
(71.2 cm)
Downloaded from www.Manualslib.com manuals search engine

17
English
• Dryer must be exhausted outside (outdoors, not beneath the mobile
home) using metal ducting that will not support combustion.
Metal ducting must be 4 inches (10.16 cm) in diameter with
no obstructions. Rigid metal duct is preferred.
• If dryer is exhausted through the floor and area beneath the
mobile home is enclosed, the exhaust system must terminate
outside the enclosure with the termination securely fastened to the
mobile home structure.
• Refer to previous pages for other important venting requirements.
• Installation must conform to current Manufactured Home
Construction & Safety Standard (which is a Federal Regulation
Title 24 CFR-Part 32-80) or when such standard is not applicable,
with American National Standard for Mobile Homes.
Warning: The dryer is designed under ANSI z 21.5.1
for home use only.
Installation in Mobile Home
DO
Correct
DON’T
Incorrect
DO
Correct
DON’T
Incorrect
DO
Correct
DON’T
Incorrect
Downloaded from www.Manualslib.com manuals search engine

18
English
1. This appliance must be properly grounded. Electrical shock can result if the
dryer is not properly grounded. Follow the instructions in this manual
for proper grounding.
2. Do not use an extension cord with this dryer. Some extension cords are not
designed to withstand the amounts of electrical current this dryer utilizes and
can melt, creating electric shock and/or fire hazard. Locate the dryer within
reach of the receptacle for the length power cord to be purchased,
allowing some slack in the cord. Refer to the electrical requirements
in this manual for the proper power cord to be purchased.
3. A U.L. approved strain relief must be installed onto power cord. If the strain
relief is not attached, the cord can be pulled out of the dryer and can be cut
by any movement of the cord, resulting in electrical shock.
4. Do not use an aluminum wire receptacle with copper wired power
cord and plug (or vice versa). A chemical reaction occurs between
copper and aluminum and can cause electrical shorts. The proper wiring
and receptacle is a copper wired power cord with a copper wired receptacle.
Note: Dryers operating on 208 Volt power supply will have longer
drying times than operating on 240 Volt power supply.
Danger: Improper connection of the equipment grounding conductor
can result in a risk of electrical shock. Check with a licensed
electrician if you are in doubt as to whether the appliance is
properly grounded.
The following are specific requirements for proper and safe
electrical installation of your dryer. Failure to follow these
instructions can create electrical shock and/or fire hazard.
WARNINGS
Electrical Connections
Requirements and Instructions
Downloaded from www.Manualslib.com manuals search engine

English
19
1. Remove the screws securing the terminal block access cover
and the strain relief mounting bracket located on the back of the
dryer upper corner.
2. Install a U.L. approved strain relief into the power cord entry hole
of the mounting bracket. Finger tighten the nut only at this time.
3. Thread a U.L. Approved 30 Amp. Power cord, NEMA 10-30 Type
SRDT, through the strain relief.
4. Attach the power cord neutral (center wire) conductor to the silver
colored center terminal on the terminal block.
Tighten the screw securely.
5. Attach the remaining two power cord outer conductors to the
outer brass colored terminals on the terminal block. Tighten both
screws securely. Warning: Do not make a sharp bend or crimp
wiring/conductor at connections.
6. Reattach the strain relief mounting bracket to the back of the dryer
with two screws. Tighten screws securely.
7. Tighten the screws securing the cord restraint firmly against the
power cord.
8. Tighten the strain relief nut securely so that the strain relief
does not turn.
9. Reinstall the terminal block cover.
Grounding: This appliance must be connected to a ground metal,
Instruction: permanent wiring system, or an equipment-grounding
conductor must be run with the circuit conductors and
connected to the equipment-grounding terminal or
lead on the appliance.
3-Wire Cord Connections (USA only)
green
ground
screw
green
neutral
ground
wire
silver terminal
nut
tighten nut
to these threads
power cord
strain relief
mounting bracket
Downloaded from www.Manualslib.com manuals search engine

20
English
4-Wire Cord Connections
1. Remove the screws securing the terminal block access cover
and the strain relief mounting bracket located on the back
of the dryer upper corner.
2. Install a U.L. approved strain relief into the power cord entry hole
of the mounting bracket. Finger tighten the nut only at this time.
3. Remove the green neutral ground wire from the green ground
screw located above the terminal block.
green
ground
screw
green neutral
ground wire
green power cord
ground wire
silver terminal
terminal block
tighten nut to
these threads
black
white
nut
strain relief
mounting bracket
power cord
Typical
Conductor
Receptacle
Typical
4 Conductor
Cord
black 240V
white neutral
red 240V
green ground
30 AMP NEMA 14-30 TYPE SRDT OR ST
red
Downloaded from www.Manualslib.com manuals search engine

English
21
4. Thread a U.L. approved 30 Amp power cord, NEMA 14-30 type ST
or SRDT through the strain relief.
5. Attach the green power cord ground wire to the cabinet with
green ground screw.
6. Attach the white (neutral) power cord conductor from the power
cord and the green ground wire from the dryer harness to the
silver-colored center terminal on the terminal block. Tighten the
screw securely.
7. Attach the red and black power cord conductors to the outer
brass-colored terminals on the terminal block. Warning: Do not
make a sharp bend or crimp wiring/conductor at connections.
8. Tighten the screws securing the cord restraint firmly
against the power cord.
9. Tighten the strain relief nut securely so that the strain
relief does not turn.
10. Reinstall the terminal block cover.
GROUNDING INSTRUCTIONS
This appliance must be grounded. In the event of malfunction or break-
down, grounding will reduce the risk of electric shock by providing a path
of least resistance for electric current. This appliance is equipped with a
cord having an equipment-grounding conductor and a grounding plug.
The plug must be plugged into an appropriate outlet that is properly
installed and grounded in accordance with all local codes and ordi-
nances.
WARNING-Improper connection of the equipment-grounding con-
ductor can result in a risk of electric shock. Check with aqualified
electrician or service representative or personnel if you are in doubt
as to whether the appliance is properly grounded.
Do not modify the plug provided with the appliance: if it will not fit
the outlet, have a proper outler installed by a qualified electrician.
Caution: Label all wires prior to disconnection, when servicing
controls. Wiring errors can cause improper operations
and be dangerous. Check unit for proper operation after
servicing.
Warning: Discard or destroy the carton and plastic bags after the
dryer is unpacked. Children should not be allowed to
use them to play with. Cartons covered with rugs,
bedspreads, or plastic sheets can become an airtight
chamber and cause suffocation leading to death. Make
all packing materials inaccessible to children.
Warning: The instructions in this manual and all other literature
included with this dryer can not cover every possible
condition and situation that may occur. Good safe
practice and caution must be applied when installing,
operating and maintaining any appliances. After
installing, if you are in doubt, call a certified
electrician to install and wire the dryer.
Downloaded from www.Manualslib.com manuals search engine

22
English
Limited Warranty
Full ONE Year In-Home Warranty
For 12 months from the date of original retail
purchase, Haier will repair or replace any
part free of charge including labor that fails
due to a defect in materials or workmanship.
Limited Warranty
After one year from the original retail pur-
chase date, Haier will provide a part at no
cost, as indicated below, to replace said part
as a result of a defect in materials or work-
manship. Haier is responsible solely for the
cost of the part. All other costs such as labor,
trip charge, etc are the responsibility of the
owner.
Second Year
Haier will provide All Parts.
Third through Fifth Year
Haier will provide the drive motor or timer.
Haier will provide the dryer drum should the
drum rust through.
Third through Tenth Year
Haier will provide the cabinet assembly
should the cabinet rust through.
NOTE: This warranty commences on the
date the item was purchased and the original
purchase receipt must be presented to the
authorized service representative before
warranty repairs are rendered.
Exceptions: Commercial or Rental
Use Warranty
90 days labor from date of original
purchase. Excludes in-home trip charge.
90 days parts from date of original
purchaseNo other warranty applies
For Warranty Service
Contact your nearest authorized service
center. All service must be performed by a
Haier authorized service center. For the name
and telephone number of the nearest
authorized service center please
call 1-877-337-3639.
Before calling please have available
the following information:
Model number and serial number of your
appliance (found on the rear of the unit on
the upper left hand side).
The name and address of the dealer
you purchased the unit from and the
date of purchase.
A clear description of the problem.
A proof of purchase (sales receipt).
This warranty covers appliances
within the continental United States,
Puerto Rico and Canada.
What is not covered by
this warranty:
Replacement or repair of household fuses,
circuit breakers, wiring or plumbing.
A product whose original serial number has
been removed or altered.
Premium service charges not specifically
identified as normal, such as outside normal
service area or hours.
Damage to clothing
Damage incurred in shipping
Damage caused by improper installation or
maintenance
Damage from misuse, abuse accident, fire,
flood, or acts of nature
Damage from service other than an
authorized Haier dealer or service center
Damage from incorrect electrical current,
voltage or supply
Damage resulting from any product
modification, alteration or adjustment not
authorized by Haier.
Adjustment of consumer operated controls as
identified in the owners manual
Hoses, knobs, lint trays and all attachments,
accessories and disposable parts
Labor, service transportation, and shipping
charges for the removal and replacement of
defective parts beyond the initial
12-month period.
Damage from other than normal
household use.
Any transportation and shipping charges.
THIS LIMITED WARRANTY IS GIVEN IN LIEU
OF ALL OTHER WARRANTIES, EXPRESSED
OR, INCLUDING THE WARRANTIES OF
MERCHANTABILITY AND FITNESS FOR A
PARTICULAR PURPOSE
The remedy provided in this warranty is
exclusive and is granted in lieu of all
other remedies.
This warranty does not cover incidental or
consequential damages, so the above
limitations may not apply to you. Some states
do not allow limitations on how long an
implied warranty lasts, so the above
limitations may not apply to you.
This warranty gives you specific legal rights,
and you may have other rights, which vary,
from state to state.
Haier America
New York, NY 10018.
Downloaded from www.Manualslib.com manuals search engine

INSTRUCCIONES DE SEGURIDAD
IMPORTANTES
Advertencia – Para reducir el riesgo de incendio, descarga
eléctrica o lesiones a personas cuando utilice el electrodomés-
tico, siga las precauciones básicas, incluyendo las siguientes:
1. Lea todas las instrucciones antes de usar el
electrodoméstico.
2. No seque prendas que hayan sido previamente limpiadas, lavadas,
mojadas, o manchadas con gasolina, solventes, u otras substancias
inflamables o explosivas, ya que se pueden producir vapores que
pueden encenderse o explotar.
3. No permita que los niños jueguen sobre o en el electrodoméstico. Es
necesario supervisar a los niños cuando el electrodoméstico es usado
en presencia de ellos.
4. La puerta de la secadora deberá ser removida una vez que la secadora
deje de funcionar o sea desechada.
5. No meta la mano dentro de la secadora cuando el cilindro
esté en movimiento.
6. No instale o guarde este electrodoméstico donde pueda ser expuesto al
agua y/o la intemperie.
7. Evite una manipulación imprudente de los controles.
8. No repare o reemplace ninguna parte del electrodoméstico ni intente
ninguna reparación a menos que sea recomendado de manera especí
fica en las instrucciones de mantenimiento o las instrucciones de
reparación publicadas, de las cuales tenga conocimiento y destreza
para desempeñarlas.
9. No use suavizantes de tela o productos para eliminar la estática a
menos que se recomiende por el fabricante del suavizante
de tela o pr oducto.
10. No utilice calor para secar artículos que contengan hule espuma o
materiales con una textura similar.
11. Limpie el filtro de pelusas antes o después de cada carga.
12. Mantenga el área alrededor del orificio de evacuación y las áreas adya
centes libres de acumulación de pelusas, polvo y suciedad.
13. El interior del electrodoméstico y el conducto de evacuación debe ser
limpiado periódicamente por un personal de reparación calificado.
1
Español
Downloaded from www.Manualslib.com manuals search engine

14. No coloque los artículos expuestos a los aceites de cocina en su secado
ra. Los artículos contaminados con aceite de cocina podrían contribuir a
una reacción química que pudiese causar un incendio.
15. Si un material ha sido usado con cualquier líquido o sólido inflamable,
éste no debe ser usado en la secadora hasta que todos los rastros de
líquido inflamable y sus vapores hayan sido eliminados.
16. Esta secadora debe ser instalada de acuerdo a las instrucciones de insta
lación antes de usarse. Vea las instrucciones de conexión a tierra en la
sección de instalación.
17. Deberá proporcionarse una conexión a tierra adecuada para reducir el
riesgo de una descarga eléctrica e incendio. Verifique con un electricista
calificado o personal de reparación si no está seguro que la secadora
tenga una conexión a tierra adecuada.
18. Use la secadora solo con el fin para que fue creada, secar ropa.
19. Siempre desconecte la secadora del suministro eléctrico antes de intentar
cualquier reparación. Desconecte el cable eléctrico jalándolo de la clavi
ja, no del cable.
20. Reemplace los cables desgastados y/o las clavijas flojas.
21. Para reducir el riesgo de descarga eléctrica o incendio, no utilice cables
de extensión o adaptadores para conectar la secadora al suministro
eléctrico.
GUARDE ESTAS INSTRUCCIONES
Para Referencia Futura
2
Español
Downloaded from www.Manualslib.com manuals search engine

Debido a que los solventes de tintorería, la gasolina, los aceites vegetales y de
cocina son materiales altamente peligrosos, los artículos mojados o manchados
con tales materiales no deben ser usados en la secadora. Los artículos pueden
contener una cantidad considerable del material peligroso aún después de haber
sido lavados. Cuando tales artículos son expuestos al calor, éstos podrían encen-
derse. Al apilar la ropa dentro de la secadora, el calor no puede escapar provo-
cando que los artículos se calienten lo suficiente como para crear un riesgo de
incendio. El lavar los artículos con agua caliente y bastante detergente puede
reducir, mas no eliminar el riesgo de incendio.
Gracias por usar este producto de
Haier. Este sencillo manual lo guiará
para obtener el mejor uso de su
secadora.
Recuerde anotar el número de reg-
istro y el número de serie. Estos se
encuentran en una etiqueta en la
parte posterior de la secadora.
Número de Modelo
Número de Serie
Fecha de Compra
Engrape su recibo junto al manual. Lo necesitará para obtener el
servicio de la garantía.
PELIGRO
Riesgo de aprisionamiento infantil. Antes de deshacerse de su
secadora vieja, quite la puerta para evitar que los niños
puedan quedar atrapados en el interior.
ADVERTENCIA
3
Español
Downloaded from www.Manualslib.com manuals search engine

Indice
PAGE
Instrucciones de Seguridad ..................................................1
INSTRUCCIONES DE FUNCIONAMIENTO ......................................5
Funciones ..............................................................................................5
Otras Funciones ....................................................................................7
Funcionamiento ......................................................................................8
Sonidos Normales de Operación ............................................................9
Sugerencias ..........................................................................................9
Guía de Limpieza y Cuidados ....................................................10
Problemas y Soluciones................................................................11
INSTRUCCIONES DE INSTALACION..............................................12
Herramientas y Materiales Requeridos ..................................................12
Requerimientos Eléctricos......................................................................12
Desempacado de la Secadora ..............................................................12
Conexiones del Sistema de Evacuación ....................................13
Instrucciones y Requerimientos ..............................................................13
Materiales ..........................................................................................14
Ubicación de su Secadora....................................................................16
Instalación en Casas Móviles ................................................................17
Conexiones Eléctricas....................................................................18
Instrucciones y Requerimientos ..............................................................18
Conexiones de Cables Trifilares ............................................................19
Conexiones de Cables Tetrafilares ........................................................20
Garantía ..........................................................................................22
4
Español
Downloaded from www.Manualslib.com manuals search engine

Funciones
Perilla de Control:
1. "Timed Dry" (Secado Temporizado): Le permite ajustar el tiempo para
secar la ropa, dependiendo del tipo de tela y del tamaño de la carga.
Esta función está diseñada para poder ajustar el número de minutos
necesarios para secar la ropa. Este ciclo provee hasta 100 minutos de
tiempo de secado para cada selección de temperatura que escoja. Los
tiempos de secado pueden variar dependiendo del tamaño, la
humedad, el peso y el tipo de tela de la carga de ropa. La temperatu
ra del cuarto, la humedad, el tipo de instalación y el voltaje eléctrico
también pueden afectar el tiempo de secado.
2. "Auto Dry" (Secado Automático): Le permite ajustar la secadora a un
ciclo de secado preajustado. Esta función está diseñada para la pren
das de algodón comunes, por ejemplo jeans, etc. Este ciclo es mejor
para artículos regulares y planchado permanente que puedan secarse
en secadoras de tambor giratorio. El tiempo de secado es determina
do automáticamente por la selección de temperatura que escoja. En
este caso el ciclo funciona mejor cuando los artículos de tela, peso y
construcción similar son secados al mismo tiempo.
INSTRUCCIONES DE FUNCIONAMIENTO
ADVERTENCIA: Para reducir el riesgo de incendio, descarga eléctrica o lesiones
a personas, lea las INSTRUCCIONES DE SEGURIDAD IMPOR-
TANTES antes de utilizar esta secadora.
5
Español
(Secado Automático)
(Secado Temporizado)
(Apagado)
(Enfriar)
(Menos Seco)
(Más Seco)
(Apagado)
(Enfriar)
Downloaded from www.Manualslib.com manuals search engine

Perilla de Temperatura:
Control de Ajuste de Temperatura: Para ajustar la temperatura de secado
según el tipo de tela de la carga de ropa.
• Temperatura Baja: para prendas tejidas y delicadas.
• Temperatura Media: para prendas de planchado
permanente y sintéticas.
• Temperatura Alta: para prendas regulares. Siempre siga las
instrucciones de cuidados en las etiquetas de las prendas. Para evitar
un incendio, no seque artículos que contengan plumas, hule espuma o
materiales de textura similar.
Perilla de Inicio:
Botón de Inicio / Encendido: Presione el botón de inicio por 2 segundos
para encender la secadora después de cargarla con ropa. La unidad
parará automáticamente al abrir la puerta de la secadora. Deberá pre-
sionar de nuevo el botón de inicio para continuar el funcionamiento una
vez que la puerta haya sido cerrada.
(Iniciar)
(Temperatura)
(Planchado Permanente)
(Temperatura Media)
(Temperatura Baja)
(Tejidos/Delicados)
(Temperatura Alta)
Español
6
Downloaded from www.Manualslib.com manuals search engine

7
Otras Funciones
Español
Su secadora también posee las siguientes funciones para su comodidad:
Sensor de Secado: (función activa solo en el ciclo de secado automático)
• Funciona mediante un sensor de humedad. La secadora se apagará
automáticamente cuando el sensor detecte que la ropa está seca.
Señal al Final del Ciclo:
• La secadora está equipada con una señal audible que sonará al término
del ciclo de secado.
Filtro de Pelusas:
• Todas las secadoras incluyen un filtro de pelusas que necesita ser
limpiado antes y después de cada uso (consulte la sección de
"Guía de Limpieza y Cuidados").
Patas Niveladoras:
• La secadora incluye cuatro patas niveladoras localizadas en las esquinas
frontales y posteriores de su secadora. Después de ubicar adecuadamente
su secadora en su posición final, puede nivelarla.
• Las patas niveladoras pueden ajustarse girándolas a la derecha para
elevar la secadora o girándolas a la izquierda para bajar la secadora.
Puerta Reversible:
Su secadora está diseñada para que la oscilación de la puerta pueda ser
invertida sin piezas adicionales. La
inversión puede llevarse a cabo al
colocar las bisagras en el lado
opuesto de la secadora.
1. Abra la puerta de la secadora.
Quite los cuatro tapones de los
orificios de las bisagras, del
lado izquierdo de la abertura
de la puerta.
2. Retire los cuatro tornillos que
sujetan las bisagras de la
puerta a la secadora.
3. Gire la puerta 180º y vuelva a
instalar las bisagras de la puer-
ta al panel frontal de la secado-
ra con los cuatro
tornillos.
4. Instale los cuatro tapones de
los orificios de las bisagras en
el lado derecho de la abertu
ra de la puerta.
QUITE 4 TORNILLOS
(UNO DE CADA BISAGRA PRIMERO)
ROTE LA PUERTA 180˚
Downloaded from www.Manualslib.com manuals search engine

Funcionamiento
1. Clasifique las prendas para secarlas. Separe las prendas de color
obscuro de las de color claro, como lo hace para lavar. Revise que no
hayan manchas que puedan no haber desaparecido durante el lava
do. El calor de la secadora puede fijar permanentemente algunas
manchas. Las prendas bien secas necesitarán un cuidado mínimo al
sacarlas de la secadora.
2. Cargue la secadora con la ropa lavada. Para mejores resultados, use
una carga de ropa de tela, peso y construcción similar. Coloque las
prendas pequeñas en una bolsa de malla para evitar que se enreden.
No cargue demasiado la secadora. Una carga promedio llenará a la
mitad el tambor de la secadora. Agregue una toallita de suavizante
de tela si lo desea.
3. Seleccione la temperatura de secado dependiendo del tipo de tela.
Consulte las instrucciones de cuidados en la etiqueta de la prenda
antes de seleccionar la temperatura.
4. Seleccione el tiempo de secado dependiendo del tipo de tela y el
tamaño de la carga.
5. Presione el botón de inicio para iniciar el ciclo de secado.
6. Espere a que el ciclo de secado termine antes de abrir la puerta de la
secadora. Una señal sonará cuando se complete el ciclo.
7. Limpie el filtro de pelusas después de cada carga y antes de cada
uso. Un filtro limpio asegura un secado adecuado. Una capa de
pelusa en el filtro reduce el flujo de aire a través de la ropa y prolon
ga el tiempo de secado.
Nota: No seque demasiado la ropa. El secarla demasiado puede causar
encogimiento, aspereza y arrugas en la tela.
Español
8
Downloaded from www.Manualslib.com manuals search engine

Sonidos Normales de Operación
Los siguientes sonidos son comunes durante el funcionamiento de la
secadora.
• Sonidos de volteretas: Esto es normal ya que las prendas mojadas son
agitadas continuamente dentro de la secadora.
• Sonidos de corrientes de aire: Esto ocurre debido a que el tambor de la
secadora gira a altas revoluciones por minuto y el aire es agitado a
través del tambor.
• Puede que escuche "clics" causados por el temporizador.
• Para mejores resultados, limpie el filtro de pelusas antes y
después de cada uso.
• No cargue demasiado la secadora.
• Balancee uniformemente la carga de la secadora para
mejores resultados.
• El tiempo de secado depende de muchas variables: del tamaño de la
carga, del tipo de tela y su humedad, del calor y la humedad en el
cuarto, del voltaje eléctrico, de la longitud del conducto
de evacuación, etc.
• Para minimizar el tiempo de secado y conservar energía, recomen
damos que escoja el ajuste de Secado Automático para
ciertas prendas.
• Siempre siga las instrucciones de cuidados en la etiqueta incluidas por
el fabricante de las prendas.
Sugerencias
9
Español
Downloaded from www.Manualslib.com manuals search engine

Español
10
Guía de Limpieza y Cuidados
• El filtro de pelusas necesita limpiarse antes y después de cada uso
para que su unidad tenga un funcionamiento óptimo. El filtro puede
sacarse jalando la pestaña localizada en el interior de la puerta de la
secadora. El filtro puede lavarse o limpiarse con una aspiradora.
Elimine el exceso de agua del filtro sacudiéndolo ligeramente. Esto
eliminará el polvo y las partículas atrapadas en el filtro. La acumu
lación de pelusa en el filtro restringe el flujo de aire, causando tiempos
de secado muy largos. Después de limpiarlo, deslice el filtro a su lugar.
NO UTILICE LA SECADORA SIN EL FILTRO DE PELUSAS.
• No use ningún tipo de limpiador en spray cuando limpie el interior de
la secadora. Podrían formarse vapores peligrosos o causar una
descarga eléctrica. Si el tambor de la secadora se mancha, limpie el
tambor con un trozo de tela húmeda. Limpie cualquier residuo antes
de secar la siguiente carga.
• Limpie el exterior de la secadora con un jabón suave y agua. No use
limpiadores fuertes o abrasivos, estos podrían dañar la secadora.
• Limpie el conducto de evacuación y el orificio de ventilación con regu
laridad para evitar obstrucciones que pudieran afectar la eficiencia de
la secadora.
lint filter
Downloaded from www.Manualslib.com manuals search engine

La secadora no funciona:
• Revise que esté conectada. La clavija puede haberse aflojado.
• Revise si el tomacorriente eléctrico tiene el voltaje apropiado.
• Revise si el cortacircuito necesita reajustarse o si el fusible necesita
reemplazarse.
• Revise si la unidad está en la modalidad de "Apagado". Presione el
botón de Inicio de nuevo.
• Revise que la puerta no esté abierta.
La secadora está funcionando pero no seca la ropa:
• La unidad puede estar demasiado cargada. El tambor de la secadora
debe estar lleno hasta la mitad.
• Revise los conductos de evacuación y el orificio de ventilación. El orifi
cio de ventilación debe estar libre de obstrucciones.
• El conducto de evacuación debe estar libre de pelusa y de polvo. Los
conductos deben limpiarse con regularidad.
• Tiene que clasificar la carga de la secadora. Las prendas pesadas
tienen que separarse de las prendas regulares.
• Acomode las prendas abultadas.
• Si las prendas se secan de manera desigual, puede que requiera un
ajuste más alto o que tenga que clasificar las prendas.
La secadora produce un sonido al secar:
• Las monedas, botones y objetos pesados pueden
producir estos sonidos.
• Puede que la secadora necesite nivelarse uniformemente.
• Lea la Guía de Funcionamiento – Sonidos Normales de Operación.
Static:
• Causada por un secado excesivo. Ajuste a un tiempo de
secado más corto.
• Mezcla de telas sintéticas. Clasifique y separe las diferentes telas.
• Use suavizantes de tela.
Problemas y Soluciones
11
Español
Downloaded from www.Manualslib.com manuals search engine

Seleccione un lugar adecuado para la secadora, un lugar firme y uniforme alejado
de los rayos directos del sol o de una fuente de calor por ejemplo radiadores,
calentadores, estufas, etc. Cualquier desnivelación del piso debe ser corregida con
las patas niveladoras ubicadas debajo de la secadora.
• Destornilladores de cabeza phillips y cabeza plana
• Pinzas ajustables
• Llave española de 1,3 cm
• Nivelador
• Cinta de medir (3,6 m, mínimo)
• Cinta de aislar para tubería
• Conducto rígido o flexible de metal de 10 cm
• Tapa de ventilación
Suministro de Energía:
Trifilar o tetrafilar, 240 Volts, 30 Amperes, 60 Hz, Monofásico
Juego del Cable de Alimentación Eléctrica: (no incluido cuando
se vende en E.U.A.) La secadora debe emplear un cable de alimentación
eléctrica de 3 conductores NEMA 10-30 tipo SRDT, con un régimen nomi
nal mínimo de 240 V ~, 30 A, con 3 conectores de terminal de horquilla
con extremos alzados o conectores de anillo cerrado y estar marcado
para su uso con secadoras de ropa. Si la secadora va ha ser instalada en
una casa móvil, ésta debe emplear un cable de alimentación eléctrica de
cuatro conductores NEMA 14-30 tipo SRDT o ST (según lo requiera) con
un régimen nominal mínimo de 240 V ~, 30 A, con cuatro conectores de
terminal de horquilla con extremos alzados o conectores de anillo cerrado
y estar marcado para su uso con secadoras de ropa. Vea Conexiones
Eléctricas para Sistema Tetrafilar.
1. Retire todo el material de embalaje. Esto incluye la base de espuma y
toda la cinta de aislar que sostiene los accesorios de la secadora en el
interior y exterior.
2. Inspeccione y retire cualquier resto de embalaje, cinta de aislar o mate
riales impresos antes de usar la secadora.
INSTRUCCIONES DE INSTALACION
Español
12
Requerimientos Eléctricos
Desempacado de la Secadora:
Downloaded from www.Manualslib.com manuals search engine

Los siguientes son requerimientos específicos para un fun-
cionamiento adecuado y seguro de su secadora. El no seguir
estas instrucciones pueden producir tiempos de secado exce-
sivos y peligros de incendio.
ADVERTENCIA
1. No use un conducto plástico flexible para evacuar la secadora. El exceso de
pelusa puede obstruir el interior del sistema de evacuación y crear un peligro de
incendio y restringir el flujo de aire. El flujo de aire restringido aumenta los tiem
pos de secado. Si su sistema actual está constituido por un conducto plástico o
conducto de hoja metálica, reemplácelo con un conducto metálico rígido o flexi
ble. Asegúrese que el conducto actual esté libre de pelusas antes de instalar el
conducto de la secadora.
2. Si la secadora no es evacuada hacia el exterior, alguna pelusa se acumulará en
el cuarto de lavado. Una acumulación de pelusa en cualquier área de la casa
puede causar peligro para la salud o peligro de incendio. Para reducir un riesgo
de incendio, la secadora DEBE SER EVACUADA HACIA EL EXTERIOR.
3. No permita que un material combustible (por ejemplo: ropa, cortinas, papel)
entre en contacto con el sistema de evacuación. La secadora no debe ser evac
uada hacia una chimenea, pared, techo o cualquier espacio encerrado de un
edificio que pueda acumular pelusa, causando un peligro de incendio.
4. El exceder la longitud del tubo de conducto o la cantidad de codos permitidos
en las gráficas de "Longitud Máxima" puede causar una acumulación de pelusa
en el sistema de evacuación. La obstrucción del sistema podría causar un peligro
de incendio y a la vez aumentar los tiempos de secado.
5. No cubra con una malla los extremos de evacuación del sistema de ventilación,
ni use tornillos o remaches para ensamblar el sistema de evacuación. La pelusa
podría quedar atrapada en la malla, en los tornillos o remaches, obstruyendo el
conducto y creando un peligro de incendio y la vez aumentando los tiempos de
secado. Use una tapa de ventilación aprobada para el extremo del conducto y
selle todas conexiones con cinta de aislar para tubería. Todos los conectores
macho del tubo de conducto deben instalarse en dirección al flujo de aire.
Peligro de Explosión:
No instale la secadora en el mismo lugar donde almacena gasolina u otros
líquidos inflamables. Si la secadora es instalada en la cochera, ésta debe colo-
carse a una altura mínima de 45, 7 cm arriba del piso. El no hacerlo podría
provocar la muerte, una explosión, un incendio o quemaduras
Conexiones del Sistema de Evacuación
Instrucciones y Requerimientos
Español
13
Downloaded from www.Manualslib.com manuals search engine

Materiales
Apersianada
(9,14 m)
(3,05 m)
(5,49 m)
(6,71 m)
(4,24 m)
(4,27 m)
Use solamente un conducto metálico de 10,2 cm de diámetro (mínimo), rígido o
flexible y una tapa de evacuación aprobada que tenga una capucha oscilante
abierta cuando la secadora esté en funcionamiento. Cuando la secadora pare, la
capucha se cerrará automáticamente para prevenir aspiraciones y la entrada de
insectos y roedores. Para evitar restringir la salida, mantenga un espacio mínimo de
30,5 cm entre la tapa de ventilación y el piso o cualquier otra obstrucción. Deberá
permitir que la capucha se mueva con facilidad.
LONGITUD MAXIMA DEL CONDUCTO DE EVACUACION
Español
14
Downloaded from www.Manualslib.com manuals search engine

Después de completar la instalación, debe utilizar el siguiente método
para determinar si el sistema de evacuación es aceptable:
1. Conecte un manómetro inclinado o digital entre la secadora y el punto
donde el conducto de evacuación se conecta a la secadora.
2. Ajuste el temporizador de la secadora y la temperatura a "secado por
flujo de aire" (enfriamiento) y encienda la secadora.
3. Lea la medida en el manómetro.
4. La contrapresión del sistema no debe ser mayor a 1,9 cm de columna
líquida. Si la contrapresión del sistema es menor a 1,9 cm de columna
líquida, el sistema es aceptable. Si la medida del manómetro es mayor
de 1,9 cm de columna líquida, el sistema es muy limitado y la insta
lación es inaceptable.
Aunque la ubicación vertical del sistema de evacuación es aceptable,
algunas circunstancias atenuantes podrían afectar el funcionamiento de la
secadora:
1. Solo se debe utilizar el conducto metálico rígido.
2. La ventilación vertical a través del techo puede exponer al sistema de
evacuación a las corrientes de aire descendentes incrementando la
restricción de ventilación.
3. El utilizar el sistema de evacuación a través de un área no aislada
puede causar condensación y una rápida acumulación de pelusa.
4. El comprimir o acortar el sistema de evacuación provocará un aumen
to en la restricción de ventilación.
El sistema de evacuación deberá ser inspeccionado y limpiado por lo
menos cada 18 meses con el uso normal. Entre más utilice la secadora,
mayor deberá ser la frecuencia con la que revise el sistema de evac-
uación y la tapa de ventilación para un funcionamiento adecuado.
15
Español
Downloaded from www.Manualslib.com manuals search engine

16
Español
No Instale su Secadora :
• En un área expuesta a goteras o a condiciones climáticas exteriores.
• En un área donde pueda entrar en contacto con las cortinas o
cualquier cosa que pueda obstruir el flujo de combustión y el
aire de ventilación.
• Sobre alfombra. El piso debe ser sólido con una inclinación
máxima de 2,5 cm.
Instalación en un Area Empotrada o Clóset:
• Una secadora instalada en una recamara, baño, área empotrada o
clóset debe evacuarse hacia el exterior.
• Su secadora necesita un espacio alrededor para una
ventilación ade cuada.
• Una abertura con un mínimo de 774,2 centímetros cuadrados, dividida
de manera uniforme en la parte superior e inferior de la puerta, es
requerida.Se requiere que los orificios de ventilación no estén obstrui
dos al instalarse la puerta.Es aceptable el uso de una puerta aper
sianada con orificios de ventilación equivalentes para todo el
largo de la puerta.
Ubicación de su Secadora
õ
IS
õ
IS
õ
IS
õ
IS
DIMENSIONES APROXIMADAS
Downloaded from www.Manualslib.com manuals search engine

• La secadora debe evacuarse hacia el exterior (hacia afuera, no
por debajo de la casa móvil) usando conductos metálicos
no combustibles.
• Si la secadora es evacuada a través del piso y el área por debajo
de la casa móvil está cercada, el sistema de evacuación debe ter
minar en el exterior de la cerca con el extremo bien asegurado a
la estructura de la casa móvil.
• Consulte las páginas anteriores para otros requerimientos de venti
lación importantes.
• La instalación debe conformar con la norma actual de
Manufactured Home Construction & Safety (la cual tiene un Título
de Regulación Federal 24 CFR-Part 32-80) o cuando tal norma no
aplique, con la American National Standard for Mobile Homes.
Advertencia: TLa secadora está diseñada bajo ANSI z 21.5.1
para uso doméstico solamente.
Instalación en Casas Móviles
SI
Correcto
NO
Incorrecto
SI
Correcto
NO
Incorrecto
SI
Correcto
NO
Incorrecto
17
Español
Downloaded from www.Manualslib.com manuals search engine

1. Este aparato debe contar con una conexión a tierra adecuada. Puede pro
ducirse una descarga eléctrica si la secadora no es conectada a tierra
correcta mente. Siga las instrucciones en este manual para una conexión
a tierra ade cuada.
2. No utilice un cable de extensión con esta secadora. Algunos cables de extensión
no están diseñados para soportar las cantidades de corriente eléctrica que esta
secadora utiliza y podrían derretirse, creando una descarga eléctrica y/o peli
gro de incendio. Coloque la secadora cerca de un tomacorriente eléctrico de
manera que el cable que vaya a adquirir quede sin tensión alguna. Consulte los
requerimientos eléctricos en este manual para una adquisición del
cable ade cuado.
3. Debe instalar un protector contra tirones, aprobado U.L., en el cable. Si no
acopla un protector contra tirones, el cable podría jalarse fuera de la secadora
y podría romperse con cualquier movimiento del cable, causando
una descarga eléctrica.
4. No use un tomacorriente con alambres de aluminio con un cable y clavija con
alambres de cobre (o viceversa). Ocurriría una reacción química entre el cobre
y el aluminio y podría producir un cortocircuito. Deberá utilizar un cable con
alambres de cobre y un tomacorriente con alambres de cobre para una insta
lación adecuada.
Nota: Las secadoras conectadas a un suministro de energía de 208 V tendrán
tiempos de secado más largos que las conectadas a un suministro de
energía de 240 V.
Peligro: Una conexión incorrecta del conducto de conexión a tierra del equipo
puede causar un riesgo de descarga eléctrica. Consulte a un electricista
calificado si tiene dudas sobre la conexión a tierra del aparato.
Los siguientes son requerimientos específicos para una insta-
lación adecuada y segura de su secadora. El no seguir estas
instrucciones pueden producir una descarga eléctrica y/o
peligro de incendio.
ADVERTENCIAS
Conexiones Eléctricas
Instrucciones y Requerimientos
18
Español
Downloaded from www.Manualslib.com manuals search engine

1. Quite los tornillos que aseguran la tapa de acceso del bloque terminal
y el soporte de instalación del protector contra tirones localizados en
la parte posterior de la esquina superior de la secadora.
2. Instale un protector contra tirones, aprobado U.L., en el orificio de
entrada del cable eléctrico del soporte de montaje. Apriete la tuerca
con los dedos por el momento.
3. Inserte un cable eléctrico de 30 A, aprobado U.L., NEMA 10-30 Tipo
SRDT, a través del protector contra tirones.
4. Fije el conductor neutral (alambre central) del cable eléctrico
a la terminal central color plateado en el bloque terminal.
Apriete bien el tornillo.
5. Fije los dos conductores exteriores restantes del cable a las terminales
exteriores color bronce en el bloque terminal. Apriete bien ambos
tornillos. Advertencia: No doble u ondule los alambres/conductores
en las conexiones.
6. Vuelva a fijar el soporte de montaje del protector contra tirones a la
parte posterior de la secadora con dos tornillos. Apriete bien
los tornillos.
7. Apriete los tornillos asegurando el protector contra tirones firmemente
contra el cable eléctrico.
8. Apriete bien la tuerca del protector contra tirones de manera que el
protector no gire.
9. Vuelva a colocar la tapa del bloque terminal.
Conexiones de Cables Trifilares
Tornillo
a tierra
verde
Alambre
neutral a
tierra
verde
Terminal plateada
Tuerca
Apriete la tuerca
a estos hilos
Cable eléctrico
Soporte de montaje del
protector contra tirones
19
Español
Instrucciones
Este aparato debe conectarse a un sistema permanente de conducción
metálica a tierra o a un conductor de puesta a tierra, que funcione con
los conductores del circuito y esté conectado al terminal del equipo de
puesta a tierra o conectado al aparato.
Downloaded from www.Manualslib.com manuals search engine

Conexiones de Cables Tetrafilares
1. Quite los tornillos que aseguran la tapa de acceso del bloque terminal
y el soporte de instalación del protector contra tirones localizados en
la parte posterior de la esquina superior de la secadora.
2. Instale un protector contra tirones, aprobado U.L., en el orificio de
entrada del cable eléctrico del soporte de montaje. Apriete la tuerca
con los dedos por el momento.
3. Quite el alambre neutral a tierra verde del tornillo a tierra verde ubi
cado arriba del bloque terminal.
Tomacorrie
nte típico
Cable tetrafilar
típico
Negro 240 V
Neutral blanco
Rojo 240 V
A tierra verde
30 A NEMA 14-30 TIPO SRDT O ST
Tornillo a
tierra
verde
Alambre neutral a
tierra verde
Alambre a tierra verde
del cable eléctrico
Terminal plateada
Bloque terminal
Apriete la
tuerca a estos
hilos
Negro
Blanco
Tuerca
Soporte de montaje del
protector contra tirones
Cable eléctrico
Rojo
20
Español
Downloaded from www.Manualslib.com manuals search engine

4. Inserte un cable eléctrico de 30 A, aprobado U.L., NEMA 14-30 Tipo
ST o SRDT, a través del protector contra tirones.
5. Fije el alambre a tierra verde del cable eléctrico al gabinete de la
secadora con el tornillo a tierra verde.
6. Fije el conductor blanco (neutral) del cable eléctrico y el alambre a
tierra verde del cableado de la secadora a la terminal central color
plateado en el bloque terminal. Apriete bien el tornillo.
7. Fije los conductores rojo y negro del cable eléctrico a las terminales
exteriores color bronce en el bloque terminal. Advertencia: No doble
ondule los alambres/conductores en las conexiones.
8. Apriete los tornillos asegurando el protector contra tirones firmemente
contra el cable eléctrico.
9. Apriete bien la tuerca del protector contra tirones de manera que el
protector no gire.
10. Vuelva a colocar la tapa del bloque terminal.
INSTRUCCIONES PARA LA PUESTA A TIERRA
Este aparato tiene que conectarse a tierra. Para anormalidades o avería,
la puesta a tierra redueira el riesgo de choque eléctrico, suministrándole
un paso de menor resistencia a la corriente eléctrica. El aparato está
equipado con un cable provisto de un conductor de puesta a tierra por
equipo y un conector a tierra. El conector debe introducirse en un enchufe
apropiado, que esté adecuadamente instalado y puesto a tierra de acuer-
do con las normas y reglamentos locales.
ADVERTENCIA
Una conexión inadecuada del conductor de puesta a tierra por equipo
puede resultar en riesgo de choque eléctrico. Si tiene dudas de si el
aparato está propiamente puesto a tierra mande a un electricista califica-
do o un representante o personal de servicios para que to examine.
No modifique el conector suministrado junto con el aparato, Si no se
adapta al enchufe, instale otro apropiado por un électricista calificado.
Precaución: Marque todos los alambres antes de desconec-
tarlos, al reparar los controles. Los errores en el
cableado pueden causar funcionamientos
inadecuados y puede ser peligroso. Revise que
la unidad tenga un funcionamiento adecuado
después de reparar.
Advertencia: Deseche o destruya la caja y las bolsas plásti-
cas después de desempacar la secadora. No
debe permitir que los niños jueguen con éstas.
Los cajas cubiertas con alfombras, cobertores o
cubiertas plásticas pueden convertirse en una
cámara hermética y provocar sofocaciones que
podrían causar la muerte. Mantenga los mate-
riales de embalaje fuera del alcance de los
niños.
Advertencia: Las instrucciones en este manual y toda otra
leyenda incluida con esta secadora no puede
cubrir todas las situaciones y condiciones posi-
bles que puedan ocurrir. Deberá tener precau-
ción al instalar, operar y dar mantenimiento a
cualquier aparato. Si tiene dudas sobre la
instalación de la secadora, llame a un
electricista calificado para que la instale.
21
Español
Downloaded from www.Manualslib.com manuals search engine

Español
22
Garantía Limitada
Full ONE Year In-Home Warranty
For 12 months from the date of original retail
purchase, Haier will repair or replace any
part free of charge including labor that fails
due to a defect in materials or workmanship.
Limited Warranty
After one year from the original retail pur-
chase date, Haier will provide a part at no
cost, as indicated below, to replace said part
as a result of a defect in materials or work-
manship. Haier is responsible solely for the
cost of the part. All other costs such as labor,
trip charge, etc are the responsibility of the
owner.
Second Year
Haier will provide All Parts.
Third through Fifth Year
Haier will provide the drive motor or timer.
Haier will provide the dryer drum should the
drum rust through.
Third through Tenth Year
Haier will provide the cabinet assembly
should the cabinet rust through.
NOTE: This warranty commences on the
date the item was purchased and the original
purchase receipt must be presented to the
authorized service representative before
warranty repairs are rendered.
Exceptions: Commercial or Rental
Use Warranty
90 days labor from date of original
purchase. Excludes in-home trip charge.
90 days parts from date of original
purchaseNo other warranty applies
For Warranty Service
Contact your nearest authorized service
center. All service must be performed by a
Haier authorized service center. For the name
and telephone number of the nearest
authorized service center please
call 1-877-337-3639.
Before calling please have available
the following information:
Model number and serial number of your
appliance (found on the rear of the unit on
the upper left hand side).
The name and address of the dealer
you purchased the unit from and the
date of purchase.
A clear description of the problem.
A proof of purchase (sales receipt).
This warranty covers appliances
within the continental United States,
Puerto Rico and Canada.
What is not covered by
this warranty:
Replacement or repair of household fuses,
circuit breakers, wiring or plumbing.
A product whose original serial number has
been removed or altered.
Premium service charges not specifically
identified as normal, such as outside normal
service area or hours.
Damage to clothing
Damage incurred in shipping
Damage caused by improper installation or
maintenance
Damage from misuse, abuse accident, fire,
flood, or acts of nature
Damage from service other than an
authorized Haier dealer or service center
Damage from incorrect electrical current,
voltage or supply
Damage resulting from any product
modification, alteration or adjustment not
authorized by Haier.
Adjustment of consumer operated controls as
identified in the owners manual
Hoses, knobs, lint trays and all attachments,
accessories and disposable parts
Labor, service transportation, and shipping
charges for the removal and replacement of
defective parts beyond the initial
12-month period.
Damage from other than normal
household use.
Any transportation and shipping charges.
THIS LIMITED WARRANTY IS GIVEN IN LIEU
OF ALL OTHER WARRANTIES, EXPRESSED
OR, INCLUDING THE WARRANTIES OF
MERCHANTABILITY AND FITNESS FOR A
PARTICULAR PURPOSE
The remedy provided in this warranty is
exclusive and is granted in lieu of all
other remedies.
This warranty does not cover incidental or
consequential damages, so the above
limitations may not apply to you. Some states
do not allow limitations on how long an
implied warranty lasts, so the above
limitations may not apply to you.
This warranty gives you specific legal rights,
and you may have other rights, which vary,
from state to state.
Haier America Trading L.L.C.
New York, NY 10018.
Downloaded from www.Manualslib.com manuals search engine

gdz22-1-02
Issued: June-01
IMPORTANT
Do Not Return This Product To The Store
If you have a problem with this product, please contact the "Haier Customer
Satisfaction Center" at 1-877-337-3639.
DATED PROOF OF PURCHASE REQUIRED FOR WARRANTY SERVICE
IMPORTANT
Ne pas Réexpédier ce Produit au Magasin
Pour tout problème concernant ce produit, veuillez contacter le service des
consommateurs ‘Haier Customer Satisfaction Center’ au 1-877-337-3639.
UNE PREUVE D’ACHAT DATEE EST REQUISE POUR BENEFICIER DE LA GARANTIE.
IMPORTANTE
No regrese este producto a la tienda
Si tiene algún problema con este producto, por favor contacte el "Centro de Servicio al
Consumidor de Haier" al 1-877-337-3639 (Válido solo en E.U.A).
NECESITA UNA PRUEBA DE COMPRA FECHADA PARA EL SERVICIO DE LA GARANTIA
120/240V, 60Hz
Made in China
Fabriqué en Chine
Hecho en China
Haier America
New York, NY 10018
Printed in China
Part # WD-9999-05
Downloaded from www.Manualslib.com manuals search engine
-
 1
1
-
 2
2
-
 3
3
-
 4
4
-
 5
5
-
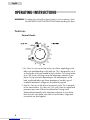 6
6
-
 7
7
-
 8
8
-
 9
9
-
 10
10
-
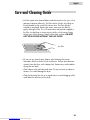 11
11
-
 12
12
-
 13
13
-
 14
14
-
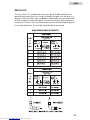 15
15
-
 16
16
-
 17
17
-
 18
18
-
 19
19
-
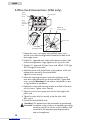 20
20
-
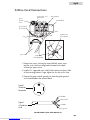 21
21
-
 22
22
-
 23
23
-
 24
24
-
 25
25
-
 26
26
-
 27
27
-
 28
28
-
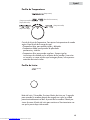 29
29
-
 30
30
-
 31
31
-
 32
32
-
 33
33
-
 34
34
-
 35
35
-
 36
36
-
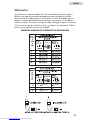 37
37
-
 38
38
-
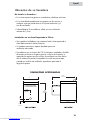 39
39
-
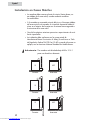 40
40
-
 41
41
-
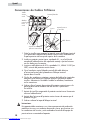 42
42
-
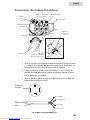 43
43
-
 44
44
-
 45
45
-
 46
46


Haier HLF11E El manual del propietario
- Categoría
- Secadoras
- Tipo
- El manual del propietario
en otros idiomas
- English: Haier HLF11E Owner's manual
