
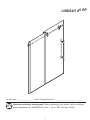
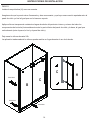
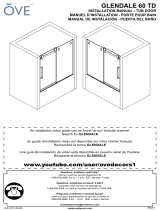
LINDSAY 60 GP
Questions, problems, missing parts? Before returning to your retailer, call our customer
service department at 1-800-880-8164, 9 a.m. – 5 p.m., EST, Monday – Friday.
1
Purchase date : _________________ Product Tracking Reference : _____________________________

2
CAUTION
Please carefully read the following important safety information before handling or installing this shower. There
is a risk of serious injury while handling this product. To minimize these risks, please note:
• Always wear safety glasses and gloves while handling.
• Always read and follow all the steps in the installation instructions.
• Inspect all contents and glass for damage before installation.
• Extreme caution should be taken while handling the glass during installation as the tempered glass may
shatter if in contact with a hard surface.
• Handle the tempered glass with caution! Improperly handling the glass can cause it to break suddenly in
small pieces (never in pointed fragments).
• Always take all precautions not to touch the tempered glass with any tools during the installation, or after
installed.
• Do not cut or modify the tempered glass as it will shatter if cut.
• Carefully remove product from packaging and keep packaging until installation is complete.
• Inspect all parts for damage; if there is damage to the unit prior to installation, please contact customer
service at the number provided in this guide.
• Install the shower on a
that is level and able to accommodate the weight of the unit and an occupant.
• Consult local building codes and compliance standards prior to installation and ensure conformity.
• After installation, and from time to time, check the glass for
and to ensure that nothing has come
loose since installation.
• Keep this installation manual for future reference.
NOTICE
• Any or alteration from what is in this instruction manual will void any and all warranty
on this product.
• The distributor is not responsible for any damage to the unit or personal property caused by improper
installation. If you disregard instructional warnings, you will void your warranty and possibly deal with water
damage.
• Consult the distributor’s website for any additional information or question on this product’s installation.
PREPARATION
You will need at least two people to install this unit properly.
Before beginning assembly of product, make sure all parts are present. Compare parts with package contents
list and hardware contents list. If any part is missing or damaged, do not attempt to assemble the product.
Estimated Assembly Time: Shower (60 min).
SAFETY INFORMATION

Package Contents........................................................................................................................................4
Hardware Contents......................................................................................................................................6
Preparation...................................................................................................................................................7
Installation Instructions ......................................................................................................................................8
Maintenance...............................................................................................................................................15
Warranty.....................................................................................................................................................15
TABLE OF CONTENTS
3

4
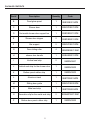
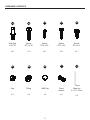
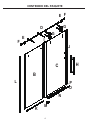
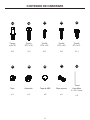
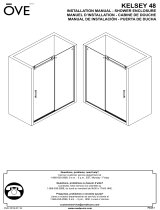
PACKAGE CONTENTS
B
C
H
E
E
D
G
G
F
F
I
J
K
L
M
O
N
P

5
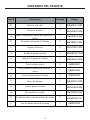
PACKAGE CONTENTS
Part # Description Quantity Code
B Fixed glass panel 1
99SG38001-WM
C Shower door 1
99SGD3801-WM
D Horizontal shower door support bar 1
99SGS3801-WM
E Shower door stopper 2
99SDS3801-WM
F Bar support 2
99SGC3801-WM
G Door sliding roller 4
99SWE3801-WM
H shower door handle 1
99SHA3801-WM
I Vertical seal strip 2
99SRU3801
J Vertical seal strip for the shower door 1
99SRU3802
K Bottom panel rubber strip 1
99SRU3803
L Aluminum track 1
99STR3801-WM
M Sliding door guide 1
99SGC3802-WM
N Metal seal strip 1
99STR3802-WM
O Decorative clip for the metal seal strip 2
99SHW3801-WM
P Bottom door panel rubber strip 1
99SRU3804

HARDWARE CONTENTS
6
Screw
ST 5 x 30
3+1
CC
EE
BB
Wall plug
ø 8 x 30
5+1
AA
DD
Screw
ST 5 x 40
2+1
Screw
ST 4 x 20
2+1
Allen key
2 / 2.5 / 5 mm
x 3
Cap
x 3
ABS Cap
x 2
Glass
bracket
x 2
Fitting
x 3
FF
GG
Screw
ST 4 x 12
3+1
HH
II
JJ

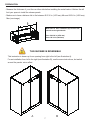
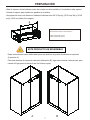
PREPARATION
7
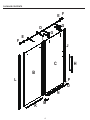
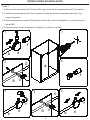
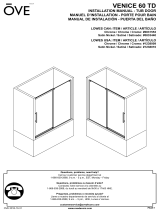
- Measure the thickness of your tiles on either side before installing the metal tracks. A thicker tile will
limit your space to install the shower panels.
- Make sure to have a distance tile to tile between 58 3/16 in (1478 mm) Min and 58 3/4 in (1493 mm)
Max (see image).
THIS SHOWER IS REVERSIBLE
This instruction is drawn up for an opening from right to the left (see illustration A).
For an installation from left to the right (see illustration B), use the same instructions, but switch
around the panels: mirror effect.
Make sure to have a distance (D) from the left
side tile to the right side tile:
D
Min: 58 3/16 in (1478 mm)
D
Max
: 58 3/4 in (1493 mm)
A B

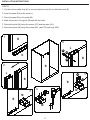
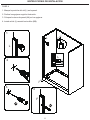
INSTALLATION INSTRUCTIONS
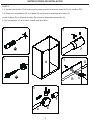
STEP A
1. Mark the position of the track (L) on the wall.
2. Drill the holes according to the illustration.
3. Put the wall plug (AA) into the holes.
4. Install the track (L) using the screws (BB).
8
L
L
L
1
L
2
3
AA
4
BB
F
20 mm
20 mm
20 mm

INSTALLATION INSTRUCTIONS
9
B
3
B
M
4
M
B
K
1
2
B
L
5
B
M
CC
HH
6
B
L
EE
FF
GG
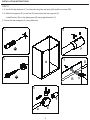
STEP B
1. Cut the bottom rubber strip (K) to size and place the strip (K) on the fixed panel (B).
2. Insert the panel (B) into the track (L).
3. Place the panel (B) on the guide (M).
4. Mark the position of the guide (M) and drill the holes.
5. Secure the guide (M) using the screws (CC) and the caps (HH).
6. Secure the panel (B) using the screws (EE), caps (FF) and rings (GG).

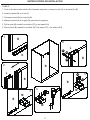
INSTALLATION INSTRUCTIONS
10
B
1
E
F
D
5
E
F
D
6
F
7
3
E
F
D
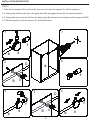
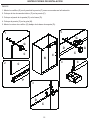
STEP C
1. Slide the two stoppers (E) on the bar (D), then mount the two bar supports (F) without tightening.
2-3. Temporarily install the bar (D) on the glass panel (B) using glass bracket (II) and mark the position.
4-5. Temporarily remove the bar (D) from the glass panel (B) and remove the stoppers and bar supports (E&F).
6-7. Mark the position of the bar supports (F) and drill the holes.
2
D
B
II
BS-2mm
4
D
B
II
BS-2mm

INSTALLATION INSTRUCTIONS
11
B
1
AA
DD
2
5
F
3
E
F
D
4
D
B
II
BS-2mm
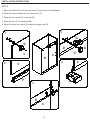
STEP D
1-2. Install the bar supports (F) on the wall using the wall plug (AA) and the screws (DD).
3-4. Slide the stoppers (E) on the bar (D) and mount the bar supports (F).
Install the bar (D) on the glass panel (B) using glass bracket (II).
5. Fasten the bar supports (F) using Allen key.

INSTALLATION INSTRUCTIONS
12
B
C
1
C
G
2
C
P
3
C
D
5
C
G
G
D
4
C
M
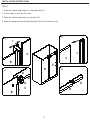
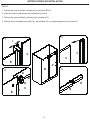
STEP E
1. Mount the rollers (G) onto the door panel (C) as shown in the illustration.
2. Place the bottom rubber strip (P) on the door (C).
3. Place the door panel (C) on the bar (D).
4. Place the door (C) on the guide (M).
5. Mount the other two rollers (G) under the support bar (D).

INSTALLATION INSTRUCTIONS
13
B
C
1
B
C
I
2
B
C
I
G
G
D
3
C
J
4
N
O
STEP F
1. Place the vertical seal strips (I) on the panel (B & C).
2. Cut the strips (I) to fit the door size.
3. Place the vertical seal strip (J) on the door (C).
4. Place the metal seal strip (N) and the clips (O) in front of the door (C).

INSTALLATION INSTRUCTIONS
14
SILICONE
SILICONE
SILICONE
B
C
H
C
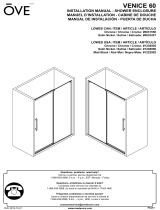
STEP G
Install the handle (H) as shown.
Ensure that the door closes tight and opens smoothly, and there is a tight connection between the side
glass panel and the frame as well as the support bar. Adjust the roller if necessary.
Apply a clear silicone water sealant around the inside and the outside perimeter of any fixed shower
components (horizontally between bottom of fixed side glass panel and base, as well as vertically between
the wall, glass frames, and any side glass panel).
Allow 24 hours for silicone to dry.
Improper application of silicone sealant may cause your shower to leak.

15
LIMITED Product Warranty
The distributor is a reseller of the following Products:
• Shower Doors (warranty period 5 years).
• Acrylic Surfaces (warranty period 5 years against blistering, cracking or chipping in the acrylic surface).
• Acrylic Shell Structure (warranty period 5 years against loss of water through
laminate of the acrylic body).
• Shower Hardware (handles, hinges, rubber support clips, metal support bars and wall tracks) (warranty period 1 year against defects in materials
or workmanship).
Limited Warranty: The distributor warrants to the original retail purchaser that within a reasonable time after
from purchaser, the distributor
will repair or replace the Product, or any part or component of the covered Product, distributed by the distributor which is proven to the satisfaction
of the distributor to be defective in workmanship or materials, and which has failed during normal use and within the warranty period. This Limited
Warranty does not apply to Products that have been damaged, or which fail, as a result of causes other than manufacturing defects (such as but not
limited to improper installation; lack of or improper care or maintenance; exposure to elements including corrosive products, environments or water;
alteration; abuse or misuse). This warranty does not cover damage to The warranty commences on the date a Product is purchased by
the customer. This warranty applies exclusively to products purchased and used in non-commercial applications.
Warranty Claim Procedure: To make a claim please call 1-800-880-8164 to trouble-shoot the issue and start the claim process. Products may be
inspected or evaluated by the distributor and any Product or component found to meet the above warranty criteria will be repaired or replaced at
the distributor’s option. Replacement or repaired parts will be shipped at no cost to customer via ground freight only. Any expedited methods of
shipments are customer’s expense.
DISCLAIMER AND EXCLUSION OF WARRANTIES: This warranty is meant to be a complete and exclusive statement of
the terms of all limited warranties offered by the distributor.
To the fullest extent permitted by law, other than the express warranty set forth in this instrument there are NO
WARRANTIES, EXPRESS OR IMPLIED, INCLUDING ANY IMPLIED WARRANTIES OF MERCHANTABILITY OR FITNESS FOR
A PARTICULAR PURPOSE EXTENDED BY THE DISTRIBUTOR.
This warranty gives you
legal rights. You may also have rights, which may vary under applicable state, provinces, or national legislation,
which cannot be disclaimed or
by the above Disclaimer. Except as permitted, the Disclaimer is not intended to waive, modify, release or limit
the applicability of preemptive state, province, or national legislation inconsistent with the terms of this Limited Warranty and Disclaimer. However, to
the extent permitted by law, no implied warranties of merchantability or
are intended or extended hereunder. Notwithstanding the Disclaimer
if any implied warranty is imposed by operation of law, to the extent permitted, the duration of such implied warranties is limited to the shorter of the
term of the express warranty or the applicable statute of limitations.
The Products listed above are intended to be installed and used for personal, consumer residential use. Use of Products for any other purpose such
as commercial purposes voids this warranty. The Limited Warranty is applicable only to the Products listed herein, and no warranty is extended to
products not distributed by the distributor. The warranty is applicable only to the
retail purchaser.
Transferability: This warranty is not transferrable.
LIMITATION AND EXCLUSION OF REMEDIES AND DAMAGES: THE DISTRIBUTOR’s sole responsibility under this Limited
Warranty shall be to repair or replace, at its option, any defective Product or component. Purchaser agrees that this is
the sole and exclusive remedy under this Limited Warranty. The distributor will not be responsible for any incidental,
consequential, special or indirect damages, including loss of use as a result of any manufacturing defect in a Product. The
distributor will not be responsible for labor, or any other fees associated with removal or installation of warranted parts.
Some states, provinces, or national legislation do not allow the exclusion or limitation of incidental or consequential
damages, so this limitation may not apply to you.
Product
tion: The distributor reserves the right to change, modify or improve the Products without obligation to incorporate such changes in
Products previously sold or installed.
Authority and
The retail seller is not the agent of the distributor and is not authorized to vary or modify the terms of the Limited Warranty.
In addition, the retail seller cannot bind the distributor or make any representations or promises about the Product that are binding on the ditributor.
CARE AND MAINTENANCE
For the daily maintenance, use a wet cloth and a soft liquid cleaner.
Never use abrasive cleaners containing some acetone, chlorine or strong bleach, scrapers, metallic brushes, nor other objects or the products which
can graze or tarnish surfaces.
Use a ratchet to strongly tighten any bolts used to support the
glass panels or doors panel (support bolts can withstand up to 250 lbf*in of
torque).
Check these bolts every 4 months and re-tighten them if necessary.

1
Preguntas, problemas, piezas faltantes?
Antes de volver a la tienda, llame a nuestro departamento de servicio al cliente al
1-800-880-8164, 9 a.m. – 5 p.m., EST, Lunes – Viernes.
Fecha de compra : __________ Seguimiento y referencia del producto : _______________
LINDSAY 60 GP

2
PRECAUCIÓN
Lea cuidadosamente la siguiente información importante antes de manipular e instalar la ducha. Hay riesgo de
lesiones graves mientras se manipula el producto. Para minimizar estos riesgos, sírvase notar:
• Utilice siempre anteojos de seguridad y guantes durante la manipulación.
• Lea y siga siempre todos los pasos en las instrucciones de instalación.
• Inspeccione todo el contenido y el vidrio por daños antes de la instalación.
• Hay que prestar atención especial mientras se manipula el vidrio durante la instalación ya que el vidrio
templado se puede despedazar al contacto con una
dura.
• Manipule el vidrio templado con precaución! Una manipulación inadecuada del vidrio puede ocasionar que
se rompa.
• Observe siempre todas las precauciones para no tocar el vidrio templado con ninguna herramienta durante
ni después de la instalación.
•
No corte el vidrio templado puesto que se despedazará si se corta.
• Retire con cuidado los productos de envase y embalaje mantendrá hasta que la instalación se haya
completado.
• Inspeccione todas las piezas en busca de daños, si hay daños en la unidad antes de la instalación, póngase
en contacto con el servicio al cliente al teléfono que
en esta guía.
• Instale la ducha en un piso que esté nivelado y pueda contener el peso de la unidad y de un ocupante.
• Consulte los códigos de construcción locales y normas requeridas antes de la instalación y asegúrese de
cumplirlos.
•
Después de la instalación, y de tiempo en tiempo,
el ajuste el acabado del vidrio para asegurarse
de que nada se ha
con el tiempo.
• Guarde este manual de instalación para consulta en el futuro.
ATENCIÓN
• Cualquier o alteración con respecto a lo en este manual de instrucción anulará
toda la garantía de este producto.
• El distribuidor no se hace responsable por cualquier tipo de daño a la unidad o propiedad personal ocasionado
por una instalación inadecuada. Ignorar estas instrucciones anulará la garantía y ocasionará daños potenciales
por agua en su hogar.
• Consulte el sitio web del distribuidor para cualquier información adicional o pregunta sobre la instalación de
este producto.
PREPARACIÓN
Necesitará al menos dos personas para instalar esta unidad de forma adecuada.
Antes de comenzar a ensamblar el producto, asegúrese de tener todas las piezas. Compare las piezas con la
lista del contenido del paquete y la lista de aditamentos. No intente ensamblar el producto si falta alguna pieza
o si estas están dañadas.
Tiempo estimado de ensamblaje: Ducha (60 min).
INFORMACIÓN DE SEGURIDAD

3
Contenido del paquete............................................................................................................4
Contenido de Hardware..........................................................................................................6
Preparación............................................................................................................................7
Instrucciones de instalación...................................................................................................8
Mantenimiento......................................................................................................................15
Garantía...............................................................................................................................15
TABLA DE CONTENIDO

4
B
C
H
E
E
D
G
G
F
F
I
J
K
L
M
O
N
P
CONTENIDO DEL PAQUETE

5
CONTENIDO DEL PAQUETE
Parte # Descripción Cantidad Código
B
Panel de vidrio fijo
1
99SG38001-WM
C
Puerta de la ducha
1
99SGD3801-WM
D
Barra horizontal de soporte de la puerta de la
ducha
1
99SGS3801-WM
E
Retenedor de la puerta de la ducha
2
99SDS3801-WM
F
Soporte de la barra
2
99SGC3801-WM
G
Rodillo de puerta corrediza
4
99SWE3801-WM
H
Manija de la puerta de la ducha
1
99SHA3801-WM
I
Tira de sellado vertical
2
99SRU3801
J
Tira de sellado vertical para la puerta de la
ducha
1
99SRU3802
K
Tira de caucho inferior del panel
1
99SRU3803
L
Rieles de aluminio
1
99STR3801-WM
M
Guía de puerta corrediza
1
99SGC3802-WM
N
Tira metálica de sellado
1
99STR3802-WM
O
Presilla decorativa para tira metálica de sellado
2
99SHW3801-W
M
P
Tira de caucho inferior de la puerta
1
99SRU3804

6
Tornillo
ST 5 x 30
3+1
CC
EE
BB
Tarugo
ø 8 x 30
5+1
AA
DD
Tornillo
ST 5 x 40
2+1
Tornillo
ST 4 x 20
2+1
Llave Allen
2 / 2.5 / 5 mm
x 3
Tapa
x 3
Tapa de ABS
x 2
Glass soporte
x 2
Adecuado
x 3
FF
GG
Tornillo
ST 4 x 12
3+1
HH
II
JJ
CONTENIDO DE HARDWARE

7
A B
PREPARACIÓN
- Mida el espesor de las baldosas antes de instalar los rieles metálicos. Una baldosa más espesa
limitará el espacio para instalar los paneles de la ducha.
- Asegúrese de tener una distancia baldosa a baldosa entre 58 3/16 pulg. (1478 mm) Min y 58 3/4
pulg. (1493 mm) Max (Ver imagen)
Estas instrucciones fueron elaboradas para una abertura de puerta de derecha a izquierda
(ilustración A).
Para una abertura de izquierda a derecha (ilustración B), siga estas mismas instrucciones, pero
cambie el lugar para la ubicación del riel: efecto espejo.
ESTE PRODUCTO ES REVERSIBLE
D Min: 1478mm (58 3/16 pu)
D Max: 1493mm (58 3/4 pu)
Asegúrese de tener una distancia (D) de baldosas en el
lado izquierdo de la teja en el lado derecho:

PASO A
1. Marque la posición del riel (L) en la pared.
2. Perfore los agujeros según la ilustración.
3. Coloque los tacos de pared (AA) en los agujeros.
4. Instale el riel (L) usando los tornillos (BB).
8
L
L
L
1
L
2
3
AA
4
BB
F
20 mm
20 mm
20 mm
INSTRUCCIONES DE INSTALACIÓN

9
B
3
B
M
4
M
B
K
1
2
B
L
5
B
M
CC
HH
6
B
L
EE
FF
GG
PASO B
1. Corte la tira de caucho inferior (K) al tamaño adecuado y coloque la tira (K) en el panel fijo (B).
2. Inserte el panel (B) en el riel (L).
3. Coloque el panel (B) en la guía (M).
4. Marque la posición de la guía (M) y perfore los agujeros.
5. Fije la guía (M) usando los tornillos (CC) y las tapas (HH).
6. Fije el panel (B) usando los tornillos (EE), las tapas (FF) y los anillos (GG).
INSTRUCCIONES DE INSTALACIÓN

10
B
1
E
F
D
5
E
F
D
6
F
7
3
E
F
D
PASO C
1. Deslice los dos retenedores (E) en la barra (D), luego monte los dos soportes de barra (F) sin apretar.
2-3. Instale temporalmente la barra (D) en el panel de vidrio (B) usando la abrazadera para vidrio (II) y
marque la posición.
4-5. Retire temporalmente la barra (D) del panel de vidrio (B) y retire los retenedores y los soportes de la
barra (E&F).
6-7. Marque la posición de los soportes de la barra (F) y perfore los orificios.
2
D
B
II
BS-2mm
4
D
B
II
BS-2mm
INSTRUCCIONES DE INSTALACIÓN

11
B
1
AA
DD
2
5
F
3
E
F
D
4
D
B
II
BS-2mm
PASO D
1-2. Instale los soportes (F) de la barra en la pared usando los tacos de pared (AA) y los tornillos (DD).
3-4. Deslice los retenedores (E) en la barra (D) and monte los soportes de la barra (F).
Instale la barra (D) en el panel de vidrio (B) usando la abrazadera para vidrio (II).
5. Fije los soportes (F) de la barra usando una llave Allen.
INSTRUCCIONES DE INSTALACIÓN

12
B
C
1
C
G
2
C
P
3
C
D
5
C
G
G
D
4
C
M
PASO E
1. Monte los rodillos (G) en el panel de la puerta (C) como se muestra en la ilustración.
2. Coloque la tira de caucho inferior (P) en la puerta (C).
3. Coloque el panel de la puerta (C) en la barra (D).
4. Coloque la puerta (C) en la guía (M).
5. Monte los otros dos rodillos (G) debajo de la barra de soporte (D).
INSTRUCCIONES DE INSTALACIÓN

13
B
C
1
B
C
I
2
B
C
I
G
G
D
3
C
J
4
N
O
PASO F
1. Coloque las tiras de sellado verticales (I) en el panel (B & C).
2. Corte las tiras (I) para ajustarse al tamaño de la puerta.
3. Coloque las tiras de sellado verticales (J) en la puerta (C).
4. Coloque la tira de sellado de metal (N) y las presillas (O) en la parte delantera de la puerta (C).
INSTRUCCIONES DE INSTALACIÓN

14
SILICONA
SILICONA
SILICONA
B
C
H
C
PASO G
Instalar la empuñadura (H) como se muestra.
Asegúrese de que la puerta cierre firmemente y abra suavemente y que haya una conexión apretada entre el
panel de vidrio y el riel al igual que con la barra se soporte.
Aplique silicona transparente resistente al agua alrededor del perímetro interno y externo de todos los
componentes de la ducha (horizontalmente entre la parte inferior del panel de vidrio y la base, al igual que
verticalmente (entre la pared, el riel y el panel de vidrio).
Deje secar la silicona durante 24h.
La aplicación inadecuada de la silicona puede resultar en fugas durante el uso de la ducha.
INSTRUCCIONES DE INSTALACIÓN

15
Garantía LIMITADA de productos
El distribuidor es un distribuidor de los siguientes productos:
• Puertas de ducha (periodo de garantía de 5 años).
•
acrílicas (periodo de garantía de 5 contra formación de burbujas, grietas o desportilladuras en la de acrílico).
• Estructura de cubierta de acrílico (periodo de garantía de 5 años contra la pérdida de agua a través del laminado de
de vidrio del cuerpo
de acrílico).
• Accesorios de ducha (manijas, bisagras, clips de soporte de caucho, barras de soporte de metal y rieles murales) (periodo de garantía de 1 año
contra defectos en materiales y mano de obra).
Garantía limitada: El distribuidor le garantiza al comprador minorista original que dentro de un tiempo razonable después de la
de parte
del comprador, el distribuidor reparará o remplazará el producto, o cualquier pieza o componente del producto cubierto, distribuido por el distribuidor
el cual, a la satisfacción del distribuidor, ha resultado defectuosos en mano de obra o materiales, y el cual ha fallado durante el uso normal y dentro
del periodo de garantía. Esta Garantía limitada no se aplica a productos que han sido dañados, o que han fallado como resultado de causas distintas
de defectos de fabricación (tales como pero sin limitarse a instalación inadecuada; falta de cuidado o mantenimiento o si éstos son inadecuados;
exposición a los elementos incluyendo productos y ambientes corrosivos o agua; alteración; abuso o uso inapropiado. Esta garantía no cubre daños
a acabados. La garantía comienza en la primera fecha en que un Producto es comprado por el cliente. Esta garantía se aplica exclusivamente a
productos comprados y usados en aplicaciones no comerciales.
Procedimiento de reclamación de garantía: Para hacer una reclamación, sírvase llamar al 1-800-880-8164 para resolver el problema y comenzar
el proceso de reclamación. Los productos pueden ser inspeccionados o evaluados por el distribuidor y cualquier producto o componente que
llegue a cumplir con los criterios de garantía expuestos arriba será reparado o remplazado a discreción del distribuidor. Las pieza
s reemplazadas o
reparadas serán enviadas sin costo alguno al cliente por vía terrestre únicamente. Cualquier método de envío acelerado será por cuenta del cliente.
EXONERACIÓN DE RESPONSABILIDADY EXCLUSIÓN DE GARANTÍAS: Esta garantía es considerada la exposición
completa y exclusiva de los términos de todas las garantías limitadas ofrecidas por el distribuidor.
Hasta donde lo permita la ley, fuera de la garantía expresa detallada en este instrumento, NO HAY GARANTÍAS,
EXPRESAS NI IMPLÍCITAS, INCLUYENDO GARANTÌAS IMPLICITAS DE COMERCIALIDAD O CONVENIENCIA PARA UN FIN
PARTICULAR, OFRECIDAS POR EL DISTRIBUIDOR.
Esta garantía le da derechos legales
Es posible que también tenga derechos, que pueden variar según legislaciones estatales,
provinciales o nacionales pertinentes, que no podrán ser sometidos a renuncia ni ser
por la exoneración de responsabilidad mencionada
arriba. Excepto lo permitido, la exoneración de responsabilidad no está destinada a generar la renuncia,
, liberar o limitar la aplicabilidad
de legislaciones preventivas estatales, provinciales o nacionales inconsistentes con los términos de esta Garantía limitada y Exoneración de
responsabilidad. Sin embargo, hasta donde la ley lo permita, ninguna garantía implícita de comercialidad o conveniencia es considerada bajo la
presente garantía. No obstante la Exoneración de responsabilidad, si cualquier garantía implícita es impuesta por la operación de la ley, hasta donde
se permita, la duración de dichas garantías implícitas está limitada al término más corto de la garantía expresa o el estatuto aplicable de limitaciones.
Los Productos mencionados arriba están destinados a ser instalados y utilizados para
personales y consumo residencial. El uso del producto
para cualquier otro
como comerciales anulará está garantía. La Garantía limitada es aplicada únicamente a los Productos detallados en
esta garantía, y no se da ninguna garantía a productos no distribuidos por el distribuidor. Esta garantía es aplicable únicamente al primer comprador
minorista.
Transferibilidad: Esta garantía no es transferible.
LIMITACIÓN Y EXCLUISIÓN DE REMEDIOS Y DAÑOS: La única responsabilidad del distribuidor bajo esta Garantía
limitada será la reparar o remplazar, a su discreción, cualquier Producto o componente defectuoso. El comprador acepta
que éste es el remedio único y exclusivo bajo esta Garantía limitada. El distribuidor no será responsable de ningún
daño incidental, resultante, especial o indirecto, incluyendo pérdida de uso como resultado de cualquier defecto de
fabricación en el Producto. El distribuidor no será responsable de mano de obra, ni de cualquier otro costo asociado al
retiro o a la instalación de piezas bajo garantía. Algunas legislaciones estatales, provinciales o nacionales no permiten
la exclusión de daños incidentales o resultantes, entonces puede que esta limitación no se aplique a usted.
de productos: El distribuidor se reserva el derecho de cambiar, o mejorar los Productos sin la obligación de incorporar dichos
cambios en Productos previamente vendidos o instalados.
Autoridad y
El vendedor minorista no es agente del distribuidor y no está autorizado a cambiar o los términos de esta
Garantía limitada. Además, el vendedor minorista no podrá obligar el distribuidor ni hacer declaraciones o promesas respecto al Producto, que
puedan comprometer el distribuidor.
MANTENIMIENTO
Para mantenimiento diario, utilice un paño húmedo y un limpiador líquido suave.
Nunca utilice abrasivos olimpiadores que contenga acetona, cloro o blanqueadores fuertes, espátulas o cepillos de cerdas metálicas, ni objetos o
productos que puedan raspar o deslucir las
Utilice un trinquete para apretar a cualquier pernos utilizados para soportar los paneles de vidrio o panel de puertas (pernos de
soporte pueden soportar hasta 250 lbf * in de torque).
Compruebe el tornillo de la rueda cada 6 meses y apriete de nuevo si es necesario.
-
 1
1
-
 2
2
-
 3
3
-
 4
4
-
 5
5
-
 6
6
-
 7
7
-
 8
8
-
 9
9
-
 10
10
-
 11
11
-
 12
12
-
 13
13
-
 14
14
-
 15
15
-
 16
16
-
 17
17
-
 18
18
-
 19
19
-
 20
20
-
 21
21
-
 22
22
-
 23
23
-
 24
24
-
 25
25
-
 26
26
-
 27
27
-
 28
28
-
 29
29
-
 30
30


en otros idiomas
- English: Schon SC70019 Operating instructions
Artículos relacionados


Otros documentos
-
Glacier Bay Cambridge Guía de instalación
-
 OVE Decors SYDNEY 48 Guía de instalación
-
 OVE Decors 15BGP-SYDN59-GLD Guía de instalación
-
 OVE Decors GLENDALE-SNTD Guía de instalación
-
 OVE Kelsey 48in. Shower Kit Acrylic White Manual de usuario
-
-
 OVE Decors VENICE-TDCH Guía de instalación
-
 OVE Decors VENICE-60GPBLK Guía de instalación
-
GYS LIFTING TABLE ERGO LIFT 650 Ficha de datos


