Ariens 96146000600 El manual del propietario
- Categoría
- Cortadoras de césped
- Tipo
- El manual del propietario
Este manual también es adecuado para

A1 73
196146600)
Owner's Manual
431593 Rev. 2 03.31.10 BY
• EspaSol, p. 18
Printed in U.S.A.

Safety Rules .......................................... 2-4
Product Specifications .............................. 4
Assembly / Pre-Operation ........................ 5
Operation ............................................... 6-9
Maintenance Schedule ........................... 10
Maintenance ...................................... 10-13
Service and Adjustments ................... 13-14
Storage .............................................. 14-15
Troubleshooting ................................. 16-17
Repair Parts....................................... 34-37
Warranty ................................................. 40
IMPORTANT: This cutting machine is
capable of amputating hands and feet and
throwing objects. Failure to observe the
following safety instructions could result in
serious injury or death.
_Look for this symbol to point out impor-
tant safety precautions, It means
CAUTION!l! BECOME ALERT?!t
YOUR SAFETY IS INVOLVED.
_, WARNING: In order to prevent ac-
cidental starting when setting up, trans-
porting, adjusting or making repairs,
always disconnect spark plug wire and
place wire where it cannot come in contact
with plug.
_I_WARNING: Engine exhaust, some of its
constituents, and certain vehicle components
contain oremit chemicals known to the State
ofCalifornia tocause cancerand birthdefects
or other reproductive harm.
_,WARNING: Battery posts, terminals and
related accessories contain lead and lead
compounds, chemicals known to the State
of California to cause cancer and birth
defects or other reproductive harm. Wash
hands after handling.
CAUTION: Muffler and other engine
parts become extremely hot during
operation and remain hot after engine
has stopped. To avoid severe burns on
contact, stay away from these areas.
e
2
I, GENERAL OPERATION
• Read, understand, and follow all
instructionson the machine and in the
manual(s) before starting.Be thoroughly
familiar withthe controlsand the proper
useofthe machine before starting.
• Do not put hands or feet near or under
rotating parts. Keep clear of the dis-
charge openingat all times.
• Only allow responsible individuals,who
are familiar with the instructions, to oper-
ate the machine,
• Clear the area of objects such as rocks,
toys, wire, bones, sticks, etc., which
could be picked up and thrown by blade.
• Be sure the area is clear of other people
before mowing. Stop machine if anyone
enters the area,
- Do not operate the mower when bare-
foot or wearing open sandals, Always
wear substantial foot wear.
• Do not pull mower backwards unless
absolutely necessary. Always look down
and behind before and while moving
backwards.
• Never direct discharged material toward
anyone. Avoid discharging material
against a wall or obstruction. Material
may richochet back toward the operator.
Stop the blade when crossing gravel
surfaces.
° Do not operate the mower without
proper guards, plates, grass catcher or
other safety protective devices in place.
• See manufacturer's instructions for prop-
er operation and installation of accesso-
ries. Only use accessories approved by
the manufacturer.
• Stop the blade(s) when crossing gravel
drives, walks, or roads.
• Stop the engine (motor) whenever you
leave the equipment, before cleaning the
mower or unclogging the chute.
Shut the engine (motor) off and wait until
the blade comes to complete stop before
removing grass catcher.
Mow only in daylight or good artificial
light.

• Do not operate the machine while under
the influence of alcohol or drugs.
• Never operate machine in wet grass.
Always be sure of your footing: keep a
firm hold on the handle; walk, never run.
• Disengage the self-propelled mech-
anism or drive clutch on mowers so
equipped before starting the engine,
• Ifthe equipment should start to vibrate
abnormally, stop the engine (motor) and
check immediately for the cause. Vibra-
tion is generally a warning of trouble.
• Always wear safety goggles or safety
glasses with side shields when operating
mower.
II. SLOPE OPERATION
Slopes are a major factor related to slip &
fall accidentswhichcan result in severe
injury.All slopes require extra caution.If
you feel uneasyon a slope, do notmow it.
DO:
• Mow across the face of slopes: never
up and down, Exerciseextreme caution
when changingdirectionon slopes.
• Remove obstaclessuch as rocks,tree
limbs,etc.
• Watch forholes, ruts, or bumps. Tall
grass can hide obstacles.
DO NOT:
• Do nottrimnear drop-offs,ditches or
embankments, The operator could lose
footing or balance.
° Do not trim excessively steep slopes.
• Do not mow on wet grass. Reduced
footing couldcause slipping.
IlL CHILDREN
Tragicaccidents can occur if the operator
is not alert to the presence of children.
Children are often attracted to the machine
and the mowing activity. Never assume
that children wilt remain where you last
saw them.
° Keep children out of the trimming area
and under the watchful care of another
responsible adult.
• Be alert and turn machine off if children
enter the area.
* Before andwhile walking backwards,
look behind and down for small children,
° Never allow children to operate the
machine,
, Use extra care when approaching blind
comers, shrubs, trees, or other objects
that may obscure vision.
IV. SAFE HANDLING OF GASOLINE
Use extreme care in handling gasoline,
Gasoline is extremely flammable and the
vapors are explosive,
• Extinguish all cigarettes, cigars, pipes
and other sources of ignition.
° Use only an approved container.
• Never remove gas cap or add fuel with
the engine running, Allow engine to cool
before refueling,
• Never refuel the machine indoors.
. Never store the machine or fuel contain-
er where there is an open flame, spark
or pilot light such as a water heater or
on other appliances.
• Never fil! containers inside a vehicle, on
a truck or trailer bed with a plastic liner,
Always place containerson the ground
away from your vehicle before filling.
• Remove gas-powered equipment from
the truck or trailer and refuel iton the
ground, Ifthis is not possible, then
refuel such equipment with a portable
container, rather than from a gasoline
dispenser nozzle.
• Keep the nozzle in contact with the rim
of the fuel tank or container opening at
all times until fueling is complete. Do
not use a nozzle lock-open device,
• tf fuel is spilled on clothing, change
clothEngimmediately,
• Never overfill fuel tank. Replace gas
cap and tighten securely.
V. GENERAL SERVICE
° Never run a machine inside a closed
area.
• Never make adjustments or repairs with
the engine (motor) running, Disconnect
the spark plug wire, and keep the wire
away from the plug to prevent accidental
starting.
• Keep nuts and bolts, especially blade
attachment bolts, tight and keep equip-
ment in good condition.
• Never tamper with safety devices.
Check their proper operation regularly.
° Keep machine free of grass, leaves, or
other debris build-up. Clean oil or fuel
spillage. Allow machine to cool before
storing.
• Stop and inspectthe equipment if you
strike an object. Repair, if necessary,
before restarting.
• Never attempt to make wheel height
adjustments while the engine is running.

° Grasscatchercomponentsaresubject
towear,damage,anddeterioration,
whichcouldexposemovingpartsor
allowobjectstobethrown.Frequently
checkcomponentsandreplacewith
manufacturer'srecommendedparts,
whennecessary.
• Mowerbladesaresharpandcancut.
Wraptheblade(s)orweargloves,and
useextracautionwhenservicingthem.
• Donotchangetheenginegovernorset-
tingoroverspeedtheengine.
• Maintainorreplacesafet_y•and instruc-
tion labels, as necessary.
_,WARNING: This lawn mower is equipped with an internal combustion engine and
should not be used on or near any unimproved forest-covered, brush-covered or
grass-covered land unless the engine's exhaust system is equipped with a spark
arrester meeting applicable local or state laws (if any). If a spark arrester is used, it
should be maintained in effective working order by the operator.
In the state of California the above is required by law (Section 4442 of the California
Public Resources Code). Other states may have similar laws. Federal laws apply on
federal lands.
Serial Number:
Date of Purchase:
Gasoline Capacity / Type: 1.6 Quarts (Unleaded Regular)
Oil Capacity: 20 Ounces
Oil Type (AP] SG-SL): SAE 30 (above 32°F); SAE 5W-30 (below 32°F)
Spark Plug: Champion RJ19LM or JI9LM (Gap: .030")
Blade Bolt Torque: 35-40 ft. Ibs.
° The model and serial numbers will be found on a decal on the rear of the lawn mower
housing. Record both serial number and date of purchase in space provided above.
4

Read these instructions and this manual in Operator
its entirety before you attempt to assemble I
or operate your new lawn mower, controlbar
IMPORTANT: This lawn mower isshipped
WITHOUT OIL OR GASOLINE in the
engine.
Your new lawn mower has been assem-
bled at the factory with the exception of
those parts left unassembled for shipping UP
purposes. To ensure safe and proper
operation of your lawn mower, all parts
and hardware you assemble must be tight- _
ened securely. Use the correct tools as
necessary to ensure proper tightness. All
parts such as nuts, washers, bolts, etc.,
necessary to complete the assembly have
been placed in the parts bag.
TO REMOVE MOWER FROM
CARTON
1. Remove loose parts included with
mower.
2. Cut down two end corners of carton
and lay end panel down flat.
3. Remove all packing materials except
padding between upper and lower
handle and padding holding operator
presence control bar to upper handle.
4. Roll lawn mower out of carton and
checkcarton thoroughly for additional
loose parts.
HOW TO SET UP YOUR MOWER
TO UNFOLD HANDLE
IMPORTANT: Unfold handle carefullyso
as notto pinch or damage contmtcables.
1. Raise handJes untillower handle sec-
tion rocks into place in mowing posi-
tion.
2. Remove protective padding, raise up-
per handle section into place on lower
handle and tighten both handle knobs.
3. Remove handte padding holding
operator presence contro!bar to upper
handle.
Your lawn mower handle can be adjusted
for your mowing comfort. Refer to "AD-
JUST HANDLE" in the Service and Adjust-
ments section of this manual.
MOWING
POSITION
Upper
handle
Handle
knob
\
Lowerhandle
TO ASSEMBLE GRASS CATCHER
1. Putgrass catcher frame intograssbag
with rigid part of bag on the bottom.
Make sure the frame handle is outside
of the bag top.
2. Slip vinyl bindings over frame.
NOTE: Ifvinyl bindings are too stiff, hold
them in warm water for a few minutes.If
bag gets wet, let it dry before using.
Vinyl
bindings
Frame
'handle
Frame
opening
TO INSTALL ATTACHMENTS
Your lawn mowerwas shipped readyto be
used as a muIcher. Toconvert mower to
bagging or discharging, see "3"OCON-
VERT MOWER" inthe Operation section
of thismanual,

KNOWYOURLAWNMOWER
READ THIS OWNER'S MANUALAND ALL SAFETY RULES BEFORE OPERATING
YOUR LAWN MOWER. Compare the illustrations with your lawn mower to familiarize
yourself with the location of various controls and adjustments, Save this manual for
future reference.
I IIIIIIII IIII I iiiiiiiii II
These symbols may appear on your lawn mower or in literature supplied with the
product. Learn and understand their meaning.
CAUTION ENGINE ENGINE FAST SLOW CHOKE FUEL OIL DANGER, KEEP HANDS
OR WARNING ON OFF AND FEET AWAY
,HII,,,H ,i,
Drive
control
ba_
Operator presence control bar
Handle knob
Starte_
handle
Engine oil cap
with dipstick
Grass
catc
Gasoline filler ca
Muffler
Air filtel
Drive cover
Housing
(on each wheel)
IMPORTANT: This lawn mower is shipped WITHOUT OIL OR GASOLINE inthe engine,
IlUlIIIIIIIIIII]IIIIIIIIIIIIIII [I ill LLI I IIIIIII IIII
MEETS CPSC SAFETY REQUIREMENTS
Our rotary walk-behind power lawn mowers conform to the safety standards of the
American National Standards Institute and the U,S, Consumer Product Safety Com-
mission. AWARNlNG: The blade turns when the engine is running,
i iii iilUl]],li u iw
Operator presence control bar - must Starter handle - used for starting engine.
be held down to the handle to start the Drive control bar - used to engage
engine. Release to stop the engine, power-propelled forward motion of mower.
6

Theoperationofanylawn
mowercanresultinforeign
objectsthrownintotheeyes,
whichcanresultinsevere
eyedamage.Alwayswear
safetyglassesoreyeshieldswhileoper-
atingyourlawnmowerorperformingany
adjustmentsorrepairs.Werecommenda
standardsafetyglassesorwidevisionsafety
maskwornoverspectacles.
HOWTO USE YOUR LAWN MOWER
ENGINE SPEED
The engine speed was set at the factory
for optimumperformance. Speed is not
adjustable.
ENGINE ZONE CONTROL
_,CAUTION: Federal regulations require
an engine controlto be installedonthis
lawn mower in order to minimize the
risk of blade contact injury. Do not under
any circumstancesattempt to defeat the
function of the operator control. The blade
turns when the engine is running.
• Your lawn mower is equipped with an
operator presence control bar which
requires the operator to be positioned
behind the lawn mower handle to start
and operate the lawn mower.
TO OPERATE DRIVE SYSTEM
• To start forward motion,lift drive con-
trol bar upto handle.
° To stop forward motion,release drive
control bar.
IMPORTANT: Alwayskeep drive control
fully engaged against handle when in use.
Operator
presence
control bar
DRIVE CONTROLENGAGED
DRIVE CONTROL DISENGAGED
TO ADJUST CUTTING HEIGHT
Raise wheels for low cutand lowerwheels
for high cut, adjust cuttingheighttosuit
your requirements.Medium positionis
bestfor most lawns.
= To change cutting height, squeeze ad-
juster lever toward wheel. Move wheel
upordownto suit yourrequirements.Be
sure all wheels are in the same setting.
NOTE: Adjuster is properlypositioned
when plate tab inserts intohole in lever.
Also, 9-position adjusters (if so equipped)
allow lever tobe positionedbetween the
plate tabs.
LEVERBACKWARD Platetab
TO LOWERMOWER
LEVERFORWARDTORAISEMOWER Lever
TO ATTACH GRASS CATCHER
1. Liftthe rear door of the lawn mower
and place the grass catcher frame side
hooks onto the door pivotpins.
2. The grass catcher is securedto the
lawnmower housing when the rear
door islowered ontothe grasscatcher
frame.
ACAUTION: Do not runyour lawn
mowerwithoutmulcher plate or plug,clip-
pingdeflector or approved grass catcher
inplace. Never attempt to operate the
lawn mower withthe rear door removed or
propped open.
Rear
Grass
catcher
handle
Catcher frame hook
TO EMPTY'GRASS CATCHER
1. Lift upon grass catcher usingthe
frame handle.
2. Remove grass catcherwith clippings
from under fawn mower handle.
3. Empty clippings from bag.
NOTE: Do not drag the bag when erup-
T tying; it willcause unnecessary wear.

\_/ "_ Grass
i_ _k._k'_ catcher
TO CONVERT MOWER
Your lawn mower was shipped ready to be
used as a mulcher. To convert to bagging:
• Open rear door and remove mulcher
plug. Store mulcher plug in a safe
place.
• You can now install grass catcher or
optional clipping deflector.
• To convert to mulching operation, install
mulcher plug into rear discharge open-
_Ling ef mower.
CAUTION; Do not runyour lawn mower
without mulcher plug, clipping deflector or
approved grass catcher in place. Never at-
tempt to operate the lawn mower with the
rear door removed or propped open.
Mu]cher plug
BEFORE STARTING ENGINE
ADD OIL
Your lawnmower is shipped without oil in
the engine. For type and grade ef oil to
use, see "ENGINE" in the Maintenance
section of this manual.
• ILCAUTION: DO NOT overfill engine with
oil, or it will smoke heavily from the muffler
on startup.
1. Be sure Iawnmower is level.
2. Remove ell dipstick from oil fill spout.
& You receive a container of oil with the
unit. Slowly pour the entire container
down the oil fill spout into the engine.
NOTE: initial oil fill requires only 18 oz.
due to residual oil in enginefrom the
manufacturers 100% quality testing. When
changing oil you may need 20 oz.
4. Insert and tighten dipstick.
IMPORTANT:
• Check oil level before each use, Add oil
if needed. Fill to full line on dipstick,
• Change the oil after every 25 hours of
operation or each season. You may
need to change the oil moreoften
under dusty, dirty conditions, See "TO
CHANGE ENGINE OIL" in the Mainte-
nance section of this manual.
oil cap
Gasoline
filler cap
ADD GASOLINE
• Fill fuel tank to bottom of tank filler neck.
Do not overfill. Use fresh, clean, regular
unleaded gasoline with a minimum of
87 octane. Do not mix oil with gasoline.
Purchase fuel in quantities that can be
used within 30 days to assure fuel fresh-
ness.
_1_CAUTION; Wipe off any spilled oil or
fuel. Do not stere, spill or use gasoline
near an open flame.
A CAUTION: Alcohol blended fuels
(called gasohol or using ethanol or metha-
nol) can attract moisture which leads to
separation and formation of acids during
storage. Acidic gas can damage the fuel
system of an engine while in storage. To
avoid engine problems, the fuel system
should be emptied before storage of 30
days or longer. Empty the gas tank, start
the engine and let it run until the fuel lines
and carburetor are empty. Use fresh fuel
next season. See Storage Instructions for
additional information. Never use engine
or carburetor cleaner products inthe fuel
tank or permanent damage may occur.

TO STOP ENGINE
• To stop engine, release operator pres-
ence controlbar.
TO START ENGINE
NOTE: Due to protective coatingson the
engine, a small amount of smoke may be
presentduringthe initialuse ofthe product
and should be considerednormal.
NOTE: Your engine is equipped withan
automatic choke system. No primingor
chokingisrequired before starting.
• To start engine, hold operator presence
controlbar downto the handleand pull
starter handlequickly. Do not allow
starter rope to snap back.
MOWING TIPS
_, CAUTION: Do not use de-thatcher
blade attachments on your mower.Such
attachments are hazardous, willdamage
your mower and couldvoid your warranty.
• Under certainconditions,suchas very
tall grass, itmay be necessary to raise
the height of cut to reduce pushing
effort and to keep from overloading the
engine and leaving clumps of grass clip-
pings. It may also be necessary to re-
duceground speed and/or run the lawn
mower over the area a second time.
• For extremely heavy cutting, reduce the
width of cut by overlapping previously
cut path and mow slowly.
- For better grass bagging and most cut-
ting conditions, the engine speed should
be set inthe FAST position.
• Pores in cloth grass catchers can be-
come filled with dirt and dust with use
and catchers willcollect lessgrass. To
prevent this, regularly hose catcher off
with water and let dry before using.
• Keep top of engine around starter clear
and clean of grass clippingsand chaff.
This will help engine air flow and extend
engine life.
MULCHING MOWING TIPS
IMPORTANT: For best performance,
keep mower housingfree of built-up
grass and trash. See "CLEANING" inthe
Maintenancesection ofthis manual.
, The special mulching blade willrecut
the grassclippingsmany timesand
reduce them in size so that as they fall
ontothe lawn they witldisperse into
the grassand not be noticed. Also, the
mulchedgrass willbiodegrade quickly
to providenutrientsfor the lawn. Always
mufch withyour highest engine (btade)
speed as this will provide the best recut-
ting action of the blades.
• Avoid cutting your lawn when it is wet.
Wet grass tends to form clumps and
interferes with the mulching action. The
best time to mow your lawn is the early
afternoon. At this time the grass has
dried, yet the newly cut area will not be
exposed to direct sunlight.
• For best results, adjust the lawn mower
cutting height so that the lawn mower
cuts off only the top one-third of the
grass blades. If the lawn is overgrown it
will be necessary to raise the height of
cut to reduce pushing effort and to keep
from overloading the engine and leaving
clumps of mulched grass. For extremely
heavy grass, reduce your width of cut
byoverlapping previouslycut path and
mow slowly.
LMAX1/3
• Certain types of grass and grass
conditionsmay require thatan area be
mulched a second time to completely
hide the clippings. When doing a sec-
ond cut, mow across (perpendicular) to
the firstcut path.
° Change yourcuttingpattern from week
toweek. Mow northto southone week
thenchange toeast to west the next
week. This will he!ppreventmatting and
grainingof the lawn.

MAINTENANCE
SCHEDULE
Check for Loose Fasteners
Clean / inspect Grass Catcher*
Check Tires
lal
_ Check Drive Wheels ""
C_ean Lawn Mower ....
IM C}ean under Drive Cover "*
'0 Check Drive Belt'/F%]Jeys "*"
_t_ Check / Sharpen / Replace Btade
Lubrication ........
Clean and Recharge Battery **
,H,,H,H , ,,
Check Engine Oil level
E Change Engine Oil
N Clean Air Filter
inspect Muffler
E Replace Air Filter Paper Cartridge
Empty fuel system or add S{abilizer
BEFORE AFTER
EACH EACH
USE
i,,'
v"
v"
,1,4
EVERY EVERY EVERY
10 25HOURS 100
USE HOURS OR SEASON HOURS
iiiiiinlllliiiii iiiii i ill II
Ik#_,2
=4
BEFORE
STORAGE
J
J
J
* (if so equipped)
** Etectdc-Start mowers
*** Power-Propelled mowers
**** Use a scraper
to clean under deck
v'
=4
it"
1 - Change more often if operating under a heavy load or in high ouldeor temperatures.
2 - Service more often if operating in dirty or dusty conditions,
3 - Replace blades more often when mowing in sandy soil,
4 - Charge 48 hours at end of season.
5 - And after each 5 hours of use.
GENERAL RECOMMENDATIONS
The warranty on this lawn mower does not
cover items that have been subjected to
operator abuse or negligence, To receive
full value from the warranty, operator must
maintain unit as instructed in this manual
Some adjustments will need to be made
periodically to properly maintain your unit.
At least once a season, check to see if
you should make any of the adjustments
described in the Service and Adjustments
section of this manual.
* At least once a year, replace the spark
plug, clean or replace air filter element
and check blade for wear. A new spark
plug and clean/new air filter element
assure proper air-fuel mixture and help
your engine run better and last longer.
° Follow the maintenance schedule in this
manual.
BEFORE EACH USE
• Check engine oil level
• Check for loose fasteners.
LUBRICATION
Keep unit weltlubricated
(See "LUBRICATION CHART").
LUBRICATION CHART
Wheel
adjuster (on
each wheel)
Engine oil
(_ Rear door
hinge
(_) Handle bracket mounting pins
_ Spray lubricant
See "ENGINE" in Maintenance section,
IMPORTANT: Do not oil or grease plastic
wheel bearings. Viscous lubricants will
attract dust anddirtthat wUlshorten the lifeof
the self-lubricating bearings. Ifyou feelthey
must belubricated, useonly adry',powdered
ographite type lubricant sparingly.
1

LAWN MOWER
Always observe safety rules when per-
forming any maintenance.
TIRES
• Keep tires free of gasoline, oil, or insect
control chemicals which can harm rubber.
• Avoid stumps, stones, deep ruts, sharp
objects and other hazards that may
cause tire damage.
DRIVE WHEELS
Check front drive wheels each time before
you mow to be sure they move freely.
The wheels not turning freely means trash,
grass cuttings, etc. areinthe drive wheel area
and must be cleaned to free drive wheels.
It necessary to clean the drive wheels, be
sure to clean both front wheels.
1. Remove hubcaps, locknuts& washers.
2. Remove wheels from wheel adjusters.
3. Remove any trash or grass cuttings
from inside the dust cover, pinion and/
or drive wheel gear teeth,
4. Put wheels back in place.
NOTE: If after cleaning, the drive wheels
do not turn freely, contact a qualified
service center.
BLADE CARE
For best results, blade must be kept sharp.
Replace a bent or damaged blade.
CAUTION: Use only a replacement blade
approved bythe manufacturer ofyour mower.
Using a blade not approved by the manu-
facturer of your mower is hazardous, could
damage your mowerand void yourwarranty.
TO REMOVE BLADE
1, Disconnect spark plug wire from spark
plug and place wire where it cannot
come in contact with plug.
2. Turn lawn mower on its side. Make
sure air filter and carburetor are up.
3, Use a wood block between blade and
mower housing to prevent blade from
turning when removing blade bolt.
NOTE: Protect your hands with gloves
and/or wrap blade with heavy cloth.
4. Remove blade bolt by turning counter-
clockwise.
5. Remove blade & attaching hardware
(bolt, lock washer & hardened washer).
TO REPLACE BLADE
1. Position blade on the blade adapter
aligning the two (2) holes in the blade
with the raised lugs on the adapter.
2. Be sure the trailing edge ofblade (oppo-
site sharp edge) is uptoward the engine.
3. Install the blade bolt with the lock
washer and hardened washer into
blade adapter and crankshaft. 11
4. Use block of wood between blade and
lawn mower housing and tightenthe
blade bolt, turning clockwise,
Recommendedtighteningtorque:35-40ft.lbs.
IMPORTANT: Blade bolt is heat treated.
If bolt needs replacing, replace only with
approved bolt shown in the Repair Parts
section of this manual.
Bladeadapter Key Crankshaft
bolt washer _ \ "_ _.6- _ elt
Trailingedge Crankshaft retainer
TO SHARPEN BLADE
NOTE: We do not recommend sharpening
the blade - but if you do, be sure the blade
is balanced. Care should be taken to keep
theblade balanced. An unbalanced bladewill
cause eventual damage tomoweror engine.
• The blade can be sharpened with a file
or on a grinding wheel. Do not attempt
to sharpen while on the mower.
• To check blade balance, drive a nail into
a beam or wall. Leave about one inch of
the straight nail exposed, Place center
hole of blade over the head of the nail.
Ifblade is balanced, it should remain in
a horizontal position. Ifeither end of the
blade moves downward, sharpen the
heavy end until the blade is balanced.
GRASS CATCHER
• The grass catcher may be hosed with
water, but must be dry when used.
• Check your grass catcher often for dam-
age or deterioration. Through normal
use it wilt wear. Ifcatcher needs replac-
ing, replace only with approved replace-
ment catcher shown in the Repair Parts
section ofthis manual. Give the lawn
mower model number when ordering.
GEAR CASE
• To keep your drive system working
propedy, the gear case and area around
the drive should be kept clean and free
of trash build-up. Clean under the drive
cover twice a season.
The gearcase is filled with lubricanttothe
proper levelat the factory, The only time
the lubricant needs attentionis ifservice
has been performed onthe gear case.
If lubricantis required, useonlyTexaco
Starplex Premium 1 Grease, Part No.
750369. Do not substitute.

ENGINE
LUBRICATION
Use only high quality detergent oilrated
with API service classification SG-SL
Select the oil's SAE viscosity grade
accordingto your expected operating
temperature.
30 _ 40
TEMPERATURE RAkIGE ANTICIPATED BEFORE N_X'T OIL CHANGE
NOTE: Although multi-viscosity oils
(5W30, IOW30 etc.)improve starting in
coldweather, these multi-viscosityoilswill
resultin increased oilconsumptionwhen
used above 32°F. Check your engine oil
level more frequently toavoidpossible
engine damage from runninglow on oil.
Change the oil after every 25 hours of
operation or at least oncea year if the
lawn mower is not used for 25 hours in
one year.
Check the crankcase oil level before
starting the engine and after each five (5)
hours of continuous use. Tighten oit plug
securely each time you check the oil bevel
TO CHANGE ENGINE OIL
NOTE: Before tipping lawn mower to drain
oil, empty fuel tank by running engine until
fuel tank is empty.
1. Disconnect spark plug wire from spark
plug and place wire where it cannot
come in contact with plug.
2. Remove engine oil cap; lay aside on a
clean surface.
3. Tip lawn mower on itsside as shown
and drain oil intoa suitable container.
Rock lawn mower back and forth to re-
move any oil trapped insideof engine,
6. Stop adding oil when you reach the
FULL mark on the dipstick. Wait a
minute to allow oil to settle.
7. Continue adding small amounts of oil,
rechecking the dipstick until oil level
settles at FULL. DO NOT overfill, or
engine will smoke heavily from the
muffler on startup.
8. Always be sure to retighten oil dipstick
before starting engine.
9. Reconnect spark plug wire to plug.
AIR FILTER
Your engine will not run properly and
may be damaged by using a dirty air
filter, Replace the air filter cartridge every
100 hours of operation or every season,
whichever occurs first. Service air cleaner
more often under dusty conditions.
TO CLEAN AIR FILTER
1. Loosen screw and tilt cover to remove.
2. Carefully remove cartridge.
3. Clean by gently tapping on a flat sur-
face. If very dirty, replace cartridge.
_CAUTION: Petroleum solvents, such
as kerosene, are not to be used to clean
cartridge. They may cause deterioration
of the cartridge. Do not oil cartridge. Do
not use pressurized air to clean or dry
cartridge.
4. Install cartridge, then replace cover
making sure the tabs are aligned with
the slots in the back plate. Fasten
screw securely.
Backplate
Cartridge
Slot
4. Wipe off any spilled oil from lawn
mower or side ofengine.
5. Slowly pouroil downthe oil fill spout,
stopping every few ouncesto check the
oil level withthe dipstick.
Cover
3over tab
MUFFLER
Inspect and replace corroded muffler as it
could create a fire hazard and/or damage.
SPARK PLUG
Replace spark plug at the beginning of
each mowing season or after every t00
hours of operation, whichever occurs
first. Spark plug type and gap setting
are shown in the "PRODUCT SPECIFIC-
12 ATIONS" section of this manual.

CLEANING
IMPORTANT: For bestperformance,
keep mower housingfree of built-grass
and trash. Clean the underside of your
mower after each use.
_I_CAUTION: Disconnect spark plug wire
from spark plug and place wire where it
cannot come in contact with plug.
• Clean the underside of your lawn mower
by scrapingto remove build-up of grass
and trash.
• Clean engine often to keep trash from
accumulating. A clogged engine runs
hotter and shortens engine life.
• Keep finished surfaces and wheels free
of all gasoline, oil, etc.
• We do not recommend using a garden
hose to clean lawn mower unless the
electrical system, muffler, air filter and
carburetor are covered to keep water
out. Water in engine can resutt in short-
ened engine life.
CLEAN UNDER DRIVE COVER
Clean under drive cover at least twice a
season. Scrape underside of cover with
putty knife or similar tool to remove any
build-up of trash or grass on underside of
drive cover.
WARNING: To avoid serious injury,
before performing any service and
adjustments:
1. Release control bar and stop engine.
2. Make sure the blade and all moving
parts have completely stopped.
3. Disconnect spark plug wire from spark
plug and place wire where it cannot
come incontact with plug.
LAWN MOWER
TO ADJUST CUTTING HEIGHT
See "TO ADJUST CUTTING HEIGHT" in
the Operation sectionofthis manual.
REAR DEFLECTOR
The rear deflector,attached between the
rear wheels of your mower, is provided to
minimize the possibility that objects will
be thrown out of the rear of the mower
intothe operator mowing position. Ifthe
deflector becomes damaged, it should be
replaced.
TO REMOVE DRIVE BELT
1, Remove drive cover.
2. Remove belt from gearcase pulley by
pushingdown on armand rollingbelt
off pulley.
3. Turnlawn mower on itsside withair
filter and carburetordown.
4. Remove blade and blade adapter.
PUSH
Drive
cover
TO REPLACE DRIVE BELT
5. Place new drive belt on blade adapter.
6. Route the other end of the new drive
belt through hole in housing.
7. Reinstall blade and blade adapter.
8. Return mower to upright position.
9. Push down on arm, install new belt on
gearcase pulley. Release arm slowly.
NOTE: Always use factory approved belt
to assure proper fit and long tile.
10.Reinstall drive cover.
bolt Hardened
washer
Crankshaft
Belt
edge retainer
13

TO ADJUST HANDLE
The handle can be mounted in a high or
low position. The mounting holes in the
bottom of lower handle are off center for
raising or lowering the handle.
1. Remove upper handle and wire tie(s)
securing cable(s) to lower handle.
2. Remove hairpin cotters from lower
handle bracket mounting pin.
3. Squeeze lower handle in to remove it
from mounting pins.
4. Turn lower handle over to raise or
lower handle.
5. Squeeze lowerhandle in and position
holes onto mounting pins on handle
bracket.
6. Reassemble upper handle and all parts
removed from lower handle.
__ SQUEEZE
TO ADJUST
Lower
_:_ Handle Mounting
bracket Hairpincotter
Mowing r_.? Mowing _-_
position _ position / /
r I t
Hairpin -'_ d'_i /t Handle \ _ / I:;
COtter_/_ l_-'bracket _,.,,_ti ;_
Mounting_ _" _
pm
LOWPOSITION HIGHPOSITION
\
Lower
ROTATE
ENGINE
ENGINE SPEED
Your engine speed has been factory set.
Do not attempt to increase engine speed
or it may result in personal injury. Ifyou
believe that engine is running too fast or
too slow, take your mower to a qualified
service center for repair and adjustment.
CARBURETOR
Your carburetorisnotadjustable. If your
engine does notoperate properly due to
suspected carburetorproblems, take your
lawn mowerto a qualified service center
for repair and/or adjustment.
IMPORTANT: Never tamper with the
enginegovernor, whichisfactory set for
properengine speed, Overspeeding
the engine abovethe factory high speed
setting can be dangerous. Ifyou think
the engine*governedhigh speed needs
adjusting, contacta qualifiedservice
center, whichhas proper equipmentand
experience tomake any necessary adjust-
ments.
Immediately prepare your lawn mower for storage at the end of the season or if the unit
will not be used for 30 days or more.
LAWN MOWER
When lawn mower is to be stored for a
period of time, clean it thoroughly, remove
all dirt, grease, leaves, etc. Store in a
clean, dry area.
1. Clean entire lawn mower (See
"CLEANING" in the Maintenance sec-
tion of this manual).
2. Lubricate as shown in the Maintenance
section of this manual.
3. Be sure that all nuts, bolts, screws, and
pins are securely fastened, inspect
moving parts for damage, breakage
and wear. Replace if necessary.
4. Touch up all rusted or chipped paint
surfaces; sand lightly before painting.
14

HANDLE
"Youcanfold yourmower handlefor storage.
1. Squeeze the bottom ends of the lower
hand[etoward eachother until the
lowerhandleclears the handle bracket,
then movehandleforward.
2. Loosen upper handlemounting bolts
enoughto allow upperhandle to be
folded back.
IMPORTANT: When folding the handle
for storage ortransportation,be sure to
fold the handle as shown or you may dam-
age the control cables.
• When setting up your handle from the
storage position, the lower handle wilt
automatically lock into mowing 3osition.
_,_._,. SQUEF---ZE
_._ TO FOLD
i"
Operator MOWING
POSITION
control bar
FOLD
FORWARE Upper
FOR handle
STORAGE
Handle
knob
Lower handle
ENGINE
FUEL SYSTEM
IMPORTANT: It is important to prevent
gum deposits from formingin essential
fuel system parts suchas carburetor,fuel
filter, fuel hose, ortank duringstorage.
Alcohol blendedfuels (called gasohctor
usingethanol or methanol)can attract
moisture whichleads to separation and
formation of acids duringstorage. Acidic
gas can damage the fuel systemof an
enginewhile instorage.
• Emptythe fuel tank by starting the en-
gine and lettingit run untilthe fuel lines
and carburetor are empty.
• Never use engine or carburetor cleaner
products in the fuel tank or permanent
damage may occur.
• Use fresh fuel next season.
NOTE; Fuel stabilizer is an acceptable
alternative inminimizing the formation of
fuel gum deposits during storage. Add
stabilizer to gasoline in fuel tank or stor-
age container. Always follow the mix ratio
found on stabilizer container. Run engine
at least 10 minutes after adding stabilizer
to allow the stabilizer to reach the car-
buretor. Do not empty the gas tank and
carburetor if using fuel stabilizer,
ENGINE OIL
Drain oil (withengine warm) and replace
with clean engine oil. (See "ENGINE" in
the Maintenance section of this manual).
CYLINDER
1. Remove spark plug.
2. Pour one ounce (29 ml) of oil through
spark plug hole into cylinder.
3. Pull starter handle slowly a few times
to distribute oil.
4. Replace with new spark plug.
OTHER
• Do not store gasoline from one season
to another.
• Replace your gasoline can if your can
starts to rust. Rust and/or dirt in your
gasoline will cause problems.
• If possible, store your unit indoors and
cover it to protect it from dust and dirt,
= Cover your unit with a suitable protec-
tive cover that does not retain moisture.
Do not use plastic. Plastic cannot
breathe, which allows condensationto
form and willcause your unit to rust.
IMPORTANT: Never cover mower while
engine and exhaust areas are still warm.
_,CAUTION: Never store the lawn
mower with gasoline in the tank inside a
building where fumes may reach an open
flame or spark, Allow the engine to cool
before storing in any enclosure.
15

TROUBLESHOOTING - See appropriate section in manual unless directed
PROBLEM
Does not start
to a qualified service center.
CAUSE
Dirty air filter.
Out of fuel.
Stale fuel.
Loss of power
CORRECTION
Water in fuel.
t.
2.
3.
4.
5. Spark plug wire is
disconnected.
6. Bad spark plug.
7. Loose blade or broken
blade adapter.
8. Control bar in released
position.
9. Control bar defective.
10.Fue_valve lever (if so
equipped) in OFF position.
11. Weak battery (if equipped).
12. Disconnected battery
connector (if equipped).
13. Blown fuse (ifequipped).
1, Rear of lawn mower
housing or cutting blade
dragging in heavy grass.
2. Cutting too much grass,
3. Dirty airfilter.
4. BuiJdupof grass, leaves,
and trash under mower.
5. Too much oil in engine.
6, Walking speed too fast.
1, Clean/replace air filter.
2. Fill fuel tank.
3, Empty fuel tank and refill tant_
with fresh, clean gasoline.
4. Empty fuel tank and refill tan],
with fresh, clean gasoline,
5. Connect wire to plug.
6. Replace spark plug.
7. Tighten blade bolt or
replace blade adapter,
8. Depress control bar to
handle.
9. Replace control bar.
10.Turn fuel valve lever
to the ON position.
11.Charge battery.
12.Connect battery to engine,
13.Replace fuse.
1. Raise cutting height.
2. Raise cutting height,
3. Clean/replace air filter.
4. Clean underside of mower
housing.
5. Check oil level,
6, Cut at slower walking speed.
16

TROUBLESHOOTING - See appropriate section in manual unless directed
to a qualified service center.
PROBLEM
Poor cut-
uneven
Excessive
vibration
Starter rope
hard to pull
Grass catcher
not filling
(If so equipped)
Hard to push
Loss of drive
or slowing of
drive speed
.................CAUSE .
1. Worn, bent or loose blade.
2. Wheel heightsuneven.
3. Buildup of grass, leaves
and trash under mower,
1. Worn, bent or loose blade.
2. Bent engine crankshaft.
1,
Engineflywheel brake ison
when controlbar isreleased.
2. Bent engine crankshaft.
3. Blade adapter broken.
4. Blade dragging in grass.
1. Cutting heighttoo low.
2. Lifton blade worn off.
3. Catcher not venting air.
1. Grass is too high or wheel
heightistoo tow.
2. Rear of lawn mower
housing or cutting blade
dragging in grass,
3. Grass catcher too full.
4. Handle height position not
right for you.
1, Belt wear.
2. Belt off of pulley,
3. Drive cable worn or broken.
4. "Loose" drive control system.
CORRECTION
1. Replace blade. Tighten
blade bolt.
2. Set atl wheels at same
height.
3. Clean underside of
mower housing.
1. Replace blade. Tighten
blade bolt.
2. Contact a qualified service
center,
1. Depress controlbar to
upper handle before
pulling starter rope.
2. Contact a qualifiedservice
center.
3, Replace blade adapter.
4. Move lawn mowerto cut
grass or to hard surface.
1. Raise cutting height.
2. Replace blade,
3. Clean grass catcher.
1. Raise cuttingheight.
2. Raise rear of lawn mower
housing one (1) setting
higher.
3. Empty grass catcher.
4. Adjust handle height to suit,
1. Check/replace drive belt.
2. Check/reinstall drive belt,
3. Replace drive cable.
4. Adjust drive control,
17

Reglas de Seguridad ................................ I8-20
Especificaciones def Producto ....................... 20
Monta|e / Pre-OperaciSn ............................... 21
OperaciSn ................................................. 22-25
Programa de Mantenimiento ......................... 26
Mantenimiento .......................................... 26-29
Servicio y Adjustes ................................... 29-30
Almacenamiento ....................................... 31-32
Identificaci6n de problemas ...................... 32-33
Partes de repuesto .................................. 34-37
Garantia ......................................................... 40
IMPORTANTE: Esta maquina cortadaora es
capaz de amputar Ins manos y los manos y
los pies y de lanzar objetos. Si no se observan
las instrueciones de seguridad siguientes se
pueden producir Iesiones graves o la muerte.
_l, Busque este sfmbolo que seSala Ins precau-
ciones de seguridad de importancia. Quiere
decir- iiiATENCIONH! i[iESTE ALERTO!H
SU SEGURIDAD ESTA COMPROMETIDA.
_ILADVERTENClA: Siempre desconecte el
alambre de la bu_[a y pSnga]o donde no pueda
entrar en contacto con la bujfa, para evitar el
arranque por accidente, durante la preparaciSn,
el transporte, el ajuste o cuando se hacen
reparaciones.
_ADVERTENCIA: Los bomes, terminales y
accesorios relativos de la batefia contienen
piomo o compuestos de plomo, productos
qufmicos conocidos en el Estado de California
como causa de cancer y defectos aI nacimiento
u otros daSos reproductivos. Lavar las manos
spu_s de manipularlos.
PRECAUCiON: El tubo de escape deI motor,
a]gunos de sus constituyentes y afgunos com-
ponentes del vehfculo contienen o desprenden
productosqufmicos conocidos en el Estado de
California como causa de cancer y defectos al
nacimiento u otros daSos reproductivos.
_PRECAUCI6N: El sitenciador y otras piezas
del motor llegan a sre extremadamente calien-
tes durante la operacion y siguen siendo cali-
entes despu6s de que el motor haya parado.
Para evitar quemaduras severas, permanezca
lejos de estas _reas.
I. OPERACION
• Antes de empezar, debe familiarizarse
completamente con los contro[es y e[ uso
correcto de la maquina. Para esto, debe leer
y comprender todas ias instrucciones que
aparecen en la maquina yen los manuales
de operaci6n.
° No ponga las manos o los pies cerca o
debajo de Ins partes rotatodas. Mant_ngase
siempre lejos de la abertura de ta descarga.
• Permita que solamente Ins personas re-
sponsabies que est6n familiarizadas con Ins
instrucciones operen la m_quina.
° Despeie el _rea de objetos tales como pie-
dras, juguetes, alambres, huesos, palos, etc.
que pueden set recogidos y lanzados por Ins
cuchiltas.
• Asegt)rese que ef &rea no se hallen per-
sonas, antes de segar. Pare ia m,_quinasi
alguien entra en el area.
° No opere la maquina sin zapatos o con san-
dal}as abiertas. P6ngase siempre zapatos
sSlidos.
, No tire de la segadora hacia atr_s a menos
que sea absolutamente necesario. Mire
siempre hacia abajo y hacia detr_s antes y
mientras que se mueve hacia atr&s.
° Nunca dirigir el material descargado hacia
Ins personas. Evitar descargar material
contra paredes o barreras. El matedal puede
retomar al operador. Para Jacuchilla cuando
se pasa por superficies de grava.
, No opere la segadora sin los respectivos
resguardos, Ins placas, el recogedor de
cesped u otros aditamentos dise ados para
su protecci6n y seguridad.
• Refi6rase a Ins instrucciones del fabricante
para el funcionamiento e instalaciSn de
accesodos. Use t3nicamente accesorios
aprobados por e!fabricante.
- Detenga la cuchitta o Ins cuchiltas cuando
cruce por calzadas, caltes o caminos de
grava.
° Parar el motor cada vez que se abandona el
aparato, antes de limpiar la segadora o de
remover residuos del tubo.
• Apagar el motor y esperar hasta que ins
cuchillas est6n completamente paradas
antes de remover el receptor de hierba.
- Segar solamente con luz dei din o con una
buena Iuz artificial.
• No opere fa maquina bajo la influencia del
alcohol o de Ins drogas.
t8

• Nunca opere la maquina cuando la hierba
est_ mojada. Aseg_rese siempre de tenet
buena traoci6n en sus pies; mantenga el
mango firmemente y camine; nunca corra.
o Desconectar el rnecanismo de propulsibn
aut6noma o el embrague de transmisi6n en
[as segadoras que Iotienen antes de poner
en marcha eI motor.
° Si et equipo empezara a vibrar de una
manera anorrnal, pare el motor y revise de
inmediato para avedguar la causa. Genera[-
mente ]avibraci6n suele indicar que existe
alguna aver{a.
• Siempre use gafas de seguddad o anteojos
con protecei6n lateral cuando opere lasega-
dora.
il. OPERACION SOBRE LAS CUESTAS
Los accidentes ocurren con m_s frecuencia en
las cuestas. Estos accidentes ocurren debido a
resbaiadas o ca{des, las cuales pueden resultar
en graves lesiones. Operar {a recortadora en
cuestas requiere mayor concentraci6n. Si se
siente inseguro en una cuesta, no la recorte.
HACER:
• Puede recortar a traves de la superficie de
la cuesta, nunca hacia arriba y hacia abajo.
Proceda con extreme precauci6n cuando
cambie de direcciSn en las cuestas.
• Renueva todos los objetos extraSos, tales
como guijarros, ramas, etc.
• Debe prestar atenci6n a hoyos, baches o
protuberancias. Recuerde que Iahierba alta
puede esconder obst_culos.
NO HACER:
, No recorte cerca de pendientes, zanjes o
terraplenes. Eloperador puede perder la
tracei6n en los pies o el equilibrio.
• No recorte cuestas demasiado inclinadas.
• No recorte en hierba rnojada. La reducci6n
en Ia tracci6n de la pisada puede causer
resbalones.
ill NI_,IOS
Se pueden producir accidentes tr&gicos si el
operador no presta atenci6n ala preseneia
de los nifios. A menudo, los niSos se sienten
atraidos pot la m&quina y pot la activ{dad de
la siega. Nunca suponga que los niSos van a
permanecer en el mismo lugar donde los vio
por eltima vez.
• Mantenga a los niSos alejados deI &tea de
la siega y bajo el cuidado estdcto de otra
persona adulta responsable.
° Est6alerta y apague la m&quina si hay niSos
que entran a] _rea.
= Antes y cuando este retrocediendo, mire
hacia atr&s y hacia abajo para vedficar sihay
niSospequefios.
• Nunca permita que los ni£=osoperen la m_-
quina,
° Tenga un cuidado extra euando se acerque
a esquinas donde no hay v]sibilidad, a los
arbustos, drboles u otros objetos que pueden
interfedr con su linea de visi6n.
IV. MANEJO SEGURO DE GASOLINA
Usar mucha atenci6n cuando se maneja gaso-
lina. La gasoline es extremamente inflamable y
los vapores son explosivos.
• Apagar todos los cigarrillos,cigarros, pipas y
otras fuentes de ignici6n.
• User solo un contenedor apropiado.
• Nunca quitar el tap6n de Ia gasolina o afiadir
carburante con el motor en marcha. Esperar
que el motor se enfrfe antes de repostar la
gasolina.
• Nunca repostar la mdquina al interiorde un
local.
• Nunca guarder Ia m&quina o el contenedor
de gasolina donde hay una llama abierta,
chispa o luz piioto come una caldera u otros
dispositivos.
• Nunca Ilenar contenedores en un veh{culo, en
un cami6n o caravana con unforro de p!&stico.
Colocar siernpre Ios contenedores en el sueio
lejos de su vehI'culo antes de Ilenar.
• Quitar equipos que funcionan con gasolina
del camibn o caravana y repostar en el
suelo. Si esto no es posible, repostar dicho
equipo con un contenedor portdtil,mds bien
que con una tobera de gaso]ina.
° Mantener la tobera en contacto con el bordo
del dep6sito de carburante o de la apertura
del contenedor siernpre haste terminar el
abastecimiento. No user un dispositivo de
cierre-apertura de Ia tobera.
° Si el carburante cae en la ropa que se ]leva,
cambi_rseia inmediatamente.
• Nunca Uenaren exceso el dep6sito de
carburante. Colocar el tap6n de Ia gasoline y
apretar de rnodo seguro.
19
V. SERVICIO
° Nunca haga funcionar una m_quina dentro
de un _rea cerrada.
• Nunca haga ajustes o reparaciones mientras
el motor est_ en marcha. Desconecte el
cabJe de Ia bujia, y mant6ngalo a cierta
distancia de esta para prevenir un arranque
accidental.
° Mantenga Ias tuercas y los pernos, espe-
ciatmente los pemos del accesodo de la
cuchiUa, apretados y mantenga el equipo en
buenas condicionea.
° Nunca manipule de forrna indebida los
dispositivos de seguridad. Controie regular-
mente su funcionamiento correcto,
• Mantenga la m_.quina libre de hierba, hojas
u otras acumulaciones de desperdicio,
Limpie los derrames de aceite o combustible.
Permita que la m_iquina se enfrie antes de
almacenada.
• Pare e inspeccione el equiposi le pega a un
objeto. Rep&relo, sies necosado, antes de
hacerlo arrancar.
° En ning_n caso hay que regular la altura de
las ruedas mientras el motor est_ en marcha.

, LoscomponentesdeIreceptordeIahierba
vansujetosadesgaste,daSosydeterioro,
quepuedenexponertaspartesenmov-
imientoopermitirqueobjetosseandispara-
dos.Controlarfrecuentementeycuandosea
necesariosustituirconpartesaconsejadas
pore]fabricante.
o Lascuchillasdelasegadoraest_nafiladas
ypuedencortar.Cubrirlashojas o [Ievar
guantes, y utilizar precauciones especiales
cuando se efectL_amantenimiento sobre las
mismas.
• No cambie el ajuste de[ regulador deI motor
ni exceda su velocidad.
o Mantener o sustituir las etiquetas de
seguridad e instrucciones, cuando sea
necesado.
A0iLADVERTENCIA: Este segadora viene equipado con un motor de combusti6n interna y nose
debe usar sobre, o cerca, de un terreno no desarro]lado cubierto de bosques, de arbustos o de
cesped, o menos que el sistema de escape del motor venga equipado con un amortiguador de
chispas que cumpfa con las leyes locales o estatales (si existen). Si se usa un amorliguador de
chispas, el operador debe rnantenedo en condiciones de trabajo eficientes.
En el estado de Califora[a, la ley exige Ioanterior (Secci6n 4442 del "California Public Re-
sources Code"). Otros estados pueden contar con otras leyes parecidas. Las leyes federales
se aplican en la tierras federales.
N_mero de Serie:
Fecha de Compra:
Capacidad y Tipo de Gasotina: 1.6 Cuartos (Regular sin Plomo)
Tipo de Aceite (API SG-SL): SAE 30 (Sobre 32°F); SAE 5W-30 (Debajo 32°F)
Capacidad de Aceite: 20 Onzas
Bujfa (Abertura: .030") Champion RJ19LM o J19LM
Torsi6n dei Perno de la Cuchilla: 35-40 ft. ibs.
El mlmero del nodelo y el de serie se encuentran en Iacalcomania adjunta a la parte trasera
de la caja de Jasegadora. Debe registrar tanto el n_mero de serie come la fecha de compra y
mantengalos en un lugar seguro para refencia en el futuro.
2O

Lea estas instrucciones y este manual completamente antes de tratar de montar u operar su sega-
dora nueva,
IMPORTANTE: Este co_ac_sped viene SINACEtTE O GASOLINA en el motor,
Su segadora nueva ha sido montada en la fdbrica con la excepci6n de aquellas panes qua se de-
jaron sin montar por razones de envfo. Todas ]as partes como Ias tuercas, las arandelas, los pemos,
etc., que son necesarias para completar el montaje han sido colocadas en la bolsa de partes. Para
asegurarse qua su segadora funcione en forma segura y adecuada, todas las partes y los artfculos
de ferreterfa que se monten tienen que set apretados eeguramente. Use [as herramientas correotas,
como sea necesado, para asegurar que se aprieten adecuadamente.
PARA REMOVER LA SEGADORA DE
LA CAJA DE CARTON
1, Remueva las partes sueltas que se incluyen
con la segadora.
2. Corte]asdosesquinasdelosextremosdelacaja
de carten y tienda el panel del extremo pfano.
3. Remueva todo e] matedal de empaque, ex-
¢epto la cuSa entre e] mango superior y el
inferior, y la cuSa qua sujeta la barra de los
controt qua exige la presencia del operador
junto con el mango superior.
4. Haga rodar la segadora hacia afiJera de la
caja de cart6n y revfsela cuidadosamente
para verificar si todavfa quedan partes
sueltas adicionales.
COMO PREPARAR SU SEGADORA
PARA DFSDOBLAR EL MANGO
IMPORTANTE: Despliegue e] mango con
mucho cuidado para no peliizcar o daP,ar los
cables de control.
1. Levante los mangos hasta qua la seccien
de[ mango inferiorse asegure en su lugar,
en la posicien para segar.
2. Remuevala curia protectora, Ievantela secci6n
del mango superior hasta su fugaren elmango
inferior, y apriete ambas manitlas del mango.
3. Remueva Ia cuSa del mango que sujeta Ia
barra de los control qua exige la presencia
del operador junto con el mango superior.
El mango de la segadora puede ajustarse
segt_n le acomode para segar. Refierase a
"AJUSTE DEL MANGO" en la seccien de
Servicio y Ajustes de este manual.
Barrade POSICION
ques×igela PARA
presenciadel SEGAR
operador
PARA MONTAR EL RECOGEDOR OI=
ClaSPED
1. Ponga el baetidor del recogedor de cesped
en la bolsa de[ cesped con la parte rigida
de la boEsaen la parte inferior. Asegdrese
que el mango del bastidor est6 en el exte-
rior de la parte superior de la bolsa.
2, Deslice los sujetadores de vinilosobre el
bastidor.
AVISO: Si los sujetadores de viniio est_n muy
duros, mdtaloe en agua caliente por algunos
minutos. Si se moja la bolsa, d_jela que sa
seque antes de usarla.
Mango del
bastidor del
recogedor
de vinllo deI bastidor
PARA INSTALAR LOS ACCESORIOS
SUsegadora fue enviada lista para usarse
como una aoolchadora de capa vegetal. Para
convertiriade modo que pueda ensacar o
descargar, refi6rase a "PARA CONVERTiR LA
8EGADORA" en la seccien de Operacien de
este manual.
LEVANTAR
Mango
supsdor
Manilla del
mango
Mango Interior
21

FAMILIARICESE CON SU SEGADORA
LEA ESTE MANUAL DEL DUENO Y LAS REGLAS DE SEGURIDAD ANTES DE OPARAR SU
SEGADORA. Compare ]as ilustraciones con su segadora para familiarizarse con ta ubicaci6n de
Ios diversos controfes y ajustes. Guarde este manual para referencia en el futuro.
:::::::::::::::::::::1, = ill i
Estos s{mbolos pueden apareser sobre su segadora o en la Ilteratura proporcionada con el
producto. Aprenda y comprenda sus significados.
AT£ENCI6N O MOTOR MOTOR Rh.P_DO LENTO ESTRANGU COM- ACEITE PELIGRO, GUARDE LAS
ADVERTEktCIA ENGENDIDO APAGADO LACI6N BUSTIBLE MANOS Y LOS PIES LF-.JOS
Barra de
control de la
impu{si6n
Barra de control que exige Ia
presencia del operador
Manilla del mango
Cordon
arrancador
Tapa del deposito de aciete
deI motor con varilla
indicadora de nivel
Recogedor
de c@s
Tapa del deposito
de la gasolina
Bujia
Silenciador
Filtro de
Caja
IMPORTANTE: Este cortac_sped viene SIN ACEITE O GASOLINA en motor.
CUMPLE CON LOS REQUISITOS DE SEGURIDAD DE LA CPSC
de
Ia impulsi6n
la rueda (en
cada rueda)
Las segadoras a motor, que se conducendesde la parte de atr_s, rotatodas, cumplen con los
estAndares de segudd,ad deI American National Standards institute y de la U.S. Consumer Product
Safety Commission. _LPRECAUCION: La cuchilla gira cuando el motor esta funcionando.
I I I I I I I lllllll I l
Barra de control que exlge la presencla del Cord6n arrancador - se usa para hacer ar-
operador - tiene que sujetarse abajo, junto rancar el motor. .-
con el mango, para hacer arrancar el motor. Barra de control de ta impulsion - se usa
Su6ltela para parar el motor, para enganchar la segadora para movimiento
hacia adelante impulsada a motor,
22

La operaci6n de cualquier
segadora puede hacer que .
salten objetos extrafios dentro de
sus ojos, Io que puede producir
dafios graves en _stos. Siempre
use anteojos de seguridad o protecci6npara
los ojos mientras opere su segadora o cuando
haga ajustes o reparaciones. Recomendarnos
galas o una mascara de seguddad de visi6n
amplia de seguridad usada sobre las galas.
COMO USAR SU SEGADORA
VELOCIDAD DEL MOTOR
La velocidad del motor se estabbci6 en la fd_
brica para un rendimiento 6ptimo. La velocidad
no se puede ajustar.
CONTROL DE ZONA DEL MOTOR
_, PRECAUCI(_N: Las regulaciones federales
exigen que se instaleun control para el motor
en esta segadora para reducir a un mfnimo el
riesgo de lesionarsedebido al contacto con la
cuchilla. Per ning0n motive trate de eg[minar
la funci6n deI controldeI operador. La cuchilla
gird cuando el motorest&funcionando.
• Su segadora viene equipada con una barra
de controlesque exigen la presencia del
operador, 1oque requiere que el operador
estd detr&s deI mango de la segadora para
hacerla arrancar y operarla,
PARA EL IMPULSION
• Para comenzar [a marcha hacia adelante,
tevantar ta barra de mando hasta el mango.
• Para parar el movimiento hacia ade]ante,
alivie [a barra de control de la impulsi6n.
IMPORTANTE: Durante la utilizaci6n, guarde
siempre la barra de control de ta impulsion en
contra del mango.
Barra con contmt
que exige la
presencia det
operador
CONTROL DE LA IMPULSI6N ENGRANCHAR
CONTROL DE LA IMPULSION DI=SENGANCHADO
PARA AJUSTAR LA ALTURA DE CORTE
Levante tas ruedas para el corte bajo y baje las
ruedas para el cortealto,, ajuste ta altura de
corte para que se acomode a sus requisites. La
posici6ndeI medio es la mejor para la mayoda
de los c6spedes.
• Para cambiar Ia altura de corte, empuje la
palanca del ajustador hacia la rueda. Mueva
{a rueda hacia arfiba o hacia abajo de mode
que se acomode a sus requisites.Asegdrese
que todas Ias ruedas queden igualmente
ajustadas.
AVISO: El ajustador esta correctamente
colocadocuando las orejas de Ia placa est&n
insertadas en el agujero clefmango. Tambi_n,
los ajustes de 9 posiciones(si equipado) per-
miten que el mango pueda ser movido entre las
orejasde ta placao
PALANCAHACIAATRAS Mango
PARABAJARELCORTACESPED _,,dlb,
PALANCA-_ v
HACIA
ADELANTEPARALEVANTARELCORTACESPED
PARA MONTAR Y ADJUNTAR EL RECOGE-
DOR DE CESPED
1. Levante la puerta trasera del cortacdsped
y colocar los ganchos del armazon de ta
recolectora de hierba en los pasadores del
quiciode la puerta.
2. Et recogedorde c_sped queda asegurado
en la caja de lasegadora cuandose baja ta
puerta trasera para descansaren el basti-
_dor del recogedor de c_sped.
PRECAUCION: No haga funcionar su sega-
dora sin el planco o tap6n de la acolchadera,
el desviador de recortes o sin el recogedor de
eL=sped,aprobados, en su lugar, Nunca trate de
operar Ia segadora cuando se ha removido Fa
puerta trasera o cuando est& un poco abierta.
Pasador del ( " " Puerta Mango deI
bastidor del
recogeder de
c6sped
Gancho lateral
bastidor del recogedor
23

PARA VACIAR EL RECOGEDOR DE ClaSPED
1. Levante el recogedor de c_sped usandoel
mango del bastidor.
2. Remueva el recogedor de c_sped, con los
recortes, de debajo deI mango de ta sega-
dora.
3. Vacfe los recortes de la bolsa.
AVISO: No arrastre la bolsa cuando la vac[e;
se producir_ un desgaste innecesario.
/ "_, Mangodel
l_ _[_\_ bastidordel
_--_'_-.'_'_"__-.-"_. _J_=) recogedor
de c_sped
PARA CONVERTIR LA SEGADORA
Su segadora fue enviada lista para usarse
como acolchadora de capa vegetal. Para con-
vertir ]a a una operaci6n de ensacado:
* Abra la puerta trasera y remueva Ia tap6n
acolchadora. GuArdela en un lugar seguro.
, Ahora puede instalar el recogedor o el des-
viador de recortes opoional.
° Para volver a la operaci6n de acolchamiento
o descarga, el tap6n acolchador en Iaaber-
il_tura de desc.arga de la segadora.
REOAUGION: No haga funcionar su sega-
dora sin el tap6n de la acolchadera, el desvia-
dot de recortes o sin el recogedor de c6sped,
aprobados, en su Iugar. Nunca trate de operar
la segadora cuando se ha removido Ia puerta
trasera o cuando est& un poco abierta.
_,PRECAUCI6N: NO sobretlene el motor con
aceite, o fumar_ pesa demante del silenciador
cuando Io vatla a arrancar.
1. AsegQrese que la segadora est6 nivelada.
2. Remueva la varilamedidora deaceite deItubo
de desarga de aceite.
3. Usted recibe un envase de aoeite con la
unidad. Vierta lentamente el envase entero
de aceite en el tubo de relleno del motor.
AVISO: El terrap!_n {nicialdel aceite requiere
solamente 18 onzas debido al aceite residual
en el motor de ta prueba de calidad de 100%
del fabdcante. A] cambiar el aceite puede
necesitar 20 onzas.
4. Inserte y apriete la varilla medidora de aceite.
IMPORTANTE:
• Revise el nivel del aceite antes de cada uso.
Agregue aceite si es necesado. Llene hasta ta
Ifnea de lleno en Ia varil]a medidora de niveL
° Cambie el aceite despu6s de 25 horas de
operaci6n o una vez por temporada. Puede
necesitar cambiar el aceite rods a menudo
cuando las condiciones son polvorosas o su-
cias. Vea "PARACAMBIAR ELACEITE DEL
MOTOR" en la seccion de Mantenimiento de
este manual.
deposito
de aceite
Tapa del
relIenador
ANTES DE HACER ARRANCAR EL
MOTOR
AGREGUE ACE|TE
Su segadora rue enviada sin aceite en el motor.
Para el tipo y elgrado del aeeite a utilizar,yea
el"MOTOR" en Iaseccibn del Mantenimiento de
AGREGUE GASOLINA
° Llene el estanque de combustible hasta
Ia parteinferior del cuellode relleno del
estanque de gasolina. No Io llene demasiado.
Use gasolina regular, sin plomo, nueva y lim-
pia con el mi'nimo de 87 octanos. No mezcle
el aceite con la gasolina. Para asegurar
que la gasolina utilizada sea fresca compre
estanques los cuales puedan ser utilizados
_durante los primeros 30 dfas.
PREOAUCION: Limpie el aceite o el
combustible derramado. No almacene, derrame
o use gasolina cerca de una llama expuesta.
• I,PRECAUCI6N: Los combustibles
rnezclados con alcohol (conocidos como
gasohol, o el uso de etanol o metanoI) pueden
atraer la humedad, la que conduce a la
separaci6n y formaci6n de _,cidos durante el
almacenamiento. La gasolina acfdica puede
daSar el sistema del combustible de un motor
durante el almacenamiento. Para evitar los
problemas con el motor, se debe vaciar el
este manual, 24

sistemadelcombustibleantesdeguardado
potunperfodode30diasom_s.Vacfeel
estanquedelcombustible,hagaarrancarel
motoryh&galofuncJonarhastaqualaslineas
delcombustibleyelcarburadorquedenvaci'os.
Lapr6ximatemporadausecombustiblenuevo.
VeataslnstruccionesParaElAlmacenamiento
paramasinformaci6n.Nuncauseproductosde
limpiezaparaelmotoroparaelcarburadoren
elestanquede]combustiblepuessepueden
producirdaSospermanentes.
PARAPARAR EL MOTOR
. Para parar el motor, suelte la barra de con-
troles qua exigen lapresencia deI operador.
PARA HACER ARRANCAR EL MOTOR
AVISO: Debido alas capas protectoras del mo-
tor, una cantidad pequeSa de humo puede es-
tar presente durante el uso inicia] dei producto
y se debe considerar normal.
AVISO: Su motor viene equipado con un
sistema de estrangulaci6n autom_tico. No
requiere ser cebado o obturado antes de
arrancar.
• Para hacer arrancar un motor, sujete la barra
de controles que exigen la presencia del
operador abajo en el mango y tire el mango
del arrancador r&pidamente. No permita que
el cord6n arrancador se devuelva abruptam-
ente.
CONSEJOS PARA SEGAR Y ACOL-
CHAR
|MPORTANTE: Para obtener el major
rendimiento mantenga Iacaja de Ia segadora
sin acumulacion de cesped y basura. Vea
"LIMPIEZA" en ta seccion de Mantonimento de
este manual.
• La cuchi[Ia acolchadora especial va a volver
a cortar los recortes de cesped muchas
races, y los reduce en tamaSo, de modo qua
si se caen en el c_sped se van a dispesar
entre 6ste y no se van a notar. Tambi_n, el
c_sped acoichado sova a deshacer r&pidam-
ante entregando substancias nutritivas para
el c6sped. Siempre acolche con la velocidad
del motor (cuchiUa) mas alta, pues asf se
obtendr& la major acci6n de recorte de las
cuchillas.
• Evite cortar el c_sped cuando est_ mojado.
El c6sped mojado tiende a formar montones
e inteffiere con la acci6n de acolchado.
La mojor hora para segar el c_sped es
ternprano en la tarde. A esa hora _ste se ha
secado y el _rea roci6n cortada no quedar&
expuesta aIsol directo.
• Para obtener los mejores resultados, ajuste
ta altura det corte de la segadora de modo
qua _sta corte solamente el tercio superior
de las hojas de c_sped, En el caso de que el
cesped haya crecido demasiado, puede ser
necosario el elevar la a[turadet corte para
reduoir el esfuerzo necesado para empujar la
segadora y para evitar sobrecargar el motor,
dojando montones de recortes de c6sped,
Para un cesped muy pesado, reduz'ca el an-
cho del corte pasando por encima del lugar
anteriormente cortado y siegue lentamente.
_I_ONSEJOS PARA SEGAR
RECAUCION: No uti[izardispositivos anti-
paja de la hoja en la segadora ya qua estos
accesodos son peligrosos, pueden da_ar su
segadora y anular su garant|a.
• Bajo ciertas condiciones, tal como c_sped
muy alto, puede set necesario el elevar Ia
altura del corte para reducir el esfuerzo
necesario para empujar la segadora y para
evitar sobrecargar el motor, dejando mon-
tones de recortes de c6sped. Puede que sea
necesario reducir la velocidad deerecorrido
y!o haga funcionar la segadora sobre el &tea
pot segunda vez.
• Para un corte muy pesado, reduzca el ancho
def corte pasando parcialmente por encima
de[ lugar anteriormente cortado y siegue
lentamente.
• Para un mejor ensacado del c_sped y para la
mayoria de las condiciones de corte, Iavelo-
cidad del motor debe ajustarse a la posici6n
de RAPIDO.
• Los poros en los recogedores de c_sped do
tela pueden Ilenarse con mugre y polvo con
el uso y los recogedores recaudar,_n menos
c_sped. Para evitar _ste, rocie el recogedor
con la manguera de agua regularmente y
d_jelo secarse antes de usado.
• Mantenga la parte superior del motor, alred-
edor del arrancador, despejada y sin recortes
de c_sped y paja, Esto ayudar& el flujo del
aire del motor y extender,_su duraci6n.
25
MAX 1/3
• Ciertos tipos de c6sped y sus cond!ciones
pueden exigir que un &rea tenga queser
acolchada pot segunda vez para esconder
compietamente los recortes. Cuando se haga
el segundo code, siegue atravesado (an
forma perpendicular) a la pasada del primer
corte.
* Cambie su patr6n de corte de semana a
semana. Siegue de norte a sur una semana
y luego cambie de este a oeste la pr6xima
semana. Esto evitar& qua et c_sped se
enrede y cambie de direcci6n.

PROGRAMA DE
MANTENIMIENTO
illll ii
Flev_sar si hay Slljetadores Su_ltos
S Limpiar/inspeccionare.IR_cogedordeC_.sped*
E ConVolar los Neum_,ticos
G Conlrolar la5 Ruecras MotricBs --*
A =
'=Limpiar Ia Segadora ....
D Lirnpiar debaio a Gubieria de _aTtansrnisiSn ***
0 Revisar lasCorreas y Ias Poleas Impulsa'das**"
a R_visar / Atilar / Gambiar {a Cuchilla
IA LtlbricacIbn
Limpiar ! RecaKJar Ia Bateria "*
,,,,,
Revisar el niveI del A;e_te
a Cambiar €,t Ace[te del motor,
O Lirnpiar el FJltro de Ake
T |nspecc;onar el Silenciader
O Carnbiar la Buj_a
R Carnbiar el Gattucho'de Papsl det F_ltro de Aire
Vaciar el sistema de! carburante
o a_,adir un eatabiIizador de carbutante,
DESPUES CADA " CADA ANTESDE_
DE CADA DECADA 10 25HORASO 100 ALMACE-
USO USO HORASTEMPORADAHORAS NAMIENTO
i ill
v/ .... v'
=/ i/ ....=/
v'
v'
,,,,, ,,
v_
if '"V_
v'
v'
v'
v'
vS
v'
...._,,,,
v'
v'
,,,, illl
* (si vlene equlpado} 1 • Cambiar m#_s a men,do cuando se opere ba_o ca_a pe_da o en ambientes can alias tempetattJras.
*_ Seg_dorat, con Alranque Er_ctr_o _' _ Dar ,_P_rvi¢_3m_ a m_r_udo cua.Ndo _ opere en _ondi_Iot_r_e, suc_as o p¢_votos_.
*** Segadoras con Pod_t Proputsor 3 - Cambie las _;Ltchillas mb,_, a m_nudo cuan_ a_egue erl te_eno _a'enaso.
*'k_* Utilizer =Jna rasq_a _ para Iimpiar 4 - Catgalt po_ 48 k0ra8 al fi_ de la _empor_da.
deb_o de la c_bierta dei _:orla¢_spr=d 5 - Y da_pues de 5; horas de f_,fncionam_o.
RECOMENDACIONES GENERALES
La garant_a de esta segadora no cubre los
articulos que han estado sujetos al abuso o a
la negligencia del operador. Para recibir todo
el valor de la garant{a, el operador tiene que
mantener la segadora segSn las instrucciones
descritas en este manual.
Hay algunos ajustes que se tienen que hacer
en forma peri5dica para poder mantener su
unidad adecuadamente•
AI menos una vez eada estaci6n comprobar
si es necesado efectuar los ajustes descdtos
en las seceiones de Servicio y Ajustes de este
manual.
• Una vez al aSo, cambie ta bujia, _impieo
cambie el elemento def filtrode aire y revise
si Ia cuchi{la est_ desgastada. Una buj{a
nueva y un elemento del fiitro de aire limpioi
nuevo aseguran la mezcla de aire-com-
bustible adecuada y ayudan a que su motor
funcione mejor y que dure mas.
• Siga el programa de mantenimiento en este
manual.
TABLA DE LUBRICACION
_) Ajustador
de la rueda
(_ Aceite del
motor
(_) Bisagra
de la
puerta
traser
_) Clavija de montaje deI puntaI de] mango
ANTES DE CADA USO
• Revise el nivel del aceite del motor,
- Revise si hay sujetadores sueltos.
LUBRICACION
Mantenga la unidad bien _ubricada
(yea la 'q-ABLA DE LUBRICACION").
(_ Rocle el lubricante
(_) Vea "MOTOR" en la section de Mantenimiento
IMPORTANTE: No aceite o engrase los roda-
mientos de la rueda de plastico. Los lubricantes
viscosos atearan polvo y mugre, Io acortara la
duracion de los rodamientos autolubricantes. Si
cree que tienen que lubricarse, use ]osamente
un lubricante tipo crafito, de polvo seco, an
forma moderada.
26

SEGADORA
Siempre observe las reglas de seguddad cu-
ando haga el mantenimiento.
LLANTAS
* Mantenga las llantas sin gasolina, aceite o
substancias qufmicas para control de insec-
tos que pueden daP,ar la goma.
o Evite los tocones, las piedras, Iasgfletas pro-
fundas, los objetos afilados y otros peligros
que pueden dafiar a Ias tlantas.
RUEDAS DE IMPULS]6N
Revise las ruedas de impulsi6n delanteras cada
vez antes de segar, para asegurarse de que se
mueven libremente. Si las ruedas no giran li-
bremente quiere decir que hay basura, recortes
de c_sped, etcoen el _rea de Ias ruedas de
impu]si6n y tienen que Iimpiarse para tiberarlas.
Es necesario Iimpiar las ruedas de impulsi6n;
revise ambas ruedas delanteras.
I. Remueva los tapacubos, las tuercas de
seguridad y las arandelas.
2. Remueva Ias ruedas de los ajustadores de
las ruedas.
3. Remueva la basura y los recortes de
c6sped de dentro de la cubierta contra
el polvo, pi56n y!o de los dientes de los
engranajes de las ruedas de impulsi6n.
4. Ponga las ruedas de vuelta en su lugar.
AVISO: Si despu_s de timpiar las ruedas de
impulsi6n no giran Iibremente, p6ngase en con-
tacto con su centro de servicio cualificado.
CUIDADO DE LA CUCHILLA
Para obtener los mejores resu[tados, la cuchilla
de la segadora tienen que mantenerse afilada.
Gamble la cuchilladoblada o da_ada.
_PRECAUCI6N: Usar solamente la hoja
de repuesto aprobada por el fabricante de su
cortac6sped. Usar una hoja no aprobada por el
fabdcante de su cortac_sped es peligroso, pu-
erie da_ar su cortac_sped y anular su garantia.
PARA REMOVER LA CUCHILLA
1. Desconecte el alambre de la bujfa y p6n-
galo en donde no pueda entrar en contacto
con _sta.
2. Haga descansar la segadora en su lado.
AsegSrese que el filtro de aire y que el
carburador queden mirando hacia ardba.
3. Use un bloque de madera entre la cuchilla
y [acaja de la segadora para evitar que la
cuchilla gire cuando se le quite el pemo.
AVISO: Proteja sus manos con guantes y/o
envuelva la cuchilla con una tela gruesa.
4. Remueva el perno de la cuchilla girdndolo
en el sentido contrado en que giran ]as
manillas del reloj.
5. Remueva Ia cuchilla y los art[culos de fer-
reteria adjuntadores (el perno, laarandela
de seguddad y la arandela endurecida).
27
AVISO: Remueva el adaptador de la cuchilla y
revise elcubo interior de la ranura del adap-
tador de la cuchilla. La ranura tiene que estar
en buenas condiciones para que funcione en
forma adecuada. Cambie e[ adaptador si estd
dafiado.
PARA CAMBIAR LA CUCHILLA
1. Ponga et adaptador de la cuchilla en el
ciguefial del motor. Aseg_rese que ta
ranura del adaptador y que el chavetero deI
cigue_al estdn alineados.
2. Ponga la cuchilla en el adaptador de 6sta
alineando los dos (2) agujeros en la cuchilla
con las salientes elevadas en el adaptador.
3. Asegdrese de que el borde de salida de
la cuchilta (opuesto at borde afilado) est_
hacia ardba hacia el motor.
4. Instale el perno de la cuchilla con la aran-
dela de seguridad y la arandela endurecida
en el adaptador de la cuchilia y el ciguefial.
5. Use un bloque de madera entre la cuchilla
y la caja de la segadora y apriete el perno
de la cuchillagirdndolo en el sentido en que
giran las manitlas del reloj.
° La torsi6n para apretar recomendada es de
35 - 40 pies libras.
IMPORTANTE: Et perno de la cuchilla es
tratado a calo. Si es necesario sustituir los
pernos, sustituirlos s6lo con pernos aprobados
mostrados en la secci6n Partes de Reparaci6n
de este manual.
Adaptadorde Ranura
la cuchilla
do (( ;
Chaveterodel
ciguenaI
_nal decorrea
PARA AFILAR LA CUCHILLA
AVISO: NO recomendamos el afilar la cuehilla
- pero si to hace, aseg_rese de que quede
balanceada. Se tiene que tener cuidado de
mantenerla balanceada. Una ouehilla que no
estd balaneeada va a producir eventuatmente
daSo en la segadora o en el motor.
• La cuchilla puede afilarse con una lima o en
una rueda rectificadora. No trate de afilarla
mientras se encuentra en la segadora.
• Para revisar et balance de la cuchifla, clave
un clavo en una viga o en la pared. Deje
alrededor de una putgada de un clavo recto
expuesto. Ponga el agujero central de la
cuchilla sobre la cabeza del clavo.Si ]a
cuchilla estd balanceada debe permanecer
en Ia posiei6n horizontal. Si cualquiera de
los extremos de la ouchillase mueve hacia
abajo, afile el extremo pesado hasta que
_sta quede balanceada.

RECOGEDORDEClaSPED
- El recogedor de cesped puede ser rociado
con el agua de Ia manguera pero tiene que
estar seco cuando se vaya a user.
• Revise su recogedor de cesped a menudo
para verificar siestA dadado o deteriorado.
Se va a desgastar con el use normal. Si se
necesita cambiar el recogedor, c#,mbielo
solamente por uno que sea aprobado por el
fabricante. De el ndmero deI modelo de la
segadopa cuando Io ordene.
1. Desconecte el alambre de la bujfa y
pdngalo de modo que no pueda entmr en
contacto con 6sta.
2. Remueva ta tape del depdsito del aceite;
d_jela a un lado en una superficie Iimpia.
3. Incline la cortadora de c_sped por este
costado tat como se muestra y purgue el
aceite en un recipiente [ddneo. Mueva Ia
segadora de atrAs pare adelante pare re*
mover todo el aceite que se haya quedado
atrapado dentro deI motor.
CAJA DE ENGRANAJES
• Pare mantener elsistema de impulsidn
funcionando en forrna adecuada, la caja
de engranajes y el Area alrededor de la
impulsidntienen que mantenerse Iimpias y
sin acumulacidn de besura. Limpie debajo
de Ia cubierla de la impulsidn dos veces por
temporada.
• La caja de engpanajes se tlena con Iubdcante
haste et nivet edecuedo en la f_brica. La
5nica vez que el lubricante necesita atencidn
es cuando se le ha prestado servicio ata
caja de engranajes.
- Si se necesita lubricante, use sotamente
Grasa Texaco Starplex Premium 1, Parle No.
750369. No use substitutos.
MOTOR
LUBRICACtON
Use solamente aceite de detergente de alta
calidad clasificado con !e cJasfficacidn SG-SL
de servicio API, Seleccione la catidad de visco-
sided SAE segen su temperature de operacidn
esperada.
GALIDADES DE VISCOSIDAD DE SAE
4. Limpie todo el aceite derramado en la sega-
dora yen el lado del motor.
5. Echar aceite despacio en el conducto del
aceite, parAndose a intervalos regulates
pera controlar el nivel de! aceite con la
varilla.
6. Perar de aRadir aceite cuando se alcanza la
sedal de Ileno (FULL) en la varilla. Esperar
un minuto pare dejar que el aceite se ar-
regle.
7. Contin0e agregando cantidades pequeas
de aceite y vuelva a inspeccionar la varitla
medidora settles del nivel de aciete en lleno
(FULL). NO sobrellene el motor con aceite,
o fumarA pesa demante del silenciador
cuando Io valla a arrancar.
8. AsegOrese de apretar la varilla medidora
deI aceite antes de arrancar el motor.
9. Vuelva aconectar el alambre de la bujfaa _sta.
AVISO: A pesar de que los aceites de multi-
viscosidad (5W30, 10W30, etc.) mejoran el
arranque en clima frio, estos aceites de mul-
tiviscosidad van ha aumentar el consumo de
eceite cuando se usan en temperaturas sobre
32° F. Revise el nivel deI aceite del motor mas
a menudo, pare evitar un posible dado en el
motor, debido a que no tiene suficiente aceite.
Cambie el aceite despuds de 25 horas de
operacidn o por lo menos una vez al ado si la
segadopa se utilize menos 25 horas el ado.
Revise el nivel del aceite del carter antes de
arrancar el motor y despuds de cada cinco (5)
horas de uso continuado. Apriete el tapdn del
aceite en forma segura cada vez que revise el
nivel del aceite.
PARA CAMBIAR EL ACEITE DEL MOTOR
AVISO: Antes de inclinar Ia segadora pare tire-
nat el aceite, drene el tanque de combustible
haciendo cotter el motor haste que el tanque
est6 vacio.
28
FILTRO DE AIRE
Su motor puede sufrir averfas y funcionar de
manera incorrecta con un filtro del aire sucio.
Sustituir el papel del cartucho una vez al ado
o tres 100 horas de funcionamiento, m_.sa
menudo si se utiliza en condiciones de sucie-
dad y polvo particulates.
PARA LIMPIAR EL FILTRO DEAIRE
1. Suelte el tornillo e incline la cubierta para
removerlo.
2. Cuidadosamente, remueva el cartucho.
3. Lfmpielo golpeAndolo suavemente en una
superficie plane. SiestA muy sucio cambie
el cartucho.
,_PRECAUCIdN; Los solventes de petrdleo,
tales como el keroseno, no se deben user papa
Iimpiar el cartucho. Pueden producir el deteri-
oro de _ste. No aceite et cartucho. No use aire
a presidn para Iimpiarlo o secarlo.
4. Instale el cartucho, Iuego vuelva a poner la
cubierta asegur_ndose que tas orejas est_,n
alineadas con Ias tenures en la plancha
trasera. Apriete el tomillo en forma segura,

Labio Plancha trasera
Cartucho
(_ejas de
Iacubierta
SILENClADOR
Inspeccione y cambie et silenciador si est_
corrofdo puede producir un peligro de incendio
y/o dafio.
BUJfA
Cambie et buj[a al comienzo de cada tempo-
rada de siega o despu_s de cada 100 horas
de operaciSn, 1oque suceda primeroo El tipo
de bujfa y el ajuste de la abertura aparecen en
"ESPECIFICACIONES DEL PRODUCTO" en la
secciSn de Mantenimiento de este manual.
LIMPIEZA
IMPORTANTE: Para obtenerel mejor
rendimineto, mantenga la caja de la segadora
sin acumulacion de cesped y basura. Umpie
la parte de abajo de su segadora despues de
cada uso.
_PREOAUCl6N: Desconecte el alambre de
la bujfa y pSngalo en donde no pueda entrar en
contacto con _sta.
• Haga descansar la segadora en su lado,
AsegL_reseque el filtro de aire y que el car-
burador queden mirando hacia arriba. Umpie
ta parte inferior de su segadora rasp_ndola
para remover la acumulacibn de c_sped y
basura.
• Limpie el motor a menudo para evitar que
se acumule ta basura. Un motor tapado fun-
ciona m_s caliente y se acorta su duraci0n.
• Mantenga Ias superficies pulidas y tas rue-
das sin gaso]ina, aceite, etc.
• No recomendamos el uso de una manguera
de jardfn para limpiar la segadora a menos
que el sistsma eldctdco, el silenciador,el
filtro de aire y el carburadorest6n tapados
para evitar que lesentre el agua. El agua en
el motor puede acortar laduraci6n de _ste.
LIMPIE DEBAJO DE LA CUBIERTA DE LA
IMPULSION
Limpie debajo de la cubierta de la impulsi6n
por Io menos dos veces cada temporada.
Rasps debajo de Ia cubierta con un cuchitlo
para masilla o con una herramienta parecida,
para remover toda acumulaci6n de edsped o
basura en la parte inferior de la oubierta de la
impulsiSn.
_ADVERTENCIA: Para evitar lesi6nes serias,
antes de darcalquier servicoo de hacer
ajustes:
1. Suelte la barra de control y pare el motor.
2. Aseg_rese qua ta euchillay que todas las
partes moviblss se hayan detenido comple-
tamente.
3. Desconecte et alarnbre de la bujfa y p6n-
galo en donde no puedaentrar en contacto
con _sta.
SEGADORA
PARA AJUSTAR LA ALTURA DE CORTE
Yea "PARA AJUSTAR LAALTURA DE CORTE"
en la secci6n de Operaei6n de este manual,
DESVIADOR TRASERO
Se proporoionaun desviador trasero, adjunto
entre las ruedas traseras de su segadora, para
reducir a un minimo ]a posibilidad que objetos
scan Ianzados hacia afuera de la parts trasera
de la segadora, en la posici6n en donde se
encuentra el opsrador. Si se daha el desviador
debe cambiarse.
29

PARA REMOVER CORREA DE IMPULSI(3N
t. Remueva la cubierta de la impulsibn.
2. Remueva la correa de la polea de Ia caja de
engranajes empujando hacia abajo.
3. Haga descansar Iasegadora en su lado
con el filtro de aire y el carburador mirando
hacia arriba.
4. Remueva la cuchilla y la adaptador de la
cuchilla.
PARA CAMBJAR CORREA DE iMPULSION
5. Colocar la nueva correa de mando en la
adaptador de la cuchilla.
6. Colocar la otra extremidad de Janueva
correa de mando a trav6s deI orificio en el
bastidor,
7. Reinstale la cuchilla y la adaptador de la
cuchilia.
8. Vuelva la segadora a taposici6n vertical,
9. Empujando hacia abajo a instale la correa
nueva a Ia polea de lacaja de engranajes,
NOTA: Siempre use la correa aprobada por fa
f&brica para asegurarse que calce y dure.
10. Reinstale Ia cubierta de la impuisi6n.
EMPUJAR
_w- APRIETE
PARAAJUSTE
Mangoinferior
L_puntal
_'del mango Clavijade horquilla
Posici6n Posiei6n r_
segar / /
, ,
I /
Clavija
de horquilla
C{avija de,
montaj
POSICION BAJA
POSICION ALTA
Cubierta de
la impulsion
Polea"
Adaptador de Ranura
la cuchilla _
Arandelade "t_a_'_/! !'N
seguridad _ \&_(tJ
dela endurecida \\ \
cuchilla Boerdd_ satida"
_Re_te_nc_i6n--_d e_correa
PARA AJUSTAR EL MANGO
Elmango puede ser montado a una posici6n
alta o baja. Los agujeros de montaje en ei
mango inferiorestdn fuera del centro para
Ievantar y bajar el mango.
1. Remueva el mango superior y conexi6ne(s) el
asegurar 61(los) cable(s) a] mango inferior.
.2. Remueva las clavijas de horquilla de Ja
clavija de montaje deI puntal del mango.
3. Apreite el mango inferior hacia dentro para
removerlo de las clavijas de montaje.
4, Gire el mango inferior por encima para
Ievantar o bajar el mango.
5. Vuelva a montar las clavijas de horquilla pot
encima de las clavijas de montaje.
6. Vuelva a montar el mango superior y todas
las partes removidas deI mango inferior.
\
\
Mango
GIRAR
MOTOR
VELOCIDAD DEL MOTOR
La velocidad del motor ha sido ajustada en Iaf_-
brica. Notrate de aumentar Iavelocidad del motor
pues se pueden produoir lesiones personales. Si
cree que el motor est,. funcionando demasiado
r&pido o demasiado lento, tleve su segadora a
mas con su centro de servicio cualificado.
CARBURADOR
Su carburadortiene un chorroprincipalfijo no
ajustab]epara eontrolar la mezcla. Si su motor
no est,. funcionandoen forma adecuada de-
bido a problemas que se sospecha vienendel
carburador,Ileve su segadora a contactocon
su centro de servicio cualificado para reparada
y/o ajustada.
IMPORTANTE: Nunca manipule el regulador
del motor, el que ha sido ajustado en laf_brica
para la velocidaddel motor adecuada, Puede
ser peligroso hacerfuncionar e{ motora una
velocidad pot sobre eJajuste de alia velocidad
de la f_brica. Si cree que ta velocidadalta
regulada del motor necesita ajuste,contacto
consu centro de servicio cualificado, el que
cuenta con el equipo adecuado y la experien-
30 cia para hacer los ajustes necesados.

Inmediatamente prepare su segadora para el atmacenamiento al final de cada temporada o sila
unidad no se va a usar pot 30 dias o m&s.
SEGADORA
Cuando se va a guardar la segadora pot cierto
periodo de tiempo, lfmpiela euidadosamente,
remueva toda Ia mugre, la grasa, las hojas, etc.
Gu&rdela en un _rea limpia y seca.
i. Limpie toda la segadora (Yea "L1MPIEZA"
en la secci6n de Mantenimento de este
manual).
2. Lubr{quela seg_n se muestra en la secci6n
de Mantenimento de este manual.
3. Aseg_rese de que todas Ias tuercas y
clavijas y todos los pemos y tornillos esten
apretados en foma segura, inspeccione
las partes que se mueven para vefificar si
est_n daSadas, quebradas o desgastadas.
C&mbielas si es necesario.
4. Retoque todas las superficies que est_n
oxidadas o con la pintura picada; use una
lija antes de pintar.
MANGO
Puede doblar el mango de su segadora para el
almacanamiento.
1. Apriete los extremos inferiores del mango
inferior entre sf hasta que et mango infedor
quede separado del puntal del mango,
Iuego mu_valo hacia adelante.
2. Suelte los pernos de montaje del mango su-
perior Io suficiente como para permitir que
el mango superior se pueda doblar hacia
atr&s,
IMPORTANTE: Cuando doble el mango para el
almacenamiento o el transporte, aseg_rese que
Io doble segdn se mueetra o purde daSar los
cables de control.
• Cuando prepare sue mangos a partir de
la posici6n de almacenamiento, el mango
inferior autom&ticamente se asegurar_, en la
posici6n para segar.
Barradecontrol POSICION
PARA
presenciadeI SEGAR
operador
DOBLAR
HACIA
ADELANTE Mango
PARA superior
ALMACENAR
Manilla deI
mango
APRtETE
PARA DOBLAR
Mango inferior
MOTOR
SISTEMA DE COMBUSTIBLE
IMPORTANTE: Es importante evitar que
se formen depositos de coma en partes
fundamentales del sistemade combustibletales
como el carburador, elfiltro del combustible,
]a mangura del combustible o en e] estanque
durante elalmacanamiento. Los combustibles
mezclados con alcohol (conocido come
gasoholo que tienen etanoI o metanol)
Pueden atraer humedad, Ioque conduce a Ia
separacion y a la formaci6n de acidos durante
el almacenamiento, La gasolina acida puede
danar st sistema de combustible de un motor
durante el perido de almacenamiento.
• Vaciar et dep6sitodel carburante poniendo
en marcha el motory dej,_ndolofuncionar
hasta que el carburante termine y el
carburadorest6 vacio.
• Nunca use los productospara Iimpieza del
carburadorodel motoren el estanque de
combustib[epues se pueden producirdaSos
permanentes.
• Use combustible nuevo Ia pr6ximatempo-
rada.
AVISO: El estabilizador de combustiblees una
altemativa aceptable para reducira un m_nimo
la forrnaci6n de dep6sitos de goma en el com-
bustibledurante el periodode almacenamiento.
Agregue estabitizador a la gasolina en el
estanque de combustible o en elenvase para el
almacenamiento, Siempre siga la proporci6nde
mezcta que se encuentra en el envase del esta-
bilizador. Haga funcionar el motor por Io menos
10 minutos despu_s de agregar el estabilizador,
para permitirque este tlegue at carburad0r. No
drene la gasolina del estanque de gasolina yel
carburadorsi se est_ usando estabilizadorde
combustible.
ACEITE DEL MOTOR
Mangoinferior Drene el aceite (con e! motor caliente) y c_.m-
bielo con aceite de motor limpio. (Vea "MO-
TOR" en ta secci6n de Mantenimento de este
manual.)
3t

OlLINDRO
1. Remueva Ia bujfa.
2. Vacfe una onza (29 mI) de aceite a trav_s
del agujero de la bujia en el citindro.
3, Tire la manilla de arranque Ientamente unas
cuantas veces para distribuir el aceite.
4. Vuelva a montar la nueva buj[a.
OTROS
• No guarde la gasolina de una temporada a la
otra.
° Cambie el envase de la gasolina si se empie-
za a oxidar. La o×idaci6n y/o la mugre en su
gasolina producir_n problemas,
° Si es posible, guarde su unidad en un recinto
cerrado y c_brala para protegerla contra el
polvo y la mugre.
° Cubra su unidad con un forro protector
adecuado que no retenga la humedad. No
use pl&stico. Et pf&stico no puede respirar, Io
que permite laformaci6n de condensaci6n,
Io que producir& la oxidaci6n de su unidad.
IMPORTANTE.' Nunca cubra la segadora
mientras e] motor y las areas de escape todavia
estan calientes.
,t_PRECAUCI6N: Nunca almacene Ia
segadora con gasolina en el estanque dentro
de un edificio en donde los gases pueden
alcanzar una llama expuesta o una chispa.
Permita que se enfrie el motor antes de
almacenarla en alg_n recinto cerrado.
SOLUCION DE PROBLEMAS - Vea la secci6n apropiada en el manual amenos que
est_ dirigido a un centro de servico cualificado.
PROBLEMA CAUSA
Filtro de aire sucio.
Sin combustible.
Combustible rancio.
No arranca 1.
2.
3.
4.
Agua en el combustible.
5. Alambre de la bujfa desconectado.
6. Bujia mala.
7. Cuchilla suelta o adaptador
de Iacuchilla quebrado.
8. Barra de control en ta
posici6n suelta.
9. Barra de control defectuosa.
I0. VAIvula del combustible (si equ-
ipada) estA en ta posici6n OFF.
11.8ater[a d_bi (si equipada).
12. Desconecte el conector
de la bateria (si equipada).
CORRECClON
1. Limpielcambie el filtro de aire.
2. Llene el estanque de combustible,
3. Vaciar el estanque y vuelva a Ilenar-
lo con combustible limpio y nuevo.
4. Vaciar el estanque y vuelva a ]lenaP
Iocon combustible limpio y nuevo.
5. Conecte elatambre a la bujia.
6. Cambie la bujia,
7. Apriete et pemo de Ia cuchilla
cambie el adaptador de la cuchilla.
8. Presione la barra de control
hacia el mango.
9. Cambie la barra decontrol,
10. Gire a la v_lvula del combustible
a la posici6n ON.
11. Cague la bateria,
12. Conecte la bateria al motor.
32

SOLUCION DE PROBLEMAS - Vea la secci6n apropiada en el manual amenos que
est_ dirigido a un centro de servico cualificado.
PROBLEMA CAUSA
Faita de 1. Cuchi[la desgastada, doblada
iuerza o suelta.
2. Altura de las ruedas dispareja.
3. Velocidad def motorlenta.
4. Acumulaci6n de c6sped, hojas o
basura debajo de la segadora.
5. Demasiado aceite en motor.
6. Velocidad de recorrido
demasiado r'&pida.
Mal code- 1. Cuchilla desgastada, doblada
dlsparejo o suelta.
2. Altura de tas ruedas dispareja.
Vibraclon
excesiva
Cord6n
arrancador
dif_ci!de tirar
Recogedor de
c_sped no se
Ilena (si vlene
equipado)
Diffcil de
empujar
P_rdida de
lmpulsi6n
o retardase
de la
velocldad
3. Acumulaci6n de c6sped, hojas o
basura debajo de la segadora.
1. Cuchilla desgastada, doblada
o suelta.
2. CigueSal del motor doblado.
2,
3.
4.
El freno def volante del motor
est& aplicado cuando se
suelta Ia barra de control.
CigueSal deI motor doblado.
Adaptador de la cuchilla quebrado.
La cuchillase arrastra en
el c6sped.
1. Attura de code demasiado baja.
2. Levantamiento de la cuchitla
desgastado.
3. Recogedor sin ventilacidn de aire.
1. El c_sped est&demasiado alto o la
altura de Ia rueda demasiado baja.
2. Parte traserade ta
caja/cuchilia de la segadora
arrastr&ndose en el c6sped.
3. Recogedor de c_sped
demasiado Ileno.
4. Posicidn de la altura del mango
no adecuada para usted.
1. Desgaste de la correa.
2. La correa est,. fuera de ta polea.
3. Cable de laimpulsi6nusado o roto.
4. El sistema de control del
mecanismo impulsor "suelto".
CORRECC]ON
1. Eleve la altura de corte.
2. Eleve la altura de corte.
3. Umpie/cambie el filtro de aire.
4. Limpie ta parte inferior de la
caja de la segadora.
5. Revise el nivel del aceite.
6. Corte a una ve]ocidad de
recorddo rods lenta.
I. Cambie la cuchilla.Apriete el pemo
de la cuchilla.
2. Ajuste todaa las ruedas ala misma
altura.
3. Limpie ta parte inferior de la
cajade Ia segadora.
1. Cambie la cuchilla.Apriete el
perno de la cuchilla.
2. P6ngase en contacto con su centro
de servicio cualificado.
1. Presione la barra de control
hacia el mango superiorantes
de tirar elcord6n arrancadoro
2. P6ngase en contactocon su centro
de servicio cualificado.
3. Gamble el adaptador de la cuchilla.
4. Mueva la segadora a un ]ugar
en donde el c6sped ha sido
cortado o a una supefficie firme
para hacer arrancar el motor.
1. Eleve la atturade corte.
2. Cambie tas cuchillas.
i3.
1.
2.
3,
4.
Limpie el recogedor do c_sped.
Eleve la altura de corte.
Eleve la parte trasera de ta caja de
la segedora (1) un Iugar m_.salto.
Vacie el recogedor de c_sped.
Ajuste la altura del mango de
modo que Ie acomode.
1. Revise/cambie correa de impulsi6n.
2. Revisefvuelva a instalar la
3. Cambie elcable de la impulsidn.
4. Ajuste el control del mecanismo
impulsor.
33

ROTARY LAWN MOWER -- MODEL NUMBER At73K22 (MFG. I.D. NUMBER 96146000600)
.... 64
¢..o
28
t5
25
./° 12 °
f
11
t6
27
34
3O
28
6
/
14
12
17
35
59 27
25
56
52
68
39
31
51

ROTARY LAWN MOWER - - MODEL NUMBER At 73K22 (MFG. I,D. NUMBER 96146000600)
KEY
NO.
1
2
3
4
5
6
7
8
9
10
11
Go
Ol
12
14
15
16
17
18
19
2O
21
24
PART KEY PART KEY PART
NO. DESCRIPTION NO, NO. DESCRIPTION NO. NO, DESCRIPTION
427619X479 Upper Handle 25 409148 Nut, Hex, Ftanged 51 170031 Kit, Front Baffle
183567 Engine Zone Control Cable 26 184193 Bolt, Rear Door (Includes Key Number 53)
850733X004 Bracket, Upstop 27 400247X428 Wheel & Tire Assy., Rear 52 404763 Danger Decal
166649 Mulcher Plug 28 174719 Bolt, Shoulder 3/8-16 x 1 53 17600406 Screw, Serrated, Type -17-
66426 Wire Tie 29 401630 Washer, Curved, Cylindrical 1/4-20
189713X428 HandIe Knob 30 401179X004 Axle Arm Assembly 55 73930600 Nut, Hex 3/8-16
750634 Screw 31 701037 Selector Knob 56 88652 Hinge Screw 1/4-20 x 1-1/4
427414X428 Control Bar 32 401621X004 Selector Spring 57 51793 Hairpin Cotter
401813X428 Rear Door Assembly 34 401629 Spacer 58 151590X479 Lower Handle
128415 Pop Rivet 35 407492X005 Wheel Adjusting Bracket, 59 191574 Handle Bolt
150050 Screw, Self-Tapping RH 64 - - - Engine, Bdggs & Stratton,
#10-24 x 5/8 37 428867 Screw 5/16-18 x 3/4 Model Number 126L02-
17060410 Screw, Seres, Hex Head, 39 195916X479 Handle Bracket Assy. LH 1459-F1 (For engine service
1/4-20 x I/2 40 195917X479 Handle Bracket Assy., RH and replacement parts, call
195622X479 Back Plate 41 150406 Screw, Hex Head, B&S at 1-800-233-3723)
410545X479 Side Baffle Thread/Roll 3/8-16 x 1-1t8 68 407493X005 Wheel Adjusting Bracket, LH
176655X479 Discharge Baffle 44 430857 Kit, Housing (Includes Key 69 197991 Clip, Cable
140661X479 Rear Baffle Numbers t4, 15 and 51) 71 422044)(004 Belt Keeper
132004 Keps Locknut 1/4-20 46 421176 Blade Adapter I Pulley - - 404764 Warning Deca! (not shown)
194788 Rope Guide 47 406713 Blade, 22" - - 431593 Owner's Manual,
413160 Rear Skirt 48 851074 Washer, Hardened English/ Spanish
405421 Spring, Rear Door, LH 49 850263 Washer, Helical - - 431594 Owner's Manual, French
405423 Spring, Rear Door, RH 50 851084 Screw, Machine, Hex Head
Grade 8 3/8-24 x 1-3/8
NOTE: All component dimensions given inU.S. inches. 1 inch = 25.4 ram,
IMPORTANT: Use only Original Equipment Manu|acturer (O.E.M.) replacement parts. Failure to do so could be hazardous, damage your lawn mower and void your warranty.

O3
54
ROTARY LAWN MOWER - - MODEL NUMBER A173K22 (MFG. I.D, NUMBER 96146000600)
J
33
13
17 14
11
\
12
29

ROTARY LAWN MOWER-- MODEL NUMBER A173K22 (MFG. I.D. NUMBER 96146000600)
Co
,,4
KEY PART KEY PART
NO. NO. DESCRIPTION NO. NO. DESCRIPTION
1 194653 Cable, Drive Control 28 401271X428 Drive Cover
7 194t85X428 Bar, Drive Control 29 409148 Locknut, Hex
11 193912X428 Wheel & TireAssembty, Front 33 146527 V-Belt
12 12000058 E-Ring 35 424201 Kit, Wheel Adjuster, LH
13 403849 Pinion (Includes Knob and Bearing)
14 t89403 Dust Cover 36 415226 Gear Case Assembly, Complete
15 404845 Paw], Drive 38 73800400 Locknut, Hex 1/4-20
16 67725 Washer, Fiat 3/8 40 t37090 Spring
17 191039 Bearing, Wheel Adjustor 41 424200 Kit, Wheel Adjuster, RH
18 701037 Selector Knob (includes Knob and Bearing)
19 150495 Spring Retainer 54 430858 Grassbag Assembly
27 175262 Pan Head Tapping Screw #10-24 x 2-3/4 57 411952 Frame, Graesbag
NOTE: All component dimensions given in U.S_ inches. I inch= 25.4 mm.
IMPORTANT: Use only Original Equipment Manufacturer (O.E.M,) replacement parts. Failure to do so could be hazardous, damage your lawn mower and void your warranty.

SERVICE NOTES
38

SERVICE NOTES
39

LIMITED WARRANTY
The Manufacturer warrants tothe original consumer purchaser that this product as
manufactured isfree from defects in materials and workmanship. For a period of
two (2) years from date of purchase by the original consumer purchaser, we willre-
pair or replace, at our option, without charge for partsor labor incurred in replacing
parts, any part which we find to be defective due to materials or workmanship. This
Warranty issubject to the following limitations and exclusions.
1.This warranty does not apply to the engine, transaxle/transmission components,
battery (except as noted below) or components parts thereof. Please refer to the
applicable manufacturer's warranty on these items.
2,Transportation charges for the movement of any power equipment unit or at-
tachment are the responsibility of the purchaser. Transportation chargesfor any
parts submitted for replacement under this warranty must be paid by the pur-
chaser unless such return is requested by the manufacturer,
3.Battery Warranty: On products equipped with a Battery, we will replace, without
charge to you, any battery which we find to be defective in manufacture, during
the first ninety (90) days of ownership. After ninety (90) days, we will exchange
the Battery, charging you 1/12 of the price of a new Battery for each full month
from the date ofthe original sate. Battery must be maintained in accordance with
the instructions furnished.
4. The Warranty period for any products used for rental or commercialpurposes is
limited to 45 days from the date of original purchase.
5.This Warranty applies only to products which have been properly assembled,
adjusted, operated, and maintained in accordance with the instructions furnished.
This Warranty does not apply to any product which has been subjected to al-
teration, misuse, abuse, improper assembly or installation, delivery damage, or to
normal wear of the product.
6. Exclusions: Excluded from this Warranty are belts, blades, blade adapters, nor-
mal wear, normal adjustments, standard hardware and normal maintenance.
7, Inthe event you have a claim under this Warranty, you must return the product to
an authorized service dealer.
Should you have any unanswered questions concerning this Warranty, contact:
HOP in Canada contact:
Customer Service Department HOP
9335 Harris Corners Parkway Customer Service Department
Charlotte, NC 28269 USA 5855 Terry Fox Way
Mississauga, Ontario L5V 3E4
giving the model number, serial number and date of purchase of your product and
the name and address of the authorized dealer from whom it was purchased.
THIS WARRANTY DOES NOT APPLY TO iNCIDENTAL OR CONSEQUENTIAL
DAMAGES AND ANY IMPLIED WARRANTIES ARE LIMITED TO THE SAME
TIME PERIODS STATED HEREIN FOR OUR EXPRESSED WARRANTIES.
Some areas do not allow the limitation of consequential damages or limitations
of how long an implied Warranty may last, so the above limitationsor exclusions
may not apply to you. This Warranty gives you specific legal rights, and you may
have other rights which vary from locale to locale.
This is a limitedWarranty within the meaning of that term as defined in the Mag-
nuson-Moss Act of 1975.
-
 1
1
-
 2
2
-
 3
3
-
 4
4
-
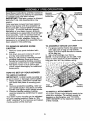 5
5
-
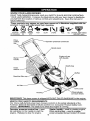 6
6
-
 7
7
-
 8
8
-
 9
9
-
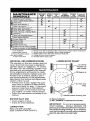 10
10
-
 11
11
-
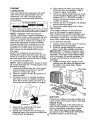 12
12
-
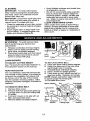 13
13
-
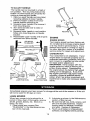 14
14
-
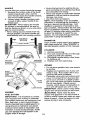 15
15
-
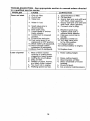 16
16
-
 17
17
-
 18
18
-
 19
19
-
 20
20
-
 21
21
-
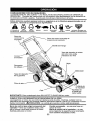 22
22
-
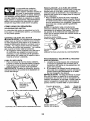 23
23
-
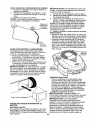 24
24
-
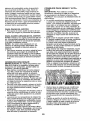 25
25
-
 26
26
-
 27
27
-
 28
28
-
 29
29
-
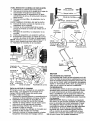 30
30
-
 31
31
-
 32
32
-
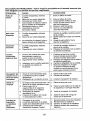 33
33
-
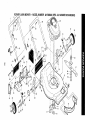 34
34
-
 35
35
-
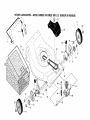 36
36
-
 37
37
-
 38
38
-
 39
39
-
 40
40


Ariens 96146000600 El manual del propietario
- Categoría
- Cortadoras de césped
- Tipo
- El manual del propietario
- Este manual también es adecuado para
En otros idiomas
- English: Ariens 96146000600 Owner's manual