Dell P2010H Manual de usuario
- Categoría
- Altavoces de la barra de sonido
- Tipo
- Manual de usuario
Este manual también es adecuado para

Dell
TM
P2010H Flat Panel Monitor
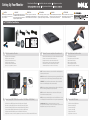
Verify the contents of the box
Setting Up Your Monitor
1 3
Attach the stand to the monitor
Fuß am Monitor befestigen
Acople la base al monitor
Прикрепите подставку к монитору
Anexe o suporte no monitor.
Fissare il supporto al monitor
Accrochez le support sur le moniteur
Installation de votre moniteur
Configurar su monitor
Configurazione del monitor
Einrichten des Monitors
PRECAUCIÓN:
Antes de configurar y utilizar su equipo
Dell™, consulte las instrucciones de
seguridad que se entregan con el mismo.
CAUTION:
Before setting up your Dell™ monitor,
see the safety instructions that ship
with your monitor.
CUIDADO:
Antesdevocêajustareoperarseucomputador
Dell™, veja as instruções de segurança
que são enviadas com seu monitor.
ATTENZIONE:
Prima di installare ed usare il computer
Dell™, leggere le istruzioni di sicurezza
fornite in dotazione al monitor.
VORSICHT:
BevorSie Ihren Dell™-Computer einrichten
und in Betriebnehmen, beachten Sie bitte
die Sicherheitsanweisungen, die mit Ihrem
Computer mitgeliefert werden.
ATTENTION :
Avant de configurer et d'utiliser votre
ordinateurDell™,consultez les précautions
de sécurité livrées avec votre moniteur.
Remove the cover and place the monitor on it
2
Nehmen Sie die Abdeckung ab, und stellen Sie den Monitor darauf
E
nlevez le cache et placez le moniteur dessus
E
xtraiga la cubierta y coloque el monitor sobre ella
Снимите крышку и поставьте на нее монитор
Retire a cobertura e coloque o monitor sobre a mesma
Rimuovere la copertura e collocarvi spora il monitor
Überprüfen Sie den Lieferumfang
Vérifiez le contenu de la boîte
Verifique los contenidos de la caja
Verifique o conteúdo da caixa
Verificare il contenuto della scatola
Проверьте содержимое упаковки
4 5
Connect using ONLY ONE of these cables: VGA (Blue) or DVI (White)
Schließen Sie nur EINES dieser Kabel an: VGA (blau) oder DVI (weiß)
Branchez en utilisant UN SEUL de ces câbles: VGA (bleu) ou DVI (blanc)
Conectar utilizando SÓLO UNO de estos cables:VGA (Azul) o DVI (Blanco)
Conecte usando APENAS UM destes cabos: VGA (Azul) ou DVI (Branco)
HINWEIS:
Nutzen Sie zur Optimierung der Leistung das weiße DVI- oder
das schwarze (nicht im Lieferumfang enthaltene) DisplayPort-Kabel.
REMARQUE:
Pour de meilleures performances, utilisez le câble DVI
blanc ou le câble DisplayPort noir (achat facultatif).
NOTA:
Si desea obtener el máximo rendimiento, utilice el cable blanco
DVI o un cable negro DisplayPort (compra opcional).
NOTA:
Para melhor desempenho, uso o cabo branco DVI ou preto
Porta de Monitor (venda opcional).
NOTA:
Per avere prestazioni migliori, usare il cavo DVI bianco o il cavo
nero DisplayPort (Porta visualizzazione - da acquistare separatamente).
ПРИМЕЧАНИЕ: Для достижения наилучшего качества
изображения используйте белый кабель DVI или черный кабель
DisplayPort (приобретается дополнительно).
Connect the USB cable
Collegare usando SOLO UNO di questi cavi: VGA (blu) o DVI (bianco)
Подключайте монитор ТОЛЬКО ОДНИМ из указанных кабелей: VGA (синий) или DVI (белый)
NOTE: For better performance, use the white DVI or black DisplayPort
(optional purchase) cable.
VGA
Schließen Sie das USB-Kabel an
Branchez le câble USB
Conecte el cable USB
Conectar o cabo USB
Collegare il cavo USB
Подключите кабель USB

(Dell Part No. W272R A00)
46.7B402.001
www.dell.com | support.dell.com
NOTE: For more information see the
User's
Guide
in the
Drivers and Documentation
media that shipped with your monitor.
REMARQUE: Pour plus d’informations,
reportezvous au
Guide de l’utilisateur
sur le CD Pilotes et Documentation
.
NOTA: Para más información, consulte
el
manual del usuario en los medios
de controladores y documentación
.
NOTA: Para obter mais informações
consulte o guia de usuário no
CD
do drive edocumentaço
.
HINWEIS: Weitere Informationen
finden Sie in dem
Benutzerhandbuch
auf dem Treiber-und
Dokumentationsmedium
.
NOTA: Tutte le altre informazioni
si trovano sul supporto che contiene
la
Guida all u’so, i Drivere la
Documentazione
.
Information in this document is subject to change
without notice.
© 2009 Dell Inc. All rights reserved.
Reproduction of these materials in any manner whatsoever
without the written permission of Dell Inc. is strictly forbidden.
Dell and the DELL logo are trademarks of Dell Inc. Dell disclaims
Dell DELL
proprietary interest in the marks and names of others.
May 2009
Les informations contenues dans ce document peuvent
être modifiées sans notification préalable.
© 2009 Dell Inc. Tous droits réservés.
Toute reproduction sous quelque forme que ce soit sans
l’autorisation écrite de Dell Inc. est strictement interdite.
Dell and the logo DELL sont des marques déposées de
Dell Inc.; Dell dénie tout intérêt propriétaire dans les
marques et les noms commerciaux autres que les siens.
Mai 2009
La información de este documento se encuentra
sujeta a cambios sin aviso previo.
© 2009 Dell Inc. Todos los derechos reservados.
Queda terminantemente prohibida la reproducción en
cualquiera de sus formas sin la autorización de Dell Inc.
Dell y el logotipo de DELL son marcas registradas de
Dell Inc. Dell descarga todo su interés de propiedad
sobre las marcas y nombres de otras empresas.
Mayo 2009
As informações contidas neste documento
estão sujeitas a alteração sem aviso prévio.
© 2009 Dell Inc. Todos os direitos reservados.
A reprodução de qualquer forma sem a
permissão escrita da Dell Inc. é estritamente
proibida.
Dell e o logo DELL são marcas registradas da
Dell Inc. Dell não tem interesse de propriedade
nas marcas e nomes de terceiros.
Maio 2009
Die Informationen in diesem Dokument
können ohne Ankündigung geändert werden.
© 2009 Dell Inc. Alle Rechte vorbehalten.
Die Reproduktion in irgendeiner Weise ohne
schriftliche Genehmigung von Dell Inc. ist
streng verboten.
Dell und das DELL-Logo sind Marken der Dell Inc..
Dell erhebt keinerlei Eigentumsansprüche auf
andere als ihre eigenen Marken und Namen.
Mai 2009
Le informazioni presenti in questo documento
sono soggette a modifiche senza preavviso.
© 2009 Dell Inc. Tutti i diritti riservati.
La riproduzione in qualsiasi forma senza
l’autorizzazione scritta di Dell Inc. è strettamente
proibita.
Dell e il logo DELL sono marchi di Dell Inc.
Dell declina qualsiasi rivendicazione sulla
proprietà di marchi e denominazioni di altri.
Maggio 2009
6
7
Monitoranpassen
Régler le moniteur
Ajuste el monitor
Нижние порты US
Ajuste o monitor
Regolazionedel monitor
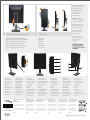
Adjust the monitor
1. USBdownstream ports
2. RegulatoryandPPID Label
3. Short Cut Key 1/Up button
4. Short Cut Key 2/Down button
5. OSD Menu/OK button
6. Back/Exit button
7. Pow
er (with power light indicator)
8. Stand ReleaseButton
9. Security LockSlot
10.DellSoundbar mounting brackets
11.Cable management slot
1. USB-Downstream-Anschluss
2. Regulierungs-undPPID-Etikett
3. Schnelltaste 1/Aufwärtstaste
4. Schnelltaste 2/Abwärtstaste
5. OSD-Menü-Taste/OK-Taste
6. Zurück-/Beenden-Taste
7. Ein/Aus(mitBetriebsanzeige)
8. Gestell-Freigabe-Schalter
9. Sicherheitsschloss-Schlitz
10.DellSoundbarSchraubbefestigungen
11.Schlitz zurKabelverwaltung
1. Ports USB enaval
2. ÉtiquetteréglementaireetPPID
3. Touche de raccourci 1/Bouton Haut
4. Touche de raccourci 2/Bouton Bas
5. Bouton Menu OSD/OK
6. Bouton Retour/Quitter
7. Alimentation
(avectémoin lumineu
xd'alimentation)
8. Boutonde dégagementdu support
9. Fente de verrouillage de sécurité
10.Supportsde montageDellSoundbar
11. Fentedegestiondescâbles
1. PuertosdedescargaUSB
2. Etiquetaadministrativa y dePPID
3. Botón de Acceso Directo 1/Botón Arriba
4. Botón de Acceso Directo 2/Botón Abajo
5. Botón del menú OSD/Botón Aceptar
6. Botón Atrás/Salir
7. Encendido
(con indicador luminoso deencendido)
8. Botón de liberacióndel soporte
9. Ranurade bloqueode seguridad
10.Abrazaderasde montajeparaDellSoundbar
11.Ranuradegestióndecable
1. PortasUSBde downstream
2. EtiquetaPPIDe Regulatória
3. Tecla de Atalho 1/botão Cima
4. Tecla de Atalho 2/botão Baixo
5. Botão de menu OSD/botão OK
6. botão Voltar/Sair
7. Liga/desliga
(com luz indicadora de funcionamento)
8. Botão de Libertação da Base
9. Ranhura de Bloqueiode Segurança
10.Suportesde montagem do Dell Soundbar
11.Slotde gerenciamentodo cabo
1. Porte USB downstream
2. Etichetta normativa e PPID
3. Tasto di scelta rapida 1/pulsante Su
4. Tasto di scelta rapida 2 /pulsante Giù
5. Pulsante menu OSD/pulsante OK
6. Pulsante Indietro/Esci
7. Tasto d’alimentazione
(con indicatore luminoso)
8. Tasto di sblocco supporto
9. Fessura per blocco di sicurezza
10.Staffe di montaggio DellSoundbar
11.Alloggio per la gestionedei cavi
1. Нижние порты USB
2. Нормативная этикеткаи PPID
3. Горячая клавиша 1/ Кнопкавверх
4. Горячаяклавиша 2/Кнопкавниз
5. Меню OSD/ Кнопка OK
6. КнопкаНазад/ Выход
7. П и т а н и е
(с и н д и к а т о р о м )
8. К н о п к а о т с о е д и н е н и я п од с т а в к и
9. Слотблокировки безопасности
10.Монтажныекронштейны звуковой панели Dell
11.Кабельныйслот
Connect the power cable and press the power button
Schließen Sie das Netzkabel an, und drücken Sie den Netzschalter.
Branchez le câble d'alimentation et appuyez sur le bouton d'alimentation
Conecte el cable de alimentación y presione el botón de encendido
Подключите сетевой шнур и нажмите кнопку питания
Conecte o cabo de energia e pressione o botão de energia
Collegare il cavo d'alimentazione e premere il tasto d’accensione
Dell DELL Dell DELL Dell DELL Dell DELL Dell DELL
Май 2009
Transcripción de documentos
Setting Up Your Monitor CAUTION: Before setting up your Dell™ monitor, see the safety instructions that ship with your monitor. VORSICHT: Bevor Sie Ihren Dell™-Computer einrichten und in Betrieb nehmen, beachten Sie bitte die Sicherheitsanweisungen, die mit Ihrem Computer mitgeliefert werden. Einrichten des Monitors Installation de votre moniteur Configurar su monitor Configurazione del monitor ATTENTION : Avant de configurer et d'utiliser votre ordinateur Dell™, consultez les précautions de sécurité livrées avec votre moniteur. PRECAUCIÓN: Antes de configurar y utilizar su equipo Dell™, consulte las instrucciones de seguridad que se entregan con el mismo. CUIDADO: Antesdevocêajustareoperarseucomputador Dell™, veja as instruções de segurança que são enviadas com seu monitor. ATTENZIONE: Prima di installare ed usare il computer Dell™, leggere le istruzioni di sicurezza fornite in dotazione al monitor. DellTM P2010H Flat Panel Monitor 1 2 Verify the contents of the box Remove the cover and place the monitor on it 3 Attach the stand to the monitor Fuß am Monitor befestigen Accrochez le support sur le moniteur Acople la base al monitor Anexe o suporte no monitor. Fissare il supporto al monitor Прикрепите подставку к монитору Nehmen Sie die Abdeckung ab, und stellen Sie den Monitor darauf Enlevez le cache et placez le moniteur dessus Extraiga la cubierta y coloque el monitor sobre ella Retire a cobertura e coloque o monitor sobre a mesma Rimuovere la copertura e collocarvi spora il monitor Снимите крышку и поставьте на нее монитор Überprüfen Sie den Lieferumfang Vérifiez le contenu de la boîte Verifique los contenidos de la caja Verifique o conteúdo da caixa Verificare il contenuto della scatola Проверьте содержимое упаковки NOTE: For better performance, use the white DVI or black DisplayPort (optional purchase) cable. HINWEIS: Nutzen Sie zur Optimierung der Leistung das weiße DVI- oder das schwarze (nicht im Lieferumfang enthaltene) DisplayPort-Kabel. VGA REMARQUE: Pour de meilleures performances, utilisez le câble DVI blanc ou le câble DisplayPort noir (achat facultatif). NOTA: Si desea obtener el máximo rendimiento, utilice el cable blanco DVI o un cable negro DisplayPort (compra opcional). NOTA: Para melhor desempenho, uso o cabo branco DVI ou preto Porta de Monitor (venda opcional). 4 Connect using ONLY ONE of these cables: VGA (Blue) or DVI (White) Schließen Sie nur EINES dieser Kabel an: VGA (blau) oder DVI (weiß) Branchez en utilisant UN SEUL de ces câbles: VGA (bleu) ou DVI (blanc) Conectar utilizando SÓLO UNO de estos cables:VGA (Azul) o DVI (Blanco) Conecte usando APENAS UM destes cabos: VGA (Azul) ou DVI (Branco) Collegare usando SOLO UNO di questi cavi: VGA (blu) o DVI (bianco) Подключайте монитор ТОЛЬКО ОДНИМ из указанных кабелей: VGA (синий) или DVI (белый) NOTA: Per avere prestazioni migliori, usare il cavo DVI bianco o il cavo nero DisplayPort (Porta visualizzazione - da acquistare separatamente). ПРИМЕЧАНИЕ: Для достижения наилучшего качества изображения используйте белый кабель DVI или черный кабель DisplayPort (приобретается дополнительно). 5 Connect the USB cable Schließen Sie das USB-Kabel an Branchez le câble USB Conecte el cable USB Conectar o cabo USB Collegare il cavo USB Подключите кабель USB NOTE: For more information see the User's Guide in the Drivers and Documentation media that shipped with your monitor. HINWEIS: Weitere Informationen finden Sie in dem Benutzerhandbuch auf dem Treiber-und Dokumentationsmedium. REMARQUE: Pour plus d’informations, reportezvous au Guide de l’utilisateur sur le CD Pilotes et Documentation. NOTA: Para más información, consulte el manual del usuario en los medios de controladores y documentación. 6 Connect the power cable and press the power button 7 46.7B402.001 (Dell Part No. W272R A00) 1. USB-Downstream-Anschluss 2. Regulierungs- und PPID-Etikett 3. Schnelltaste 1/Aufwärtstaste 4. Schnelltaste 2/Abwärtstaste 5. OSD-Menü-Taste/OK-Taste 6. Zurück-/Beenden-Taste 7. Ein/Aus(mit Betriebsanzeige) 8. Gestell-Freigabe-Schalter 9. Sicherheitsschloss-Schlitz 10. Dell Soundbar Schraubbefestigungen 11. Schlitz zur Kabelverwaltung Adjust the monitor NOTA: Tutte le altre informazioni si trovano sul supporto che contiene la Guida all u’so, i Drivere la Documentazione. Monitor anpassen Régler le moniteur Ajuste el monitor Ajuste o monitor Regolazione del monitor Нижние порты US Schließen Sie das Netzkabel an, und drücken Sie den Netzschalter. Branchez le câble d'alimentation et appuyez sur le bouton d'alimentation Conecte el cable de alimentación y presione el botón de encendido Conecte o cabo de energia e pressione o botão de energia Collegare il cavo d'alimentazione e premere il tasto d’accensione Подключите сетевой шнур и нажмите кнопку питания 1. USB downstream ports 2. Regulatory and PPID Label 3. Short Cut Key 1/Up button 4. Short Cut Key 2/Down button 5. OSD Menu/OK button 6. Back/Exit button 7. Power (with power light indicator) 8. Stand Release Button 9. Security Lock Slot 10. Dell Soundbar mounting brackets 11. Cable management slot NOTA: Para obter mais informações consulte o guia de usuário no CD do drive edocumentaço. 1. Ports USB en aval 2. Étiquette réglementaire et PPID 3. Touche de raccourci 1/Bouton Haut 4. Touche de raccourci 2/Bouton Bas 5. Bouton Menu OSD/OK 6. Bouton Retour/Quitter 7. Alimentation (avec témoin lumineux d'alimentation) 8. Bouton de dégagement du support 9. Fente de verrouillage de sécurité 10. Supports de montage Dell Soundbar 11. Fente de gestion des câbles 1. Puertos de descarga USB 2. Etiqueta administrativa y de PPID 3. Botón de Acceso Directo 1/Botón Arriba 4. Botón de Acceso Directo 2/Botón Abajo 5. Botón del menú OSD/Botón Aceptar 6. Botón Atrás/Salir 7. Encendido (con indicador luminoso de encendido) 8. Botón de liberación del soporte 9. Ranura de bloqueo de seguridad 10. Abrazaderasde montajeparaDellSoundbar 11. Ranura de gestión de cable 1. Portas USB de downstream 2. Etiqueta PPID e Regulatória 3. Tecla de Atalho 1/botão Cima 4. Tecla de Atalho 2/botão Baixo 5. Botão de menu OSD/botão OK 6. botão Voltar/Sair 7. Liga/desliga (com luz indicadora de funcionamento) 8. Botão de Libertação da Base 9. Ranhura de Bloqueio de Segurança 10. Suportes de montagem do Dell Soundbar 11. Slot de gerenciamento do cabo 1. Porte USB downstream 2. Etichetta normativa e PPID 3. Tasto di scelta rapida 1/pulsante Su 4. Tasto di scelta rapida 2 /pulsante Giù 5. Pulsante menu OSD/pulsante OK 6. Pulsante Indietro/Esci 7. Tasto d’alimentazione (con indicatore luminoso) 8. Tasto di sblocco supporto 9. Fessura per blocco di sicurezza 10. Staffe di montaggio Dell Soundbar 11. Alloggio per la gestione dei cavi 1. Нижние порты USB 2. Нормативная этикетка и PPID 3. Горячая клавиша 1/Кнопка вверх 4. Горячаяклавиша 2/Кнопкавниз 5. Меню OSD/Кнопка OK 6. Кнопка Назад/Выход 7. Питание (с индикатором) 8. Кнопка отсоединения подставки 9. Слот блокировки безопасности 10. Монтажные кронштейны звуковой панели Dell 11. Кабельный слот Information in this document is subject to change without notice. © 2009 Dell Inc. All rights reserved. Die Informationen in diesem Dokument können ohne Ankündigung geändert werden. © 2009 Dell Inc. Alle Rechte vorbehalten. Les informations contenues dans ce document peuvent être modifiées sans notification préalable. © 2009 Dell Inc. Tous droits réservés. La información de este documento se encuentra sujeta a cambios sin aviso previo. © 2009 Dell Inc. Todos los derechos reservados. As informações contidas neste documento estão sujeitas a alteração sem aviso prévio. © 2009 Dell Inc. Todos os direitos reservados. Le informazioni presenti in questo documento sono soggette a modifiche senza preavviso. © 2009 Dell Inc. Tutti i diritti riservati. Reproduction of these materials in any manner whatsoever without the written permission of Dell Inc. is strictly forbidden. Die Reproduktion in irgendeiner Weise ohne schriftliche Genehmigung von Dell Inc. ist streng verboten. Toute reproduction sous quelque forme que ce soit sans l’autorisation écrite de Dell Inc. est strictement interdite. Queda terminantemente prohibida la reproducción en cualquiera de sus formas sin la autorización de Dell Inc. A reprodução de qualquer forma sem a permissão escrita da Dell Inc. é estritamente proibida. La riproduzione in qualsiasi forma senza l’autorizzazione scritta di Dell Inc. è strettamente proibita. Dell and the DELL logo are trademarks of Dell Inc. Dell disclaims proprietary interest in the marks and names of others. DELL-Logo sind Marken der Dell Inc.. Dell und das DELL Dell erhebt keinerlei Eigentumsansprüche auf andere als ihre eigenen Marken und Namen. Dell and the logo DELL sont des marques déposées de Dell Inc.; Dell dénie tout intérêt propriétaire dans les marques et les noms commerciaux autres que les siens. Dell y el logotipo de DELL son marcas registradas de Dell Inc. Dell descarga todo su interés de propiedad sobre las marcas y nombres de otras empresas. Dell e o logo DELL são marcas registradas da Dell Inc. Dell não tem interesse de propriedade nas marcas e nomes de terceiros. Dell e il logo DELL sono marchi di Dell Inc. Dell declina qualsiasi rivendicazione sulla proprietà di marchi e denominazioni di altri. May 2009 Mai 2009 Mai 2009 Mayo 2009 Maio 2009 Maggio 2009 Май 2009 www.dell.co m | support .dell.com-
 1
1
-
 2
2


Dell P2010H Manual de usuario
- Categoría
- Altavoces de la barra de sonido
- Tipo
- Manual de usuario
- Este manual también es adecuado para
en otros idiomas
- français: Dell P2010H Manuel utilisateur
- italiano: Dell P2010H Manuale utente
- English: Dell P2010H User manual
- Deutsch: Dell P2010H Benutzerhandbuch
- português: Dell P2010H Manual do usuário