
Owne•;s'Manual
Bedienungsan
leitung Mode d'emploi Manual de instrucciones i!l.Pftlill'f.-M
'1(
@@
~@
1
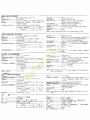
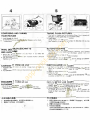
NAMES OF PARTS
t Exposure Counter
. i
$hu
tter
Re
lease
j AccessO<y Shoe
q V
•e
wfinder
(~
F
1l
m R
ew
i
nd
Clank/Knob
{
§_
Handstrap Eyet
et
•
1:
B
ack
Cover Lock
fj
Exposure Ring
~f
t
Exposure
Symbots
't9Lens
f1
Film Chamber
·
~Fi
lm
Rewind Sptndle
13
Spr
oc
k
et
Teeth
1é
Fil
....
· '
ta
nce
Kf)('lb
·j~P•es»~re
Plate
%Came
ra
BACk
.jT
tFitm Take-up
SPOOI
·faFitm Rewind Button
BE
ZEICHNUNG
DE
R
TE
llE
! •Bitdzahl
w.xk
}Austose
c
·3'
Auls
teckschuh
l
4:Svchér
@Filmcûc
ksp
ul
kuc
be
i/
Knopl
@Tragschlaufenôse
·
(î.:
Rùc
kw
an
dentriegel
ung
® Bienden•ing
.
"§
)Wettersymbote
~lt
Ob
j
ekt
iv
ù;F
ilmkamm
er
Ï~
Fi
lmrückspu
iSP
•
ndel
1
!l
ZJihne der F tl
mtransJ)O<t
.
rolle
j4
tFil
mt
ransPO<t
roocher1
•
5l
Andru
ckplatt
e
,
-
~
Rückwand
ITIF
ilm
au
fw•cket
sPu
le
I~Fi
lmrucksp
ulknop
f
NOM
ENCLATURE
(i)cOmpteur d'images
•Ï)
Décl
enchew
, 3 Griffe POrte-accessoires
,f
Viseur
.
~
Bouton/Mano velle
de
re-
bobmaye
ov
hlm
• 6 O
er
ll
et
de
courro•e
, 1 Verrouillage du
dos
:le
l'appareil
:.t
Bague d'expos
ttton
@Symboles d'exposition
@O
b
ject
if
•
jî
.Logement
du
film
·i~Axe
de
oebobonage
du
hlm
@Dents
de 1 axe
den-
trai
nemen
t
.
ji;
Molette d'avancement
du
fi
lm
•ISPresse-
fi
tm
tt6'
Dos
de
l'appareil
,tf
B
ob
i
ne
r
éœpt
ro
ce
du
film
·
1s
Bout
on
de
rebobinage
NOMENCLATURA
1
ContadO<
de
exposico1es
2 Oisparador
3 Zapata
de
accesoroos
4
V!SOr
5 Botoni
Man
ivela
de
•e-
oooulacto
ae
la
peflcula
6 o,
ete
para la correa
1·Seguro
de la tapa
pos·
tefior
de
la camara
s ·
An•
llo
de
expos•cion
9·Simboi
Os
de
exposici6n
l
jO
bietivo
ït
Compartimiento
para
el
ca
rtuc
ho
de
pe
licula
,
·1
Eje
de
rebobona
do de
ta
pelicula
13
Eie
de
nta
do
14
Ru
eda
be
avance
de
ta
pe
ti
cu
ta
1 1 Pla
ca
de
presi6n
16
·T
apa
posteri
oc
de
la
câma
ra
17
·Carrete recept
oc
de
la
peh
cula
·18
Botvn
c-;..
·ebob•nado de
la
p~hCu•J•
(i)~r
t
W
@lki'~I'Hil
@JIHNili•
:h
fl<
q)J(I(ilt'~
~)
10:
J;'i;(1(!fl
l
ll
i
'i
iUlt
®N.fii:·*'l!U;;
(î)ll(l
ffHI'I.
fH.illllllll
®lVI1'tàltli!J.l<
@J.ll.1'tr.:.3t:
®tl~1i
@~J',
·
$
@P;ill!l!!tll'llllt
@li
U~
al!
@~<~;r,
·
n~;uR
~''IR
@'Kitll
llt
iUi
@lflltHH.;)
@tl;l\/1lf!U

SPECIFICATIONS
' F
ilm
Gartridge-packed
135
roll film.
Picture
Slze
24 x 36mm
Le
ns Fujinon 1.8, 42mm, 3
compOnents.
3 elements
Sh
utter Mechanical. 11
100
-sec fixed speed,
X-
synchronizat
ion.
Expœure Contrai
--
Ape<ture setting via
we
ather symbol
s.
Weather Symbols
Aperture
TECHNISCHE DATEN
Film - -
---
--
ln PatJone gepackter
135-R
o
ll
hlm
Bil
dlo
r
mat-----24
x
36
mm
Ob
je
kt
rv
Fujrnon
8142
mm
. 3 Gliedér, 3 Linsen
VerschluB-
!'vtP.chan
ischer Versçhlufl. feste Verschlufl-
z,~it
von 1/100 s. X..Synchroms
ation
Belichtungsregelung-
-B
iendeneinstellung nach Wettersymbolen
Wettersyrnbole
Blende
Scharfeinste
llung--Fix
fokus
t.
Zm-
._,
FICHE TECHNIQUE
Film
Fi
lm 135
en
chargeu
r.
Format de négat
if--24
x 36
mm
Objectif- Fu
1rn
on
1:8, 42mm. 3
gr
oupes. 3 éléments.
Obtu
rateu
r---
-
M~can•
que
.
vi
t
esse
fixe
de
t/
100
sec
.:
sync
hr
on
isation X.
Contrôle o
·c
tp
ositi
on-
Reglage du diaphragme avec les symboles
atmosph91iQues.
SymbO
les
0
C>
l
Ouve
rt
ure
Ft!
FS
Mise au po
in
t---
-Fixe.
1.
2 m-
ESPECIFICACIONES
Pe
li
cula Cartu
chO
de pel;cula del
tiPO
13
5
Tama
li
o del negativo- 24 x
36
mm
Ob
je
tivo FuJ•non 1
8.
42
mm. 3 compenentes.
3 elementos.
O
bt
urador -
--
-
-Meca
nico: vel
oc
idad fria a 1/100 de seg :
s•ncron
c
za
c
•on
X.
Con
tr
ol de exposic
iOn-A
juste del
drafragma
med
iao!e
los
simboiOs
de
expos
rc
t6n.
S.m
bolos
de
exposiciCwl
Abertura
En
foque
--
---En
foque fi jo. t, 2 m -
Il<
1\
--
-
-
--
1-\
·
~H!'l!i,t
1
35
~'
11J'I1:
11(
11
)
N.
·
1·
--
- -
-2•
x
36*
*
Il!
•li---
-
-F'
uj
i
no
n 1:
8,
42
·,-,ik
3~fll'i'
,
3>
t:l
't
·
~
1"1
'fl!ll«..l:. lf lO
OW
.
-11il
>ii
~
~:
Il.'!
'lt.
·
1H1f.i
i'
V
lili
.>l::.:<!ifli
'.l!
!ll
A:i.\f:!.ii:.{'l:'•il 'lt.!l!l
1
0
C>l
F'
ll
.
F'
8
Focusing Fixed locus. 1 2 m -
Viewflnder
· Rev
e<se
·Gal
i1e
an type.
Film Advance
----
Wh
eel in camera back : provisron for
double-exposure
IJ(
evention.
F
il
m Rewind
----
Rew
ind
button and cranklknob.
Exposure Cou
nt
er--Automati
c reset, addrtive.
Others
Accessory shoe thot-shoe).
st<ap
eyelet.
Dimensions
71 x
114
x
54
mm
Weight T80g
Note : Specif
icat
io
ns are su
b1ect
to change wrthou1 notice
Sucher Galilerscher T
yp
.
Filmtransport-
---
Ràdchen
in
Kameraruckwand: Vorrichtung
zur
Ve
rhrnderu
l1g
von Ooppelbel
ich
tung
Filmrüc
ks
pul
un
g--
-R
ückspulknopf und Kurbe
i/
Knopf
Bildzahlwe
rk
A
utom
atrsche Rucksiellung,
vo<w
ârtstâhlend
Sonst
ig
es
--
- -
-A
ufstecksch
uh
(M
ittenkonlakt
).
Tr
agschlau-
fe
nôse
Abmessung
en-
--
71 X
114
x
54
mm
Gewicht I
SO
g
Zu
r Beachtung : Ànderungen
der
lechnis
che
n Daten jederzeit
IJOrbeh
alten.
Vise
u<
Ty
pe
Ga
lilée.
Avancement du
film-Mo
lette située au dos de 1 appareil:
prevention de double exposition.
Rebobin
age
du film
--
Bovton
et
ma
nivelle
de
rebobînag
e.
Compteur
d'
images-
Ad
d•flf.
retour
autom
atique
Divers
ri
H~
porte
..
accessoires
{â
contact d
ir
ect).
œi
ii
P.!
de
courr
oie
Oimen
si
ons
--
-
--71
.<
114
x
54
mm
.
Po
i
ds
--
---
- - 180 gr.
Note : Spécrf
icat
io
ns P<esenlées sous réserve
de
modifications
sans
avis
pr
éala
bl~
Visor Ti
po
Gal
il
eo
.
Avance
de
la
pel
l
cu
la
--Rued
a situada en la parte posterior
de
la
câmara : p
ro
tecciôn contra dobles expo-
S•C•
ones.
Rebobinado
de
la
peli
cu
la - Bot on y manivefa de rebobinado.
Con
tadO<
de
exposlc
looes
Aditivo: ref)osicton automélica.
Otras Zapata de accesorros (con conlaclo centra
l)
.
01
ete para la correa.
Oimensi
ones
----
71
x 1
14
X 54
mm
.
Peso
1SOgr
.
Av
iso
:
La
s
esoe
cîfi
cac•onàS
eS
tan
sutetas
a
camb
1o
s
sin
pre
v
•o
aviso
.
1\1:1.1\~
'
''
lW(
~·
•.
1.2'1<
-oo
If<
!ji;
if
;
!'!
1~
>t:!
ll
ft
J
trti
'Il!
.
fl<l
'c
l!iliJ!>H,t
!!'lnJJOt
mfrii'
IIUIJfi!:
f~il
:l
'!l!>lil!l;t;~J;Ji:.
fkr
'c
l·
ilœ
li
,t----I
·
<:J1Uo
fil '4.ff!lll
lli'i
/
!;(ill
· ~
t'
<
.i
~
t'li
l;
/ltf-1. #.HJ.:
JI;
·t:
llltr'J'llfir'fi!Jii
tt
!(lllltil!ll
r,, i'i: l.
't
·
r:il'il'1i:
'lli!JI
.1!1\
ll
l
ni
l
~
·1 71 x 114 x
54~=!':
IKI
IU
I!l
<!Uil;
180i.\'!:
lt:
Jft
rnZ
'I!
!/.!
.
tl!
'-I
"IHh
!!!
lilt

1
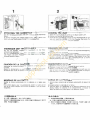
ATTACHING
THE
HANDSTRAP
Clip lhe Handstrap (included
wilh
your calll<!fa) on
t1>e
Handstrap
Eyelet. •
To
!)<event
dropping the camera inadvertenlly,
cany
it
about and
shoot with your hand passed through the Handstrap
IOOP.
ANBRINGEN DER TRAGSCHLAUFE
Oie (mit der Kamera mitgetieferte) Tragschlaufe an der Trag-
schlaufenOse
bè
testigen.
Um ein versehent
li
ches
Fallentassen der Kamera zu ve<meiden,
zum Tragen und beim Fotografieren eine
Hand durch die Trag-
schtaufe gesteekt lassen.
'
'
FIXATION DE LA COURROIE
Acetocher
la
courroie (fournie avec
J'appa
reil) à J'œillet prévu a
cet
effe
t.
Quand on photographie ou porte l'appareil,
paSSe<
la
m
aon
dans
la courr
oie
POU<
év•te<
de laisser tomber
J'a
ppareil
par
ac
cident.
MONTAJE DE LA CORREA
Sujetar
la
correa (sum•nistrada con la cêmara) en el ojete para
esta
Para evitar
deJSr
la caer inavertidamente, pasar ta mano
por
el
lazo de
la
corr
ea
siempre que se lieve la càmara o
Que
se
tomen
fotografias.
~t>l~'R~~
~
H-1'
*1'
(#
t!!t
!Jt.!l(f'!'J
f:iff'f~~~'!M
I
'I'.
~M~T-~-~~~ffi
t!!l~
r~~.
~~'f~A~~*I'&~~~$
~~
m
ill
. t.-!il•itrrta
11t
!rH;
·.
2
LOADING
THE
FILM
1 Open the Camera
Back
by pressing the
Back
Cover Lock.
• Always load the film in subdued light.
2.
Clear the Film Chamber
by
pulling the Film Rewind Knob ali the
way out. msert the cartridge '" the Film Chamber. then press the
Film Rewi
nd
Knob dawn
to
its original oosltion.
EINLEGEN DES FILM
1.
Ooe
Kamcra-Rückwand dur
ch
Orucken der Rückwandentriegelung
ôffnen.
• Den Ftlm stets bet gedampltem Licht emlegen.
2.
Ote Ftimkammer durch Herausziehen
des
Filmrückspulknopfes
b
ts
zum Anschlag zugângllch machen. Oie Petrone
in
die Film-
kammer einlegen und
dam
den Filmrüej<spulknopf
zu
seiner
Ausgangsstellung nach unten
Clrüeken.
'
CHARGEMENT DU FILM
1
..
Pousser
re
verrou
du dos
de
rappareH et 9uvru celui-cL
•
TouJOu
rs charg<lr
le
film en tumtère tamisée.
2.
Retirer complètement
le
bouton de rebobinage de sorte que son
axe
ne fasse plus saillie dans
le
logement. installer
le
chargeur.
puis
repousser
re
bouton a
sa
position orî
g1n
afe
.
CARGA DE LA PELICULA
1. Abrir
ta
tapa oosteri
a<
de
la
câmara presionando
el
seguro
Cle
esta.
e C8rgar siempre la
peltCUia
en
luz tenue.
2. Tirar del boton de rebobinado de la pelicula totatmente hacia
afuêra, insertar
el
cartucho en
el
compartimiento. y empujar
el
baton de rebobtnado hacia
aba10
a su oosici6n ongtna
t.
«;:
):t
lr:J
~
}~
1 . tkll!l!J..I!llltiHillllll. !1llll!.!!ltl!ll1Hl,
• -:E'J'
tt~~!a!5lf.JIIfffilrrf&:l\·tn'!li
A.
2.
~lXI\
lii:ltiii!Hi!H~!liil'i,
ifü~f&:ll'~~lil*·
tMt~P,
·
&'!IIAf&:
r.-~•.
~~~IXIl'Kltiii!~~T~~-~L

3.
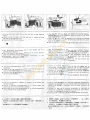
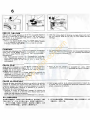
Pull
th!'
f
ilm
dnd
1nS€<1
the
t1p
•nto
the
stol
of
the Take-up
Spool
• lnsert
the
f,tm
t1p
deepty
mto the
SlOI
untol
~
comes
out
from
the
stOl
on
!he
OPP0$1~>
s
de
•
Make
sUie
the
film
pe~oqtoons
engage
the
$p<ockel Teeth
•
3
Den
Filmant<.~ng
h<:r..ousz
iehen
und
in
den
Sch
l
ilz
der
Auf·
wic
ke
tspule eonslecken.
•
Den
Folm
so
we
ot
on
den
Sch
litz
slecken
.
bis
eo
au
f
der
anderen
Sci!e
des
Sch
htzes
woedtJr
hcrauskommt.
• S•che<stellen,
daB
<Joe
fllmperforation
e.nwandtrei
m11
den
FilmtranspOftrollonzahnen
1n
Eingriff
ist
:1
Tore<
SUl
1 amorce
du
lofm
el
t
•nsé<er
dans ta
lente
de
la
bob
ne
receptriCe
• Veoller
a
ce
Q•>e
l'amorce
so1:
nser
ee
profondernen!
lusQu
à
ce
Que son
extr"'mitê depasse Par
1
aut
re
lenle.
• S assurer
aue
les
perforations
du
f.tm s·engreooe
nl
sur
les denis
de
1
axe
d
en!rainemenl
3
Tuar
de
ra
pelocula
e 1nsertar
su
extremo
en
la
ra
nura del
calfete
receptOf
•
lnsertar
et extremo profundame
nte
en
la
raniJfa
hasta
aue
sobresa
ga
de
la
ranura
dellado
opuesto
• Asegurarse
de
aue
las
perforaciones
de
la
petocula engancnan
correctamenle
en
Id
rwda
denlada
3.
Hm~r.
ttftn~•~A~~~œn~~•
.
·
~~a
~~
-m~~~
AM~
··
~~~K.IDK-~M~PlliC
IS,tl
,
e
tttif
.::!
'IX
I\
J
n~LIK +f.'*
fl-1!:
1l!lii
Uii
~
.
4
Tum
the
Film Advaroca
Knob
and
depress
!he
Shlltte<
Retease
Repeat
ti'ÎS
cycle
once
()( tw!Ce
10
make
SUie
the
Hm
woll
Wlnd
then
close
the
Baek
Cover.
5
Ta
ke
up
the
folm
Sl"<:k
b'(
erecto1'1Q
and
tU<rong
the
Rewond
Ctank
stowty
on
the
d•rectoon
of
the
arrow
then
fOid
Ille
cran
l<
bad<
10
o
ts
origJnat
pcsn on
a
Stop
turno
ng
the
crarli<
~s
~
u
it
feels I•Qht
Do
not
fOtce
ol.
4.
Das
Filmtransportrâdcnen
drehen und den
Ausl
ëiser
drücke
n.
Diesen Vorgang
eir>-
blh
~welme
l
wiodemolen,
um
siche<zustellen,
daB der
F1
lm
transport<
wl
wird.
DMn
die
Rückwand
sch
li
eBen.
5.
Filmdurchha
ng
dUlch
Auls
te
lle
n und longsames Drehen der
Ruckspulkurbel
in
Pfeolr•ch!ung
aufnehmcn. Dann
die
Kurbet
in
ohre
Ausgangsstellung zuruckklappen.
•
~h.i
e'n
Wide-~stand
1
&u
swen
'''·
mtt
dem
Otdhttn
der
Kurbel aufhor
en
Ke•ne
IJ9W&Il
~nwenden
4
Tourner
la
mo1e11e
d"8)'80Cemenl
Ou
hl
m
et
presser
sur
le
deClencheur. Repèter
cette
oper
auon
une
ou
deux
fois
POU'
sassurer
Que
le
~lm
avance.
puos
refeuoor
le
dos
de
l'
appareil.
5
Degager
la
manivelle
de
rebob nage
el
la
IOU<ner
lentement
dans
le
sens
de
la
1\êche
POur
rattrdoer
un
•mou
de
la
pellicule,
ll\J
<S
rep
lo
er
la
ma
ni~le
.
• Arrèler
de
1ourner
*
qu
on
sent
une
résistance.
Ne pas forcer
4
G<rar
la
rueda
de
avance
de
'a
pelicula
y presionar
el
disparador.
Repel
r
esla
aperaci6n
una
odos
veces para cerciOfarse
aue
la
pellcuta
se
enroUa,
y
despues
cerrer
la
tapa
poster~or
de
la
camara
5
Recoger
el
laxo
de
la
pelicula levantando
la
manrvela
de
rebOI:>Inado
y
gorândola entamente
en
la
dueccion
de
ta flecha
y vr>"'er
a
co
iOcarla
en
su
pasociOn
Ofogonal.
• De)ar
de
g<ar
la
man1vela
llll8MS
se s.enta lension.
No
la
fue<oe
4 .
Q
J!Jf*
lt
liililtit,
~lt<'FtH,IUII.
,
•.t.!llU~fli-.
:.:*
.
Wf
i'l?
~
!H
lWI!trli.
~f
i
.
tfll!lllHitiUt,
5.
~ll:..IHIHiiJHJll*lliè'~
/i
lô
•
J'*lt
tU
!J~r.
~i:
!I
IIII
M
.•
rttilflH!~I\
'I'rl
U~I!Ht.
~~-~
tl:
ltf
.{
l\'!diJH!m
4
B
~I
UfU'
.
·
~~n
"
~~ ~
·h~.
aw~d
"~tl:ltk~IIIIM
~
~~~
"
J!r
t:.

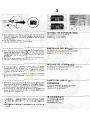
6. While watching the
ExPOs
ure Counter, turn the Film Advance
Kn
ob
and
P<ess
down the Shu
t1
er Release. Repeat until the
number
"1' appears in the Counter. (The film is now
in
POS
ition
for the first shot.l
•
The film
is
properly loaded
if
the Rewind Knob turns to the left
while the F
il
m Advance Knob
is
bei
ng
turnad.
6. Unter Beachtung des BildzâhlwerkS
4
das FilmtransPOrtrâdchen
drehen und den
Auslôser nach unten drücken. Den Vorgang
solange wiederholen, bis
"1"
im B
il
diêhhverk erscheint. (Der Film
befindet s
ic
h n
un
in der
ri
c
ht
i
~n
Position Ill'
die
erste
Aufnahme
.l
"'
• Der Film ist r
ich
tig geladen. wenn sjch der Ruckspulknopf nach
links dreht.
wlihtend der F
il
m transoort
ie
rt w.rd.
6.
En
regardant dans
le
compteur
<f
rmages, tourner
la
molette
d'avancement
du
fi
lm
et
presser sur
le
déc
l
enc~
eur
.
Repèter
l'opérat
ro
n
JU
squ'a
ce
que
le
chiffre
'T'
apparaisse dans
le
compteur. (Le film est maintenant mis
en
place
PO
ur
la
P<emlêre
vue.)
• Le film est catrecteme
nt
chargé si le bouton oe rebobinage
tourne
dans
le
sens
inv
erse
des
aigu
il
les l
or
sa
u·
on
fait
avancer
le
f
rl
m.
6. Mientras se observa
el
con
tador
de
expasiciones, birat
la
rueda
de
avance de
la
pelicu
la
y presion
ar
el disparàdor. Repetirlo
hasta
que
el
nùmero T aparezca en
el
contador
.'
(La pell
cula
ya estâ en POsiciôn para tomat
la
primera fotografia.)
• Si
la
manivela de rebobinado gira
en
la
direccion opUesta a las
agujas del re
lo
i al accronar
la
rueda de avance, significa que
la
pelicula se ha
ca
rgado bien.
6 . - ïfi!ltttiUt.
-!fi
Mi!J-.
~IIilllJll.
;Jf;tJCF~r,tJ<m
.
&!Ul
ft
t'l'.
iti313t
tj:
ât
l:.lllffi
lilft'f-
., ••
< t~o
Il"
to
*
fl!'ll
-
fllttmfl'J~
il
.)
•
ji[JJI!:(f
"
tJJtlc
~llilil
ü~-
r.-
&I!I.I<Jll
.l
i!J:=fti:il.
ftOJ~ffi-lt'lli
"'"~
'*
·
3
SETIING
THE EXPOSURE RING
The expasure ring rs set as fotl
ows:
Opposile 0 on c1ear weather
Opposite
C>
on
ha
zy
sunlight
EINSTELLEN
DER
BLENDE
Der Blendenring
wrrd
folgenderma6en eingestellt:
Gegenùber
0
be
i Sonnenschein
Gegenüber
C>
bei le
ich
ter Bewolkung
REGLAGE
DE
L'EXPOSITION
Le
réglage
de
la bague
<l'exPOs
it
io
n se
fa
rt comme
suit:
En
regard de 0 par
temPS
cla
ir
En
regard de
(:;)
par soleil voilê.
AJUSTE DEL ANILLO DE
EXPOSICION
El
anille
de
exPOsicion
se
ajusta como sigue :
Opuesto a
o en
tiemPO
despejado.
Opuesto a
C>
en sol velado.
111:/tii~lllii~~~
tJ<T~lJ!~~lëaJ1t~lË!ll:
~:1€11-H<Iill
0 IU è:
~1t~MII;f,.i11\C>
l'l
ie,

4
-COMPOSING AND TAKING
YOUR PICTURE
1. Look through the Vo
ew
hn
der
a
nd
bring your sub1ect in the center
of the Viewfinder frame.
2 To take your picture. press t e Shutter Release gently down. '
-WAHL DES BILDAUSSCHNITTS
UND
AUFNAH~E
1. Ourch den Such
er
schaue
n
un
d das Motiv
in
doe
Mi
tte
des
Sucherrahmens
bringe"'
2.
Um
die
Aufnahme
zu
'machen.
den
Auslôser dr
ucke
n.
oone
die
Kamera
z~
verwackel'i
-CADRAGE
ET
PRISE DE VUE
1.
Regarder dans
le
vose
ur
et
centrer r omage dans le cadre du
vîseur.
2. P
our
prendre
la
photo. appuyer doucement sur
Je
d
éc
le
ncheur
-ENCUADRE Y TOMA DE LA
FOTOGRAFIA
1.
Mirar por
el
visor Y c;entrar el tema
en
el m
ateo
del vo
sor.
2. Para tomar
la
fotografia, presionar lentamente el disparaoor.
...
~
~~-ft!lftlll
1 .
l!ii§Jf(Jltlii!
~ffl~
lf<
t t.
.
i!.~:Jtl:lY!'Jf(Jltl«<t'
*·
2.
fiŒl*TIH'IlU!.
Wiiffl'l
ll
l!!\
1\-,
5
TAKING FLASH PICTURES
1. T
he
fl
ash
os clipped into the Accessory Shoe. (Your camera
wil
l
lake
any cordless type flash. but
not
nash bulbs.)
2. Set t
he
Exposure Ring
at
t
he
1 symbol.
3. Flash range
Using
a. flash
unot
with
guode
number t6 (ISO/ASA t
OO·m).
t
he
nash shOctlng ran
ge
i~
1.2-
3m
BLITZFOTOGRAFIE
t.
Der Blitz wird
on
~n
A
ufs
tec
ksch
uh
gesteckt. (
Ooe
Kamera
funktio
nr
ert
mit
allen drahtlosen Blltztypen. J
edOCh
nicht mit
Bhtzlam
pen
.)
2.
De
n Bfen
denron
g auf
das
1 -Symbof
eo
ns
te
lfen.
3. Bhtzbereoch
Mot einem Blitz m
ot
LZ
t~(ISQ
I
ASA
tOO
·ml. betragt
de<
Blitzauf-
nahm&t)ereo
ch
1.
2 bis 3
l~
t
er
.
f <
\ \
PHOTOGRAPHIE AU FLASH
1.
Le flash est
fi
xé dans
la
grrffe porte-accessoires. tOn peut se
servir de
n
omport
e
Que
l flash sans fit, mais pas d'ampoules
flash.)
2. Régler ta bag
ue
d'expositoon sur le symbole
3. Portée du tfa
sh
A
vec
un
tfash
ay
a
nl
un
no
mbre guide
de
16 (1
00
ISO/ASA, métre).
la
oortée du flash est de
1.
2 a 3 m.
FOTOG~AFfAS
CON FLASH .
t.
Mo
ntar
el
flash en la zapata para accesorios. {
Su
camara acepta
cuafquier flash de topo
sin
cord6n. pero
no
lâmparas
de
flas
h.)
2. Ajustar
el
Sl]illo de exposici6n enfrente de la marca
3. Campo
de
cqbe
nura del flash
El campo
cie
cobertura de
ll
!lash es 1. 2 - 3 m cuando se
utlliza
un
flash Que tenga
un
h&nero
guia
de
16
(ISO! ASA
100.
metros).
~
"
~
n:-m
m~
1 . MIXI*:JIHŒJIIIHU!
.t&
..t.
(â
Ul
iiti
7
1XJjt;l.ll~~.
~.t:JH
lffaJU'Wiiljjl&J':IXI1ti2
. l
2 .
lllf
!J
jt;r.i'~llt~~~
1
!U~Illli
.
3 .
IXJjf;ilfà\Jtl'li
i
L'!
IIl
.
ft!llliXI1t'lli'<llfk'llJ!til!IXJ*:IIi
lll
lil.li.
16 (ISO/AS
A1
00·m)
~lflll.
IXI1tl.ll(J!)tê
li
1E
IIl
"'i
L2- 3
?ii:.

6
END OF T
HE
FILM
Alter
you
are
through exposing a roll
of
film
(C
hOOk
the Exposure
Counter to
make sure
it
shows the
nu
mber "24"
if
the
fi
lm in
the
camera is a 24-exposure roll), rewind it into lts cartridge
and
unload it as follows :
1.
Press rn the Rewind Butten, erect the Rewind Crank and turn
it
in
t
he
d
ir
ection of the arrow until you feel a sudden release
of tension. The film
has
now been rewound into lts cartridge.
FILMENDE
Nachdem alle Autnahmen des Films gemacht si
nd
(bei Verwendung
eines Films
mit
24 Bildern muB das Bildzâhlwerk
24
anzeigen),
den
Film in seine Patrone zurückspulen und fa
lgende<
maBen
herausnehmen :
1.
Den
Rückspulknopf drücken, die Rücksputkurbel autrichien
und in Pfeilrichtung drehen, bis
ei
n plôtzliches Nachlassen der
Span
nu
ng zu spüren
ist.
Der Film J ist dann
in
se
i
~
Patrooe
zuruckgespult. \
FIN DU FILM
'
"
Aprés avoir fini d'exposer
un
cha
rgeur
de
film, (vérifier le compteur
d'images pour s'assurer
qu
'i
l indique "24" si le film chargé dans
l'appareil est de
24
poses). rebobiner
le
film dans le chargeur
et
retirer
ce
t
uî·
,
cî
com
me
su
tt :
1.
Presse<
sur le bouton de rebobinage, dégager la manivelle de
rebobinage
et
la tourner dans
te
sens
de
ta fleche jusqu'à
sentir
un relâchem
ent
soudain
de
la
te
nSlon
.
Le film a été complétement rebobiné.
FIN DE LA PELICULA
Después
de
haber terminado de exponer un cartucho
de
pelicula,
{verificar el contador de exposîciones para
ce
rci
orasse
de que
muestra el numero
"2
4" cuando la pelicula cargada en la câmara
es de 24 exposiciones). rebobinar la pelicula en
el
cartucho y
descargarlo de la forma siguiente :
1.
Presionar el bot6n de rebobinaclo, levantar la manivela de
rebobinado
y giratla
en
la direccion
de
la
fl
echa hasta que se
sienta una
Ialta repentina de tension.
Esta indica
que la pelicula ya se ha
re
bobi
naclo
en su cartucho.
~J:tfé Hl
~· ~
11;1A
tl
1'è
••
t' fk
~
(QJJfli'
~AI'r.JfXWlli
U
!I!I\"â
,
lti
l:t
i
Ht.
61
12
'
Ul
ff.
1ll
1Ji:
'f'"
24
")
.Z.I
t.
llf'Em~~â'l>.
f1.\!t
në"f~lJ:!~ll\(1!l'e
:
1 .
në"ftx~l.iiltli.
NA!:fk~
liU
§II!l~.
~
nëim "'11
1
û
JIU
!'E.
ill$
!'f.
lt
!I!:1J?.I!f1.\lfl~~lll.tl:,
)l~
fj:
~
è
lf
1iili4J.\'1t'l'
,
2. Open t
he
Camera
Back
by
pressing the B
ack
Cover Lock, pull
the Film Rewind Knob ali the way out and unload
th
e
fi
lm
cartridge.
2. Die KamerarUckwand durch Drücken
de<
Rückwandentriegelung
ôffnen, den Filmrückspulknopf bis zum Anschlag herausziehen
u
nd
die F
il
mpatrone herausnehmen.
2.
Ouvrir
le d
os
de l'appareil en
pOussant
son
ve
rr
ou.
retirer
complétement la manivelle
de
rebobinage et enlever le
cha
rgeur.
2. Abrir
la tapa posterior
de
la càmara presionanda
el
segura de
la
misma, tirar de la manivela
de
rebobinaclo totalmente hacia
afuera. y descargar el
ca
rtucho.
2.
në"fl'tlllltl'!ltilllillll. fJ/lil.
l!lllll
tl'!lt
•.
llf
fk
ltl.lll
UUftttJ:.
·
il
:1ESJ1ii\\Jt,
.lËint!Jitt;.

CAMERA
CA
RE
•
Your
Fu
joca
MA
-t
os
a
P!llcosoon
ins!rument
which
requores
c:a
reful
handling.
Do
not
wet
tt
or
drOP
tt
on the
1100<
.
•
Oust and
soit
on
the Lens and Vt
ewf
onder
are
removed
wtth
an
air
blower
and
by
wipong
lightly with
a
p1ece
of
soft. hnl-flee
cloth.
e
ln
hot weather, do not leave your
ca
mera
in
a
closed
car
or on
an ocean
beach
except
temperarily for
a
ve
ry
sho
rt
time. and
never tea
ve
lt
ln molst places
KAMERAPFLEGE
e thre
Futoca
MA
·t
os
t etn
Praz
soonsinstrument.
das
sorgfêltoger
Behandluno
bedal1
Setzen S.e
die
Kamera ke•nen
Et
schûttarungen
aus und lassen
S111
sie nicht na6
v.erden.
• EnlferiiEin Sie Staub
und
Sctvnutz
vom
Ob,ektrv
und
dem
Sucherlenster mrt
e<nern
Btasepinsel
und durch
~•chtes
AbW1SChen
mit
eonem
weochen. fluseflfre
oen
Tuch.
•
Lassen
Ste d•e Kamera
an
hei6en Tagen ntcht
tn
eonem
geschlossell9n Wag
on
oder
am
Strand.
"s
sei
denn nur fur
ganz
kurze
Zeit.
und aut
ke
•nem
Fall an einem
Ort
mit
hO
he
m
Feuchtigkeitsgeholt llegen.
ENTRETIEN DE L'APPAREIL
•
Le
Fu
1ica
MA·t
est
un
instrument de
précision
quo
dott taire
l'objet
de
soins attentlls.
Eviter
de
le
mouiller ou de le laisser
tomber
.
•
La
poussière
et
les taches
Qui
se
trouvent
su
r
l'obteclof
et
te
viseur
sont
enlevées avec
une
poire
soufflante
et
en
essuyam
légérement avec
un
chtffon doux sans
pe
luche.
•
Par
temps
Chaud.
ne
pas
laisser
r appareil
da
ns
une
v
ooture
fermèe
ou
sur
une
plage
.
sauf
peur
une
tres
courte durée
Ne
jamaos
le
latsser
dans un endroit humide.
CUIDADO DE
LA
CAMARA
•
Su
Fujica
MA
-t
es
un instrumente de
prec•s•on
que
necesita
un manejo culdadoso. Evitar mojarla o dejarla caer at sueto.
• El polvo
y suciedad depositad
os
en
el
ob1
et
r
vo
y vi sor se
ouitan con una
pera sopl
adO<a
y frotando ligeramente
co
n un
pano suave
oue
no
date
pelusa.
•
En tlempo caluroso.
no
dejar
la
cémara
en un
autom6vil
cerredo
o sobre la arena de
la
ptaya,
excepte
cua
ndo
se
haga
ternpooalmente
dU<ante
un periodo
de
hemPO
muy
CO<to
.
No
de)811a
en
Sltios
humedos
!!!UIH~Ul
ll
~
t:
•
Fujiu
MA
·lll
- !IIM'f:lSI«.
lt
f'I!
11JI~
llii1JIU-l•·C•.
:r-J!M
'E
,$
ill~~
'EIU
:
Jt!R.l:
.
·
•
~~~~m
~
~•
~ •
~m
•~~
~
.
~m~~
--
~~~
ftRM
lit
.
•
&~
~
~~~
~
l
~ ~ M
~
-M
~~
1-
JI
~~
~-
~~«
NM
"
i'l$~.
!l<.ili
. J:.
[oi]._,tl1.
~
1-
IJ!
~Œ
ii!A
~IIiffr
.
\
P.
T.
HONORIS
INDUSTRY
JL. Raya Bekasi
KM
. 25, Jaka
rt
a-Ti
mur.
lndonesia
PHONE : 480726, 483408
Transcripción de documentos
Owne•;s' Manual Bedienungsanleitung Mode d'emploi Manual de instrucciones i!l.Pftlill'f.-M '1( @@ ~@ 1 NAMES OF PARTS t Exposure Counter .i $hutter Release j q AccessO<y Shoe V•ewfinder (~ F1lm Rewind Clank/Knob {§_ Handstrap Eyetet •1: Back Cover Lock fj Exposure Ring ~ftExposure Symbots 't9Lens f1 Film Chamber ·~Film Rewind Sptndle 13 Sprocket Teeth 1é Fil .... · ' tance Kf)('lb ·j~P•es»~re Plate %Camera BACk .jTtFitm Take-up SPOOI ·faFitm Rewind Button BEZEICHNUNG DER TEllE ! •Bitdzahlw.xk }Austosec ·3' Aulsteckschuh l4:Svchér @ Filmcûckspulkucbei/Knopl @Tragschlaufenôse ·(î.:Rùckwandentriegelung ® Bienden•ing ."§)Wettersymbote ~ltObjektiv ù;Filmkammer Ï~FilmrückspuiSP•ndel 1!lZJihne der FtlmtransJ)O<t . rolle j4tFilmtransPO<t roocher1 •5lAndruckplatte ,-~Rückwand ITIFilmaufw•cketsPule I~Fi lmruckspulknopf NOMENCLATURE (i)cOmpteur d'images •Ï)Déclenchew ,3 Griffe POrte-accessoires ,f Viseur . ~ Bouton/Manovelle de rebobmaye ov hlm •6 Oerllet de courro•e ,1 Verrouillage du dos :le l 'appareil :.tBague d'exposttton @Symboles d'exposition @Objectif •jî.Logement du film ·i~Axe de oebobonage du hlm @Dents de 1axe dentrainement .ji;Molette d'avancement du film •ISPresse-fitm tt6'Dos de l'appareil ,tfBobine réœptroce du film ·1s Bouton de rebobinage NOMENCLATURA 1 ContadO< de exposico1es 2 Oisparador 3 Zapata de accesoroos 4 V!SOr 5 Botoni Manivela de •e - oooulacto ae la peflcula 6 o ,ete para la correa 1·Seguro de la tapa pos· tefior de la camara s ·An• llo de expos•cion 9·SimboiOs de exposici6n ljObietivo ït Compartimiento para el cartucho de pelicula ,·1 Eje de rebobonado de ta pelicula 13 Eie dentado 14 Rueda be avance de ta peticuta 11Placa de presi6n 16·Tapa posteri oc de la câmara 17·Carrete receptoc de la pehcula ·18 Botvn c-;.. ·ebob•nado de la p~hCu•J• (i)~rtW @lki'~I'Hil @JIHNili•:h fl< q)J(I(ilt'~ ~) 10: J;'i;(1(!flllli'i iUlt ®N.fii:·*'l!U;; (î)ll(lffHI'I. fH.illllllll ®lVI1'tàltli!J.l< @J.ll.1'tr.:.3t: ®tl~1i @~J',· $ @P;ill!l!!tll'llllt @liU~ al! @~<~;r,· n~;uR ~''IR @'Kitll lltiUi @lflltHH.;) @tl;l\/1lf!U SPECIFICATIONS ' Film Picture Slze Lens Shutter Gartridge-packed 135 roll film. 24 x 36mm Fujinon 1.8, 42mm, 3 compOnents. 3 elements M echanical. 11100-sec fixed speed , Xsynchronization. Expœure Contrai - -Ape<ture setting via weather symbols. Weather Symbols Aperture Focusing Fixed l ocus. 12 m Reve<se· Gali1ean type . Viewflnder · Film Advance- - - -Wheel in camera back : provisron for double-exposure IJ(evention. Film Rewind - - - -Rewind button and cranklknob. Exposure Counter--Automatic reset, addrtive. Accessory shoe thot-shoe). st<ap eyelet. Others Dimensions 71 x 114 x 54 mm Wei ght T80g Note : Specifications are sub1ect to c hange wrthou1 notice TECHNISCHE DATEN Film - - - - - - -ln PatJone gepackter 135-Rollhlm Bildlormat-----24 x 36 mm Objektrv Fujrnon 8142 mm. 3 Gliedér, 3 Linsen VerschluB !'vtP.chanischer Versçhlufl. feste Verschluflz,~it von 1/100 s. X..Synchromsation Belichtungsregelung--Biendeneinstellung nach Wettersymbolen Wettersyrnbole Blende Scharfeinstellung--Fixfokus t.Zm- ._, Sucher Galilerscher Typ. Filmtransport- - - - Ràdchen in Kameraruckwand : Vorrichtung zur Verhrnderul1g von Ooppelbelichtung Filmrückspulung - --Rückspulknopf und Kurbei/Knopf Bildzahlwerk Automatrsche Rucksiellung, vo<w ârtstâhlend Sonstiges- -- - -Aufsteckschuh (Mittenkonlakt). Tragschlaufenôse Abmessungen-- -71 X 114 x 54 mm Gewicht ISO g Zur Beachtung : Ànderungen der lechnischen Daten jederzeit IJOrbehalten. FICHE TECHNIQUE Film Fi lm 135 en chargeur. Format de négatif--24 x 36 mm Objectif Fu1rnon 1: 8, 42mm. 3 groupes. 3 éléments. Obturateur - - - - M~can• que . vi tesse fixe de t/100 sec.: synchronisation X . Contrôle o·ctposition-Reglage du diaphragme avec les symboles atmosph91i Ques. SymbOles 0 Ouverture Ft! C> l Viseu< Type Galilée . Avancement du film-Molette située au dos de 1 appareil: prevention de double exposition. Rebobinage du film- -Bovton et manivelle de rebobînage. Compteur d'imagesAdd•flf. retour automatique riH~ porte ..accessoires {â contact direct). Divers œiiiP.! de courroie Oimensions- -- --71 .< 114 x 54 mm. Poids- -- - -- - 180 gr. FS Note : Spécrfications P<esenlées sous réserve de modifications sans avis préalabl~ Mise au point - - --Fixe. 1. 2 m - ESPECIFICACIONES Pelicula CartuchO de pel;cula del tiPO 135 Tamalio del negativo - 24 x 36 mm Objetivo Visor FuJ•non 1 8. 42 mm . 3 compenentes. 3 elementos. -Mecanico: velocidad fri a a 1/100 de seg : s•ncronczac•on X. Control de exposiciOn-Ajuste del drafragma mediao!e los simboiOs de exposrct6n. Obturador - - -- S.mbolos de exposiciCwl Abertura Aviso : Las esoecîficac•onàS eStan sutetas a camb1os sin prev•o aviso. Enfoque - -- - - E nfoque fijo. t , 2 m - Il< 1\ -- - --- 1-\· ~H!'l!i,t 135 ~'11J'I1: 11(11) N. ·1·- -- - - 2 • x 36* Il! • l i - - -- -F'ujinon 1: 8, 42·,-,ik 3~fll'i', 3>t:l't· ~ 1"1 'fl!ll«..l:. l f l OOW. -11il >ii~ ~: Il.'! 'lt. · 1H1f.ii'V lili .>l::.:<!ifli '.l!!ll A:i.\f:!.ii:.{'l:'•il 'lt.!l!l * 1 Tipo Galileo . Avance de la pell cula--Rueda situada en la parte posterior de la câmara : protecciôn contra dobles expoS•C•ones. Rebobinado de la pelicula - Boton y manivefa de rebobinado. ContadO< de exposlclooes Aditivo: ref)osicton automélica. Otras Zapata de accesorros (con conlaclo central). 01ete para la correa. Oimensiones- - - -71 x 114 X 54 mm. Peso 1SOgr. 0 C>l F' ll . F' 8 1\1:1.1\~''' lW( ~·•. 1.2'1< -oo If< !ji;if ;!'! 1~ >t:!ll ftJtrti 'Il! . fl<l'cl!iliJ!>H,t !!'lnJJOtmfrii'IIUIJfi! : f~il :l'!l!>lil!l;t;~J;Ji:. fkr'c l·ilœ li , t - - - - I·<:J1Uo fil '4.ff!llllli'i/ !;(ill · ~t'< .i ~ t'lil; /ltf-1. #.HJ.: JI; ·t: llltr'J'llfir'fi!Jii tt!(lllltil!ll r,, i'i: l. 't·r:il'il'1i:'lli!JI .1!1\lll nil~ ·1 71 x 114 x 54~=!': IKIIUI!l<!Uil; 180i.\'!: lt: JftrnZ 'I! !/.!.tl! '-I"IHh!!! lilt 2 1 ATTACHING THE HANDSTRAP Clip lhe Handstrap (included wilh your calll<!fa) on t1>e Handstrap Eyelet. • To !)<event dropping the camera inadvertenlly, cany it about and shoot with your hand passed through the Handstrap IOOP. LOADING THE FILM 1 Open the Camera Back by pressing the Back Cover Lock. • Always load the film in subdued light. 2. Clear the Film Chamber by pulling the Film Rewind Knob ali the way out. msert the cartridge '" the Film Chamber. then press the Film Rewind Knob dawn to its original oosltion. ANBRINGEN DER TRAGSCHLAUFE EINLEGEN DES FILM Oie (mit der Kamera mitgetieferte) Tragschlaufe an der TragschlaufenOse bètestigen. Um ein versehentliches Fallentassen der Kamera zu ve<meiden, zum Tragen und beim Fotografieren eine Hand durch die Tragschtaufe gesteekt lassen. 1. Ooe Kamcra-Rückwand durch Orucken der Rückwandentriegelung ôffnen. • Den Ftlm stets bet gedampltem Licht emlegen. ' ' FIXATION DE LA COURROIE Acetocher la courroie (fournie avec J'appareil) à J'œillet prévu a cet effet. Quand on photographie ou porte l'appareil, paSSe< la maon dans la courroie POU< év•te< de laisser tomber J'appareil par accident. 2. Ote Ftimkammer durch Herausziehen des Filmrückspulknopfes b ts zum Anschlag zugângllch machen. Oie Petrone in die Filmkammer einlegen und dam den Filmrüej<spulknopf zu seiner Ausgangsstellung nach unten Clrüeken. ' CHARGEMENT DU FILM re verrou du dos de rappareH et 9uvru celui-cL • TouJOurs charg<lr le film en tumtère tamisée. 2. Retirer complètement le bouton de rebobinage de sorte que son axe ne fasse plus saillie dans le logement. installer le chargeur. 1.. Pousser puis repousser re bouton a sa position orîg1nafe. MONTAJE DE LA CORREA CARGA DE LA PELICULA Sujetar la correa (sum•nistrada con la cêmara) en el ojete para esta Para evitar deJSrla caer inavertidamente, pasar ta mano por el 1. Abrir ta tapa oosteria< de la câmara presionando el seguro Cle lazo de la correa siempre que se lieve la càmara o Que se tomen 2. Tirar del boton de rebobinado de la pelicula totatmente hacia afuêra, insertar el cartucho en el compartimiento. y empujar el baton de rebobtnado hacia aba10 a su oosici6n ongtnat. fotografias. esta. e C8rgar siempre la peltCUia en luz tenue. ~t>l~'R~~ «;: ):t lr:J ~ }~ ~ H-1'*1' (#t!!t!Jt.!l(f'!'J f:iff'f~~~'!MI'I'. ~M~T-~-~~~ffi t!!l~r~~. ~~'f~A~~*I'&~~~$ ~~ 1 . tkll!l!J..I!llltiHillllll. !1llll!.!!ltl!ll1Hl, • -:E'J' tt~~!a!5lf.JIIfffilrrf&:l\·tn'!li A. mill. t.-!il•itrrta11t!rH;·. 2. ~lXI\ lii:ltiii!Hi!H~!liil'i, ifü~f&:ll'~~lil*· tMt~P,· &'!IIAf&: r.-~•. ~~~IXIl'Kltiii!~~T~~-~L 3. Pull th!' film dnd 1nS€<1 the t1p •nto the stol of the Take-up Spool • lnsert the f,tm t1p deepty mto the SlOI untol ~ comes out from the stOl on !he OPP0$1~> s de • Make sUie the film pe~oqtoons engage the $p<ockel Teeth • 4 Tum the Film Advaroca Knob and depress !he Shlltte< Retease Repeat ti'ÎS cycle once ()( tw!Ce 10 make SUie the Hm woll Wlnd then close the Baek Cover. 5 Take up the folm Sl"<:k b'( erecto1'1Q and tU<rong the Rewond Ctank stowty on the d•rectoon of the arrow then fOid Ille cranl< bad< 10 ots origJnat pcsn on a Stop turnong the crarli< ~s ~ u it feels I•Qht Do not fOtce ol. 3 Den Filmant<.~ng h<:r..ousziehen und in den Schlilz der Auf· wicketspule eonslecken. sowe ot on den Schlitz slecken. bis eo auf der anderen Folm • Den Sci!e des Schhtzes woedtJr hcrauskommt. • S•che<stellen, daB <Joe fllmperforation e.nwandtrei m11 den FilmtranspOftrollonzahnen 1n Eingriff ist 4 . Das Filmtransportrâdcnen drehen und den Auslëiser drücken. :1 Tore< SUl 1amorce du lofm el t •nsé<er dans ta lente de la bob ne receptriCe • Veoller a ce Q•>e l'amorce so1: nseree profondernen! lusQu à ce Que son extr"'mitê depasse Par 1 autre lenle. • S assurer aue les perforations du f.tm s·engreooenl sur les denis de 1axe d en!rainemenl 4 3 Tuar de ra pelocula e 1nsertar su extremo en la ranura del calfete receptOf • lnsertar et extremo profundamente en la raniJfa hasta aue sobresa ga de la ranura dellado opuesto • Asegurarse de aue las perforaciones de la petocula engancnan correctamenle en Id rwda denlada 4 G<rar la rueda de avance de 'a pelicula y presionar el disparador. 3. Hm~r. ttftn~•~A~~~œn~~• . Diesen Vorgang eir>- blh ~welmel wiodemolen, um siche<zustellen, daB der F1lm transport<wl wird. DMn die Rückwand schlieBen. 5 . Filmdurchhang dUlch Aulstellen und longsames Drehen der Ruckspulkurbel in Pfeolr•ch!ung aufnehmcn. Dann die Kurbet in ohre Ausgangsstellung zuruck klappen. • ~h.i e'n Wide-~stand1 &u swen '''· mtt dem Otdhttn der Kurbel aufhoren Ke•ne IJ9W&Il ~nwenden Tourner la mo1e11e d"8)'80Cemenl Ou hlm et presser sur le deClencheur. Repèter cette oper auon une ou deux fois POU' sassurer Que le ~lm avance. puos refeuoor le dos de l'appareil. 5 Degager la manivelle de rebob nage el la IOU<ner lentement dans le sens de la 1\êche POur rattrdoer un •mou de la pellicule, ll\J<S reploer la mani~le. quon sent une résistance. Ne pas forcer • Arrèler de 1ourner * Repel r esla aperaci6n una odos veces para cerciOfarse aue la pellcuta se enroUa , y despues cerrer la tapa poster~or de la camara 5 Recoger el laxo de la pelicula levantando la manrvela de rebOI:>Inado y gorândola entamente en la dueccion de ta flecha y vr>"'er a coiOcarla en su pasociOn Ofogonal. • De)ar de g<ar la man1vela llll8MS se s.enta lension. No la fue<oe 4 . Q J!Jf* ltliililtit, IS,tl , e tttif.::! 'IX I\ J n~LIK+f.'*fl-1!:1l!liiUii ~ . ~lt<'FtH,IUII., •.t.!llU~fli-. :.:*. Wf i'l? ~!HlWI!trli. ~fi. tfll!lllHitiUt, · ~~a~~-m~~~ AM~ ·· ~~~K.IDK-~M~PlliC 5. ~ll:..IHIHiiJHJll*lliè'~ /ilô•J'*lttU!J~r. ~i:!IIIII M .• rttilflH!~I\'I'rl U~I!Ht. ~~-~ tl: ltf.{ l\'!diJH!m4B~IUfU'. · ~~n "~~~·h~. aw~d "~tl:ltk~IIIIM J!rt:. ~~~~" 3 SETIING THE EXPOSURE RING 6. While watching the ExPOsure Counter, turn the Film Advance Knob and P<ess down the Shut1er Release. Repeat until the number "1' appears in the Counter. (The film is now in POSition for the first shot.l • The f ilm is properly loaded if the Rewind Knob turns to the left while the Film Advance Knob is being turnad. The expasure ring rs set as fotlows: Opposile 0 on c1ear weather Opposite C> on hazy sunlight 6 . Unter Beachtung des BildzâhlwerkS4 das FilmtransPOrtrâdchen drehen und den Auslôser nach unten drücken. Den Vorgang solange wiederholen, bis "1" im Bildiêhhverk erscheint. (Der Film befindet sich nun in der richti~n Position Ill' die erste "' Aufnahme.l • Der Film ist richt ig geladen. wenn sjch der Ruckspulknopf nach links dreht. wlihtend der Film transoortiert w.rd. Der Blendenri ng wrrd folgenderma6en eingestellt: Gegenùber 0 bei Sonnenschein Gegenüber C> bei leichter Bewolkung EINSTELLEN DER BLENDE REGLAGE DE L'EXPOSITION 6. En regardant dans le compteur <frmages, tourner la molette d'avancement du film et presser sur le décl enc~eur. Repèter l'opératron JUsqu'a ce que le chiffre 'T' apparaisse dans le compteur. (Le film est maintenant mis en place POur la P<emlêre vue.) • Le film est catrectement chargé si le bouton oe rebobinage tourne dans le sens inverse des aiguilles lorsau·on fait avancer le frlm. 6. Mientras se observa el contador de expasiciones, birat la rueda de avance de la pelicula y presionar el disparàdor. Repetirlo hasta que el nùmero T aparezca en el contador.' (La pellcula ya estâ en POsiciôn para tomat la primera fotografia.) • Si la manivela de rebobinado gira en la direccion opUesta a l as agujas del reloi al accronar la rueda de avance, significa que la pelicula se ha cargado bien. Le réglage de la bague <l'exPOsition se fart comme suit: En regard de 0 par temPS clair En regard de (:;) par soleil voilê. AJUSTE DEL ANILLO DE EXPOSICION El anille de exPOsicion se ajusta como sigue : Opuesto a en tiemPO despejado. Opuesto a C> en sol velado. o 111:/tii~lllii~~~ 6 . - ïfi!ltttiUt. -!fiMi!J-.~IIilllJll. ;Jf;tJCF~r,tJ<m. &!Ulft t'l'. iti313ttj:ât l:.lllffi lilft'f- . , •• < t~o Il" to fl!'ll-fllttmfl'J~ il .) • ji[JJI!:(f"tJJtlc ~llililü~-r.- &I!I.I<Jll.li!J:=fti:il. ftOJ~ffi-lt'lli * "'"~'*· tJ<T~lJ!~~lëaJ1t~lË!ll: ~:1€11-H<Iill 0 IU è : l'lie, ~1t~MII;f,.i11\C> 5 4 -COMPOSING AND TAKING TAKING FLASH PICTURES YOUR PICTURE 1. Look through the Voewhnder and bri ng your sub1ect in the center of the Viewfinder frame. 2 To take your picture. press t e Shutter Release gently down. ' -WAHL DES BILDAUSSCHNITTS BLITZFOTOGRAFIE UND AUFNAH~E 1. Ourch den Sucher schauen und das Motiv in doe Mitte des Sucherrahmens bringe"' 2. Um die Aufnahme zu 'm achen. den Auslôser drucken. oone die Kamera z~ verwackel'i t. Der Blitz wird on ~n Aufsteckschuh gesteckt. (Ooe Kamera funktionrert mit allen drahtlosen Blltztypen. JedOCh nicht mit Bhtzlampen.) 2. Den Bfendenrong auf das 1 -Symbof eonstelfen. 3. Bht zbereoch M ot einem Blitz mot LZ t~(ISQIASA tOO ·ml. betragt de< Blitzaufnahm&t)ereoch 1. 2 bis 3 l~ter. f \ < -CADRAGE ET PRISE DE VUE 1. Regarder dans le voseur et centrer r omage vîseur. . t. Mon tar el flash en la zapata para accesorios. {Su camara acepta 1. Mirar por el visor Y c;entrar el tema en el mateo del vosor. 2. Para t omar la fotografia, presionar lentamente el disparaoor. ... l!ii§Jf(Jltlii! ~ffl~lf<tt. . i!.~:Jtl:lY!'Jf(Jltl«<t' 2. fiŒl*TIH'IlU!. Wiiffl'llll!!\1\-, 1. Le flash est fixé dans la grrffe porte-accessoires. tOn peut se servir de n omporte Quel flash sans fit, mais pas d'ampoules flash.) 2. Régler ta bague d'expositoon sur l e symbole 3. Portée du tfash Avec un tfash ayanl un nombre guide de 16 (100 ISO/ASA, métre). la oortée du f lash est de 1. 2 a 3 m. FOTOG~AFfAS CON FLASH -ENCUADRE Y TOMA DE LA FOTOGRAFIA ~ ~~-ft!lftlll \ PHOTOGRAPHIE AU FLASH dans le cadre du 2. Pour prendre la photo. appuyer doucement sur Je déclencheur 1. 1. The flash os c lipped into the Accessory Shoe. (Your camera will lake any cordless type flash. but not nash bulbs.) 2. Set t he Exposure Ri ng at the 1 symbol. 3. Flash range Using a. flash unot with guode number t6 (ISO/ASA tOO·m). the nash shOctlng range i~ 1.2- 3m cuafquier flash de topo sin cord6n. pero no lâmparas de flash.) 2. Ajustar el Sl]illo de exposici6n enfrente de la marca 3. Campo de cqbenura del flash El campo cie cobertura dell!lash es 1. 2 - 3 m cuando se utlliza un flash Que tenga un h&nero guia de 16 (ISO!ASA 100. metros). ~ " *· ~ n:-mm~ 1 . MIXI*:JIHŒJIIIHU! .t&..t. (âUliiti7 1XJjt;l.ll~~. ~.t:JH lffaJU'Wiiljjl&J':IXI1ti2. l 2 . lllf!Jjt;r.i'~llt~~~ 1 !U~Illli. 3 . IXJjf;ilfà\Jtl'lii L'! IIl. ft!llliXI1t'lli'<llfk'llJ!til!IXJ*:IIillllil.li. 16 ( I SO/ A SA100·m ) ~lflll. IXI1tl.ll(J!)têli1EIIl"'i L 2- 3 ?ii:. 6 END OF T HE FILM Alter you are through exposing a roll of film (ChOOk the Exposure Counter to make sure it shows the number "24" if the fi lm in the camera is a 24-exposure roll), rewind it into lts cartridge and unload it as follows : 1. Press rn the Rewind Butten, erect the Rewind Crank and turn 2. Open the Camera Back by pressing the Back Cover Lock, pull the Film Rewind Knob ali the way out and unload the film cartridge. it in the direction of the arrow until you feel a sudden release of tension. The film has now been rewound into lts cartridge. FILMENDE Nachdem alle Autnahmen des Films gemacht sind (bei Verwendung eines Films mit 24 Bildern muB das Bildzâhlwerk 24 anzeigen), den Film in seine Patrone zurückspulen und falgende<maBen herausnehmen : 1. Den Rückspulknopf drücken, die Rücksputkurbel autrichien und in Pfeilrichtung drehen, bis ein plôtzliches Nachlassen der Spannung zu spüren ist. Der Film Jist dann in zuruckgespult. sei ~ 2. Die KamerarUckwand durch Drücken de< Rückwandentriegelung ôffnen, den Filmrückspulknopf bis zum Anschlag herausziehen und die Filmpatrone herausnehmen. Patrooe \ '" FIN DU FILM Aprés avoir fini d'exposer un chargeur de film, (vérifier le compteur d'images pour s'assurer qu'il indique "24" si le film chargé dans l'appareil est de 24 poses). rebobiner le film dans le chargeur et retirer cetuî·,cî comme sutt : 1. Presse< sur le bouton de rebobinage, dégager la manivelle de rebobinage et la tourner dans te sens de ta fleche jusqu'à sentir un relâchement soudain de la tenSlon. Le film a été complétement rebobiné. 2. Ouvrir le dos de l'apparei l en pOussant son verrou. retirer complétement la manivelle de rebobinage et enlever le chargeur. FIN DE LA PELICULA Después de haber terminado de exponer un cartucho de pelicula, {verificar el contador de exposîciones para cerciorasse de que muestra el numero "24" cuando la pelicula cargada en la câmara es de 24 exposiciones). rebobinar la pelicula en el cartucho y descargarlo de la forma siguiente : 1. Presionar el bot6n de rebobinaclo, levantar la manivela de rebobinado y giratla en la direccion de la flecha hasta que se sienta una Ialta repentina de tension. Esta indica que la pelicula ya se ha rebobinaclo en su cartucho. 2. Abrir la tapa posterior de la càmara presionanda el segura de la misma, tirar de la manivela de rebobinaclo totalmente hacia afuera. y descargar el cartucho. ~J:tféHl ~· ~ 11;1Atl 1'è• • t' fk ~ (QJJfli' ~AI'r.JfXWlli U !I!I\"â, 'Ulff. 1ll1Ji:'f'"24") .Z.It. ltil:tiHt. 6112 llf'Em~~â'l>. f1.\!tnë"f~lJ:!~ll\(1!l'e : 1 . në"ftx~l.iiltli. NA!:fk~ liU§II!l~. ~nëim"'111ûJIU!'E. ill$ !'f.lt!I!:1J?.I!f1.\lfl~~lll.tl:, )l~fj:~ è lf1iili4J.\'1t'l', 2. në"fl'tlllltl'!ltilllillll. fJ/lil.l!llllltl'!lt •. llffk ltl.lllUUftttJ:. · il :1ESJ1ii\\Jt, .lËint!Jitt;. CAMERA CARE • Your Fujoca MA-t os a P!llcosoon ins!rument which requores c:areful handling. Do not wet tt or drOP tt on the 1100<. • Oust and soit on the Lens and Vtewfonder are removed wtth an air blower and by wipong lightly with a p1ece of soft. hnl-flee c loth. e ln hot weather, do not leave your camera in a closed car or on an ocean beach except temperarily for a very short time. and never teave lt ln molst places KAMERAPFLEGE e thre Futoca MA· t ost etn Praz soonsinstrument. das sorgfêltoger Behandluno bedal1 Setzen S.e die Kamera ke•nen Et schûttarungen aus und lassen S111 sie nicht na6 v.erden. • EnlferiiEin Sie Staub und Sctvnutz vom Ob,ektrv und dem Sucherlenster mrt e<nern Btasepinsel und durch ~•chtes AbW1SChen mit eonem weochen. fluseflfreoen Tuch. • Lassen Ste d•e Kamera an hei6en Tagen ntcht tn eonem geschlossell9n Wagon oder am Strand. "s sei denn nur fur ganz kurze Zeit. und aut ke•nem Fall an einem Ort mit hOhem Feucht igkeitsgeholt llegen. ENTRETIEN DE L'APPAREIL • Le Fu1ica MA·t est un instrument de précision quo dott taire l'objet de soins attentlls. Eviter de le mouiller ou de le laisser tomber. • La poussière et les taches Qui se trouvent sur l'obteclof et te viseur sont enlevées avec une poire soufflante et en essuyam légérement avec un chtffon doux sans peluche. • Par temps Chaud. ne pas laisser r appareil dans une vooture fermèe ou sur une plage. sauf peur une tres courte durée Ne jamaos le latsser dans un endroit humide. \ CUIDADO DE LA CAMARA • Su Fujica MA-t es un instrumente de prec•s•on que necesita un manejo c uldadoso. Evitar mojarla o dejarla caer at sueto. • El polvo y suciedad depositados en el ob1etrvo y vi sor se ouitan con una pera sopladO<a y frotando ligeramente con un pano suave oue no date pelusa. • En t lempo caluroso. no dejar la cémara en un autom6vil cerredo o sobre la arena de la ptaya, excepte cuando se haga ternpooalmente dU<ante un periodo de hemPO muy CO<to. No de)811a en Sltios humedos !!!UIH~Ulll ~t: • Fujiu MA·lll - !IIM'f:lSI«. ltf'I!11JI~llii1JIU-l•·C•. :r-J!M 'E ,$ ill~~ 'EIU:Jt!R.l:. · •~~~~m ~~• ~• ~m •~~~. ~m~~--~~~ftRM lit. • &~ ~~~~ ~ l ~ ~ M~-M~~ 1-JI~~ ~-~~«NM" i'l$~. !l<.ili. J:. [oi]._,tl1.~1-IJ! ~Œii!A ~IIiffr. P.T. HONORIS INDUSTRY JL. Raya Bekasi KM. 25, Jakarta-Timur. lndonesia PHONE : 480726, 483408-
 1
1
-
 2
2
-
 3
3
-
 4
4
-
 5
5
-
 6
6
-
 7
7
-
 8
8


Fuji MA-1 El manual del propietario
- Tipo
- El manual del propietario
- Este manual también es adecuado para
en otros idiomas
- français: Fuji MA-1 Le manuel du propriétaire
- English: Fuji MA-1 Owner's manual
- Deutsch: Fuji MA-1 Bedienungsanleitung


