LG WT22WS6HP El manual del propietario
- Categoría
- Lavadoras
- Tipo
- El manual del propietario

MANUAL DEL PROPIETARIO
LAVADORA
Antes de empezar la instalación, lea con atención estas
instrucciones. Con ello, la instalación le resultará más sencilla y
se asegurará de que el aparato quede instalado de forma
correcta y segura. Guarde estas instrucciones cerca del aparato
después de la instalación para poder consultarlas en el futuro.
MFL68267086
Rev.00_081320
www.lg.com
Copyright © 2020 LG Electronics Inc. Todos los derechos reservados
es_main.book.book Page 1 Thursday, August 13, 2020 4:29 PM
LS ESPAÑOL
EN ENGLISH
WT22WS6HP

ÍNDICE
Este manual puede contener imágenes o
contenido diferente del modelo que haya
adquirido.
Este manual está sujeto a revisión por
parte del fabricante.
INSTRUCCIONES DE SEGURIDAD
LEA TODAS LAS INSTRUCCIONES ANTES DE USAR ........................................3
ADVERTENCIA.....................................................................................................3
INSTALACIÓN
Partes y especificaciones ..................................................................................9
Requisitos del lugar de instalación................................................................11
Conexión de las mangueras de entrada de agua........................................12
Instalación de la manguera de drenaje ........................................................13
Nivelado del electrodoméstico.......................................................................13
FUNCIONAMIENTO
Descripción general del funcionamiento......................................................15
Preparando la ropa..........................................................................................15
Agregado de detergente, suavizantes y blanqueadores............................18
Panel de control ...............................................................................................20
Tabla de programas.........................................................................................22
Opciones y funciones extra ............................................................................25
FUNCIONES INTELIGENTES
Aplicación LG ThinQ.........................................................................................30
Smart Diagnosis ...............................................................................................32
MANTENIMIENTO
Limpieza después de cada lavado .................................................................34
Limpieza periódica del aparato......................................................................34
SOLUCIÓN DE PROBLEMAS
Antes de solicitar asistencia técnica ..............................................................37
es_main.book.book Page 2 Thursday, August 13, 2020 4:29 PM

3
INSTRUCCIONES DE SEGURIDAD
LS
INSTRUCCIONES DE SEGURIDAD
LEA TODAS LAS INSTRUCCIONES ANTES DE USAR
Las siguientes instrucciones de seguridad tienen por objetivo evitar
riesgos imprevistos o daños derivados de un funcionamiento poco
seguro o incorrecto del aparato.
Las instrucciones se dividen en "ADVERTENCIAS" y "PRECAUCIONES",
como se describe a continuación.
Mensajes de seguridad
ADVERTENCIA
ADVERTENCIA
Para reducir el riesgo de explosión, incendio, muerte, descarga
eléctrica, lesiones o quemaduras a personas al utilizar este producto,
siga instrucciones básicas de seguridad, entre las que se encuentran
las siguientes:
Seguridad técnica
• Este aparato no debe ser utilizado por personas (incluidos niños) con
discapacidades físicas, sensoriales o mentales, o falta de experiencia
y conocimientos, si no es bajo supervisión y siguiendo las
instrucciones de seguridad de una persona responsable.
Este símbolo se muestra para indicar cuestiones y acciones que
pueden suponer un riesgo. Lea con atención la parte señalada
con este símbolo y siga las instrucciones a fin de evitar riesgos.
ADVERTENCIA
Indica que, de no seguirse las instrucciones, pueden producirse
lesiones graves o la muerte.
PRECAUCIÓN
Indica que, de no seguirse las instrucciones, pueden producirse
lesiones leves o daños en el producto.
es_main.book.book Page 3 Thursday, August 13, 2020 4:29 PM

4
INSTRUCCIONES DE SEGURIDAD
LS
• Debe vigilarse a los niños de corta edad para asegurarse de que no
jueguen con el aparato.
• La limpieza y mantenimiento no debe ser realizada por niños sin
supervisión.
• Si el cable de alimentación está dañado, debe ser reemplazado por el
fabricante, su agente de servicio o personas con cualificación similar
para evitar peligros.
• Las aperturas de ventilación no deben ser obstruidas por una
alfombra.
• Este electrodoméstico tiene como propósito ser utilizado en un
hogar.
• Utilice una manguera nueva o el conjunto de manguera suministrado
con el electrodoméstico. Volver a utilizar mangueras usadas puede
provocar una pérdida de agua y el posterior daño de la propiedad.
• La presión de entrada del agua debe estar comprendida entre 50 y
800 kPa.
Carga Máxima
La capacidad máxima en algunos ciclos para el lavado de ropa seca es
de
22,0 kg.
INSTALACIÓN
• Nunca intente hacer funcionar este electrodoméstico si está
estropeado, funciona mal, parcialmente desmontado o tiene piezas
perdidas o rotas, incluidos el cable o enchufe dañado.
• Este electrodoméstico solo debe ser transportado por dos o más
personas que lo sujeten con firmeza.
• No instale el electrodoméstico en un lugar húmedo y polvoriento. No
instale ni almacene el electrodoméstico al aire libre ni en un área que
esté sujeta a condiciones climáticas, tales como luz directa del sol,
viento o lluvia, ni a temperaturas bajo cero.
• Asegúrese de que el enchufe está insertado completamente en el
tomacorriente.
es_main.book.book Page 4 Thursday, August 13, 2020 4:29 PM

5
INSTRUCCIONES DE SEGURIDAD
LS
• No conecte el aparato a tomacorrientes de múltiples conectores o a
una extensión del cable de alimentación.
• No modifique el enchufe de alimentación provisto con el aparato. Si
no se ajusta a la tomacorriente, haga que un electricista calificado
instale una toma adecuada.
• Este electrodoméstico debe estar conectado a tierra. En caso de mal
funcionamiento o avería, la conexión a tierra reducirá el riesgo de
descarga eléctrica ya que proporciona una vía de menor resistencia
para la corriente eléctrica.
• Este electrodoméstico está equipado con un cable que cuenta con un
conductor y un enchufe de conexión a tierra. El enchufe debe
conectarse en un tomacorriente adecuado, correctamente instalada
y que tenga la conexión a tierra debida, de conformidad con todos los
códigos y las ordenanzas locales.
• Una conexión incorrecta del conductor de conexión a tierra del
equipo puede ocasionar riesgo de descarga eléctrica. Si tiene dudas
respecto de la conexión a tierra adecuada del electrodoméstico,
consulte a un electricista calificado o personal de servicio.
• Apriete y asegure la manguera de drenaje en los extremos de
conexión para evitar la separación.
• Para modelos con una sola válvula de suministro de agua de entrada,
no conecte al agua caliente. Conecte solo al agua fría.
Funcionamiento
• No use objetos afilados con el panel de control para manejar el
electrodoméstico.
• No intente separar los paneles ni desmontar el electrodoméstico.
• No repare ni reemplace ninguna parte del electrodoméstico. Todas
las reparaciones y servicios deben ser realizados por personal de
servicio cualificado, a menos que se recomiende lo contrario en este
manual del propietario. Utilice sólo repuestos autorizados.
• No coloque animales vivos, como mascotas, dentro del producto.
es_main.book.book Page 5 Thursday, August 13, 2020 4:29 PM

6
INSTRUCCIONES DE SEGURIDAD
LS
• Mantenga el área debajo del electrodoméstico y alrededor de este sin
materiales inflamables, como pelusas, papel, paños, productos
químicos, etc.
• No deje la puerta del electrodoméstico abierta. Los niños pueden
colgarse de la puerta o meterse dentro del electrodoméstico y
provocar daños o sufrir lesiones.
• No introduzca, lave ni seque prendas que se hayan limpiado, lavado,
empapado o salpicado con combustible o sustancias explosivas (por
ejemplo, ceras, removedores de ceras, aceite, pintura, gasolina,
desengrasantes, solventes para limpieza en seco, queroseno,
combustible, quitamanchas, aguarrás, aceite vegetal, aceite de
cocina, acetona, alcohol, etc.). El uso inadecuado puede provocar
incendios o explosiones.
• No utilice ni almacene sustancias inflamables o combustibles (éter,
benceno, alcohol, químicos, LPG, aerosol combustible, insecticida,
ambientador, cosméticos, etc.) cerca del electrodoméstico.
• Nunca introduzca la mano dentro del electrodoméstico mientras está
en funcionamiento. Espere hasta que el tambor se haya detenido por
completo.
• En caso de una fuga de agua del aparato, desconecte el enchufe de
alimentación y comuníquese con el centro de información del cliente
de LG Electronics.
• Cierre los grifos de agua para aliviar la presión en las mangueras y
válvulas y minimizar la fuga si en caso ocurriera una ruptura. Revise
la condición de las mangueras de llenado; estas podrían requerir ser
reemplazadas luego de 5 años.
• Si hay una fuga de gas (isobutano, propano, gas natural, etc.) dentro
de la casa, no toque el aparato ni el enchufe de alimentación y ventile
el área de inmediato.
• Si la manguera de drenaje o de entrada se congeló durante el
invierno, úsela después de que se haya descongelado.
• Mantenga todos los detergentes de lavado, suavizantes y cloros
fuera del alcance de los niños.
• No toque el enchufe ni los controles del aparato con las manos
mojadas.
es_main.book.book Page 6 Thursday, August 13, 2020 4:29 PM

7
INSTRUCCIONES DE SEGURIDAD
LS
• No doble excesivamente el cable de alimentación ni coloque un
objeto pesado sobre él.
• No coloque su mano, pie o algo más debajo del electrodoméstico
mientras éste está en operación.
• Evite tocar el agua que se drena del aparato durante el lavado.
• Asegúrese de que el drenaje está funcionando apropiadamente. Si el
agua no se drena apropiadamente, su piso podría inundarse.
• Si, al centrifugar, abre la puerta y no se detiene el tambor en
aproximadamente 10 segundos, interrumpa inmediatamente el
funcionamiento del aparato y comuníquese con su distribuidor o con
el centro de servicio de LG Electronics.
• No use un tomacorriente, equipo de cableado o cable de extensión
de una capacidad eléctrica inferior a la capacidad establecida del
electrodoméstico.
• Cuando la temperatura del aire es alta y la del agua es baja, puede
ocurrir condensación y por lo tanto humedecer el piso.
• Limpie la suciedad o el polvo de los contactos del enchufe de
alimentación
Mantenimiento
• Desconecte el electrodoméstico del suministro de energía antes de
limpiarlo. Ajustar los controles en APAGADO o en posición de Espera
no desconecta este electrodoméstico del suministro de energía.
• Conecte con firmeza el enchufe en la toma de corriente tras eliminar
por completo toda humedad y polvo.
• No rocíe agua dentro o fuera del producto para limpiarlo.
• No tire del cable para desenchufar el aparato. Sujete el enchufe con
fuerza y desconéctelo del tomacorriente.
• Únicamente personal de servicio autorizado de un centro de servicio
LG ELECTRONICS debe desarmar, reparar o modificar el
electrodoméstico. Contacte a un centro de información al cliente de
LG ELECTRONICS si mueve e instala el electrodoméstico en una
ubicación diferente.
es_main.book.book Page 7 Thursday, August 13, 2020 4:29 PM

8
INSTRUCCIONES DE SEGURIDAD
LS
Eliminación
• Antes de descartar un electrodoméstico antiguo, desenchúfelo. Corte
el cable directamente detrás del electrodoméstico para evitar que se
use.
• Aleje todos los materiales de embalaje, como bolsas plásticas y
poliestireno, de los niños. Los materiales de embalaje pueden
provocar asfixia.
• Retire la puerta antes de descartar o desechar este electrodoméstico
para evitar el peligro de que niños o pequeños animales queden
atrapados en su interior.
es_main.book.book Page 8 Thursday, August 13, 2020 4:29 PM

9
INSTALACIÓN
LS
INSTALACIÓN
Partes y especificaciones
NOTA
• El aspecto y las especificaciones pueden cambiar sin previo aviso para mejorar la calidad del
electrodoméstico.
Vista frontal
* Esta característica solo está disponible en
algunos modelos.
a
Puerta
b
Vidrio templado
c
Bandeja Dispensadora
d
Dispensador de blanqueador
e
Tambor
f
Pata niveladora
g
Manguera de drenaje*
h
Panel de control
i
Cable de alimentación
j
Entradas de agua caliente y fría
Accesorios
*1 Los accesorios incluidos podrían variar
dependiendo del modelo que usted adquirió.
*2 Este accesorio no está incluido en el producto,
pero puede comprarlo a través del centro de
servicio de LG.
a
Mangueras de entrada de agua fría y caliente
*1
b
Manguera de Drenaje
*1
c
Precinto
*1
d
Cubierta anti-ratas
*2
e
Tornillo para la cubierta anti-ratas
*2
es_main.book.book Page 9 Thursday, August 13, 2020 4:29 PM

10
INSTALACIÓN
LS
Especificaciones
Dimensiones(mm)
Modelo WT22WS6HP
Alimentación eléctrica 120 V~ 60 Hz
Potencia nominal 700 W
Peso del producto Aprox. 57kg
W 690 D 730 H 1 023
D' 760 H' 1 410
H
H’
D
D’
W
es_main.book.book Page 10 Thursday, August 13, 2020 4:29 PM

11
INSTALACIÓN
LS
Requisitos del lugar de
instalación
Antes de instalar el electrodoméstico, verifique la
siguiente información para instalar el
electrodoméstico en un lugar correcto.
Ubicación de la instalación
• Instale el electrodoméstico sobre un piso plano
de material rígido que sea lo suficientemente
fuerte para soportar un electrodoméstico
completamente lleno. (El ángulo máximo
admisible debajo del electrodoméstico es de: 1º)
• Nunca intente nivelar un desnivel del piso
colocando trozos de madera, cartón o
materiales similares debajo del
electrodoméstico.
• Si es imposible evitar posicionar el
electrodoméstico junto a una cocina de gas o
estufa de brasas, se debe colocar un aislamiento
(85 x 60 cm) cubierto con papel aluminio del lado
que enfrenta la cocina o estufa entre los dos
electrodomésticos.
• Asegúrese de que cuando el electrodoméstico se
instale, se coloque en un lugar que sea accesible
para un técnico de servicio en caso de avería.
• El hueco adicional para la pared debe tener
10
cm
para el lado trasero y
2 cm
para los lados
derecho e izquierdo.
ADVERTENCIA
• Este electrodoméstico solo debe utilizarse para
fines domésticos y no debe usarse en
aplicaciones móviles.
NOTA
• No instale este electrodoméstico sobre una
superficie o plataforma alzada, plinto o soporte.
Podría provocar lesiones o un mal
funcionamiento grave.
Ventilación
• Asegúrese de que la circulación de aire
alrededor del electrodoméstico no quede
obstruida por alfombras, tapetes, etc.
Temperatura Ambiente
• No instale el electrodoméstico en habitaciones
donde puede haber temperaturas bajo cero. Las
mangueras congeladas pueden explotar bajo
presión. La confiabilidad de la unidad de control
electrónico puede verse perjudicada a
temperaturas bajo cero.
• Si el electrodoméstico se entrega en invierno y
las temperaturas no superan los 0 °C, colóquelo
a temperatura ambiente por algunas horas
antes de ponerlo en funcionamiento.
Conexión eléctrica
• No use un cable de extensión ni un adaptador
doble.
• Siempre desenchufe el electrodoméstico y corte
el suministro de agua después de usarlo.
• Conecte el electrodoméstico a una toma de
corriente con conexión a tierra, de conformidad
con las regulaciones de cableado actuales.
• El electrodoméstico debe posicionarse de modo
que pueda accederse fácilmente al enchufe.
• La toma de corriente debe encontrarse a
1,5 metros de cada lado del electrodoméstico.
ADVERTENCIA
• Únicamente personal calificado puede realizar
reparaciones en el electrodoméstico. Las
reparaciones realizadas por personas sin
experiencia pueden ocasionar lesiones o averías
graves. Contáctese con su técnico de
reparaciones autorizado de LG.
10
cm
2
cm
2
cm
es_main.book.book Page 11 Thursday, August 13, 2020 4:29 PM

12
INSTALACIÓN
LS
ADVERTENCIA
• El enchufe de alimentación debe conectarse/en
un tomacorriente adecuado, correctamente
instalado y que tenga la conexión de/a tierra
debida, de conformidad con todos los códigos y
las ordenanzas locales.
Conexión de las
mangueras de entrada de
agua
Antes de conectar la manguera de entrada de agua
al grifo de agua, verifique el tipo de conexión de la
manguera y luego elija las instrucciones correctas.
Nota para la conexión
• La presión del suministro de agua debe estar
entre
50 kPa
y
800 kPa
(0,5 - 8,0 kgf / cm²). Si la
presión del suministro de agua es mayor a
800
kPa
un dispositivo reductor de presión debe ser
instalado.
• No apriete demasiado la manguera de entrada
de agua a la válvula.
• Revise el estado de la manguera de manera
periódica y reemplácela si fuera necesario.
• La manguera de suministro de agua incluida
puede variar de país a país. Asegúrese de
conectar la manguera de suministro azul al grifo
de agua FRÍA, y la manguera de suministro
naranja al grifo de agua CALIENTE.
Verificación del sello de goma
Dos sellos de goma
a
son incluidos con la
mangueras de entrada de agua. Estos son
utilizados para prevenir fugas de agua. La conexión
a los grifos ha de estar lo suficientemente
apretada.
• No utilice dispositivos mecánicos como
sujeciones múltiples para apretar las mangueras
de entrada. Asegúrese de que el extremo curvo
de la manguera de entrada de agua esté
conectado al aparato.
Conexión de la manguera con el
grifo
Conexión de la manguera tipo rosca con el grifo
roscado
Enrosque el conector de la manguera en el grifo de
suministro de agua. Apriételo a mano solamente
con la ayuda de un paño suave.
NOTA
• Una vez conectada la manguera de entrada al
grifo de agua, ábralo para drenar sustancias
externas (suciedad, arena, aserrín, etc.) de las
tuberías de agua. Drene el agua en una cubeta y
controle la temperatura.
es_main.book.book Page 12 Thursday, August 13, 2020 4:29 PM

13
INSTALACIÓN
LS
Conexión de la manguera al
aparato
Enrosque la manguera de entrada de agua a la
válvula de entrada de agua en la parte posterior del
aparato.
• No conecte la manguera al suministro de agua
caliente para los modelos con una entrada de
agua. Conecte solo al suministro de agua fría.
NOTA
• Después de completar la conexión, si el agua
gotea de la manguera, repita los mismos pasos.
Utilice el tipo de grifo más convencional para el
suministro de agua. En caso de que el grifo sea
cuadrado o demasiado grande, retire la placa
guía antes de insertar el grifo en el adaptador.
Instalación de la manguera
de drenaje
Antes de conectar la manguera de drenaje, revise
el modelo de la manguera y elija las instrucciones
correctas.
Para modelos con bomba de
drenaje
La altura de descarga debe estar a
aproximadamente
90 - 120 cm
del piso.
• Al ajustar la manguera de drenaje
correctamente se protege el suelo de daños
ocasionados por pérdidas de agua.
• Si la manguera de desagüe es demasiado larga,
no fuerce la manguera de desagüe en la salida
de desagüe. Esto causará un ruido anormal.
NOTA
• La manguera de drenaje no debe ser colocada a
más de
120 cm
sobre el piso. El agua del
electrodoméstico podría no drenar o hacerlo
lentamente.
Nivelado del
electrodoméstico
Comprobación del nivel
La nivelación del electrodoméstico previene ruidos
y vibraciones innecesarios. Verifique si el
electrodoméstico está totalmente nivelado luego
de la instalación.
• Si el electrodoméstico se balancea al presionar la
placa superior del electrodoméstico
diagonalmente, ajuste los pies otra vez.
90 - 120 cm
es_main.book.book Page 13 Thursday, August 13, 2020 4:29 PM

14
INSTALACIÓN
LS
Ajuste y nivelación de los pies
Cuando el electrodoméstico no está totalmente a
nivel, gire las patas de ajuste hasta que el
electrodoméstico no se tambalee.
• Gire las patas de ajuste hacia la derecha para
elevar o gire las patas de ajuste hacia la
izquierda para bajar el electrodoméstico.
NOTA
• No inserte piezas de madera, etc. debajo de los
pies.
• El piso de madera o flotante puede contribuir a
una falta de nivelación y vibración excesivas. El
refuerzo o sustentación del suelo de madera
podría ayudar a detener o reducir los ruidos y
vibraciones excesivos.
• No instale el electrodoméstico sobre ninguna
superficie o plataforma elevada, ya que podría
quedar inestable y provocar lesiones y daños
graves.
• Si el electrodoméstico está instalado en un piso
desigual, débil o inclinado, y causa una vibración
excesiva, podría ocurrir una falla de
centrifugado o el error
UE
. Éste debe ser
colocado en un piso firme y nivelado para
prevenir un fallo de centrifugado.
Ensamblando la cubierta anti-
ratas
Puede insertar la cubierta anti-rata de acuerdo con
el tipo para proteger el aparato de la rata.
Tipo plegable
1
Tumbe el electrodoméstico del revés.
PRECAUCIÓN
• Tenga cuidado con sus pies o manos cuando
tumbe o levante el electrodoméstico.
2
Retire la esponja adjunta a la base.
3
Inserte los 8 tornillos
a
en los agujeros para
ensamblar la cubierta anti-ratas en el
electrodoméstico.
es_main.book.book Page 14 Thursday, August 13, 2020 4:29 PM

15
FUNCIONAMIENTO
LS
FUNCIONAMIENTO
Descripción general del
funcionamiento
Uso del electrodoméstico
Antes del primer lavado, seleccione el programa
Normal
y añada la mitad de cantidad de
detergente. Inicie el electrodoméstico sin ropa.
• Esto eliminará los residuos y agua del tambor
que hayan podido quedar durante la fabricación.
1
Clasificar las prendas para lavar y cargarlas.
• Clasifique las prendas para lavar por tipo de
tela, nivel de suciedad, color y tamaño del
artículo según sea necesario. Abra la puerta
y coloque las prendas en el
electrodoméstico.
2
Agregue detergente, suavizante y/o cloro.
• Agregue la cantidad adecuada de
detergente en la gaveta dispensadora. Si lo
desea, añada cloro o suavizante en las zonas
correspondientes del dispensador.
3
Encienda el electrodoméstico.
• Presione el botón de
ENCENDIDO/
APAGADO
para encender el
electrodoméstico.
4
Elija el ciclo de lavado deseado.
• Presione el botón
Programa
repetidamente
hasta que el programa deseado haya sido
seleccionado.
• Seleccione el botón de opción para ajustar la
temperatura de lavado, velocidad de
centrifugado, etc. Consulte la etiqueta de
mantenimiento del tejido de su ropa para
conocer cualquier aviso o instrucciones
especiales.
5
Comenzar el ciclo.
• Presione el botón
INICIO/PAUSA
para
comenzar el ciclo.
• El electrodoméstico se agitará brevemente
sin agua para medir el peso de las prendas.
• Si el botón
INICIO/PAUSA
no se presiona
dentro de un determinado periodo de
tiempo, el electrodoméstico se apagará y
todas las configuraciones se perderán.
6
Fin del ciclo.
• Una melodía sonará cuando el ciclo haya
finalizado. Remueva inmediatamente las
prendas del electrodoméstico para reducir
las arrugas.
NOTA
• La función de
Reinicio Automático
permite que
el ciclo se reinicie por sí mismo en caso de que
exista una falla de energía. Lo hace desde la
etapa en la que éste se detuvo.
Preparando la ropa
Clasifique la ropa para obtener los mejores
resultados de lavado posibles, y luego prepare la
ropa de acuerdo con los símbolos de las etiquetas
de cuidado.
Clasificación de las prendas
• Para obtener los mejores resultados de lavado,
clasifique sus prendas según una etiqueta de
cuidado que indique el tipo de tejido y
temperatura de lavado. Ajuste la velocidad de
centrifugado para lavarlas.
• Nivel de suciedad (mucha, normal, poca): separe
las prendas según el nivel de suciedad. De ser
posible, no lave prendas muy sucias con prendas
más limpias.
• Color (blanco, claro, oscuro): lave por separado
las prendas oscuras o tintadas y las de colores
blancos o claros. La mezcla de prendas con
tinturas y prendas claras pueden provocar una
transferencia de tintes o decoloración de las
prendas más claras.
• Pelusas (productores, colectores de pelusa): lave
por separado los tejidos que producen pelusas y
es_main.book.book Page 15 Thursday, August 13, 2020 4:29 PM

16
FUNCIONAMIENTO
LS
los tejidos colectores de pelusa. Los tejidos
productores de pelusa pueden provocar bolitas
y pelusas en los tejidos colectores.
es_main.book.book Page 16 Thursday, August 13, 2020 4:29 PM

17
FUNCIONAMIENTO
LS
Verificación de la etiqueta de
cuidado de tejidos
Estas informan acerca del contenido de la ropa y
cómo deben lavarse.
Símbolos de las etiquetas de mantenimiento
NOTA
• Los guiones debajo del símbolo le proporcionan
información sobre el tipo de tejido y la máxima
tolerancia mecánica.
Verificación de la ropa antes de
la carga
• Combine artículos grandes y pequeños en una
carga. Cargue los artículos grandes primero. Los
artículos grandes no deberían ocupar más de la
mitad de la carga total.
• No lave artículos pequeños por separado. Añada
1 - 2 artículos similares a la carga para prevenir
una carga desequilibrada.
• Asegúrese de vaciar todos los bolsillos. Objetos
como sujetadores de cabello, mecheros,
bolígrafos, monedas y llaves podrían dañar de
manera irreparable tanto su electrodoméstico
como su ropa.
• Lave las prendas delicadas (medias, sujetadores
con aros) en una red de lavado.
• Cierre las cremalleras, los ganchos y las tiras
para asegurarse de que no se enganchen con
otras prendas.
• Trate previamente la suciedad y las manchas
saturando la suciedad y las manchas con
detergente disuelto y cepillándolas para
eliminar la suciedad.
PRECAUCIÓN
• No lave o centrifugue cualquier artículo
etiquetado o conocido como a prueba de agua o
resistente al agua, incluso si la etiqueta de
cuidado de dicho artículo dice que el lavado a
máquina es permisible. No seguir estas
instrucciones podría resultar en un daño severo
a sus carga de lavado, su electrodoméstico y/o
en daño a la propiedad como resultado de la
vibración anormal del electrodoméstico.
- Ejemplos de artículos a prueba de agua o
resistentes al agua incluyen ciertos
protectores de colchón, fundas para colchón,
ropa de lluvia, ropa para acampar, ropa para
esquiar o ropa para exteriores y artículos
similares.
Símbolo Tipo de lavado / tejido
• Lavado normal
• Algodón, Tejidos mixtos
• Easy Care (Sintético)
• Tejidos sintéticos, mixtos
• Lavado especial delicado
• Delicadas
• Lavar únicamente a mano
• Lana, seda
• No lavar
es_main.book.book Page 17 Thursday, August 13, 2020 4:29 PM

18
FUNCIONAMIENTO
LS
Agregado de detergente,
suavizantes y
blanqueadores
Dosis de detergente
• El detergente debe ser seleccionado de acuerdo
con el tipo de tejido, color, nivel de suciedad y
temperatura de lavado, y debería ser utilizado
de acuerdo con las instrucciones del fabricante
del detergente.
• El uso excesivo de detergente da como resultado
un exceso de espuma que causa un lavado
deficiente.
• Al utilizar detergente líquido, siga las pautas
proporcionadas por el fabricante del detergente.
• Puede verter detergente líquido directamente
en la gaveta de detergente principal si va a
iniciar el ciclo de lavado inmediatamente.
También se recomienda que se añada en el
tambor cuando cargue la ropa.
• No utilice detergente líquido si va a emplear la
función retrasar o prelavado, ya que el líquido
puede endurecerse.
• Reduzca la cantidad de detergente si se forma
demasiada espuma.
• Es posible que deba regularse el uso de
detergente según la temperatura y la dureza del
agua, y el nivel de suciedad de las prendas. Para
obtener mejores resultados, evite la formación
excesiva de espuma.
• Consulte las etiquetas de las prendas antes de
elegir el detergente y la temperatura del agua.
• Utilice únicamente detergentes adecuados para
el tipo de ropa respectivo:
- Detergentes en polvo generales para todo
tipo de telas
- Detergentes en polvo para telas delicadas
- Detergentes líquidos para todo tipo de telas o
detergentes líquidos designados
exclusivamente para lana
• Para un mejor blanqueo y desempeño del
lavado, utilice detergente que contenga cloro en
polvo general.
• El detergente se dispensa desde el dispensador
al comienzo del ciclo.
• Diluya detergente líquido en agua, viértalo en el
tambor, inicie el ciclo.
PRECAUCIÓN
• Utilizar detergente líquido sin diluirlo, o dejar
prendas en el tambor luego de haber vertido el
detergente líquido diluido podría hacer que la
ropa quede dañada, blanqueada o decolorada.
NOTA
• No deje que el detergente se endurezca. De lo
contrario, pueden producirse obstrucciones,
malos resultados de enjuague u olores.
• Carga completa: Según la recomendación del
fabricante.
• Carga parcial: 3/4 de la cantidad normal
• Carga mínima: 1/2 de la carga completa
Agregado de detergente
• Agregue la cantidad medida de detergente en el
compartimento del detergente
a
.
• Utilice más detergente si tiene agua dura,
artículos grandes, grasientos o manchas
aceitosas o temperatura baja del agua.
• No se deben utilizar escamas de jabón o polvos
de jabón granulado en su electrodoméstico. Al
lavar lanas, recuerde utilizar un detergente
adecuado para estas.
NOTA
• Use una cantidad adecuada de detergente.
Demasiado detergente, cloro o suavizante
puede producir un rebose o mal
funcionamiento.
es_main.book.book Page 18 Thursday, August 13, 2020 4:29 PM

19
FUNCIONAMIENTO
LS
Agregado de suavizante
• Agregue suavizante hasta la línea de llenado
máximo.
• Si el suavizante está concentrado, entonces
debería diluirse.
• Cierre la gaveta del dispensador suavemente.
• No deje el suavizante en la gaveta del detergente
por más de 2 días. El suavizante podría
endurecerse.
• El suavizante se incorporará automáticamente
durante el último ciclo de enjuague.
• No abra la gaveta mientras se está
suministrando el agua.
• Jamas se deben utilizar solventes (benceno, etc.).
NOTA
• El vertido excesivo de suavizante por encima de
la línea de llenado máximo puede provocar que
se dispense demasiado pronto, lo que podría
manchar la ropa.
• No vierta suavizante directamente sobre la ropa,
ya que esto causará manchas en la ropa que
serán difíciles de quitar.
Añadiendo blanqueadores
líquidos
• Antes de encender el aparato, vierta la cantidad
medida de blanqueador directamente en el
dispensador de blanqueador
a
. Evite
salpicaduras o sobrellenado.
• Mezcle el blanqueador en polvo con agua hasta
obtener una consistencia líquida y viértala en el
dispensador de lejía.
• Revise las etiquetas de cuidado de sus prendas
para instrucciones especiales y separe las
prendas que serán blanqueadas.
• Diluya blanqueador de cloro líquido con agua.
• Mida la cantidad recomendada de blanqueador
líquido siguiendo cuidadosamente las
instrucciones en la botella.
PRECAUCIÓN
• Nunca vierta blanqueador líquido sin diluir
directamente sobre las prendas o en la canasta
de lavado. Esto puede causar un cambio de color
o daño en el lavado.
• No vierta blanqueador en polvo en el
dispensador de blanqueador. El blanqueador en
polvo podría endurecerse, y podría bloquear el
dispensador de blanqueador.
es_main.book.book Page 19 Thursday, August 13, 2020 4:29 PM

20
FUNCIONAMIENTO
LS
Panel de control
Características del panel de control
a
Botón de
ENCENDIDO/APAGADO
• Presione el botón de
ENCENDIDO/APAGADO
para encender o apagar el electrodoméstico.
• El electrodoméstico se apaga automáticamente una vez haya transcurrido cierto tiempo luego de
haber completado el lavado.
b
Botón de
INICIO/PAUSA
• Presione el botón
INICIO/PAUSA
para comenzar o pausar un ciclo de lavado.
• Presione el botón
INICIO/PAUSA
para detener un ciclo de lavado temporalmente.
NOTA
• Si el botón
INICIO/PAUSA
no se presiona dentro de un determinado periodo de tiempo, el
electrodoméstico se apagará y todas las configuraciones se perderán.
• Por la seguridad del usuario, la puerta se bloqueará automáticamente durante la operación. Si hay más
prendas a introducir, presione
INICIO/PAUSA
para desbloquear.
c
Botón de
Programa
• Hay programas disponibles según el tipo de prendas para lavar.
• Se enciende una luz que indica el programa seleccionado.
d
Opciones y funciones extra
• Puede usar las opciones y funciones extra para personalizar los programas.
Início Remoto
Con la aplicación
LG ThinQ
, puede usar un teléfono inteligente para controlar su electrodoméstico
remotamente.
• Para utilizar esta función, consulte
FUNCIONES INTELIGENTES
.
Wi-Fi
Presione el botón
Diferir Tiempo de Lavado
por 3 segundos para iniciar la conexión del
electrodoméstico con la aplicación
LG ThinQ
.
e
Indicador de estado de ciclo
es_main.book.book Page 20 Thursday, August 13, 2020 4:29 PM

21
FUNCIONAMIENTO
LS
• El indicador de estado de ciclo se enciende antes del inicio.
• El indicador de estado de ciclo parpadea durante el proceso, y luego el indicador se apaga cuando
ese proceso ha finalizado.
f
Pantalla
• La pantalla muestra la configuración, el tiempo restante estimado, las opciones y los mensajes de
estado. Cuando se enciende el electrodoméstico, se iluminará la configuración predeterminada en la
pantalla.
•
18:88
: Cuando se selecciona un programa, el tiempo predeterminado para dicho programa se
muestra. El tiempo puede cambiarse conforme se seleccionan las opciones.
- Si la pantalla muestra
-:--
entonces el tiempo se mostrará después de que el sensor de carga haya
detectado el tamaño de las prendas.
- El tiempo mostrado solo es una estimación. Diversos factores externos (tamaño de las prendas,
temperatura ambiente, temperatura del agua entrante, etc.) pueden afectar al tiempo real.
•
H
: El icono
Door Lock
se enciende cuando el ciclo se inicia y la puerta se bloquea.
•
f
: El icono
Wi-Fi
se enciende cuando el electrodoméstico se conecta a una red Wi-Fi en el hogar.
es_main.book.book Page 21 Thursday, August 13, 2020 4:29 PM

22
FUNCIONAMIENTO
LS
Tabla de programas
Programa de lavado
Los programas de lavado están diseñados para proporcionar el mejor desempeño de lavado posible para
tipos diferentes de prendas.
• Presione el botón
Programa
para seleccionar el programa deseado.
• Cuando selecciona un programa de lavado, la luz para el programa de lavado correspondiente se
encenderá.
Normal
Carga
Máxima
Descripción Utilice este programa para lavar ropas normales. El sensor
integrado detecta el peso de las ropas, calculando los ajustes de
lavado, enjuague y centrifugado de acuerdo a ello.
• Si ya hay agua o ropas húmedas en el tambor previo al inicio, el
nivel de agua se incrementará.
• Para artículos voluminosos y de peso liviano, el nivel de agua
podría ser muy bajo. Incremente el nivel de agua de forma
manual.
Menos de 22,0
kg
Enjuague Inteligente Carga máx.
Descripción Utilice este programa para mejorar los resultados de enjuague. Esto
es adecuado para la ropa interior y la ropa de bebé. Utilice este
programa si tiene la piel sensible o problemas en la piel.
Menos de 22,0
kg
Lavado Rápido
Carga
Máxima
Descripción Use este programa para lavar prendas ligeramente sucias durante
un periodo corto de tiempo.
• La cantidad de lavado recomendada en este programa es menor
a
3 kg
.
Menos de 3,0
kg
Toallas
Carga
Máxima
Descripción Utilice este programa para lavar toallas de baño, batas de baño,
toallas de mano, etc.
• Lave independientemente de otras ropas.
Menos de 14,0
kg
es_main.book.book Page 22 Thursday, August 13, 2020 4:29 PM

23
FUNCIONAMIENTO
LS
Prelavado+Normal
Carga
Máxima
Descripción Use este programa para tratar previamente la suciedad sin lavar a
mano.
• Es necesario para la ropa que huela mal si no se lava en el
momento adecuado.
Menos de 22,0
kg
es_main.book.book Page 23 Thursday, August 13, 2020 4:29 PM

24
FUNCIONAMIENTO
LS
Edredones
Carga
Máxima
Descripción Utilice este programa para lavar una sabana o ropa de cama que
tengan el signo de lavado a mano en la etiqueta de mantenimiento.
• La ropa de cama de casimir; sábanas acrílicas, de hilado mezclado
o de lana; relleno (poliéster 101) y sábanas podrían dañarse si se
deja que floten. Se recomienda que compre una red de lavado
separada para lavarlas.
• Separe la ropa de cama de las prendas generales. Puede causar
que la carga de lavado quede desequilibrada lo que da lugar a un
lavado anormal.
• Puede que al secado por centrifugado le tome más tiempo
redistribuir las prendas de manera equilibrada si la ropa de cama
está aglomerada a un lado.
• Nunca lave una manta eléctrica, alfombras, tapetes, accesorios
para mascotas, muñecos de peluche o zapatos. Esto puede
provocar daños al electrodoméstico y a otros artículos del lavado.
• Coloque la ropa de cama en una red de lavado y luego remoje y
sumérjala para que facilitar que no flote. Si los artículos flotan
durante el lavado o el centrifugado, podrían dañar el
electrodoméstico y la ropa.
• Sin importar el tamaño, recomendamos lavar la ropa de cama
una por una. Si se lavan al mismo tiempo dos artículos de ropa de
cama de diferentes materiales, esto podría causar un error de
centrifugado debido al desequilibrio.
PRECAUCIÓN
• Cuando ponga una manta en el tambor, no la cargue por encima
de la línea máxima
a
. La manta debe estar también sumergida
en el auga. De lo contrario, o si sobrecarga la manta en el
electrodoméstico, podría provocar daños a la carga de lavado y al
electrodoméstico.
Menos de 22,0
kg
es_main.book.book Page 24 Thursday, August 13, 2020 4:29 PM

25
FUNCIONAMIENTO
LS
Opciones y funciones extra
Puede usar las opciones y funciones extra en
algunos programas para personalizar el ciclo.
• Las opciones y funciones extra pueden ser
cambiadas cuando el botón
INICIO/PAUSA
es
presionado durante el funcionamiento
dependiendo de los programas, opciones y
funciones seleccionados.
Personalización de un
programa de lavado
Cada programa tiene ajustes predeterminados que
se seleccionan automáticamente. También puede
personalizar estos ajustes utilizando estos
botones.
Nivel de Agua
Este electrodoméstico detecta la cantidad de ropa
automáticamente, y luego ajusta el nivel de agua.
Sin embargo, el aumento manual del nivel de agua
podría ser necesario y recomendado para evitar la
formación de pelusas y errores de desequilibrio
Lana
Carga
Máxima
Descripción Utilice este programa para lavar tejidos delicados como lencería o
prendas de lana. Antes del lavado, verifique las instrucciones en las
etiquetas de cuidados de las prendas.
• Este programa utiliza una rotación lenta para extraer agua de las
ropas, para que las ropas conserven más humedad de la normal.
NOTA
• Cuelgue o extienda horizontalmente sus prendas delicadas
cuando las seque.
• Sólo se utilizará agua fría en este programa pues el agua caliente
podría dañar sus ropas.
Menos de 5,0
kg
Ropa Deportiva
Carga
Máxima
Descripción Lava prendas especiales como ropa deportiva o para el aire libre.
• Utilizar para ropa con tejidos laminados resistentes al agua.
Menos de 22,0
kg
Limpieza de Tina
Descripción Esta es una función especial para limpiar el interior del tambor de su
electrodoméstico.
• Para usar esta función, consulte la sección
MANTENIMIENTO
para obtener más
detalles.
Descarga de Ciclo
Descripción Este programa le permite descargar un programa de lavado nuevo y especial en
su electrodoméstico con un teléfono inteligente.
es_main.book.book Page 25 Thursday, August 13, 2020 4:29 PM

26
FUNCIONAMIENTO
LS
cuando la carga es voluminosa pero de peso
liviano.
• Presione la opción
Nivel de Agua
para ajustar el
nivel de agua.
• Cuando seleccione un programa de lavado, el
nivel de agua se mostrará en el panel de control.
• Cuando el nivel de agua es detectado
automáticamente, este puede diferir
dependiendo de la cantidad del lavado, incluso
al indicar el mismo nivel de agua en el panel de
control.
Lavado
El ajuste de la configuración del tiempo de lavado
modifica los tiempos del ciclo y/o acciones de
lavado.
• Presione el botón
Lavado
hasta que el tiempo de
lavado deseado haya sido seleccionado.
Enjuague
Presione esta opción para cambiar la cantidad de
enjuagues.
• Presione el botón
Enjuague
para cambiar el
número de enjuagues.
• Cuando la opción
Enjuague
se selecciona, el
icono
l
se enciende.
• Si selecciona un número máximo de enjuagues,
entonces esta opción se desactiva.
NOTA
• Esta opción solo está disponible en algunos
programas.
Centrifugado
Use esta opción para cambiar la fuerza de
centrifugado. Cuando presione el botón
INICIO/
PAUSA
después de seleccionar esta opción, el
tiempo restante se indica en la pantalla.
NOTA
• Mantenga siempre la cantidad de lavado en
2 kg
o menos, y asegúrese de que sus ropas se
redistribuyan de manera pareja.
• Para reducir efectivamente la humedad,
seleccione 60 minutos para lavado de algodón y
120 minutos para lavado de fibra sintética.
Para utilizar la función Secar Con Aire
Al seleccionar
Secar Con Aire
, usted puede reducir
el tiempo de secado al minimizar la humedad que
queda en la ropa.
• Presione el botón
Centrifugado
por 3 segundos
para seleccionar y presione el botón
ENCENDIDO/APAGADO
para deseleccionar.
Uso de opciones especiales
Puede personalizar los programas utilizando las
siguientes opciones especiales:
TurboWash
Agregar esta opción reduce el tiempo de programa
pero se proporcionarán resultados de lavado
similares.
Onda Fuerte
Use esta opción para cambiar la onda de agua
fuerte.
• Se establece en onda de agua media de manera
predeterminada y no se indica en la pantalla.
Siga los siguientes pasos para
utilizar una opción especial.
1
Presione el botón de
ENCENDIDO/APAGADO
.
2
Seleccione un programa de lavado.
3
Para usar opciones especiales, presione el
botón
TurboWash
, o
Onda Fuerte
.
4
Presione el botón de
INICIO/PAUSA
.
Uso de opciones básicas
Diferir Tiempo de Lavado
Use esta función para retardar el tiempo de
finalización. El electrodoméstico comenzará
automáticamente y finalizará después de un
intervalo de tiempo especificado.
1
Presione el botón de
ENCENDIDO/APAGADO
.
2
Seleccione un programa de lavado.
es_main.book.book Page 26 Thursday, August 13, 2020 4:29 PM

27
FUNCIONAMIENTO
LS
3
Presione el botón
Diferir Tiempo de Lavado
para ajustar el tiempo de finalización diferido
requerido.
4
Presione el botón de
INICIO/PAUSA
.
NOTA
• Esta función es el transcurso de tiempo hasta el
final del programa, no el inicio. El tiempo de
ejecución real puede variar por la temperatura
del agua, las prendas del lavado u otros factores.
• Se puede hacer una reservación de hasta 18
horas;
- Un intervalo de 1 hora hasta 3 - 12 horas
- Un intervalo de 2 horas hasta 12 - 18 horas
• Esta función no puede establecerse para menos
de 3 horas.
• Para cancelar esta función, presione el botón
Diferir Tiempo de Lavado
repetidamente hasta
que la reservación se haya cancelado o presione
el botón
ENCENDIDO/APAGADO
para apagar y
encender el electrodoméstico.
Remojo
Esta opción puede ser seleccionada para lavar ropa
muy sucia y soltar la suciedad y mugre al
remojarlas en agua por algún tiempo.
• Cuando esta opción se activa, el icono
u
se
enciende.
• Para activar esta opción, mantenga presionado
el botón
TurboWash
por 3 segundos.
• Para cambiar el tiempo de remojo en la pantalla
o desactivar esta opción, presione el botón
TurboWash
mientras esta opción está activada.
NOTA
• Mientras
TurboWash
está activada, esta opción
no puede ser establecida incluso si el botón
TurboWash
se mantiene presionado por 3
segundos.
Lavado Caliente / Lavado Frío
Presione los botones
Lavado Caliente
y/o
Lavado
Frío
para seleccionar agua caliente, agua fría, o
agua caliente y fría (agua tibia).
• Si se selecciona
Lavado Caliente
, el lavado se
llevará a cabo con agua caliente y el enjuague
con agua fría.
• En situaciones de uso normales y estándar, agua
tibia ingresará al tambor cuando el agua caliente
y el agua fría sean seleccionadas.
• Este puede ser cambiado durante la operación.
NOTA
• Tanto el botón
Lavado Caliente
como
Lavado
Frío
son seleccionados automáticamente en los
programas
Enjuague Inteligente
y
Limpieza
de Tina
.
Ajuste
Bloqueo infantil
Utilice la función
Bloqueo infantil
para
deshabilitar los controles. Esta función puede
evitar que los niños cambien los programas o
manejen este electrodoméstico.
NOTA
• Una vez que se establece esta función, todos los
botones quedan bloqueados, excepto el botón
ENCENDIDO/APAGADO
.
• Cuando los controles están bloqueados,
CL
y el
tiempo restante se muestran alternativamente
en la pantalla durante el lavado mientras el
bloqueo para niños está activado.
• Apagar la alimentación no restablecerá esta
función. Debe desactivar esta función antes de
poder acceder a otras opciones y funciones.
Bloqueo del panel de control
1
Conectar la alimentación.
2
Mantenga presionados los botones
Nivel de
Agua
y
Centrifugado
simultáneamente por 3
segundos para activar esta función.
Desbloqueo del panel de control
1
Conectar la alimentación.
es_main.book.book Page 27 Thursday, August 13, 2020 4:29 PM

28
FUNCIONAMIENTO
LS
2
Mantenga presionados los botones
Nivel de
Agua
y
Centrifugado
simultáneamente por 3
segundos para desactivar esta función.
• Cuando esta función está desactivada,
sonará un pitido y el tiempo restante para el
ciclo actual volverá a aparecer en la pantalla.
es_main.book.book Page 28 Thursday, August 13, 2020 4:29 PM

29
FUNCIONAMIENTO
LS
Lavado Manual
Cuando necesite un enjuague y centrifugado, solo centrifugado, solo enjuague o únicamente ciclo de
lavado, puede configurarlo manualmente.
NOTA
• Cuando ajusta un ciclo de lavado manualmente como el de solo enjuague, solo lavado o lavado y
enjuague, el agua no se drenará después de que haya finalizado el lavado. Si desea drenar el agua,
seleccione el ciclo de solo centrifugado después de que el lavado haya finalizado.
• Si se ha seleccionado un ciclo de solo enjuague, el suministro de agua comienza luego de detectar la
carga y el ciclo se inicia. Sin embargo el agua se seguirá llenando hasta el nivel de agua seleccionado
incluso si ya hay agua en el tambor.
• Si no selecciona o cambia el
Nivel de Agua
, el nivel de agua se ajustará automáticamente.
Enjuague y
Centrifugado
Solo Centrifugado Solo Enjuague Solo Lavado
1
s
o
t
Presione el botón de
ENCENDIDO/APAGADO
.
2
l
Presione el botón de
Enjuague
.
p
Presione el botón de
Centrifugado
.
l
Presione el botón de
Enjuague
.
k
Presione el botón de
Lavado
.
3
Enjuague y
Centrifugado son
seleccionados
automáticamente.
Presione el botón
Centrifugado
para
ajustar la potencia
del centrifugado.
Presione el botón
Centrifugado
hasta
que la función de
centrifugado sea
cancelada.
Enjuague y
Centrifugado son
seleccionados
automáticamente.
4
l
y
p
Presione los botones
Enjuague
o
Centrifugado
para
ajustar el número de
enjuagues o la
potencia de
centrifugado.
l
Presione el botón
Enjuague
para
ajustar la cantidad de
enjuagues.
l
y
p
Presione los botones
Enjuague
y
Centrifugado
hasta
que las funciones de
enjuague y
centrifugado sean
canceladas.
5
u
Presione el botón
INICIO/PAUSA
para iniciar el ciclo(s).
es_main.book.book Page 29 Thursday, August 13, 2020 4:29 PM

30
FUNCIONES INTELIGENTES
LS
FUNCIONES INTELIGENTES
Aplicación LG ThinQ
La aplicación
LG ThinQ
le permite comunicarse con
el aparato usando un teléfono inteligente.
Características de la aplicación
LG ThinQ
Comuníquese con el electrodoméstico desde un
teléfono inteligente usando las características
inteligentes más convenientes.
Ciclo de Lavado (Início Remoto, Descarga de
Ciclo)
Configure o descargue el ciclo que prefiera y
manéjelo por control remoto.
Ayuda de Limpieza de la Tina
Esta función muestra cuántos ciclos quedan para
ejecutar la función
Limpieza de Tina
.
Monitoreo de la energía
Esta función comprueba el consumo de energía de
los ciclos usados recientemente y el promedio
mensual.
Smart Diagnosis
Esta función le proporciona información útil para el
diagnóstico y resolución de problemas del
electrodoméstico con base en el patrón de uso.
Configuración
Le permite configurar varias opciones en el
electrodoméstico y en la aplicación.
Alerta 'push'
Cuando el ciclo finalice o el electrodoméstico tenga
problemas, tiene la opción de recibir notificaciones
push en un teléfono inteligente. Las
notificacionesse ejecutan incluso si la aplicación
LG
ThinQ
está apagada.
NOTA
• Si cambia de enrutador inalámbrico, proveedor
de Internet o contraseña, borre el
electrodoméstico registrado en la aplicación
LG
ThinQ
y proceda a registrarlo de nuevo.
• La aplicación está sujeta a cambios con
propósito de mejoras en el electrodoméstico sin
previo aviso a los usuarios.
• Algunas características pueden variar
dependiendo del modelo.
Antes de usar la aplicación LG
ThinQ
1
Revise la distancia entre el electrodoméstico y
el enrutador inalámbrico (Red Wi-Fi).
• Si la distancia entre el electrodoméstico y el
enrutador inalámbrico es muy grande, la
señal será débil. Puede que le tome más
tiempo registrarse o que falle la instalación.
2
Desactive los
Datos Móviles
o
Datos
Celulares
en su teléfono inteligente.
3
Conecte su teléfono inteligente al enrutador
inalámbrico.
NOTA
• Para verificar la conexión Wi-Fi, verifique que el
icono
f
en el panel de control esté encendido.
• El electrodoméstico funciona únicamente con
redes Wi-Fi de 2.4 GHz. Contacte a su proveedor
de servicios de internet o verifique el manual del
enrutador inalámbrico para revisar la frecuencia
de su red.
es_main.book.book Page 30 Thursday, August 13, 2020 4:29 PM

31
FUNCIONES INTELIGENTES
LS
•
LG ThinQ
no es responsable de ningún
problema de conexión de red ni de errores,
fallos o anomalías causadas por la misma.
• Si el electrodoméstico está teniendo problemas
para conectarse a la red Wi-Fi, puede que éste se
encuentre muy lejos del enrutador. Compre un
amplificador Wi-Fi (extensión de rango) para
mejorar la fuerza de la señal Wi-Fi.
• La conexión Wi-Fi puede no llevarse a cabo o
puede ser interrumpida debido al entorno de la
red de casa.
• La conexión de red puede no funcionar
apropiadamente dependiendo del servicio del
proveedor de internet.
• El entorno inalámbrico circundante puede hacer
que el servicio de red inalámbrica se ejecute
lentamente.
• El electrodoméstico no puede registrarse debido
a problemas con la transmisión de la señal
inalámbrica. Desconecte el electrodoméstico y
espere alrededor de un minuto previo a
intentarlo de nuevo.
• Si el cortafuegos de su enrutador inalámbrico
está activado, desactívelo o añada una
excepción a éste.
• El nombre de la red inalámbrica (SSID) debe ser
una combinación de letras y números. (No utilice
caracteres especiales)
• La interfaz de usuario (IU) del teléfono
inteligente puede variar dependiendo del
sistema operativo (OS) del móvil y del fabricante.
• Puede que no logre configurar la red si el
protocolo de seguridad del router está en
WEP
.
Por favor cambie este protocolo por otro (es
recomendado el
WPA2
) y registre el producto de
nuevo.
Instalación de la aplicación LG
ThinQ
Busque la aplicación
LG ThinQ
en la tienda Google
Play Store o Apple App Store desde un teléfono
inteligente. Siga las instrucciones para descargar e
instalar la aplicación.
Uso remoto del
electrodoméstico
Remote Start (Inicio Remoto)
Use un teléfono inteligente para controlar su
electrodoméstico remotamente. También puede
monitorear el funcionamiento de su ciclo para que
pueda saber cuánto tiempo le queda al mismo.
Uso de esta función
1
Ingrese la ropa en el tambor y agregue
detergente en el cajón del dispensador de
detergente.
• Si lo desea, agregue blanqueador o
suavizante en las áreas apropiadas del
dispensador.
2
Presione el botón de
ENCENDIDO/APAGADO
.
3
Presione y mantenga presionado el botón
Início Remoto
por 3 segundos para habilitar la
función de control remoto.
4
Inicie un ciclo con la aplicación
LG ThinQ
de su
teléfono inteligente.
NOTA
• Una vez se ha habilitado esta función, solo
puede comenzar un ciclo desde la aplicación
LG
ThinQ
para teléfonos inteligentes. Si el ciclo no
es iniciado, el electrodoméstico esperará a que
el ciclo se inicie hasta que esta se apague de
forma remota desde la aplicación, o al
deshabilitar esta función.
• Si la puerta se ha abierto, no puede iniciar un
ciclo remotamente.
Deshabilitar esta función manualmente
Cuando esta función está activada, pulse y
mantenga presionado el botón
Início Remoto
por
3 segundos.
Download Cycle (Descarga de Ciclo)
Puede descargar ciclos nuevos y especiales que no
están incluidos en los ciclos básicos del
electrodoméstico.
es_main.book.book Page 31 Thursday, August 13, 2020 4:29 PM

32
FUNCIONES INTELIGENTES
LS
Los electrodomésticos que han sido registrados
con éxito pueden descargar una variedad de ciclos
de especialidad específicos para su modelo.
Una vez el electrodoméstico ha completado el ciclo
de descarga, este se mantendrá en él hasta que un
nuevo ciclo sea descargado.
NOTA
• El electrodoméstico solamente puede almacenar
un ciclo descargado a la vez.
Especificaciones de Módulo LAN
Inalámbrico
Versión del software de la función inalámbrica: V
1.0
Para que el usuario lo tenga en cuenta, este
dispositivo debe ser instalado y operado con una
distancia mínima de 20 cm entre el dispositivo y el
armazón.
Módulo LAN Inalámbrico
regulaciones
La operación de este equipo está sujeta a las
siguientes dos condiciones:
(1) es posible que este equipo o dispositivo no
cause interferencia perjudicial y
(2) este equipo o dispositivo debe aceptar cualquier
interferencia, incluyendo la que pueda causar su
operación no deseada.
Software de Código Abierto
Para obtener el código fuente bajo GPL, LGPL, MPL
y otras licencias de código abierto que contiene
este producto, visite http://opensource.lge.com.
Además del código fuente, se pueden descargar
los términos de la licencia, las anulaciones de la
garantía y los avisos de derechos de autor.
LG Electronics también le proporcionará el código
abierto en un CD-ROM por un costo que cubra los
gastos de dicha distribución (como el costo del
medio, del envío y de la manipulación) una vez
realizado el pedido por correo electrónico a la
dirección [email protected]. Esta oferta es
válida solo durante un período de tres años
después de que se envíe el último cargamento de
este producto. Esta oferta es válida para todo aquel
que reciba esta información.
Smart Diagnosis
Esta función solo está disponible en los modelos
con el logo
c
o
d
.
Use esta función para ayudarle a diagnosticar y
solucionar problemas con su aparato.
NOTA
• Por motivos no atribuibles a negligencias de
LGE, el servicio podría no funcionar debido a
factores externos como, entre otros, no
disponibilidad de red Wi-Fi, desconexión de la
red Wi-Fi, política local de la tienda de apps, o no
disponibilidad de la app.
• La función podría estar sujeta a cambios sin
previo aviso y podría presentar una forma
diferente dependiendo de dónde se encuentre
usted ubicado.
Uso de LG ThinQ para
diagnosticar problemas
Si experimenta un problema con su aparato
equipado con Wi-Fi, puede transmitir datos de
resolución de problemas a un teléfono inteligente
usando la aplicación
LG ThinQ
.
• Ejecute la aplicacón
LG ThinQ
y seleccione la
función
Smart Diagnosis
en el menú. Siga las
Modelo LCW-004
Rango de
Frecuencia
2412 a 2472 MHz
Potencia de
salida (máx.)
IEEE 802.11b: 17.82 dBm
IEEE 802.11g: 17.72 dBm
IEEE 802.11n: 16.61 dBm
es_main.book.book Page 32 Thursday, August 13, 2020 4:29 PM

33
FUNCIONES INTELIGENTES
LS
instrucciones que se proporcionan en la
aplicación
LG ThinQ
.
Uso de diagnóstico audible para
diagnosticar problemas
Siga las instrucciones que aparece debajo para
usar el método de diagnóstico audible.
• Ejecute la aplicacón
LG ThinQ
y seleccione la
función
Smart Diagnosis
en el menú. Siga las
instrucciones para el diagnóstico audible que se
proporcionan en la aplicación
LG ThinQ
.
1
Presione el botón de
ENCENDIDO/APAGADO
para encender el electrodoméstico.
• No presione ningún otro botón.
2
Coloque el micrófono de su teléfono
inteligente cerca del logo
c
o
d
.
3
Pulse y mantenga presionado el botón
Lavado
Frío
durante 3 segundos o más mientras
sostiene el micrófono del teléfono inteligente
junto al logo hasta que la transferencia de
datos finalice.
• Mantenga el teléfono inteligente allí hasta
que la transmisión de datos haya finalizado.
Se muestra el tiempo restante para la
transferencia de datos.
4
Luego de que la transferencia de datos haya
finalizado, el diagnóstico se mostrará en la
aplicación.
NOTA
• Para obtener mejores resultados, no mueva el
teléfono inteligente mientras se transmiten los
tonos.
Max.
10 mm
Max.
10 mm
es_main.book.book Page 33 Thursday, August 13, 2020 4:29 PM

34
MANTENIMIENTO
LS
MANTENIMIENTO
ADVERTENCIA
• Desenchufe el electrodoméstico antes de limpiarlo para evitar el riesgo de descarga eléctrica. Si no se
cumple con esta advertencia, se pueden producir lesiones graves, incendios, descargas eléctricas o la
muerte.
• Nunca utilice químicos fuertes, limpiadores abrasivos ni solventes para limpiar el electrodoméstico.
Pueden dañar la terminación.
Limpieza después de cada
lavado
Qué limpiar
• Si siempre usa agua fría, le recomendamos que
se lleve a cabo un lavado tibio o caliente en
intervalos regulares, por ejemplo, cada 5 lavadas
se debe llevar a cabo uno tibio.
• Cierre los grifos después de cada uso para
prevenir el riesgo de inundaciones si llegase, de
lo contrario una manguera podría estallar.
• Siempre desconecte el cable de alimentación
después de su uso.
• Luego de que finaliza un ciclo, limpie la puerta y
el lado interno de la puerta con un paño seco
para eliminar la humedad.
• Limpie alrededor del dispensador de
blanqueador con agua para drenar cualquier
blanqueador residual de la abertura del
dispensador ya que el blanqueador puede ser
corrosivo si se queda sin diluir.
ADVERTENCIA
• Deje la puerta abierta para que se seque el
interior del tambor pero solo si es seguro y los
niños están supervisados.
Limpieza del exterior
El cuidado adecuado del electrodoméstico puede
prolongar su vida útil.
Exterior
• Seque inmediatamente cualquier derrame.
• Límpielo con un paño húmedo.
• No presione sobre la superficie ni la pantalla con
objetos cortantes.
Bandeja Dispensadora
El detergente o el suavizante puede acumularse en
la gaveta dispensadora. Quite la gaveta y los
separadores de la gaveta dispensadora y limpie
cualquier resto de material acumulado una o dos
veces al mes.
Limpieza periódica del
aparato
Limpieza de Tina
Esta es una función especial que ayuda a limpiar el
interior del electrodoméstico al empapar, lavar,
enjuagar y centrifugar.
Ejecute esta función
una vez al mes
(o más según
sea necesario) para reducir la acumulación de
detergente y suavizante y otros residuos.
• Si hay malos olores o moho dentro del
electrodoméstico, ejecute esta función una vez a
la semana durante 3 semanas adicionalmente a
los intervalos sugeridos regularmente.
NOTA
• El mensaje
tcL
se mostrará para alertar sobre la
recomendación de ejecutar la función
Limpieza
de Tina
.
es_main.book.book Page 34 Thursday, August 13, 2020 4:29 PM

35
MANTENIMIENTO
LS
• Si el mensaje
tcL
se muestra en el
electrodoméstico, o si se selecciona luego de
completar 30 ciclos de lavado, el tiempo de
ejecución aumentará hasta a 12 horas debido al
tiempo de remojo agregado.
• Para los modelos con filtro de pelusas, retire las
pelusas o suciedad del interior del filtro de
pelusas antes y después de usar este programa.
• En los modelos sin filtro de pelusas, éstas son
descargadas al momento de drenar el agua
durante el lavado.
1
Remueva cualquier prenda o artículo del
electrodoméstico.
2
Abra la gaveta dispensadora y agregue un
descalcificador en el compartimento de lavado
principal.
ADVERTENCIA
• No agregue ningún detergente al
compartimiento del dispensador de detergente
para esta función. De lo contrario, podría
generarse espuma excesiva y salir del
electrodoméstico provocando daños a la
propiedad.
3
Cierre la bandeja dispensadora lentamente y
cierre la puerta.
4
Presione el botón de
ENCENDIDO/APAGADO
.
5
Presione el botón
Programa
para seleccionar
Limpieza de Tina
.
6
Presione el botón de
INICIO/PAUSA
para
comenzar.
7
Deje la puerta abierta para que se seque
completamente el interior del
electrodoméstico.
• Cuando el interior del electrodoméstico no
se seque completamente, se pueden
provocar malos olores o moho.
ADVERTENCIA
• Deje la puerta abierta para que se seque el
interior del tambor pero solo si es seguro y los
niños están supervisados.
Limpieza del filtro de entrada
de agua
El filtro de entrada de agua recoge la cal o
pequeños objetos que pueda haber en el agua
suministrada al electrodoméstico. Limpie el filtro
de entrada de agua regularmente.
• Cierre los grifos al electrodoméstico si no va a
utilizarse por un tiempo (p. ej., vacaciones),
especialmente si no hay drenaje en el suelo
(sumidero) cerca.
•
IE
El mensaje de error aparecerá en el panel de
control cuando no haya agua ingresando a la
gaveta para detergente.
• Si el agua es muy dura o contiene restos de cal,
el filtro de entrada de agua podría atascarse.
1
Apague el electrodoméstico y cierre el grifo de
agua y desenrosque la manguera de entrada
de agua.
2
Retire el filtro de entrada de agua con pinzas
pequeñas y luego limpie el filtro utilizando un
cepillo de diente de cerdas medianas.
es_main.book.book Page 35 Thursday, August 13, 2020 4:29 PM

36
MANTENIMIENTO
LS
Limpieza del filtro de la bomba
de desagüe
El filtro de drenaje acumula hilos y pequeños
objetos que quedan de las prendas. Controle
regularmente que el filtro esté limpio para
garantizar el buen funcionamiento del
electrodoméstico.
1
Encienda el electrodoméstico.
2
Presione el botón
Centrifugado
para vaciar
toda el agua del tambor.
3
Apague el electrodoméstico y desenchúfelo de
la toma de corriente.
4
Coloque una toalla en el piso debajo de la tapa
de la bomba de drenaje.
• Es posible que quede algo de agua residual
en la manguera de drenaje y se produzcan
fugas de agua de la manguera de drenaje.
5
Gire la tapa
a
en la parte posterior del
electrodoméstico hacia la izquierda y retírela.
6
Saque todo objeto extraño y pelusas que
pueda haber dentro del tambor y en el filtro.
7
Inserte el filtro por las costillas de la guía
dentro de la carcasa de la bomba y gire la tapa
hacia la derecha para reajustar la tapa.
• Gire la tapa hacia la derecha con firmeza
hasta que esté apretada.
8
Conecte la alimentación y revise que no haya
fugas antes de recolocar el electrodoméstico.
PRECAUCIÓN
• Tenga cuidado al drenar el agua pues puede que
el agua residual esté caliente.
es_main.book.book Page 36 Thursday, August 13, 2020 4:29 PM

37
SOLUCIÓN DE PROBLEMAS
LS
SOLUCIÓN DE PROBLEMAS
Antes de solicitar asistencia técnica
El manejo del electrodoméstico puede llevar a errores o funcionamientos inadecuados. Las siguientes
tablas contienen causas y notas para la resolución de mensajes de error o funcionamientos inadecuados.
Puede solucionar la mayoría de los problemas por sí mismo, ahorrando tiempo y dinero, ya que no tendrá
la necesidad de llamar al Centro de Servicio de LG Electronics. La siguiente tabla debería ayudarlo a
resolver problemas.
Mensajes de error
El electrodoméstico está equipado con un sistema de monitoreo de errores automático que detecta y
diagnostica problemas anticipadamente. Si este electrodoméstico no funciona correctamente, o no
funciona en absoluto, compruebe lo siguiente antes de llamar al Centro de Servicio de LG Electronics.
Síntomas Causa posible y solución
dE
ERROR EN LA PUERTA
La puerta no está cerrada apropiadamente.
• Cierre la puerta completamente. Si el código de error se muestra todavía,
llame al servicio técnico.
dL
ERROR BLOQUEO
PUERTA
La puerta no se bloquea adecuadamente.
• Revise que no haya nada atascado debajo de la puerta, incluyendo
material de empaque o prendas.
• Cierre la puerta completamente. Si el código de error se muestra todavía,
llame al servicio técnico.
dr
FUNCIÓN DRENAJE
El electrodoméstico se pausa durante un ciclo durante unos minutos.
• El ciclo se cancelará y cualquier resto de agua del tambor se drenará.
1E
ERROR DE ENTRADA
Los grifos de suministro de agua no están completamente abiertos.
• Abra el grifo completamente.
La(s) manguera(s) de suministro de agua están torcidas, apretadas o
aplastadas.
• Estire o reinstale la(s) manguera(s) de suministro de agua.
El filtro de las mangueras de suministro está obstruido.
• Revise y limpie el filtro de la(s) manguera(s) de suministro.
La presión del suministro de agua al grifo o al hogar es demasiado baja
o demasiado alta.
• Contacte a un fontanero para que compruebe la presión del agua o
restablezca los requisitos de funcionamiento.
El suministro de agua está conectado con manguera(s) de limitantes de
fugas.
• No utilice manguera(s) limitante(s) de fugas.
es_main.book.book Page 37 Thursday, August 13, 2020 4:29 PM

38
SOLUCIÓN DE PROBLEMAS
LS
LE1
ERROR OBJETOS
EXTRAÑOS
Objetos extraños, como monedas, pines, pinzas, etc., están atrapados
entre el pulsador y el tambor interior.
• Apague el electrodoméstico y luego presione el botón
ENCENDIDO/
APAGADO
. Presione el botón
Centrifugado
sin seleccionar un ciclo para
drenar y luego centrifugar la ropa. Cuando el centrifugado haya sido
completado, remueva las prendas y luego busque y remueva cualquier
objeto que esté atrapado en el hueco del pulsador.
OE
ERROR DE SALIDA DE
AGUA
La manguera de drenaje está torcida, apretada o aplastada.
• Limpie y enderece la manguera de drenaje.
La descarga del drenaje se encuentra a más de 1,2 m sobre la planta de
la lavadora.
• Ajuste la manguera o reconfigure la tubería de drenaje. La altura máxima
de drenaje es 1,2 m.
UE
ERROR DE
DESEQUILIBRIO
La operación de rebalanceo no ha sido exitosa.
• El intento automático para rebalancear la ropa no ha sido exitoso. El ciclo
ha sido pausado para permitirle ajustar manualmente la ropa.
La carga es muy pequeña.
• Agregue más artículos para dejar que el electrodoméstico equilibre las
prendas.
Los elementos pesados están mezclados con artículos más ligeros.
• Lave elementos de pesos similares.
La carga no está equilibrada.
• Redistribuya manualmente la ropa si ésta se ha enredado.
tE
ERROR SENSOR
TEMPERATURA
Error de control.
• Desconecte el electrodoméstico y espere 60 segundos. Vuelva a conectar
la energía e inténtelo de nuevo.
• Si el código de error se muestra todavía, llame al servicio técnico.
FE
ERROR DE DERRAME
La lavadora se llena demasiado de agua porque falla la válvula.
• Cierre los grifos de agua, desconecte el electrodoméstico, y llame al
servicio.
PE
ERROR DEL SENSOR DE
PRESIÓN
El sensor de nivel de agua no está funcionando correctamente.
• Cierre los grifos de agua, desconecte el electrodoméstico, y llame al
servicio.
LE
ERROR DE BLOQUEO
DEL MOTOR
Ha ocurrido un error en el motor.
• Deje que el electrodoméstico descanse durante 30 minutos y luego
reinicie el ciclo.
• Si el código de error se muestra todavía, llame al servicio técnico.
AE
ERROR EMBRAGUE
Error de embrague.
• Desconecte el electrodoméstico y llame al servicio.
Síntomas Causa posible y solución
es_main.book.book Page 38 Thursday, August 13, 2020 4:29 PM

39
SOLUCIÓN DE PROBLEMAS
LS
Ruidos
tcL
ALARMA DE LIMPIEZA
DE TINA
El programa ha funcionado más de 30 veces.
• Ejecute la función
Limpieza de Tina
.
E3
ERROR SENSOR
PRENDAS
El sensor de detección de prendas está defectuoso.
• Redistribuya manualmente la ropa si ésta se ha enredado.
La revolución del motor es muy baja.
El punto de contacto del Conector está defectuoso.
• Desconecte el electrodoméstico y espere 60 segundos. Vuelva a conectar
la energía e inténtelo de nuevo.
CL
ERROR BLOQUEO
INFANTIL
CL
no es un error. Esta opción previene que los niños cambien de ciclos
u operen el electrodoméstico.
• Desactive la función
Bloqueo infantil
del panel de control.
Síntomas Causa posible y solución
Ruido metálico y de
traqueteo
Puede haber objetos extraños como llaves, monedas o alfileres en el
tambor.
• Detenga el electrodoméstico, revise si hay objetos extraños en el tambor.
Si los ruidos continúan luego de haber reiniciado el electrodoméstico,
llame al servicio.
Golpeteo Las prendas pesadas pueden producir un golpeteo. Esto suele ser
normal.
• Si el ruido continúa, probablemente el electrodoméstico esté
desequilibrado. Deténgalo y distribuya nuevamente las prendas.
Las prendas podrían estar desequilibradas.
• Pause el ciclo y redistribuya las prendas luego de que la puerta se haya
desbloqueado.
Síntomas Causa posible y solución
es_main.book.book Page 39 Thursday, August 13, 2020 4:29 PM

40
SOLUCIÓN DE PROBLEMAS
LS
Ruido de vibración Los materiales de empaque no han sido removidos.
• Remueva los materiales de empaque.
Las prendas podrían estar distribuidas desigualmente en el tambor.
• Pause el ciclo y redistribuya las prendas luego de que la puerta se haya
desbloqueado.
No todas las patas niveladoras están apoyadas firmemente y de forma
pareja en el piso.
• Consulte la sección
Nivelado del electrodoméstico
para ajustar y nivelar
las patas.
El piso no es lo suficientemente rígido.
• Compruebe si el piso es sólido y no se hunde. Consulte la sección
Requisitos del lugar de instalación
para seleccionar la ubicación
adecuada.
Síntomas Causa posible y solución
es_main.book.book Page 40 Thursday, August 13, 2020 4:29 PM

41
SOLUCIÓN DE PROBLEMAS
LS
Funcionamiento
Síntomas Causa posible y solución
El electrodoméstico no
funcionará.
El panel de control se ha apagado debido a la inactividad.
• Esto es normal. Presione el botón de
ENCENDIDO/APAGADO
para
encender el electrodoméstico.
El electrodoméstico está desenchufado.
• Asegúrese de que el enchufe esté conectado de forma segura a un
tomacorriente funcional.
El suministro de agua está apagado.
• Abra el grifo de suministro de agua completamente.
Los controles no están configurados apropiadamente.
• Asegúrese de que el ciclo fue configurado correctamente. Cierre la puerta
y presione el botón
INICIO/PAUSA
.
El cortacircuitos /fusible está obstaculizado/fundido.
• Verifique los cortacircuitos/fusibles de su hogar. Reemplace los fusibles o
reinicie el cortacircuito. El electrodoméstico debe estar en un rama de
circuito dedicada. El electrodoméstico reiniciará el ciclo donde se detuvo
cuando regrese la electricidad.
El control debe ser reiniciado.
• Presione el botón
ENCENDIDO/APAGADO
, luego reseleccione el
programa deseado y presione el botón
INICIO/PAUSA
.
INICIO/PAUSA no se presionó después de que se configurara un ciclo.
• Presione el botón
ENCENDIDO/APAGADO
, luego vuelva a seleccionar el
ciclo deseado y presione el botón
INICIO/PAUSA
. Si el botón
INICIO/
PAUSA
no se presiona dentro de un cierto periodo de tiempo, el
electrodoméstico se apagará.
Presión de agua demasiado baja.
• Verifique en otro grifo de la casa para cerciorarse que la presión de agua
del hogar es la adecuada.
El electrodoméstico está demasiado frío.
• Si el electrodoméstico ha sido expuesto a temperaturas bajo cero por un
largo período de tiempo, permita que esta se entibie previo a presionar el
botón
ENCENDIDO/APAGADO
.
El electrodoméstico está calentando el agua o creando vapor. (solo
algunos modelos)
• El tambor del electrodoméstico puede dejar de operar temporalmente
durante ciertos ciclos, mientras el agua se caliente de forma segura para
establecer una temperatura.
es_main.book.book Page 41 Thursday, August 13, 2020 4:29 PM

42
SOLUCIÓN DE PROBLEMAS
LS
El detergente no se
dispensa
completamente o no se
dispensa en absoluto.
Se está usando demasiado detergente.
• Siga las pautas proporcionadas por el fabricante del detergente.
Fuga de agua La conexión de manguera de entrada de agua está suelta en parte de la
tapa o el electrodoméstico.
• Revise que no hayan fugas, rajaduras o fracturas en las mangueras.
• Apriete las conexiones de la manguera.
La tubería de drenaje del hogar está obstruida.
• El electrodoméstico bombea agua muy rápidamente. Revise si el agua se
regresa de la pipa de drenaje durante dicho proceso. Si observa agua
saliendo del drenaje, revise la instalación adecuada de la manguera de
drenaje y vea si existe algún impedimento en ella. Contacte a un plomero
para reparar la pipa de drenaje.
La manguera de drenaje se ha salido de la alcantarilla o no está lo
suficientemente insertada.
• Ate la manguera de drenaje a la manguera de suministro o al tubo vertical
para prevenir que esta se salga durante el drenaje. Para pipas de drenaje
más pequeñas, inserte la manguera de drenaje dentro de la pipa hasta el
borde de la manguera. Para pipas de drenaje más largas, inserte la
manguera de drenaje en la pipa 2,5 - 5 cm pasada la pestaña.
Un objeto grande como una almohada o manta está por encima de la
parte superior del tambor.
• Detenga el electrodoméstico y compruebe el elemento. Asegúrese de que
el elemento no se encuentre por encima del borde superior del tambor.
El electrodoméstico no
se llena
adecuadamente.
El filtro está obstruido.
• Asegúrese de que los filtros de entrada en las válvulas de llenado no se
obstruyen.
Las mangueras de suministro podrían estar torcidas.
• Revise que las mangueras de suministro no estén torcidas u obstruidas.
Suministro de agua insuficiente.
• Asegúrese de que los grifos de agua caliente y fría estén completamente
abiertos.
Las mangueras de suministro de agua fría y caliente están revertidas.
• Revise las conexiones de la manguera de suministro.
El electrodoméstico no
drena el agua.
La manguera de drenaje está torcida.
• Asegúrese de que la manguera de drenaje no esté torcida.
El drenaje está ubicado a más de 1,2 m sobre el piso.
• Asegúrese de que la manguera de drenaje no se encuentre a más de 1,2
m de la planta del electrodoméstico.
Síntomas Causa posible y solución
es_main.book.book Page 42 Thursday, August 13, 2020 4:29 PM

43
SOLUCIÓN DE PROBLEMAS
LS
Desempeño
El tiempo del ciclo es
superior al habitual.
La carga es muy pequeña.
• Agregue más artículos para dejar que el electrodoméstico equilibre las
prendas.
Los elementos pesados están mezclados con artículos más ligeros.
• Siempre intente lavar elementos de peso similar juntos para permitirle al
electrodoméstico distribuir equitativamente el peso de la ropa al
momento del centrifugado.
La carga no está equilibrada.
• Redistribuya manualmente la ropa si ésta se ha enredado.
Síntomas Causa posible y solución
Eliminación pobre de la
suciedad
Opciones adecuadas no están seleccionadas.
• Mucha suciedad y manchas más pesadas pueden requerir poder de
limpieza adicional. Presione la opción
Remojo
para impulsar el poder de
limpieza del ciclo seleccionado.
Manchas fijadas previamente.
• Los elementos que han sido lavados previamente pueden tener manchas
que se han fijado. Estas manchas pueden ser difíciles de remover y pueden
requerir lavado a mano o un pre-tratamiento para ayudar con la
eliminación de las mismas.
Síntomas Causa posible y solución
Suciedad El suavizante o el blanqueador ha sido dispensado muy pronto.
• El compartimiento del dispensador está demasiado lleno causando que el
blanqueador o el suavizante se dispense inmediatamente. SIEMPRE mida
el blanqueador para evitar el llenado en exceso.
• Cierre la gaveta del dispensador suavemente.
El cloro o el suavizante se agregaron directamente a las prendas en el
tambor.
• Use siempre los dispensadores para asegurarse de que los productos de
lavado se dispensen adecuadamente en el momento justo del ciclo.
Las prendas no se clasificaron apropiadamente.
• Lave siempre los colores oscuros por separado de los colores claros y los
blancos para prevenir su decoloración.
• Nunca lave artículos con suciedad abundante junto a artículos con
suciedad ligero.
Síntomas Causa posible y solución
es_main.book.book Page 43 Thursday, August 13, 2020 4:29 PM

44
SOLUCIÓN DE PROBLEMAS
LS
Wi-Fi
Arrugas El electrodoméstico no se descargó en su momento.
• Retire siempre los artículos del electrodoméstico tan pronto como el ciclo
finalice.
El electrodoméstico está sobrecargado.
• El electrodoméstico puede estar completamente cargado, pero el tambor
no debería estar abarrotado de artículos. La puerta del electrodoméstico
debería cerrarse fácilmente.
Las mangueras de suministro de agua fría y caliente están revertidas.
• El enjuague con agua caliente puede fijar arrugas en su ropa. Revise las
conexiones de la manguera de suministro.
Olor a rancio o a moho
en el electrodoméstico
El interior del tambor no se limpió adecuadamente.
• Ejecute la función
Limpieza de Tina
regularmente.
Síntomas Causa posible y solución
El electrodoméstico de
su hogar y su teléfono
inteligente no están
conectados a la red Wi-
Fi.
La contraseña para la red Wi-Fi a la que se está intentando conectar es
incorrecta.
• Busque la red Wi-Fi conectada a su teléfono inteligente y remuévala, luego
registre su electrodoméstico en
LG ThinQ
.
Los Datos Móviles para su teléfono inteligente están activados.
• Desactive la
Datos Móviles
en su teléfono inteligente y registre el
electrodoméstico utilizando la red Wi-Fi.
El nombre de la red inalámbrica (SSID) se ha configurado
incorrectamente.
• El nombre de la red inalámbrica (SSID) debe ser una combinación de letras
y números. (No utilice caracteres especiales)
La frecuencia del enrutador no es de 2.4 GHz.
• Sólo se admite una frecuencia de enrutador de 2.4 GHz. Configure el
enrutador inalámbrico a 2.4 GHz y conecte el electrodoméstico a éste. Para
verificar la frecuencia del enrutador, consulte con su proveedor de
servicios de internet o con el fabricante del enrutador.
La distancia entre el enrutador y el electrodoméstico es muy grande.
• Si la distancia entre el electrodoméstico y el enrutador es muy grande, la
señal puede ser débil y puede que no se configure la conexión
correctamente. Reubique el enrutador a manera de que esté más cerca del
electrodoméstico.
Síntomas Causa posible y solución
es_main.book.book Page 44 Thursday, August 13, 2020 4:29 PM

Notas
es_main.book.book Page 45 Thursday, August 13, 2020 4:29 PM

Notas
es_main.book.book Page 46 Thursday, August 13, 2020 4:29 PM

Notas
es_main.book.book Page 47 Thursday, August 13, 2020 4:29 PM

Notas
es_main.book.book Page 47 Thursday, August 13, 2020 4:29 PM

OWNER'S MANUAL
WASHING MACHINE
Before beginning installation, read these instructions
carefully. This will simplify installation and ensure that the
product is installed correctly and safely. Leave these
instructions near the product after installation for future
reference.
www.lg.com
Copyright © 2020 LG Electronics Inc. All Rights Reserved.
global_main.book.book Page 1 Thursday, August 13, 2020 4:39 PM

TABLE OF CONTENTS
This manual may contain images or
content that may be different from the
model you purchased.
This manual is subject to revision by the
manufacturer.
SAFETY INSTRUCTIONS
READ ALL INSTRUCTIONS BEFORE USE...........................................................3
WARNING............................................................................................................3
INSTALLATION
Parts and Specifications ....................................................................................8
Installation Place Requirements ....................................................................10
Connecting the Water Inlet Hoses.................................................................11
Installing the Drain Hose ................................................................................12
Levelling the Appliance ...................................................................................12
OPERATION
Operation Overview.........................................................................................14
Preparing Laundry...........................................................................................14
Adding Detergents, Softeners and Bleaches................................................16
Control Panel ....................................................................................................18
Programme Table ............................................................................................20
Extra Options and Functions ..........................................................................22
SMART FUNCTIONS
LG ThinQ Application.......................................................................................27
Smart Diagnosis ...............................................................................................29
MAINTENANCE
Cleaning after Every Wash..............................................................................31
Cleaning the Appliance Periodically ..............................................................31
TROUBLESHOOTING
Before Calling for Service................................................................................34
global_main.book.book Page 2 Thursday, August 13, 2020 4:39 PM

3
SAFETY INSTRUCTIONS
EN
SAFETY INSTRUCTIONS
READ ALL INSTRUCTIONS BEFORE USE
The following safety guidelines are intended to prevent unforeseen
risks or damage from unsafe or incorrect operation of the appliance.
The guidelines are separated into ‘WARNING’ and ‘CAUTION’ as
described below.
Safety Messages
WARNING
WARNING
To reduce the risk of explosion, fire, death, electric shock, injury or
scalding to persons when using this product, follow basic precautions,
including the following:
Technical Safety
• This appliance is not intended for use by persons (including children)
with reduced physical, sensory or mental capabilities, or lack of
experience and knowledge, unless they have been given supervision
or instruction concerning use of the appliance by a person
responsible for their safety.
This symbol is displayed to indicate matters and operations that
can cause risk. Read the part with this symbol carefully and
follow the instructions in order to avoid risk.
WARNING
This indicates that the failure to follow the instructions can cause
serious injury or death.
CAUTION
This indicates that the failure to follow the instructions can cause
minor injury or damage to the product.
global_main.book.book Page 3 Thursday, August 13, 2020 4:39 PM

4
SAFETY INSTRUCTIONS
EN
• Children should be supervised to ensure that they do not play with
the appliance.
• Cleaning and user maintenance shall not be made by children
without supervision.
• If the power cord is damaged, it must be replaced by the
manufacturer, its service agent or similarly qualified persons in order
to avoid a hazard.
• Ventilation openings must not be obstructed by a carpet.
• This appliance is intended to be used in household only.
• Use a new hose or hose-set supplied with the appliance. Reusing old
hoses can cause a water leak and subsequent property damage.
• The inlet water pressure must be between 50 and 800 kPa.
Maximum Capacity
The maximum capacity in some cycles for dry clothes to be washed is
22.0 kg
.
Installation
• Never attempt to operate the appliance if it is damaged,
malfunctioning, partially disassembled, or has missing or broken
parts, including a damaged cord or plug.
• This appliance should only be transported by two or more people
holding the appliance securely.
• Do not install the appliance in a damp and dusty place. Do not install
or store the appliance in any outdoor area, or any area that is subject
to weathering conditions such as direct sunlight, wind, rain, or
temperatures below freezing.
• Make sure the power plug is completely pushed into the power
outlet.
• Do not plug the appliance into multiple outlet sockets or an extension
power cable.
global_main.book.book Page 4 Thursday, August 13, 2020 4:39 PM

5
SAFETY INSTRUCTIONS
EN
• Do not modify the power plug provided with the appliance. If it does
not fit the power outlet, have a proper outlet installed by a qualified
electrician.
• This appliance must be grounded. In the event of malfunction or
breakdown, grounding will reduce the risk of electric shock by
providing a path of least resistance for electric current.
• This appliance is equipped with a power cord having an equipment-
grounding conductor and a grounding power plug. The power plug
must be plugged into an appropriate outlet socket that is installed
and grounded in accordance with all local codes and ordinances.
• Improper connection of the equipment-grounding conductor can
result in risk of electric shock. Check with a qualified electrician or
service personnel if you are in doubt as to whether the appliance is
properly grounded.
• Tighten and secure the drain hose at connecting ends to avoid
separation.
• For models with only one inlet water supply valve, do not connect to
hot water. Connect to cold water only.
Operation
• Do not apply any sharp objects to the control panel in order to
operate the appliance.
• Do not attempt to separate any panels or disassemble the appliance.
• Do not repair or replace any part of the appliance. All repairs and
servicing must be performed by qualified service personnel unless
specifically recommended in this Owner's Manual. Use only
authorized factory parts.
• Do not put animals, such as pets into the appliance.
• Keep the area underneath and around the appliance free of
combustible materials such as lint, paper, rags, chemicals, etc.
• Do not leave the appliance door open. Children may hang on the door
or crawl inside the appliance, causing damage or injury.
• Do not put in, wash or dry articles that have been cleaned in, washed
in, soaked in, or spotted with combustible or explosive substances
global_main.book.book Page 5 Thursday, August 13, 2020 4:39 PM

6
SAFETY INSTRUCTIONS
EN
(such as waxes, wax removers, oil, paint, gasoline, degreasers,
drycleaning solvents, kerosene, petrol, spot removers, turpentine,
vegetable oil, cooking oil, acetone, alcohol, etc.). Improper use can
cause fire or explosion.
• Do not use or store flammable or combustible substances (ether,
benzene, alcohol, chemical, LPG, combustible spray, insecticide, air
freshener, cosmetics, etc.) near the appliance.
• Never reach into the appliance while it is operating. Wait until the
drum has completely stopped.
• In case of a water leak from the appliance, disconnect the power plug
and contact the LG Electronics customer information centre.
• Turn off water taps to relieve pressure on hoses and valves and to
minimize leakage if a break or rupture should occur. Check the
condition of the fill hoses; they may need replacement after 5 years.
• If there is a gas leakage (isobutane, propane, natural gas, etc.) within
the home, do not touch the appliance or power plug and ventilate the
area immediately.
• If the drain hose or inlet hose is frozen during winter, use it only after
thawing.
• Keep all washing detergents, softener and bleach away from
children.
• Do not touch the power plug or the appliance controls with wet
hands.
• Do not bend the power cable excessively or place a heavy object on it.
• Do not put your hand, foot or anything under the appliance while the
appliance is in operation.
• Avoid touching any water that is drained from the appliance during
the wash.
• Make sure that drainage is working properly. If water is not drained
properly, your floor may get flooded.
• If, during spinning, opening the door does not stop the drum within
about 10 seconds, immediately discontinue operating the appliance
and contact your dealer or LG Electronics service centre.
global_main.book.book Page 6 Thursday, August 13, 2020 4:39 PM

7
SAFETY INSTRUCTIONS
EN
• Do not use a power outlet, wiring equipment and extension cord of
which the electric capacity is lower than the appliance's rated
capacity.
• When the air temperature is high and the water temperature is low,
condensation may occur and thus wet the floor.
• Wipe off dirt or dust on the contacts of the power plug.
Maintenance
• Disconnect the appliance from the power supply before cleaning the
appliance. Setting the controls to the OFF or stand by position does
not disconnect this appliance from the power supply.
• Securely plug the power plug in the outlet socket after completely
removing any moisture and dust.
• Do not spray water inside or outside the appliance to clean it.
• Never unplug the appliance by pulling on the power cable. Always
grip the power plug firmly and pull straight out from the outlet
socket.
• Only qualified service personnel from LG Electronics service centre
should disassemble, repair, or modify the appliance. Contact an LG
Electronics customer information centre if you move and install the
appliance in a different location.
Disposal
• Before discarding an old appliance, unplug it. Cut off the cable
directly behind the appliance to prevent misuse.
• Dispose of all packaging materials (such as plastic bags and
styrofoam) away from children. The packaging materials can cause
suffocation.
• Remove the door before disposing of or discarding this appliance to
avoid the danger of children or small animals getting trapped inside.
global_main.book.book Page 7 Thursday, August 13, 2020 4:39 PM

8
INSTALLATION
EN
INSTALLATION
Parts and Specifications
NOTE
• Appearance and specifications may change without notice to improve the quality of the appliance.
Front View
* This feature is only available on some models.
a
Door
b
Tempered Glass
c
Dispenser Drawer
d
Bleach Dispenser
e
Drum
f
Levelling Feet
g
Drain Hose*
h
Control Panel
i
Power Cord
j
Hot and Cold Water Inlets
Accessories
*1 The included accessories vary depending on the
model you purchased.
*2 This accessory is not included in the product, but
you can purchase it from the LG service centre.
a
Cold and Hot Water Inlet Hoses
*1
b
Drain Hose
*1
c
Tie Strap
*1
d
Anti-Rat Cover
*2
e
Screw for Anti-Rat Cover
*2
global_main.book.book Page 8 Thursday, August 13, 2020 4:39 PM

9
INSTALLATION
EN
Specifications
Dimension(mm)
Model WT22WS6HP
Power Supply 120 V~, 60 Hz
Max. Watt 700 W
Product Weight Approx. 57 kg
W 690 D 730 H 1023
D' 760 H' 1410
H
H’
D
D’
W
global_main.book.book Page 9 Thursday, August 13, 2020 4:39 PM

10
INSTALLATION
EN
Installation Place
Requirements
Before installing the appliance, check the following
information in order to install the appliance in a
correct place.
Installation Location
• Install the appliance on a flat floor of hard
material that is strong enough to support a fully
loaded appliance. (Allowable slope under the
appliance: 1º)
• Never try to level any uneven floor by putting
pieces of wood, cardboard or similar materials
under the appliance.
• If it is impossible to avoid positioning the
appliance next to a gas cooker or coal burning
stove, an insulation (85 X 60 cm) covered with
aluminium foil on the side facing the cooker or
stove must be inserted between the two
appliances.
• Ensure that when the appliance is installed, it is
easily accessible for a service technician in the
event of a breakdown.
• Additional clearance for the wall should have
10
cm
for the rear and
2 cm
for right and left side.
WARNING
• This appliance must only be used for domestic
household purposes and should not be used in
mobile applications.
NOTE
• Do not install this appliance on a raised surface
or platform, plinth or stand. It may cause injury
or serious malfunctioning.
Ventilation
• Make sure that air circulation around the
appliance is not impeded by carpets, rugs, etc.
Ambient Temperature
• Do not install the appliance in rooms where
freezing temperatures may occur. Frozen hoses
may burst under pressure. The reliability of the
electronic control unit may be impaired at
temperatures below freezing point.
• If the appliance is delivered in winter and
temperatures are below freezing, place the
appliance at room temperature for a few hours
before putting it into operation.
Electrical Connection
• Do not use an extension cord or double adapter.
• Always unplug the appliance and turn off the
water supply after use.
• Connect the appliance to an earthed socket in
accordance with current wiring regulations.
• The appliance must be positioned so that the
plug is easily accessible.
• Power outlet must be within 1.5 meters of either
side of the appliance.
WARNING
• Repairs to the appliance must only be carried out
by qualified personnel. Repairs carried out by
inexperienced persons may cause injury or
serious malfunctioning. Contact your local
authorised LG repairer.
• The power plug must be plugged into an
appropriate outlet socket that is installed and
grounded/earthed in accordance with all local
codes and ordinances.
10
cm
2
cm
2
cm
global_main.book.book Page 10 Thursday, August 13, 2020 4:39 PM

11
INSTALLATION
EN
Connecting the Water Inlet
Hoses
Before connecting the water inlet hose to the water
tap, check the hose fitting type and then choose
the correct instruction.
Note for Connection
• Water supply pressure must be between
50 kPa
and
800 kPa
(0.5 - 8.0 kgf / cm²). If the water
supply pressure is more than
800 kPa
a
decompression device should be installed.
• Do not overtighten the water inlet hose to the
valve.
• Periodically check the condition of the hose and
replace the hose if necessary.
• The water supply hose supplied may vary from
country to country. Make sure to connect the
blue supply hose to the COLD water tap, and the
orange supply hose to the HOT water tap.
Checking the Rubber Seal
Two rubber seals
a
are supplied with the water
inlet hoses. They are used to prevent water leaks.
Connection to taps is sufficiently tight.
• Do not use mechanical devices such as multi
grips to tighten the inlet hoses. Ensure that the
curved end of the water inlet hose is connected
to the appliance.
Connecting the Hose to the
Water Tap
Connecting Screw-Type Hose to Tap with Thread
Screw the hose connector onto the water supply
tap. Hand tighten only with the aid of a soft cloth.
NOTE
• After connecting the water inlet hose to the
water tap, turn on the water tap to flush out
foreign substances (dirt, sand, sawdust, and etc.)
in the water lines. Let the water drain into a
bucket, and check the water temperature.
Connecting the Hose to the
Appliance
Screw the water inlet hose to the water inlet valve
on the back of the appliance.
• Do not connect the hose to the hot water supply
for models with one water inlet. Connect to the
cold water supply only.
global_main.book.book Page 11 Thursday, August 13, 2020 4:39 PM

12
INSTALLATION
EN
NOTE
• After completing connection, if water leaks from
the hose, repeat the same steps. Use the most
conventional type of tap for the water supply. In
case that the tap is square or too big, remove the
guide plate before inserting the tap into the
adaptor.
Installing the Drain Hose
Before connecting the drain hose, check your drain
hose model and choose the correct instruction.
For Models with Drain Pump
The discharge height should be approximately
90 -
120 cm
from the floor.
• Securing the drain hose correctly will protect the
floor from damage due to water leakage.
• If the drain hose is too long, do not force the
drain hose further into the drain outlet. This will
cause abnormal noise.
NOTE
• The drain hose must not be placed higher than
120 cm
above the floor. Water in the appliance
may not drain or may drain slowly.
Levelling the Appliance
Checking the Level
Levelling the appliance prevents unnecessary
noise and vibration. Check whether the appliance is
perfectly level after installation.
• If the appliance rocks when pushing the top
plate of the appliance diagonally, adjust the feet
again.
Adjusting and Levelling the
Feet
When the appliance is not perfectly level, turn the
adjustable feet until the appliance no longer
wobbles.
• Turn the adjustable feet clockwise to raise or
turn the adjustable feet counterclockwise to
lower the appliance.
NOTE
• Do not insert pieces of wood etc. under the feet.
• Timber or suspended type flooring will
contribute to excessive vibration and unbalance.
Reinforcing or bracing the timber floor may
need to stop or reduce excessive noise and
vibration.
• Do not install the appliance on any elevated
surface or platform, as it may become unstable
and cause serious injury and damage.
• If the appliance is installed on a uneven, weak or
tilted floor causing excessive vibration, spin
failure or
UE
error can occur. It must be placed
on a firm and level floor to prevent spin failure.
90 - 120 cm
global_main.book.book Page 12 Thursday, August 13, 2020 4:39 PM

13
INSTALLATION
EN
Assembling the Anti-Rat Cover
You can insert the anti-rat cover according to the
type to protect the appliance from the rat.
Folding Type
1
Lay the appliance backwards.
CAUTION
• Be careful your feet or hands when you lay or
raise the appliance.
2
Remove the sponge attached on the base.
3
Insert the 8 screws
a
into the holes to
assemble the anti-rat cover to the appliance.
global_main.book.book Page 13 Thursday, August 13, 2020 4:39 PM

14
OPERATION
EN
OPERATION
Operation Overview
Using the Appliance
Before the first wash, select the
Normal (Normal)
programme and add a half amount of detergent.
Start the appliance without laundry.
• This will remove residue and water from the
drum that may have been left during
manufacturing.
1
Sort laundry and load items.
• Sort laundry by fabric type, soil level, colour
and item size as needed. Open the door and
load items into the appliance.
2
Add detergent, fabric softener and/or bleach.
• Add the proper amount of detergent to the
detergent dispenser drawer. If desired, add
bleach or fabric softener to the appropriate
areas of the dispenser.
3
Turn on the appliance.
• Press the
POWER (ENCENDIDO/APAGADO)
button to turn on the appliance.
4
Choose the desired wash cycle.
• Press the
Program (Programa)
button
repeatedly until the desired programme is
selected.
• Select the option button to adjust wash
temperature, spin speed, etc. Refer to a
fabric care label of your clothes for any
warning or special instructions.
5
Begin cycle.
• Press the
START/PAUSE (INICIO/PAUSA)
button to begin the cycle.
• The appliance will agitate briefly without
water to measure the weight of the laundry.
• If the
START/PAUSE (INICIO/PAUSA)
button
is not pressed within a certain time, the
appliance will shut off and all settings will be
lost.
6
End of cycle.
• When the cycle is finished, a melody will
sound. Immediately remove your clothing
from the appliance to reduce wrinkling.
NOTE
• The
Auto Restart
function allows the cycle to
restart by itself in case of power failure. It
resumes from the stage where it stopped.
Preparing Laundry
Sort laundry for best washing results, and then
prepare laundry according to the symbols on the
care labels.
Sorting the Clothes
• For best washing results, sort your clothes
according to a care label stating fabric type and
washing temperature. Adjust the spin speed to
wash them.
• Soil level (Heavy, Normal, Light): Separate
clothes according to soil level. If possible, do not
wash heavily soiled items with lightly soiled
ones.
• Colour (White, Lights, Darks): Wash separately
dark or dyed clothes from whites or light colours.
Mixing dyed clothes with light clothes can result
in dye transfer or discolouration of lighter
clothes.
• Lint (Lint producers, Collectors): Wash separately
lint producing fabrics from lint collecting fabrics.
Lint producers can result in pilling and linting on
the lint collectors.
global_main.book.book Page 14 Thursday, August 13, 2020 4:39 PM

15
OPERATION
EN
Checking the Fabric Care Label
This will tell you about the fabric content of your
clothes and how it should be washed.
Symbols on the Care Labels
NOTE
• The dashes under the symbol give you
information about the type of fabric and the
maximum allowance of mechanical stress.
Checking the Laundry before
Loading
• Combine large and small items in a load. Load
large items first. Large items should not be more
than half of total load.
• Do not wash single small items. Add 1 - 2 similar
items to the load to prevent an out-of-balance
load.
• Make sure to empty all pockets. Items such as
hair clips, lighters, pens, coins and keys can
cause irreparable damage to both your
appliance and clothes.
• Wash delicates (stockings, underwired bras) in a
wash net.
• Close zippers, hooks and strings to make sure
that these items do not snag other clothes.
• Pre-treat dirt and stains by saturating the dirt
and stains with dissolved detergent and
brushing them in order to remove dirt.
CAUTION
• Do not wash or spin any item labelled or known
to be water-proof or water-resistant, even if the
product care label on the item permits machine
washing. Failure to follow these instructions
could result in severe damage to your washing
load, your appliance and/or property damage as
a result of abnormal load friction or vibration of
the appliance.
- Examples of water-proof or water-resistant
items include certain mattress pads, mattress
covers, rain gear, camping gear, skiing
apparel, outdoor gear and similar items.
Symbol Wash / Fabric type
• Normal Wash
• Cotton, Mixed Fabrics
• Easy Care
• Synthetic, Mixed Fabrics
• Special Delicate Wash
• Delicates
• Hand Wash Only
• Wool, Silk
• Do not wash
global_main.book.book Page 15 Thursday, August 13, 2020 4:39 PM

16
OPERATION
EN
Adding Detergents,
Softeners and Bleaches
Detergent Dosage
• Detergent should be selected according to fabric
type, colour, soil level and washing temperature
and should be used according to the detergent
manufacturer’s instructions.
• Too much detergent results in excessive suds
which cause poor washing.
• When you use liquid detergent, follow the
guidelines provided by the detergent
manufacturer.
• You can pour liquid detergent directly into the
main detergent drawer if you are starting the
wash cycle immediately. It is also recommended
that it be added into the drum when loading the
clothes.
• Do not use liquid detergent if you are using delay
or pre-wash function as the liqluid may harden.
• Reduce the amount of detergent if too many
suds are formed.
• Detergent usage may need to be adjusted for
water temperature, water hardness, size and soil
level of the laundry. For best results, avoid
oversudsing.
• Refer to the label of the clothes, before choosing
the detergent and water temperature.
• Use only suitable detergents for the respective
type of clothing:
- General powdered detergents for all types of
fabric
- Powdered detergents for delicate fabric
- Liquid detergents for all types of fabric or
designated detergents only for wool
• For better washing performance and whitening,
use detergent that contains general powdered
bleach.
• Detergent is dispensed from the dispenser at the
beginning of the cycle.
• Dilute liquid detergent with water, pour into the
drum and start the cycle.
CAUTION
• Using liquid detergent without diluting, or
leaving laundry for a long time after pouring
diluted liquid detergent into the drum might
cause the clothes to be damaged, bleached,
discoloured.
NOTE
• Do not let the detergent harden. Doing so may
lead to blockages, poor rinse performance or
odour.
• Full load: According to manufacturer’s
recommendation.
• Part load: 3/4 of the normal amount
• Minimum load: 1/2 of full load
Adding Detergents
• Add the measured amount of detergent into the
detergent compartment
a
.
• Use more detergent if you have hard water,
large items, greasy or oily soils or lower water
temperature.
• Soap flakes or granulated soap powders should
not be used in the appliance. When washing
woollens, remember to use detergent suitable
for washing woollens.
NOTE
• Use the appropriate amount of detergent. Too
much detergent, bleach or softener may cause
an overflow or a malfunction.
global_main.book.book Page 16 Thursday, August 13, 2020 4:39 PM

17
OPERATION
EN
Adding Fabric Softeners
• Add a fabric softener to the maximum fill line.
• If the softener is concentrated, then it should be
diluted.
• Close the dispenser drawer gently.
• Do not leave the fabric softener in the detergent
drawer for more than 2 days. Fabric softener
may harden.
• Softener will automatically be added during the
last rinse cycle.
• Do not open the drawer when water is being
supplied.
• Solvents (benzene, etc.) must never be used.
NOTE
• Pouring excessive fabric softener over the
maximum fill line can cause it to dispense too
early, which may stain clothes.
• Do not pour fabric softener directly onto the
laundry, doing so will cause staining on the
clothes that will be difficult to remove.
Adding Liquid Bleaches
• Before starting the appliance, pour the
measured amount of bleach directly into the
bleach dispenser
a
. Avoid splashing or
overfilling.
• Mix powdered bleach with water to a liquid
consistency and pour it into the bleach
dispenser.
• Check clothing care label for special instructions
and separate the laundry to be bleached.
• Dilute liquid chlorine bleach with water.
• Measure the recommended amount of liquid
bleach carefully according to instructions on the
bottle.
CAUTION
• Never pour undiluted liquid bleach directly onto
laundry or into the wash basket. This may cause
change of colour or damage to the laundry.
• Do not pour powdered bleach into the bleach
dispenser. Powdered bleach may harden, so it
will block the bleach dispenser.
global_main.book.book Page 17 Thursday, August 13, 2020 4:39 PM

18
OPERATION
EN
Control Panel
Control Panel Features
a
POWER (ENCENDIDO/APAGADO)
Button
• Press the
POWER (ENCENDIDO/APAGADO)
button to turn on or off the appliance.
• The appliance automatically turns off once a certain time has passed after the wash has completed.
b
START/PAUSE (INICIO/PAUSA)
Button
• Press the
START/PAUSE (INICIO/PAUSA)
button to start or pause a wash cycle.
• Press the
START/PAUSE (INICIO/PAUSA)
button to stop a wash cycle temporarily.
NOTE
• If the
START/PAUSE (INICIO/PAUSA)
button is not pressed within a certain time, the appliance will shut
off and all settings will be lost.
• For customer safety, the door will be locked automatically during operation. If there is additional laundry
to put in, press
START/PAUSE (INICIO/PAUSA)
to unlock.
c
Program (Programa)
Button
• Programmes are available according to the laundry type.
• The lamp will light up to indicate the selected programme.
d
Extra Options and Functions
• You can use the extra options and functions to customize the programmes.
Remote Start (Início Remoto)
With the
LG ThinQ
app, you can use a smartphone to control your appliance remotely.
• In order to use this function, refer to
SMART FUNCTIONS
.
Wi-Fi (Wi-Fi)
Press the
Time Delay (Diferir Tiempo de Lavado)
button for 3 seconds to initiate the connection of the
appliance to the
LG ThinQ
application.
e
Cycle Status Indicator
• The cycle status indicator is turned on before the start.
global_main.book.book Page 18 Thursday, August 13, 2020 4:39 PM

19
OPERATION
EN
• The cycle status indicator blinks during that process, and then the indicator turns off when that
process has completed.
f
Display
• The display shows the settings, remaining estimated time, options, and status messages. When the
appliance is turned on, the default settings in the display will light up.
•
18:88
: When a programme is selected, the default time for that programme is displayed. The time
can change as options are selected.
- If the display shows
-:--
, then the time will be displayed after the load sensing has detected the
laundry size.
- The time shown is only an estimate. Several external factors (laundry size, room temperature,
incoming water temperature, etc.) can affect the actual time.
•
H
: The
Door Lock
icon turns on when the cycle starts and the door is locked.
•
f
: The
Wi-Fi
icon turns on when the appliance is connected to Wi-Fi network at home.
global_main.book.book Page 19 Thursday, August 13, 2020 4:39 PM

20
OPERATION
EN
Programme Table
Washing Programme
Wash programmes are designed for the best wash performance for different types of clothes.
• Press the
Program (Programa)
button to select the desired programme.
• When you select a wash programme, the light for the corresponding wash programme will turn on.
Normal (Normal) Max. Load
Description Use this programme to wash normal clothes. The built-in sensor
detects the weight of the clothes, calculating wash, rinse and, spin
settings accordingly.
• If water or wet clothes is already in the drum before the start, the
water level will be increased.
• For lightweight and bulky items, the water level may be too low.
Increase the water level manually.
Less than 22.0
kg
Smart Rinse (Enjuague Inteligente) Max Load
Description Use this programme to improve rinsing results. This is suitable for
underwear and baby clothes. If you have sensitive skin or skin
trouble, use this programme.
Less than 22.0
kg
Quick Wash (Lavado Rápido) Max. Load
Description Use this programme to wash lightly soiled clothes for a short time.
• This programme's recommended laundry amount is under
3 kg
.
Less than 3.0
kg
Towels (Toallas) Max. Load
Description Use this programme to wash bath towels, bathrobes, hand towels
etc.
• Wash separately from other clothes.
Less than 14.0
kg
Pre Wash+Normal (Prelavado+Normal) Max. Load
Description Use this programme to pretreat immediate stain without
handwash.
• It is necessary for clothes which could smell bad if they are not
washed promptly.
Less than 22.0
kg
global_main.book.book Page 20 Thursday, August 13, 2020 4:39 PM

21
OPERATION
EN
Duvet (Edredones) Max. Load
Description Use this programme to wash a blanket or bedclothes that have the
hand wash sign on the care label.
• Cashmere bedclothes, acrylic blanket, mixed spinning blanket,
woollen blanket, infilling (polyester 101), and bed sheets might be
damaged if they are allowed to float. It is recommended to
purchase a separate laundry net to wash.
• Separate bed clothes from general clothes. It might cause laundry
to be unbalanced, which results in abnormal washing.
• Spin dry might take longer to redistribute the laundry evenly if
bedclothes are lumped to a side.
• Never wash an electric blanket, carpets, rugs, pet accessories, soft
toys or shoes. It can cause damage to the appliance and other
items in the wash.
• Put bedclothes into a laundry net and then soak and sink them in
water so that they are less likely to float. If the items float during
the wash or spin, it may damage the appliance and the clothes.
• Regardless of size, we recommend washing bedclothes
individually. If two bedclothes with different materials are washed
at the same time, it might cause a spin malfunction due to
imbalance.
CAUTION
• When putting a blanket into the drum, do not load it over the
maximum line
a
. The blanket must also be submerged in the
water. Failure to do so or overloading the blanket in the appliance
will result in damage to the wash load and the appliance.
Less than 22.0
kg
global_main.book.book Page 21 Thursday, August 13, 2020 4:39 PM

22
OPERATION
EN
Extra Options and
Functions
You can use the extra options and functions on
some programmes to customize the cycle.
• The extra options and functions can be changed
when the
START/PAUSE (INICIO/PAUSA)
button
is pressed during operation depending on the
selected programmes, options and functions.
Customising a Washing
Programme
Each programme has default settings that are
selected automatically. You may also customise
these settings using these buttons.
Water Level (Nivel de Agua)
This appliance detects the amount of laundry
automatically, then sets the water level. However,
manually increasing the water level may be
required and recommended to avoid linting and
unbalanced errors when the load is bulky but
lightweight.
• Press
Water Level (Nivel de Agua)
option to
adjust water level.
• When you select a wash programme, the water
level will be shown on the control panel.
• When water level is automatically detected, it
may differ depending on the amount of laundry
even though the same water level is indicated on
the control panel.
Wool (Lana) Max. Load
Description Use this programme to wash delicate fabrics such as lingerie and
woolens. Before washing, check the care label for the washing
instructions.
• This programme uses a slow spin to extract water from clothes,
so the clothes has more moisture than normal.
NOTE
• Hang or lay your delicates flat when you dry them.
• Only cold water will be used for this programme as hot water may
damage clothes.
Less than 5.0
kg
Sports Wear (Ropa Deportiva) Max. Load
Description Washes special garments like sports and outdoor wear.
• Use for water-repellent fabric laminate used on clothing.
Less than 22.0
kg
Tub Clean (Limpieza de Tina)
Description This is a special function to clean inside the drum of your appliance.
• To use this function, refer to the
MAINTENANCE
for details.
Download Cycle (Descarga de Ciclo)
Description This programme allows you to download a new and special washing programme
to your appliance with a smartphone.
global_main.book.book Page 22 Thursday, August 13, 2020 4:39 PM

23
OPERATION
EN
Wash (Lavado)
Adjusting the wash time setting modifies the cycle
times and/or wash actions.
• Press
Wash (Lavado)
button until the desired
wash time is selected.
Rinse (Enjuague)
Use this option to change the number of rinses.
• Press
Rinse (Enjuague)
button to change the
number of rinses.
• When the
Rinse (Enjuague)
option is selected,
l
icon is lit.
• If selecting the maximum number of rinses, then
this option is deactivated.
NOTE
• This option is only available on some
programmes.
Spin (Centrifugado)
Use this option to change the spin strength. When
you press the
START/PAUSE (INICIO/PAUSA)
button after selecting this option, the remaining
time is indicated on the display.
NOTE
• Always keep the laundry amount to
2 kg
or less
and make sure to redistribute the clothes evenly.
• Select 60 minutes for cotton laundry and 120
minutes for synthetic fibre laundry for effective
moisture reduction.
To Use the Air Dry (Secar Con Aire) Function
When you select
Air Dry (Secar Con Aire)
, you can
reduce the drying time by minimizing the moisture
that remains within the clothes.
• Press the
Spin (Centrifugado)
button for 3
seconds to select and press the
POWER
(ENCENDIDO/APAGADO)
button to deselect.
Using Special Options
You can customize the programmes by using the
following special options:
Turbo Wash (TurboWash)
Adding this option reduces the programme time
but the similar washing results will be provided.
Strong Wave (Onda Fuerte)
Use this option to change the strong water wave.
• It is set to medium water wave by default and it
is not indicated on the display.
Follow the next steps to use a special
option.
1
Press the
POWER (ENCENDIDO/APAGADO)
button.
2
Select a washing programme.
3
To use special options, press
Turbo Wash
(TurboWash)
or
Strong Wave (Onda Fuerte)
button.
4
Press the
START/PAUSE (INICIO/PAUSA)
button.
Using Basic Options
Time Delay (Diferir Tiempo de Lavado)
Use this function to delay ending time. The
appliance will start automatically and finish after a
specified time interval.
1
Press the
POWER (ENCENDIDO/APAGADO)
button.
2
Select a washing programme.
3
Press the
Time Delay (Diferir Tiempo de
Lavado)
button to set the required delay
ending time.
4
Press the
START/PAUSE (INICIO/PAUSA)
button.
global_main.book.book Page 23 Thursday, August 13, 2020 4:39 PM

24
OPERATION
EN
NOTE
• This function is the time to the end of the
programme, not the start. The actual running
time may vary due to water temperature, wash
laundry and other factors.
• Reservation can be made up to 18 hours;
- 1 hour interval up to 3 - 12 hours
- 2 hours interval up to 12 - 18 hours
• This function cannot be set for less than 3 hours.
• To cancel this function, press
Time Delay
(Diferir Tiempo de Lavado)
button repeatedly
until the reservation is cancelled or press the
POWER (ENCENDIDO/APAGADO)
button to
turn off and on power.
Soak (Remojo)
This option can be selected to wash heavily soiled
clothes by soaking them in water for some time to
loosen dirt and grime.
• When this option is activated, the
u
icon is lit.
• To activate this option, press and hold the
Turbo
Wash (TurboWash)
button for 3 seconds.
• To change the soak time on the display or
deactivate this option, press the
Turbo Wash
(TurboWash)
button while this option is
activated.
NOTE
• While
Turbo Wash (TurboWash)
is activated,
this option cannot be set even if the
Turbo Wash
(TurboWash)
button is pressed for 3 seconds.
Hot Wash (Lavado Caliente) / Cold Wash (Lavado
Frío)
Press the
Hot Wash (Lavado Caliente)
and/or
Cold Wash (Lavado Frío)
buttons to select hot
water, cold water, or hot and cold water (warm
water).
• If
Hot Wash (Lavado Caliente)
is selected,
washing will be done with hot water and rinse
will be done with cold water.
• Under normal and standard user environments,
warm water will enter the drum when both hot
water and cold water are selected.
• It can be changed during operation.
NOTE
• Both
Hot Wash (Lavado Caliente)
and
Cold
Wash (Lavado Frío)
buttons are automatically
selected under the
Smart Rinse (Enjuague
Inteligente)
, and
Tub Clean (Limpieza de Tina)
programmes.
Setting
Child Lock (Bloqueo infantil)
Use
Child Lock (Bloqueo infantil)
function to
disable the controls. This function can prevent
children from changing programmes or operating
this appliance.
NOTE
• Once this function is set, all buttons are locked
except the
POWER (ENCENDIDO/APAGADO)
button.
• When the controls are locked,
CL
and the
remaining time are alternatively shown on the
display during the wash while the child lock is
engaged.
• Turning off the power will not reset this function.
You must deactivate this function before you can
access any other options and functions.
Locking the Control Panel
1
Turn on the power.
2
Press and hold the
Water Level (Nivel de
Agua)
and
Spin (Centrifugado)
buttons
simultaneously for 3 seconds to activate this
function.
Unlocking the Control Panel
1
Turn on the power.
2
Press and hold the
Water Level (Nivel de
Agua)
and
Spin (Centrifugado)
buttons
simultaneously for 3 seconds to deactivate this
function.
global_main.book.book Page 24 Thursday, August 13, 2020 4:39 PM

25
OPERATION
EN
• When this function is deactivated, a beeper
will sound and the remaining time for the
current cycle will reappear on the display.
global_main.book.book Page 25 Thursday, August 13, 2020 4:39 PM

26
OPERATION
EN
Manual Washing
When you need a rinse and spin, spin only, rinse only or wash only cycle, these can be set manually.
NOTE
• When you set a washing cycle manually such as rinse only, wash only or wash and rinse, the water will
not be drained out after the wash is completed. If you wish to drain the water, select a spin only cycle
after the wash has completed.
• If a rinse only cycle is selected, the water supply begins after detecting the load and the cycle will start.
However the water will still fill to the selected water level even if there is water already in the tub.
• If you do not select or change the
Water Level (Nivel de Agua)
, the water level will be set automatically.
Rinse and Spin Spin only Rinse only Wash only
1
s
or
t
Press the
POWER (ENCENDIDO/APAGADO)
button.
2
l
Press the
Rinse
(Enjuague)
button.
p
Press the
Spin
(Centrifugado)
button.
l
Press the
Rinse
(Enjuague)
button.
k
Press the
Wash
(Lavado)
button.
3
Rinse and spin are
automatically
selected.
Press the
Spin
(Centrifugado)
button to adjust spin
strength.
Press the
Spin
(Centrifugado)
button until the spin
function is cancelled.
Rinse and spin are
automatically
selected.
4
l
and
p
Press the
Rinse
(Enjuague)
or
Spin
(Centrifugado)
buttons to adjust the
number of rinses or
spin strength.
l
Press the
Rinse
(Enjuague)
button to
adjust the number of
rinses.
l
and
p
Press the
Rinse
(Enjuague)
and
Spin
(Centrifugado)
buttons until the
rinse and spin
functions are
cancelled.
5
u
Press the
START/PAUSE (INICIO/PAUSA)
button to start the cycle(s).
global_main.book.book Page 26 Thursday, August 13, 2020 4:39 PM

27
SMART FUNCTIONS
EN
SMART FUNCTIONS
LG ThinQ Application
The
LG ThinQ
application allows you to
communicate with the appliance using a
smartphone.
LG ThinQ Application Features
Communicate with the appliance from a
smartphone using the convenient smart features.
Washer Cycle (Remote Start (Início Remoto),
Download Cycle (Descarga de Ciclo))
Set or download any preferred cycle and operate
by remote control.
Tub Clean Coach
This function shows how many cycles remain
before running the
Tub Clean (Limpieza de Tina)
function.
Energy Monitoring
This function checks the energy consumption of
the recently used cycles and monthly average.
Smart Diagnosis
This function provides useful information for
diagnosing and solving issues with the appliance
based on the pattern of use.
Settings
Allows you to set various options on the appliance
and in the application.
Push Alert
When the cycle is complete or the appliance has
problems, you have the option of receiving push
notifications on a smartphone. The notifications
are triggered even if the
LG ThinQ
application is
off.
NOTE
• If you change your wireless router, Internet
service provider, or password, delete the
registered appliance from the
LG ThinQ
application and register it again.
• The application is subject to change for
appliance improvement purposes without notice
to users.
• Functions may vary by model.
Before Using LG ThinQ
Application
1
Check the distance between the appliance and
the wireless router (Wi-Fi network).
• If the distance between the appliance and
the wireless router is too far, the signal
strength becomes weak. It may take a long
time to register or installation may fail.
2
Turn off the
Mobile data
or
Cellular Data
on
your smartphone.
3
Connect your smartphone to the wireless
router.
NOTE
• To verify the Wi-Fi connection, check that
f
icon
on the control panel is lit.
• The appliance supports 2.4 GHz Wi-Fi networks
only. To check your network frequency, contact
your Internet service provider or refer to your
wireless router manual.
•
LG ThinQ
is not responsible for any network
connection problems or any faults,
malfunctions, or errors caused by network
connection.
global_main.book.book Page 27 Thursday, August 13, 2020 4:39 PM

28
SMART FUNCTIONS
EN
NOTE
• If the appliance is having trouble connecting to
the Wi-Fi network, it may be too far from the
router. Purchase a Wi-Fi repeater (range
extender) to improve the Wi-Fi signal strength.
• The Wi-Fi connection may not connect or may be
interrupted because of the home network
environment.
• The network connection may not work properly
depending on the Internet service provider.
• The surrounding wireless environment can
make the wireless network service run slowly.
• The appliance cannot be registered due to
problems with the wireless signal transmission.
Unplug the appliance and wait about a minute
before trying again.
• If the firewall on your wireless router is enabled,
disable the firewall or add an exception to it.
• The wireless network name (SSID) should be a
combination of English letters and numbers. (Do
not use special characters.)
• Smartphone user interface (UI) may vary
depending on the mobile operating system (OS)
and the manufacturer.
• If the security protocol of the router is set to
WEP
, you may fail to set up the network. Please
change it to other security protocols (
WPA2
is
recommended) and register the product again.
Installing the LG ThinQ
Application
Search for the
LG ThinQ
application from the
Google Play Store or Apple App Store on a
smartphone. Follow instructions to download and
install the application.
Using the Appliance Remotely
Remote Start
Use a smartphone to control your appliance
remotely. You can also monitor your cycle
operation so you know how much time is left in the
cycle.
Using this function
1
Put the laundry into the drum and add
detergent into the detergent dispenser
drawer.
• If desired, add bleach or fabric softener to
the appropriate areas of the dispenser.
2
Press the
POWER (ENCENDIDO/APAGADO)
button.
3
Press and hold
Remote Start (Início Remoto)
button for 3 seconds to enable the remote
control function.
4
Start a cycle from the
LG ThinQ
application on
your smartphone.
NOTE
• Once this function is enabled, you can only start
a cycle from the
LG ThinQ
smartphone
application. If the cycle is not started, the
appliance will wait to start the cycle until it is
turned off remotely from the application or this
function is disabled.
• If the door has been opened, you can not start a
cycle remotely.
Disable this function manually
When this function is activated, press and hold the
Remote Start (Início Remoto)
button for 3
seconds.
Download Cycle
You can download new and special cycles that are
not included in the basic cycles on the appliance.
Appliances that have been successfully registered
can download a variety of specialty cycles specific
to the appliance.
Once cycle download is completed in the appliance,
the product keeps the downloaded cycle until a
new cycle is downloaded.
NOTE
• Only one downloaded cycle can be stored on the
appliance at a time.
global_main.book.book Page 28 Thursday, August 13, 2020 4:39 PM

29
SMART FUNCTIONS
EN
Wireless LAN Module
Specifications
Wireless function S/W version: V 1.0
For consideration of the user, this device should be
installed and operated with a minimum distance of
20 cm between the device and the body.
Wireless LAN Module
Regulation
The operation of this equipment is subject to the
following two conditions:
(1) this equipment or device may not cause harmful
interference and
(2) This equipment or device must accept any
interference, including any that may cause
undesired operation.
Open Source Software Notice
Information
To obtain the source code under GPL, LGPL, MPL,
and other open source licenses, that is contained in
this product, please visit http://
opensource.lge.com.
In addition to the source code, all referred license
terms, warranty disclaimers and copyright notices
are available for download.
LG Electronics will also provide open source code to
you on CD-ROM for a charge covering the cost of
performing such distribution (such as the cost of
media, shipping, and handling) upon email request
to openso[email protected]. This offer is valid for a
period of three years after our last shipment of this
product. This offer is valid to anyone in receipt of
this information.
Smart Diagnosis
This feature is only available on models with the
c
or
d
logo.
Use this feature to help you diagnose and solve
problems with your appliance.
NOTE
• For reasons not attributable to LGE’s negligence,
the service may not operate due to external
factors such as, but not limited to, Wi-Fi
unavailability, Wi-Fi disconnection, local app
store policy, or app unavailability.
• The feature may be subject to change without
prior notice and may have a different form
depending on where you are located.
Using LG ThinQ to Diagnose
Issues
If you experience a problem with your Wi-Fi
equipped appliance, it can transmit
troubleshooting data to a smartphone using the
LG ThinQ
application.
• Launch the
LG ThinQ
application and select the
Smart Diagnosis
feature in the menu. Follow
the instructions provided in the
LG ThinQ
application.
Using Audible Diagnosis to
Diagnose Issues
Follow the instructions below to use the audible
diagnosis method.
• Launch the
LG ThinQ
application and select the
Smart Diagnosis
feature in the menu. Follow
the instructions for audible diagnosis provided
in the
LG ThinQ
application.
1
Press the
POWER (ENCENDIDO/APAGADO)
button to turn on the appliance.
• Do not press any other buttons.
Model LCW-004
Frequency
Range
2412 to 2472 MHz
Output Power
(Max.)
IEEE 802.11b: 17.82 dBm
IEEE 802.11g: 17.72 dBm
IEEE 802.11n: 16.61 dBm
global_main.book.book Page 29 Thursday, August 13, 2020 4:39 PM

30
SMART FUNCTIONS
EN
2
Place the mouthpiece of your smartphone
close to the
c
or
d
logo.
3
Press and hold the
Cold Wash (Lavado Frío)
button for 3 seconds or longer while holding
the smartphone mouthpiece to the logo until
the data transfer is complete.
• Keep the smartphone in place until the data
transfer has finished. Time remaining for
data transfer is displayed.
4
After the data transfer is complete, the
diagnosis will be displayed in the application.
NOTE
• For best results, do not move the smartphone
while the tones are being transmitted.
Max.
10 mm
Max.
10 mm
global_main.book.book Page 30 Thursday, August 13, 2020 4:39 PM

31
MAINTENANCE
EN
MAINTENANCE
WARNING
• Unplug the appliance before cleaning to avoid the risk of electric shock. Failure to follow this warning
may result in serious injury, fire, electric shock, or death.
• Never use harsh chemicals, abrasive cleaners, or solvents to clean the appliance. They may damage the
finish.
Cleaning after Every Wash
What to Clean
• If you always use cold water, we recommend
that a warm or hot wash be used at regular
intervals e.g. every 5th wash should be at least a
warm one.
• Turn off taps after use to prevent the chance of
flooding, otherwise an inlet hose may burst.
• Always unplug the power cord after use.
• After the cycle is finished, wipe the door and the
inside of the door to remove any moisture.
• Clean around the bleach dispenser with water to
flush any residual bleach from the dispenser
opening as bleach can be corrosive if left
undiluted.
WARNING
• Leave the door open to dry the drum interior but
only if it is safe and any children are supervised.
Cleaning the Exterior
Proper care of the appliance can extend the service
life.
Exterior
• Immediately wipe off any spills.
• Wipe with a damp cloth.
• Do not press on the surface or the display with
sharp objects.
Dispenser Drawer
Detergent or fabric softener may build up in the
dispenser drawer. Remove the drawer and inserts
from the dispenser drawer and clean any buildup
once or twice a month.
Cleaning the Appliance
Periodically
Tub Clean
This is a special function to help clean the inside of
the appliance by soaking, washing, rinsing and
spinning.
Run this function
once a month
(or more often if
needed) to reduce build-up of detergent and
softener and other residue.
• If there is a bad smell or mildew inside the
appliance, run this function once a week for 3
weeks in addition to the regularly prompted
intervals.
NOTE
• The
tcL
message will be displayed to alert to the
recommendation of operating the
Tub Clean
(Limpieza de Tina)
function.
• If the
tcL
message is displayed on the appliance,
or if it is selected after the completion of 30 wash
cycles, the running time will increase up to 12
hours due to added soaking time.
• For models with a lint filter, remove lint or dirt
from the inside of the lint filter before and after
using this programme.
global_main.book.book Page 31 Thursday, August 13, 2020 4:39 PM

32
MAINTENANCE
EN
NOTE
• For models without a lint filter, the lint is
discharged when the water drains during
washing.
1
Remove any clothing or items from the
appliance.
2
Open the dispenser drawer and add anti-
limescale to the main wash compartment.
WARNING
• Do not add any detergent to the detergent
dispenser drawer for this function. Doing so may
generate excessive suds and leak out from the
appliance and cause damage to property.
3
Close the dispenser drawer slowly and close
the door.
4
Press the
POWER (ENCENDIDO/APAGADO)
button.
5
Press the
Program (Programa)
button to
select
Tub Clean (Limpieza de Tina)
.
6
Press the
START/PAUSE (INICIO/PAUSA)
button to start.
7
Leave the door open to dry the inside of the
appliance completely.
• When the inside of the appliance is not dried
completely, it may cause a bad smell or
mildew.
WARNING
• Leave the door open to dry the drum interior but
only if it is safe and any children are supervised.
Cleaning the Water Inlet Filter
Water inlet filter collects lime or any small objects
that may be in water supplied to the appliance.
Clean the water inlet filter regularly.
• Turn off the water taps to the appliance if the
appliance is to be left for any length of time (e.g.
holiday), especially if there is no floor drain
(gully) in the immediate vicinity.
•
IE
error message will be displayed on the
control panel when water is not entering the
detergent drawer.
• If the water is very hard or contains traces of
limescale, the filter on the water inlet may be
clogged.
1
Turn off the power and the water tap and then
unscrew the water inlet hose.
2
Remove the water inlet filter with small pliers
and then clean the filter using a medium bristle
tooth brush.
Cleaning the Drain Pump Filter
The drain filter collects threads and small objects
left in the laundry. Check regularly that the filter is
clean to ensure smooth running of the appliance.
1
Turn on the appliance.
global_main.book.book Page 32 Thursday, August 13, 2020 4:39 PM

33
MAINTENANCE
EN
2
Press the
Spin (Centrifugado)
button to empty
all the water from the drum.
3
Turn off the appliance and unplug it from the
power outlet socket.
4
Place a towel on the floor under the drain
pump cap.
• Residual water may remain in the drain hose
and the water may leak from the drain hose.
5
Turn the cap
a
on the rear of the appliance
counter-clockwise and pull it out.
6
Remove any foreign objects and fluff inside
pump casing and from the filter.
7
Insert the filter along the guide ribs inside the
pump casing and turn the cap clockwise to refit
the cap.
• Securely turn the cap clockwise until it is
tight.
8
Turn on the power and check for leaks before
repositioning the appliance.
CAUTION
• Be careful when draining, as any residual water
may be hot.
global_main.book.book Page 33 Thursday, August 13, 2020 4:39 PM

34
TROUBLESHOOTING
EN
TROUBLESHOOTING
Before Calling for Service
Operation of the appliance can lead to errors and malfunctions. The following tables contain possible
causes and notes for resolving an error message or malfunction. You can remedy most of the problems by
yourself, consequently save time and money, since you do not need to call LG Electronics service centre.
The following table should assist you by troubleshooting.
Error Messages
The appliance is equipped with an automatic error-monitoring system to detect and diagnose problems at
an early stage. If this appliance does not function properly or does not function at all, check the following
before you call LG Electronics service centre.
Symptoms Possible Cause & Solution
dE
DOOR ERROR
The door is not closed properly.
• Close the door completely. If the error code is still displayed, call for
service.
dL
DOOR LOCK ERROR
Door is not locked properly.
• Check nothing is caught under the door, including shipping materials or
clothing.
• Close the door completely. If the error code is still displayed, call for
service.
dr
DRAIN FEATURE
The appliance is paused during a cycle for a few minutes.
• The cycle will be cancelled and any water remaining in the drum will be
drained.
1E
INLET ERROR
Water supply tap(s) are not completely open.
• Fully open tap.
Water supply hose(s) are kinked, pinched, or crushed.
• Straighten or reinstall the water supply hose(s).
The filter of the supply hose(s) are clogged.
• Check and clean the filter of the supply hose(s).
Water supply pressure to tap or house is too low or too high.
• Contact a plumber to have the water pressure checked or restored to the
operating requirements.
Water supply is connected with leak limiting hose(s).
• Do not use leak limiting hose(s).
global_main.book.book Page 34 Thursday, August 13, 2020 4:39 PM

35
TROUBLESHOOTING
EN
LE1
FOREIGN OBJECTS
ERROR
Foreign objects, such as coins, pins, clips, etc.,are caught between the
pulsator and the inner drum.
• Turn off the appliance and then press the
POWER (ENCENDIDO/
APAGADO)
button. Press the
Spin (Centrifugado)
button without
selecting a cycle to drain and spin the laundry. When the spin is complete,
remove the clothes and then find and remove any objects caught in the
pulsator gap.
OE
WATER OUTLET ERROR
Drain hose is kinked, pinched, or clogged.
• Clean and straighten the drain hose.
Drain discharge is more than 1.2 m above the bottom of the appliance.
• Adjust the hose or reconfigure the drain pipe. Maximum drain height is 1.2
m.
UE
UNBALANCE ERROR
Rebalancing operation is not successful.
• The automatic attempt to rebalance the laundry was not successful. The
cycle has been paused to allow the laundry to be manually adjusted.
The load is too small.
• Add more items to allow the appliance to balance the laundry.
Heavy items are mixed with lighter items.
• Wash items of somewhat similar weight.
The load is out of balance.
• Manually redistribute the laundry if laundry have become tangled.
tE
TEMPERATURE SENSOR
ERROR
Control error.
• Unplug the appliance and wait 60 seconds. Reconnect power and try
again.
• If the error code is still displayed, call for service.
FE
OVERFLOW ERROR
Water overfills due to the faulty water valve.
• Close the water taps, unplug the appliance, and call for service.
PE
PRESSURE SENSOR
ERROR
The water level sensor is not working correctly.
• Close the water taps, unplug the appliance, and call for service.
LE
MOTOR LOCKED ERROR
A motor error has occurred.
• Allow the appliance to stand for 30 minutes and then restart the cycle.
• If the error code is still displayed, call for service.
AE
CLUTCH ERROR
Clutch error.
• Unplug the appliance and call for service.
tcL
TUB CLEAN ALARM
The programme has run more than 30 times.
• Run the
Tub Clean (Limpieza de Tina)
function.
Symptoms Possible Cause & Solution
global_main.book.book Page 35 Thursday, August 13, 2020 4:39 PM

36
TROUBLESHOOTING
EN
Noises
E3
CLOTHES SENSING
ERROR
Sensor for clothes-sensing is defective.
• Manually redistribute the laundry if laundry have become tangled.
Motor’s revolution is too low.
Contact-point of Connector is defective.
• Unplug the appliance and wait 60 seconds. Reconnect power and try
again.
CL
CHILD LOCK FUNCTION
CL
is not an error. This prevents children from changing cycles or
operating the appliance.
• Turn off the
Child Lock (Bloqueo infantil)
function in the control panel.
Symptoms Possible Cause & Solution
Rattling and clanking
noise
Foreign objects, such as keys, coins, or safety pins may be in the drum.
• Stop the appliance, check the drum for foreign objects. If noise continues
after the appliance is restarted, call for service.
Thumping sound Heavy laundry may produce a thumping sound. This is usually normal.
• If the sound continues, the appliance is probably out of balance. Stop and
redistribute the laundry.
The laundry may be out of balance.
• Pause the cycle and redistribute the laundry after the door unlocks.
Vibrating noise Packaging materials are not removed.
• Remove packing materials.
The laundry may be unevenly distributed in the drum.
• Pause the cycle and redistribute the laundry after the door unlocks.
Not all levelling feet are resting firmly and evenly on the floor.
• See the section
Levelling the Appliance
to adjust and level the feet.
Floor is not rigid enough.
• Check if the floor is solid and does not flex. See the section
Installation
Place Requirements
to select the proper location.
Symptoms Possible Cause & Solution
global_main.book.book Page 36 Thursday, August 13, 2020 4:39 PM

37
TROUBLESHOOTING
EN
Operation
Symptoms Possible Cause & Solution
Appliance will not
operate.
Control panel has powered off due to inactivity.
• This is normal. Press the
POWER (ENCENDIDO/APAGADO)
button to turn
on the appliance.
Appliance is unplugged.
• Make sure that the cord is plugged securely into a working outlet.
Water supply is turned off.
• Turn on the water supply tap completely.
Controls are not set properly.
• Make sure the cycle is correctly set. Close the door and press the
START/
PAUSE (INICIO/PAUSA)
button.
Circuit breaker/fuse is tripped/blown.
• Check house circuit breakers/fuses. Replace fuses or reset breaker. The
appliance should be on a dedicated branch circuit. The appliance will
resume the cycle where it stopped once power is restored.
Control needs to be reset.
• Press the
POWER (ENCENDIDO/APAGADO)
button, then reselect the
desired programme and press the
START/PAUSE (INICIO/PAUSA)
button.
START/PAUSE (INICIO/PAUSA) was not pressed after a cycle was set.
• Press the
POWER (ENCENDIDO/APAGADO)
button, then reselect the
desired cycle and press the
START/PAUSE (INICIO/PAUSA)
button. If the
START/PAUSE (INICIO/PAUSA)
button is not pressed within a certain
time, the appliance will be turned off.
Extremely low water pressure.
• Check another tap in the house to make sure that household water
pressure is adequate.
Appliance is too cold.
• If the appliance has been exposed to temperatures below freezing for an
extended period of time, allow it to warm up before pressing the
POWER
(ENCENDIDO/APAGADO)
button.
Appliance is heating the water or making steam. (some models only)
• The drum in the appliance may stop operating temporarily during certain
cycles, while water is safely heated to a set temperature.
Detergent is not
dispensed completely
or not dispensed at all.
Too much detergent is used.
• Follow the guidelines provided by the detergent manufacturer.
global_main.book.book Page 37 Thursday, August 13, 2020 4:39 PM

38
TROUBLESHOOTING
EN
Water leaking Water inlet hose connection is loose at tap or appliance.
• Check hoses for leaks, cracks and splits.
• Tighten hose connections.
House drain pipes are clogged.
• The appliance pumps out water very rapidly. Check for water backing up
out of the drain pipe during drain. If water is seen coming out of the drain,
check for proper drain hose installation and check for restrictions in the
drain. Contact a plumber to repair drain pipe.
Drain hose has come out of drain or is not inserted far enough.
• Tie drain hose to supply hose or standpipe to prevent it from coming out
during drain. For smaller drain pipes, insert the drain hose into the pipe as
far as the drain hose flange. For larger drain pipes, insert the drain hose
into the pipe 2.5 - 5 cm past the flange.
A large item such as a pillow or blanket is above the top of the drum.
• Stop the appliance and check the item. Make sure the item does not crest
above the top edge of the drum.
Appliance is not filling
properly.
Filter is clogged.
• Make sure the inlet filters on the fill valves are not clogged.
Supply hoses may be kinked.
• Check that supply hoses are not kinked or clogged.
Insufficient water supply.
• Make sure that both hot and cold water taps are turned on all the way.
Hot and cold supply hoses are reversed.
• Check supply hose connections.
Appliance will not
drain water.
Drain hose is kinked.
• Ensure that the drain hose is not kinked.
Drain is located higher than 1.2 m above the floor.
• Make sure that the drain hose is no higher than 1.2 m above the bottom of
the appliance.
Cycle time is longer
than usual.
The load is too small.
• Add more items to allow the appliance to balance the laundry.
Heavy items are mixed with lighter items.
• Always try to wash items of somewhat similar weight to allow the
appliance to evenly distribute the weight of the laundry for spinning.
The load is out of balance.
• Manually redistribute the laundry if laundry have become tangled.
Symptoms Possible Cause & Solution
global_main.book.book Page 38 Thursday, August 13, 2020 4:39 PM

39
TROUBLESHOOTING
EN
Performance
Symptoms Possible Cause & Solution
Poor stain removal Proper options are not selected.
• Heavier soils and tougher stains may require extra cleaning power. Select
the
Soak (Remojo)
option to boost the cleaning power of the selected
cycle.
Previously set stains.
• Items that have previously been washed may have stains that have been
set. These stains may be difficult to remove and may require hand washing
or pretreating to aid in stain removal.
Symptoms Possible Cause & Solution
Staining Bleach or softener dispensed too soon.
• Dispenser compartment is overfilled causing bleach or softener to
dispense immediately. ALWAYS measure bleach to prevent overfilling.
• Close the dispenser drawer gently.
Bleach or softener was added directly to the laundry in the drum.
• Always use the dispensers to ensure that laundry products are properly
dispensed at the right time in the cycle.
Clothes were not properly sorted.
• Always wash dark colours separately from light colours and whites to
prevent discolouration.
• Never wash heavily soiled items with lightly soiled items.
Wrinkling Appliance is not unloaded promptly.
• Always remove items from the appliance as soon as the cycle is complete.
Appliance overloaded.
• The appliance can be fully loaded, but the drum should not be tightly
packed with items. The door of the appliance should be closed easily.
Hot and cold water supply hoses are reversed.
• Hot water rinse can set wrinkles in clothes. Check the supply hose
connections.
Musty or mildewy
odour in the appliance
Inside of drum was not cleaned properly.
• Run the
Tub Clean (Limpieza de Tina)
function regularly.
global_main.book.book Page 39 Thursday, August 13, 2020 4:39 PM

40
TROUBLESHOOTING
EN
Wi-Fi
Symptoms Possible Cause & Solution
Your home appliance
and smartphone are
not connected to the
Wi-Fi network.
The password for the Wi-Fi that you are trying to connect to is incorrect.
• Find the Wi-Fi network connected to your smartphone and remove it, then
register your appliance on
LG ThinQ
.
Mobile data for your smartphone is turned on.
• Turn off the
Mobile data
of your smartphone and register the appliance
using the Wi-Fi network.
The wireless network name (SSID) is set incorrectly.
• The wireless network name (SSID) should be a combination of English
letters and numbers. (Do not use special characters.)
The router frequency is not 2.4 GHz.
• Only a 2.4 GHz router frequency is supported. Set the wireless router to 2.4
GHz and connect the appliance to the wireless router. To check the router
frequency, check with your Internet service provider or the router
manufacturer.
The distance between the appliance and the router is too far.
• If the distance between the appliance and the router is too far, the signal
may be weak and the connection may not be configured correctly. Move
the location of the router so that it is closer to the appliance.
global_main.book.book Page 40 Thursday, August 13, 2020 4:39 PM

Memo
global_main.book.book Page 41 Thursday, July 30, 2020 11:32 AM

Memo
global_main.book.book Page 42 Thursday, July 30, 2020 11:32 AM

Memo
global_main.book.book Page 43 Thursday, July 30, 2020 11:32 AM

global_main.book.book Page 41 Thursday, August 13, 2020 4:39 PM
-
 1
1
-
 2
2
-
 3
3
-
 4
4
-
 5
5
-
 6
6
-
 7
7
-
 8
8
-
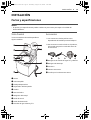 9
9
-
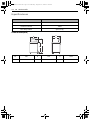 10
10
-
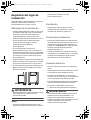 11
11
-
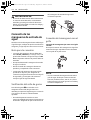 12
12
-
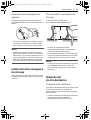 13
13
-
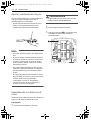 14
14
-
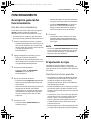 15
15
-
 16
16
-
 17
17
-
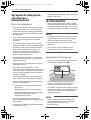 18
18
-
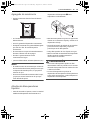 19
19
-
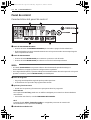 20
20
-
 21
21
-
 22
22
-
 23
23
-
 24
24
-
 25
25
-
 26
26
-
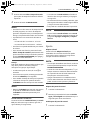 27
27
-
 28
28
-
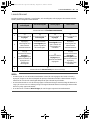 29
29
-
 30
30
-
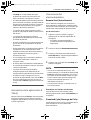 31
31
-
 32
32
-
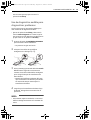 33
33
-
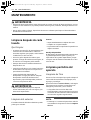 34
34
-
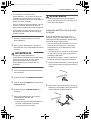 35
35
-
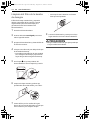 36
36
-
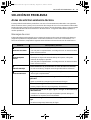 37
37
-
 38
38
-
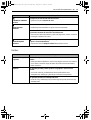 39
39
-
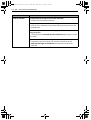 40
40
-
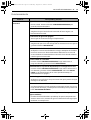 41
41
-
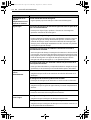 42
42
-
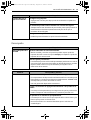 43
43
-
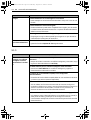 44
44
-
 45
45
-
 46
46
-
 47
47
-
 48
48
-
 49
49
-
 50
50
-
 51
51
-
 52
52
-
 53
53
-
 54
54
-
 55
55
-
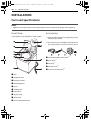 56
56
-
 57
57
-
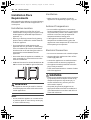 58
58
-
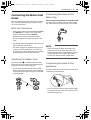 59
59
-
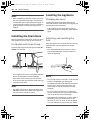 60
60
-
 61
61
-
 62
62
-
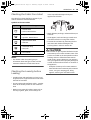 63
63
-
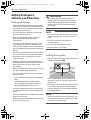 64
64
-
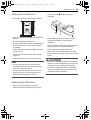 65
65
-
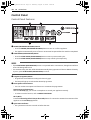 66
66
-
 67
67
-
 68
68
-
 69
69
-
 70
70
-
 71
71
-
 72
72
-
 73
73
-
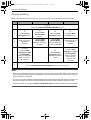 74
74
-
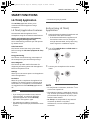 75
75
-
 76
76
-
 77
77
-
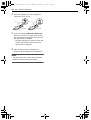 78
78
-
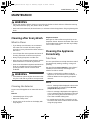 79
79
-
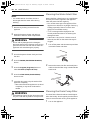 80
80
-
 81
81
-
 82
82
-
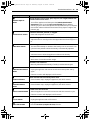 83
83
-
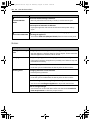 84
84
-
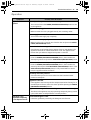 85
85
-
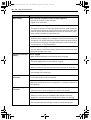 86
86
-
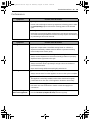 87
87
-
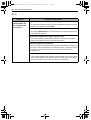 88
88
-
 89
89
-
 90
90
-
 91
91
-
 92
92


LG WT22WS6HP El manual del propietario
- Categoría
- Lavadoras
- Tipo
- El manual del propietario
en otros idiomas
- English: LG WT22WS6HP Owner's manual
Artículos relacionados
-
LG WT19DV6 Manual de usuario
-
LG WT25VT6HK El manual del propietario
-
LG WM20WV26 El manual del propietario
-
-
-
-
LG WM20WV26W El manual del propietario
-
-
-