Generac 20 kW G0055251 Manual de usuario
- Categoría
- Generadores de poder
- Tipo
- Manual de usuario

Owner’s Manual
8, 10, 12, 14, 16, 17 & 20kW Air-cooled,
Automatic Standby Generators
DANGER
DEADLY EXHAUST FUMES. OUTDOOR INSTALLATION ONLY!
Not intended for use as Primary Power in place of utility
or in life-support applications.
L
I
S
T
E
D
C
U
S
DO NOT LIFT UNIT BY ROOF!

INTRODUCTION
Thank you for purchasing this compact, high performance, air-
cooled, engine-driven generator. It is designed to automatically
supply electrical power to operate critical loads during a utility
power failure.
This unit is factory installed in an all-weather, metal enclosure and
is intended exclusively for outdoor installation. This generator
will operate using either vapor withdrawn liquid propane (LP) or
natural gas (NG).
NOTE:
This generator is suitable for supplying typical residential loads
such as Induction Motors (sump pumps, refrigerators, air con-
ditioners, furnaces, etc.), Electronic Components (computer,
monitor, TV, etc.), Lighting Loads and Microwaves.
READ THIS MANUAL THOROUGHLY
If any portion of this manual is not understood, contact the nearest
Dealer for starting, operating and servicing procedures.
Throughout this publication, and on tags and decals affixed to the
generator, DANGER, WARNING, CAUTION and NOTE blocks are
used to alert personnel to special instructions about a particular
operation that may be hazardous if performed incorrectly or care-
lessly. Observe them carefully. Their definitions are as follows:
DANGER
After this heading, read instructions that, if not
strictly complied with, will result in serious per-
sonal injury, including death.
After this heading, read instructions that, if not
strictly complied with, could result in serious per-
sonal injury, including death.
After this heading, read instructions that, if not
strictly complied with, might result in minor or mod-
erate injury.
NOTE:
After this heading, read instructions that, if not strictly complied
with, may result in damage to equipment and/or property.
These safety warnings cannot eliminate the hazards that they
indicate. Common sense and strict compliance with the special
instructions while performing the service are essential to pre-
venting accidents.
Four commonly used safety symbols accompany the DANGER,
WARNING and CAUTION blocks. The type of information each
indicates follows:
This symbol points out important safety
information that, if not followed, could endanger
personal safety and/or property of others.
This symbol points out potential explosion
hazard.
This symbol points out potential fire hazard.
This symbol points out potential electrical shock
hazard.
The operator is responsible for proper and safe use of the equip-
ment. The manufacturer strongly recommends that the operator
read this Owner's Manual and thoroughly understand all instruc-
tions before using this equipment. The manufacturer also strongly
recommends instructing other users to properly start and operate
the unit. This prepares them if they need to operate the equipment
in an emergency.
CONTENTS
This manual contains pertinent owner’s information for these
models:
7 kW NG, 8 kW LP, single-cylinder GH-410 Engine•
9 kW NG, 10 kW LP, V-twin GT-530 Engine•
12 kW NG, 12 kW LP, V-twin GT-990 Engine•
13 kW NG, 14 kW LP, V-twin GT-990 Engine•
16 kW NG, 16 kW LP, V-twin GT-990 Engine•
16 kW NG, 17 kW LP, V-twin GT-990 Engine•
18 kW NG, 20 kW LP, V-twin GT-999 Engine•
OPERATION AND MAINTENANCE
It is the operator's responsibility to perform all safety checks, to
make sure that all maintenance for safe operation is performed
promptly, and to have the equipment checked periodically by a
Dealer. Normal maintenance service and replacement of parts
are the responsibility of the owner/operator and, as such, are not
considered defects in materials or workmanship within the terms
of the warranty. Individual operating habits and usage contribute to
the need for maintenance service.
Proper maintenance and care of the generator ensures a minimum
number of problems and keep operating expenses at a minimum.
See a Dealer for service aids and accessories.
HOW TO OBTAIN SERVICE
When the generator requires servicing or repairs, contact a Dealer
for assistance. Service technicians are factory-trained and are
capable of handling all service needs.
When contacting a Dealer about parts and service, always supply
the complete model number and serial number of the unit as given
on its data decal, which is located on the generator. See section "The
Generator" for decal location.
Model No. _________________ Serial No. ______________

Table of Contents
Air-cooled Generators
1
Introduction .................... Inside Front Cover
Read This Manual Thoroughly .............................................IFC
Contents ............................................................................IFC
Operation and Maintenance.................................................IFC
How to Obtain Service ........................................................IFC
Table of Contents ........................................ 1
Safety Rules .................................................2
Standards Index .....................................................................3
Section 1 – General Information ................. 4
1.1 Unpacking/Inspection .....................................................4
1.2 Protection Systems ........................................................4
1.3 NEC Requirement for Arc Fault Circuit
Interruption Breaker for Bedrooms ..................................4
1.4 Emission Information......................................................5
1.5 The Generator ................................................................6
1.6 Specifications ................................................................7
1.7 System Set LED .............................................................8
1.8 Fuel Requirements and Recommendations ......................8
1.9 Fuel Consumption ..........................................................8
1.10 Reconfiguring the Fuel System ........................................9
1.11 Location .......................................................................10
1.12 Battery Requirements ...................................................11
1.13 Battery Installation ........................................................13
1.14 The Battery ..................................................................13
1.15 Battery Charger ............................................................14
Section 2 – Post Installation Start-up
and Adjustments ....................14
2.1 Before Initial Startup .....................................................14
2.2 Check Transfer Switch Operation ..................................14
2.3 Electrical Checks ..........................................................14
2.4 Generator Tests Under Load ..........................................15
2.5 Checking Automatic Operation ......................................15
2.6 Engine Governor Adjustment ........................................16
2.7 Voltage Regulator Adjustment .......................................16
Section 3 – Operation ................................ 17
3.1 Control Panel Interface .................................................17
3.2 Automatic Transfer Operation ........................................18
3.3 Sequence of Automatic Operation .................................19
3.4 Manual Transfer Operation ............................................20
3.5 Side Compartment (V-twin Only) ..................................20
3.6 Protection Systems ......................................................21
Section 4 – Maintenance ........................... 22
4.1 Fuse .............................................................................22
4.2 Checking the Engine Oil Level .......................................22
4.3 Changing the Engine Oil ................................................23
4.4 Changing the Engine Air Cleaner ...................................24
4.5 Spark Plug(s) ...............................................................25
4.6 Battery Maintenance .....................................................25
4.7 Adjusting GH-410/GT-530/990/999 Valve Clearance ......26
4.8 Cooling System ............................................................27
4.9 Attention After Submersion ...........................................27
4.10 Corrosion Protection.....................................................27
4.11 Out of Service Procedure ..............................................27
4.12 Service Schedule .........................................................29
Section 5 – Troubleshooting ..................... 30
5.1 Troubleshooting Guide ..................................................30
Section 6 – Appendix ................................ 31
6.1 Menu System Navigation ..............................................31
Section 7 – Installation Diagrams ............. 33
Section 8 – Warranty ................................. 36

2
Study these SAFETY RULES carefully before installing, operating
or servicing this equipment. Become familiar with this Owner’s
Manual and with the unit. The generator can operate safely, effi-
ciently and reliably only if it is properly installed, operated and
maintained. Many accidents are caused by failing to follow simple
and fundamental rules or precautions.
The manufacturer cannot anticipate every possible circumstance
that might involve a hazard. The warnings in this manual, and on
tags and decals affixed to the unit are, therefore, not all-inclusive. If
using a procedure, work method or operating technique the manu-
facturer does not specifically recommend, ensure that it is safe for
others. Also make sure the procedure, work method or operating
technique utilized does not render the generator unsafe.
DANGER
Despite the safe design of this generator,
operating this equipment imprudently, neglecting
its maintenance or being careless can cause
possible injury or death. Permit only responsible
and capable persons to install, operate and main-
tain this equipment.
Potentially lethal voltages are generated by
these machines. Ensure all steps are taken to
render the machine safe before attempting to
work on the generator.
Parts of the generator are rotating and/or hot
during operation. Exercise care near running
generators.
Installation must always comply with applicable
codes, standards, laws and regulations.
A running generator gives off carbon monoxide,
and odorless, colorless poison gas. Breathing in
carbon monoxide can cause headaches, fatigue,
diziness, nausea, vomitting, confusion, fainting,
siezures or death.
GENERAL HAZARDS
For safety reasons, the manufacturer recommends that this equip-•
ment be installed, serviced and repaired by a Service Dealer or
other competent, qualified electrician or installation technician who
is familiar with applicable codes, standards and regulations. The
operator also must comply with all such codes, standards and
regulations.
The engine exhaust fumes contain carbon monoxide, which •
can be DEADLY. This dangerous gas, if breathed in sufficient
concentrations, can cause unconsciousness or even death.
Do NOT alter or add to the exhaust system or do anything that
might render the system unsafe or in noncompliance with appli-
cable codes and standards.
Install a battery operated carbon monoxide alarm indoors, •
according to manufacturer's instructions/recommendations.
Adequate, unobstructed flow of cooling and ventilating air is •
critical to correct generator operation. Do not alter the instal-
lation or permit even partial blockage of ventilation provisions,
as this can seriously affect safe operation of the generator. The
generator MUST be installed and operated outdoors only.
Keep hands, feet, clothing, etc., away from drive belts, fans, •
and other moving or hot parts. Never remove any drive belt or
fan guard while the unit is operating.
When working on this equipment, remain alert at all times. •
Never work on the equipment when physically or mentally
fatigued.
Inspect the generator regularly, and contact the nearest Dealer •
for parts needing repair or replacement.
Before performing any maintenance on the generator, discon-•
nect its battery cables to prevent accidental start up. Disconnect
the cable from the battery post indicated by a NEGATIVE, NEG
or (–) first, then remove the POSITIVE, POS or (+) cable. When
reconnecting the cables, connect the POSITIVE cable first, the
NEGATIVE cable last.
Never use the generator or any of its parts as a step. Stepping •
on the unit can stress and break parts, and may result in dan-
gerous operating conditions from leaking exhaust gases, fuel
leakage, oil leakage, etc.
ENGINE EXHAUST HAZARDS
Generator engine exhaust contains DEADLY carbon monox-•
ide, an odorless, colorless poisonous gas. Breathing carbon
monoxide can cause: dizziness, throbbing temples, nausea,
muscular twitching, headache, vomiting, weakness and sleepi-
ness, inability to think clearly, fainting, unconsciousness or
even death. If you experience any carbon monoxide poisoning
symptoms, move into fresh air and immediately seek medical
attention.
Never operate the generator set with the vehicle inside any •
garage or other enclosed area.
IMPORTANT SAFETY INSTRUCTIONS
Air-cooled Generators
SAVE THESE INSTRUCTIONS – The manufacturer suggests that these rules for safe operation be copied and posted near
the unit’s installation site. Safety should be stressed to all operators and potential operators of this equipment.
The engine exhaust from this product
contains chemicals known to the state
of California to cause cancer, birth
defects or other reproductive harm.
WARNING:
This product contains or emits chemicals
known to the state of California to cause
cancer, birth defects or other reproductive harm.
WARNING:

3
ELECTRICAL HAZARDS
All generators covered by this manual produce dangerous •
electrical voltages and can cause fatal electrical shock. Utility
power delivers extremely high and dangerous voltages to the
transfer switch as does the standby generator when it is in
operation. Avoid contact with bare wires, terminals, connec-
tions, etc., while the unit is running. Ensure all appropriate
covers, guards and barriers are in place, secured and/or locked
before operating the generator. If work must be done around
an operating unit, stand on an insulated, dry surface to reduce
shock hazard.
Do not handle any kind of electrical device while stand-•
ing in water, while barefoot, or while hands or feet are wet.
DANGEROUS ELECTRICAL SHOCK MAY RESULT.
The National Electrical Code (NEC) requires the frame and external •
electrically conductive parts of the generator to be connected to
an approved earth ground. Local electrical codes also may require
proper grounding of the generator electrical system.
After installing this home standby electrical system, the genera-•
tor may crank and start at any time without warning. When this
occurs, load circuits are transferred to the STANDBY (genera-
tor) power source. To prevent possible injury if such a start and
transfer occur, always set the generator’s AUTO/OFF/MANUAL
switch to its OFF position before working on equipment and
remove the 15A fuse from the generator control panel.
In case of accident caused by electric shock, immediately shut •
down the source of electrical power. If this is not possible,
attempt to free the victim from the live conductor. AVOID DIRECT
CONTACT WITH THE VICTIM. Use a nonconducting implement,
such as a dry rope or board, to free the victim from the live
conductor. If the victim is unconscious, apply first aid and get
immediate medical help.
Never wear jewelry when working on this equipment. Jewelry •
can conduct electricity resulting in electric shock, or may get
caught in moving components causing injury.
FIRE HAZARDS
For fire safety, the generator must be installed and maintained •
properly. Installation must always comply with applicable
codes, standards, laws and regulations. Adhere strictly
to local, state and national electrical and building codes.
Comply with regulations the Occupational Safety and Health
Administration (OSHA) has established. Also, ensure that the
generator is installed in accordance with the manufacturer’s
instructions and recommendations. Following proper installa-
tion, do nothing that might alter a safe installation and render
the unit in noncompliance with the aforementioned codes,
standards, laws and regulations.
Keep a fire extinguisher near the generator at all times. •
Extinguishers rated “ABC” by the National Fire Protection
Association are appropriate for use on the standby electric
system. Keep the extinguisher properly charged and be familiar
with its use. Consult the local fire department with any ques-
tions pertaining to fire extinguishers.
EXPLOSION HAZARDS
Do not smoke around the generator. Wipe up any fuel or oil •
spills immediately. Ensure that no combustible materials are left
in the generator compartment, or on or near the generator, as
FIRE or EXPLOSION may result. Keep the area surrounding the
generator clean and free from debris.
Gaseous fluids such as natural gas and liquid propane (LP) •
gas are extremely EXPLOSIVE. Install the fuel supply system
according to applicable fuel-gas codes. Before placing the
home standby electric system into service, fuel system lines
must be properly purged and leak tested according to applica-
ble code. After installation, inspect the fuel system periodically
for leaks. No leakage is permitted.
STANDARDS INDEX
In the absence of pertinent standards, codes, regulations and
laws, the published information listed below may be used for
installation guidance for this equipment.
1. NFPA No. 37, STATIONARY COMBUSTION ENGINES AND
GAS TURBINES, available from the National Fire Protection
Association, 470 Atlantic Avenue, Boston, MA 02210.
2. NFPA No. 76A, ESSENTIAL ELECTRICAL SYSTEMS FOR
HEALTH CARE FACILITIES, available same as Item 1.
3. NFPA No. 54, NATIONAL FUEL GAS CODE, available same as
Item 1.
4. NFPA No. 58, AMERICAN NATIONAL STANDARD FOR
STORAGE AND HANDLING OF LIQUEFIED PETROLEUM GAS,
available same as Item 1.
5. NFPA No. 70, NFPA HANDBOOK OF NATIONAL ELECTRIC
CODE, available same as Item 1.
6. Article X, NATIONAL BUILDING CODE, available from the
American Insurance Association, 85 John Street, New York,
N.Y. 10038.
7. AGRICULTURAL WIRING HANDBOOK, available from the Food
and Energy Council, 909 University Avenue, Columbia, MO
65201.
8. ASAE EP-3634, INSTALLATION AND MAINTENANCE OF
FARM STANDBY ELECTRICAL SYSTEMS, available from the
American Society of Agricultural Engineers, 2950 Niles Road,
St. Joseph, MI 49085.
9. NFPA No. 30, FLAMMABLE AND COMBUSTIBLE LIQUIDS
CODE, available same as Item 1.
IMPORTANT SAFETY INSTRUCTIONS
Air-cooled Generators

DANGER
Only qualified electricians or contractors should
attempt such installations, which must comply
strictly with applicable codes, standards and regu-
lations.
1.1 UNPACKING/INSPECTION
After unpacking, carefully inspect the contents for damage.
This standby generator set is ready for installation with a factory •
supplied and pre-mounted base pad and has a weather protec-
tive enclosure that is intended for outdoor installation only.
This UL listed standby generator set may be packaged with an •
automatic transfer switch with built in load center. The combi-
nation transfer switch and load center is pre-wired with a two
foot and 30 foot conduit. Circuit breakers for emergency circuit
connections are included (if equipped).
This UL listed, 2-pole switch is rated at 100 • or 200 AC amperes
at 250 volts maximum. The 100 Amp transfer switch is for
indoor use only. The 200 Amp transfer switch is for indoor/
outdoor use (if equipped).
If this generator is used to power electrical load
circuits normally powered by a utility power
source, it is required by code to install a transfer
switch. The transfer switch must effectively isolate
the electrical system from the utility distribution
system when the generator is operating (NEC 700,
701 & 702). Failure to isolate an electrical system
by such means will result in damage to the gen-
erator and also may result in injury or death to
utility power workers due to backfeed of electrical
energy.
If any loss or damage is noted at time of delivery, have the
person(s) making the delivery note all damage on the freight bill
or affix their signature under the consignor's memo of loss or
damage.
If a loss or damage is noted after delivery, separate the damaged
materials and contact the carrier for claim procedures.
“Concealed damage” is understood to mean damage to the con-
tents of a package that is not in evidence at the time of delivery,
but is discovered later.
To properly open the roof, press down on the center top lip and
release the latch. If pressure is not applied from the top, the roof
may appear stuck. Always verify that the side lock is unlocked
before attempting to lift the roof.
1.2 PROTECTION SYSTEMS
Unlike an automobile engine, the generator may have to run for
long periods of time with no operator present to monitor engine
conditions. For that reason, the engine is equipped with the fol-
lowing systems that protect it against potentially damaging condi-
tions:
1. Low Oil Pressure Sensor
2. High Temperature Sensor
3. Overcrank
4. Overspeed
5. RPM Sensor
6. Low Battery
There are readouts on the control panel to notify personnel that
one of these failures has occurred. There is also a System Set LED
(single cylinder) or a Status message on the display (V-twins) that
displays when all of the conditions described in the "System Set
LED" section are true.
1.3 NEC REQUIREMENT FOR ARC FAULT
CIRCUIT INTERRUPTION BREAKER FOR
BEDROOMS
In 2001, the National Electric Code (NEC) introduced a requirement
for new construction. This new requirement indicates the need for
Arc Fault Circuit Interrupters to be used to protect the complete
branch circuit that feeds a dwelling bedroom. The actual NEC
requirement is indicated below.
1.3.1 SECTION 210.12 ARC FAULT CIRCUIT INTER-
RUPTER PROTECTION
1. Definition: An arc fault circuit interrupter is a device intended
to provide protection from the effects of arc faults by recog-
nizing characteristics unique to arcing and by functioning to
de-energize the circuit when an arc fault is detected.
2. Dwelling Unit Bedrooms: All branch circuits that supply 125
volt, single-phase, 15 and 20 ampere outlets installed in
dwelling unit bedrooms shall be protected by an arc fault cir-
cuit interrupter listed to provide protection of the entire branch
circuit.
Section 210.12 requires that AFCI protection be provided on branch
circuits that supply outlets (receptacle, lighting, etc.) in dwell-
ing bedrooms. The requirement is limited to 15 and 20 ampere,
125 volt circuits. There is no prohibition against providing AFCI
protection on other circuits or in locations other than bedrooms.
Because circuits are often shared between a bedroom and other
areas such as closets and hallways, providing AFCI protection on
the complete circuit would comply with 210.12.
Section 1 — General Information
Air-cooled Generators
4

Section 1 — General Information
Air-cooled Generators
5
If during the installation of the home standby system the decision
is made to provide back up power to a bedroom branch circuit,
then the circuit breaker in the transfer switch should be replaced
with an Arc Fault Circuit Interrupter.
It is most important that breakers only be switched like for like.
For instance, if replacing a 15A breaker, it MUST be replaced with
a 15A AFCI breaker. Likewise, a 20A breaker MUST be replaced
with a 20A AFCI.
These AFCI breakers are available at the nearest hardware store.
Siemens Item # Description
Q115AF 15A Single Pole AFCI
Q120AF 20A Single Pole AFCI
1.4 EMISSION INFORMATION
The Environmental Protection Agency requires that this generator
complies with exhaust emission standards. This generator is certi-
fied to meet the applicable EPA emission levels. Additional infor-
mation regarding the requirements set by the EPA is as follows:
The generator is certified for use as a stationary engine for standby
power generation. Any other use may be a violation of federal
and/or local laws. It is important that to follow the maintenance
specifications in the "Maintenance" section to ensure that the
engine complies with the applicable emission standards for the
duration of the engine’s life. This engine is certified to operate on
Liquid Propane fuel and pipeline Natural Gas. The emission control
system on the generator consists of the following:
Fuel Metering System•
Carburetor/mixer assembly•
Fuel regulator•
Air Induction System•
Intake pipe/manifold•
Air cleaner•
Ignition System•
Spark plug•
Ignition module•
The Emissions Compliance Period referred to on the Emissions
Compliance Label indicates the number of operating hours for
which the engine has been shown to meet Federal emission
requirements. See the table below to determine the compliance
period for the generator. The displacement of the generator is listed
on the Emissions Compliance Label.
Displacement Category Compliance Period
< 66 cc
A 300 Hours
B 125 Hours
C 50 Hours
66 cc -
< 225 cc
A 500 Hours
B 250 Hours
C 125 Hours
225 cc
A 1000 Hours
B 500 Hours
C 250 Hours

6
Section 1 — General Information
Air-cooled Generators
1.5 THE GENERATOR
Data Label
(see sample)
Oil
Dipstick
Exhaust
Enclosure
Composite Base Oil Filter Battery Compartment
Fuel
Regulator
Fuel Inlet
(back)
Air Filter
Circuit
Breaker
Control
Panel
Data Label
(see sample)
Oil
Dipstick
Exhaust
Enclosure
Composite Base Oil Filter Battery Compartment
Fuel
Regulator
Fuel Inlet
(back)
Air Filter
Circuit
Breakers
Control
Panel
Figure 1.3 – 12, 14, 16, 17 and 20kW, V-twin,
GT-990/GT-999 Engine (door removed)
Figure 1.1 – 8kW, Single Cylinder, GH-410 Engine
(door removed)
Data Label
(see sample)
Oil
Dipstick
Exhaust
Enclosure
Composite Base Oil Filter Battery Compartment
Fuel
Regulator
Fuel Inlet
(back)
Air
Filter
Circuit
Breaker
Control
Panel
Figure 1.2 – 10kW, V-twin, GT-530 Engine
(door removed)
Data Label Sample

7
Section 1 — General Information
Air-cooled Generators
1.6 SPECIFICATIONS
1.6.1 GENERATOR
Model 8kW 10kW 12kW 14kW 16kW 17kW 20kW
Rated Voltage 240
Rated Maximum Load Current
(Amps) at 240 Volts (LP)*
33.3 41.6 50.0 58.3 66.6 70.8 83.3
Main Circuit Breaker 35 Amp 45 Amp 50 Amp 60 Amp 65 Amp 65 Amp 100 Amp
Circuits** 50A, 240V - - - 1 1 1 -
40A, 240V - - 1 1 1 1 -
30A, 240V 1 1 1 - - - -
20A, 240V - 1 - 1 1 1 -
20A, 120V 1 3 3 4 5 5 -
15A, 120V 5 3 5 4 5 5 -
Phase 1
Number of Rotor Poles 2
Rated AC Frequency 60 Hz
Battery Requirement
Group 26R, 12
Volts and 350 CCA
Minimum
Group 26R, 12 Volts and 525 CCA Minimum
Weight (unit only in lbs.) 340 387 439 439 439 455/421 450
Enclosure Steel Steel Steel Steel Steel Steel/Aluminum Aluminum
Normal Operating Range -20° F (-28.8° C) to 77° F (25° C)
These generators are rated in accordance with UL2200, Safety Standard for Stationary Engine Generator Assemblies; and CSA-C22.2 No. 100-04 Standard for Motors and Generators.
* Natural Gas ratings will depend on specific fuel Btu content. Typical derates are between 10-20% off the LP gas rating.
** Circuits to be moved must be protected by same size breaker. For example, a 15 amp circuit in the main panel must be a 15 amp circuit in the transfer switch.
1.6.2 ENGINE
Model 8 kW 10 kW 12/14/16/17 kW 20 kW
Type of Engine GH-410 GT-530 GT-990 GT-999
Number of Cylinders 1 2 2 2
Rated Horsepower @ 3,600 rpm* 14.8 18 32 36
Displacement 410cc 530cc 992cc 999cc
Cylinder Block Aluminum w/Cast Iron Sleeve
Valve Arrangement Overhead Valves
Ignition System Solid-state w/Magneto
Recommended Spark Plug RC14YC BPR6HS RC14YC RC12YC
Spark Plug Gap 0.76 mm (0.030 inch) 0.76 mm (0.030 inch) 1.02 mm (0.040 inch) 0.76 mm (0.030 inch)
Compression Ratio 8.6:1 9.5:1 9.5:1 9.5:1
Starter 12 VDC
Oil Capacity Including Filter Approx. 1.5 Qts Approx. 1.7 Qts Approx. 1.7 Qts Approx. 1.7 Qts
Recommended Oil Filter Part # 070185F
Recommended Air Filter Part # 0G3332 Part # 0E9581 Part # 0C8127 Part # 0G5894
Operating RPM 3,600
* Engine power is subject to and limited by such factors as fuel Btu content, ambient temperature and altitude. Engine power decreases about 3.5 percent for each 1,000 feet above sea level; and
also will decrease about 1 percent for each 6 C (10 F) above 16 C (60 F) ambient temperature.

1.7 SYSTEM SET LED
The “System Set” LED (single cylinder) or "Ready to Run" on the
display (v-twin) is ready when all of the following conditions are
true:
1. The AUTO/OFF/MANUAL switch is set to the AUTO position.
2. The utility voltage being supplied to the unit is being sensed
by the PCB. If the utility sense voltage is not connected to the
unit or if it is below approximately 150-160 volts AC, then the
system set light will flash rapidly (8kW). This indicates that if
the AUTO/OFF/MANUAL switch is placed in the Auto position,
the generator will start.
3. No alarms are present, for example, low oil pressure, high
temperature, etc.
1.8 FUEL REQUIREMENTS
AND RECOMMENDATIONS
With LP gas, use only the vapor withdrawal system. This type of
system uses the vapors formed above the liquid fuel in the storage
tank.
The engine has been fitted with a fuel carburetion system that
meets the specifications of the 1997 California Air Resources
Board for tamper-proof dual fuel systems. The unit will run on
natural gas or LP gas, but it has been factory set to run on natural
gas. Should the primary fuel need to be changed to LP gas, the
fuel system needs to be reconfigured. See the reconfiguring the
Fuel System section for instructions on reconfiguration of the fuel
system.
Recommended fuels should have a Btu content of at least 1,000
Btus per cubic foot for natural gas; or at least 2,520 Btus per
cubic foot for LP gas. Ask the fuel supplier for the Btu content of
the fuel.
Required fuel pressure for natural gas is five (5) inches to seven
(7) inches water column (0.18 to 0.25 psi); and for liquid pro-
pane, 10 inches to 12 inches of water column (0.36 to 0.43 psi).
The primary regulator for the propane supply is NOT INCLUDED
with the generator.
NOTE:
All pipe sizing, construction and layout must comply with NFPA
54 for natural gas applications and NFPA 58 for liquid propane
applications. Once the generator is installed, verify that the fuel
pressure NEVER drops below four (4) inches water column for
natural gas or 10 inches water column for liquid propane.
Prior to installation of the generator, the installer should consult
local fuel suppliers or the fire marshal to check codes and regula-
tions for proper installation. Local codes will mandate correct rout-
ing of gaseous fuel line piping around gardens, shrubs and other
landscaping to prevent any damage.
Special considerations should be given when installing the unit
where local conditions include flooding, tornados, hurricanes,
earthquakes and unstable ground for the flexibility and strength of
piping and their connections.
Use an approved pipe sealant or joint compound on all threaded
fitting.
All installed gaseous fuel piping must be purged and leak tested
prior to initial start-up in accordance with local codes, standards
and regulations.
1.9 FUEL CONSUMPTION
Unit
Nat. Gas LP Vapor
1/2 Load Full Load 1/2 Load Full Load
7/8 kW 77 140 0.94/34 1.68/62
9/10 kW 102 156 1.25/46 1.93/70
12/12 kW 152 215 1.53/56 2.08/76
13/14 kW 156 220 1.56/58 2.30/84
16/16 kW 183 261 1.59/58 2.51/91
16/17 kW 183 261 1.61/59 2.57/94
18/20 kW 206 294 1.89/69 2.90/106
* Natural gas is in cubic feet per hour.
** LP is in gallons per hour/cubic feet per hour.
*** Values given are approximate.
Verify that gas meter is capable of providing enough fuel flow to
include household appliances.
1.9.1 BTU FLOW REQUIREMENTS -
NATURAL GAS
BTU flow required for each unit based on 1000 BTU per cubic
foot.
7kW — 140,000 BTU/Hour•
9kW — 156,000 BTU/Hour•
12kW — 215,000 BTU/Hour•
13kW — 220,000 BTU/Hour•
16kW — 261,000 BTU/Hour•
18kW — 294,000 BTU/Hour•
DANGER
Gaseous fuels such as natural gas and liquid
propane (LP) gas are highly explosive. Even the
slightest spark can ignite such fuels and cause
an explosion. No leakage of fuel is permitted.
Natural gas, which is lighter than air, tends to
collect in high areas. LP gas is heavier than air
and tends to settle in low areas.
NOTE:
A minimum of one approved manual shut-off valve must be
installed in the gaseous fuel supply line. The valve must be eas-
ily accessible. Local codes determine the proper location.
Section 1 — General Information
Air-cooled Generators
8

9
1.10 RECONFIGURING THE
FUEL SYSTEM
1.10.1 8 KW, 410CC ENGINE
To reconfigure the fuel system from NG to LP, follow these steps
(Figure 1.4):
NOTE:
The primary regulator for the propane supply is NOT INCLUDED
with the generator. A fuel pressure of 10 to 12 inches of water
column (0.36 to 0.43 psi) to the fuel inlet of the generator MUST
BE SUPPLIED.
1. Turn off the main gas supply (if connected).
2. Open the roof and remove the door.
3. Remove the battery (if installed).
4. Take the plastic T-handle fuel selector in the poly bag supplied
with the generator.
5. Locate the selector knob on the air box cover, behind the
yellow air filter door and power bulge. The unit comes from
the factory in the NG (Natural Gas) position. Grasping the
T-handle, insert the pin end into the hole in the selector knob
and pull out to overcome spring pressure and then twist
clockwise 90 degrees and allow the selector to return in once
aligned with the LP (Liquid Propane) position.
6. Save this tool with the Owner's Manual.
7. Install the battery, door and close the roof.
8. Reverse the procedure to convert back to natural gas.
Figure 1.4 – Fuel Selector
NOTE:
Use an approved pipe sealant or joint compound on all threaded
fittings to reduce the possibility of leakage.
1.10.2 10, 12, 14, 16, 17 AND 20KW, V-TWIN
ENGINES
To reconfigure the fuel system from NG to LP, follow these steps:
NOTE:
The primary regulator for the propane supply is NOT INCLUDED
with the generator. A fuel pressure of 10 to 12 inches of water
column (0.36 to 0.43 psi) to the fuel inlet of the generator MUST
BE SUPPLIED.
1. Open the roof.
2. For 10kW units: Loosen clamp and slide back the air inlet
hose.
Slide fuel selector on carburetor out towards the back of the •
enclosure (Figures 1.5 and 1.6).
Return the inlet hose and tighten clamp securely.•
For 12, 14, 16, 17 and 20kW units: remove the air cleaner
cover.
Slide the selector lever out towards the back of the enclosure •
(Figures 1.7 and 1.8).
Return the air cleaner cover and tighten the two thumb •
screws.
Figure 1.5 - 10kW, GT-530 (Inlet Hose Slid Back)
Fuel Selection
Lever - "In"
Position for
Natural Gas
Fuel
Figure 1.6 - 10kW, GT-530 (Inlet Hose Slid Back)
Fuel Selection
Lever - "Out"
Position for
Liquid Propane
(Vapor) Fuel
Section 1 — General Information
Air-cooled Generators

10
3. Close the roof.
4. Reverse the procedure to convert back to natural gas.
Figure 1.7 - 12, 14, 16, 17, & 20kW,
GT-990/GT-999 (Airbox Cover Removed)
Fuel Selection Lever - "In" Position for Natural Gas Fuel
Figure 1.8 - 12, 14, 16, 17, & 20kW,
GT-990/GT-999 (Airbox Cover Removed)
Fuel Selection Lever - "Out" Position for Liquid Propane
(Vapor) Fuel
1.11 LOCATION
DANGER
The engine exhaust fumes contain carbon mon-
oxide, which can be DEADLY. This dangerous
gas, if breathed in sufficient concentrations,
can cause unconsciousness or even death. This
generator must be installed properly, in strict
compliance with applicable codes and stan-
dards. Following installation, do nothing that
might render the system unsafe or in noncom-
pliance with such codes and standards.
• Operate the generator outdoors ONLY.
• Keep exhaust gases from entering a confined
area through windows, doors, ventilation, crawl
spaces or other openings (Figure 1.9).
• Generac Power Systems as a responsible manu-
facturer highly recommends that carbon monox-
ide detector(s) be installed indoors according to
the manufacturer's instructions/recommendations.
• The generator must me mounted safely per appli-
cable codes and the manufacturer's specifica-
tions. Do NOT alter or add to the exhaust system,
or do anything that might render the exhaust sys-
tem unsafe or in noncompliance with applicable
codes and standards.
1.11.1 GENERATOR
Install the generator set, in its protective enclosure, outdoors,
where adequate cooling and ventilating air is always available
(Figure 1.9). Consider these factors:
The installation of the generator • must comply strictly with
NFPA 37, NFPA 54, NFPA 58, and NFPA 70 standards.
Install the unit where air inlet and outlet openings will not •
become obstructed by leaves, grass, snow, etc.. If prevailing
winds will cause blowing or drifting, consider using a wind-
break to protect the unit.
Install the generator on high ground where water levels will not •
rise and endanger it.
Allow sufficient room on all sides of the generator for mainte-•
nance and servicing. This unit must be installed in accordance
with current applicable NFPA 37 and NFPA 70 standards; as
well as any other federal, state and local codes for minimum
distances from other structures. DO NOT install under wooden
decks or structures unless there is at least four (4) feet of clear-
ance above the generator, three (3) feet of clearance on sides
and front, and 18 inches of clearance at back of unit.
Install the unit where rain gutter down spouts, roof run-off, •
landscape irrigation, water sprinklers or sump pump discharge
does not flood the unit or spray the enclosure, including any air
inlet or outlet openings.
Install the unit where services will not be affected or obstructed, •
including concealed, underground or covered services such as
electrical, fuel, phone, air conditioning or irrigation.
Where strong prevailing winds blow from one direction, face the •
generator air inlet openings to the prevailing winds.
Install the generator as close as possible to the fuel supply, to •
reduce the length of piping.
Install the generator as close as possible to the transfer switch. •
REMEMBER THAT LAWS OR CODES MAY REGULATE THE
DISTANCE AND LOCATION.
The genset must be installed on a level surface. The base frame •
must be level within two (2) inches all around.
The generator is typically placed on pea gravel or crushed •
stone. Check local codes if a concrete slab is required. If a
concrete base slab is required, all federal, state and local codes
should be followed. Special attention should be given to the
concrete base slab which should exceed the length and width
of the generator by a minimum of six (6) inches (0.152 meters)
on all sides.
Section 1 — General Information
Air-cooled Generators

11
Figure 1.9 – Generator Clearances
1.11.2 NEW INSTALLATION GUIDELINES FOR
STATIONARY AIR-COOLED 8, 10, 12, 14, 16,
17 AND 20 KW GENERATORS.
The National Fire Protection Association has a standard for the
installation and use of stationary combustion engines. That
standard is NFPA 37 and its requirements limit the spacing of an
enclosed generator set from a structure or wall (Figure 1.10).
NFPA 37, Section 4.1.4, Engines Located Outdoors. Engines, and
their weatherproof housings if provided, that are installed outdoors
shall be located at least 5 ft. from openings in walls and at least 5
ft. from structures having combustible walls. A minimum separa-
tion shall not be required where the following conditions exist:
1. The adjacent wall of the structure has a fire resistance rating
of at least 1 hour.
2. The weatherproof enclosure is constructed of noncombus-
tible materials and it has been demonstrated that a fire within
the enclosure will not ignite combustible materials outside the
enclosure.
Annex A — Explanatory Material
A4.1.4 (2) Means of demonstrating compliance are by means
of full scale fire test or by calculation procedures.
Because of the limited spaces that are frequently available for
installation, it has become apparent that exception (2) would be
beneficial for many residential and commercial installations. With
that in mind, the manufacturer contracted with an independent
testing laboratory to run full scale fire tests to assure that the
Carrier enclosure would not ignite combustible materials outside
the enclosure.
The criteria was to determine the worst case fire scenario within
the generator and to determine the ignitability of items outside
the engine enclosure at various distances. The Carrier enclosure
is constructed of non-combustible materials and the results and
conclusions from the independent testing lab indicated that any
fire within the generator enclosure would not pose any ignition risk
to nearby combustibles or structures, with or without fire service
personnel response.
Based on this testing and the requirements of NFPA 37, Sec 4.1.4,
the guidelines for installation of the generators listed above are
changed to 18 inches (457mm) from the back side of the genera-
tor to a stationary wall or building. For adequate maintenance and
airflow clearance, the area above the generator should be at least
4 feet with a minimum of 3 feet at the front and ends of the enclo-
sure. This would include trees, shrubs and vegetation that could
obstruct airflow. See the diagram on the reverse of this page and
the installation drawing within the owner’s manual for details.
Generator exhaust contains DEADLY carbon monoxide gas. This
dangerous gas can cause unconsciousness or death. Do not place
the unit near windows, doors, fresh air intakes (furnaces, etc.) or
any openings in the building or structure, including windows and
doors of an attached garage.
1.11.3 TRANSFER SWITCH ( if included)
1.11.3.1 8, 10, 12, 14, 16, 17 and 20kW Units
(if equipped)
The transfer switch that may have shipped inside the carton with
the 8, 10, 12, 14, 16 or 17kW generator is enclosed in a NEMA
1 (indoor rated only) enclosure. The transfer switch that may
have shipped with the 20kW generator is enclosed in a NEMA 3R
(indoor/outdoor rated) enclosure.
Install the transfer switch indoors on a firm, sturdy supporting •
structure.
To prevent switch distortion, level the switch if necessary. This •
can be done by placing washers between the switch enclosure
and mounting surface.
Never install the switch where water or any corrosive substance •
might drip onto the enclosure.
Protect the switch at all times against excessive moisture, dust, •
dirt, lint, construction grit and corrosive vapors.
If the AUTO/OFF/MANUAL switch is not set to its
OFF position, the generator can crank and start
as soon as the battery cables are connected. If
the utility power supply is not turned off, spark-
ing can occur at the battery posts and cause an
explosion.
1.12 BATTERY REQUIREMENTS
See the Specifications section for correct battery size and rating.
Section 1 — General Information
Air-cooled Generators

12
Section 1 — General Information
Air-cooled Generators
Figure 1.10 – Installation Guidelines
18 inches
Minimum Distance
36 inches
36 inches
36 inches
60 inches 60 inches
Existing Wall
No windows or openings in the wall permitted
within 5 feet from any point of the generator.
Top of Generator
48” Minimum
60” Recommended
Minimum From Ends
18 inches
Minimum
Generator
Clearance from windows,
doors, any openings in the
wall, shrubs or vegetation
over 12” in height
Clearance from the ends and front of the
generator should be 36 inches. This
would include shrubs, trees and any
kind of vegetation. Clearance at the top
should be a minimum of 48 inches from
any structure, overhang or projections
from the wall. The generator should not
be placed under a deck or other
structure that is closed in and would limit
or contain air flow.
These guidelines are based upon fire
testing of the generator enclosure and
the manufacturer’s requirement for air
flow for proper operation. Local codes
may be different and more restrictive
than what is described here.
This drawing supersedes installation instructions in all Carrier air-cooled installation and owner’s manuals dated
previous to May 26, 2007.

13
1.13 BATTERY INSTALLATION
Fill the battery with the proper electrolyte fluid if necessary and
have the battery fully charged before installing it.
Before installing and connecting the battery, complete the follow-
ing steps:
1. Set the generator's AUTO/OFF/MANUAL switch to OFF.
2. Turn off utility power supply to the transfer switch.
3. Remove the 7.5A fuse from the generator control panel.
Battery cables were factory connected at the generator (Figure
1.10). Connect cables to battery posts as follows:
4. Connect the red battery cable (from starter contactor) to the
battery post indicated by a positive, POS or (+).
5. Connect the black battery cable (from frame ground) to the
battery post indicated by a negative, NEG or (—).
Figure 1.10 – Battery Cable Connections
NOTE:
Dielectric grease should be used on battery posts to aid in the
prevention of corrosion.
NOTE:
Damage will result if battery connections are made in reverse.
NOTE:
In areas where temperatures regularly fall below 10° F (-12° C)
it is recommended that a pad type battery heater be installed to
aid in cold climate starting.
1.14 THE BATTERY
DANGER
Do not dispose of the battery in a fire. The
battery is capable of exploding.
A battery presents a risk of electrical shock
and high short circuit current. The following pre-
cautions are to be observed when working on
batteries:
• Remove the 7.5A fuse from the generator control
panel.
• Remove watches, rings or other metal objects;
• Use tools with insulated handles;
• Wear rubber gloves and boots;
• Do not lay tools or metal parts on top of the
battery; and
• Disconnect charging source prior to connecting or
disconnecting battery terminals.
Do not open or mutilate the battery. Released
electrolyte has been known to be harmful to the
skin and eyes, and to be toxic.
The electrolyte is a dilute sulfuric acid that is
harmful to the skin and eyes. It is electrically
conductive and corrosive.
The following procedures are to be observed:
• Wear full eye protection and protective clothing;
• Where electrolyte contacts the skin, wash it off
immediately with water;
• Where electrolyte contacts the eyes, flush thor-
oughly and immediately with water and seek medi-
cal attention; and
• Spilled electrolyte is to be washed down with an
acid neutralizing agent. A common practice is to
use a solution of 1 pound (500 grams) bicarbonate
of soda to 1 gallon (4 liters) of water. The bicar-
bonate of soda solution is to be added until the
evidence of reaction (foaming) has ceased. The
resulting liquid is to be flushed with water and the
area dried.
Lead-acid batteries present a risk of fire
because they generate hydrogen gas. The fol-
lowing
procedures are to be followed:
• DO NOT SMOKE when near the battery;
• DO NOT cause flame or spark in battery area; and
• Discharge static electricity from body before
touching the battery by first touching a grounded
metal surface.
Be sure the AUTO/OFF/MANUAL switch is set to
the OFF position before connecting the battery
cables. If the switch is set to AUTO or MANUAL,
the generator can crank and start as soon as
the battery cables are connected.
Section 1 — General Information
Air-cooled Generators

14
Be sure the utility power supply is turned off
and the 7.5A fuse is removed from the generator
control panel, or sparking may occur at the bat-
tery posts as the cables are attached and cause
an explosion.
Servicing of the battery is to be performed or supervised by per-
sonnel knowledgeable of batteries and the required precautions.
Keep unauthorized personnel away from batteries.
See the Specifications section for the correct size and rating when
replacing the battery. Have these procedures performed at the
intervals specified in the “Service Schedule.” A negative ground
system is used. Battery connections are shown on the wiring dia-
grams. Make sure the battery is correctly connected and terminals
are tight. Observe battery polarity when connecting the battery to
the generator set.
1.15 BATTERY CHARGER
NOTE:
These generators DO NOT contain an internal battery charger.
NOTE:
The manufacturer provides a battery trickle charger that is
active when the unit is set up for automatic operation. With
the battery installed and utility power source voltage available
to the transfer switch, the battery receives a trickle charge to
prevent self-discharge. The trickle charger is designed to help
extend the life of the battery by maintaining the battery. The
trickle charge feature cannot be used to recharge a discharged
battery.
For units shipped with a transfer switch/load center, the battery
charger is pre-installed in the transfer switch enclosure.
For units shipped without a transfer switch/load center, a separate
battery charger module is included with the generator.
(For battery charger installation, see the Generator Install Guidelines
and Battery Charger Instructions included with the unit.)
2.1 BEFORE INITIAL START-UP
NOTE:
These units have been run and tested at the factory prior to
being shipped and do not require any type of break-in.
NOTE:
This unit comes filled with oil from the factory. Check the oil
level and add the appropriate amount if necessary.
Before starting, complete the following:
1. Set the generator’s main circuit breaker to its OFF (or OPEN)
position.
2. Set the generator's AUTO/OFF/MANUAL switch to the OFF
position.
3. Turn OFF all breakers on the load center of the transfer box (T1
and T2).
4. Turn OFF all loads connected to the transfer switch terminals
T1 and T2.
5. Check the engine crankcase oil level and, if necessary, fill to
the dipstick FULL mark with the recommended oil. Do not fill
above the FULL mark.
6. Check the fuel supply. Gaseous fuel lines must have been
properly purged and leak tested in accordance with applicable
fuel-gas codes. All fuel shutoff valves in the fuel supply lines
must be open.
During initial start up only, the generator may exceed the normal
number of start attempts and experience an “over crank” fault (See
the "Overcrank" section). This is due to accumulated air in the fuel
system during installation. Reset the control board and restart up
to two more times, if necessary. If unit fails to start, contact the
local dealer for assistance.
Never operate the engine with the oil level
below the “Add” mark on the dipstick. Doing this
could damage the engine.
2.2 CHECK TRANSFER SWITCH
OPERATION
Refer to the "Manual Transfer Operation" section, of the owner’s
manual for procedures.
DANGER
Do not attempt manual transfer switch operation
until all power voltage supplies to the transfer
switch have been positively turned off. Failure to
turn off all power voltage supplies will result in
extremely hazardous and possibly fatal electri-
cal shock.
2.3 ELECTRICAL CHECKS
Complete electrical checks as follows:
1. Set the generator's main circuit breaker to its OFF (or OPEN)
position.
2. Set the generator's AUTO/OFF/MANUAL switch to the OFF
position.
3. Turn OFF all breakers on the load center of the transfer box (T1
and T2).
4. Turn on the utility power supply to the transfer switch using
the means provided (such as a utility main line circuit break-
er).
DANGER
The transfer switch is now electrically “hot.”
Contact with “hot” parts will result in extremely
hazardous and possibly fatal electrical shock.
Proceed with caution.
5. Use an accurate AC voltmeter to check utility power source
voltage across transfer switch terminals N1 and N2. Nominal
line-to-line voltage should be 240 volts AC.
Section 2 — Post Installation Start-up and Adjustments
Air-cooled Generators

15
6. Check utility power source voltage across terminals N1 and
the transfer switch neutral lug; then across terminal N2 and
neutral. Nominal line-to-neutral voltage should be 120 volts
AC.
7. When certain that utility supply voltage is compatible with
transfer switch and load circuit ratings, turn OFF the utility
power supply to the transfer switch.
8. On the generator panel, set the Auto/Off/ Manual switch to
MANUAL. The engine should crank and start.
9. Let the engine warm up for about five minutes to allow inter-
nal temperatures to stabilize. Then, set the generator’s main
circuit breaker to its ON (or closed) position.
DANGER
Proceed with caution! Generator power voltage
is now supplied to the transfer switch. Contact
with live transfer switch parts will result in dan-
gerous and possibly fatal electrical shock.
10. Connect an accurate AC voltmeter and a frequency meter
across transfer switch terminal lugs E1 and E2. 8kW voltage
should be 230-240 volts at a frequency of 61-63 Hertz. 12,
14, 16, 17 and 20kW voltage should be 247-249 at a fre-
quency of 59.5-60.5 Hertz. 10kW voltage should be 220-230
volts at a frequency of 59.5-60.5 Hertz.
11. Connect the AC voltmeter test leads across terminal lugs E1
and neutral; then across E2 and neutral. In both cases, volt-
age reading should be 121-126 volts AC (8kW), and 125-126
volts AC (10, 12, 14, 16, 17 and 20kW).
12. Set the generator’s main circuit breaker to its OFF (or OPEN)
position. Let the engine run at no-load for a few minutes to
stabilize internal engine generator temperatures.
13. Set the generator's AUTO/OFF/MANUAL switch to OFF. The
engine should shut down.
NOTE:
It is important not to proceed until certain that generator AC
voltage and frequency are correct and within the stated limits.
Generally, if both AC frequency and voltage are high or low,
the engine governor requires adjustment* (*GH410 only). If
frequency is correct, but voltage is high or low, the generator’s
voltage regulator requires adjustment.
2.4 GENERATOR TESTS UNDER LOAD
To test the generator set with electrical loads applied, proceed as
follows:
1. Set generator’s main circuit breaker to its OFF (or OPEN) posi-
tion.
2. Turn OFF all breakers on the load center of the transfer box (T1
and T2).
3. Set the generator's AUTO/OFF/MANUAL switch to OFF.
4. Turn OFF the utility power supply to the transfer switch,
using the means provided (such as a utility main line circuit
breaker).
Do not attempt manual transfer switch operation
until all power voltage supplies to the transfer
switch have been positively turned off. Failure to
turn off all power voltage supplies will result in
extremely hazardous and possibly fatal electri-
cal shock.
5. Manually set the transfer switch to the STANDBY position, i.e.,
load terminals connected to the generator's E1/E2 terminals.
The transfer switch operating lever should be down.
6. Set the generator's AUTO/OFF/MANUAL switch to MANUAL.
The engine should crank and start immediately.
7. Let the engine stabilize and warm up for a few minutes.
8. Set the generator’s main circuit breaker to its ON (or CLOSED)
position. Loads are now powered by the standby generator.
9. Turn ON the load center of the transfer switch (T1 and T2).
10. Connect an accurate AC voltmeter and a frequency meter
across terminal lugs E1 and E2.
8kW voltage should be greater than 230 volts and frequency •
should be greater than 58 Hz.
10, • 12, 14, 16, 17 and 20kW voltage should be greater than
240 volts and frequency should be 60 Hz.
11. Let the generator run at full rated load for 20-30 minutes.
Listen for unusual noises, vibration or other indications of
abnormal operation. Check for oil leaks, evidence of overheat-
ing, etc.
12. When testing under load is complete, turn OFF electrical
loads.
13. Set the generator's main circuit breaker to its OFF (or OPEN)
position.
14. Let the engine run at no-load for a few minutes.
15. Set the AUTO/OFF/MANUAL switch to OFF. The engine should
shut down.
2.5 CHECKING AUTOMATIC
OPERATION
To check the system for proper automatic operation, proceed as
follows:
1. Set generator’s main circuit breaker to its OFF (or OPEN) posi-
tion.
2. Check that the AUTO/OFF/MANUAL switch is set to OFF.
3. Turn OFF the utility power supply to the transfer switch, using
means provided (such as a utility main line circuit breaker).
4. Manually set the transfer switch to the UTILITY position, i.e.,
load terminals connected to the utility power source side.
5. Turn ON the utility power supply to the transfer switch,
using the means provided (such as a utility main line circuit
breaker).
6. Set the generator's main circuit breaker to its ON (or CLOSED)
position.
7. Set the AUTO/OFF/MANUAL switch to AUTO. The system is
now ready for automatic operation.
Section 2 — Post Installation Start-up and Adjustments
Air-cooled Generators

16
8. Turn OFF the utility power supply to the transfer switch.
With the AUTO/OFF/MANUAL switch at AUTO, the engine should
crank and start when the utility source power is turned OFF after
a 10 second delay. After starting, the transfer switch should
connect load circuits to the standby side after a five (5) second
delay. Let the system go through its entire automatic sequence of
operation.
With the generator running and loads powered by generator AC
output, turn ON the utility power supply to the transfer switch. The
following should occur:
After about 15 seconds, the switch should transfer loads back •
to the utility power source.
About one minute after re-transfer, the engine should shut •
down.
2.6 ENGINE GOVERNOR ADJUSTMENT
If both AC frequency and voltage are correspondingly high or low,
adjust the engine governor as follows:
2.6.1 8 KW UNITS
The engine must be OFF to perform steps 1 and
2.
1. Loosen the governor clamp bolt (Figure 2.1).
2. Hold the governor lever at its wide open throttle position
(clockwise), and rotate the governor shaft clockwise as far
as it will go. Then, tighten the governor lever clamp bolt to 70
inch-pounds (8 N-m).
3. Start the generator; let it stabilize and warm up at no-load.
4. Connect a frequency meter across the generators AC output
leads.
Figure 2.1 — Engine Governor Adjustment
Single Cylinder Engines
GOVERNOR
SHAFT
PRIMARY
ADJUST
SCREW
GOVERNOR
CLAMP
BOLT
SECONDARY
ADJUST SCREW
5. Turn the primary adjust screw to obtain a frequency reading
of 61.5 Hertz. Turn the secondary adjust screw to obtain a
frequency of 62.5 Hz.
2.6.2 12, 14, 16, 17 & 20KW UNITS
NOTE:
All V-twin units DO NOT require an engine governor adjustment
due to their design.
2.6.3 ADDITIONAL CORROSION
PROTECTION
Periodically spray all engine linkage parts and brackets with corro-
sion inhibiting spray such as WD-40 or a comparable product.
2.7 VOLTAGE REGULATOR
ADJUSTMENT
2.7.1 8 & 10KW UNITS
Due to the brushless design of these two alternators, no voltage
regulator is used and therefore no voltage adjustment is required.
2.7.2 12, 14, 16, 17 & 20KW UNITS
With the frequency between 59.5 -60.5 Hertz at no-load, slowly
turn the slotted potentiometer (Figure 2.2) until line voltage reads
247-249 volts.
Figure 2.2 – Voltage Adjustment Potentiometer
Turn to
adjust voltage.
NOTE:
The access panel on top of the control panel must be removed
to adjust the voltage regulator.
NOTE:
The voltage regulator is housed behind the generator's control
panel. The regulator maintains a voltage in direct proportion to
frequency at a 2-to-1 ratio. For example, at 60 Hertz, line-to-
neutral voltage will be 124 volts.
Section 2 — Post Installation Start-up and Adjustments
Air-cooled Generators

17
Section 3 — Operation
Air-cooled Generators
3.1 CONTROL PANEL INTERFACE
3.1.1 USING THE AUTO/OFF/MANUAL SWITCH
(FIGURES 3.1 & 3.2)
With the switch set to AUTO, the engine may
crank and start at any time without warning.
Such automatic starting occurs when utility
power source voltage droops below a preset
level or during the normal exercise cycle. To
prevent possible injury that might be caused
by such sudden starts, always set the switch to
OFF and remove the fuses before working on or
around the generator or transfer switch. Then,
place a “DO NOT OPERATE” tag on the genera-
tor panel and on the transfer switch.
1. “AUTO” Position – Selecting this switch activates fully auto-
matic system operation. It also allows the unit to automati-
cally start and exercise the engine every seven days with the
setting of the exercise timer (see the Setting the Exercise
Timer section).
2. “OFF” Position – This switch position shuts down the engine.
This position also prevents automatic operation.
3. “MANUAL” Position – Set the switch to MANUAL to crank
and start the engine. Transfer to standby power will not occur
unless there is a utility failure.
Figure 3.1 – 8kW Generator Control Panel
SET
EXERCISE
SYSTEM READY
LOW BATTERY
LOW OIL PRESSURE
HIGH OIL TEMPERATURE
OVERSPEED
RPM SENSOR LOSS
OVERCRANK
Figure 3.2 – 10/12/14/16/17 & 20kW Generator
Control Panel
ENTER
ECS
3.1.2 SETTING THE EXERCISE TIMER
This generator is equipped with an exercise timer. Once it is set,
the generator will start and exercise every seven days, on the day
of the week and at the time of day specified. During this exercise
period, the unit runs for approximately 12 minutes and then shuts
down. Transfer of loads to the generator output does not occur
during the exercise cycle unless utility power is lost.
8kW
A switch on the control panel (see Figure 3.1) permits selection of
the day and time for the system to exercise. At the chosen time,
perform the following sequence to select the desired day and time
of day the system will exercise. Remember seasonal time changes
affect the exercise settings.
1. Verify that the AUTO/OFF/MANUAL switch is set to AUTO.
2. Press and hold the “Set Exercise” switch for several seconds.
All the red LED’s will stop flashing immediately and the gen-
erator will start.
3. The generator will start and run for approximately 12 minutes
and then shut down. The exerciser is now set to run at this
time of day each week.
Example: If the “Set Exercise” pressed on Saturday afternoon at
2:00 p.m., the generator will start and exercise for approximately
12 minutes every Saturday at 2:00 p.m.
NOTE:
The exerciser will only work in the AUTO mode and will not work
unless this procedure is performed. The exerciser will need to
be reset every time the 12 volt battery is disconnected and then
reconnected, and when the fuse is removed and/or replaced.

18
10 to 20 KW - INSTALLATION ASSISTANT
Interconnect System Self Test Feature (follow the on-screen
prompts)
Upon power up, this controller will go through a system self test
which will check for the presence of utility voltage on the DC
circuits. This is done to prevent damage if the installer mistakenly
connects AC utility power sense wires into the DC terminal block.
If utility voltage is detected, the controller will display a warning
message and lock out the generator, preventing damage to the
controller. Power to the controller must be removed to clear this
warning.
Utility voltage must be turned on and present at the N1 and N2
terminals inside the generator control panel for this test to be
performed and pass.
NOTE:
DAMAGE CAUSED BY MISWIRING OF THE INTERCONNECT
WIRES IS NOT WARRANTABLE!
This test will be performed each time the controller is powered
up.
Upon first power up of the generator, the display interface will
begin an installation assistant. The assistant will prompt the user
to set the minimum settings to operate. These settings are sim-
ply: Current Date/Time and Exercise Day/Time. The maintenance
intervals will be initialized when the exercise time is entered (Figure
3.2).
The exercise settings can be changed at any time via the "EDIT"
menu (see Appendix, "Menu System").
If the 12 volt battery is disconnected or the fuse removed, the
Installation Assistant will operate upon power restoration. The
only difference is the display will only prompt the customer for the
current Time and Date.
IF THE INSTALLER TESTS THE GENERATOR PRIOR TO
INSTALLATION, PRESS THE “ENTER” KEY TO AVOID SETTING
UP THE EXERCISE TIME. THIS WILL ENSURE THAT WHEN
THE CUSTOMER POWERS UP THE UNIT, HE WILL STILL BE
PROMPTED TO ENTER AN EXERCISE TIME.
NOTE:
The exerciser will only work in the AUTO mode and will not work
unless this procedure is performed. The current date/time will
need to be reset every time the 12 volt battery is disconnected
and then reconnected, and/or when the fuse is removed.
3.1.3 DISPLAY INTERFACE
8 kW LED Display
Seven (7) LED’s are provided for user status indications. The LED
functions are:
1. System Ready (green)
2. Low Battery (red)
3. Low Oil Pressure (red)
4. High Oil Temperature (red)
5. Over Speed (red)
6. RPM Sensor Loss (red)
7. Over Crank (red)
See the Protection Systems section for details.
10 to 20KW DISPLAY INTERFACE MENUS
The LCD display is organized as detailed below:
The “Home” page, this page is the default page which will be •
displayed if no keys are pressed for 30 seconds. This page
normally shows the current Status message and the current
date and time. The highest priority active Alarm and/or Warning
will be automatically posted on this page as well as flashing
the backlight when such an event is detected. In the case of
multiple Alarms or Warnings, only the first message will be
displayed. To clear an Alarm or Warning, see the Protection
Systems section - Clear Alarm.
The display backlight is normally off. If the user presses any •
key, the backlight will come on automatically and remain on for
30 seconds after the last key was pressed.
The “Main Menu” page will allow the user to navigate to all other •
pages or sub-menus by using the Left/Right and Enter keys.
This page can be accessed at any time with several presses of
the dedicated Escape key. Each press of the Escape key takes
you back to the previous menu until the main menu is reached.
This page displays the following options: HISTORY; STATUS;
EDIT; AND DEBUG. (See the Appendix - "Menu System".)
3.2 AUTOMATIC TRANSFER OPERATION
To select automatic operation, do the following:
1. Make sure the transfer switch main contacts are set to their
UTILITY position, i.e., loads connected to the utility power
source (Figure 3.2).
2. Be sure that normal UTILITY power source voltage is avail-
able to transfer switch terminal lugs N1 and N2 (Refer to the
Electrical Data section).
3. Set the generator’s AUTO/OFF/MANUAL switch to AUTO.
4. Set the generator’s main circuit breaker to its ON (or CLOSED)
position.
With the preceding steps complete, the generator will start auto-
matically when utility source voltage drops below a preset level.
After the unit starts, loads are transferred to the standby power
source. Refer to the Sequence of Automatic Operation section.
Section 3 — Operation
Air-cooled Generators

19
3.3 SEQUENCE OF AUTOMATIC OPERATION
3.3.1 UTILITY FAILURE
Initial Conditions: Generator in Auto, ready to run, load being sup-
plied by utility source. When utility fails (below 65% of nominal),
a 10 second (optionally programmable on the 17 and 20kW only)
line interrupt delay time is started. If the utility is still gone when
the timer expires, the engine will crank and start. Once started, a
five (5) second engine warm-up timer will be initiated. When the
warm-up timer expires, the control will transfer the load to the
generator. If the utility power is restored (above 75% of nominal)
at any time from the initiation of the engine start until the generator
is ready to accept load (5 second warm-up time has not elapsed),
the controller will complete the start cycle and run the generator
through its normal cool down cycle; however, the load will remain
on the utility source.
3.3.2 CRANKING
The system will control the cyclic cranking as follows: 16 second
crank, seven (7) second rest, 16 second crank, seven (7) second
rest followed by three (3) additional cycles of seven (7) second
cranks followed by seven (7) second rests.
Choke Operation
1. The 990/999cc engines have an electric choke in the air
box that is automatically controlled by the electronic control
board.
2. The 530cc engines have an electric choke on the divider panel
air inlet hose that is automatically controlled by the electronic
control board.
3. The 410cc engines have a choke behind the air box that is
automatically controlled by the electronic control board.
Failure to Start
This is defined as any of the following occurrences during crank-
ing.
1. Not reaching starter dropout within the specified crank cycle.
Starter dropout is defined as four (4) cycles at 1,000 RPM.
2. Reaching starter dropout, but then not reaching 2200 RPM
within 15 seconds. In this case the control board will go into
a rest cycle for seven (7) seconds, then continue the rest of
the crank cycle.
During a rest cycle the start and fuel outputs are de-energized and
the magneto output is shorted to ground.
Cranking Conditions
The following notes apply during cranking cycle.
1. Starter motor will not engage within five (5) seconds of the
engine shutting down.
2. The fuel output will not be energized with the starter.
3. The starter and magneto outputs will be energized together.
4. Once the starter is energized the control board will begin look-
ing for engine rotation. If it does not see an RPM signal within
three (3) seconds it will shut down and latch out on RPM
sensor loss.
5. Once the control board sees an RPM signal it will energize the
fuel solenoid, drive the throttle open and continue the crank
sequence.
6. Starter motor will disengage when speed reaches starter
dropout.
7. If the generator does not reach 2200 RPM within 15 seconds,
re-crank cycle will occur.
8. If engine stops turning between starter dropout and 2200
RPM, the board will go into a rest cycle for seven (7) seconds
then re-crank (if additional crank cycles exist).
9. Once started, the generator will wait for a hold-off period
before starting to monitor oil pressure and oil temperature
(refer to the Alarm Messages section for hold-off times).
10. During Manual start cranking, if the Mode switch is moved
from the Manual position, the cranking stops immediately.
11. During Auto mode cranking, if the Utility returns, the cranking
cycle does NOT abort but continues until complete. Once the
engine starts, it will run for one (1) minute, then shut down.
3.3.3 LOAD TRANSFER
The transfer of load when the generator is running is dependent
upon the operating mode as follows:
1. Manual
Will not transfer to generator if utility is present.•
Will transfer to generator if utility fails (below 65% of nominal •
for 10 consecutive seconds.
Will transfer back when utility returns for 15 consecutive •
seconds. The engine will continue to run until removed from
the Manual mode.
2. Auto
Will start and run if Utility fails for 10 consecutive seconds.•
Will start a five (5) second engine warm-up timer.•
Will not transfer if utility subsequently returns.•
Will transfer to generator if utility is still not present.•
Will transfer back to utility once utility returns (above 75% of •
nominal) for 15 seconds.
Will transfer back to utility if the generator is shut down for •
any reason (such as the switch is in the OFF position or a
shutdown alarm.
After transfer, will shut down engine after one (1) minute •
cool-down time.
3. Exercise
Will not exercise if generator is already running in either Auto •
or Manual mode.
During exercise, the controller will only transfer if utility fails •
during exercise for 10 seconds, and will switch to Auto
mode.
Section 3 — Operation
Air-cooled Generators

20
3.3.4 UTILITY RESTORED
Initial Condition: Generator supplying power to customer load.
When the utility returns (above 75% of nominal), a 15 second
return to utility timer will start. At the completion of this timer, if
the utility supply is still present and acceptable, the control will
transfer the load back to the utility and run the engine through a
one (1) minute cool down period and then shut down. If utility fails
for three (3) seconds during this cool down period, the control
will transfer load back to the generator and continue to run while
monitoring for utility to return.
3.4 MANUAL TRANSFER OPERATION
3.4.1 TRANSFER TO GENERATOR
POWER SOURCE
To start the generator and activate the transfer switch manually,
proceed as follows:
1. Set the generator’s AUTO/OFF/MANUAL switch to OFF.
2. Set the generator’s main circuit breaker to its OFF (or OPEN)
position.
3. Turn OFF the utility power supply to the transfer switch
using the means provided (such as a utility main line circuit
breaker).
DANGER
Do not attempt to activate the transfer switch
manually until all power voltage supplies to the
switch have been positively turned off. Failure to
turn off all power voltage supplies may result in
extremely hazardous and possibly fatal electri-
cal shock.
4. Use the manual transfer handle inside the transfer switch to
move the main contacts to their STANDBY position, i.e., loads
connected to the standby power source (Figure 3.3).
Figure 3.3 – Manual Transfer Switch Operation
5. To crank and start the engine, set the AUTO/OFF/MANUAL
switch to MANUAL.
6. Let the engine stabilize and warm up for a few minutes.
7. Set the generator’s main circuit breaker to its ON (or CLOSED)
position. The standby power source now powers the loads.
3.4.2 TRANSFER BACK TO UTILITY POWER
SOURCE
When utility power has been restored, transfer back to that source
and shut down the generator. This can be accomplished as fol-
lows:
1. Set the generator’s main circuit breaker to its OFF (or OPEN)
position.
2. Let the engine run for a minute or two at no-load to stabilize
the internal temperatures.
3. Set the generator’s AUTO/OFF/MANUAL switch to its OFF (or
OPEN) position. The engine should shut down.
4. Check that utility power supply to the transfer switch is turned
OFF.
DANGER
Do not attempt to activate the transfer switch
manually until all power voltage supplies to the
switch have been positively turned off. Failure to
turn off all power voltage supplies may result in
extremely hazardous and possibly fatal electri-
cal shock.
5. Use the manual transfer handle inside the transfer switch to
move the main contacts back to their UTILITY position, i.e.,
loads connected to the utility power source (Figure 3.2).
6. Turn ON the utility power supply to the transfer switch using
the means provided.
7. Set the system to automatic operation as outlined in Automatic
Transfer Operation section.
3.5 SIDE COMPARTMENT (V-TWIN ONLY)
(FIGURES 3.4 & 3.5)
Local codes may require this compartment to be locked. A hasp is
provided so the owner can secure the compartment with their own
padlock. Check local codes in the area.
3.5.1 MAIN CIRCUIT BREAKER
This is a 2-pole breaker rated according to the Specifications sec-
tion.
3.5.2 EXTERIOR READY LIGHTS
Green LED ‘Ready’ light (10, 12, 14, 16, 17 & 20 KW) is on •
when utility is present and switch is in AUTO indicating the
generator is ready and when the generator is running.
Red LED ‘Alarm’ light (10, 12, 14, 16, 17 & 20 KW) is on when •
the generator is OFF or a fault is detected. (See the Protections
Systems section.)
Yellow LED ‘Maintenance’ light (17 & 20 KW) (See the •
Protections Systems section.)
Section 3 — Operation
Air-cooled Generators

21
3.5.3 120 VAC GFCI OUTLET & 15 AMP BREAKER
(17 & 20 KW ONLY)
These models are equipped with an external, 15 amp, 120 volt,
GFCI convenience outlet that is located in a compartment on the
right side of generator (Figure 1.3).
When the generator is running, in the absence of utility power, this
outlet may also be used to power items outside your home such
as lights or power tools. This outlet may also be used when utility
power is present by running the generator in manual mode. This
outlet does not provide power if the generator is not running. This
outlet is protected by a 15 amp circuit breaker in the same com-
partment as the outlet. (Do not use when the generator is running
in exercise mode.)
Figure 3.4 – Side Compartment
Figure 3.5 – Open Side Compartment
120V GFCI Outlet 15 Amp Outlet Breaker
Main Circuit BreakerLED Indicator Lights
3.6 PROTECTION SYSTEMS
3.6.1 ALARMS
Highest Priority (Latching) Displayed on the control panel and
the external red LED (V-twins only). They must be cleared before
the alarm message goes away. The alarm log records each occur-
rence (see Appendix - "Menu System").
Low Oil Pressure (Shutdown Alarm)
A five (5) second delay on start-up and seven (7) second delay
once the engine is running.
This switch (Figure 3.6) has normally closed contacts that are
held open by engine oil pressure during operation. Should the oil
pressure drop below the five (5) PSI range, switch contacts close
and the engine shuts down. The unit should not be restarted until
oil level is verified.
High Engine Temperature (Shutdown Alarm – Auto
Reset)
A 10 second delay on start-up and one (1) second delay before
shutdown. Auto reset when the condition clears and restart the
engine if a valid start signal is still present.
This switch’s contacts (Figure 3.6) close if the temperature should
exceed approximately 144° C (293° F), initiating an engine shut-
down. Once the oil temperature drops to a safe level the switch’s
contacts open again.
Over Crank (Shutdown Alarm)
This occurs if the engine has not started within the specified crank
cycle. (See "Cranking" section.)
Figure 3.6 – Low Oil Pressure and
High Temperature Switches
Oil Filter
Oil
Drain
Hose
Low Oil Switch
High Temp Switch
L
o
o
s
e
n
NOTE:
The oil drain hose may be routed in the opposite direction as
shown in figure.
Section 3 — Operation
Air-cooled Generators

22
Over Speed (Shutdown Alarm)
4320 RPM for three (3) seconds or 4500 RPM immediately. This
feature protects the generator from damage by shutting it down
if it happens to run faster than the preset limit. This protection
also prevents the generator from supplying an output that could
potentially damage appliances connected to the generator circuit.
Contact the nearest Dealer if this failure occurs.
RPM Sense Loss (Shutdown Alarm)
During cranking, if the Control Board does not see a valid RPM
signal within three (3) seconds, it will shut down and lock out on
RPM sense loss. While engine is running, if RPM signal is lost for
one (1) second the Control Board will shut the engine down, wait
15 seconds, then re-crank the engine. If no RPM signal is detected
within the first three (3) seconds of cranking, the Control Board
will shut the engine down and latch out on RPM sensor loss. If the
RPM signal is detected, the engine will start and run normally. If
the RPM signal is subsequently lost again, the Control Board will
try one more re-crank attempt before latching out and displaying
the RPM sensor failure message.
Under-frequency (Shutdown Alarm)
After starting, if the generator stays under frequency for more than
30 seconds it will shut down. The under-frequency setting is 50
Hz.
Internal Fault (Shutdown Alarm)
This alarm cannot be cleared, call service dealer.
CLEAR ALARM
8kW — Clear the alarm by setting the AUTO/OFF/MANUAL •
switch to the OFF position and back to AUTO.
10 - 20kW — Clear the alarm by setting the AUTO/OFF/MANUAL •
switch to the OFF position. Press the ENTER key to unlatch any
active fault and clear the corresponding alarm message.
3.6.2 WARNINGS
Second Priority (Non-latching) Displayed on the control panel
and the external yellow LED (V-twins only). Warnings automati-
cally clear when the monitored condition goes away. Warnings are
recorded in the alarm log. Warnings cannot cause shutdowns.
Low Battery
The Control Board monitors battery voltage and displays a warn-
ing if the battery voltage falls below 11.0 volts for one (1) minute.
Warning is automatically cleared if the battery voltage rises above
11.0 volts. Battery voltage is not monitored during the crank
cycle.
Exercise Set Error
If the exercise period becomes corrupted, a warning message
will be displayed. This message will only clear when the exercise
period is reset.
3.6.3 MAINTENANCE ALERTS (10 - 20KW ONLY)
Third priority
Maintenance Message
When a maintenance period expires, a warning message will be
displayed. (16 through 20kW models include an external yellow
LED which will illuminate.) The alert can be reset by pressing the
Enter key, which will cause the user to be prompted to confirm
the action. Resetting will clear the alert and reset the maintenance
counters for all conditions annunciated. The history log will record
the alert. The maintenance counter will not accumulate without
battery power. Once battery power is restored, the set time prompt
will be displayed. The maintenance counters will be adjusted to the
new time and date.
NOTE:
Since most maintenance alerts will occur at the same time
(most have two (2) year intervals), only one will appear on the
display at any one time. Once the first alert is cleared, the next
active alert will be displayed.
4.1 FUSE
The 7.5 amp fuse on the control panel protects the DC control
circuit against overload (Figures 3.1 and 3.2). This fuse is wired
in series with the battery output lead to the panel. If this fuse ele-
ment has melted open, the engine will not be able to crank or start.
Replace this fuse using only an identical 7.5 amp replacement
fuse. Whenever the fuse is removed or replaced, the exercise timer
needs to be reset.
4.2 CHECKING THE ENGINE
OIL LEVEL
For oil capacities, see the Specifications section. For engine oil
recommendations, see the Engine Oil Recommendations section.
When power outages necessitate running the generator for extend-
ed periods of time, the oil level should be checked daily.
To check the engine oil level, proceed as follows (Figures 4.1, 4.2
and 4.3):
1. If the generator is running during a utility outage, first turn OFF
all associated loads running in the residence. Second, turn the
generator's main circuit breaker to the OFF position.
2. Move the AUTO/OFF/MANUAL switch to the OFF position.
3. Remove the dipstick and wipe it dry with a clean cloth.
4. Completely insert the dipstick; then, remove it again. The oil
level should be at the dipstick “Full” mark. If necessary, add
oil to the “Full” mark only. DO NOT FILL ABOVE THE “FULL”
MARK.
Never operate the engine with the oil level
below the “Add” mark on the dipstick. Doing this
could damage the engine.
Section 4 — Maintenance
Air-cooled Generators

Figure 4.1 — Oil Dipstick and Fill, 8kW
Oil Dipstick and Fill
Figure 4.2 — Oil Dipstick, 10kW
5. Install the dipstick.
6. Reset the AUTO/OFF/MANUAL switch to its original position.
7. If the generator was running during a utility outage, first turn
the generator's main circuit breaker back to the ON position.
Second, turn ON needed loads in the residence.
Figure 4.3 — Oil Dipstick and Fill,
12, 14, 16, 17 & 20kW
Oil Dipstick
Oil Fill
4.3 CHANGING THE ENGINE OIL
Hot oil may cause burns. Allow engine to cool
before draining oil. Avoid prolonged or repeated
skin exposure with used oil. Thoroughly wash
exposed areas with soap.
4.3.1 OIL CHANGE INTERVALS
See the "Service Schedule" section.
4.3.2 ENGINE OIL RECOMMENDATIONS
All oil should meet minimum American Petroleum Institute (API)
Service Class SJ, SL or better. Use no special additives. Select
the oil's viscosity grade according to the expected operating tem-
perature.
SAE 30 • Î Above 32° F
10W-30 • Î Between 40° F and -10° F
Synthetic 5W-30 • Î 10° F and below
SAE 30
SAE 30
Synthetic 5W-30
Sy nthe tic 5W- 30
10W-30
10W -30
Any attempt to crank or start the engine before
it has been properly serviced with the recom-
mended oil may result in an engine failure.
4.3.3 OIL & OIL FILTER CHANGE PROCEDURE
To change the oil, proceed as follows:
1. Start the engine by moving the AUTO/OFF/MANUAL switch to
MANUAL and run until it is thoroughly warmed up. Then shut
OFF the engine by moving the switch to the OFF position.
2. Immediately after the engine shuts OFF, pull the oil drain hose
(Figure 4.4) free of its retaining clip. Remove the cap from the
hose and drain the oil into a suitable container.
3. After the oil has drained, replace the cap onto the end of the
oil drain hose. Retain the hose in the clip.
Change the engine oil filter as follows:
1. With the oil drained, remove the old oil filter by turning it
counterclockwise.
2. Apply a light coating of clean engine oil to the gasket of the
new filter. See the Specifications section for recommended
filter.
23
Section 4 — Maintenance
Air-cooled Generators

24
3. Screw the new filter on by hand until its gasket lightly contacts
the oil filter adapter. Then, tighten the filter an additional 3/4 to
one turn (Figure 4.4).
4. Refill with the proper recommended oil (see the Engine Oil
Recommendations section). See the Specifications section
for oil capacities.
Figure 4.4 – Oil Drain Hose and Filter
Oil Filter
Oil
Drain
Hose
Low Oil Switch
High Temp Switch
L
o
o
s
e
n
5. Start the engine, run for one (1) minute, and check for leaks.
6. Shutdown and recheck oil level, add as needed. DO NOT
OVER FILL.
7. Reset the AUTO/OFF/MANUAL switch to the AUTO position.
8. Dispose of used oil at a proper collection center.
NOTE:
The oil drain hose may be routed in the opposite direction as
shown in figure.
4.4 CHANGING THE ENGINE
AIR CLEANER
4.4.1 12, 14, 16, 17 & 20KW GENERATORS
See "The Generator" section for the location of the air cleaner. Use
the following procedures (Figure 4.5):
1. Lift the roof and remove the door.
2. Turn the two screws counterclockwise to loosen.
3. Remove the cover and air filter.
4. Wipe away dust or debris from inside of the air box and
around edges.
5. Install the new air cleaner into the air box.
6. Install the cover. Turn the two cover screws clockwise to
tighten.
See the Service Schedule section for air cleaner maintenance. See
the Specifications section for air filter replacement part number.
Figure 4.5 — 12, 14, 16, 17 & 20kW
Engine Air Cleaner
Cover
Filter
Screw
4.4.2 10KW GENERATORS
See "The Generator" section for the location of the air cleaner. Use
the following procedure (Figure 4.6):
1. Lift the roof and remove the door.
2. Turn the worm gear clamp screw counterclockwise to loos-
en.
3. Pull the old filter off the divider panel hub.
4. Wipe away dust or debris from the panel hub.
5. Install the new air cleaner onto the hub.
6. Turn the worm gear clamp screw clockwise to tighten.
7. Replace door and roof.
Figure 4.6 — 10kW Engine Air Cleaner
Air Filter
Section 4 — Maintenance
Air-cooled Generators

25
4.4.3 8KW GENERATOR
See "The Generator" section to locate the air box. Use the following
procedures to replace the dirty air filter within the air box (Figure
4.7).
1. Lift the roof and remove the door.
2. Push back on the latch of the yellow air filter access door to
swing open.
3. Pull out the old air filter and discard appropriately.
4. Install the new filter, open end first into the air box.
5. Swing the yellow door shut and snap to close.
6. Replace door and close roof securely.
Figure 4.7 — 8kW Engine Air Cleaner Location
Air Cleaner
Cover
4.5 SPARK PLUG(S)
Reset the spark plug(s) gap or replace the spark plug(s) as neces-
sary. See the Service Schedule section for maintenance require-
ments.
1. Clean the area around the base of the spark plug(s) to keep
dirt and debris out of the engine.
2. Remove the spark plug(s) and check the condition. Replace
the spark plug(s) if worn or if reuse is questionable. See the
Service Schedule section for recommended inspection. Clean
by scraping or washing using a wire brush and commercial
solvent. Do not blast the spark plug(s) to clean.
3. Check the spark plug gap using a wire feeler gauge. Adjust
the gap to 0.76 mm (0.030 inch) for 8, 10 and 20kW; and
1.02 mm (0.040 inch) for 12, 14, 16 and 17kW by carefully
bending the ground electrode (Figure 4.8).
Figure 4.8 – Setting the Spark Plug Gap
4.6 BATTERY MAINTENANCE
The battery should be inspected per the "Service Schedule" sec-
tion. The following procedure should be followed for inspection:
1. Inspect the battery posts and cables for tightness and corro-
sion. Tighten and clean as necessary.
2. Check the battery fluid level of unsealed batteries and, if nec-
essary, fill with Distilled Water Only. Do not use tap water in
batteries.
3. Have the state of charge and condition checked. This should
be done with an automotive-type battery hydrometer.
DANGER
Do not dispose of the battery in a fire. The
battery is capable of exploding.
A battery presents a risk of electrical shock
and high short circuit current. The following pre-
cautions are to be observed when working on
batteries:
• Remove the 7.5A fuse from the generator control
panel.
• Remove watches, rings or other metal objects;
• Use tools with insulated handles;
• Wear rubber gloves and boots;
• Do not lay tools or metal parts on top of the
battery; and
• Disconnect charging source prior to connecting or
disconnecting battery terminals.
Do not open or mutilate the battery. Released
electrolyte has been known to be harmful to the
skin and eyes, and to be toxic.
The electrolyte is a dilute sulfuric acid that is
harmful to the skin and eyes. It is electrically
conductive and corrosive. The following
procedures are to be observed:
• Wear full eye protection and protective clothing;
• Where electrolyte contacts the skin, wash it off
immediately with water;
Section 4 — Maintenance
Air-cooled Generators
SET PLUG GAP AT 0.76 mm (.030 inch) - 8, 10 &
20kW; 1.02 mm (.040 inch) - 12, 14, 16 & 17kW

26
• Where electrolyte contacts the eyes, flush thor-
oughly and immediately with water and seek medi-
cal attention; and
• Spilled electrolyte is to be washed down with an
acid neutralizing agent. A common practice is to
use a solution of 1 pound (500 grams) bicarbonate
of soda to 1 gallon (4 liters) of water. The bicar-
bonate of soda solution is to be added until the
evidence of reaction (foaming) has ceased. The
resulting liquid is to be flushed with water and the
area dried.
Lead-acid batteries present a risk of fire
because they generate hydrogen gas. The
following procedures are to be followed:
• DO NOT SMOKE when near the battery;
• DO NOT cause flame or spark in battery area; and
• Discharge static electricity from body before
touching the battery by first touching a grounded
metal surface.
Be sure the AUTO/OFF/MANUAL switch is set to
the OFF position before connecting the battery
cables. If the switch is set to AUTO or MANUAL,
the generator can crank and start as soon as
the battery cables are connected.
Be sure the utility power supply is turned off
and the 7.5A fuse is removed from the generator
control panel, or sparking may occur at the bat-
tery posts as the cables are attached and cause
an explosion.
4.7 ADJUSTING GH-410/GT-530/
990/999 VALVE CLEARANCE
After the first six (6) months of operation, check the valve clear-
ance in the engine, adjust if necessary.
Important: If feeling uncomfortable about doing this procedure
or the proper tools are not available, please contact the Dealer for
service assistance. This is a very important step to ensure longest
life for the engine.
To check valve clearance:
The engine should be cool before checking. If valve clearance is •
0.002" - 0.004" (0.05 - 0.1mm), adjustment is not needed.
Remove spark plug wires and position wires away from plugs.•
Remove spark plugs.•
Make sure the piston is at Top Dead Center (TDC) of its com-•
pression stroke (both valves closed). To get the piston at TDC,
remove the intake screen at the front of the engine to gain
access to the flywheel nut. Use a large socket and socket
wrench to rotate the nut and hence the engine in a clockwise
direction. While watching the piston through the spark plug
hole. The piston should move up and down. The piston is at
TDC when it is at its highest point of travel.
To adjust valve clearance (if necessary), (Figure 4.9):
Make sure the engine is at 60° to 80° F.•
Make sure that the spark plug wire is removed from the spark •
plug and out of the way.
Remove the four screws attaching the valve cover.•
Loosen the rocker jam nut. Use an 10mm allen wrench to turn •
the pivot ball stud while checking clearance between the rocker
arm and the valve stem with a feeler gauge. Correct clearance
is 0.002-0.004 inch (0.05-0.1 mm).
NOTE:
Hold the rocker arm jam nut in place as the pivot ball stud is
turned.
When valve clearance is correct, hold the pivot ball stud in place
with the allen wrench and tighten the rocker arm jam nut. Tighten
the jam nut to 174 in/lbs. torque. After tightening the jam nut,
recheck valve clearance to make sure it did not change.
Install new valve cover gasket.•
Re-attach the valve cover.•
Figure 4.9 - Valve Clearance Adjustment
Jam Nut
Pivot Ball
Stud
Rocker
Arm
Valve
Stem
NOTE:
Start all four screws before tightening or it will not be possible
to get all the screws in place. Make sure the valve cover gasket
is in place.
Install spark plugs.•
Re-attach the spark plug wire to the spark plug.•
On the GT-530 and GT-990/999, repeat the process for the •
other cylinder.
Section 4 — Maintenance
Air-cooled Generators

27
4.8 COOLING SYSTEM
Air inlet and outlet openings in the generator compartment must
be open and unobstructed for continued proper operation. This
includes such obstructions as high grass, weeds, brush, leaves
and snow.
Without sufficient cooling and ventilating air flow, the engine/gen-
erator quickly overheats, which causes it to quickly shut down.
(See Figure 4.10 for vent locations.)
Make sure the doors and roof are in place during operation as
running the generator with them removed can effect cooling air
movement.
The exhaust from this product gets extremely
hot and remains hot after shutdown. High grass,
weeds, brush, leaves, etc. must remain clear of
the exhaust. Such materials may ignite and burn
from the heat of the exhaust system.
Figure 4.10 – Cooling Vent Locations
The maximum ambient temperature for the gen-
erator is 25° C (77° F).
4.9 ATTENTION AFTER SUBMERSION
If the generator has been submerged in water, it MUST NOT be
started and operated. Following any submersion in water, have
a Dealer thoroughly clean, dry and inspect the generator. If the
structure (ex. home) has been flooded, it should be inspected by
a certified electrician to ensure there won't be any electrical prob-
lems during generator operation or when utility is returned.
4.10 CORROSION PROTECTION
Periodically wash and wax the enclosure using automotive type
products. Frequent washing is recommended in salt water/coastal
areas. Spray engine linkages with a light oil such as WD-40.
4.11 OUT OF SERVICE PROCEDURE
4.11.1 REMOVAL FROM SERVICE
If the generator cannot be exercised every seven days, and will
be out of service longer than 90 days, prepare the generator for
storage as follows:
1. Start the engine and let it warm up.
2. Close the fuel shutoff valve in the fuel supply line and allow
the unit to shut down.
3. Once the unit has shut down, switch to the OFF position.
4. Set the generator’s main circuit breaker to its OFF (or OPEN)
position.
5. Set the AUTO/OFF/MANUAL switch to OFF and turn off the util-
ity power to the transfer switch. Remove the 7.5A fuse from
the generator control panel. Disconnect the battery cables as
outlined in “General Hazards”.
6. While the engine is still warm from running, drain the oil
completely. Refill the crankcase with oil. See ”Engine Oil
Recommendations".
7. Attach a tag to the engine indicating the viscosity and clas-
sification of the oil in the crankcase.
8. Remove the spark plug(s) and spray fogging agent into the
spark plug(s) threaded openings. Reinstall and tighten the
spark plug(s).
9. Remove the battery and store it in a cool, dry room on a
wooden board. Never store the battery on any concrete or
earthen floor.
10. Clean and wipe the entire generator.
4.11.2 RETURN TO SERVICE
To return the unit to service after storage, proceed as follows:
1. Verify that utility power is turned off and that the AUTO/OFF/
MANUAL switch is set to OFF.
2. Check the tag on the engine for oil viscosity and classification.
Verify that the correct recommended oil is used in the engine
(see the Engine Oil Recommendations section). If necessary,
drain and refill with the proper oil.
3. Check the state of the battery. Fill all cells of unsealed bat-
teries to the proper level with distilled water. DO NOT USE
TAP WATER IN THE BATTERY. Recharge the battery to 100
percent state of charge, or, if defective, replace the battery.
See “Specifications,” for type and size.
4. Clean and wipe the entire generator.
5. Make sure the 7.5A fuse is removed from the generator con-
trol panel. Reconnect the battery. Observe battery polarity.
Damage may occur if the battery is connected incorrectly.
6. Open the fuel shutoff valve.
7. Insert the 7.5A fuse into the generator control panel. Start the
unit by moving the AUTO/OFF/MANUAL switch to MANUAL.
Allow the unit to warm up thoroughly.
8. Stop the unit by setting the AUTO/OFF/MANUAL switch to
OFF.
Section 4 — Maintenance
Air-cooled Generators

28
9. Turn on the utility power to the transfer switch.
10. Set the AUTO/OFF/MANUAL switch to AUTO.
11. The generator is now ready for service.
NOTE:
If the battery was dead or disconnected, the exercise timer
(single cylinder), current date and time (v-twin) must be reset.
4.11.3 ACCESSORIES
There are performance enhancing accessories available for the
air-cooled generators.
Cold Weather Kits• are recommended in areas where tempera-
tures regularly fall below 10° F (-12° C).
Scheduled Maintenance Kits• include all pieces necessary to
perform maintenance on the generator along with oil recom-
mendations.
Auxiliary Transfer Switch Lockout• enables any of the transfer
switches to completely lock out one large electrical load by
tying into its control system.
A Fascia Skirt Wrap• is standard on all 20kW units. It's avail-
able for all other current production air-cooled units. It snaps
together to provide a smoothing, contoured look as well as
rodent/insect protection.
The PowerMaster• load prioritization device allows home own-
ers to potentially operator two (2) large electrical loads by giv-
ing one (1) priority over the other.
The Remote Monitor System• is a wireless, indoor mounted,
box that indicates generator run status and allows for exercise
programing as well as provide maintenance reminders.
Touch-up Paint Kits• are very important to maintain the look and
integrity of the generator enclosure. These kits include touch-up
paint and instructions if the need should arise.
For more details on accessories, please contact a Dealer.
Section 4 — Maintenance
Air-cooled Generators

29
Section 4 — Maintenance
Air-cooled Generators
4.12 SERVICE SCHEDULE
ATTENTION: It is recommended that all service work
be performed by the nearest Dealer.
SYSTEM/COMPONENT PROCEDURE FREQUENCY
X = Action
R = Replace as Necessary
* = Notify Dealer if Repair is
Needed.
Inspect Change Clean
W = Weekly
M = Monthly
Y = Yearly
FUEL
Fuel lines and connections*
XM
LUBRICATION
Oil level
X M or 24 hours of
continuous operation.
Oil
X 2Y or 200 hours
of operation.**
Oil filter
X 2Y or 200 hours
of operation.**
COOLING
Enclosure louvers
XXW
BATTERY
Remove corrosion, ensure
dryness
XXM
Clean and tighten battery
terminals
XXM
Check charge state
X R EVERY 6 M
Electrolyte level
X R EVERY 6 M
ENGINE AND MOUNTING
Air cleaner
X R 2Y or 200 hours
Spark plug(s)
X R 2Y or 200 hours
GENERAL CONDITION
Vibration, Noise, Leakage, Temperature*
XM
COMPLETE TUNE-UP* TO BE COMPLETED BY A DEALER 2Y or 200 hours
* Contact the nearest dealer for assistance if necessary.
** Change oil and filter after first eight (8) hours of operation and then every 200 hours thereafter, or 2 years, whichever occurs first. Change
sooner when operating under a heavy load or in a dusty or dirty environment or in high ambient temperatures.

30
Section 5 — Troubleshooting
Air-cooled Generators
5.1 TROUBLESHOOTING GUIDE
Problem Cause Correction
The engine will not crank. 1. Fuse blown. 1. Correct short circuit condition, replace
7.5A fuse in generator
control panel.
2. Loose, corroded or defective 2. Tighten, clean or replace
battery cables. as necessary.
3. Defective starter contactor. (8 kW) 3. *
4. Defective starter motor. 4. *
5. Dead Battery. 5. Charge or replace battery.
The engine cranks but 1. Out of fuel. 1. Replenish fuel/Turn on fuel valve.
will not start. 2. Defective fuel solenoid (FS). 2. *
3. Open #14 wire from 3. *
engine control board.
4. Fouled spark plug(s). 4. Clean, re-gap or replace plug(s).
5. Valve lash out of adjustment. 5. Reset valve lash.
6. Choke not operating. 6. Verify choke plate moves freely.
The engine starts hard 1. Air cleaner plugged 1. Check, replace air cleaner.
and runs rough. or damaged.
2. Fouled spark plug(s). 2. Clean, re-gap or replace plug(s).
3. Fuel pressure incorrect. 3. Confirm fuel pressure to regulator
is 10-12” water column (0.36-0.43 psi) for
LP, and 5-7” water column (0.18-0.25 psi)
for natural gas.
4. Fuel selector in wrong position. 4. Move selector to correct position.
5. Choke remains closed. 5. Verify choke plate moves freely.
The AUTO/OFF/MANUAL 1. Defective switch. 1. *
switch is set to OFF, but 2. AUTO/OFF/MANUAL switch 2. *
the engine continues wired incorrectly.
to run. 3. Defective control board. 3. *
There is no AC output 1. Main line circuit breaker is in 1. Reset circuit breaker
from the generator. the OFF (or OPEN) position. to ON (or CLOSED).
2. Generator internal failure. 2. *
There is no transfer to 1. Defective transfer switch coil. 1. *
standby after utility 2. Defective transfer relay. 2. *
source failure. 3. Transfer relay circuit open. 3. *
4. Defective control logic board. 4. *
Unit consumes large 1. Engine over filled with oil. 1. Adjust oil to proper level.
amounts of oil. 2. Improper type or viscosity of oil. 2. See "Engine Oil Recommendations".
3. Damaged gasket, seal or hose. 3. Check for oil leaks.
4. Engine breather defective. 4. *
*Contact the nearest Dealer for assistance.

31
Section 6 — Appendix
Air-cooled Generators
6.1 MENU SYSTEM NAVIGATION
To get to the MENU, use the "Esc" key from any page. It may need
to be pressed many times before getting to the menu page. The
currently selected menu is displayed as a flashing word. Navigate
to the menu required by using the +/- keys. When the menu
required is flashing, press the ENTER key. Depending on the menu
selected, there may be a list of choices presented. Use the same
navigation method to select the the desired screen (refer to the
Menu System diagram).
6.1.1 CHANGING SETTINGS (EDIT MENU)
To change a setting such as display contrast, go to the EDIT menu
and use the +/- keys to navigate to the setting to change. Once
this setting is displayed (e.g. Contrast), press the ENTER key to go
into the edit mode. Use the +/- keys to change the setting, press
the ENTER key to store the new setting.
NOTE:
If the ENTER key is not pressed to save the new setting, it will
only be saved temporarily. The next time the battery is discon-
nected, the setting will revert back to the old setting.

32
Section 6 — Appendix
Air-cooled Generators
MAIN MENU
RUN LOGALARM LOG
HISTORY STATUS
COMMAND
STATE
VERSIONSDISPLAY
GENERATOR
FREQUENCY
ENGINE
HOURS
ENGINE
RPM
BATTERY
VOLTAGE
DEBUG
INPUTS OUTPUTS DISPLAYS
STARTUP
DELAY
EDIT
CONTRAST
LANGUAGE
FREQUENCY
TIME/DATE
EXERCISE
TIME
RESET
MAINTENANCE
ESC
Press the “ESCAPE” key
to jump back up through
the menu levels.
+ / -
Use the “+/-” key
to navigate through
the menu.
ENTER
Use the “ENTER” key
to select items or
enter data.
ESC
ESC
ESC
ESC
ESC ESC
17 &
20kW
only
English
or Other
60 Hz
The possible Status messages of the display
are as follows:
• Switched Off/Time & Date
• Ready to Run/Time & Date
• Utility Loss Delay/Pausing for X Seconds
• Cranking/Attempt # X
• Running in Exercise/Time & Date
• Running/Cooling Down
• Running - Warning/Warning Message
• Running - Alarm/Alarm Message
• Stopped - Alarm/Alarm Message
• Stopped - Warning/Warning Message
• Cranking/Pausing for X Seconds
• Running/Time & Date
• Running/Warming Up
• Cranking - Warning/Warning Message
• Cranking - Alarm/Alarm Message
The possible commands
on Line 2 of the display
are as follows:
• Switched Off
• Running Manually
• Stopped in Auto Mode
• Running - Utility Lost
• Running in Exercise
• Running from Radio
MENU SYSTEM
17 &
20kW
only
17 &
20kW
only
17 &
20kW
only

33
Section 7 — Installation Diagrams
Air-cooled Generators
Circuit Breakers - Drawing No. 0G8573-A

34
Section 7 — Installation Diagrams
Air-cooled Generators
Generator - Drawing No. 0G8280-D

35
Section 7 — Installation Diagrams
Air-cooled Generators
Generator - Drawing No. 0G8280-D

36
CALIFORNIA EMISSION CONTROL WARRANTY STATEMENT
YOUR WARRANTY RIGHTS AND OBLIGATIONS
The California Air Resources Board (CARB) and Generac Power Systems, Inc. (Generac) are pleased to explain the Emission Control System Warranty on
your new engine.* In California, new utility, and lawn and garden equipment engines must be designed, built and equipped to meet the state’s stringent
anti-smog standards. Generac will warrant the emission control system on your engine for the periods of time listed below provided there has been no
abuse, neglect, unapproved modification or improper maintenance of your engine.
Your emission control system may include parts such as the carburetor, ignition system and exhaust system. Generac will repair your engine at no cost to
you for diagnosis, replacement parts and labor, should a warrantable condition occur.
MANUFACTURER’S EMISSION CONTROL SYSTEM WARRANTY COVERAGE:
Emissions control systems on 1995 and later model year engines are warranted for two years as hereinafter noted. If, during such warranty period, any
emission-related component or system on your engine is found to be defective in materials or workmanship, repairs or replacement will be performed by
a Generac Authorized Warranty Service Facility.
PURCHASER’S/OWNER’S WARRANTY RESPONSIBILITIES:
As the engine purchaser/owner, you are responsible for the completion of all required maintenance as listed in your factory supplied Owner’s Manual. For
warranty purposes, Generac recommends that you retain all receipts covering maintenance on your engine. However, Generac cannot deny warranty solely
due to the lack of receipts or for your failure to ensure the completion of all scheduled maintenance.
As the engine purchaser/owner, you should, however, be aware that Generac may deny any and/or all warranty coverage or responsibility if your engine,
or a part/component thereof, has failed due to abuse, neglect , improper maintenance or unapproved modifications, or the use of counterfeit and/or “grey
market” parts not made, supplied or approved by Generac.
You are responsible for contacting a Generac Authorized Warranty Service Facility as soon as a problem occurs. The warranty repairs should be
completed in a reasonable amount of time, not to exceed 30 days.
Warranty service can be arranged by contacting either your selling dealer or a Generac Authorized Warranty Service Facility. To locate the Generac
Authorized Warranty Service Facility nearest you, call our toll-free number:
1-800-333-1322
IMPORTANT NOTE: This warranty statement explains your rights and obligations under the Emission Control System Warranty (ECS Warranty), which is
provided to you by Generac pursuant to California law. See also the “Generac Limited Warranties for Generac Power Systems, Inc.,” which is enclosed
herewith on a separate sheet, also provided to you by Generac. The ECS Warranty applies only to the emission control system of your new engine. If there
is any conflict in terms between the ECS Warranty and the Generac Warranty, the ECS Warranty shall apply except in circumstances where the Generac
Warranty may provide a longer warranty period. Both the ECS Warranty and the Generac Warranty describe important rights and obligations with respect
to your new engine.
Warranty service can be performed only by a Generac Authorized Warranty Service Facility. When requesting warranty service, evidence must be presented
showing the date of the sale to the original purchaser/owner.
If you have any questions regarding your warranty rights and responsibilities, you should contact Generac at one of the following addresses:
For Air-cooled Product ... For Liquid-cooled Product ...
ATTENTION WARRANTY DEPARTMENT ATTENTION WARRANTY DEPARTMENT
GENERAC POWER SYSTEMS, INC. GENERAC POWER SYSTEMS, INC.
P.O. BOX 297 211 MURPHY DRIVE
WHITEWATER, WI 53190 EAGLE, WI 53119
Part 1
Section 8 – Warranty
Air-cooled Generators
NOTE: This Emission Control Warranty Statement pertains to this product only IF the generator size is 15 kW or below.

37
EMISSION CONTROL SYSTEM WARRANTY
Emission Control System Warranty (ECS Warranty) for 1995 and later model year engines:
(a) Applicability: This warranty shall apply to 1995 and later model year engines. The ECS Warranty Period shall begin on the date the new engine or equip-
ment is purchased by/delivered to its original, end-use purchaser/owner and shall continue for 24 consecutive months thereafter.
(b) General Emissions Warranty Coverage: Generac warrants to the original, end-use purchaser/owner of the new engine or equipment and to each subse-
quent purchaser/owner that each of its engines is ...
(1) Designed, built and equipped so as to conform with all applicable regulations adopted by the CARB pursuant to its authority, and
(2) Free from defects in materials and workmanship which, at any time during the ECS Warranty Period, may cause a warranted emissions-related part
to fail to be identical in all material respects to the part as described in the engine manufacturer’s application for certification.
(c) The ECS Warranty only pertains to emissions-related parts on your engine, as follows:
(1) Any warranted, emissions-related parts that are not scheduled for replacement as required maintenance in the Owner’s Manual shall be warranted for
the ECS Warranty Period. If any such part fails during the ECS Warranty Period, it shall be repaired or replaced by Generac according to Subsection
(4) below. Any such part repaired or replaced under the ECS Warranty shall be warranted for the remainder of the ECS Warranty Period.
(2) Any warranted, emissions-related part that is scheduled only for regular inspection as specified in the Owner’s Manual shall be warranted for the ECS
Warranty Period. A statement in such written instructions to the effect of “repair or replace as necessary” shall not reduce the ECS Warranty Period.
Any such part repaired or replaced under the ECS Warranty shall be warranted for the remainder of the ECS Warranty Period.
(3) Any warranted, emissions-related part that is scheduled for replacement as required maintenance in the Owner’s Manual shall be warranted for the
period of time prior to the first scheduled replacement point for that part. If the part fails prior to the first scheduled replacement, the part shall be
repaired or replaced by Generac according to Subsection (4) below. Any such emissions-related part repaired or replaced under the ECS Warranty
shall be warranted for the remainder of the ECS Warranty Period prior to the first scheduled replacement point for such emissions-related part.
(4) Repair or replacement of any warranted, emissions-related part under this ECS Warranty shall be performed at no charge to the owner at a Generac
Authorized Warranty Service Facility.
(5) When the engine is inspected by a Generac Authorized Warranty Service Facility, the owner shall not be held responsible for diagnostic costs if the
repair is deemed warrantable.
(6) Generac shall be liable for damages to other original engine components or approved modifications proximately caused by a failure under warranty
of any emission-related part covered by the ECS Warranty.
(7) Throughout the ECS Warranty Period, Generac shall maintain a supply of warranted emission-related parts sufficient to meet the expected demand
for such emission-related parts.
(8) Any Generac authorized and approved emission-related replacement part may be used in the performance of any ECS Warranty maintenance or repairs
and will be provided without charge to the owner. Such use shall not reduce Generac ECS Warranty obligations.
(9) Unapproved, add-on, modified, counterfeit and/or “grey market” parts may not be used to modify or repair a Generac engine. Such use voids this
ECS Warranty and shall be sufficient grounds for disallowing an ECS Warranty claim. Generac shall not be held liable hereunder for failures of any
warranted parts of a Generac engine caused by the use of such an unapproved, add-on, modified, counterfeit and/or “grey market” part.
EMISSION RELATED PARTS INCLUDE THE FOLLOWING:
* Generac engine types covered by this warranty statement include the following:
1) Prepackaged Standby Generator
2) Auxiliary Power Unit (APU) Generator
3) Standby Generator
Part 2
Section 8 – Warranty
Air-cooled Generators
1) Fuel Metering System:
1.2) LPG/Natural Gas carburetion assembly and its internal components.
a) Fuel controller (if so equipped)
b) Mixer and its gaskets (if so equipped)
c) Carburetor and its gaskets (if so equipped)
d) Primary gas regulator (if so equipped)
e) LP liquid vaporizer (if so equipped)
2) Air Induction System including:
a) Intake pipe/manifold
b) Air cleaner
3) Ignition System including:
a) Spark plug
b) Ignition module
4) Catalytic Muffler Assembly (if so equipped) including:
a) Muffler gasket
b) Exhaust manifold
5) Crankcase Breather Assembly including:
a) Breather connection tube

Part No. 0G8334 Revision F (03/19/10) Printed in U.S.A.
Catalog No. OMASPCA-S-01

Manual del propietario
Generadores automáticos de respaldo
enfriados por aire de 8, 10, 12, 14, 16,
17 & 20kW
PELIGRO
GASES MORTALES DEL ESCAPE ¡SÓLO PARA INSTALACIÓN EN EXTERIORES!
No previsto para usarse como fuente primaria de energía en lugar
de la electricidad pública ni en aplicaciones de soporte de vida.
L
I
S
T
E
D
C
U
S
¡NO LEVANTE LA UNIDAD POR EL TECHO!

INTRODUCCIÓN
Gracias por comprar este generador compacto impulsado por motor,
refrigerado por aire, de alto rendimiento. Está diseñado para proveer
energía eléctrica en forma automática para operar cargas críticas durante
una falla de la electricidad comercial.
Esta unidad está instalada de fábrica en una caja metálica para todo
clima y prevista exclusivamente para su instalación en exteriores. Este
generador operará usando ya sea propano líquido en vapor (LP) o gas
natural (GN).
NOTA:
Este generador es adecuado para suministrar cargas residenciales
típicas como motores de inducción (bombas, refrigeradores, aires
acondicionados, chimeneas, etc), componentes electrónicos (com-
putadoras, monitores, televisores, etc.), cargas de iluminación y
microondas.
LEA ESTE MANUAL COMPLETAMENTE
Si alguna parte de este manual no se entiende bien, póngase en contacto
con el concesionario más cercano para conocer los procedimientos de
arranque, operación y servicio.
A lo largo de esta publicación, y en lo que respecta a las etiquetas y calco-
manías fijadas en el generador, los bloques de PELIGRO, ADVERTENCIA,
CUIDADO Y NOTA se usan para alertar al personal sobre instrucciones
especiales sobre una operación en particular que puede ser peligrosa si
se ejecuta en forma incorrecta o sin cuidado. Obsérvelas con cuidado.
Sus definiciones son como sigue:
PELIGRO
Luego de este encabezado, lea las instrucciones que,
si no se siguen estrictamente, traerán como resultado
daños personales serios, incluyendo la muerte.
ADVERTENCIA
Luego de este encabezado, lea las instrucciones que, si
no se siguen estrictamente, podría traer como resultado
daños personales serios, incluyendo la muerte.
CUIDADO
Luego de este encabezado, lea las instrucciones que, si
no se siguen estrictamente, pueden traer como resultado
daños menores o moderados.
NOTA:
Luego de este encabezado, lea las instrucciones que, si no se siguen
estrictamente, podrían traer como resultado daños al equipo y/o a la
propiedad.
Estas advertencias de seguridad no pueden eliminar los peligros que
indican. El sentido común y un estricto cumplimiento de las instruc-
ciones especiales cuando se realiza un servicio son esenciales para
evitar accidentes.
Cuatro símbolos de seguridad usados comúnmente acompañan los
bloques de PELIGRO, ADVERTENCIA y CUIDADO. El tipo de información
que cada uno indica es como sigue:
Este símbolo señala importante información de
seguridad que, si no se sigue, puede poner en peli-
gro la seguridad personal y/o las propiedades de
otros.
Este símbolo indica un peligro potencial de
explosión.
Este símbolo indica un peligro potencial de incendio.
Este símbolo indica un peligro potencial de descarga
eléctrica.
El operador es responsable del uso apropiado y seguro de este equipo. El
fabricante recomienda encarecidamente que el operador lea este Manual
de Propietario y entienda completamente todas las instrucciones antes de
usar este equipo. El fabricante asimismo recomienda con igual firmeza el
instruir a otros usuarios para arrancar y operar apropiadamente la unidad.
Esto los prepara si necesitan operar el equipo en alguna emergencia.
CONTENIDO
Este manual contiene información pertinente al propietario de estos
modelos:
7 kW NG, 8 kW LP, motor de un cilindro GH-410•
9 kW NG, 10 kW LP, motor V-twin GH-530•
12 kW NG, 12 kW LP, motor V-twin GH-990•
13 kW NG, 14 kW LP, motor V-twin GH-990•
16 kW NG, 16 kW LP, motor V-twin GH-990•
16 kW NG, 17 kW LP, motor V-twin GH-990•
18 kW NG, 20 kW LP, motor V-twin GH-999•
OPERACIÓN Y MANTENIMIENTO
Es responsabilidad del operador el realizar todos los chequeos de
seguridad, asegurarse de que se haya realizado adecuadamente todo el
mantenimiento para una segura operación, y hacer revisar periódicamente
el equipo por un concesionario. El normal mantenimiento y reemplazo de
piezas son de responsabilidad del propietario/operador y, como tal, no se
considera defectos de material ni mano de obra dentro de los términos de
la garantía. Los hábitos individuales de operación y uso contribuyen a la
necesidad de servicio de mantenimiento.
Un mantenimiento apropiado y el cuidado del generador aseguran un
número mínimo de problemas y mantienen los gastos operativos al
mínimo. Consulte a su concesionario para que lo ayude en el servicio y
con los accesorios.
CÓMO OBTENER SERVICIO
Cuando el generador requiere servicio o repuestos, busque ayuda con el
concesionario. Los técnicos de servicio están capacitados en fábrica y
son capaces de manejar todas las necesidades de servicio.
Al ponerse en contacto con un concesionario respecto a repuestos y ser-
vicio, siempre proporcione el número de modelo y de serie de la unidad
tal como está en la calcomanía de datos, ubicada en el generador. Vea la
ubicación de la calcomanía en la sección de “El Generador”.
Modelo No._________________ Serie No. ______________

Tabla de contenidos
Generadores enfriados por aire
1
Introducción ...........Cubierta frontal interior
Lea este manual completamente ...........................................CFI
Contenido .............................................................................CFI
Operación y mantenimiento ...................................................CFI
Cómo obtener servicio ..........................................................CFI
Tabla de contenidos .................................... 1
Reglas de seguridad ................................... 2
Índice de estándares ..............................................................3
Sección 1 – Información General ............. 4
1.1 Desempaque/inspección ................................................4
1.2 Sistemas de protección ..................................................4
1.3 Requerimiento de NEC para interruptor de circuito
por falla de arco para dormitorios ...................................4
1.4 Información de emisiones ..............................................5
1.5 El generador ...................................................................6
1.6 Especificaciones ............................................................7
1.7 LED de sistema correcto ................................................8
1.8 Requerimientos de combustible y recomendaciones .......8
1.9 Consumo de combustible ...............................................8
1.10 Reconfiguración del sistema de combustible...................9
1.11 Ubicación .....................................................................10
1.12 Requerimientos de batería ............................................11
1.13 Instalación de la batería ................................................11
1.14 La batería .....................................................................13
1.15 Cargador de la batería ..................................................14
Sección 2 – Arranque luego de la
instalación y ajustes ............. 14
2.1 Antes del arranque inicial ..............................................14
2.2 Revise la operación del interruptor de transferencia .......14
2.3 Revisión eléctricas .......................................................14
2.4 Pruebas del generador bajo carga .................................15
2.5 Revisando la operación automática ...............................15
2.6 Ajuste del gobierno del motor .......................................16
2.7 Ajuste del regulador de voltaje ......................................16
Sección 3 – Operación ........................... 17
3.1 Interfaz del panel de control ..........................................17
3.2 Operación de transferencia automática .........................18
3.3 Secuencia de operación automática ..............................19
3.4 Operación de la transferencia manual ...........................20
3.5 Compartimiento laterales (V-twin solamente) ................20
3.6 Sistemas de protección ................................................21
Sección 4 – Mantenimiento .................... 22
4.1 Fusible .........................................................................22
4.2 Revisar el nivel de aceite de motor ................................22
4.3 Cambio del aceite de motor ..........................................23
4.4 Cambio del limpiador de aire del motor .........................24
4.5 Bujía(s) ........................................................................25
4.6 Mantenimiento de la batería ..........................................25
4.7 Ajustando la claridad de la válvula
GH-410/GT-530/990/999 ..............................................26
4.8 Sistema de enfriamiento ...............................................27
4.9 Atención luego de la sumersión ....................................27
4.10 Protección contra corrosión .........................................27
4.11 Procedimiento fuera de servicio ....................................27
4.12 Agenda de mantenimiento ............................................29
Sección 5 – Detección de problemas .... 30
5.1 Guía de detección de problemas ...................................30
Sección 6 – Apéndice ................................ 31
6.1 Navegación del sistema de menú ..................................31
Sección 7 – Diagramas de instalación .... 33
Sección 8 – Garantía ................................ 36
TABLA
DE
CONTENIDOS

2
Estudie estas REGLAS DE SEGURIDAD con cuidado antes de instalar,
operar o dar servicio a este equipo. Familiarícese con este Manual del
propietario y con la unidad. El generador puede operar en forma segura,
eficiente y confiable sólo si se le instala, se le opera y mantiene en forma
apropiada. Muchos accidentes son causados por no seguir reglas o pre-
cauciones simples y fundamentales.
El fabricante no puede anticipar todas las posibles circunstancias que
puedan involucrar peligros. Las advertencias en este manual y en las
etiquetas y calcomanías fijadas en la unidad son, por tanto, no comple-
tamente inclusivas. Si se usa un procedimiento, método de trabajo o
técnica de operación que el fabricante no recomienda específicamente,
asegúrese de que sea seguro para los demás. Asimismo asegúrese que
el procedimiento, método de trabajo o técnica de operación utilizada no
vuelva inseguro al generador.
PELIGRO
A despecho del muy seguro diseño de este generador,
el operar este equipo en forma imprudente, con defi-
ciente mantenimiento o en forma descuidada, puede
causar posibles daños o la muerte. Permita sólo que
personas responsables y capaces instalen, operen y
den mantenimiento a este equipo.
Estas máquinas generan voltajes potencialmente
letales. Asegúrese de que se haya tomado todos los
pasos para hacer la máquina segura antes de intentar
trabajar en el generador.
Partes del generador están girando y/o calientes
durante la operación. Tenga mucho cuidado en las
cercanías de los generadores en funcionamiento.
La instalación debe siempre cumplir con los códigos,
estándares, leyes y regulaciones aplicables.
Un generador en funcionamiento expele monóxido
de carbono, un gas venenoso sin color ni aroma. La
inhalación de monóxido de carbono puede causar
dolor de cabeza, fatiga, mareos náuseas, vómitos,
ataques o muerte.
PELIGROS GENERALES
Por razones de seguridad, el fabricante recomienda que a este equipo se le •
dé servicio, sea instalado y reparado por un concesionario de servicio u otro
electricista calificado o un técnico de instalación competente que esté famil-
iarizado con los códigos, estándares y regulaciones aplicables. El operador
también debe cumplir estos códigos, estándares y regulaciones.
Los humos del escape del motor contienen monóxido de carbono, •
que puede ser MORTAL. Este gas peligroso, si se aspira en concen-
traciones suficientes, puede hacerle perder la conciencia y causarle la
muerte. NO altere ni agregue nada al sistema de escape ni haga nada
que pueda volver inseguro al sistema o que no cumpla con los códigos
y estándares aplicables.
Instale una alarma de monóxido de carbono operada con baterías en •
los interiores, de acuerdo a las recomendaciones e instrucciones del
fabricante.
El flujo adecuado y sin obstrucciones de aire para ventilación y •
refrigeración es crítico para la correcta operación del generador. No
altere la instalación ni permita que haya siquiera un bloqueo parcial
de la provisión de ventilación, ya que esto puede afectar seriamente la
operación segura del generador. El generador DEBE ser instalado y
operado sólo en exteriores.
Mantenga las manos, pies, ropa, etc, lejos de las correas de tracción, •
ventiladores y otras partes móviles o calientes. Nunca retire correa
de tracción alguna o protección de ventilador mientras la unida esté
operando.
Al trabajar con este equipo, manténgase alerta en todo momento. •
Nunca trabaje en el equipo cuando esté física o mentalmente fati-
gado.
Inspeccione el generador con regularidad, y póngase en contacto •
con el concesionario más cercano si necesita repararlo o conseguir
repuestos.
Antes de realizar cualquier mantenimiento al generador, desconecte los •
cables de su batería para evitar un arranque accidental. Desconecte
primero el cable del borne de la batería indicado como NEGATIVO,
NEG; o (-) y luego retire el cable POSITIVO, POS o (+). Al reconec-
tar los cables, conecte el cable POSITIVO primero, luego el cable
NEGATIVO al final.
Nunca use el generador ni alguna de sus partes como escalón. •
Pararse sobre la unidad puede tensar y romper partes, y puede traer
como resultado condiciones peligrosas de operación como escape de
gases, combustible o aceite.
PELIGROS DEL ESCAPE DEL MOTOR
El escape del motor del generador contiene el MORTAL monóxido de •
carbono, un gas venenoso sin olor ni color. El inhalar el monóxido de
carbono puede causar: mareos, dolor de cabeza, náuseas, espasmos
musculares, vómitos, debilidad y somnolencia, incapacidad de pensar
claramente, desvanecimientos, inconciencia e inclusive la muerte. Si
usted expermenta cualquier síntoma de envenenamiento por monóxido
de carbono, vaya a un lugar con aire fresco y busque atención médica
inmediata.
Nunca opere el generador con el vehículo dentro de algún garaje u •
otras áreas cerradas.
REGLAS DE
SEGURIDAD
INSTRUCCIONES DE SEGURIDAD IMPORTANTES
Generadores enfriados por aire
GUARDE ESTAS INSTRUCCIONES – El fabricante sugiere que estas reglas para la operación segura se copien y publiquen cerca del
sitio de instalación de la unidad. Debe insistirse en la seguridad para todos los operadores y potenciales operadores de este equipo.
El escape del motor de este producto contiene químicos
que el Estado de California sabe que causan cáncer,
defectos de nacimiento u otros daños reproductivos.
ADVERTENCIA:
Este producto contiene o emite químicos que el Es-
tado de California sabe que causan cáncer, defectos de
nacimiento u otros daños reproductivos.
ADVERTENCIA:

3
PELIGROS ELÉCTRICOS
Todos los generadores cubiertos por este manual producen voltajes •
eléctricos peligrosos y pueden causar descargas eléctricas fatales.
El servicio eléctrico doméstico entrega voltajes altos y peligrosos al
interruptor de transferencia como lo hace el generador cuando está
en operación. Evite el contacto con cables pelados, terminales conex-
iones, etc. mientras la unidad está funcionando. Asegúrese que todas
las cubiertas, protecciones y barreras apropiadas se encuentren en
su lugar y/o bloqueadas antes de operar el generador. Si es necesario
trabajar alrededor de una unidad en operación, párese sobre una
superficie seca y aislada para reducir el peligro de choque eléctrico.
No manipule ningún tipo de dispositivo eléctrico mientras esté de pie •
sobre agua, con los pies descalzos o con las manos o pies húmedos.
PUEDE HABER UNA DESCARGA ELÉCTRICA COMO RESULTADO.
El Código Eléctrico Nacional (NEC) requiere que el marco y las partes •
externas que son conductores eléctricos estén conectadas a una conexión
a tierra aprobada. Los códigos eléctricos locales pueden asimismo requerir
una apropiada conexión a tierra del sistema eléctrico del generador.
Luego de instalar este sistema de respaldo eléctrico doméstico, el •
generador puede arrancar en cualquier momento sin advertencia.
Cuando esto ocurra, los circuitos de carga son transferidos a la fuente
de energía de RESPALDO (generador). Para evitar daños posibles si
ocurren tales arranques y transferencias, siempre coloque el interrup-
tor de AUTO/OFF/MANUAL del generador en su posición OFF antes de
trabajar en el equipo y retire los fusibles de 15A del panel de control
del generador.
En caso de un accidente causado por descarga eléctrica, apague inme-•
diatamente la fuente de energía eléctrica. Si esto no es posible, intente
liberar a la víctima del conductor vivo. EVITE EL CONTACTO DIRECTO
CON LA VÍCTIMA. Une un implemento no conductivo, como una soga
seca o una tabla, para liberar a la víctima del conductor vivo. Si la víc-
tima está inconsciente, aplique los primeros auxilios y consiga ayuda
médica inmediatamente.
Nunca use joyas al trabajar con este equipo. Las joyas pueden con-•
ducir electricidad y traer como resultado una descarga eléctrica, o
puede quedar atrapada en los componentes móviles.
PELIGRO DE INCENDIO
Para mayor seguridad contra incendios, el generador debe instalarse y •
mantenerse en forma apropiada. La instalación debe siempre cum-
plir con los códigos, estándares, leyes y regulaciones aplicables.
Adhiérase estrictamente a los códigos nacionales, estatales y locales
de electricidad y construcción. Cumpla con las regulaciones que la
Administración de salud y seguridad ocupacional (OSHA) ha estableci-
do. Asimismo asegúrese de que el generador sea instalado de acuerdo
con las instrucciones y recomendaciones del fabricante. Luego de
una instalación apropiada, no haga nada que pueda alterar una segura
instalación ni hacer que la unidad no cumpla con los mencionados
códigos, estándares, leyes y regulaciones.
Tenga un extinguidor cerca al generador en todo momento. Los extin-•
guidores marcados “ABC” por la Asociación nacional de protección
contra incendios son los apropiados para usarse en los sistemas
eléctricos de emergencia. Mantenga el extinguidor apropiadamente
cargado y familiarícese con su uso. Consulte su departamento local
de bomberos cualquier duda respecto a los extinguidores.
PELIGRO DE EXPLOSIÓN
No fume alrededor del generador. Limpie cualquier derrame de com-•
bustible o aceite inmediatamente. Asegúrese de que no haya dejado
materiales combustible en el compartimiento del generador, en o cerca
del generador, ya que pueden causar INCENDIOS y/o EXPLOSIONES.
Mantenga el área circundante del generador limpia y libre de desper-
dicios.
Los fluidos gaseosos como el gas natural y el gas propano líquido •
(GLP) son extremadamente explosivos. Instale el sistema de abas-
tecimiento de combustible de acuerdo a los códigos aplicables para
combustible y gas. Antes de colocar el sistema de respaldo eléctrico
de respaldo en servicio, las líneas del sistema de combustible deben
purgarse apropiadamente y buscar fugas de acuerdo al código apli-
cable. Luego de la instalación, inspeccione el sistema de combustible
pe
riodicamente en busca de fugas. No se permiten fugas.
ÍNDICE DE ESTÁNDARES
En ausencia de los estándares, códigos, regulaciones o leyes pertinentes,
la información publicada listada abajo puede usarse como guía para la
instalación de este equipo.
1. NFPA No. 37, STATIONARY COMBUSTION ENGINES AND GAS
TURBINES, disponible en la National Fire Protection Association, 470
Atlantic Avenue, Boston, MA 02210.
2. NFPA No. 76A, ESSENTIAL ELECTRICAL SYSTEMS FOR HEALTH
CARE FACILITIES, disponible igual que el Item 1.
3. NFPA No. 54, NATIONAL FUEL GAS CODE, disponible igual que el
Item 1.
4. NFPA No. 58, AMERICAN NATIONAL STANDARD FOR STORAGE
AND HANDLING OF LIQUEFIED PETROLEUM GAS, disponible igual
que el Item 1.
5. NFPA No. 70, NFPA HANDBOOK OF NATIONAL ELECTRIC CODE,
disponible igual que el Item 1.
6. Article X, NATIONAL BUILDING CODE, disponible en la American
Insurance Association, 85 John Street, New York, N.Y. 10038.
7. AGRICULTURAL WIRING HANDBOOK, disponible en la Food and
Energy Council, 909 University Avenue, Columbia, MO 65201.
8. ASAE EP-3634, INSTALLATION AND MAINTENANCE OF FARM
STANDBY ELECTRICAL SYSTEMS, disponible en la American
Society of Agricultural Engineers, 2950 Niles Road, St. Joseph, MI
49085.
9. NFPA No. 30, FLAMMABLE AND COMBUSTIBLE LIQUIDS CODE,
disponible igual que el Item 1.
REGLAS DE
SEGURIDAD
INSTRUCCIONES DE SEGURIDAD IMPORTANTES
Generadores enfriados por aire

PELIGRO
Solo electricistas o contratistas calificados deberán
intentar estas instalaciones, que deben cumplir
estrictamente con los códigos estándares y regula-
ciones aplicables.
1.1 DESEMPAQUE/INSPECCIÓN
Luego del desempaque, inspeccione cuidadosamente si hay daños en el
contenido.
Este generador de respaldo está listo para su instalación con una •
almohadilla base pre montada y proporcionada de fábrica y tiene una
caja protectora contra el clima que está diseñada para la instalación
en exteriores solamente.
Este generador de respaldo listado por la UL puede empacarse con •
un interruptor de transferencia automática con un centro de cargas
incorporado. La combinación de interruptor de transferencia y centro
de cargas está pre-cableada con un conductor de dos pies y 30 pies.
Los interruptores de circuido para conexiones de circuito de emergen-
cia están incluidos (si está equipado con ellos).
Este interruptor de dos polos listado en la UL nominalmente es de 100 •
o 200 amperios AC a un máximo de 250 voltios. El interruptor de
transferencia de 100 Amp es para uso en interiores únicamente. El
interruptor de transferencia de 200 Amp es para uso en exteriores/
interiores (si está equipado con él).
ADVERTENCIA
Si este generador se usa para energizar circuitos
de carga eléctrica normalmente energizados por
una fuente de energía de servicio público, el código
requiere que se instale un interruptor de transfer-
encia. El interruptor de transferencia debe aislar
efectivamente el sistema eléctrico del sistema de
distribución de energía pública cuando el generador
está operando (NEC 700, 701 & 702). El no aislar un
sistema eléctrico de esa manera traerá como resul-
tado daños al generador y también puede causar
daños o la muerte a los trabajadores del servicio
público eléctrico debido a una realimentación de la
energía eléctrica.
Si se nota alguna pérdida o daños el momento de la entrega, haga que la
persona que entrega la carga tome nota de todos los daños en la guía de
embarque o coloque su firma debajo del memo del consignatario sobre
pérdida o daños.
Si se nota una pérdida o daño luego de la entrega, separe los materiales
dañados y póngase en contacto con el transportista para los procedimien-
tos de reclamo.
“Daño oculto” se entiende como el daño al contenido de un paquete que
no se evidencia al momento de la entrega, pero se descubre luego.
Para abrir apropiadamente el techo, presione sobre el labio superior
central y libere el pestillo. Si la presión no se aplica desde arriba, el techo
puede parecer atascado. Siempre verifique que el cierre lateral esté abi-
erto antes de intentar levantar el techo.
1.2 SISTEMAS DE PROTECCIÓN
A diferencia del motor de un automóvil, el generador puede que tenga
que funcionar por largos periodos de tiempo sin operador presente para
monitorear las condiciones del motor. Por esta razón, el motor está
equipado con los siguientes sistemas que lo protegen contra condiciones
potencialmente dañinas:
1. Sensor de bajo nivel de aceite
2. Sensor de alta temperatura
3. Falla de arranque
4. Exceso de velocidad
5. Senso de RPM
6. Batería baja
Existen lecturas sobre el panel de control para notificar al personal que na
de estas fallas ha ocurrido. Existe también un LED de “Sistema correcto”
(cilindro único) o un mensaje de estatus en la pantalla (V-twins) que se
muestra cuando todas las condiciones descritas en la sección de “LED de
sistema correcto” sean verdaderas.
1.3 REQUERIMIENTO DE NEC PARA
INTERRUPTOR DE CIRCUITO POR
FALLA DE ARCO PARA DORMITORIOS
En 2001, el Código Eléctrico Nacional (MEC) presentó un requerimiento
para una nueva construcción. Este nuevo requerimiento indica la necesi-
dad de usar interruptores de circuito de falla de arco para proteger la
rama completa del circuito que alimenta el dormitorio de una vivienda. El
requerimiento del NEC se indica abajo.
1.3.1 SECCIÓN 210.12 PROTECCIÓN POR INTER-
RUPTOR DE CIRCUITO PARA FALLA DE ARCO
1. Definición: Un interruptor de circuito para falla de arco es un dis-
positivo cuyo propósito es proporcionar protección de los efectos
de fallas de arco reconociendo las características únicas del arco y
procediendo a desenergizar el circuito cuando se detecta una falla
de arco.
2. Dormitorios de viviendas: Todos los circuitos ramales que sumin-
istran 125 voltios, con salidas de 12 y 20 amperios monofásicos
instaladas en dormitorios de viviendas serán protegidas por un
interruptor de circuito de falla de arco listado para proporcionar
protección al ramal competo del circuito.
La Sección 210.12 requiere que se proporcione protección AFCI a los
circuitos ramales que suministran salidas (receptáculos, iluminación,
etc.) en dormitorios de viviendas. El requerimiento se limita a circuitos de
15 y 20 amperios de 125 voltios. No hay prohibición contra proporcionar
protección AFCI en otros circuitos o en ubicaciones diferentes a los dor-
mitorios. Debido a que los circuitos frecuentemente se comparten entre
un dormitorio y otras áreas como armarios y pasillos, el proporcionar
protección AFCI sobre el circuito completo cumpliría con la 210.12.
Si durante la instalación de un sistema de respaldo para la casa se toma
la decisión de proporcionar energía de respaldo a un circuito ramal de dor-
mitorio, el interruptor de circuito en el interruptor de transferencia deberá
reemplazarse con un interruptor de circuito de falla de arco (AFCI).
Es muy importante que los interruptores sólo se reemplacen con otro
similar. POr ejemplo, si se reemplaza un interruptor de 15A, DEBE ser
reemplazado con un interruptor AFCI de 15 A. Del mismo modo, un inter-
ruptor de 20A DEBE ser reemplazado con un AFCI de 20A.
INFORMACIÓN
GENERAL
Sección 1 — Información General
Generadores enfriados por aire
4

INFORMACIÓN
GENERAL
Sección 1 — Información General
Generadores enfriados por aire
5
Estos interruptores AFCI están disponibles en la ferretería más cercana.
Item Siemens # Descripción
Q115AF 15A polo único AFCI
Q120AF 20A polo único AFCI
1.4 INFORMACIÓN DE EMISIONES
La agencia de protección ambiental requiere que este generador cumpla
con los estándares de emisión en el escape. Este generador está certifi-
cado para cumplir los niveles de emisión de EPA aplicables. Información
adicional respecto a los requerimientos puestos por EPA a continuación:
El generador está certificado para usarse como motor estacionario para
generación de energía de respaldo. Cualquier otro uso puede ser una
violación de leyes federales y/o locales. Es importante que usted siga las
especificaciones en la sección de mantenimiento para asegurar que su
motor cumple con los estándares de emisión aplicables por la duración de
la vida del motor. Este motor está certificado para operar con combustible
de propano líquido y gas natural. El sistema de control de emisiones del
generador consiste en lo siguiente:
Sistema de medición de combustible•
Ensamble del carburador/mezclador•
Regulador de combustible•
Sistema de inducción de aire•
Tubería/distribuidor de entrada•
Limpiador de aire•
Sistema de ignición•
Bujías•
Módulo de ignición•
El período de cumplimiento de emisiones mencionado en la etiqueta de
cumplimiento de emisiones indica el número de horas de operación para
las que el motor ha demostrado cumplir los requerimientos de emisión
federales. Vea la tabla abajo para determinar el periodo de cumplimiento
para el generador. El desplazamiento del generador está listado en la
etiqueta de cumplimiento de emisiones.
Desplazamiento Categoría Período de cumplimiento
< 66 cc
A 300 horas
B 125 horas
C 50 horas
66 cc -
< 225 cc
A 500 horas
B 250 horas
C 125 horas
225 cc
A 1000 horas
B 500 horas
C 250 horas

6
INFORMACIÓN
GENERAL
Sección 1 — Información General
Generadores enfriados por aire
1.5 EL GENERADOR
Etiqueta de
datos (ver
muestra)
Varilla de
Aceite
Caja del
escape
Base compuesta Filtro de aceite Compartimiento de batería
Regulador
de combustible
Entrada
de combustible
(atrás)
Filtro
de aire
Interruptor
de circuito
Panel de
control
Etiqueta
de datos
(ver muestra)
Varilla de
aceite
Caja del
escape
Base compuesta Filtro de aceite Compartimiento de batería
Regulador
de combustible
Entrada de
combustible
(atrás)
Filtro de aire
Interruptores
de circuito
Panel de
control
Figura 1.3 – 12, 14, 16, 17, y 20kW, motor V-twin,
GT-990/GT-999 (puerta retirada)
Figura 1.1 – 8kW, Cilindro único, motor GH-410
(puerta retirada)
Etiqueta de
datos
(ver muestra)
Varilla de
aceite
Caja del
escape
Base compuesta Filtro de aceite Compartimiento de batería
Regulador
de combustible
Entrada de
combustible
(atrás)
Filtro
de aire
Interruptor
de ciercuito
Panel de
control
Figura 1.2 – 10kW, V-twin, motor GT-530
(puerta retirada)
Muestra de etiqueta de datos

7
INFORMACIÓN
GENERAL
Sección 1 — Información General
Generadores enfriados por aire
1.6 ESPECIFICACIONES
1.6.1 GENERADOR
Modelo 8kW 10kW 12kW 14kW 16kW 17kW 20kW
Voltaje nominal 240
Corriente de carga máxima nominal (Amps)*
240 Volts (LP) 33.3 41.6 50.0 58.3 66.6 70.8 83.3
Interruptor principal de circuito 35 Amp 45 Amp 50 Amp 60 Amp 65 Amp 65 Amp 100 Amp
Circuitos** 50A, 240V - - - 1 1 1 -
40A, 240V - - 1 1 1 1 -
30A, 240V 1 1 1 - - - -
20A, 240V - 1 - 1 1 1 -
20A, 120V 1 3 3455-
15A, 120V 5 3 5455-
Fase 1
Número de polos del rotor 2
Frecuencia nominal AC 60 Hz
Requerimiento de batería
Grupo 26R, 12
Volts y 350 CCA
Mínimo
Grupo 26R, 12 Volts y 525 CCA Mínimo
Peso (unidad solamente en lbs.) 340 387 439 439 439 455/421 450
Caja Acero Acero Acero Acero Acero Acero/aluminio Aluminio
Rango normal de operación de -20° F (-28.8° C) a 77° F (25° C)
Estos generadores han sido calibrados de acuerdo a UL2200, Safety Standard for Stationary Engine Generator Assemblies; y CSA-C22.2 No. 100-04 Standard for Motors and Generators.
* Los valores de gas natural dependerán del contenido de BTUs del combustible específico. Los desgastes típicos están entre 10-20% fuera del valor nominal de gas LP.
** Los circuitos a moverse deben estar protegidos por un interruptor del mismo tamaño. Por ejemplo, un circuito de 15 amperios en el panel principal debe ser un circuito de 15 amperios en el
interruptor de transferencia.
1.6.2 MOTOR
Modelo 8 kW 10 kW 12/14/16/17 kW 20 kW
Tipo de motor GH-410 GT-530 GT-990 GT-999
Número de cilindros 1 2 2 2
Potencia nominal en caballos @ 3,600 rpm 14.8 18 32 36
Desplazamiento 410cc 530cc 992cc 999cc
Bloque del cilindro Aluminio con manga de hierro forjado
Arreglo de válvulas Válvulas elevadas
Sistema de ignición Estado sólido c/magneto
Bujía recomendada RC14YC BPR6HS RC14YC RC12YC
Espaciamiento de la bujía 0.76 mm (0.762 mm) 0.76 mm (0.762 mm) 1.02 mm (1.016 mm) 0.76 mm (0.762 mm)
Razón de compresión 8.6:1 9.5:1 9.5:1 9.5:1
Arrancador 12 VCC
Capacidad de aceite incluyendo filtro Aprox. 1.5 Qts Aprox. 1.7 Qts Aprox. 1.7 Qts Aprox. 1.7 Qts
Filtro del Aceite recomendado Parte # 070185F
Filtro de aire recomendado Parte # 0G3332 Parte # 0E9581 Parte # 0C8127 Parte # 0G5894
RPM en operación 3,600

1.7 LED DE SISTEMA CORRECTO
El LED de “Sistema correcto” (cilindro único) o “Listo para funcionar”
en la pantalla (v-twin) está listo cuando todas las siguientes condiciones
son verdaderas:
1. El interruptor AUTO/OFF/MANUAL está puesto en la posición de
AUTO.
2. El voltaje de la red pública que se suministra a la unidad está siendo
sensado por el PCB. Si el voltaje sensado de la red pública no está
conectado a la unidad o si sen encuentra debajo de aproximada-
mente 150-160 VAC, entonces la luz de sistema correcto destellará
rápidamente (8kW). Esto indica que si el interruptor AUTO/OFF/
MANUAL está colocado en la posición Auto, el generador arran-
cará.
3. No hay alarmas presentes, por ejemplo, baja presión de aceite, alta
temperatura, etc.
1.8 REQUERIMIENTOS DE COMBUSTIBLE
Y RECOMENDACIONES
Con gas LP, use sólo el sistema de entrega de vapor. Este tipo de
sistema usa los vapores formados encima del combustible líquido en el
tanque de almacenamiento.
El motor ha sido adaptado con un sistema de carburación de combustible
que cumple las especificaciones de la 1997 California Air Resources
Board para sistemas de combustible dual a prueba de aperturas. La uni-
dad funcionará a gas natural o gas LP, pero ha sido configurado de fábrica
para funcionar a gas natural. Si la necesidad de combustible primario
se cambia a gas LP, el sistema de combustible necesita reconfigurarse.
Las instrucciones para la reconfiguración del sistema de combustible se
encuentran en la sección de reconfiguración de sistema de combustible.
Los combustibles recomendados deberán tener un contenido de BTU de
al menos 1,000 BTUs por pie cúbico para gas natural, o al menos 2,520
BTUs por pie cúbico para gas LP. Pregunte al proveedor de combustible el
contenido del BTUs del mismo.
La presión del combustible requerida para gas natural es de cinco (5)
pulgadas a siete (7) pulgadas de columna de agua (de 0.18 a 0.25 psi);
y para propano líquido de 10 pulgadas a 12 pulgadas de columna de
agua (de 0.36 a 0.43 psi). El regulador primario para el suministro de
propano NO SE INCLUYE con el generador.
NOTA:
Todo el dimensionamiento de las tuberías, construcción y disposición
deben cumplir con la NFPA 54 para aplicaciones de gas natural y NFPA
58 para aplicaciones de propano líquido. Una vez que el generador
está instalado, verifique que la presión de combustible NUNCA caiga
debajo de cuatro (4) pulgadas de columna de agua para gas natural o
10 pulgadas de columna de agua para propano líquido.
Antes de la instalación del generador, el instalador deberá consultar a
sus proveedores locales de combustible o al departamento de bomberos
para revisar los códigos y regulaciones para una apropiada instalación.
Los códigos locales obligarán a una correcta ruta de la tubería de línea
de combustible gaseoso alrededor de jardines, arbustos y otros paisajes
para evitar algún daño.
Se debe tener consideraciones especiales al instalar la unidad donde las
condiciones locales incluyan inundaciones, tornados, huracanes, terre-
motos y suelos inestables en cuanto a la flexibilidad y fuerza de la tubería
y sus conexiones.
Use un sellador de tubería aprobado o compuesto de junturas en todos
los accesorios.
Todas las tuberías de combustible gaseoso instaladas deben ser purgadas
y probadas contra fugas antes del arranque inicial de acuerdo con los
códigos locales, estándares y regulaciones.
1.9 CONSUMO DE COMBUSTIBLE
Unidad
Gas nat. Vapor de LP
1/2 carga Carga
completa
1/2 carga Carga
completa
7/8 kW 77 140 0.94/34 1.68/62
9/10 kW 102 156 1.25/46 1.93/70
12/12 kW 152 215 1.53/56 2.08/76
13/14 kW 156 220 1.56/58 2.30/84
16/16 kW 183 261 1.59/58 2.51/91
16/17 kW 183 261 1.61/59 2.57/94
18/20 kW 206 294 1.89/69 2.90/106
* El gas natural está en pies cúbicos por hora.
** LP está en galones por hora/pies cúbicos por hora.
*** Valores aproximados.
Verifique que el medidor de gas es capaz de proporcionar suficiente flujo
de combustible para incluir aparatos domésticos.
1.9.1 REQUERIMIENTOS DE FLUJO DE BTU -
GAS NATURAL
Flujo de BTU requerido para cada unidad en base a 1000 BTUs por pie
cúbico.
7kW — 140,000 BTU/Hora•
9kW — 156.000 BTU/Hora•
12kW — 215,000 BTU/Hora•
13kW — 220.000 BTU/Hora•
16kW — 261,000 BTU/Hora•
18kW — 294.000 BTU/Hora•
PELIGRO
Los fluidos gaseosos como el gas natural y el gas
propano líquido (GLP) son altamente explosivos.
Aun la más ligera chispa puede encender tales com-
bustibles y causar una explosión. No se permiten
fugas de combustible. El gas natural, que es más
ligero que el aire, tiende a juntarse en áreas altas. El
gas LP es más pesado que el aire y tiende a descan-
sar en áreas bajas.
NOTA:
Se debe instalar un mínimo de una válvula de cierre manual aprobada
en la línea de suministro de combustible gaseoso. La válvula debe
ser fácilmente accesible. Los códigos locales determinan la ubicación
apropiada.
Sección 1 — Información General
Generadores enfriados por aire
8
INFORMACIÓN
GENERAL

9
1.10 RECONFIGURACIÓN DEL
SISTEMA DE COMBUSTIBLE
1.10.1 MOTOR DE 8 KW, 410CC
Para reconfigurar el sistema de combustible de GN a GLP, siga los
siguientes pasos (Figura 1.4).
NOTA:
El regulador primario para el suministro de propano NO SE INCLUYE
con el generador. SE DEBE SUMINISTRAR una presión de 10 a 12
pulgadas de columna de agua (0.36 a 0.43 psi) a la entrada de com-
bustible del generador.
1. Apague el suministro principal del gas (si está conectado).
2. Abra el techo y retire la puerta.
3. Retire la batería (si está instalada).
4. Tome el manubrio T de plástico selector de combustible en la bolsa
plástica suministrada con el generador.
5. Ubique la perilla selectora en la cubierta de la caja de aire, detrás de
la puerta del filtro de aire amarillo y el bulto de energía. La unidad
viene de fábrica en posición de gas natural. Agarrando el manubrio
en T, inserte el extremo del pasador en el agujero en la perilla selec-
tora y tire hacia afuera para vencer la presión del resorte y luego gire
en sentido horario 90 grados y deje que el selector retorne una vez
alineado con la posición de LP.
6. Guarde esta herramienta con el manual del propietario.
7. Instale la batería, la puerta y cierre el techo (tapa).
8. Invierta el proceso para convertir de regreso a gas natural.
Figura 1.4 – Selector de combustible
NOTA:
Use un sellador o compuesto para juntas de tuberías aprobado en
todos los accesorios para reducir la probabilidad de fugas.
1.10.2 MOTORES DE 10, 12, 14, 16, 17 Y 20KW,
V-TWIN
Para reconfigurar el sistema de combustible de GN a GLP, siga los
siguientes pasos.
NOTA:
El regulador primario para el suministro de propano NO SE INCLUYE
con el generador. SE DEBE SUMINISTRAR una presión de 10 a 12
pulgadas de columna de agua (0.36 a 0.43 psi) a la entrada de com-
bustible del generador.
1. Abra el techo (tapa).
2. Para unidades de 10kW: Suelte la abrazadera y deslice hacia atrás
la manguera de ingreso de aire.
Deslice el selector de combustible en el carburador hacia afuera y •
atrás de la caja (Figuras 1.5 y 1.6).
Regrese la manguera de entrada y ajuste la abrazadera en forma •
segura.
Para unidades de 12, 14, 16, 17 y 20kW: retire la cubierta del
limpiador de aire.
Deslice la palanca selectora hacia afuera y atrás de la caja (Figuras •
1.7 y 1.8).
Regrese la cubierta del limpiador de aire y ajuste los dos tornillos.•
Figura 1.5 - 10kW, GT-530 (manguera de entrada
deslizada atrás)
Palanca de
selección de
combustible -
posición para
gas natural
Figura 1.6 - 10kW, GT-530 (manguera de entrada
deslizada atrás)
Palanca de
selección de
combustible -
Posición para
propano líquido
3. Cierre el techo (tapa).
Sección 1 — Información General
Generadores enfriados por aire
INFORMACIÓN
GENERAL

10
4. Invierta el proceso para convertir de regreso a gas natural.
Figura 1.7 - 12, 14, 16, 17, y 20kW,
GT-990/GT-999 (cubierta de caja de aire reti-
rada)
Palanca de sel. de combustible - Posición “In” para GN
Figura 1.8 - 12, 14, 16, 17, y 20kW,
GT-990/GT-999 (cubierta de caja de aire reti-
rada)
Palanca de selección de combustible -
Posición “fuera” para gas propano líquido
1.11 UBICACIÓN
PELIGRO
Los humos del escape del motor contienen monóxido
de carbono, que puede ser MORTAL. Este gas peli-
groso, si se aspira en concentraciones suficientes,
puede hacerle perder la conciencia y causarle la
muerte. Este generador debe instalarse en forma
apropiada, en cumplimiento estricto de los están-
dares y códigos aplicables. Luego de la instalación,
no haga nada que pueda volver el sistema inseguro,
o que no cumpla con tales códigos y estándares.
• Opere el generador en exteriores solamente.
• Evite que los gases del escape ingresen a un área
confinada a través de ventanas, puertas, ventiladores,
espacios de arrastre u otras aberturas (Figura 1.9).
• Generac Power Systems como fabricante responsable
recomienda encarecidamente que se instale detectores
de monóxido de carbono en interiores de acuerdo on
las instrucciones y recomendaciones del fabricante.
• El generador debe ser montado en forma segura según
los códigos aplicables y las especificaciones del fabri-
cante. NO altere ni agregue nada al sistema de escape
ni haga nada que pueda volver inseguro al sistema de
escape o que no cumpla con los códigos y estándares
aplicables.
1.11.1 GENERADOR
Instale el generador en su caja protectora, en exteriores, donde haya
siempre disponible adecuada refrigeración y aire de ventilación (Figure
1.9). Considere estos factores:
La instalación del generador • debe cumplir estrictamente con los
estándares NFPA 37, NFPA 54, NFPA 58, y NFPA 70.
Instale la unidad donde las aberturas de entrada y salida no se vean •
obstruidas por hojas, césped, nieve, etc. Si los vientos prevalecientes
causan movimientos, considere el uso de un cortavientos para pro-
teger la unidad.
Instale el generador en cierta altura donde los niveles de agua no lo •
alcancen ni lo pongan en peligro.
Deje suficiente espacio a los lados del generador para mantenimiento •
y servicio. Esta unidad debe instalarse de acuerdo con los estándares
aplicables actuales NFPA 37 y NFPA 70 así como cualquier otro código
federal, estatal y local sobre distancias mínimas desde otras estruc-
turas. NO instale bajo plataformas de madera o estructuras a menos
que haya al menos cuatro (4) pies de claridad sobre el generador, tres
(3) pies de claridad a los lados y al frente y 18 pulgadas de claridad
en la parte trasera.
Instale la unidad donde no exista flujo de descarga de canaletas de llu-•
via, tejados, irrigación de paisajes, regaderas o sumideros que mojen
la unidad o su cubierta, incluyendo las aberturas de entrada y salida.
Instale la unidad donde los servicios no se vean afectados u obstrui-•
dos, incluyendo servicios disimulados, subterráneos o cubiertos
como los eléctricos, de combustibles, teléfonos, aire acondicionado
o irrigación.
Donde los vientos fuertes soplen en una dirección, coloque el genera-•
dor con la entrada de aire en dirección a los vientos.
Instale el generador lo más cerca posible a la fuente de combustible, •
para reducir la longitud de los tubos.
Instale el generador lo más cerca posible del interruptor de transferen-•
cia. RECUERDE QUE LAS LEYES O CÓDIGOS PUEDEN REGULAR LA
DISTANCIA Y UBICACIÓN.
El equipo debe instalarse en una superficie nivelada. El marco base •
debe estar nivelado dentro de dos (2) pulgadas alrededor.
El generador se coloca típicamente sobre gravilla o piedra chancada. •
Revise los códigos locales si se necesita bloques de concreto. Si se
requiere una base de bloque de concreto, se debe seguir todos los
códigos federales, estatales y locales. Se debe dar atención especial
al bloque base de concreto que deberá exceder la longitud y ancho
del generador por un mínimo de 6 (seis) pulgadas (0.152 metros) a
todos lados.
Sección 1 — Información General
Generadores enfriados por aire
INFORMACIÓN
GENERAL

11
Figura 1.9 – Claridades del generador
1.11.2 NUEVAS GUÍAS DE INSTALACIÓN PARA GEN-
ERADORES ESTACIONARIOS ENFRIADOS POR
AIRE DE 8, 10, 12, 14, 16, 17 Y 20 KW.
La National Fire Protection Association tiene un estándar para la insta-
lación y uso de motores de combustión estacionarios. Ese estándar es el
NFPA 37 y sus requerimientos limitan el espacio de un generador cerrado
de una estructura o pared (Figura 1.10).
NFPA 37, Sección 4.1.4, Motores ubicados en exteriores. Los motores y
sus cajas a prueba del clima si se provee, que se instalan en exteriores,
deberán ubicarse al menos a 5 pies de las aberturas en paredes y al
menos 5 pies de las estructuras que tienen paredes combustibles. No
se requerirá una separación mínima donde existan las siguientes condi-
ciones:
1. La pared adyacente de la estructura tiene una resistencia al fuego de
al menos una hora.
2. La caja a prueba de clima está construida de materiales no com-
bustibles y se ha demostrado que un incendio dentro de la caja no
encenderá los materiales combustibles fuera de la caja.
Anexo A — Material explicativo
A4.1.4 (2) Los medios para demostrar cumplimiento son a través
de una prueba de fuego a escala completa o por procedimientos de
cálculo.
Debido a los espacios frecuentemente limitados disponibles para la insta-
lación, se ha hecho aparente que la excepción (2) sería beneficioso para
muchas instalaciones residenciales y comerciales. Con ello en mente, el
fabricante contrató un laboratorio de pruebas independiente para llevar
a cabo pruebas de fuego a escala completa para asegurar que la caja
Carrier no encenderá materiales combustibles fuera de la caja.
El criterio era determinar el peor caso de escenario de incendio dentro del
generador y determinar la vulnerabilidad al fuego de los ítems fuera de la
caja del motor e diferentes distancias. La caja Carrier está construida de
materiales no combustibles y los resultados y conclusiones del laborato-
rio independiente de pruebas indicaron que cualquier fuego dentro de la
caja del generador no supondrá ningún riesgo de ignición a combustible o
estructuras cercanas, con o sin respuesta de personal de servicio contra
incendios.
En base a estas pruebas y los requerimientos de NFPA 37 Sec 4.1.4, las
guías para la instalación de los generadores listadas arriba se cambian a
18 pulgadas (457 mm) desde el lado trasero del generador a una pared o
edificio estacionario. Para un adecuado mantenimiento y claridad de flujo
de aire, el área encima del generador deberá estar al menos a 4 pies, con
un mínimo de 3 pies al frente y extremos de la caja. Esto incluirá árboles,
arbustos y vegetación que pudiera obstruir el flujo de aire. Vea el diagrama
al reverso de esta página y el dibujo de instalación dentro del manual del
propietario para mayores detalles.
El escape del generador contiene gases MORTALES de monóxido de
carbono. Este peligroso gas puede causar pérdida de conciencia o la
muerte. No coloque la unidad cerca de ventanas, puertas, entradas de aire
fresco (chimeneas, etc) ni ninguna abertura en el edificio o estructura,
incluyendo ventanas y puertas de un garaje cercano.
1.11.3 I NTERRUPTOR DE TRANSFERENCIA
(si se incluye)
1.11.3.1 Unidades de 8, 10, 12, 14, 16, 17 y 20kW
(si está equipado)
El interruptor de transferencia que puede haberse entregado dentro de la
caja con el generador de 8, 10, 12, 14, 16, o 17 kW está cerrado en una
caja NEMA1 (sólo para interiores). El interruptor de transferencia que
puede haberse entregado con el generador de 20kW está cerrado en una
caja NEMA 3R (para interiores y exteriores).
Instale el interruptor de transferencia en interiores sobre una estructura •
de soporte firme.
Para evitar la distorsión del interruptor, nivélelo si es necesario. Esto •
puede hacerse colocando arandelas entre la caja del interruptor y la
superficie de montaje.
Nunca instale el interruptor en lugares donde pueda gotear agua o •
cualquier sustancia corrosiva sobre la caja.
Proteja el interruptor en todo momento contra la humedad excesiva, •
polvo, suciedad, pelusas, polvo de construcción y vapores corrosi-
vos.
ADVERTENCIA
Si el interruptor de AUTO/OFF/MANUAL no está en
la posición OFF, el generador puede arrancar tan
pronto como se conecten los cables de la batería. Si
la fuente de energía pública no está apagada, puede
ocurrir chisporroteo en los postes de la batería y
causar una explosión.
1.12 REQUERIMIENTOS DE BATERÍA
Consulte en la sección de especificaciones el tamaño y valores correctos
de la batería.
1.13 INSTALACIÓN DE LA BATERÍA
Llene la batería con el fluido electrolítico apropiado si es necesario y tenga
la batería totalmente cargada antes de instalarla.
Antes de instalar y conectar la batería, complete los siguientes pasos:
1. Ponga el interruptor de AUTO/OFF/MANUAL del generador en OFF.
2. Apague la energía pública del interruptor de transferencia.
3. Retire el fusible de 7.5A del panel de control del generador.
Los cables de batería se conectan en fábrica al generador (Figura 1.10).
Conecte los cables a los bornes de la batería como sigue:
4. Conecte el cable rojo de la batería (desde el contactor del arranca-
dor) al borne de la batería indicado con un signo positivo, POS o
(+).
Sección 1 — Información General
Generadores enfriados por aire
INFORMACIÓN
GENERAL

12
Sección 1 — Información General
Generadores enfriados por aire
INFORMACIÓN
GENERAL
Figura 1.10 – Guías de instalación
18 pulg
Distancia mínima
36 pulgadas
36 pulgadas
36 pulgadas
60 pulgadas 60 pulg
Pared existente
No se permiten aberturas ni ventanas en la pared
dentro de los 5 pies de cualquier punto del generador
Tope del generador
48” Mínimo
60” recomendado
mínimo desde los
extremos
18 pulg
Mínimo
Generador
Claridad desde las
ventanas, puertas,
cualquier abertura en la
pared, arbustos o
vegetación mayor que 12”
en altura
La claridad desde los extremos y el
frente del generador debe ser 36 pulg.
Esto incluirá arbustos, árboles y
cualquier tipo de vegetación. La claridad
arriba deberá ser un mínimo de 48
pulgadas desde cualquier estructura,
colgante o proyecciones de la pared. El
generador no deberá colocarse bajo
una plataforma u otra estructura que
este cerrada y limite o contenga el flujo
de aire.
Estas guías se basan en pruebas con
fuego de la caja del generador y los
requerimientos de flujo de aire del
fabricante para la operación apro-
piada. Los códigos locales pueden ser
diferentes y más restrictivos que lo
que se describe aquí.
Este dibujo sustituye a las instrucciones de instalación en todas las instalaciones refrigeradas por aire Carrier y los
manuales de propietario con fechas anteriores al 26 de mayo de 2007.

13
5. Conecte el cable negro de la batería (desde la tierra del marco) al
borne de la batería indicado con un signo negativo, NEG o (+).
Figura 1.10 – Conexiones de cable de la batería
PUNTA NEGRA
(DESDE EL MARCO
PUNTA ROJA
(DESDE EL CONTACTOR
DEL ARRANCADOR)
ROJO
BATERÍA
NEGRO
NOTA:
Deberá usarse grasa dieléctrica sobre los bornes de la batería para
ayudar a evitar la corrosión.
NOTA:
Puede haber daños si las conexiones de la batería se hacen al revés.
NOTA:
En áreas donde las temperaturas regularmente caen debajo de 10° F
(-12° C) se recomienda que se instale un calentador de batería tipo
almohadilla para ayudar al arranque en clima frío.
1.14 LA BATERÍA
PELIGRO
No arroje la batería al fuego. La batería puede
explotar.
Una batería presenta un riesgo de choque eléctrico
y una gran corriente de cortocircuito. Las siguientes
precauciones serán observadas al trabajar con bat-
erías:
• Retire el fusible de 7.5A del panel de control del genera-
dor.
• Sáquese relojes, anillos y otros objetos de metal;
• Use herramientas con manubrios aislados;
• Use guantes y botas de goma;
• No deje herramientas ni partes metálicas encima de la
batería; y
• Desconecte la fuente de carga antes de conectar o
desconectar los terminales de la batería.
ADVERTENCIA
No abra ni mutile la batería. El electrolítico li-berado
es dañino para la piel y ojos y es tóxico.
El electrolito es ácido sulfúrico diluido que es dañino
para la piel y los ojos. Es conductor eléctrico y cor-
rosivo.
Se debe observar los siguientes procedimientos:
• Usar protección de ojos completa y ropa protectora;
• Donde haya contacto del electrolito con la piel, lave
inmediatamente con agua.
• Donde haya contacto del electrolito con los ojos,
enjuague completa e inmediatamente con agua y
busque atención médica; y
• El electrolito derramado debe lavarse con un agente
neutralizador de ácido. Una práctica común es usar una
solución de 1 libra (1/2 kilo) de bicarbonato de sodio en
1 galón (4 litros) de agua. La solución de bicarbonato
de sodio se debe añadir hasta que la evidencia de la
reacción (espuma) haya cesado. El líquido resultante
debe enjuagarse con agua y el área deberá secarse.
Las baterías de plomo-ácido presentan riesgo de
fuego porque generan gas hidrógeno. Se debe seguir
los siguientes procedimientos:
• NO FUME cerca de la batería;
• NO haga fuego/chispas en el área de la batería; y
• Descargue la electricidad estática del cuerpo antes de
tocar la batería, tocando primero una superficie metáli-
ca conectada a tierra.
Asegúrese que el interruptor AUTO/OFF/MANUAL se
encuentre en la posición de OFF antes de conectar
los cables de la batería. Si el interruptor se coloca a
AUTO o MANUAL, el generador puede arrancar tan
pronto como se conectan los cables de batería.
Asegúrese de que el suministro público de electrici-
dad esté apagado y que el fusible de 7.5A esté fuera
del panel de control del generado, ya que puede
ocurrir una chispa en los bornes de la batería ya que
los cables están juntos y causar una explosión.
El servicio de la batería deberá ser realizado o supervisado por personal
que conozca de baterías y las precauciones requeridas. Mantenga al per-
sonal no autorizado lejos de las baterías.
Consulte en la sección de especificaciones el tamaño y valores correctos
al reemplazar la batería Estos procedimientos deben realizarse a intervalos
especificados en la “Agenda de servicio”. Se usa un sistema de tierra
negativa. Las conexiones de la batería se muestran en los diagramas
de cableado. Asegúrese que la batería esté correctamente conectada
y los terminales estén ajustados. Observe la polaridad de la batería al
conectarla al generador.
Sección 1 — Información General
Generadores enfriados por aire
INFORMACIÓN
GENERAL

14
1.15 CARGADOR DE BATERÍAS
NOTA:
Estos generadores NO contienen un cargador interno de baterías.
NOTA:
El fabricante proporciona un cargador lento de batería que está activo
cuando la unidad está preparada para operación automática. Con la
batería instalada y la fuente de energía pública disponible en el inter-
ruptor de transferencia, la batería recibe una carga lenta para evitar
que se descargue. El cargador está diseñado para ayudar a extender la
vida de la batería manteniéndola. La característica de carga de batería
no se puede usar para cargar una batería descargada.
Para unidades embarcadas con un interruptor de transferencia, el cargador
de baterías está preinstalado en la caja del interruptor de transferencia.
Para unidades embarcadas sin un interruptor de transferencia/centro
de cargas, un módulo cargador de baterías separado se incluye con el
generador.
(Para mayor información sobre la instalación del cargador de baterías, vea
las guías de instalación del generador y las instrucciones del cargador de
baterías incluidas con la unidad).
2.1 ANTES DEL ARRANQUE INICIAL
NOTA:
Estas unidades han funcionado y han sido probadas en la fábrica antes
de ser embarcadas y no requieren ningún tipo de entrada forzada.
NOTA:
Esta unidad viene llena con aceite de fábrica. Revise el nivel de aceite
y agregue la cantidad apropiada si es necesario.
Antes de arrancar, complete lo siguiente:
1. Fije el interruptor principal del circuito en su posición OFF (o en
OPEN).
2. Ponga el interruptor de AUTO/OFF/MANUAL en la posición OFF.
3. Apague todos los interruptores en el centro de cargas de la caja de
transferencia (T1 y T2).
4. Apague todas las cargas conectadas a los terminales T1 y T2 del
interruptor de transferencia.
5. Revise el nivel de aceite en el cárter del motor, y si es necesario,
llene hasta que la varilla marque FULL con el aceite recomendado.
No llene por encima de la marca FULL.
6. Revise el suministro de combustible. Las líneas de combustible
gaseoso deben haber sido purgadas en forma apropiada y sin fugas
comprobadas de acuerdo con los códigos aplicables de gas com-
bustible. Todas las válvulas de cierre en las líneas de abastecimiento
de combustible deben estar abiertas.
Sólo durante el arranque inicial, el generador puede exceder el número
normal de intentos de arranque y experimentar una falla de sobre-arranque
(ver la sección de “sobre-arranque”) Esto se debe al aire acumulado en
el sistema de combustible durante la instalación. Reinicie el tablero de
control y reinicie hasta dos veces más si es necesario. Si la unidad no
arranca, contacte a su concesionario local.
CUIDADO
Nunca opere el motor con el nivel de aceite por
debajo de la marga “Add” (agregar) de la varilla. Esto
puede dañar el motor.
2.2 REVISE LA OPERACIÓN DEL
INTERRUPTOR DE TRANSFERENCIA
Consulte los procedimientos en la sección “Operación de transfe-rencia
manual” del manual de propietario.
PELIGRO
No intente una operación manual del interruptor de
transferencia hasta que todos los suministros de vol-
taje al interruptor de transferencia hayan sido posi-
tivamente apagados. El no apagar todas las fuentes
de voltaje traerá como resultado un choque eléctrico
extremadamente peligroso y posiblemente fatal.
2.3 REVISIONES ELÉCTRICAS
Complete los chequeos eléctricos de esta manera:
1. Fije el interruptor principal del circuito en su posición OFF (o en
OPEN).
2. Ponga el interruptor de AUTO/OFF/MANUAL en la posición OFF.
3. Apague todos los interruptores en el centro de cargas de la caja de
transferencia (T1 y T2).
4. Encienda el suministro de energía pública al interruptor de transfer-
encia usando los medios provistos (como un interruptor de línea
principal pública).
PELIGRO
El interruptor de transferencia está ahora eléctrica-
mente “caliente”. El contacto con partes “Calientes”
puede traer como resultado un choque eléctrico
extremadamente peligroso y posiblemente fatal.
Proceda con cuidado.
5. Use un voltímetro AC exacto para revisar la fuente de energía pública
a través de los terminales del interruptor de transferencia N1 y N2. El
voltaje nominal de línea a línea deberá ser 240 volts AC.
6. Revise el voltaje de la fuente de energía pública a través de los ter-
minales N1 y la oreja neutral del interruptor de transferencia, luego a
través del terminal N2 y el neutro. El voltaje nominal de línea a neutro
deberá ser 120 volts AC.
7. Cuando esté seguro de que el voltaje de la fuente de energía pública
sea compatible con los valores del interruptor de transferencia y el
circuito de carga, apague la fuente de energía pública al interruptor
de transferencia.
8. En el panel del generador, coloque el interruptor de Auto/Off/Manual
en MANUAL. El motor deberá arrancar.
9. Deje calentar al motor por alrededor de cinco minutos para dejar
estabilizar las temperaturas internas. Luego, fije el interruptor princi-
pal del circuito en su posición ON (o cerrado).
PELIGRO
¡Proceda con cuidado! El voltaje del generador ahora
es proporcionado al interruptor de transferencia. El
contacto con las partes vivas del interruptor de trans-
ferencia traerá como resultado un choque eléctrico
peligroso y posiblemente fatal.
Sección 2 — Arranque luego de la instalación y ajustes
Generadores enfriados por aire
AJUSTES DE
ARRANQUE
POST- INSTALACIÓN

15
10. Conecte un voltímetro AC exacto y un frecuencímetro a través de las
orejas terminales E1 y E2 del interruptor de transferencia. El voltaje
del de 8kW deberá ser 230-240 voltios a una frecuencia de 61-63
Hertz. El voltaje de los de 12, 14, 16, 17 y 20kW deberá ser 247-249
a una frecuencia de 59.5-60.5 Hertz. El voltaje del de 10kW deberá
ser 220-230 voltios a una frecuencia de 59,5-60,5 Hertz.
11. Conecte las puntas de prueba del voltímetro AC a través de las orejas
terminales E1 y neutro, luego a través de E2 y neutro. En ambos
casos, la lectura de voltaje deberá ser 121-126 volts AC (8kW), y
125-126 volts AC (10, 12, 14, 16, 17 y 20kW).
12. Fije el interruptor principal del circuito en su posición OFF (o en
OPEN). Deje el motor correr sin carga por unos minutos para esta-
bilizar las temperaturas internas del motor del generador.
13. Ponga el interruptor de AUTO/OFF/MANUAL en la posición OFF. El
motor debería apagarse.
NOTA:
Es importante no proceder hasta que sea seguro que el voltaje AC
del generador y la frecuencia son las correctas y están dentro de los
límites indicados. Generalmente, si la frecuencia y el voltaje AC son
altos o bajos, el gobernador del motor requiere ajustes* (*GH410
solamente). Si la frecuencia es correcta, pero el voltaje es alto o bajo,
el regulador de voltaje del generador requiere ajustes.
2.4 PRUEBAS DEL GENERADOR BAJO
CARGA
Para probar el generador con cargas eléctricas aplicadas, proceda como
sigue:
1. Fije el interruptor principal del circuito en su posición OFF (o en
OPEN).
2. Apague todos los interruptores en el centro de cargas de la caja de
transferencia (T1 y T2).
3. Ponga el interruptor de AUTO/OFF/MANUAL en la posición OFF.
4. Apague el suministro de energía pública al interruptor de transfer-
encia usando los medios provistos (como un interruptor de línea
principal pública).
ADVERTENCIA
No intente una operación manual del interruptor de
transferencia hasta que todos los suministros de vol-
taje al interruptor de transferencia hayan sido posi-
tivamente apagados. El no apagar todas las fuentes
de voltaje traerá como resultado un choque eléctrico
extremadamente peligroso y posiblemente fatal.
5. Coloque manualmente el interruptor de transferencia en la posición
STAND BY, es decir los terminales de carga conectados a los termi-
nales E1/E2 del generador. La palanca de operación del interruptor
de transferencia deberá estar abajo.
6. Ponga el interruptor de AUTO/OFF/MANUAL en la posición MANUAL.
El motor deberá arrancar inmediatamente.
7. Deje que el motor se estabilice y caliente por unos minutos.
8. Fije el interruptor principal del circuito en su posición ON (o en
CLOSED). Las cargas ahora están energizadas por el generador de
respaldo.
9. Encienda el centro de cargas del interruptor de transferencia (T1 y
T2).
10. Conecte un voltímetro AC exacto y un frecuencímetro a través de las
orejas terminales E1 y E2.
El voltaje del de 8kW deberá ser mayor a 230 voltios y la frecuencia •
deberá ser mayor que 58 Hz.
10, • los voltajes de los de 12, 14, 16, 17 y 20kW deberán ser may-
ores que 240 voltios y la frecuencia deberá ser 60 Hz.
11. Deje el generador funcionando a plena carga por 20 o 30 minutos.
Escuche si hay ruidos inusuales, vibraciones u otras indicaciones
de operación anormal. Revise si hay fugas de aceite, evidencia de
sobrecalentamiento, etc.
12. Cuando la prueba con carga esté completa, apague las cargas eléc-
tricas.
13. Fije el interruptor principal del circuito en su posición OFF (o en
OPEN).
14. Deje funcionar al motor sin carga por unos minutos.
15. Ponga el interruptor de AUTO/OFF/MANUAL en la posición OFF. El
motor debería apagarse.
2.5 REVISANDO LA OPERACIÓN
AUTOMÁTICA
Para revisar la apropiada operación automática del sistema, proceda
como sigue:
1. Fije el interruptor principal del circuito en su posición OFF (o en
OPEN).
2. Revise que el interruptor de AUTO/OFF/MANUAL se encuentre en la
posición OFF.
3. Apague el suministro de energía pública al interruptor de transfer-
encia usando los medios provistos (como un interruptor de línea
principal pública).
4. Coloque manualmente el interruptor de transferencia en la posición
UTILITY, es decir los terminales de carga conectados al lado de la
fuente de energía pública.
5. Encienda el suministro de energía pública al interruptor de transfer-
encia usando los medios provistos (como un interruptor de línea
principal pública).
6. Fije el interruptor principal del circuito en su posición ON (o en
CLOSED).
7. Ponga el interruptor de AUTO/OFF/MANUAL en la posición AUTO. El
sistema está ahora listo para operación automática.
8. Apague la energía pública del interruptor de transferencia.
Con el interruptor de AUTO/OFF/MANUAL en AUTO, el motor deberá arran-
car cuando la fuente de energía pública se apaga luego de un retardo de
10 segundos. Luego del arranque, el interruptor de transferencia deberá
conectar los circuitos de carga al lado de respaldo luego de un retardo
de 5 segundos. Deje al sistema ir a través de su secuencia automática
de operación.
Con el generador funcionando y las cargas energizadas por la salida AC
del generador, encienda la fuente de energía pública al interruptor de
transferencia. Puede ocurrir lo siguiente:
Luego de 15 segundos, el interruptor deberá transferir las cargas de •
regreso al suministro público de energía.
Luego de un minuto después de la retransferencia, el motor deberá •
apagarse.
Sección 2 — Arranque luego de la instalación y ajustes
Generadores enfriados por aire
AJUSTES DE
ARRANQUE
POST- INSTALACIÓN

16
2.6 AJUSTE DEL GOBIERNO DEL MOTOR
Si la frecuencia y el voltaje AC están correspondientemente altos o bajos,
ajuste el gobierno del motor como sigue.
2.6.1 UNIDADES DE 8KW
ADVERTENCIA
El motor debe estar apagado para realizar los pasos
1 y 2.
1. Suelte el perno de la abrazadera del gobernador (Figura 2.1).
2. Sostenga la palanca del gobernador en su posición de acelerador
totalmente abierto (sentido horario), y gírela en sentido horario todo
lo que vaya. Luego, ajuste el perno de la abrazadera de la palanca
del gobernador a 70 pulg-lb (8 N-m).
3. Arranque el generador, déjelo estabilizarse y calentar sin carga.
4. Conecte un medidor de frecuencia a través de las puntas de salida
AC del generador.
Figura 2.1 — Ajuste de gobernador de motor en
motores de cilindro único
EJE
GOBERNADOR
TORNILLO DE
AJUSTE
PRIMARIO
PERNO DE
ABRAZADERA
DE GOBERNADOR
TORNILLO DE
AJUSTE SECUNDARIO
5. Gire el tornillo de ajuste primario para obtener una lectura de fre-
cuencia de 61.5 Hz. Gire el tornillo de ajuste secundario para obtener
una frecuencia de 62,5 Hz.
2.6.2 UNIDADES DE 12, 14, 16, 17 Y 20KW
NOTA:
Todas las unidades V-twin NO requieren un ajuste de gobernador de
motor debido a su diseño.
2.6.3 PROTECCIÓN ADICIONAL
CONTRA CORROSIÓN
Periódicamente pulverice todas las partes de unión del motor y soportes
con spray inhibidor de corrosión como WD-40 o un producto compa-
rable.
2.7 AJUSTE DEL REGULADOR DE VOLTAJE
2.7.1 UNIDADES DE 8 Y 10KW
Debido al diseño sin escobillas de estos dos alternadores, no se usa un
regulador de voltaje y por tanto no se requiere ajuste de voltaje.
2.7.2 UNIDADES DE 12, 14, 16, 17 Y 20KW
Con la frecuencia entre 59.5 -60.5 Hertz sin carga, lentamente gire el
potenciómetro ranurado (Figura 2.2) hasta que el voltaje de línea se lea
247-249 volts.
Figura 2.2 – Potenciómetro de ajuste de voltaje
Girar para
ajustar voltaje.
NOTA:
El panel de acceso encima del panel de control debe retirarse para
ajustar el regulador de voltaje.
NOTA:
El regulador de voltaje está encapsulado detrás del panel de control
del generador. El regulador mantiene un voltaje en proporción directa
a la frecuencia a razón de 2 a 1. Por ejemplo, a 60 Hz, el voltaje de
línea a neutro será de 124 voltios.
Sección 2 — Arranque luego de la instalación y ajustes
Generadores enfriados por aire
AJUSTES DE
ARRANQUE
POST- INSTALACIÓN

17
OPERACIÓN
Sección 3 — Operación
Generadores enfriados por aire
3.1 INTERFAZ DEL PANEL DE CONTROL
3.1.1 USO DEL INTERRUPTOR AUTO/OFF/MANUAL
(FIGURAS 3.1 Y 3.2)
ADVERTENCIA
Con el interruptor colocado en AUTO, el motor puede
arrancar en cualquier momento sin advertencia. Tal
arranque automático ocurre cuando el voltaje de
la fuente de energía pública cae por debajo de un
nivel predeterminado o durante el ciclo de ejercicio
normal. Para evitar un posible daño que puede ser
causado por tales arranques repentinos, siempre
coloque el interruptor en OFF y retire los fusibles
antes de trabajar o estar cerca del generador o del
interruptor de transferencia. Luego coloque una eti-
queta de “NO OPERAR” sobre el panel del generador
y sobre el interruptor de transferencia.
1. Posición AUTO – Seleccionar este interruptor activa la operación
totalmente automática del sistema. También permite a la unidad
arrancar automáticamente y ejercitar el motor cada siete días con
los ajustes del temporizador de ejercicios (ver la sección de configu-
ración del temporizador de ejercicios).
2. Posición “OFF” – Esta posición del interruptor apaga el motor. Esta
posición también evita la operación automática.
3. Posición “manual” – Coloque el interruptor en MANUAL para arran-
car el motor. La transferencia a la energía de respaldo no ocurrirá a
menos que haya una falla del servicio público.
Figura 3.1 – Panel de control del generador de
8kW
SET
EXERCISE
SYSTEM READY
LOW BATTERY
LOW OIL PRESSURE
HIGH OIL TEMPERATURE
OVERSPEED
RPM SENSOR LOSS
OVERCRANK
Figura 3.2 – Panel de control del generador de
10/12/14/16/17 y 20kW
ENTER
ECS
3.1.2 FIJANDO EL TEMPORIZADOR DE EJERCICIOS
Este generador está equipado con un temporizador de ejercicios. Una
vez fijado, el generador arrancará y se ejercitará cada siete días, en el día
de la semana y la hora especificada. Durante este periodo de ejercicio,
la unidad funciona aproximadamente 12 minutos y luego se apaga. La
transferencia de cargas a la salida del generador no ocurre durante el ciclo
de ejercicios a menos que se pierda la energía pública.
8kW
Un interruptor en el panel de control (ver Figura 3.1) permite la selección
del día y la hora de ejercicio del sistema. En el momento elegido, realice
la siguiente secuencia para seleccionar el día y hora deseadospara el
ejercicio del sistema. Recuerde los cambios de hora estacionales que
afectan la configuración de los ejercicios.
1. Verifique que el interruptor AUTO/OFF/MANUAL esté puesto en
AUTO.
2. Mantenga presionado el interruptor “Fijar ejercicio” por algunos
segundos. Todos los LED’s dejarán de destellar inmediatamente y el
generador arrancará.
3. El generador arrancará y funcionará por aproximadamente 12
minutos y luego se apagará. El ejercitador ahora está colocado para
funcionar a esta hora del día de cada semana.
Ejemplo: Si el “Fijar ejercicio” se presionó el sábado en la tarde a las 2:00
p.m., el generador arrancará y ejercitará aproximadamente 12 minutos
cada sábado a las 2:00 p.m.
NOTA:
El ejercitador sólo funcionará en modo AUTO y no funcionará a menos
que se realice este procedimiento. El ejercitador necesitará reini-
ciarse cada vez que la batería de 12 voltios se desconecte y luego se
reconecte, y cuando el fusible se saque o se reemplace.

18
ASISTENTE DE INSTALACIÓN DE 10 a 20 KW
Característica de pruba propia del sistema de interconexión (siga las
instrucciones en pantalla)
Al encendido, este controlador realizará un auto examen que revisará la
presencia de voltaje de la red pública en los circuitos CC. Esto se hace
para evitar daños si el instalador conecta por error los cables de sensado
de energía de la red pública AC al bloque terminal CC. Si se deflexiona
el voltaje de la red pública, el controlador mostrará una advertencia y
bloqueará el generador, evitando daños al controlador. Debe retirarse la
energía al controlador para apagar esta advertencia.
El voltaje de la red pública debe encenderse y estar presente en los ter-
minales N1 y N2 dentro del panel de control del generador para que se
realice y apruebe este examen.
NOTA:
¡EL DAÑO CAUSADO POR MAL CABLEADO DE LOS CABLES DE
INTERNCONEXIÓN NO ES CUBIERTO POR LA GARANTÍA!
Este examen se realizará cada vez que el controlador se enciende.
En el primer arranque del generador, la interfaz de pantalla empezará el
asistente de instalación. El asistente pedirá al usuario fijar los ajustes
mínimos para operar. Estos ajustes son simples: Fecha/hora actual y día/
hora de ejercicio. Los intervalos de mantenimiento serán inicializados
cuando se ingresa la hora del ejercicio (Figura 3.2).
Los ajustes de ejercicio se pueden cambiar en cualquier momento con el
menú “EDIT” (ver Apéndice, “Sistema del menú”).
Si la batería de 12 voltios está desconectada y el fusible retirado, el
asistente de instalación operará a la restauración de la energía. La única
diferencia es que la pantalla sólo pedirá al cliente la fecha y hora actual.
SI EL INSTALADOR PRUEBA AL GENERADOR ANTES DE LA INSTALACIÓN,
PRESIONE LA TECLA “ENTER” PARA EVITAR CONFIGURAR LA HORA DE
EJERCICIO. ESTO ASEGURARÁ QUE CUANDO EL CLIENTE ENERGICE
LA UNIDAD, TODAVÍA SE LE PEDIRÁ INGRESAR UNA HORA DE
EJERCICIO.
NOTA:
El ejercitador sólo funcionará en modo AUTO y no funcionará a menos
que se realice este procedimiento. La fecha/hora actual necesitará
reiniciarse cada vez que la batería de 12 voltios se desconecte y luego
se reconecte, y/o cuando el fusible se saque.
3.1.3 INTERFAZ DE PANTALLA
Pantalla del LED de 8Kw.
Se proporciona siete (7) LEDs para indicaciones de estatus de usuario.
Las funciones del LRD son:
1. Sistema listo (verde)
2. Batería baja (rojo)
3. Baja presión de aceite (rojo)
4. Alta temperatura del aceite (rojo)
5. Sobrevelocidad (rojo)
6. Pérdida de sensor de RPM (rojo)
7. Sobrearranque (rojo)
Ver la sección de sistemas de protección para mayores detalles.
MENÚS DE INTERFAZ DE PANTALLA PARA 10 a 20KW
La pantalla LCD está organizada como se detalla abajo:
La página de “Inicio”, esta página es la página predeterminada que •
se mostrará si no se presionan teclas por 30 segundos. Esta página
normalmente muestra el mensaje de estatus actual y la fecha y hora
actuales. La alarma y/o advertencia activa de más alta prioridad se
enviará automáticamente a esta página así como destellará la luz de
fondo cuando tal evento se detecte. En caso de múltiples alarmas o
advertencias, sólo se mostrará el primer mensaje. Para borrar una
alarma o advertencia, vea la sección de sistemas de protección - bor-
rar alarma.
La luz trasera de la pantalla normalmente está apagada. Si el usuario •
presiona cualquier tecla, la luz trasera se encenderá automáticamente
y permanecerá encendida por 30 segundos luego de que se presione
la última tecla.
La página de “Menú principal” permitirá al usuario navegar a todas •
las otras páginas o sub-menús usando las teclas izquierda/derecha
y Enter. A esta página puede accederse en cualquier momento con
varias presiones de la tecla Escape dedicada. Cada presión de la
tecla Escape lo lleva de regreso al menú previo hasta que se alcance
el menú principal. Esta página muestra las siguientes opciones:
HISTORIA, ESTATUS, EDITAR Y DEPURAR. (Vea el apéndice -
“Sistema de menú”).
3.2 OPERACIÓN DE TRANSFERENCIA
AUTOMÁTICA
Para seleccionar la operación automática, haga lo siguiente:
1. Asegúrese de que los contactos principales del interruptor de trans-
ferencia estén fen su posición de UTILITY (servicio público), es decir
las cargas conectadas a la energía pública (Figura 3.2).
2. Asegúrese que haya un suministro normal de energía PÚBLICA a las
orejas del interruptor de transferencia N1 y N2 (consulte la sección
de datos eléctricos).
3. Ponga el interruptor de AUTO/OFF/MANUAL del generador en
AUTO.
4. Fije el interruptor principal del circuito en su posición ON (o en
CLOSED).
Con los pasos precedentes completos, el generador arrancará automáti-
camente cuando el voltaje de la energía pública cae debajo de un nivel
predeterminado. Luego de que arranca la unidad, las cargas se transfieren
a la fuente de energía de respaldo. Consulte la sección de Secuencia de
operación automática.
Sección 3 — Operación
Generadores enfriados por aire
OPERACIÓN

19
3.3 SECUENCIA DE OPERACIÓN
AUTOMÁTICA
3.3.1 FALLA DE SERVICIO PÚBLICO
Condiciones iniciales: Generador en Auto, listo para funcionar, carga sum-
inistrada por la fuente de energía pública. Cuando el servicio público falla
(por debajo del 65% del nominal), se inicia un retardo de interrupción de
línea de 10 segundos (opcionalmente programable sólo en los modelos
de 17 y 20 kW). Si el servicio público no se restaura cuando el tiempo
expira, el motor arrancará. Una vez arrancado, se inicia un temporizador
de 5 segundos para calentamiento del motor. Cuando el temporizador de
calentamiento expira, el control transferirá la carga al generador. Si se res-
taura el servicio eléctrico público (por encima del 75% del valor nominal)
en cualquier momento desde la iniciación del arranque del motor hasta
que el generador esté listo para aceptar carga (y el tiempo de calentam-
iento de 5 segundos no se ha completado), el controlador completará el
ciclo de arranque y llevará al generador a su ciclo normal de enfriamiento,
sin embargo, la carga permanecerá en el servicio público.
3.3.2 ARRANQUE
El sistema controlará el ciclo de arranque así: 16 segundos de arranque,
siete (7) segundos descanso, 16 segundos de arranque, siete (7) segun-
dos de descanso, seguidos por tres (3) ciclos adicionales de siete (7)
segundos de arranque seguidos por siete (7) segundos de descanso.
Operación del choke
1. Los motores de 990/999cc tienen un choke eléctrico en la caja de
aire que se controla automáticamente por el tablero de control elec-
trónico.
2. Los motores de 530cc tienen un choke eléctrico en la manguera de
ingreso de aire del panel divisor que se controla automáticamente
por el tablero de control electrónico.
3. Los motores de 410cc tienen un choke eléctrico detrás de la caja
de aire que se controla automáticamente por el tablero de control
electrónico.
Falla de arranque
Esto se define como cualquiera de las siguientes ocurrencias durante el
arranque.
1. No se alcanza la soltura del arranque durante el ciclo de arranque
especificado. La soltura del arrancador se define como cuatro (4)
ciclos a 1,000 RPM.
2. Se alcanza la soltura del arranque, pero no se alcanza las 2200 RPM
en 15 segundos. En este caso el tablero de control irá a un ciclo de
descanso por siete (7) segundos, luego continuará el resto del ciclo
de arranque.
Durante un ciclo de descanso las salidas de combustible y arranque son
de-energizadas y la salida del magneto hace corto a tierra.
Condiciones de arranque
Las siguientes notas se aplican durante el ciclo de arranque.
1. El motor del arrancador no engancha dentro de los cinco (5) segun-
dos del apagado del motor.
2. La salida de combustible no está energizada con el arrancador.
3. Las salidas del arrancador y el magneto serán energizadas juntas.
4. Una vez que el arrancador está energizado, el tablero de control
empezará a buscar la rotación del motor. Si no ve una señal RPM
dentro de tres (3) segundos se apagará y se enganchará como
pérdida de sensor RPM.
5. Una vez que el tablero de control ve una señal RPM, energizará
el solenoide de combustible, abrirá el acelerador y continuará la
secuencia de arranque.
6. El motor arrancador se desenganchará cuando la velocidad alcanza
la soltura del arrancador.
7. Si el generador no alcanza los 2200 RPM dentro de los 15 segundos,
ocurrirá un ciclo de re-arranque.
8. Si el motor deja de cambiar entre soltura de arrancador y 2200 RPM,
el tablero irá a un ciclo de descanso por siete (7) segundos y luego
re-arrancará (si existen ciclos adicionales de arranque).
9. Una vez arrancado, el generador esperará un período antes de
empezar a monitorear la presión de aceite y su temperatura (con-
sulte los tiempos de espera en la sección de mensajes de alarma).
10. Durante el arranque manual, si el interruptor de Modo se mueve de
la posición Manual, el arranque se detiene inmediatamente.
11. Durante el modo Auto, si el servicio público regresa, el ciclo de
arranque NO aborta, sino continua hasta que se completa. Una vez
que el motor arranca, funcionará por un minuto, y luego se apa-
gará.
3.3.3 TRANSFERENCIA DE CARGA
La transferencia de carga cuando el generador está funcionando depende
del modo de operación como sigue:
1. Manual
No transferirá al generador si el servicio público está presente.•
Transferirá al generador si el servicio público falla (debajo del 65% •
del nominal por 10 segundos consecutivos.
Transferirá de regreso cuando el servicio público regresa por 15 •
segundos consecutivos. El motor continuará funcionando hasta que
salga del modo Manual.
2. Automático
Arrancará y funcionará si el servicio público falla por 10 segundos •
consecutivos.
Iniciará un temporizador de calentamiento del motor, de 5 segun-•
dos.
No transferirá si el servicio público regresa.•
No transferirá al generador si el servicio público aun no está pre-•
sente.
Transferirá de regreso al servicio público una vez que este retorne •
(por encima del 75% del nominal) por 15 segundos.
Transferirá de regreso al servicio público si el generador se apaga •
por cualquier razón (como que el interruptor esté en posición OFF).
o exista una alarma de apagado.
Luego de la transferencia, se apagará el motor luego de un minuto •
de tiempo de enfriamiento.
3. Ejercicio
No ejercitará si el generador está ya funcionando ya sea en modo •
Auto o Manual.
Durante el ejercicio, el controlador sólo transferirá si el servicio •
público falla durante el ejercicio por 10 segundos, y cambiará a
modo Auto.
•
OPERACIÓN
Sección 3 — Operación
Generadores enfriados por aire

20
3.3.4 SERVICIO PÚBLICO RESTAURADO
Condición inicial: Generador suministrando energía a la carga del cliente.
Cuando el servicio público regresa (por encima del 75% del nominal), se
iniciará un temporizador de 15 segundos de regreso al servicio público.
Al finalizar este temporizador, si el suministro público está aún presente y
es aceptable, el control transferirá la carga de regreso al servicio público
y hará funcionar el motor en un periodo de enfriamiento de un minuto y
luego se apagará. Si el suministro público falla por tres segundos durante
este periodo de enfriado, el control transferirá la carga de regreso al
generador y continuará funcionando mientras monitorea el retorno del
servicio público.
3.4 OPERACIÓN DE LA TRANSFERENCIA
MANUAL
3.4.1 TRANSFERENCIA A LA FUENTE DE ENERGÍA
DEL GENERADOR
Para arrancar el generador y activar el interruptor de transferencia manu-
almente, proceda como sigue:
1. Ponga el interruptor de AUTO/OFF/MANUAL en la posición OFF.
2. Fije el interruptor principal del circuito en su posición OFF (o en
OPEN).
3. Apague el suministro de energía pública al interruptor de transfer-
encia usando los medios provistos (como un interruptor de línea
principal pública).
PELIGRO
No intente activar el interruptor de transferencia man-
ualmente hasta que todos los suministros de voltaje
al interruptor hayan sido positivamente apagados. El
no apagar todas las fuentes de voltaje puede traer
como resultado un choque eléctrico extremadamente
peligroso y posiblemente fatal.
4. Use el manubrio de transferencia manual dentro del interruptor de
transferencia para mover los contactos principales a su posición de
STANDBY, es decir las cargas conectadas a la fuente de energía de
respaldo (Figura 3.3).
Figura 3.3 – Operación manual del interruptor
de transferencia
CARGA CONECTADA A SERVICIO PÚBLICO DE ELECTRICIDAD
CARGA CONECTADA A FUENTE DE RESPALDO
MANUBRIO DE TRANSFERENCIA
MANUAL
PALANCA DE OPERACIÓN
DEL INTERRUPTOR DE TRANSFERENCIA
5. Para arrancar el motor, ponga el interruptor de AUTO/OFF/MANUAL
en MANUAL.
6. Deje que el motor se estabilice y caliente por unos minutos.
7. Fije el interruptor principal del circuito en su posición ON (o en
CLOSED). La fuente de energía de respaldo ahora energiza las car-
gas.
3.4.2 TRANSFERENCIA DE REGRESO AL SERVICIO
ELÉCTRICO PÚBLICO
Cuando se ha restaurado el servicio público, transfiera de regreso a esa
fuente y apague el generador. Esto se logra como sigue:
1. Fije el interruptor principal del circuito en su posición OFF (o en
OPEN).
2. Haga funcionar por un minuto o dos sin carga para estabilizar las
temperaturas internas.
3. Ponga el interruptor de AUTO/OFF/MANUAL del generador en la
posición OFF (o en OPEN). El motor debería apagarse.
4. Revise que la energía pública al interruptor de transferencia se
encuentre apagada.
PELIGRO
No intente activar el interruptor de transferencia man-
ualmente hasta que todos los suministros de voltaje
al interruptor hayan sido positivamente apagados. El
no apagar todas las fuentes de voltaje puede traer
como resultado un choque eléctrico extremadamente
peligroso y posiblemente fatal.
5. Use el manubrio de transferencia manual dentro del interruptor de
transferencia para mover los contactos principales a su posición
de UTILITY (servicio público), es decir las cargas conectadas a la
fuente de energía pública (Figura 3.2).
6. Encienda la energía pública al interruptor de transferencia usando los
medios provistos.
7. Coloque el sistema en operación automática como se indica en la
sección Operación de transferencia automática.
3.5 COMPARTIMIENTOS LATERALES
(V-TWIN SOLAMENTE) (FIGURAS 3.4 & 3.5)
Los códigos locales pueden requerir que este compartimiento esté cer-
rado. Se proporciona un pestillo para que el propietario pueda asegurar
el compartimiento con su propio candado. Revise los códigos locales en
su área.
3.5.1 INTERRUPTOR PRINCIPAL DEL CIRCUITO
Este es un interruptor de dos polos con valores de acuerdo a la sección
de Especificaciones.
3.5.2 LUCES EXTERIORES DE LISTO
La luz LED verde de ‘Listo’ (10, 12, 14, 16, 17 y 20 KW) se enciende •
cuando el servicio público está presente y el interruptor está en AUTO
indicando que el generador está listo y cuando el generador está
funcionando.
La luz del LED rojo de ‘Alarma’ (10, 12, 14, 16, 17 y 20 KW) se •
enciende cuando el generador está apagado o se detecta una falla.
(Ver la sección de sistemas de protección).
Luz de LED amarillo de ‘Mantenimiento’ (17 y 20 KW) (Ver la sección •
de sistemas de protección.)
Sección 3 — Operación
Generadores enfriados por aire
OPERACIÓN

21
3.5.3 SALIDA DE 120 VAC GFCI E INITERRUPTOR
DE 15 AMP (17 Y 20 KW SOLAMENTE)
Estos modelos están equipados con una toma GFCI externa de 15 ampe-
rios y 120 voltios que está ubicada en un compartimiento a la derecha
del generador (Figura 1.3).
Cuando el generador está funcionando, en ausencia del servicio público,
esta toma también se puede usar para energizar ítems fuera de su hogar
como luces o herramientas de potencia. Esta toma puede también usarse
cuando la energía pública está presente haciendo funcionar el generador
en modo manual. Esta toma no proporciona energía si el generador no
está funcionando. Esta toma está protegida por un interruptor de circuito
de 15 amperios en el mismo compartimiento que la salida. (No usar
cuando el generador está funcionando en modo de ejercicio).
Figura 3.4 – Compartimiento lateral
Figura 3.5 – Compartimiento lateral abierto
Salida 120V GFCI Interruptor de salida 15 Amp
Interr principal del circuitoLuces LED indicadoras
3.6 SISTEMAS DE PROTECCIÓN
3.6.1 ALARMAS
Prioridad más alta (pestillo) mostrada en el panel de control y el LED
rojo externo (sólo V-twins). Tienen que anularse antes de que el mensaje
de alarma se vaya. El registro de alarma registra cada ocurrencia (ver
Apéndice - “Sistema de menú”).
Baja presión de aceite (alarma de apagado)
Un retraso de cinco segundos en el arranque y 7 segundos una vez que
el motor está funcionando.
Este interruptor (Figura 3.6) tiene contactos normalmente cerrados que se
mantienen abiertos por la presión de aceite de motor durante la operación.
Si la presión de aceite cae debajo del rango de los 5 PSI, los contactos
del interruptor se cierran y el motor se apaga. La unidad no se reiniciará
hasta que se verifique el nivel de aceite.
Alta temperatura del motor (alarma de apagado –
Auto reinicio)
Un retardo de 10 segundos al arranque y un segundo antes del apagado,
Auto reinicio cuando la condición se apaga y reinicia el motor si hay una
señal válida de arranque presente.
Los contactos del interruptor (Figura 3.6) se cierran si la temperatura
excede aproximadamente 144° C (293° F), iniciando un apagado del
motor. Una vez que la temperatura del aceite cae a un nivel seguro, los
contactos del interruptor se abren otra vez.
Sobrearranque (alarma de apagado)
Esto ocurre si el motor no ha arrancado dentro del ciclo específico de
arranque. (Ver sección “arranque”)
Figura 3.6 – Baja presión de aceite e
interruptores de alta temperatura
Filtro de
aceite
Manguera
de drenaje
de aceite
Interruptor de bajo aceite
Interruptor de alta temp
S
o
l
t
a
r
NOTA:
La manguera de drenaje de aceite puede estar ruteada en la dirección
opuesta como se muestra en la figura.
OPERACIÓN
Sección 3 — Operación
Generadores enfriados por aire

22
Sobrevelocidad (alarma de apagado)
4320 RPM por tres (3) segundos o 4500 RPM inmediatamente. Esta
característica protege al generador del daño apagándolo si ocurre que
funciona más rápido que el límite predeterminado. Esta protección
también evita que el generador suministre una salida que pudiera dañar
potencialmente aparatos conectados al circuito del generador. Contacte al
concesionario más cercano si ocurre una falla.
Pérdida de sensado de RPM (alarma de apagado)
Durante el arranque, si el tablero de control no ve una señal válida de RPM
dentro de tres segundos, se apagará y bloqueará en la pérdida de sensado
RPM. Mientras el motor está funcionando, si la señal RPM se pierde por
un segundo, el tablero de control apagará el motor, espere 15 segundos y
vuelva a arrancar el motor. Si no hay señal RPM detectada dentro de los
primeros 3 segundos del arranque, el tablero de control apagará el motor
y se enganchará como pérdida de sensado RPM. Si se detecta la señal
RPM, el motor arrancará y funcionará normalmente. Si consiguientemente
la señal RPM se pierde nuevamente, el tablero de control tratará una vez
más de arrancar antes de engancharse y mostrar el mensaje de falla de
sensor RPM.
Baja frecuencia (alarma de apagado)
Luego del arranque, si el generador permanece con baja frecuencia por
más de 30 segundos, se apagará. El ajuste de baja frecuencia es 50 Hz.
Falla interna (alarma de apagado)
Esta alarma no puede apagarse, llame al concesionario de servicio.
APAGAR ALARMA
8kW — Apague la alarma colocando el interruptor de AUTO/OFF/•
MANUAL en la posición OFF y de regreso en AUTO.
10 - 20kW — Apague la alarma colocando el interruptor de AUTO/•
OFF/MANUAL en la posición OFF. Presione la tecla ENTER para
desenganchar la falla activa y apagar el correspondiente mensaje de
alarma.
3.6.2 ADVERTENCIAS
Segunda prioridad (sin pestillo) mostrada en el panel de control y el LED
amarillo externo (sólo V-twins). Las advertencias se apagan automática-
mente cuando la condición monitoreada se aleja. Las advertencias se
registran en el registro de alarmas. Las advertencias no pueden hacer
que el motor se apague.
Batería baja
El tablero de control monitorea el voltaje de la batería y muestra una
advertencia si este cae por debajo de 11.0 voltios por un minuto. La
advertencia se apaga automáticamente si el voltaje de la batería se eleva
encima de los 11.0 voltios. El voltaje de la batería no se monitorea durante
el ciclo de arranque.
Error de ejercicio
Si el periodo de ejercicio se corrompe, se mostrará un mensaje de adver-
tencia. Este mensaje sólo se apagará cuando el periodo de ejercicio se
reinicie.
3.6.3 ALERTAS DE MANTENIMIENTO
(SÓLO 10 - 20KW)
Tercera prioridad
Mensaje de mantenimiento
Cuando el periodo de mantenimiento expire, se mostrará un mensaje de
advertencia. (Los modelos de 16 hasta 20 kW incluyen un LED amarillo
externo que se iluminará). La alerta se puede reiniciar presionando la tecla
Enter, que hará que se le pida al usuario confirmar la acción. El reinicio
apagará la alerta y reiniciará los contadores de mantenimiento para todas
las condiciones anunciadas. El registro de historial guardará la alerta. El
contador de mantenimiento no se acumulará sin energía de la batería. Una
vez que la energía de la batería se restablezca, se mostrará un pedido para
fijar el tiempo. Los contadores de mantenimiento serán ajustados a una
nueva fecha y hora.
NOTA:
Ya que la mayoría de alertas de mantenimiento ocurrirán al mismo
tiempo (la mayoría tiene intervalos de dos años), sólo uno aparecerá
en la pantalla al mismo tiempo. Una vez que la primera alerta se haya
apagado, la siguiente alerta activa se mostrará.
4.1 FUSIBLE
El fusible de 7.5 amp en el panel de control protege el circuito de control
DC contra sobrecargas (Figuras 3.1 y 3.2). Este fusible está cableado en
serie con la punta de salida de la batería al panel. Si este elemento fusible
está abierto el motor no podrá arrancar. Reemplace este fusible sólo con
un fusible de reemplazo idéntico de 7.5 amperios. Siempre que este fus-
ible se saque o reemplace, el temporizador del ejercicio debe reiniciarse.
4.2 REVISAR EL NIVEL DE ACEITE DEL
MOTOR
Vea en la sección de especificaciones las capacidades de aceite. Vea los
aceites recomendados en la sección de Recomendaciones de aceite de
motor.
Cuando los apagones hacen que se necesite el generador por periodos
extensos de tiempo, el nivel de aceite debe revisarse diariamente.
Para revisar el nivel de aceite del motor, proceda como sigue (Figuras
4.1, 4.2 y 4.3):
1. Si el generador está funcionando durante un apagón, primero apague
todas las cargas asociadas que funcionan en la residencia. Segundo,
gire el interruptor de circuito principal del generador a la posición
OFF.
2. Mueva el interruptor de AUTO/OFF/MANUAL en la posición OFF.
3. Retire la varilla y séquela con un trapo limpio.
4. Inserte completamente la varilla, luego retírela otra vez. El nivel
de aceite deberá estar en la marca “Full” (lleno). Si es necesario,
agregue aceite hasta la marca “Full” solamente. NO LLENE POR
ENCIMA DE LA MARCA “FULL”.
CUIDADO
Nunca opere el motor con el nivel de aceite por
debajo de la marga “Add” (agregar) de la varilla. Esto
puede dañar el motor.
MANTENIMIENTO
Sección 4 — Mantenimiento
Generadores enfriados por aire

Figura 4.1 — Varilla de aceite y llenado, 8kW
Varilla de aceite y relleno
Figura 4.2 — Varilla de aceite, 10kW
5. Instale la varilla.
6. Vuelva a poner el interruptor de AUTO/OFF/MANUAL en su posición
original.
7. Si el generador estuvo funcionando durante un apagón, gire primero
el interruptor principal del circuito de regreso a la posición ON.
Segundo, encienda las cargas necesarias de la residencia.
Figura 4.3 — Varilla de aceite y llenado,
12, 14, 16, 17 & 20kW
Varilla de aceite
Llenar
4.3 CAMBIO DE ACEITE DE MOTOR
CUIDADO
El aceite caliente puede causar quemaduras. Permita
que el motor enfríe antes de drenar el aceite. Evite
una exposición prolongada o repetida de la piel
con el aceite usado. Lave completamente las áreas
expuestas con jabón.
4.3.1 INTERVALOS DE CAMBIO DE ACEITE
Ver la sección de “Agenda de servicio”.
4.3.2 RECOMENDACIONES DE ACEITE DE MOTOR
Todo aceite debe cumplir el estándar mínimo de la American Petroleum
Institute (API) Service Class SJ, SL o superior. No use aditivos especiales.
Seleccione el grado de viscosidad del aceite de acuerdo a la temperatura
esperada de operación.
SAE 30 • Î por encima de 32° F
10W-30 • Î Entre 40° F y -10° F
Sintético 5W-30 • Î 10° F y menos
SAE 30
SAE 30
Synthetic 5W-30
Sy nthe tic 5W- 30
10W-30
10W -30
Rango de temperaturas de uso esperado
CUIDADO
Cualquier intento de arrancar el motor antes de que
se le haya dado servicio apropiado con el aceite
recomendado puede traer como resultado una falla
del motor.
4.3.3 PROCEDIMIENTO DE CAMBIO DE ACEITE Y
FILTRO
Para cambiar el aceite, proceda como sigue:
1. Arranque el motor moviendo el interruptor de AUTO/OFF/MANUAL
a MANUAL y hágalo funcionar hasta que caliente completamente.
Luego apague el motor moviendo el interruptor a la posición OFF:
2. Inmediatamente luego de que el motor se apaga, liberte el pasador
de retén de la manguera de drenaje de aceite (Figura 4.4). Retire la
tapa de la manguera y drene el aceite a un contenedor apropiado.
3. Luego de que el aceite haya drenado, vuelva a colocar la tapa al
extremo de la manguera de drenaje. Retenga la manguera en el
pasador.
23
MANTENIMIENTO
Sección 4 — Mantenimiento
Generadores enfriados por aire

24
Cambie el filtro de aceite como sigue:
1. Con el aceite drenado, retire el filtro antiguo girándolo en sentido
antihorario.
2. Aplique una ligera capa de aceite de motor limpio a la junta del
nuevo filtro. Ver los filtros recomendados en la sección de especifi-
caciones.
3. Atornille el nuevo filtro a mano hasta que la junta contacte lig-
eramente al adaptador de filtro de aceite. Luego, ajuste el filtro 3/4
adicionales o hasta una vuelta (Figura 4.4).
4. Rellene con el aceite apropiado recomendado (ver la sección de
Recomendaciones de aceite de motor). Ver las capacidades de
aceite en la sección de especificaciones.
Figura 4.4 – Manguera de drenaje de aceite y
filtro
Filtro de
aceite
Manguera
de drenaje
de aceite
Interruptor de bajo aceite
Interruptor de alta temp
S
o
l
t
a
r
5. Arranque el motor, hágalo funcionar por un minuto y revise si hay
fugas.
6. Apague y vuelva a revisar el nivel de aceite del motor, añada si es
necesario. NO LLENE DEMASIADO
7. Vuelva a poner el interruptor de AUTO/OFF/MANUAL en la posición
AUTO.
8. Disponga del aceite usado en un centro de recolección apropiado.
NOTA:
La manguera de drenaje de aceite puede estar ruteada en la dirección
opuesta como se muestra en la figura.
4.4 CAMBIO DEL LIMPIADOR DE
AIRE DEL MOTOR
4.4.1 GENERADORES DE 12, 14, 16, 17 Y 20KW
Vea la ubicación del limpiador de aire en la sección “El generador”. Utilice
los siguientes procedimientos (Figura 4.5):
1. Levante el techo y retire la puerta.
2. Gire los dos tornillos en sentido antihorario para soltarlos.
3. Retire la cubierta y el filtro de aire.
4. Limpie el polvo y los residuos dentro de la caja de aire y alrededor
de los bordes.
5. Instale el nuevo limpiador de aire en la caja de aire.
6. Instale la cubierta. Gire los dos tornillos de cubierta en sentido hor-
ario para ajustar.
Vea en la sección de Agenda de servicio el mantenimiento del limpiador de
aire. Vea el número de parte del reemplazo del filtro de aire en la sección
de Especificaciones.
Figura 4.5 — 12, 14, 16, 17 y 20kW
Limpiador de aire del motor
Cubierta
Filtro
Tornillo
4.4.2 GENERADORES DE 10KW
Vea la ubicación del limpiador de aire en la sección “El generador”. Utilice
el siguiente procedimiento (Figura 4.6):
1. Levante el techo y retire la puerta.
2. Gire la abrazadera sin fin en sentido antihorario para soltarla.
3. Tire el filtro antiguo fuera del panel divisor.
4. Limpie el polvo o residuos del panel.
5. Instale el nuevo limpiador de aire en el lugar.
6. Gire la abrazadera sin fin en sentido horario para ajustarla.
7. Vuelva a colocar la puerta y el techo.
MANTENIMIENTO
Sección 4 — Mantenimiento
Generadores enfriados por aire

25
Figura 4.6 — Limpiador de aire del motor de
10kW
Filtro de aire
4.4.3 GENERADOR DE 8 KW
Ver la sección de “El Generador” para ubicar la caja de aire. Use los
siguientes procedimientos para reemplazar el filtro de aire sucio dentro de
la caja de aire (Figura 4.7).
1. Levante el techo y retire la puerta.
2. Empuje hacia atrás en el pestillo de la puerta de acceso del filtro de
aire amarillo para abrirla.
3. Tire hacia afuera el filtro de aire antiguo y descarte en forma apro-
piada.
4. Instale el nuevo filtro, el extremo abierto primero dentro de la caja de
aire.
5. Cierre la puerta amarilla y presione hasta cerrar.
6. Reemplace la puerta y cierre el techo en forma segura.
Figura 4.7 — Limpiador de aire del motor de
8kW
Cubierta del
limpiador de aire
4.5 BUJÍA(S)
Vuelva a colocar la tapa de la bujía o reemplace la bujía si es necesario.
Vea los requerimientos de mantenimiento en la sección de agenda de
servicio.
1. Limpie el área alrededor de la base de la bujía para sacar el polvo y
la suciedad del motor.
2. Retire la bujía y revise su condición. Reemplace la bujía si está usada
o es imposible volverla a usar. Vea la inspección recomendada en la
sección de agenda de servicio. Limpie usando un cepillo de alambre
y un solvente comercial. No golpee la bujía al limpiarla.
3. Revise el espacio de la bujía usando un calibrador. Ajuste el espacio
a 0.76 mm (0.030 pulg) para 8, 10 y 20kW; y 1.02 mm (0.040 pulg)
para 12, 14, 16 y 17kW doblando con cuidado el electrodo de tierra
(Figura 4.8).
Figura 4.8 – Fijando el espacio de la bujía
4.6 MANTENIMIENTO DE LA BATERÍA
La batería deberá inspeccionarse según la sección “Agenda de servicio”.
El siguiente procedimiento deberá seguirse en la inspección:
1. Inspeccione los bornes de la batería, su ajuste y si hay corrosión.
Ajuste y limpie si es necesario.
2. Revise el nivel de fluido de la batería en las batería no selladas y, si
es necesario, rellene con agua destilada solamente. No use agua
corriente en las baterías.
3. Haga revisar el estado de la carga y la condición. Esto deberá hac-
erse con un hidrómetro para baterías de automóviles.
PELIGRO
No arroje la batería al fuego. La batería puede
explotar.
Una batería presenta un riesgo de choque eléctrico
y una gran corriente de cortocircuito. Las siguientes
precauciones serán observadas al trabajar con bat-
erías:
• Retire el fusible de 7.5A del panel de control del genera-
dor.
• Retire relojes, anillos y otros objetos metálicos;
• Use herramientas con manubrios aislados;
• Use guantes y botas de goma;
• No deje herramientas ni partes metálicas encima de la
batería ni
• Desconecte la fuente de carga antes de conectar o
desconectar los terminales de la batería.
MANTENIMIENTO
Sección 4 — Mantenimiento
Generadores enfriados por aire
ESPACIO FIJADO DE LA BUJÍA A 0.76 mm (.030 pulg)
- 8, 10 y 20kW; 1.02 mm (.040 pulg) - 12, 14, 16 y 17kW

26
ADVERTENCIA
No abra ni mutile la batería. El electrolítico liberado
es dañino para la piel y ojos y es tóxico.
El electrolito es ácido sulfúrico diluido que es dañino
para la piel y los ojos. Es conductor eléctrico y cor-
rosivo. Se debe observar los
siguientes procedimientos:
• Use protección completa para los ojos y ropa protec-
tora;
• Donde hubo contacto del electrolito con la piel, lave
inmediatamente con agua;
• Donde haya contacto del electrolito con los ojos,
enjuague completa e inmediatamente con agua y
busque atención médica; y
• El electrolito derramado debe lavarse con un agente
neutralizador de ácido. Una práctica común es usar una
solución de 1 libra (1/2 kilo) de bicarbonato de sodio en
1 galón (4 litros) de agua. La solución de bicarbonato
de sodio se debe añadir hasta que la evidencia de la
reacción (espuma) haya cesado. El líquido resultante
debe enjuagarse con agua y el área deberá secarse.
Las baterías de plomo-ácido presentan riesgo de
fuego porque generan gas hidrógeno. Se debe seguir
los siguientes procedimientos:
• NO FUME cerca de la batería;
• NO haga fuego/chispas en el área de la batería y
• Descargue la electricidad estática del cuerpo antes
de tocar la batería, haga esto tocando una superficie
metálica conectada a tierra.
Asegúrese que el interruptor AUTO/OFF/MANUAL se
encuentre en la posición de OFF antes de conectar
los cables de la batería. Si el interruptor se coloca a
AUTO o MANUAL, el generador puede arrancar tan
pronto como se conectan los cables de batería.
Asegúrese de que el suministro público de electrici-
dad esté apagado y que el fusible de 7.5A esté fuera
del panel de control del generado, ya que puede
ocurrir una chispa en los bornes de la batería ya que
los cables están juntos y causar una explosión.
4.7 AJUSTANDO LA CLARIDAD DE LA
VÁLVULA GH-410/GT-530/990/999
Luego de las primeras 6 horas de operación, revise la claridad de la
válvula en el motor y ajústela si es necesario.
Importante: Si se siente incómodo al hacer este procedimiento o no tiene
las herramientas apropiadas, por favor contacte al concesionario para
solicitar ayuda. Este es un paso muy importante para asegurar la mayor
vida de su motor.
Para revisar la claridad de la válvula:
El motor deberá estar frío antes de revisarlo. Si la claridad de la válvula •
es 0.002” - 0.004” (0.05 - 0.1mm), no es necesario el ajuste.
Retire los cables de la bujía y coloque los cables lejos de sus conex-•
iones.
Retire las bujías.•
Asegúrese de que el pistón esté en el centro muerto (TDC o Top Dead •
Center) de su recorrido de compresión (ambas válvulas cerradas).
Para colocar el pistón en TDC, retire la pantalla de la toma de ingreso
al frente del motor para tener acceso a la tuerca del volante. Use un
dado grande y una llave de dados para girar la tuerca y el motor en
sentido horario. Mientras mira el pistón a través del agujero de la bujía.
El pistón deberá moverse de arriba a abajo. El pistón está en TDC
cuando está en su más alto punto de recorrido.
Para ajustar la claridad de la válvula (si es necesario), (Figura 4.9):
Asegúrese de que el motor esté a 60° - 80° F.•
Asegúrese de que el cable de la bujía se haya retirado de esta y esté •
lejos.
Retire los cuatro tornillos que unen la cubierta de la válvula.•
Suelte la contratuerca del brazo inestable. Use una llave allen de 10mm •
para girar el taco de bola pivote mientras revisa la claridad entre el
brazo inestable y el vástago de la válvula con un calibrador graduador.
La claridad correcta es de 0.002-0.004 pulgadas (0.05-0.1 mm).
NOTA:
Sostenga la contratuerca del brazo inestable en su lugar mientras se
gira el taco de bola pivote.
Cuando la claridad de la válvula sea la correcta, sostenga el taco de bola
pivote en su lugar con una llave allen y ajuste la contratuerca del brazo
inestable. Ajuste la contratuerca a un torque de 174 pulg-lib. Luego de
ajustar la contratuerca, vuelva a revisar la claridad de la válvula para
asegurarse de que no cambie.
Instale una nueva junta de cubierta de la válvula.•
Vuelva a unir la cubierta de la válvula.•
Figura 4.9 - Ajuste de claridad de la válvula
Contratuerca
Cuña de bola
pivote
Balancín
Vástago de
válvula
NOTA:
Empiece a ajustar los cuatro tornillos antes del ajuste final o no será
posible poner a todos los tornillos en su lugar. Asegúrese de que la
junta de la cubierta de la válvula esté en su lugar.
Instale las bujías.•
Vuelva a unir el cable de bujía a esta.•
En el GT-530 y GT-990/999, repita el proceso para el otro cilindro.•
MANTENIMIENTO
Sección 4 — Mantenimiento
Generadores enfriados por aire

27
4.8 SISTEMA DE ENFRIAMIENTO
Las aberturas de entrada y salida en el compartimiento del generador
deben estar abiertas y sin obstrucciones para una operación continua
apropiada. Esto incluye obstrucciones como césped alto, malezas, arbus-
tos, hojas y nieve.
Sin suficiente enfriamiento y aire de ventilación, el motor/generador se
sobrecalienta rápidamente, lo que hace que se apague. (Vea las ubica-
ciones de los respiraderos en la Figura 4.10).
Asegúrese que las puertas y el techo estén en su lugar durante la oper-
ación ya que hacer funcionar el generador sin ellas puede afectar el
movimiento del aire de enfriamiento.
ADVERTENCIA
El escape de este producto se caliente en extremo
y permanece caliente luego del apagado. El césped
alto, la malahierba, arbustos, hojas, etc deben per-
manecer lejos del escape. Tales materiales pueden
encenderse y quemarse por el calor del sistema de
escape.
Figura 4.10 – Respiraderos de enfriamiento
CALIENTE
CUIDADO
La temperatura ambiental máxima para el generador
es de 25° C (77° F).
4.9 ATENCIÓN LUEGO DE LA SUMERSIÓN
Si el generador ha sido sumergido en agua, NO DEBE arrancarse ni oper-
arse. Luego de sumergirse en agua, haga que el concesionario lo limpie
completamente yt lo inspeccione. Si la estructura (o la casa) ha sufrido
una inundación, deberá inspeccionarla un electricista certificado para
asegurarse que no habrá problemas eléctricos durante la operación del
generador o cuando regrese la electricidad pública.
4.10 PROTECCIÓN CONTRA CORROSIÓN
Lave y encere periódicamente la caja usando productos para automóviles.
Se recomienda un lavado frecuente en lugares costeros y de abundante
sal. Pulverice los enlaces del motor con un aceite ligero como el WD-40.
4.11 PROCEDIMIENTO FUERA DE SERVICIO
4.11.1 RETIRO DEL SERVICIO
Si el generador no puede ejercitarse siete días y va a estar fuera de servi-
cio por un plazo de 90 días, prepare el generador para su almacenamiento
como sigue:
1. Arranque el motor y déjelo calentar.
2. Cierre la válvula de cierre en la línea de suministro de combustible y
deje que la unidad se apague.
3. Una vez que la unidad se ha apagado, cambie a la posición OFF.
4. Fije el interruptor principal del circuito en su posición OFF (o en
OPEN).
5. Fije el interruptor AUTO/OFF/MANUAL en OFF y apague la energía
de la red pública al interruptor de transferencia. Retire el fusible de
7.5A del panel de control del generador. Desconecte los cables de la
batería como se describe en “Peligros generales”.
6. Mientras el motor está todavía caliente por el funcionamiento,
drene completamente el aceite. Rellene el cárter con aceite. Ver
“Recomendaciones de aceite de motor”.
7. Coloque una etiqueta en el motor indicando la viscosidad y clasifi-
cación del aceite en el cárter.
8. Retire la bujía y pulverice un agente empañador en las aberturas
roscadas de la(s) bujía(s). Reinstale y ajuste la(s) bujía(s).
9. Retire la batería y almacénela en un lugar fresco y seco en una caja
de madera. Nunca almacene la batería sobre piso de concreto o
tierra.
10. Limpie el generador completo.
4.11.2 RETORNO AL SERVICIO
Para regresar la unidad al servicio luego del almacenamiento, proceda
como sigue:
1. Verifique que la unidad esté apagada y que el interruptor de AUTO/
OFF/MANUAL esté colocado en OFF.
2. Revise la etiqueta del motor, la viscosidad del aceite y su clasifi-
cación. Verifique que se use el aceite recomendado correcto en el
motor (vea la sección de Recomendaciones de aceite del motor). Si
es necesario, drene y rellene con el aceite apropiado.
3. Revise el estado de la batería. Llene todas las celdas de las baterías
no selladas hasta el nivel apropiado con agua destilada. NO USE
AGUA CORRIENTE EN LA BATERÍA. Recargue la batería al 100 por
ciento de su estado de carga o en su defecto, reemplácela. Vea el
tamaño y tipo en “Especificaciones”.
4. Limpie el generador completo.
5. Asegúrese que se retire el fusible de 7.5A del panel de control del
generador. Reconecte la batería. Observe la polaridad de la batería.
Puede haber daños si la batería se conecta incorrectamente.
6. Abra la válvula de cierre.
7. Inserte el fusible de 7.5A al panel de control del generador. Arranque
la unidad moviendo el interruptor de AUTO/OFF/MANUAL a MANUAL.
Deje calentar la unidad completamente.
8. Deténgala colocando el interruptor de AUTO/OFF/MANUAL en la
posición OFF.
9. Encienda la energía pública a interruptor de transferencia.
10. Ponga el interruptor de AUTO/OFF/MANUAL en la posición AUTO.
11. El generador está ahora listo para el servicio.
MANTENIMIENTO
Sección 4 — Mantenimiento
Generadores enfriados por aire

28
NOTA:
Si la batería estaba muerta o desconectada, el temporizador de
ejercicio (cilindro único), la fecha y hora actual (V-twin) deben ser
reiniciados.
4.11.3 ACCESORIOS
Tenemos accesorios disponibles para mejorar el rendimiento de los gen-
eradores enfriados por aire.
Kits para climas fríos• se recomiendan en áreas donde las temperatu-
ras regularmente caen por debajo de 10° F (-12° C).
Kits de mantenimiento programado• incluyen todas las piezas nec-
esarias para realizar el mantenimiento del generador junto con reco-
mendaciones para el aceite.
Bloqueo de interruptor de transferencia auxiliar• permite a cualquiera
de los interruptores de transferencia bloquear completamente una
carga eléctrica grande con su sistema de control.
Una cubierta tipo faldón• es estándar en todas las unidades de 20kW.
Está disponible para todas las otras unidades enfriadas por aire de
producción actual. Se une para proporcionar una apariencia con-
torneada así como protección contra roedores e insectos.
El dispositivo de priorización de carga PowerMaster• permite a los
usuarios domésticos operar potencialmente dos grandes cargas eléc-
tricas dando a una, prioridad sobre la otra.
El sistema de monitor remoto• es una caja inalámbrica montada en
interiores que indica el estatus de funcionamiento del generador y
permite el programa de ejercicios así como proporciona recordatorios
de mantenimiento.
Kits de retoque de pintura• son muy importantes para conservar la
apariencia e integridad de la caja del generador. Estos kits incluyen
pintura para retoques e instrucciones si se necesitara.
Para mayores detalles sobre los accesorios, por favor contacte al conc-
esionario.
MANTENIMIENTO
Sección 4 — Mantenimiento
Generadores enfriados por aire

29
MANTENIMIENTO
Sección 4 — Mantenimiento
Generadores enfriados por aire
4.12 AGENDA DE MANTENIMIENTO
ATENCIÓN: Se recomienda que todo trabajo de servicio
sea realizado por el concesionario más cercano.
SISTEMA/COMPONENTE PROCEDIMIENTO FRECUENCIA
X = Acción
R = Reemplazar si es necesario
* = Notificar al concesionario si se
necesita reparación.
Inspeccionar Cambiar Clean
W = Semanal
M = Mensual
Y = Anual
COMBUSTIBLE
Líneas de combustible y conexiones*
XM
LUBRICACIÓN
Nivel de aceite
X M o 24 horas de
operación continua.
Aceite
X 2Y o 200 horas
de operación.**
Filtro del Aceite
X 2Y o 200 horas
de operación.**
ENFRIAMIENTO
Persianas de la caja
XXS
BATERÍA
Retire la corrosión, asegurar
sequedad
XXM
Limpie y ajuste los terminales de la
batería
XXM
Revise el estado de la carga
X R CADA 6M
Nivel del electrolito
X R CADA 6M
MOTOR Y MONTAJE
Limpiador de aire
X R 2Y o 200 horas
Bujia(s)
X R 2Y o 200 horas
CONDICIÓN GENERAL
Vibración, ruido, fugas, temperatura*
XM
AFINAMIENTO COMPLETO* A SER COMPLETADO POR UN CONCESIONARIO 2Y o 200 horas
* Contacte al concesionario más cercano si necesita ayuda.
** Cambie el aceite y el filtro luego de las primeras ocho (8) horas de operación y luego cada 200 horas desde ahí, o 2 años, lo que ocurra prime-
ro. Cambie más pronto cuando se opera bajo cargas pesadas o en un ambiente polvoriento o sucio o en altas temperaturas ambientales.

30
Sección 5 — Detección de problemas
Generadores enfriados por aire
PROBLEMAS
*Contacte al concesionario más cercano si necesita ayuda.
5.1 GUÍA DE DETECCIÓN DE PROBLEMAS
Problema Causa Corrección
El motor no enciende. 1. Fusible volado. 1. Corrija la condición de cortocircuito, reemplace
el fusible de 7.5A en el panel de control del gen-
erador.
2. Sueltos, corrodidos o defectuosos 2. Ajuste, limpie o reemplace los
cables de batería si es necesario.
3. Contactor de arranque defectuoso. (8 kW) 3. *
4. Motor de arranque defectuoso. 4. *
5. Batería muerta. 5. Cargue o reemplace la batería.
El motor intenta arrancar, pero 1. Sin combustible 1. Llene combustible/gire válvula de combust.
no arranca. 2. Solenoide de combustible defectuoso (FS). 2. *
3. Abra el cable #14 del 3. *
tablero de control del motor.
4. Bujía(s) obstruida(s). 4. Limpie, calibre o reemplace la(s) bujía(s).
5. Holgura de la válvula fuera de ajuste. 5. Ajuste la holgura de la válvula.
6. Choke no opera. 6. Verifique que la placa del choke se mueva
con libertad.
El motor arranca con dificultad 1. Limpiador de aire tapado 1. Revise, reemplace el limpiador de aire.
y funciona con brusquedad. o está dañado.
2. Bujía(s) obstruida(s). 2. Limpie, calibre o reemplace la(s) bujía(s).
3. Incorrecta presión de combustible. 3. Confirme que la presión de combustible al regu-
lador sea de 10-12” de columna de agua (0.36-
0.43 psi) para GLP, y 5-7” de columna de agua
(0.18-0.25 psi) para gas natural.
4. Selec de combustible en posición incorrecta. 4. Mueva el selector a la posición correcta.
5. El choke permanece cerrado. 5. Verifique que la placa del choke se mueva
con libertad.
AUTO/OFF/MANUAL 1. Interruptor defectuoso. 1. *
interruptor puesto en OFF, pero 2. interruptor AUTO/OFF/MANUAL 2. *
el motor continúa Cableado incorrectamente.
funcionando. 3. Tablero de control defectuoso. 3. *
No hay salida AC 1. El interr de circuito de línea principal en 1. Reinicie el interruptor del ciercuito
del generador. la posición OFF (o en OPEN). a ON (o DLOSED).
2. Falla interna del generador. 2. *
No hay transferencia a 1. Bobina de interruptor de transferencia dfectuoso. 1. *
respaldo luego que la red pública 2. Relé de transferencia defectuoso. 2. *
falla de fuente. 3. Circuito de relé de transferencia abierto. 3. *
4. Tablero lógico de control defectuoso. 4. *
La unidad consume grandes 1. Motor sobrecargado de aceite. 1. Ajuste el aceite al nivel apropiado.
cantidades de aceite. 2. Tipo o viscosidad de aceite inapropiado. 2. Ver “Recomendaciones de aceite de motor”.
3. Junta, sello o manguera dañadas 3. Revise si hay fugas de aceite.
4. Respirador del motor defectuoso. 4. *

31
Sección 6 — Apéndice
Generadores enfriados por aire
6.1 NAVEGACIÓN DEL SISTEMA DE MENÚ
Para ir al MENU, use la tecla “Esc” desde cualquier página. Es posible
que se necesite presionar varias veces antes de llegar a la página del
menú. El menú actualmente seleccionado se muestra como una palabra
que destella. Navegue al menú requerido usando las teclas +/-. Cuando
el menú requerido está destellando, presione la tecla ENTER. Dependiendo
del menú seleccionado, puede haber una lista de opciones presentadas.
Use el mismo método de navegación para seleccionar la pantalla deseada
(consulte el diagrama de Sistema de menú).
6.1.1 CAMBIO DE AJUSTES (MENÚ DE EDICIÓN)
Para cambiar un ajuste como el contraste de la pantalla, vaya al menú
EDIT y use las teclas +/- para navegar al ajuste que se cambiará. Una vez
que el ajuste se muestre, (por ej. contraste), presione la tecla ENTER para
ir al modo de edición. Use las teclas +/- para cambiar el ajuste, presione
la tecla ENTER para almacenar el nuevo ajuste.
NOTA:
Si no se presiona la tecla ENTER para grabar el nuevo ajuste, sólo
se guardará temporalmente. La siguiente vez que la batería se
desconecte, el ajuste revertirá al su valor anterior.
APÉNDICE

32
Sección 6 — Apéndice
Generadores enfriados por aire
APÉNDICE
MENU PRINCIPAL
REGISTRO DE
FUNCIONAMIENTO
REGISTRO DE
ALARMA
HISTORIA ESTATUS
COMANDO
ESTADO
VERSIONESPANTALLA
FRECUENCIA
DEL GENERADOR
HORAS DE
MOTOR
RPM DEL
MOTOR
VOLTAJE DE LA
BATERÍA
DEPURAR
ENTRADAS SALIDAS PANTALLAS
RETARDO DE
ARRANQUE
EDITAR
CONTRASTE
IDIOMA
FRECUENCIA
HORA/FECHA
HORA DE
EJERCICIO
REINICIAR
MANTENIMIENTO
ESC
Presione la tecla “ESCAPE”
para regresar por los
niveles del manú.
+ / -
Use la tecla “+/-”
para navegar por
el menú.
ENTER
Use la tecla “ENTER”
para seleccionar ítems o
ingresar datos.
ESC
ESC
ESC
ESC
ESC ESC
sólo
17 y
20kW
Inglés
u otro
60 Hz
Los posibles mensajes de estatus de la pantalla
son como sigue:
• Apagado/fecha y hora
• Listo para funcionar/fecha y hora
• Retarde de pérdida de servicio público/pausa X Seg
• Arranque/intento # X
• Funcionando en ejercicio/fecha y hora
• Funcionando/enfriando
• Funcionando - advertencia/mensaje de advertencia
• Funcionando- Alarma/mensaje de alarma
• Detenido - Alarma/mensaje de alarma
• Detenido - Advertencia/Mensaje de advertencia
• Arranque/Pausa por X Segs
• Funcionando/fecha y hora
• Funcionando/calentando
• Arrancando - Advertencia/mensaje de advertencia
• Arrancando - Alarma/mensaje de alarma
Los posibles comandos
en la línea 2 de la pantalla
son como sigue:
• Apagado
• Funcionando manualmente
• Detenido en modo auto
• Funcionando - pérdida de servicio público
• Funcionando en ejercicio
• Funcionando desde radio
SISTEMA DEL MENU
sólo
17 y
20kW
sólo
17 y
20kW
sólo
17 y
20kW

33
Sección 7 — Diagramas de instalación
Generadores enfriados por aire
Interruptores de circuito - Dibujo No. 0G8573-A

34
Sección 7 — Diagramas de instalación
Generadores enfriados por aire
Generador - Dibujo No. 0G8280-D

35
Sección 7 — Diagramas de instalación
Generadores enfriados por aire
Generador - Dibujo No. 0G8280-D

36
GARANTÍAGARANTÍA
Sección 8 – Garantía
Generadores enfriados por aire
NOTA: Esta declaración de garantía de control de emisiones se refiere a este producto únicamente si el tamaño del generador es de 15 kW o menos.
DECLARACIÓN DE GARANTÍA DE CONTROL DE EMISIONES
DE CALIFORNIA
SUS DERECHOS Y OBLIGACIONES DE GARANTÍA
California Air Resources Board (CARB) y Generac Power Systems, Inc. (Generac) se complacen en explicar la garantía del sistema de control de emisiones
de su nuevo motor.* En California, los motores nuevos para servicios públicos, campo y jardín deben ser diseñados, construidos y equipados para cumplir
los exigentes estándares anti contaminación del estado. Generac garantizará los sistemas de emisión en su motor por los periodos de tiempo listados abajo
siempre que no haya abuso, negligencia, modificación o mantenimiento inapropiado de su motor.
Su sistema de control de emisión puede incluir partes como el carburador, sistema de ignición y sistema de escape. Generac reparará su motor sin costo
para usted por el diagnóstico, repuestos y mano de obra si ocurriera una situación de garantía.
COBERTURA DE GARANTÍA DEL SISTEMA DE CONTROL DE EMISIONES DEL FABRICANTE:
Los sistemas de control de emisiones en los motores del año 1995 y posteriores están garantizados por dos años como se detalla aquí. Si durante este
periodo de garantía se encuentra que cualquier componente o sistema relacionado a las emisiones está defectuoso en materiales o mano de obra, se
efectuará las reparaciones o el intercambio por parte de un local de servicio autorizado de Generac.
RESPONSABILIDADES DE LA GARANTÍA DEL COMPRADOR/PROPIETARIO:
Como propietario/comprador del motor, usted es responsable de completar todos los mantenimientos requeridos tal como se lista en el manual del propi-
etario proporcionado por la fábrica. Para propósitos de garantía, Generac recomienda que usted conserve todos los recibos que cubren el mantenimiento
sobre su motor. Sin embargo, Generac no puede negar la garantía sólo por la falta de recibos o por usted no haya asegurado el cumplimiento de todos
los mantenimientos programados.
Como comprador/propietario del motor, usted deberá, sin embargo, ser consciente de que Generac puede negar cualquier y/o todas las coberturas y
responsabilidades de la garantía si su motor, o una parte o componente del mismo, ha fallado debido al abuso, negligencia, mantenimiento inapropiado o
modificaciones no aprobadas, o el uso de repuestos falsos o del mercado negro no fabricados, suministrados o aprobados por Generac.
Usted es responsable de contactar a un local de servicio autorizado de garantía de Generac tan pronto se presente el problema. Las reparaciones
de garantía deberán completarse en un tiempo razonable, sin exceder los 30 días.
El servicio de garantía puede arreglarse contactando ya sea a su concesionario de venta o a un local de servicio de garantía autorizado de Generac. Para
ubicar el local de servicio de garantía autorizado de Generac más cercano a usted, llame a nuestro número gratuito.
1-800-333-1322
NOTA IMPORTANTE: Esta declaración de garantía explica sus derechos y obligaciones bajo la Garantía del sistema de control de emisiones (ECS
Warranty), que Generac le proporciona Generac siguiendo las leyes de California. También vea “Garantías limitadas de Generac para los sistemas de
potencia de Generac, Inc.” que se adjunta a este manual en una hoja separada, también proporcionada a usted por Generac. La garantía ECS se aplica
sólo al sistema de control de emisiones de su motor. Si hubiera algún conflicto en términos entre la garantía ECS y la garantía de Generac, la garantía de
ECS se aplicará excepto en las circunstancias en que la garantía de Generac pueda proporcionar un periodo de garantía mayor. Ambas garantías describen
derechos y obligaciones importantes respecto a su nuevo motor.
El servicio de garantía puede ser realizado sólo por un servicio de garantía autorizado de Generac. Cuando se requiera servicio de garantía, se debe pre-
sentar evidencia que muestre la fecha de venta al comprador/propietario original.
Si usted tuviera alguna pregunta respecto a sus derechos y responsabilidades de garantía, deberá ponerse en contacto con Generac en una de las
siguientes direcciones:
Para productos enfriados por aire ... Para productos enfriados por líquido ...
ATENCIÓN DEPARTAMENTO DE GARANTÍAS ATENCIÓN DEPT DE GARANTÍAS
GENERAC POWER SYSTEMS, INC. GENERAC POWER SYSTEMS, INC.
P.O. BOX 297 211 MURPHY DRIVE
WHITEWATER, WI 53190 EAGLE, WI 53119
Parte 1

37
GARANTÍAGARANTÍA
Sección 8 – Garantía
Generadores enfriados por aire
GARANTÍA DEL SISTEMA DE CONTROL DE EMISIONES
La garantía del sistema de control de emisiones (ECS) para los modelos de motor de 1995 y posteriores.
(a) Aplicabilidad: Esta garantía se aplicará a motores cuyo modelo sea del año 1995 y posteriores. El periodo de garantía ECS empezará en la fecha en que
el motor nuevo es comprado por o entregado a su propietario/comprador final original y continuará por los siguientes 24 meses consecutivos.
(b) Cobertura general de la garantía de emisiones: Generac garantiza al propietario/comprador final original del motor o equipamiento nuevo y a cada sub-
siguiente comprador/propietario que cada uno de sus motores está:
(1) Diseñado, construido y equipado para cumplir con todas las regulaciones aplicables adoptadas por el CARB y
(2) Libre de defectos en materiales y mano de obra que, en cualquier momento durante el periodo de garantía de ECS, pueda hacer que una parte
garantizada relacionada a las emisiones pueda no ser idéntica en todo lo material a la parte descrita en la aplicación para certificación del fabricante
del motor.
(c) La garantía ECS se refiere sólo a partes relacionadas a las emisiones de su motor, como sigue:
(1) Cualquier parte garantizada relacionada a las emisiones que no esté programada para reemplazo como mantenimiento requerido en el Manual del
propietario será garantizada en el periodo de garantía ECS. Si fallara cualquier parte durante el periodo de garantía ECS, deberá ser reparado o
reemplazado por Generac de acuerdo a la Subsección (4) más abajo. Cualquier parte así reparada o reemplazada bajo la garantía ECS deberá ser
garantizada por el resto del periodo de garantía ECS.
(2) Cualquier parte garantizada relacionada a las emisiones que no esté programada para reemplazo como mantenimiento requerido en el Manual del
propietario será garantizada en el periodo de garantía ECS. Una declaración en tal sentido por escrito a efecto de “reparar o reemplazar según sea
necesario” no reducirá el periodo de garantía ECS. Cualquier parte así reparada o reemplazada bajo la garantía ECS deberá ser garantizada por el
resto del periodo de garantía ECS.
(3) Cualquier parte garantizada relacionada a las emisiones que esté programada para reemplazo según lo requiera el mantenimiento en el Manual del
Propietario deberá ser garantizado por el periodo de tiempo antes del primer punto de reemplazo programado para esa parte. Si la parte falla antes
del primer reemplazo programado, la parte será reparada o reemplazada por Generac de acuerdo a la Subsección (4) más abajo. Cualquier parte
relacionada a las emisiones así reparada o reemplazada bajo la garantía ECS será garantizada por el resto del periodo de garantía ECS antes del primer
punto de reemplazo programado para aquella parte relacionada a las emisiones.
(4) La reparación o reemplazo de cualquier parte garantizada relacionada a las emisiones bajo esta garantía ECS deberá realizarse sin costo alguno para
el propietario en un centro de servicio de garantía autorizado por Generac.
(5) Cuando el motor sea inspeccionado por un centro de servicio de garantía autorizado de Generac, el propietario no será responsable de los costos de
diagnóstico si la reparación se considera dentro de la garantía.
(6) Generac será responsable por los daños a otros componentes originales del motor o modificaciones aprobadas cercanas causadas por la falla bajo
la garantía de cualquier parte relacionada a las emisiones cubierta por esta garantía ECS.
(7) A lo largo del periodo de garantía ECS, Generac mantendrá un suministro de partes garantizadas relacionadas a las emisiones suficiente para cumplir
la demanda esperada para tales repuestos relacionados a la emisión.
(8) Cualquier repuesto relacionado a la emisión autorizado y aprobado por Generac puede usarse en la ejecución de cualquir reparación o mantenimiento
de garantía ECS y se proporcionará sin costo al propietario. Dicho uso no reducirá las obligaciones de garantía ECS de Generac.
(9) Los repuestos no aprobados, añadidos, modificados, falsos y/o del mercado negro no se pueden usar para modificar o reparar un motor Generac.
Dicho uso invalida esta garantía ECS y será base suficiente para no aceptar un reclamo por garantía ECS. Generac no podrá ser declarado respons-
able por fallas de cualquier parte garantizada de un motor Generac causadas por el uso de tales repuestos no aprobados, añadidos, modificados,
falsos y/o del mercado negro.
LAS PARTES RELACIONADAS A LA EMISIÓN INCLUYEN A LO SIGUIENTE:
*Tipos de motor Generac cubiertos por esta declaración de garantía incluidos:
1) Generador de respaldo pre-empacado
2) Generador unidad de energía auxiliar (APU)
3) Generador de respaldo
Parte 2
1) Sistema de medición de combustible
1.2) Unidad de carburación de GLP/gas natural y sus componentes internos.
a) Controlador de combustible (si está equipado con él)
b) Mezclador y sus juntas (si está equipado con ellos)
c) Carburador y sus juntas (si está equipado con ellos)
d) Regulador primario de gas (si está equipado con él)
e) Vaporizador de líquido LP (si está equipado así)
2) Sistema de inducción de aire, que incluye:
a) Tubería/distribuidor de entrada
b) Limpiador de aire
3) Sistema de ignición que incluye:
a) Bujía
b) Módulo de ignición
4) Unidad de silenciador catalítico (si está equipado así) que incluye:
a) Junta del silenciador
b) Distribuidor de escape
5) Unidad de respirador de cárter que incluye:
a) Tubo de conexión del respirador

Parte No. 0G8334 Revisión F (03/19/10) Impreso en los EE.UU.
Catálogo No. OMASPCA-S-01

INSTALL HSB GENERATOR - 2008
0G8280 E
DWG. NO.
REV
TITLE
DWN
DATE
GROUP EV
FIRST USE
SHEET 1 OF 1
E.1
ALL APPROVALS ELECTRONICALLY STORED INSIDE WINDCHILL
JRG
1/25/2008
WINDCHILL VERSION
2013 HSB
1/25/2008
Date
Eco No.
-
747
[29.4]
698
[27.5]
207
[8.2]
299
[11.8]
914 [36.0]
MINIMUM OPEN AREA
ON SIDES AND
FRONT
457.2
[18.0]
731.9
[28.8]
637.6
[25.1]
642
[25.3]
1226
[48.3]
1218
[47.9]
244.4
[9.6]
178.9
[7.0]
76.2 [3.0]
PEA
GRAVEL
MINIMUM
250.0
[9.8]
446.6
[17.6]
530.0
[20.9]
44.8
[1.8]
575.3
[22.7]
378.7
[14.9]
692
[27.24]
289
[11.4]
343
[13.5]
762.4
[30.0]
TRANSFER
SWITCH
8KW - 17KW
(IF SUPPLIED)
AIR
INTAKE
AIR
OUTLET
MINIMUM
DISTANCE
AIR
INTAKE
FRONT
VIEW
LEFT SIDE
VIEW
RIGHT SIDE
VIEW
REAR
VIEW
"DO NOT LIFT BY
ROOF"
**ALL DIMENSIONS IN:
MILLIMETERS
[INCHES]
GROUNDING
LUG
n30.2 [n1.2]
LIFTING HOLES 4
CORNERS
FUEL INLET - 12-20KW (1/2" NPT)
8 & 10KW (3/4" NPT) - USE SUPPLIED ADAPTER
REQUIRED FUEL PRESSURE: NATURAL GAS = 5-7" WATER COLUMN
LIQUID PROPANE (VAPOR) = 10-12" WATER
COLUMN
SERVICE
ENTRANCE
TRANSFER SWITCH
(IF SUPPLIED)
CABLE ACCESS
HOLE
HOLE LOCATIONS FOR
OPTIONAL MOUNTING
TO
A CONCRETE PAD
TOP
VIEW
FRONT OF
UNIT

-
 1
1
-
 2
2
-
 3
3
-
 4
4
-
 5
5
-
 6
6
-
 7
7
-
 8
8
-
 9
9
-
 10
10
-
 11
11
-
 12
12
-
 13
13
-
 14
14
-
 15
15
-
 16
16
-
 17
17
-
 18
18
-
 19
19
-
 20
20
-
 21
21
-
 22
22
-
 23
23
-
 24
24
-
 25
25
-
 26
26
-
 27
27
-
 28
28
-
 29
29
-
 30
30
-
 31
31
-
 32
32
-
 33
33
-
 34
34
-
 35
35
-
 36
36
-
 37
37
-
 38
38
-
 39
39
-
 40
40
-
 41
41
-
 42
42
-
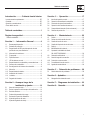 43
43
-
 44
44
-
 45
45
-
 46
46
-
 47
47
-
 48
48
-
 49
49
-
 50
50
-
 51
51
-
 52
52
-
 53
53
-
 54
54
-
 55
55
-
 56
56
-
 57
57
-
 58
58
-
 59
59
-
 60
60
-
 61
61
-
 62
62
-
 63
63
-
 64
64
-
 65
65
-
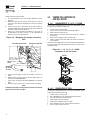 66
66
-
 67
67
-
 68
68
-
 69
69
-
 70
70
-
 71
71
-
 72
72
-
 73
73
-
 74
74
-
 75
75
-
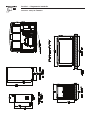 76
76
-
 77
77
-
 78
78
-
 79
79
-
 80
80
-
 81
81
-
 82
82


Generac 20 kW G0055251 Manual de usuario
- Categoría
- Generadores de poder
- Tipo
- Manual de usuario
En otros idiomas
- English: Generac 20 kW G0055251 User manual