
10028939
Rowbi

2
Sehr geehrter Kunde,
zunächst möchten wir Ihnen zum Erwerb Ihres Gerätes gratulieren.
Bitte lesen Sie die folgenden Anschluss- und Anwendungshinweise sorgfältig durch und befolgen Sie diese
um möglichen technischen Schäden vorzubeugen.
Warnung / Allgemeine Sicherheitshinweise
• Setzen Sie dieses Gerät nicht dem Regen aus.
• Stellen Sie keine mit Flüssigkeiten gefüllten Gefäße, wie Vasen, auf dieses Gerät.
• Verwenden Sie ausschließlich das empfohlene Zubehör.
• Wenden Sie sich zur Wartung an qualifiziertes Kundendienstpersonal.
• Stellen Sie keine schweren Gegenstände auf dieses Gerät.
• Reinigen Sie das Gerät nur mit einem trockenen Tuch.
• Achtung - Stellen Sie keine Quellen offener Flammen, z.B. brennende Kerzen, auf das Gerät.
• Das Gerät ist nur für den Hausgebrauch geeignet und nicht für den therapeutischen oder medizini-
schen Einsatz konzipiert.
• Achten Sie darauf, geeignete Trainingskleidung zu tragen. Weite Kleidung kann sich in beweglichen
Teilen verfangen.
• Maximales Nutzergewicht: 120kg.
• Das Gerät darf nur verwendet werden, solange es sich in technisch einwandfreiem Zustand befindet.
Achten Sie insbesondere darauf, dass alle Verbindungen und Verschraubungen stets fest sind.
Kleine Objekte/Verpackungsteile (Plastikbeutel, Karton, etc.): Bewahren Sie kleine Objekte (z.B. Schrau-
ben und anderes Montagematerial, Speicherkarten) und Verpackungsteile außerhalb der Reichweite von
Kindern auf, damit sie nicht von diesen verschluckt werden können. Lassen Sie kleine Kinder nicht mit Folie
spielen. Es besteht Erstickungsgefahr!
Transport des Gerätes: Bitte bewahren Sie die Originalverpackung auf. Um einen ausreichenden Schutz
beim Transport des Gerätes zu erreichen, verpacken Sie das Gerät in der Originalverpackung.
Reinigung der Oberfläche: Verwenden Sie keine flüchtigen Flüssigkeiten, wie Insektensprays. Durch zu
starken Druck beim Abwischen können die Oberflächen beschädigt werden. Gummi- oder Plastikteile soll-
ten nicht über einen längeren Zeitraum mit dem Gerät in Kontakt sein. Nutzen Sie ein trockenes Tuch.
Spezielle Hinweise zu diesem Gerät
• Lesen Sie sich diese Bedienungsanleitung vor dem Aufbauen und Benutzen des Gerätes aufmerksam
durch. Ein sicherer und effektiver Gebrauch des Gerätes kann nur erzielt werden, wenn das Gerät ord-
nungsgemäß aufgebaut, gepflegt und benutzt wird. Stellen Sie sicher, dass sämtliche Personen, die
dieses Gerät nutzen, über die Warnungen und Sicherheitshinweise informiert sind.
• Die Sicherheit des Gerätes kann nur gewährleistet werden, wenn das Gerät regelmäßig gepflegt und
auf etwaige Schäden oder Abnutzungserscheinungen untersucht wird.
• Halten Sie das Gerät fern von Feuchtigkeit oder Salz (z.B. aus Pools).

3
Dear Customer,
Congratulations on purchasing this product. Please read and follow these instructions, in order to avoid
damaging the item. We do not cover any damages that may arise from improper use of the item or the
disregard of the safety instructions.
General Safety Notice
• Read all instructions before using.
• Do not place on or near a hot gas or electric burner or in a heated oven.
• The appliance is not a toy. Do not let the children play with it. Never let children insert foreign objects
into the appliance.
• Do not use the appliance for other than intended use. This appliance has been designed solely for
domestic use; the manufacturer‘s liability shall not be engaged in the event of any professional use, by
any misuse or by any use not complying with the operating instructions.
• Save these instructions.
Special safety advice for the use of sports equipment
• Check all the bolts, nuts and other connections before using the machine for the first time to ensure
the machine is in the safe condition.
• Place a suitable base (e.g. rubber mat, wooden board etc.) beneath the machine in the area of assem-
bly to avoid dirt.
• Before beginning the training, remove all objects within a radius of 2 meters from the machine.
• Your health can be affected by incorrect or excessive training. Consult a doctor before beginning the
training program. He can define the maximum setting (Pulse. Watts. Duration of training etc) to which
you may train yourself and can get precise information during training. This machine is not suitable for
therapeutic purpose.
• Only train on the machine when it is in correct working way. Use only original spare parts for any ne-
cessary repairs.
• This machine can be used for only one person’s training at a time.
• Wear training clothes and shoes that are suitable for fitness training with the machine. Your training
shoes should be appropriate for the trainer.
• If you have a feeling of dizziness, sickness or other abnormal symptoms, please stop training and
consult a doctor immediately.
• People such as children and handicapped persons should only use the machine in the presence of
another person who can give aid and advice.
• The power of the machine increases with increasing the speed, and the reverse. The machine is equip-
ped with adjustable knob that can adjust the resistance.

4
Chère cliente, cher client,
Toutes nos félicitations pour l’acquisition de ce nouvel appareil. Veuillez lire attentivement les instructions
de branchement et d’utilisation afin d’éviter d’éventuels dommages techniques. Le fabricant ne saurait être
tenu pour responsable des dommages dus au non-respect des consignes de sécurité et à la mauvaise
utilisation de l’appareil.
Consignes de sécurité
• Lire attentivement ce mode d’emploi avant de monter et d’utiliser cet appareil. Pour une utilisation
performante et sûre, monter, entretenir et utiliser l’appareil conformément aux instructions fournies.
S’assurer que toutes les personnes utilisant cet appareil aient été informées de tous les avertissements
et des consignes de sécurité.
• Avant de commencer tout entraînement avec cet appareil, consulter un médecin pour déterminer tou-
tes restrictions physiques ou de santé, pouvant mettre en péril un maniement sûr et performant de cet
appareil. La consultation est obligatoire si vous prenez des médicaments ayant une répercussion sur
la pression sanguine, votre rythme cardiaque ou votre taux de cholestérol.
• Soyez attentif aux signaux de votre corps. Un entraînement inadéquat ou extrême peut être dangereux
pour la santé. Arrêter immédiatement l’entraînement si l’un des symptômes suivants est ressenti :
douleurs ou sensation d’oppression dans la poitrine, rythme cardiaque irrégulier, essoufflements ext-
rêmes, sensations d’étourdissement léger, vertiges ou nausées. Si l’un de ces symptômes est ressenti,
consulter un médecin avant de poursuivre l’entraînement.
• Cet appareil ne doit pas être utilisé par des personnes (y compris les enfants) ayant des capacités
physiques, mentales ou sensorielles réduites ou ne possédant pas les connaissances ou l’expérience
suffisante pour utiliser l’appareil, sauf si celles-ci sont sous la surveillance ou ont reçu les instructions
d‘utilisation appropriées de la personne responsable de leur sécurité. Surveiller les enfants pour qu’ils
ne jouent pas avec l’appareil.
• Placer l’appareil sur une surface sèche et plane.
• Avant chaque entraînement, s’assurer que toutes les vis et les fixations soient correctement serrées.
• La sûreté de l’appareil ne peut être garantie que si l’appareil est correctement entretenu et si les éven-
tuels dommages ou usures sont traités.
• Utiliser l’appareil comme indiqué ci-dessus. Interrompre immédiatement l’entraînement si des élé-
ments défectueux sont détectés lors du montage ou lors de l’inspection ou bien si l’appareil émet des
bruits inhabituels. Identifier et résoudre les problèmes avant de réutiliser l’appareil.
• Porter des vêtements adaptés et éviter des vêtements qui pourraient se prendre dans l’appareil ou qui
pourraient restreindre la liberté de vos mouvements.
• L’appareil n’est pas destiné à un usage thérapeutique.
• Déplacer ou soulever l’appareil avec prudence. Utiliser avec précaution les techniques de levage et
prendre de bons appuis pour déplacer l’appareil.
• S’assurer que les petits éléments (par exemple vis, matériel de montage) et éléments d’emballage
soient conservés hors de la portée des enfants pour éviter les risques d‘étouffement. Ne pas laisser les
enfants jouer avec les emballages plastiques, ils peuvent s’asphyxier!
• Veuillez conserver l’emballage original. Emballer l’appareil dans son emballage d’origine, pour assurer
une meilleure protection lors de son transport.
• Ne pas utiliser de liquides volatils tels que le spray insecticide. Une pression trop forte lors de
l’essuyage peut endommager les surfaces.
• Vérifier que les vis et que les fixations sont bien serrées. Resserrer les vis si besoin.
• Maintenir une distance suffisante entre l’appareil et les autres objets, tels que les meubles et autres
appareils. En premier lieu, se familiariser avec l’appareil et commencer avec un entraînement léger.

5
Estimado cliente:
Le felicitamos por la adquisición de su aparato Klarfit. Por favor, lea con atención el siguiente manual y siga
cuidadosamente las instrucciones de uso con el fin de evitar posibles daños. La empresa no se responsa-
biliza de los daños producidos por el incumplimiento de las indicaciones de seguridad o un uso inapropiado
del aparato.
Advertencias de seguridad
• Lea atentamente estas instrucciones de uso antes de montar y utilizar el aparato. La efectividad y
seguridad del aparato solamente estará asegurada realizando un montaje, mantenimiento y uso segu-
ros. Asegúrese de que todas las personas que utilizan el aparato están al tanto de las advertencias e
indicaciones de seguridad.
• Antes de iniciar el entrenamiento con el aparato, acuda a su médico para que realice un examen
médico que determine si padece algún tipo de problema físico o de salud que le impidan utilizar este
aparato de entrenamiento de una manera eficiente y segura. En caso de que utilice medicamentos que
puedan afectar a la tensión arterial, ritmo cardíaco o niveles de colesterol, consulte inmediatamente a
su médico antes de comenzar con los entrenamientos.
• Preste atención a su reacción corporal. Un entrenamiento incorrecto o excesivo puede ser perjudicial
para la salud. Finalice el entrenamiento si se presentan los siguientes síntomas: dolores/presión en el
pecho, ritmo cardiaco irregular, fatiga extrema, ligero mareo, vértigo o náuseas. En caso de que sufra
alguno de estos síntomas, consulte a su médico antes de continuar con los entrenamientos.
• Este aparato no es adecuado para personas (incluidos niños) con limitaciones físicas, psíquicas o
sensoriales o que carezcan de los conocimientos necesarios para su uso. Por su seguridad, deberán
estar bajo la supervisión de otra persona o recibir instrucciones de la misma para utilizar el aparato.
Los niños deberán estar acompañados de un adulto para evitar que jueguen con el aparato.
• Coloque el aparato en una superficie seca y plana.
• Antes de cada entrenamiento asegúrese de que todos los tornillos y fijaciones están colocados cor-
rectamente.
• La seguridad del aparato solo podrá garantizarse si realiza un mantenimiento periódico del mismo
para detectar posibles daños o señales de deterioro.
• Utilice el aparato solamente según el uso previsto. Si detecta partes defectuosas durante el montaje
o revisión o si escucha sonidos fuera de lo normal procedentes del aparato durante el entrenamiento,
finalice inmediatamente el ejercicio. Utilice el aparato una vez se haya identificado y solventado el
problema.
• Lleve ropa adecuada para utilizar el aparato. Evite la ropa ancha que pueda engancharse y limitar su
libertad de movimiento.
• El aparato no es adecuado para uso terapéutico.
• Si necesita levantar o mover el aparato, hágalo con cuidado. Utilice técnicas para levantar peso que
protejan su espalda y pida ayuda para mover el aparato.
• Conserve el embalaje original. Para proteger el aparato durante el transporte introdúzcalo en su em-
balaje original.
• No utilice líquidos que se evaporen rápidamente, como insecticidas. La superficie del aparato podría
verse dañada si frota con demasiada fuerza.
• Controles Compruebe que todas las piezas atornilladas y las conexiones están fijadas correctamente.
De no ser así, apriete los tornillos. Asegúrese de que existe una distancia suficiente entre el aparato
y otros objetos como muebles, etc. Familiarícese poco a poco con el aparato y comience con un
entrenamiento “suave”.

6
Gentile cliente,
La ringraziamo per aver scelto il nostro prodotto. La preghiamo di leggere e seguire attentamente le se-
guenti istruzioni di installazione e utilizzo del dispositivo per evitare eventuali danni tecnici. Decliniamo
ogni responsabilità in caso di danni dovuti a una mancata osservanza delle norme di sicurezza e a un uso
improprio del prodotto.
Importanti indicazioni di sicurezza
• Prima montare e utilizzare il dispositivo, leggere attentamente il presente libretto di istruzioni. Il mon-
taggio corretto, la manutenzione attenta e l’impiego appropriato garantiscono l’uso sicuro e efficace
del dispositivo. Assicurarsi che il dispositivo venga utilizzato da persone a conoscenza delle presenti
istruzioni e avvertenze.
• Prima di iniziare ad allenarsi con questo dispositivo, è consigliato di sottoporsi a una visita medica che
assicuri che si hanno le condizioni psicofisiche idonee all’utilizzo del dispositivo. In caso si faccia uso
di farmaci per la pressione sanguigna, per il cuore o per il colesterolo, un controllo medico preliminare
è assolutamente necessario.
• Rispettare sempre i segnali del proprio corpo; un allenamento sbagliato o eccessivo può essere dan-
noso. Interrompere l’allenamento se compaiano i seguenti sintomi: dolori al petto, senso di soffoca-
mento, battito cardiaco irregolare, difficoltà di respirazione, vertigini, giramenti di testa e malori. In
questi casi consultare il medico prima di proseguire l’attività di allenamento.
• Questo dispositivo non è destinato a essere usato da persone (bambini compresi) le cui capacità
fisiche, sensoriali o mentali siano limitate, oppure da persone con mancanza di esperienza o di co-
noscenza, a meno che esse abbiano potuto beneficiare, attraverso l’intermediazione di una persona
responsabile della loro sicurezza, di una sorveglianza o di istruzioni riguardanti l’uso dell’apparecchio.
Sorvegliare i bambini, se sono nelle vicinanze, per assicurarsi che non giochino con il dispositivo.
• Posizionare il dispositivo su una superficie piana e asciutta.
• Prima di ogni allenamento assicurarsi che le viti e i sistemi di fissaggio siano ben serrati.
• La sicurezza del dispositivo è garantita quando esso è tenuto con cura e quando, in presenza di danni
o di segnali di usura, viene sottoposto a controllo
• Utilizzare il dispositivo esclusivamente per gli scopi previsti. Se durante il montaggio o una verifica si
dovessero riscontrare componenti difettose, o se il dispositivo durante il suo impiego emettesse dei
rumori insoliti, interrompere immediatamente l’allenamento. Riutilizzare il dispositivo solo dopo aver
identificato e risolto il problema.
• Indossare abbigliamento idoneo, evitando capi troppo larghi che possono incappare nel dispositivo o
limitare la libertà di movimento.
• Il dispositivo non è per uso terapeutico.
• Prestare attenzione nel sollevare o muovere il dispositivo. Utilizzare le tecniche di sollevamento a cari-
co della spalla e muovere il dispositivo con l’aiuto di un’assistente.
• Tenere gli accessori forniti in dotazione (per esempio le viti e altri utensili per il montaggio) e il materiale
d’imballaggio fuori dalla portata dei bambini per evitare che li ingeriscano. Non lasciare che i bambini
giochino con l’involucro. Pericolo di soffocamento.
• Custodire la confezione originale. Per proteggere il dispositivo durante il trasporto, imballarlo nella
confezione originale.
• Non utilizzare liquidi volati (per esempio spray per insetti). Non pulire troppo energicamente: può dan-
neggiare le superfici.
Controllo
• Verificare che tutti i giunti siano avvitati saldamente e che i connettori siano ben inseriti.
• Assicurarsi che ci sia una distanza sufficiente tra il dispositivo e altri oggetti come mobili, apparecchi-
ature ecc.
• Prendere dimestichezza con il dispositivo e iniziare con un allenamento leggero

7
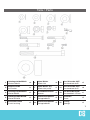
Teile / Parts
1
Unterlegscheibe M8x16
Washer M8x16
x8
6
Nylon-Mutter
Nylock Nut
x6
11
Hex-Schraube 8x55
Hex head bolt 8x55
x2
2
Bogenscheibe
Arc washer
x4
7
Nylon-Mutter (kl.)
Nylock Nut (small)
x1
12
Hex-Schraube 8x15
Hex head bolt 8x15
x8
3
Unterlegscheibe M8x23
Washer M8x23
x2
8
Schraubenschlüssel
Spanner
x1
13
Hex-Schraube 127mm
Hex head bolt 127mm
x1
4
Unterlegscheibe M10x26
Washer M10x26
x2
9
Schlossschraube 8x70
Carriage bolt 8x70
x2
14
Schraube
Screw
x2
5
Kunststoff-Hülse
Plastic bushing
x2
10
Schlossschraube 8x50
Carriage bolt 8x50
x2
15
O-Ring
Sponge
x2

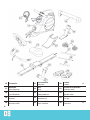
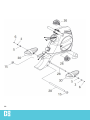
8
16 Computer 21
Rückenlehne
Backrest
26
Pedale
Pedals
x2
17
Gehäuse
Main housing
22
Sitz
Seat
27
Schaft für Fußrasten
Footrest shaft
18
Vorderfuß
Front Stabilizer
23
Seitliche Griffe
Side handle bar
28
Spindelschaft
Spindle tube
19
Klammer
Bracket
24
Alu-Schiene
Aluminum rail
29
Pin
Pull pin
20
Abdeckung
Bracket cover
25
Hinterer Fuß
Rear stabilizer
30
Fußrasten
Footrests
x2

9
Aufbau / Assembly
Schritt 1
Montieren Sie den Vorderfuß (18) am Gehäuse.
Nutzen Sie die Schlossschrauben 8x70mm (9) mit
den Bogenscheiben (2) und den Nylon-Muttern (7),
Step 1
Attach the front stabilizer onto the main housing
bracket using the two carriage bolts (#9), 2 arc
washers (#2) and the nylock nuts (#7).

10
Schritt 2
Montieren Sie die Klammer (19) am Gehäuse. Nut-
zen Sie zwei Schrauben (11) und Unterlegscheiben
(1). Stecken Sie dann die Abdeckung (20) auf und
befestigen Sie mit den kleinen Schrauben (14).
Step 2
Attach the bracket (#19) to the Main frame using
two washers (#1) and two bolts (#11). Ensuring to
attach the bracket cover (#20) when you tightened
the screws (#14).

11
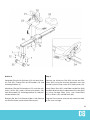
Schritt 3
Verbinden Sie die Alu-Schiene (24) mit dem hinte-
ren Fuß (25). Fixieren Sie mit Schrauben (12) und
Unterlegscheiben (1).
Montieren Sie die Rückenlehne (21) und die seit-
lichen Griffe (23) mittels Schlossschrauben (10),
Hex-Schrauben (12), Unterlegscheiben (1) und pas-
senden Muttern (6)
Stecken Sie das Puls-Sensor-Kabel in die Buchse
am Sitz-Schlitten (siehe kleines Bild rechts).
Step 3
Connect the Aluminum Rail (#24) to the rear Sta-
bilizer (#25) using the bracket provided. Lock the
bracket in place using screw (#12) and washer (#1).
Attach Back Rest (#21) and Side Handle Bar (#23)
and Seat Bracket to the underside of the seat (#22)
by using Carriage Bolts (#10), Hex Head Bolts
(#12), washers (#1) and M8 Nuts (#6).
Plug the Pulse sensor wire into the socket located
on the seat carriage.

12

13
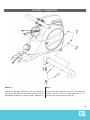
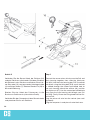
Schritt 4
Montieren Sie die Nylon-Mutter (6) am linken Ende
des Spindel-Schafts (28) und stecken Sie dann von
rechts her eine Unterlegscheibe (3), eine Kunststoff-
Hülse (5) und schließlich eine Fußraste (30) auf.
Fädeln Sie dann die dergestalt halb montierte Spin-
del durch die Öffnung im Gehäuse (siehe links).
Setzen Sie die rechte Seite in entsprechender Sym-
metrie zusammen: Montieren Sie zunächst die Fuß-
raste, gefolgt von einer Kunststoff-Hülse (5), einer
Unterlegscheibe (3) und schließlich einer weiteren
Nylon-Mutter (6).
Bringen Sie die Schaumgummi-Stücke (15) an den
Enden der Stange an.
Bringen Sie die Pedale (26) an der Kurbelabde-
ckung an.
Step 4
Attach the Nylon Nut (#6) to the end of the left hand
side of the spindle bar (#28), and then slide onto the
bar from the right the washer (#3), followed by the
plastic bushing (#5) then the footrest (#30). Then
slot the part assembled spindle bar through the
hole in the main housing (see left page).
Now start to assemble the right hand pedal onto
the spindle bar (#28). Slide the pedal (#30) onto the
right hand side of the pedal spindle bar followed by
the plastic bushing (#5), the washer (#3) and finally
the M8 Nylon nut (# 6).
Attach the Foams (#15) to left side of the footrest
shaft (#28), then slot the footrest shaft (#28) through
the hole in the holder bracket cover and attach the
other Foams (#15) to the other side of the bar.
Lock the pedals (#26) to the crank cover on main
housing (see left page).

14
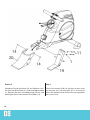
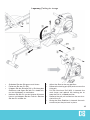
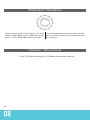
Schritt 5
Verbinden Sie die Sensor-Kabel der Schiene (24)
und des Gehäuses miteinander. Schieben Sie dann
die Schiene in das Gehäuse und fixieren Sie mit ei-
ner Schraube (13) samt passender Unterlegscheibe
(4) und Nylon-Mutter (7). Stecken Sie den Pin (29) in
die zweite Bohrung.
Stecken Sie das Kabel des Pulsmessers in die
Buchse am Gehäuse ein (siehe kleine Grafik).
Verbinden Sie den Computer mit den Sensorkabeln
und platzieren Sie ihn am Gehäuse.
Step 5
Connect the sensor wires which are on the Rail and
Main housing together, then slide the Aluminum
Rail (#24) into the main housing (per FIG 5) and bolt
into place using the fixing bolt (#13), once the bolt
is slotted through the nearest pre-drilled hole to
the main housing attach the washer (#4) and the
thin Nylon nut (#7). Use the second pre-drilled hole
away from the main housing slot through your Pull
pin (#29). Finally, Screw the fixing knob into the Alu-
minum Rail.
Plug the pulse coil wire into the socket (see small
fig above).
Plug the computer in and place it onto the frame.

15
Lagerung | Folding for storage
• Schieben Sie den Sitz ganz nach hinten.
• Entfernen Sie den Pin (29).
• Klappen Sie die Schiene (24) in Richtung des
Gehäuses und fügen Sie den Pin wieder ein,
um ein Aufklappen zu verhindern.
• Nehmen Sie den Pin an der hinteren Klammer
heraus und klappen Sie den Fuß ein. Stecken
Sie den Pin wieder ein.
• Adjust the Seat to the rear position.
• Remove the locking pin (#29) and unscrew the
fixing pin.
• Pull the Aluminum Rail (#24) in towards the
main frame and replace the locking pin to
keep the Rail in a folded position
• Remove the pull pin located on the rear bra-
cket of the rail.
• Swing the Rear Stabilizer in towards the main
frame and put the pin back in place.

16
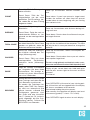
Computer Funktionen / Computer Functions
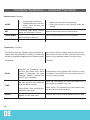
Bedientasten | Controls
MODE
• Auswahl der Funktionen
• Eingabe speichern und fort-
fahren (nach Auswahl der
Einstellung)
• Select each function for presetting
• Enter and switch to next function (after pre-
setting)
SET
Einstellung (Wert jeweils aufstei-
gend) der jeweiligen Funktion
Upward adjustment of each function data
TOTAL RESET
Löschen aller eingegebenen Da-
ten und Werten; Neustart
Clear all preset data and restart computer
RECOVERY
Heart Rate Recovery-Funktion Switch to heart rate recovery function
Funktionen | Functions
Der Monitor zeigt das Tempo sowie den jeweils ak-
tuellen Wert der gewählten Funktion an. Wechseln
Sie die Anzeige per Knopfdruck (am Gehäuserand).
Funktionen:
The monitor displays speed and count base func-
tions in the same unit. Use the switch on the casing
side to switch between speed / function count.
Functions:
SCAN
Schaltet die Funktionen auto-
matisch der Reihe nach durch
(bleibt 6 Sekunden bei jeder
Funktion stehen). Drücken Sie
MODE zum auswählen.
Automatically scans through each function in every
6 seconds. Press MODE to stop scanning and se-
lect the current function.
TIME
Count Up: Der Computer zählt
die Zeit aufwärts von 00:00 bis
maximal 99:59 minuten
Count Down: Zählt von einer ein-
gestellten Zeit herab.
Count up: The monitor will count the workout time
from 00:00 up to 99:59 mins max.
Count Down: The computer will count down from
any pre-set time down to 00:00.
SPEED
Anzeige der aktuellen Geschwin-
digkeit in km/h oder mp/h.
Displays the current training speed in kmh or mph.

17
COUNT
Count Up: Zählt die Trainingsein-
heiten aufwärts.
Count Down: Zählt die Trai-
ningseinheiten von der zuvor
gewählten Ziel-Einstellung her-
ab, sobald Sie mit dem Training
begonnen haben.
Count up: Accumulates workout numbers from
zero.
Count down: If yxou have pre-set a target count
number, the monitor will count from this pre-set
number down to zero, beginning with you starting
your workout circle.
DISTANCE
Count Up: Zeigt die gefahrene
Strecke an.
Count Down: Zeigt die noch zu
absolvierende Strecke an, be-
ginnend von der voreingestellten
Distanz.
Count up: Accumulates total distance during trai-
ning from zero.
Count down: Counts down the distance from pre-
set target distance.
TOTAL COUNT
Zählt alle Trainingseinheiten seit
der Inbetriebnahme. Diese Daten
werden nur gelöscht, wenn die
Batterien entnommen werden.
Accumulates the total number of workouts begin-
ning with the installation of the computer. This data
will only be lost in case you remove or change the
batteries.
CALORIES
Count Up: Zählt die verbrauch-
ten Kalorien während des Trai-
nings (Näherungswert).
Count Down: Zählt von einem
voreingestellten Ziel-Kalorien-
verbrauch herab (Näherungs-
wert!).
Count up: Accumulates calories consumption du-
ring training.
Count down: Counts down from a pre-set calories
consumption target level.
This data is a rough guide only and should only used as a com-
parison over several excercise sessions! Not therapeutically valid!
PULSE
Zeigt die aktuelle Pulsfrequenz
an. Umgreifen Sie dazu beide
Pulssensoren. Die Anzeige er-
scheint mit einem Messintervall
von circa 5 Sekunden.
Display of your current heart rate. Hold both grips
with the puls sensors tight for the most accurate
outcome.
The interval
RECOVERY
Wählen Sie RECOVERY am Ende
Ihres Trainings und halten Sie die
Puls-Sensoren umschlossen.
Es werden alle Funktionen be-
endet, außer TIME. Der Compu-
ter zählt nun automatisch eine
Minute herunter, während Ihre
Pulsfrequenz gemessen wird.
Am Ende wird eine Kennziffer
von F1 (beste) bis F6 (schlech-
teste) angezeigt, die Ihre Puls-
Erholung indiziert. Drücken Sie
RECOVERY zum Beenden.
Press RECOVERY at the end of your training peri-
od. All functions will be stopped whilst the display
will show a countdown of 60 seconds.
Please keep holding the pulse sensors.
After recovery, the computer will display your heart
rate recovery grade (F1 = best - F6 = worst).
Press RECOVERY again to return to main display.

18
Widerstand / Resistance
Drehen Sie den Knopf im Uhrzeigersinn für einen
höheren Pedalwiderstand bzw. gegen den Uhrzei-
gersinn, um den Pedalwiderstand zu verringern.
Turn the tension knob clockwise for high resistance
tension, for lower resistance turns the tension knob
anti-clockwise.
Hersteller / Manufacturer
CHAL-TEC GmbH, Wallstraße 16, 10179 Berlin, Deutschland / Germany

19
Hinweise zur Entsorgung
Befindet sich diese Abbildung (durchgestrichene Mülltonne auf Rädern) auf dem Pro-
dukt, gilt die Europäische Richtlinie 2002/96/EG. Diese Produkte dürfen nicht mit dem
normalen Hausmüll entsorgt werden. Informieren Sie sich über die örtlichen Regelungen
zur getrennten Sammlung elektrischer und elektronischer Gerätschaften. Richten Sie sich
nach den örtlichen Regelungen und entsorgen Sie Altgeräte nicht über den Hausmüll.
Durch die regelkonforme Entsorgung der Altgeräte werden Umwelt und die Gesundheit
ihrer Mitmenschen vor möglichen negativen Konsequenzen geschützt. Materialrecycling
hilft, den Verbrauch von Rohstoffen zu verringern.
Konformitätserklärung
Dieses Produkt entspricht den folgenden Europäischen Richtlinien:
2004/108/EG (EMV)
2011/65/EU (RoHS)
Environment Concerns
According to the European waste regulation 2002/96/EG this symbol on the product or
on its packaging indicates that this product may not be treated as household waste.
Instead it should be taken to the appropriate collection point for the recycling of electrical
and electronic equipment. By ensuring this product is disposed of correctly, you will help
prevent potential negative consequences for the environment and human health, which
could otherwise be caused by inappropriate waste handling of this product. For more
detailled information about recycling of this product, please contact your local council or
your household waste disposial service.
Declaration of Conformity
This product is conform to the following European directives:
2004/108/EC (EMC)
2011/65/EU (RoHS)
-
 1
1
-
 2
2
-
 3
3
-
 4
4
-
 5
5
-
 6
6
-
 7
7
-
 8
8
-
 9
9
-
 10
10
-
 11
11
-
 12
12
-
 13
13
-
 14
14
-
 15
15
-
 16
16
-
 17
17
-
 18
18
-
 19
19


Capital Sports 10028939 Manual de usuario
- Tipo
- Manual de usuario
- Este manual también es adecuado para
En otros idiomas
- français: Capital Sports 10028939 Manuel utilisateur
- italiano: Capital Sports 10028939 Manuale utente
- English: Capital Sports 10028939 User manual
- Deutsch: Capital Sports 10028939 Benutzerhandbuch
Otros documentos
-
SPORTSTECH EX 500 Manual de usuario
-
Tunturi R30 El manual del propietario
-
-
-
-
-
-
-
-