
H-283
UNIDAD ELECTRONICA
ELECTRONIC MONITOR
UNITÉ ÉLECTRONIQUE
ELEKTRONIKEINHEIT
UNIDADE ELECTRÓNICA
IMPIANTO ELETTRONICO
ELEKTRONISCHER MONITOR


3
Español
COLOCACION PILAS.-
Este monitor utiliza dos PILAS
ALCALINAS de 1,5 voltios.
Para colocar las pilas, suelte la tapa
trasera del monitor, Fig.1, e inserte
con precaución pilas alcalinas del tipo
«R-6» en el compartimento de las
pilas (A) orientando correctamente la
polaridad de las pilas (haciendo
coincidir el polo «+» de las pilas con la
señal «+» del compartimento de las
pilas y el polo «-» con la señal «-»).
Cierre la tapa, como muestra la Fig.1.
Si después de conectar el monitor
electrónico, se produjeran indicacio-
nes erróneas o sólo aparecen los
segmentos parcialmente, extraiga las
pilas y espere unos 15 segundos
antes de volver a instalarlas.
Las baterías débiles (descargadas)
generan cifra débiles (sin contraste) e
indicaciones erróneas. Cámbielas
inmediatamente.
El monitor se apagara automática-
mente cuando la unidad este 3
minutos parada .
Importante: Deposite los componen-
tes electrónicos en contenedores
especiales, Fig.2.
COLOCACION MONITOR
ELECTRONICO.-
Suelte los tornillos de la parte trasera
del monitor, conexione los terminales
del reenvío (21) con los del monitor
(32) Fig.3, seguido introduzca el
monitor de arriba hacia abajo
deslizándolo por la
chapa del tubo
remo (4), teniendo cuidado de no pillar
los cables, coloque los tornillos y
apriete, conexione el terminal del
hand-grip (24) en la parte trasera del
monitor Fig.4.
MONITOR ELECTRONICO.-
Para hacer más cómodo y simple el
control de su ejercicio este electrónico
muestra simultáneamente la
Velocidad, la distancia, el tiempo de
ejercicio, las calorías consumidas y el
pulso.
La pantalla se encenderá automática-
mente al comenzar el ejercicio o
pulsando cualquier tecla.
El monitor se apagará automática-
mente cuando la unidad esté 3
minutos parada.
A.FUNCIÓN SCAN.-
En el modo SCAN, el ordenador
revisa y visualiza continuamente
durante sus ejercicios todas las
funciones. La función visualizada se
indica por medio de parpadeos.
Para seleccionar la función SCAN:
1. Al comenzar el ejercicio o pulsando
cualquier tecla se enciende el monitor
en la función SCAN, que cada 8
segundos se visualizará en la pantalla
principal el TIEMPO, VELOCIDAD,
DISTANCIA, CALORÍAS, PULSO y en
la parte inferior del monitor también se
visualizará el valor en forma de
parpadeo.
2. Pulse la tecla MODE y se eliminara
la función SCAN.

4
B.FUNCIÓN TIEMPO.-
La función cuenta o descuenta en
incrementos de un segundo hasta un
máximo de 99:00 segundos. Pulsando
durante mas de dos segundos la tecla
DOWN todos los valores pasan a cero
a excepción de la información
personal.
1. Pulse cualquier tecla, para poner en
marcha el monitor.
2. Pulsando la tecla MODE
parpadeara la ventana pequeña de
TIME.
3. Pulsando las teclas UP ó DOWN
seleccione el tiempo.
4. Comience el ejercicio y empezara a
disminuir el tiempo, una vez haya
llegado a cero emitirá unos pitidos
durante 3 segundos, advirtiéndole que
ha llegado al tiempo seleccionado,
comenzando a contar el tiempo hacia
arriba.
C.FUNCIÓN DISTANCIA.-
La función cuenta o descuenta en
incrementos de 0,1 Km/ml hasta un
máximo de 999 Km/ml. Pulsando
durante mas de dos segundos la tecla
DOWN todos los valores pasan a cero
a excepción de la información
personal.
1. Pulse cualquier tecla, para poner en
marcha el monitor.
2. Pulsando la tecla MODE
parpadeara la ventana pequeña de
DIST (DISTANCIA).
3. Pulsando las teclas UP ó DOWN
seleccione la distancia.
4. Comience el ejercicio y empezará a
disminuir la distancia, una vez haya
llegado a cero emitirá unos pitidos
durante 3 segundos, advirtiéndole que
ha llegado al valor seleccionado,
comenzando a contar la distancia
hacia arriba.
D.FUNCIÓN CALORÍAS.-
La función cuenta y descuenta de una
en una caloría, hasta un máximo de
999 calorías. Pulsando durante más
de dos segundos la tecla DOWN
todos los valores pasan a cero a
excepción de la información personal.
1. Pulse cualquier tecla, para poner en
marcha el monitor.
2. Pulsando la tecla MODE
parpadeara la ventana pequeña de
CAL (CALORIAS).
3. Pulsando las teclas UP ó DOWN
seleccione las calorías.
4. Comience el ejercicio y empezará a
disminuir las calorías, una vez haya
llegado a cero emitirá unos pitidos
durante 3 segundos, advirtiéndole que
ha llegado al valor seleccionado,
comenzando a contar las calorías
hacia arriba.
Cuando termine las calorías
programadas, el monitor emite una
señal acústica de 3 segundos, y
empieza automáticamente a aumentar
las calorías.
E.FUNCIÓN PULSO.-
La función pulso le muestra las P.P.M
(pulsaciones por minuto). Para ello
coloque las manos Fig.5 sobre los
sensores del manillar (R) y al cabo de
unos segundos le mostrara su ritmo
cardíaco.
No es un aparato médico por lo cual el
valor es orientativo.

5
Para seleccionar el THR (ritmo
cardíaco objetivo ) siga los siguientes
pasos:
1. Pulse cualquier tecla, para poner en
marcha el monitor.
2. Pulsando la tecla MODE
parpadeara la ventana pequeña de
pulso y le saldrá THR.
3. Pulsando las teclas UP ó DOWN
seleccione el valor del pulso que
usted quiere hacer el ejercicio entre
40 y 199 (PPM), valor inicial
programado en el monitor 150 PPM.
4. Comience el ejercicio y visualizará
en la pantalla PULSE, su ritmo
cardíaco, una vez haya llegado al
valor seleccionado emitirá unos
pitidos, advirtiéndole que ha
alcanzado el valor seleccionado.
NOTA:
Si no visualiza ninguna señal de
pulsaciones después de 15 segundos
en la pantalla le mostrara «E 3»,
asegúrese de tener colocadas ambas
manos sobre los sensores (R) del
manillar, Fig.6. Si no hay ninguna
señal después de transcurridos 5
segundos, la pantalla principal volverá
a su función anterior.
INSTRUCCIONES - USO DEL
HAND-GRIP (PULSO).-
El pulso de este modelo se mide
colocando ambas manos en los
sensores (R), que están puestos en el
manillar como se indica en la Fig.6.
Una vez colocadas ambas manos en
los sensores, comenzará a parpadear
el corazón en la parte derecha de la
pantalla que indica PULSE de la
pantalla del monitor y al cabo de unos
segundos aproximadamente
aparecerá el valor de su ritmo
cardíaco.
Si no tiene colocadas ambas manos
correctamente como muestra Fig.6, el
pulso no funciona.
Si en pantalla aparece un «0» o no
parpadea el corazón, asegúrese de
que tiene colocadas ambas manos en
los sensores y de que los conector
(32) estén conectados en la parte de
atrás del electrónico.
F.MEDICION DEL TEST:
ESTADO DE FORMA.-
Este electrónico está equipado con la
función de pulso de recuperación.
Esto tiene la ventaja de que usted
puede medir el pulso de recuperación
después de terminado el ejercicio.
Después de terminar su ejercicio y sin
quitar las manos de los sensores de
pulso, presione el botón de «Recovery
Test: Estado de Forma» y comenzará
la cuenta atrás de un minuto.
Solamente estarán encendidas las
líneas de las funciones de Tiempo y
de Pulso. El electrónico medirá su
pulso durante este minuto. El pulso de
recuperación irá apareciendo en la
línea del pulso.
Cuando termine este minuto, el
electrónico calcula y valoriza la
diferencia y la nota de su estado de
forma aparecerá en la pantalla: «F1,
F2,..., F5, F6»; siendo «F1» el mejor
(estado de forma: «Excelente») y
«F6» el peor (estado de forma: «Muy
Deficiente»).
Presionando el botón de RECOVERY,
volverá a la pantalla principal donde
las funciones estarán en modo de que
ha comenzado el TEST.

6
La comparación entre el pulso de
esfuerzo y el pulso de recuperación es
una posibilidad sencilla y rápida de
controlar su estado de forma. La nota
de su estado de forma es un valor
orientativo para su capacidad de
recuperación después de esfuerzos
físicos. Si usted efectúa un
entrenamiento regular, usted
comprobará que su nota mejora.
El test no funciona si los sensores no
están conexionados adecuadamente
o si en la pantalla aparece la letra
«E1».
El TEST no funciona si no tiene
colocadas ambas manos sobre las
sensores (R) (hand-grip) y usted ha
parado de hacer el ejercicio.
Si en la pantalla le aparece el
mensaje «E1» significa que no tiene
correctamente colocadas las manos
sobre las sensores (R) (hand-grip).
Si en la pantalla le aparece el
mensaje «E2» significa que no ha
detenido el ejercicio.
G.FUNCION BODY-FAT.-
Este monitor dispone de una memoria
para grabar el SEXO (Hombre 1 –
Mujer 0 ); ALTURA (100 – 200 cm);
PESO (30 – 200 Kg); EDAD (10 –
100).
1. Pulse cualquier tecla, para poner en
marcha el monitor.
2. Pulsando la tecla BODY-FAT
parpadeará la silueta hombre,
pulsando las teclas UP–DOWN
seleccione Hombre ó Mujer.
3. Pulse la tecla BODY-FAT y le
aparecerá en pantalla la altura, (100 –
200 cm), con las teclas UP-DOWN
seleccione su altura.
4. Pulse la tecla BODY-FAT y le
aparecerá el peso, (30–200 Kg), con
las teclas UP-DOWN seleccione su
peso.
5. Pulse la tecla BODY-FAT y le
aparecerá la edad, (10–100), con las
teclas UP-DOWN seleccione su edad.
6. Colocando ambas manos sobre los
sensores de pulso del manillar (R)
aparecerá en la pantalla unos
caracteres (
) de tiempo
de medición de grasa BMR (Ritmo
Basal Metabólico valores entre (1–
9999), BMI: (Indice de masa corporal
valores entre (1,0–99,9), FAT % (% de
grasa corporal valores entre (5–50%)
se mostrara este valor el la pantalla
del monitor y los anteriores valores se
mostrarán en las pantallas inferiores
del monitor.
NOTA:
Si aparece el mensaje «E3» en la
pantalla, significa que no ha colocado
correctamente las manos sobre los
sensores (R), situados en el manillar.
Para medir el estado de GRASA
CORPORAL, consulte la tabla
siguiente
TABLA DE REF.
PORCENTAJE GRASA
CORPORAL % (BODY FAT).-
SEXO /
GRASA%
BAJO BAJO /
MEDIO
MEDIO ALTO
HOMBRE <
13%
13%-
25,8%
26%-
30%
>30%
MUJER <23% 23%-
35,8%
36%-
40%
>40%

7
D. TIPOS DE CUERPO:
Hay 9 tipos de cuero divididos según
el porcentaje de grasa calculado.
TIPO 1 Varón muy deportista
TIPO 2 Varón deportista ideal
TIPO 3 Muy esbelto
TIPO 4 Deportista
TIPO 5 Salud ideal
TIPO 6 Esbelto
TIPO 7 Demasiado obeso
TIPO 8 Obeso
TIPO 9 Ultra obeso
GUIA DE PROBLEMAS.-
Problema: Se enciende el display y
sólo funciona la función de Tiempo
Solución:
a.- Compruebe si el cable de conexión
está conectado.
Problema: El display no se enciende
o la visualización de los segmentos
del display es muy débil
Solución:
a.- Compruebe que las pilas estén
colocadas correctamente
b.- Compruebe la carga de las
baterías
c.- Si están bajas, cambie las pilas
inmediatamente.
Problema: Si algún segmento de
alguna función no se enciende o si se
producen indicaciones erróneas en
alguna función.
Solución:
a.- Desconecte las pilas durante 15
segundos y vuelva a instalarlas
correctamente.
b.- Compruebe la carga de las pilas.
Si están bajas, cambie las pilas.
c.- Si los pasos anteriores no le
ayudan, reemplace el monitor
electrónico
Evite que le dé a su monitor
electrónico la luz directa del sol, pues
se puede estropear la pantalla del
cristal líquido. No lo exponga tampoco
al agua ni a golpes.
BH SE RESERVA EL DERECHO A
MODIFICAR LAS ESPECIFICACIO-
NES DE SUS PRODUCTOS SIN
PREVIO AVISO.

8
English
FITTING THE BATTERIES.-
This monitor uses two 1.5 volt
ALKALINE BATTERIES. To fit the
batteries, remove the rear cover on
the monitor, Fig.1, and carefully insert
the two “R-6” type batteries into the
battery compartment (A) making sure
that the battery’s polarity is correct
(matching the battery’s «+» terminal
with the «+» sign inside the battery
compartment, and the «-» terminal
with the «-» sign). Close the cover, as
shown in Fig.1.
If, after having switched the monitor
on, it displays errors or merely partial
segments then remove the batteries
and wait for about 15 seconds before
reinstalling them.
Weak batteries (run down) produce a
weak digital display (poor contrast)
and erroneous readings. Change them
immediately.
The monitor will switch itself off
automatically if the unit remains
motionless for 3 minutes.
Important: Deposit electronic
components in special containers, Fig.2.
FITTING THE ELECTRONIC
MONITOR.-
Remove the screws from the base of
the monitor, connect the terminals for
the feedback cable (21) to those on
the monitor (32), Fig.3, then slide the
front of the monitor down onto the
plate on the main post (4), making
sure not to snag any of the wires, fit
the screws and tighten, plug the
terminal for the handgrip (24) into the
rear of the monitor, Fig.4.
ELECTRONIC MONITOR.-
To give you greater control over the
exercise, this electronic unit provides
simultaneous read-outs of speed,
distance, exercise time, calories burnt
and pulse rate.
The screen will switch itself on
automatically as soon as you start
exercising or by pressing any key.
The monitor will switch itself off
automatically if the unit stands idle for
more than 3 minutes.
A.SCAN FUNCTION.-
In SCAN mode the computer
continuously scans and displays all of
the functions during exercise. The
function being displayed will flash on
and off.
To select the SCAN function:
1. The monitor starts in SCAN mode
as soon as exercise begins or if any
key is pressed, the main screen will
display TIME, SPEED, DISTANCE,
CALORIES, PULSE RATE values
every 8 seconds, this value will also
be displayed flashing on the lower
section of the monitor.
2. Press the MODE key and this will
cancel the SCAN function.
B.TIME FUNCTION.-
This function counts up or down in
steps of one second, up to a
maximum of 99:00 seconds. Pressing
the DOWN key for more than two
seconds will reset all of the values,
except those relating to personal
information.
1. Press any key to switch the monitor
on.

9
2. Press the MODE key to start the
small TIME window flashing.
3. Press the UP or DOWN keys to
select the time.
4. Begin the exercise and the time
value will begin the countdown, when
it reaches zero it will beep for 3
seconds, advising you that the
selected time has elapsed, the time
value will then start counting upward.
C.DISTANCE FUNCTION.-
This function counts up or down in
steps of 0.01 km/ml, up to a maximum
of 99.99 km/ml. Pressing the DOWN
key for more than two seconds will
reset all of the values, except those
relating to personal information.
1.Press any key to switch the monitor
on.
2. Press the MODE key to start the
small DIST (DISTANCE) window
flashing.
3. Press the UP or DOWN keys to
select the distance.
4. Begin the exercise and the distance
value will begin the countdown, when
it reaches zero it will beep for 3
seconds, advising you that the
selected distance has been covered,
the distance value will then start
counting upward.
D.CALORIE FUNCTION.-
This function counts up or down in
steps of one calorie, up to a maximum
of 999 calories. Pressing the DOWN
key for more than two seconds will
reset all of the values, except those
relating to personal information.
1. Press any key to switch the monitor
on.
2. Press the MODE key to start the
small CAL (CALORIE) window
flashing.
3. Press the UP or DOWN keys to
select the calories.
4. Begin the exercise and the calorie
value will begin the countdown, when
it reaches zero it will beep for 3
seconds, advising you that the
selected calorie value has been
reached , the calorie value will then
start counting upward.
When the programmed calories have
finished, the monitor will beep for 3
seconds and begin to tally the new
calories burnt automatically.
E.PULSE FUNCTION.-
The pulse function shows you heart
beats per minute (BPM). To use this
function place your hands on the
handlebar sensors (R), Fig.5, and your
heart rate will be displayed after a few
seconds. This is not a medical
appliance and therefore these values
are for guideline purposes only.
To select the THR (Target Heart Rate)
carry out the following steps:
1. Press any key to switch the monitor
on.
2. Press the MODE key to start the
small pulse window flashing and THR
will appear.
3. Press the UP or DOWN keys to set
the pulse rate value that you wish to
use during the exercise, between 40
and 199 (BPM), the monitor’s default
value is 150 BPM.
4. Begin exercising and your heart
rate will be displayed in the PULSE
window, when you reach the selected
value the monitor will beep to advise
you that you have reached the set
pulse rate.
NOTE:
If, after 15 seconds, the sensor does
not detect a signal then the error code

10
“E 3” will appear on the screen, make
sure that both your hands are placed
on the handlebar sensors (R), Fig. 6. If
no signal is received after a further 5
seconds then the screen will revert to
the previously displayed function.
HAND-GRIP (PULSE)
INSTRUCTIONS/USE.-
On this model the pulse rate is
measured by placing both hands on
the sensors (R), located on the
handlebar, as shown in Fig.6.
When both hands are placed on the
sensors the heart symbol on the right-
hand side of the screen, marked
PULSE, will begin to flash and after a
few seconds a heart rate reading will
be displayed.
If both hands are not placed correctly
as shown in Fig.6 then the pulse
function will not work.
If a “0” appears on the screen or the
heart symbol does not flash then
make sure that both hands are placed
on the sensors and that the
connectors (32) are connected at the
back of the electronic unit.
F.TEST MEASUREMENTS:
FITNESS.-
This electronic device is equipped with
a recovery test function. This offers
you the advantage of being able to
measure how long it takes your heart
rate to recover after having finished
the exercise. After finishing the
exercise leave your hands on the
pulse sensors (R) and press the
“RECOVERY Fitness Test” button and
this will start a one minute countdown.
Only the Time and Pulse rate function
read-outs will remain displayed. The
electronic device will measure your
pulse rate during this minute. The
heart rate recovery time will be
displayed on the Heart rate line.
When the minute is up, the electronic
device will work out the difference and
your fitness rating will be displayed up
on the screen: “F1, F2,..., F5, F16;
where F1 is the best (fitness
“Excellent”) and F6 the worst (fitness
“Very Poor”).
Pressing the RECOVERY button will
take you back to the main screen,
where the functions will be in the
same mode as when the TEST began.
The comparison between the worked
heart rate and the recovery heart rate
provides a fast, simple method of
gauging how fit you are. Your fitness
rating is a guideline that shows you
how fast your heart recovers after
physical exertion. If you exercise
regularly then you will see your fitness
rating improve.
The test will not work if the sensor is
not positioned correctly or if the error
code “E1” appears on the screen.
The TEST will not work if you do not
have both hands placed on the hand-
grip sensors (R) after you have
stopped doing the exercise.
If the error code “E1” is shown on the
screen then this means that you do
not have your hands positioned
correctly on the hand-grip sensors (R).
If the error code “E2” appears on the
screen, this means that you have not
stopped exercising.
G.BODY-FAT FUNCTION.-
This monitor has a memory to record
SEX (Male 1 – Female 0); HEIGHT
(100 – 200 cm); WEIGHT (30 – 200
kg); AGE (10 – 100).
1. Press any key to switch the monitor
on.

11
2. Press the BODY FAT key and the
male Fig. will start flashing, use the
UP or DOWN keys to select Male or
Female.
3. Press the BODY FAT key and the
height screen will appear, (100 – 200
cm), use the UP – DOWN keys to
select your height.
4. Press the BODY FAT key and the
weight screen will appear, (30 – 200
kg), use the UP – DOWN keys to
select your weight.
5. Press the BODY FAT key and the
age screen will appear, (10 – 100),
use the UP – DOWN keys to select
your age.
6. Place both hands on the hand-grip
sensors (R) and certain characters
(
) will appear on the
screen displaying your BMR (Basal
Metabolic Rate, values between 1 –
9999), BMI (Body Mass Index, values
between 1.0 – 99.9), FAT% ( Body fat
%, values between 5 – 50%), this last
value will be shown on the main
screen and the previous values on the
bottom screens.
NOTE:
If the error code “E3” is shown on the
screen then this means that you do
not have your hands positioned
correctly on the hand-grip sensors (R).
Personal data is not stored and will be
lost when the monitor is reset or
switched off.
Refer to the following table to gauge
your BODY FAT status:
REFERENCE TABLE: BODY
FAT PERCENTAGE %
SEX /
FAT%
LOW LOW /
AVERAGE
AVERAGE HIGH
MALE <
13%
13%-
25.8%
26%-30% >30%
FEMALE <23% 23%-
35.8%
36%-40% >40%
D. BODY TYPES:
There are 9 body types based on the
percentage of fat calculated.
TYPE 1 Extremely athletic
TYPE 2 Ideal sportsman
TYPE 3 Very slender
TYPE 4 Sportsman
TYPE 5 Ideal health
TYPE 6 Slender
TYPE 7 Very overweight
TYPE 8 Overweight
TYPE 9 Extremely obese
TROUBLESHOOTING GUIDE.-
Problem: The display comes on but
only the Time function works
Solution:
a.- Make sure that the connection
cable is connected.
Problem: The display does not come
on or the displayed segments are very
weak
Solution:
a.- Check that the batteries are fitted
correctly.
b.- Check the battery charge
c.- If they are run down change them
immediately
Problem: Display segments of a
function read-out are not visible or
error messages for a particular
function appear.

12
Solution:
a.- Remove the batteries for 15
seconds and then refit them correctly.
b.- Check the battery charge If they
are run down change the batteries
c.- If the above steps do not help then
replace the electronic monitor.
Avoid leaving the electronic monitor in
direct sunlight as this might damage
the liquid crystal display. Similarly, do
not expose it to water or knocks.
BH RESERVES THE RIGHT TO
MODIFY THE SPECIFICATIONS OF
ITS PRODUCTS WITHOUT PRIOR
NOTICE

13
Français
MISE EN PLACE DES PILES.-
Ce moniteur fonctionne avec deux
PILES ALCALINES de 1,5 volts. Pour
placer les piles, retirez le couvercle
arrière du moniteur, Fig.1 et introduire
avec précaution les piles alcalines type
«R-6» dans le logement des piles (A) en
orientant correctement la polarité des
piles (en faisant coïncider le pôle «+»
des piles avec le signe «+» du logement
des piles et le pôle «-» avec le signe «-
»). Fermez le couvercle, comme indiqué
dans la Fig.1.
Si après avoir branché le moniteur
électronique, vous constatez que les
indications sont inexactes ou que les
segments s’affichent partiellement,
retirez les piles et attendez 15 secondes
environ avant de les replacer.
Des batteries faibles (déchargées)
produisent des chiffres faibles (sans
contraste) et des informations inexactes.
Remplacez-les immédiatement.
Si l’unité est 3 minutes arrêtée, l’écran
s’éteint automatiquement.
Remarque importante: Les compo-
sants électroniques hors d’usage
doivent être déposés dans des
conteneurs spécialement prévus à cet
effet Fig.2.
MISE EN PLACE DU
MONITEUR ÉLECTRONIQUE.-
Dévissez les vis de la partie arrière du
moniteur, connectez les connecteurs
du renvoi (21) à ceux du moniteur (32)
Fig.3, puis introduire le moniteur de
haut en bas en le faisant glisser dans
la rainure du tube rameur (4) en
veillant à ne pas pincer les câbles.
Posez les vis et vissez-les, connectez
le connecteur du hand-grip (24) en
partie arrière du moniteur Fig.4.
MONITEUR ÉLECTRONIQUE.-
Pour vous permettre de contrôler
facilement et confortablement vos
exercices, cet appareil électronique
affiche simultanément, la vitesse, la
distance, la durée de l’exercice, les
calories brûlées et le pouls.
Dès le démarrage de l’exercice,
l’écran s’allume automatiquement, il
s’allume également si vous appuyez
sur une touche.
Si l’unité est 3 minutes arrêtée, l’écran
s’éteint automatiquement.
A.FONCTION SCAN.-
Dans le mode SCAN, l’ordinateur
révise et affiche toutes les fonctions
continuellement durant la réalisation
de vos exercices. La fonction affichée
est indiquée par des clignotements.
Pour sélectionner la fonction SCAN:
1. Au début de l’exercice ou si vous
appuyez sur l’une des touches, le
moniteur s’allume dans la fonction
SCAN et toutes les 8 secondes, la
DURÉE, la VITESSE, la DISTANCE,
les CALORIES et le POULS seront
affichés à l’écran principal. En outre,
ces informations seront également
affichées en bas de l’écran et en
clignotant.
2. Pour annuler la fonction SCAN,
appuyez sur la touche MODE.
B:FONCTION DURÉE.-
Cette fonction ajoute ou soustrait par
des incréments d’une seconde jusqu’à

14
un maximum de 99:00 secondes. En
appuyant + de deux secondes sur la
touche DOWN, toutes les valeurs
reviennent sur zéro, excepté les
informations personnelles.
1. Pour mettre en marche le moniteur,
appuyez sur une touche quelconque.
2. En appuyant sur la touche MODE la
petite fenêtre TIME clignotera.
3. Pour sélectionner la durée, appuyez
sur les touches UP ou DOWN.
4. Commencez l’exercice, le compte à
rebours commencera et à la fin de la
durée programmée, le moniteur émet
un signal sonore durant 3 secondes
pour signaler que le temps sélectionné
s’est écoulé et que le temps
commence à augmenter.
C:FONCTION DISTANCE.-
Cette fonction ajoute ou soustrait par
des incréments de 0.01 km/ml jusqu’à
un maximum de 999 km/ml. En
appuyant + de deux secondes sur la
touche DOWN, toutes les valeurs
reviennent sur zéro, excepté les
informations personnelles.
1. Pour mettre en marche le moniteur,
appuyez sur une touche quelconque.
2. En appuyant sur la touche MODE la
petite fenêtre DIST (DISTANCE)
clignotera.
3. Pour sélectionner la distance,
appuyez sur les touches UP ou
DOWN.
4. Commencez l’exercice, la distance
commencera à diminuer et à la fin de
la distance programmée, le moniteur
émet un signal sonore durant 3
secondes pour signaler que la
distance sélectionnée a été parcourue
et qu’elle commence à augmenter.
D:FONCTION CALORIES
Cette fonction ajoute ou soustrait les
calories, une à une, jusqu’à un
maximum de 999 calories. En
appuyant + de deux secondes sur la
touche DOWN, toutes les valeurs
reviennent sur zéro, excepté les
informations personnelles.
1. Pour mettre en marche le moniteur,
appuyez sur une touche quelconque.
2. En appuyant sur la touche MODE la
petite fenêtre CAL (CALORIES)
clignotera.
3. Pour sélectionner les calories,
appuyez sur les touches UP ou
DOWN.
4. Commencez l’exercice, les calories
commenceront à diminuer et à la fin
des calories programmées, le
moniteur émet un signal sonore durant
3 secondes pour signaler que les
calories sélectionnées ont été brûlées
et qu’elles commencent à augmenter.
E. FONCTION POULS.-
La Fonction pouls affiche les P.P.M
(pulsations par minute). Pour ce faire,
posez les mains Fig.5 sur les
senseurs du guidon (R) et dans les
secondes suivantes votre fréquence
cardiaque sera affichée. Ce moniteur
n’est pas un appareil médical, par
conséquent les valeurs sont données
à titre purement indicatif.
Pour sélectionner le THR (cadence
cardiaque cible), faire comme indiqué
ci-après:
1. Pour mettre en marche le moniteur,
appuyez sur une touche quelconque.
2. En appuyant sur la touche MODE la
petite fenêtre du pouls clignotera et la
fréquence (THR) sera affichée.
3. En appuyant sur les touches UP ou
DOWN, sélectionnez la valeur du
pouls avec laquelle vous voulez

15
réaliser l’exercice entre 40 et 199
(PPM), valeur initiale programmée
dans le moniteur 150 PPM.
4. Commencez l’exercice et votre
fréquence cardiaque sera affichée à
l’écran PULSE dès que la valeur
sélectionnée sera atteinte, le moniteur
émettra un signal sonore pour indiquer
que cette valeur a été atteinte.
NOTA:
Si au bout de 15 secondes aucun
signal de pulsations n’est affiché, le
message «E 3» sera affiché à l’écran,
vérifiez si vos deux mains sont bien
posées sur les senseurs (R) du
guidon, Fig.6. Si aucun signal n’est
donné au bout de 5 secondes, l’écran
reviendra à la fonction précédente.
MODE D’EMPLOI DU HAND-
GRIP (POULS).-
Sur ce modèle, le pouls se mesure en
posant les deux mains sur les
senseurs (R) placés sur le guidon,
comme indiqué dans la Fig.6.
Dès que vos mains seront posées sur
les senseurs, un cœur commencera à
clignoter sur la droite de l’écran
PULSE de l’écran du moniteur et votre
fréquence cardiaque sera affichée
dans les secondes suivantes.
Si vos deux mains ne sont pas posées
correctement comme indiqué dans la
Fig.6, la fonction pouls ne
fonctionnera pas.
Si un “0” s’affiche à l’écran ou si le
cœur ne clignote pas, vérifiez si vos
mains sont bien posées sur les
senseurs et si les connecteurs (32)
sont bien connectés en partie arrière
de l’électronique.
F:MESURE DU TEST : ÉTAT
DE LA FORME.-
Cet électronique est équipée de la
fonction pouls de récupération. Grâce
à cette fonction vous pourrez mesurer
le pouls de récupération après avoir
effectué l’exercice.À la fin de
l’exercice et sans retirer les mains des
senseurs de pouls, appuyez sur le
bouton “RecoveryTest: État de forme”
et au bout d’une minute, le compte à
rebours commencera. Seules les
lignes des fonctions Durée et Pouls
seront allumées. L’électronique
mesurera votre pouls au cours de
cette minute. Le pouls de récupération
s’affichera sur la ligne du pouls.
À la fin de cette minute, l’électronique
calcule et évalue la différence et la
note de votre forme physique est
affichée à l’écran: «F1, F2,..., F5, F6»,
«F1» étant le meilleur (état de forme:
«Excellent») et «F6» le pire (état de
forme: «Très insuffisant»).
En appuyant sur le bouton
RECOVERY, le moniteur reviendra à
l’écran principal dans lequel les
fonctions se trouvent dans le mode en
service au moment du démarrage du
TEST.
La comparaison du pouls de l’effort et
du pouls de récupération est une
façon simple et rapide de contrôler
l’état de votre forme. La note sur l’état
de votre forme est une information
donnée à titre purement indicatif quant
à votre pouvoir de récupération après
avoir effectué un exercice physique. Si
vous vous entraînez régulièrement,
vous pourrez constater une
amélioration de votre note.
Ce test ne fonctionnera pas si les
senseurs ne sont pas correctement
connectés ou si le message «E1»
s’affiche à l’écran.

16
Ce TEST ne fonctionnera pas non
plus si vos deux mains ne sont pas
bien posées sur les senseurs (R)
(hand-grip) et si vous avez arrêté
l’exercice.
Si le message «E1» s’affiche à
l’écran, cela voudra dire que vos
mains ne sont pas bien posées sur les
senseurs (R) (hand-grip).
Si le message «E2» s’affiche à
l’écran, cela voudra dire que vous
avez arrêté l’exercice.
G.FONCTION BODY-FAT.-
Ce moniteur dispose d’une mémoire
pour l’enregistrement du SEXE
(homme 1 – femme 0 ), TAILLE (100 –
200 cm), POIDS (30 – 200 kg), ÂGE
(10 – 100).
1. Pour mettre en marche le moniteur,
appuyez sur une touche quelconque.
2. En appuyant sur la touche BODY-
FAT, une silhouette d’homme
clignotera et pour sélectionner
Homme ou Femme, appuyez sur les
touches UP–DOWN.
3. Appuyez sur la touche BODY-FAT
pour afficher l’écran de la taille (100 –
200 cm) qu’il faudra sélectionner par
l’intermédiaire des touches UP-
DOWN.
4. Appuyez sur la touche BODY-FAT
pour afficher l’écran du poids (30 –
200 kg) qu’il faudra sélectionner par
l’intermédiaire des touches UP-
DOWN.
5. Appuyez sur la touche BODY-FAT
pour afficher l’écran de l’âge (10 –
100) qu’il faudra sélectionner par
l’intermédiaire des touches UP-
DOWN.
6. En posant les deux mains sur les
senseurs de pouls du guidon (R), des
caractères (
) du temps
de la mesure de la graisse BMR
(Fréquence de Base Métabolique–
valeurs entre 1–9999), BMI, seront
affichés à l’écran: (Taux de masse
corporelle–valeurs entre 1,0–99,9),
FAT % (% de graisse corporelle –
valeurs entre 5–50%), cette valeur
sera affichée à l’écran du moniteur et
les valeurs précédentes seront
affichées sur les écrans inférieurs du
moniteur.
NOTA:
Si le message “E3” s’affiche à l’écran,
cela voudra dire que vos mains ne
sont pas bien posées sur les senseurs
(R) du guidon.
En cas d’extinction ou de mise à zéro,
le moniteur ne conserve pas les
informations personnelles de
l’utilisateur.
Pour mesurer le taux de GRAISSE
CORPORELLE, voir le tableau ci-
après:
TABLEAU DE RÉFÉRENCE
TAUX DE GRAISSE
CORPORELLE % (Body Fat)
SEXE/
GRAISSE
%
FAIBLE FAIBLE/
MOYEN
MOYEN ÉLEVÉ
HOMME < 13% 13%-
25,8%
26%-
30%
>30%
FEMME <23% 23%-
35,8%
36%-
40%
>40%
D. TYPE DE PHYSIQUES.-
Les physiques classés selon le taux
de graisse calculé, sont au nombre de
9, à savoir:

17
TYPE 1 homme, très sportif
TYPE 2 Homme, sportif idéal
TYPE 3 Très svelte
TYPE 4 Sportif
TYPE 5 Santé idéale
TYPE 6 Svelte
TYPE 7 Trop obèse
TYPE 8 Obèse
TYPE 9 Super obèse
GUIDE DES PROBLÈMES.-
Problème: Le display s’allume bien
mais seule fonctionne la fonction
durée.
Solution:
A. Vérifiez si le cordon de connexion
est bien connecté.
Problème: le display ne s’allume pas
ou l’affichage des segments du
display est très faible.
Solution:
A. Vérifiez si les piles sont bien
placées.
B: Vérifiez la charge des batteries
C: Si la charge est faible, remplacez
les piles immédiatement.
Problème: Si un segment d’une
fonction ne s’allume pas ou si les
informations affichées sont faussées
Solution:
A. Déconnectez les piles 15 secondes
et les remettre en place correctement.
B: Vérifiez la charge des piles. Si la
charge est faible, remplacez les piles.
C: Si les problèmes persistent après
avoir suivi ces instructions, remplacez
le moniteur électronique.
Garder le moniteur électronique à
l’abri du rayonnement direct du soleil
car cela risquerait d’endommager le
verre liquide. Tenir le moniteur à
l’écart de l’eau et éviter les coups.
BH SE RÉSERVE LE DROIT DE
MODIFIER LES CARACTÉRISTI-
QUES DE SES PRODUITS SANS
PRÉAVIS.

18
Deutsch
EINSETZEN DER
BATTERIEN.-
Dieser Monitor funktioniert mit 1,5 Volt
ALKALIBATTERIEN. Zum Einsetzen
der Batterien lösen Sie bitte den
hinteren Deckel des Monitors, Fig.1
und setzen Sie die Alkalibatterien des
Typs «R-6» vorsichtig in das
Batteriefach (A). Achten Sie dabei auf
die korrekte Ausrichtung der Polarität
der Batterien (der Pol «+” der
Batterien muss mit dem «+» Zeichen
im Batteriefach übereinstimmen,
ebenso wie der «-» Pol mit dem «-»
Zeichen). Verschließen Sie den
Deckel wie auf Fig.1 dargestellt.
Wenn nach dem Einschalten des
Monitors falsche oder unvollständige
Anzeigen erscheinen, entnehmen Sie
bitte die Batterien, warten Sie 15
Sekunden und setzen Sie sie wieder
ein.
Schwache (entladene) Batterien
führen zu schwachen (kontrastarmen)
und falschen Anzeigen. Tauschen Sie
sie umgehend aus.
Der Monitor schaltet sich automatisch
aus, wenn er 3 Minuten nicht benutzt
wird.
Wichtig: Entsorgen Sie
elektronischen Komponenten in
speziellen Containern. Fig.2.
ANBRINGEN DES
ELEKTRONISCHEN
MONITORS.-
Lösen Sie die Schrauben auf der
Rückseite des Monitors, schließen Sie
die Feedbackklemmen (21) an die des
Monitors (32) Fig.3 und setzen Sie
dann den Monitor von oben nach
unten ein, indem Sie ihn über das
Blech des Ruderrohrs (4) rutschen
lassen. Achten Sie dabei darauf, die
Kabel nicht einzuklemmen. Schließen
Sie die Endklemme des Hand-Grip
(24) auf der Rückseite des Monitors
an Fig.4.
ELEKTRONIKMONITOR.-
Um Ihnen die Kontrolle Ihres Trainings
zu erleichtern, zeigt dieser Monitor
gleichzeitig Geschwindigkeit, Strecke,
Trainingsdauer, verbrauchte Kalorien
und Puls an
Der Bildschirm schaltet automatisch
zu Beginn der Übung bzw. bei
Betätigen einer beliebigen Taste ein.
Der Monitor schaltet automatisch aus,
wenn das Gerät 3 Minuten nicht
benutzt wird.
A.SCAN-FUNKTION.-
Im SCAN-MODUS überprüft und
aktualisiert der Computer
kontinuierlich alle Funktionen während
der Übung. Die angezeigte Funktion
blinkt.
Einstellen der SCAN-Funktion:
1. Zu Beginn der Übung oder bei
Betätigen einer beliebigen Taste
schaltet der Monitor in SCAN-Funktion
ein. Dieser zeigt alle 8 Sekunden auf
dem Hauptbildschirm DAUER,
GESCHWINDIGKEIT, STRECKE,
KALORIEN, PULS an. Im unteren Teil
des Bildschirms wird der Wert
ebenfalls angezeigt (blinkend).
2. Durch Betätigen der MODE-Taste
wird die SCAN-Funktion annulliert.

19
B.DAUER.-
Diese Funktion summiert oder
subtrahiert in Sekundenschritten die
Zeitdauer bis maximal 99:00
Sekunden. Betätigt man die DOWN
Taste länger als zwei Sekunden,
werden alle Werte auf Null gesetzt, mit
Ausnahme der persönlichen Daten.
1. Betätigen Sie eine beliebige Taste,
um den Monitor einzuschalten.
2. Betätigt man die MODE-Taste,
blinkt das kleine Fenster DAUER.
3. Stellen Sie mit Hilfe der Tasten UP
oder DOWN die Trainingsdauer ein.
4. Beginnen Sie die Übung und der
eingestellte Wert verringert sich
entsprechend der tatsächlich
absolvierten Trainingsdauer. Sobald
der Wert Null erreicht wird, ertönt 3
Sekunden lang ein Pfeifton, um
anzuzeigen, dass der eingestellte
Wert abgelaufen ist und dass die
Dauer nun in positiver Richtung
summiert wird.
C.STRECKE.-
Diese Funktion summiert oder
subtrahiert in 0,1 km/ml –Schritten die
Strecke bis maximal 999 km/ml.
Betätigt man die DOWN -Taste länger
als zwei Sekunden, werden alle Werte
auf Null gesetzt, mit Ausnahme der
persönlichen Daten.
1. Betätigen Sie eine beliebige Taste,
um den Monitor einzuschalten.
2. Betätigt man die MODE-Taste,
blinkt das kleine Fenster DIST
(STRECKE).
3. Stellen Sie mit Hilfe der Tasten UP
oder DOWN die Strecke ein.
4. Beginnen Sie die Übung und der
eingestellte Wert verringert sich
entsprechend der tatsächlich
zurückgelegten Strecke. Sobald der
Wert Null erreicht wird, ertönt 3
Sekunden lang ein Pfeifton, um
anzuzeigen, dass der eingestellte
Wert abgelaufen ist und dass die
Strecke nun in positiver Richtung
summiert wird.
D.KALORIEN.-
Diese Funktion summiert oder
subtrahiert in 1 Kalorien-Schritten die
verbrauchte Kalorienzahl bis maximal
999 Kalorien. Betätigt man die DOWN
-Taste länger als zwei Sekunden,
werden alle Werte auf Null gesetzt, mit
Ausnahme der persönlichen Daten.
1. Betätigen Sie eine beliebige Taste,
um den Monitor einzuschalten.
2. Betätigt man die MODE-Taste,
blinkt das kleine Fenster CAL
(KALORIEN).
3. Stellen Sie mit Hilfe der Tasten UP
oder DOWN die Kalorien ein.
4. Beginnen Sie die Übung und der
eingestellte Kalorienwert verringert
sich entsprechend. Sobald der Wert
Null erreicht wird, ertönt 3 Sekunden
lang ein Pfeifton, um anzuzeigen,
dass der eingestellte Wert abgelaufen
ist und dass die Dauer nun in positiver
Richtung summiert wird.
E.PULS.-
Die Pulsfunktion zeigt die P.P.M
(Pulsschlag pro Minute) an. Legen Sie
dazu Ihre Hände auf die Sensoren des
Lenkers (R), Fig.5. Nach einigen
Sekunden wird Ihr Herzrhythmus
angezeigt. Es handelt sich hier um
kein medizinisches Gerät, die
Angaben sind reine Richtwerte.
Um den THR (objektiven
Herzrhythmus ) einzustellen, gehen
Sie bitte folgendermaßen vor:
1. Betätigen Sie eine beliebige Taste,
um den Monitor einzuschalten.

20
2. Betätigt man die MODE-Taste,
blinkt das kleine Puls-Fenster und der
THR wird angezeigt.
3. Stellen Sie mit Hilfe der Tasten UP
oder DOWN den Pulswert ein
(zwischen 40 und 199 PPM) ein, mit
dem Sie die Übung ausführen
möchten. Der im Monitor
programmierte Ausgangswert sind
150 PPM.
4. Beginnen Sie die Übung und auf
dem PULSE-Bildschirm wird Ihr
Herzrhythmus angezeigt. Wenn der
eingestellte Wert erreicht wird, ertönt
ein Pfeifton, der darauf hinweist, dass
der Wert erreicht wurde.
ANMERKUNG: Wenn nach 15
Sekunden kein Pulssignal angezeigt
wird, erscheint auf dem Bildschirm die
Anzeige «E 3»; vergewissern Sie sich
dann, dass Sie beide Hände auf den
Sensoren (R) des Lenkers liegen
haben Fig.6. Wenn nach 5 Sekunden
kein Signal kommt, wechselt der
Bildschirm auf die vorherige Funktion.
ANLEITUNG ZUR
BENUTZUNG DES HAND-
GRIP (PULS).-
In diesem Modell wird der Puls durch
Auflegen beider Hände auf die
Sensoren (R) gemessen. Diese
Sensoren befinden sich im Lenker
Fig.6.
Wenn beide Hände auf den Sensoren
liegen, beginnt das für PULSE
stehende Herzsymbol auf der rechten
Seite des Bildschirms zu blinken und
nach einigen Sekunden erscheint der
Wert Ihres Herzrhythmus.
Wenn nicht beide Hände korrekt auf
den Sensoren liegen Fig.6, funktioniert
die Puls-Funktion nicht.
Zeigt der Bildschirm “0” an oder das
Herz blinkt, vergewissern Sie sich,
dass beide Hände auf den Sensoren
liegen und dass die Steck-
verbindungen (32) auf der Rückseite
des Monitors angeschlossen sind.
F.KONDITIONSTEST.-
Diese Elektronikeinheit ist mit einer
Funktion zur Messung des
Erholungspulses ausgestattet. Damit
kann der Erholungspuls nach
Beendigung der Übung gemessen
werden. Wenn Sie mit der Übung
fertig sind, lassen Sie dazu die Hände
auf den Pulssensoren liegen und
Betätigen die Taste «Recovery Test:
Kondition». Es erfolgt eine
Countdown-Zählung während einer
Minute. Nur die Zeilen der Funktionen
Dauer und Puls werden angezeigt.
Während dieser Minute misst die
Elektronikeinheit Ihren Puls. Der
Erholungspuls wird dann in der
Pulszeile angezeigt.
Nach Ablauf der Minute, berechnet
und bewertet die Elektronikeinheit den
Unterschied und auf dem Bildschirm
wird die Bewertung Ihrer Kondition
angezeigt: «F1, F2,..., F5, F6»; dabei
ist «F1» die beste (Kondition:
«Exzellent») und «F6» die
schlechteste Bewertung (Kondition:
«Sehr Mangelhaft»).
Betätigt man die RECOVERY-Taste,
wird erneut der Hauptbildschirm
angezeigt, auf dem die Funktionen
sich im Status des laufenden Tests
befinden.
Der Vergleich zwischen
Belastungspuls und Erholungspuls ist
eine Möglichkeit, auf einfache und
schnelle Weise Ihre Kondition zu
überprüfen. Die Bewertung Ihrer
physischen Kondition ist ein Richtwert

21
für Ihre Erholungsfähigkeit nach
physischer Belastung. Wenn Sie ein
regelmäßiges Training durchführen,
werden Sie feststellen, dass sich
diese Bewertung verbessern wird.
Der Test funktioniert nicht, wenn die
Sensoren nicht richtig angeschlossen
sind oder wenn auf dem Bildschirm
die Anzeige «E1» erscheint.
Der TEST funktioniert nicht, wenn
nicht beide Hände auf den Sensoren
(R) (Hand-Grip) liegen und Sie das
Training unterbrochen haben.
Die Meldung «E1» auf dem Bildschirm
bedeutet, dass die Hände nicht richtig
auf den Sensoren (R) (Hand-Grip)
liegen.
Erscheint die Meldung «E2», wurde
das Training nicht unterbrochen.
G.BODY-FAT.-
Dieser Monitor hat einen Speicher, in
dem folgende Angaben eingegeben
werden können: GESCHLECHT
(männlich 1 – weiblich 0 );
KÖRPERGRÖSSE (100–200 cm);
GEWICHT (30 – 200 Kg); ALTER (10–
100).
1. Betätigen Sie eine beliebige Taste,
um den Monitor einzuschalten.
2. Betätigt man dann die Taste BODY-
FAT, blinkt das Personen-Symbol. Mit
den Tasten UP–DOWN können Sie
das entsprechende Geschlecht
einstellen.
3. Betätigen Sie dann die Taste
BODY-FAT, um den Bildschirm für die
Körpergröße (100 – 200 cm)
anzuzeigen, auf dem Sie Ihre Größe
mit den Tasten UP-DOWN einstellen
können.
4. Betätigen Sie erneut die Taste
BODY-FAT, um den Bildschirm
Gewicht (30–200 Kg) anzuzeigen, auf
dem Sie mit den Tasten UP-DOWN
Ihr Gewicht eingeben können.
5. Betätigen Sie die Taste BODY-FAT,
um nun den Bildschirm für das Alter
(10–100) aufzurufen, das Sie
ebenfalls mit den Tasten UP-DOWN
einstellen können.
6. Legen Sie nun beide Hände auf die
Pulssensoren am Lenker (R). Auf dem
Bildschirm erscheinen Zeichen
(
) für die Messdauer der
Fettmessung BMR (Basaler
Stoffwechselfaktor mit Werten
zwischen 1–9999), BMI:
(Körpermassenindex mit Werten
zwischen 1,0–99,9), FAT % (%
Körperfett in Prozent mit Werten
zwischen 5–50%). Dieser Wert wird
auf dem Bildschirm des Monitors
angezeigt, die anderen Werte auf den
unteren Monitorbildschirmanzeigen.
ANMERKUNG:
Erscheint auf dem Bildschirm die
Meldung «E3», haben Sie die Hände
nicht korrekt auf die Sensoren (R) des
Lenkers gelegt.
Die persönlichen Daten werden beim
Ausschalten des Monitors oder bei
einer Rückstellung auf Null nicht
gespeichert.
Bezüglich der Messung des
KÖRPERFETTS vergleichen Sie bitte
nachfolgende Tabelle:
REFERENZTABELLE
KÖRPERFETT IN PROZENT %
(Body Fat).-
GESCHL./
FETT %
NIED
RIG
NIEDRIG/
MITTEL
MITTEL HOCH
MÄNNER <
13%
13%-
25,8%
26%-
30%
>30%
FRAUEN <23% 23%-
35,8%
36%-
40%
>40%

22
D. KÖRPERTYPEN:
Nach dem berechneten
Fettprozentsatz unterscheidet man 9
verschiedene Körpertypen.
TYP 1 Sehr sportlicher Mann
TYP 2 Idealer männl. Sportler
TYP 3 Sehr schlank
TYP 4 Sportler
TYP 5 Ideale Gesundheit
TYP 6 Schlank
TYP 7 Zu übergewichtig
TYP 8 Übergewichtig
TYP 9 Stark übergewichtig
FEHLERLÖSUNG.-
Problem: Das Display schaltet ein
und es funktioniert nur die Dauer-
Funktion
Lösung:
a.- Prüfen Sie, ob das Anschlusskabel
korrekt angeschlossen ist.
Problem: Das Display schaltet nicht
ein oder die Anzeige der Segmente
des Displays ist sehr schwach.
Lösung:
a.- Prüfen Sie, ob die Batterien korrekt
eingesetzt sind.
b.-Prüfen Sie den Ladezustand der
Batterien.
c.- Sollten die Batterien schwach sein,
tauschen Sie sie bitte umgehend aus.
Problem: Eines der Segmente einer
Funktion wird nicht angezeigt oder die
Anzeigen einer der Funktionen sind
nicht korrekt.
Lösung:
a.- Nehmen Sie die Batterien 15
Sekunden lang heraus und setzen Sie
sie dann wieder ein.
b.- Überprüfen Sie den Ladezustand
der Batterien. Sollte dieser niedrig
sein, tauschen Sie sie aus.
c.- Sollten die vorgenannten Schritte
keinen Erfolg haben, tauschen Sie
den Monitor aus.
Setzen Sie den elektronischen Monitor
nicht der direkten Sonneneinstrahlung
aus, da dies den Flüssigglasbildschirm
beschädigen könnte. Vermeiden Sie
Schläge und Kontakt mit Wasser.
BH BEHÄLT SICH DAS RECHT
VOR, DIE SPEZIFIZIERUNGEN
SEINER PRODUKTE OHNE
VORHERIGE ANKÜNDIGUNG ZU
ÄNDERN.

23
Português
COLOCAÇÃO DAS PILHAS.-
Este monitor utiliza duas PILHAS
ALCALINAS de 1,5 voltes. Para
colocar as pilhas, solte a tampa de
atrás do monitor, Fig.1, e coloque com
precaução pilhas alcalinas do tipo «R-
6» no compartimento das pilhas (A),
orientando correctamente a
polaridade das pilhas (deverá coincidir
o polo «+» das pilhas com o sinal «+»
do compartimento das pilhas e o polo
«-» com o sinal «-»). Feche a tampa,
como se mostra na Fig.1.
Se depois de ligar o monitor
electrónico, aparecerem indicações
erróneas ou só aparecerem
segmentos parciais, deverá retirar as
pilhas e esperar uns 15 segundos
antes de voltar a instalá-las.
As baterias fracas (descarregadas)
produzem cifras débeis (sem
contraste) e indicações erróneas.
Deverá mudá-las imediatamente.
O monitor apagar-se-á
automaticamente quando a unidade
estiver parada durante 3 minutos.
Importante: Deposite os componentes
electrónicos em contentores especiais,
Fig.2.
COLOCAÇÃO MONITOR
ELECTRÓNICO.-
Solte os parafusos da parte traseira do
monitor, ligue os terminais de reenvio
(21) com os do monitor (32) Fig.3.
Depois introduza o monitor de cima para
baixo deslizando-o pela chapa do tubo
remo (4), tendo cuidado para não
enganchar os cabos.
Coloque os parafusos e aperte. Ligue
o terminal do hand-grip (24) na parte
traseira do monitor Fig.4.
MONITOR ELECTRONICO.-
Para tornar mais cómodo e mais
simples o controle do seu exercício
este electrónico mostra simultanea-
mente a velocidade, a distância, o
tempo de duração do exercício, as
calorias gastas e a pulsação.
O ecrã acender-se-á automaticamente
ao começar o exercício ou apertando
qualquer tecla.
O monitor apagar-se-á automatica-
mente quando a unidade estiver
parada durante 3 minutos.
A. FUNÇÃO SCAN.-
No modo SCAN, o computador revê e
visualiza continuamente durante os
seus exercícios todas as funções. A
função visualizada estará indicada
através de uma intermitência.
Para seleccionar a função SCAN:
1. Ao começar o exercício ou
apertando qualquer tecla o monitor
acender-se-á na função SCAN, que
cada 8 segundos mostrará no ecrã
principal o TEMPO, VELOCIDADE,
DISTÂNCIA, CALORIAS, PULSAÇÃO
e na parte inferior do monitor também
mostrará o valor em forma
intermitente.
2. Aperte a tecla MODE e ficará
eliminada a função SCAN.
B.FUNÇÃO TEMPO.-
A função conta ou desconta em
incrementos de um segundo até um
máximo de 99:00 segundos.
Apertando durante mais de dois
segundos a tecla DOWN todos os

24
valores passarão a zero, exceptuando
a informação pessoal.
1. Aperte qualquer tecla para pôr em
funcionamento o monitor.
2. Apertando a tecla MODE ficará
intermitente a janela pequena de
TIME.
3. Apertando as teclas UP ou DOWN
poderá seleccionar o tempo.
4. Comece o exercício e começará a
diminuir o tempo; quando terminar o
tempo programado o monitor emitirá
um sinal acústico de 3 segundos,
advertindo-o que terminou o tempo
seleccionado e começará automatica-
mente a aumentar o tempo.
C.FUNÇÃO DISTÂNCIA.-
A função conta ou desconta em
incrementos de 0,1 Km/ml até um
máximo de 999 Km/ml. Apertando
durante mais de dois segundos a tecla
DOWN todos os valores passarão a
zero, exceptuando a informação
pessoal.
1. Aperte qualquer tecla para pôr em
funcionamento o monitor.
2. Apertando a tecla MODE ficará
intermitente a janela pequena de DIST
(DISTÂNCIA).
3. Apertando as teclas UP ou DOWN
poderá seleccionar a distância.
4. Comece o exercício e começará a
diminuir a distância; quando tiver
chegado a zero emitirá um sinal
acústico de 3 segundos, advertindo-o
que chegou ao valor seleccionado e
começará automaticamente a somar a
distância percorrida.
D.FUNÇÃO CALORÍAS.-
A função conta e desconta de uma em
uma caloria, até um máximo de 999
calorias. Apertando durante mais de
dois segundos a tecla DOWN todos
os valores passarão a zero,
exceptuando a informação pessoal.
1. Aperte qualquer tecla para pôr em
funcionamento o monitor.
2. Apertando a tecla MODE ficará
intermitente a janela pequena de CAL
(CALORIAS).
3. Apertando as teclas UP ou DOWN
poderá seleccionar as calorias.
4. Comece o exercício e começará a
diminuir as calorias; quando tiver
chegado a zero emitirá um sinal
acústico de 3 segundos, advertindo-o
que chegou ao valor seleccionado e
começará automaticamente a
aumentar as calorias.
Quando terminar as calorias
programadas, o monitor emitirá um
sinal acústico de 3 segundos, e
começará automaticamente a
aumentar as calorias.
E.FUNÇÃO PULSAÇÃO.-
A função pulsação mostra-lhe as
P.P.M. ( Pulsações por minuto). Para
isso coloque as mãos Fig.5 sobre os
sensores do guiador (R) e depois de
uns segundos mostrar-lhe-á o seu
ritmo cardíaco. Como não se trata de
um aparelho médico o seu valor só
lhe servirá de orientação.
Para seleccionar o THR (ritmo
cardíaco objectivo) siga os seguintes
passos:
1. Aperte qualquer tecla para pôr em
funcionamento o monitor.
2. Apertando a tecla MODE ficará
intermitente a janela pequena de
pulsação e aparecerá THR.
3. Apertando as teclas UP ou DOWN
poderá seleccionar o valor da
pulsação em que deseja fazer o
exercício, entre 40 e 199 (PPM),

25
sendo o valor inicial programado no
monitor 150 PPM.
4. Comece o exercício e aparecerá no
ecrã PULSAÇÃO, o seu ritmo
cardíaco; quando tiver alcançado o
valor seleccionado emitirá um sinal
acústico, advertindo-o que atingiu o
valor seleccionado.
NOTA:
Se não aparecer nenhum sinal de
pulsações depois de 15 segundos, no
ecrã aparecerá “E 3”. Verifique se tem
ambas as mãos bem colocadas nos
sensores (R) do guiador, Fig.6. Se
não aparecer nenhum sinal depois de
transcorridos 5 segundos, o ecrã
principal voltará á sua função anterior.
INSTRUÇÕES – USO DO
HAND-GRIP (PULSAÇÃO).-
A pulsação neste modelo mede-se
colocando ambas as mãos nos
sensores (R), que estão colocados no
guiador, como se indica na Fig.6.
Depois de ter colocado ambas as
mãos nos sensores, aparecerá um
coração intermitente na parte direita
do ecrã do monitor que indica
PULSAÇÃO e depois de uns según-
dos aproximadamente, aparecerá o
valor do seu ritmo cardíaco.
Se ambas as mãos não estiverem
colocadas correctamente como
mostra a Fig.6, a pulsação não
aparecerá.
Se aparecer no ecrã um “0” ou se o
coração não aparecer intermitente,
verifique se tem ambas as mãos
colocadas nos sensores e se os
conectores (32) estão ligados à parte
de atrás do electrónico.
F.MEDIÇÃO DO TESTE:
ESTADO FÍSICO.-
Este electrónico vem equipado com a
função de pulsação de recuperação. A
vantagem desta função é a de que
você poderá medir a pulsação de
recuperação depois de ter terminado
o exercício. Depois de ter terminado o
seu exercício e sem tirar as mãos dos
sensores de pulsação, aperte o botão
de “Recovery Teste: Estado físico” e
começará a contagem decrescente de
um minuto. Só estarão acesas as
linhas das funções de Tempo e de
Pulsação. Durante este minuto o
electrónico medirá a sua pulsação. A
pulsação de recuperação irá
aparecendo na linha da pulsação.
Quando este minuto terminar, o
electrónico calculará e comparará a
diferença e a nota do seu estado
físico aparecerá no ecrã: “F1, F2, ...,
F5, F6”; sendo “F1” o melhor (estado
físico: “Excelente”) e “F6” o pior
(estado físico: “Muito Deficiente”).
Apertando o botão de RECOVERYE,
voltará ao ecrã principal onde as
funções estarão no mesmo modo em
que começou o TESTE.
A comparação entre a pulsação de
esforço e a pulsação de recuperação
é uma maneira rápida e fácil de
calcular o seu estado físico. A nota do
seu estado físico é um valor que lhe
dará uma ideia sobre a sua
capacidade de recuperação depois de
esforços físicos. Se você efectuar um
treino regular poderá comprovar que a
sua nota irá melhorando.
O teste não funcionará se os sensores
não estiverem colocados adecuada-
mente ou se no ecrã aparecer a letra
“E1”.
O TESTE não funcionará se não tiver
ambas as mãos colocadas nos

26
sensores (R) (hand-grip) e se parou
de fazer o exercício.
Se no ecrã aparece a mensagem “E1”
significa que as mãos não estão
correctamente colocadas sobre os
sensores (R) (hand-grip).
Se no ecrã aparece a mensagem “E2”
significa que não parou o exercício.
G.FUNÇÃO BODY-FAT.-
Este monitor possui uma memória
para registar o SEXO ( homem 1 –
Mulher 0); ALTURA ( 100 - 200 cm);
PESO (30 - 200 Kg); IDADE (10 - 100
anos).
1. Aperte qualquer tecla para pôr em
funcionamento o monitor
2. Apertando a tecla BODY-FAT
aparecerá de forma intermitente a
silhueta de um homem, apertando as
teclas UP-DOWN seleccione Homem
ou Mulher.
3. Aperte a tecla BODY-FAT e
aparecerá no ecrã a altura, (100 – 200
cm); com as teclas UP-DOWN
seleccione a sua altura.
4. Aperte a tecla BODY-FAT e
aparecerá o peso, (30 – 200 Kg); com
as teclas UP-DOWN seleccione o seu
peso.
5. Aperte a tecla BODY-FAT e
aparecerá a idade (10 – 100), com as
teclas UP-DOWN seleccione a sua
idade.
6. Colocando ambas as mãos nos
sensores de pulsação do guiador (R)
aparecerá no ecrã uns caracteres
(
) de tempo de medição
de gordura BMR (Ritmo Basal
Metabólico, valores entre 1-9999),
BMI: (Índice de massa corporal,
valores entre 1,0-99,9), FAT % (% de
gordura corporal, valores entre 5-50
%) aparecerão estes valores no ecrã
do monitor e os anteriores valores
aparecerão nos ecrãs inferiores do
monitor.
NOTA:
Se lhe aparecer a mensagem “E3” no
ecrã, significa que não colocou
correctamente as mãos sobre os
sensores (R), situados no guiador.
Os dados pessoais não ficam
guardados no monitor quando se
desliga ou se faz um reset e se
colocam em zero os valores.
Para medir o estado de GORDURA
CORPORAL, consulta a seguinte
tabela.
TABELA DE REF.
PERCENTAGEM GORDURA
CORPORAL %(Body Fat).-
SEXO /
GORDURA
%
BAIXO BAIXO
/
MÉDIO
MÉDIO ALTO
HOMEM < 13% 13%-
25,8%
26%-
30%
>30%
MULHER <23% 23%-
35,8%
36%-
40%
>40%
D. TIPOS DE CORPO.-
Há 9 tipos de corpo divididos segundo
a percentagem de gordura calculada.
TIPO 1 Homem muito desportista
TIPO 2 Homem desportista ideal
TIPO 3 Muito elegante
TIPO 4 Desportista
TIPO 5 Saúde ideal
TIPO 6 Elegante
TIPO 7 Demasiado obeso
TIPO 8 Obeso
TIPO 9 Ultra-obeso

27
GUIA DE PROBLEMAS.-
Problema: Se ao acender o display
só funcionar a função de Tempo
Solução:
a.- Verifique se o cabo de ligação está
ligado.
Problema: Não se consegue acender
o display ou os segmentos do display
só se podem ver de uma forma muito
débil.
Solução:
a.- Verifique se as pilhas estão
correctamente colocadas.
b.- Verifique se as baterias estão
carregadas.
c.- Se estiverem fracas, mude as
pilhas imediatamente.
Problema: Se não conseguir acender
algum segmento de uma função ou se
aparecerem indicações erróneas em
alguma função.
Solução:
a.- Desligue as pilhas durante 15
segundos e volte a instalá-las
correctamente.
b.- Verifique se as pilhas estão
carregadas. Se estão fracas, mude as
pilhas.
c.- Se os passos anteriores não
tiverem ajudado, substitua o monitor
electrónico.
Evite que a luz solar bata
directamente no seu monitor
electrónico, porque o ecrã de cristal
líquido poderia estragar-se. Também
deverá protegê-lo da água e de
golpes.
BH RESERVA O DIREITO DE
PODER MODIFICAR AS
ESPECIFICAÇÕES DOS SEUS
PRODUTOS SEM PRÉVIO AVISO.

28
Italiano
COLLOCAZIONE PILE.-
Questo monitor funziona con due
PILE ALCALINE da 1,5 volt. Per
collocare le pile, tolga il coperchio
posteriore del monitor, Fig.1, ed
inserisca con attenzione le pile
alcaline del tipo «R-6» nello
scomparto delle pile (A) orientando
correttamente la polarità delle pile
(facendo coincidere il polo «+» delle
pile con il marchio «+» dello
scomparto delle pile ed il polo «-» con
il marchio «-»). Chiuda il coperchio,
come mostra la Fig.1.
Se dopo aver collegato il monitor
elettronico si dovessero verificare
indicazioni di errore o solo apparissero
i segmenti parzialmente, tolga le pile
ed aspetti 15 secondi prima di
introdurle di nuovo.
Le pile deboli (scariche) producono
cifre deboli (senza contrasto) ed
indicazioni di errore. Le cambi
inmediatamente.
Il monitor si spegnerà automatica-
mente quando l’ apparecchio si trovi
fermo più di 3 minuti.
Importante: Depositare i componenti
elettronici negli appositi contenitori
speciali, Fig.2.
COLLOCAZIONE MONITOR
ELETTRONICO.-
Rimuovere le viti dalla base del
monitor, connettere i terminali per il
cavo di ritorno (21) a quelli del monitor
(32), Fig.3, dopodiché far scorrere la
parte anteriore del monitor sulla
piastra del tubo principale (4) facendo
attenzione a non intralciare alcun
cavo, inserire le viti e stringere,
inserire il terminale per la manopola
(24) nel retro del monitor, Fig.4.
MONITOR ELECTTONICO.-
Per rendere più comodo e semplice il
controllo del suo allenamento questo
elettronico mostra allo stesso tempo la
velocità, la distanza, il tempo dell’
allenamento, le calorie consumate ed
il polso.
Lo schermo si accenderà automatica-
mente nel cominciare l’ allenamento o
premendo qualsiasi tasto.
Il monitor si spegnerà automatica-
mente quando l’ apparecchio si trovi
più di 3 minuti fermo.
A.FUNZIONE SCAN.-
Nel modo SCAN, il computer controlla
e visualizza continuamente durente i
suoi allenamenti tutte le funzioni. La
funzione visualizzata viene indicata
con lampeggi.
Per scegliere la funzione SCAN:
1. nel cominciare l’ allenamento o
premendo qualsiasi tasto si accende il
monitor nella funzione SCAN, ed ogni
8 secondi si visualizzerà nello
schermo principale il TEMPO,
VELOCITÀ, DISTANZA, CALORIE,
POLSO ed anche nella parte inferiore
del monitor si visualizzerà il valore
sotto forma di lampeggio.
2. Prema il tasto MODE e si eliminerà
la funzione SCAN.
B.FUNZIONE TEMPO.-
La funzione conta o sconta in
incrementi di un secondo fino ad un

29
massimo di 99:00 secondi. Premendo
durante più di due secondi il tasto
DOWN tutti i valori si metteranno a
zero eccetto l’ informazione personale.
1. Prema qualsiasi tasto per mettere in
funzionamento il monitor.
2. Premendo il tasto MODE
lampeggerà la finestra piccola di
TIME.
3. Premendo i tasti UP o DOWN
scelga il tempo.
4. Cominci l’ allenamento e comincerà
a diminuire il tempo, una volta arrivato
a zero si sentiranno dei fischi durante
3 secondi, avvertendo che ha
raggiunto il tempo scelto, cominciando
a contare il tempo in crescendo.
C.FUNZIONE DISTANZA.-
La funzione conta o sconta in
incrementi di 0,1 Km/ml fino ad un
massimo di 999 Km/ml. Premendo
durante più di due secondi il tasto
DOWN tutti i valori si mettono a zero
eccetto l’ informazione personale.
1. Prema qualsiasi tasto per mettere in
funzionamento il monitor.
2. Premendo il tasto MODE
lampeggerà la finestra piccola di DIST
(DISTANZA).
3. Premendo i tasti UP o DOWN
scelga la distanza.
4. Cominci l’ allenamento e comincerà
a diminuire la distanza, una volta
arrivato a zero si sentiranno dei fischi
durante 3 secondi, avvertendo che ha
raggiunto il valore scelto, cominciando
a contare la distanza in crescendo.
D.FUNZIONE CALORIE.-
La funzione conta e sconta di una in
una le calorie, fino ad un massimo di
999 calorie. Premendo durante più di
due secondi il tasto DOWN tutti i valori
si mettono a zero eccetto l’
informazione personale.
1. Prema qualsiasi tasto per mettere in
funzionamento il monitor
2. Premendo il tasto MODE
lampeggerà la finestra piccola di CAL
(CALORIE).
3. Premendo i tasti UP o DOWN
scelga le calorie.
4. Cominci l’ allenamento e
cominceranno a diminuire le calorie,
una volta arrivato a zero si sentiranno
dei fischi durante 3 secondi,
avvertendo che ha raggiunto il valore
scelto, cominciando a contare le
calorie in crescendo.
Quando finisca le calorie
programmate, il monitor emette un
segnale acustico di 3 secondi, e
comincia automaticamente ad
aumentare le calorie.
E.FUNZIONE POLSO.-
La funzione polso mostra le P.P.M
(pulsazioni per minuto). Per fare
questo collochi le mani Fig.5 sui
sensori del manubrio (R) e passati
alcuni secondi il monitor mostrerà il
suo battito cardiaco. Non è un
apparecchio medico quindi il valore è
solamente orientativo.
Per scegliere il THR (ritmo cardiaco
obiettivo) segua i seguenti passi:
1. Prema qualsiasi tasto per mettere in
funzionamento il monitor.
2. Premendo il tasto MODE
lampeggerà la finestra piccola di polso
e vedrà le THR.
3. Premendo i tasti UP o DOWN
scelga il valore del polso con il quale
lei desidera realizzare l’ allenamento,
fra 40 e 199 (PPM), valore iniziale
programmato nel monitor 150 PPM.
4. Cominci l’ allenamento e
visualizzerà nello schermo PULSE, il

30
ritmo del suo battito cardiaco, una
volta abbia raggiunto il valore scelto, il
monitor emetterà dei fischi,
avvertendo così che ha raggiunto il
valore scelto.
NOTA:
Se non visualizza nessun segnale di
pulsazioni passati 15 secondi nello
schermo apparirà la lettera “E 3”, si
assicuri di aver ben collocate le mani
sui sensori (R) del manubrio, Fig.6. Se
non riceve nessun segnale trascorsi 5
secondi, lo schermo principale tornerà
alla sua funzione anteriore.
ISTRUZIONI - USO DEL
HAND-GRIP (POLSO).-
Il polso di questo modello si misura
collocando ambedue le mani nei
sensori (R), che si trovano nel
manubrio come viene indicato nella
Fig.6.
Una volta collocate ambedue le mani
nei sensori, comincerà a lampeggiare
il cuore nella parte destra dello
schermo che indica PULSE dello
schermo del monitor e passati alcuni
secondi apparirà il valore del ritmo del
suo battito cardiaco.
Se non ha collocato correttamente
ambedue le mani come mostra la
Fig.6, il polso non funzionerà.
Se nello schermo appare uno “0” o
non lampeggia il cuore, si assicuri di
aver collocato ambedue le mani nei
sensori e che i connettori (32) sono
ben collegati nella parte posteriore
dell’ elettronico.
F.MISURA DEL TEST: STATO
DI FORMA.-
Questo elettronico include anche la
funzione di polso di recupero. Questo
ha il vantaggio che lei può misurare il
polso di recupero dopo aver finito l’
allenamento. Dopo aver finito il suo
allenamento e senza togliere le mani
dai sensori del polso, prema il tasto di
“Recovery Test: stato di Forma» e
comincerà il conteggio alla rovescia di
un minuto. Solamente si troveranno
accese le linee dell funzioni di Tempo
e di Polso. L’ elettronico misurerà il
suo polso durante questo minuto. Il
polso di recupero apparirà poco a
poco nella linea del polso.
Quando finisca questo minuto, l’
elettronico calcola e valorizza la
differenza ed il calcolo del suo stato di
forma apparirà nello schermo: «F1,
F2,..., F5, F6»; essendo «F1» il
migliore (stato di forma: «Eccellente»)
ed «F6» il peggore (stato di forma:
«Molto scarso»).
Premendo il tasto di RECOVERY,
tornerà allo schermo principale dove
le funzioni si troverranno nel punto in
cui ha cominciato il TEST.
Il confronto fra il polso di sforzo ed il
polso di recupero è una possibilità
semplice e veloce per controllare il
suo stato di forma fisica. Il calcolo del
suo stato di forma è un valore
orientativo per controllare la sua
capacità di recupero dopo aver
realizzato sforzi fisici. Se lei realizza
un allenamento regolare, potrà
osservare che questo calcolo sarà
migliore.
Il testo non funziona se i sensori non
sono stati collegati correttamente o se
nello schermo appare la lettera «E1».
Il TEST no funziona se non ha
collocato ambedue le mani sui sensori
(R) (hand-grip) e se lei ha fermato l’
allenamento.
Se nello schermo appare il messaggio
«E1» significa che non ha collocato

31
correttamente le mani sui sensori (R)
(hand-grip).
Se nello schermo appare il messaggio
«E2» significa che non ha fermato l’
allenamento.
G.FUNZIONE BODY-FAT.-
Questo monitor ha una memoria per
registrare il SESSO (Uomo 1 – Donna
0 ); ALTEZZA (100 – 200 cm); PESO
(30 – 200 Kg); ETÀ (10 – 100).
1. Premi qualsiasi tasto per mettere in
funzionamento il monitor.
2. Premendo il tasto BODY-FAT
lampeggerà la sagoma uomo,
premendo i tasti UP–DOWN scelga
Uomo o Donna.
3. Prema il tasto BODY-FAT ed
apparirà nello schermo l’ altezza, (100
– 200 cm), con i tasti UP-DOWN
scelga la sua altezza.
4. Prema il tasto BODY-FAT ed
apparirà il peso, (30–200 Kg), con i
tasti UP-DOWN scelga il suo peso.
5. Prema il tasto BODY-FAT ed
apparirà l’ età, (10 –100), con i tasti
UP-DOWN scelga la sua età.
6. Collocando ambedue le mani nei
sensori di polso del manubrio (R)
appariranno nello schermo dei
caratteri (
) di tempo di
misurazione del grasso BMR (Ritmo
Basale Metabolico valori fra 1–9999),
BMI: (Indice di massa corporale valori
fra 1,0–99,9), FAT % (% di grasso
corporale valori fra 5–50%) si
mostrerà questo valore nello schermo
del monitor ed i valori anteriori si
mostreranno negli schermi inferiori del
monitor.
NOTA:
Se appare il messaggio “E3” nello
schermo, significa che non ha
collocato correttamente le mani sui
sensori (R), che si trovano nel
manubrio.
I dati personali non si registrano nel
monitor quando si spegne o si mette a
zero.
Per misurare lo stato di GRASSO
CORPORALE, osservi questa tabella.
TABELLA DI RIF.
PERCENTUALE DI GRASSO
CORPORALE % (Body Fat).-
SESSO /
GRASSO%
BASSO BASSO
/
MEDIO
MEDIO ALTO
UOMO < 13% 13%-
25,8%
26%-
30%
>30%
DONNA <23% 23%-
35,8%
36%-
40%
>40%
D. TIPI DI CORPO:
Ci sono 9 tipi di corpo divisi a seconda
della percentuale di grasso calcolata.
TIPO 1 Uomo molto sportivo
TIPO 2 Uomo sportivo ideale
TIPO 3 Molto snello
TIPO 4 Sportivo
TIPO 5 Salute ideale
TIPO 6 Snello
TIPO 7 Troppo grasso
TIPO 8 Grasso
TIPO 9 Ultra grasso
SOLUZIONE DI PROBLEMI.-
Problema: Si accende il display e
solo funziona la funzione di Tempo
Solucióne:
a.- Verifichi se il cavo di collegamento
è stato collegato.
Problema: Il display non si accende o
la visualizzazione dei segmenti del
display è molto debole.
Soluzione:
a.- Verifichi che le pile siano state

32
collocate correttamente.
b.- Verifichi al carica delle pile
c.- Se sono scariche, cambi le pile
immediatamente.
Problema: Si il segmento de qualsiasi
funzione non si accende o se si
verificano indicazioni di errore in
qualche funzione.
Soluzione:
a.- Tolga le pile durante 15 secondi e
le collochi di nuovo correttamente.
b.- Verifichi la carica delle pile. Se
sono scariche, cambi le pile.
c.- Se i passi anteriori non sono d’
aiuto rimpiazzi il monitor elettronico.
Eviti che il suo monitor elettronico
riceva la luce diretta del sole, perchè
si potrebbe danneggiare lo schermo di
cristallo liquido. Non esporlo neanche
all’ acqua ed a colpi.
BH SI RISERVA IL DIRITTO DI
MODIFICARE LE SPECIFICHE
TECNICHE DEI SUOI PRODOTTI
SENZA AVVERTIMENTO PREVIO.

33
Nederlands
PLAATSING BATTERIJEN.-
Deze monitor functioneert op twee
ALKALINE BATTERIJEN van 1,5
Volt. Om de batterijen te plaatsen,
opent u het klepje aan de achterkant,
Fig.1, en plaatst voorzichtig alkaline
batterijen van het type «R-6» in het
batterijhuis (A) waarbij u er voor zorgt
dat de batterijen correct geplaatst
worden (zorg dat de «+» pool van de
batterijen samenvalt met het «+»
teken in het batterijhuis en de «-» pool
van de batterijen met het «-» teken).
Sluit het klepje, zoals wordt getoond in
Fig.1.
Wanneer, na aansluiting van de
monitor, blijkt dat er foutieve of
gedeeltelijke meldingen op het
beeldscherm verschijnen, haalt u de
batterijen uit en wacht ongeveer 15
seconden voordat u ze weer opnieuw
plaatst.
Batterijen die bijna op zijn
veroorzaken moeilijk leesbare cijfers
(zonder contrast) en foutieve
indicaties. Vervang ze onmiddellijk.
De monitor gaat vanzelf uit wanneer
het apparaat langer dan 3 minuten
niet in gebruik is.
Belangrijk: Deponeer elektronische
componenten in speciale containers,
Fig.2.
PLAATSING VAN DE
ELEKTRONISCHE MONITOR.-
Draai de schroeven aan de achterkant
van de monior los, verbind de
terminals van de verbindingskabel
(21) met die van de monitor (32) Fig.3.
Vervolgens plaatst u de monitor, deze
van boven naar beneden schuivend
over de plaat van de greepbeugel (4),
waarbij u er rekening mee dient te
houden dat de kabels niet bekneld
raken. Plaats de schroeven en draai
dezen vast, verbind de terminal van
de hand-grip (24) aan de achterkant
van de monitor Fig.4.
ELEKTRONISCHE MONITOR.-
Om de controle van uw oefeningen te
vergemakkelijken en te
vereenvoudigen toont het elektronisch
gedeelte tegelijkertijd de snelheid,
afstand, tijdsduur van de oefening, de
verbrandde calorieën en hartslag.
Het beeldscherm licht automatisch op
bij het starten van de oefening of
wanneer u op een toets drukt.
De monitor gaat vanzelf uit wanneer
het apparaat langer dan 3 minuten
niet in gebruik is.
A. SCAN FUNCTIE.-
Tijdens de SCAN modus controleert
en toont de computer tijdens de
oefeningen continu alle functies. De
getoonde functie wordt door middel
van knipperen weergegeven.
Om de SCAN functie te kiezen:
1. Bij het begin van de oefening of
door op een willekeurige toets te
drukken schakelt de monitor in op de
SCAN modus en elke 8 seconden
wordt er op het hoofdscherm de TIJD,
SNELHEID, AFSTAND, CALORIEËN
en HARTSLAG getoond. Op het
onderste gedeelte van het scherm
wordt ook de waarde knipperend
weergegeven.
2. Druk op de toets MODE en de
functie SCAN wordt uitgeschakeld.

34
B. FUNCTIE TIJD.-
Deze functie telt per seconde op of af
tot een maximum van 99:00
seconden. Door langer dan twee
seconden op de toets DOWN te
drukken, springen alle waarden op
nul, behalve de persoonlijke
gegevens.
1. Druk op een willekeurige toets om
de monitor in te schakelen.
2. Door op de toets MODE te drukken
gaat het kleine venster van de TIJD
knipperen.
3. Door op de toetsen UP of DOWN te
drukken, kiest u de tijd.
4. Wanneer u de oefening start, begint
de computer met het aftellen van de
tijd en wanneer deze de nulwaarde
heeft bereikt, zult u gedurende 3
seconden een piepsignaal horen, wat
u waarschuwt dat de gekozen tijd is
bereikt en de computer begint door te
tellen.
C. FUNCTIE AFSTAND.-
Deze functie telt per 0,1 Km/ml op of
af tot een maximum van 999 Km/ml.
Door langer dan twee seconden op de
toets DOWN te drukken, springen alle
waarden op nul, behalve de
persoonlijke gegevens.
1. Druk op een willekeurige toets om
de monitor in te schakelen.
2. Door op de toets MODE te drukken
gaat het kleine venster van de DIST
(AFSTAND) knipperen.
3. Door op de toetsen UP of DOWN te
drukken, kiest u de afstand.
4. Wanneer u de oefening start, begint
de computer met het aftellen van de
afstand en wanneer deze de
nulwaarde heeft bereikt, zult u
gedurende 3 seconden een
piepsignaal horen, wat u waarschuwt
dat de gekozen afstand is bereikt en
de computer begint door te tellen.
D. FUNCTIE CALORIEËN.-
Deze functie telt per calorie op of af tot
een maximum van 999 calorieën.
Door langer dan twee seconden op de
toets DOWN te drukken, springen alle
waarden op nul, behalve de
persoonlijke gegevens.
1. Druk op een willekeurige toets om
de monitor in te schakelen.
2. Door op de toets MODE te drukken
gaat het kleine venster van de CAL
(CALORIEËN) knipperen.
3. Door op de toetsen UP of DOWN te
drukken, kiest u de hoeveelheid
calorieën.
4. Wanneer u de oefening start, begint
de computer met het aftellen van de
calorieën en wanneer deze de
nulwaarde heeft bereikt, zult u
gedurende 3 seconden een
piepsignaal horen, wat u waarschuwt
dat de gekozen waarde is bereikt en
de computer begint de calorieën door
te tellen.
Wanneer het aantal geprogram-
meerde calorieën is bereikt, laat de
monitor gedurende 3 seconden een
piepsignaal horen en begint
automatisch de calorieën door te
tellen.
E. FUNCTIE HARTSLAG.-
De functie hartslag toont u het aantal
P.P.M (hartslagen per minuut).
Hiervoor plaatst u uw handen Fig.5
over de sensoren op het stuur (R) en
na enkele seconden wordt uw
hartslagfrequentie getoond. Dit is
geen medisch apparaat en deze
waarde is slechts een indicatie.

35
Om de THR (streefwaarde hartslag) te
kiezen, dient u de volgende stappen te
volgen:
1. Druk op een willekeurige toets om
de monitor in te schakelen.
2. Door op de toets MODE te drukken
gaat het kleine venster van de
hartslag knipperen en verschijnt THR.
3. Door op de toetsen UP of DOWN te
drukken, kiest u een
hartslagfrequentie tussen de 40 en
199 (PPM) waarop u de oefening wilt
doen. De geprogrammeerde
beginwaarde staat ingesteld op 150
PPM.
4. Wanneer u de oefening start, wordt
op het beeldscherm PULSE getoond
met uw hartslagfrequentie en
wanneer de gekozen waarde is
bereikt, zult u gedurende 3 seconden
een piepsignaal horen, wat u
waarschuwt dat de gekozen waarde is
bereikt.
OPMERKING:
Wanneer er, na 15 seconden, geen
enkel hartslagsignaal wordt
weergegeven, wordt er op het scherm
“E 3” getoond. Controleer of u beide
handen over de sensoren (R) op het
stuur, Fig.6, heeft gelegd. Wanneer er
geen signaal binnen 5 seconden wordt
waargenomen, keert het beeldscherm
naar zijn vorige stand terug.
INSTRUCTIES - GEBRUIK
HANDGRIP (HARTSLAG).-
De hartslag van dit model wordt
gemeten door beide handen over de
sensoren (R), die zich op het stuur
bevinden, te leggen, zoals wordt
getoond in Fig.6
Wanneer u beide handen op de
sensoren heeft gelegd, begint het
hartje, rechts in het scherm van de
monitor, aangeduid door PULSE, te
knipperen en na enkele seconden
verschijnt de waarde van uw hartslag.
Wanneer u uw beide handen niet
correct op de sensoren heeft gelegd,
zoals getoond in Fig.6, functioneert de
hartslagmeting niet.
Wanneer er een “0” in het scherm
verschijnt of het hartje niet knippert,
controleer dan of u uw handen juist op
de sensoren heeft gelegd en of de
connectoren (32) aangesloten zijn op
de achterkant van het elektronisch
gedeelte.
F. TESTMETING:
LICHAMELIJKE CONDITIE.-
De elektronische eenheid is uitgerust
met de mogelijkheid het herstel van de
hartslag te meten. Dit heeft het
voordeel dat u het herstel van de
hartslag kunt meten nadat u de
oefening gedaan heeft. Nadat u de
oefening beëindigd heeft en zonder de
handen van de sensoren te nemen,
drukt u op de toets «Recovery Test:
conditie» en de elektronische eenheid
begint een minuut terug te tellen.
Alleen de functielijnen Tijd en Hartslag
lichten op. De elektronische eenheid
meet gedurende deze minuut de
hartslag. Het herstel van de hartslag
verschijnt op de hartslag lijn.
Na het verstrijken van deze minuut,
berekent en waardeert de
elektronische eenheid het verschil en
de beoordeling van uw lichamelijke
conditie verschijnt op het scherm: «F1,
F2,..., F5, F6»; waarbij «F1» het beste
(lichamelijke conditie: «Zeer goed»)
en «F6» het slechtste (lichamelijke
conditie: «Zeer slecht») resultaat is.
Wanneer u op de toets Test drukt,
keert u terug naar het hoofdscherm,

36
waar de u functies aantreft, zoals ze
waren bij het begin van de TEST.
De vergelijking van de hartslag tijdens
inspanning en de hersteltijd is een
eenvoudige en snelle manier om de
lichamelijke conditie te controleren. De
beoordeling is een indicatieve waarde
om uw herstelvermogen na een
fysieke inspanning te meten. Wanneer
u regelmatig traint, zult u merken dat
de beoordeling verbetert.
De test functioneert niet wanneer de
sensoren niet juist geplaatst zijn of
wanneer de letter «E1» in het scherm
verschijnt.
De TEST functioneert niet, wanneer u
beide handen niet op de sensoren (R)
(handgrip) houdt, wanneer u de
oefening beëindigt.
Wanneer op het scherm de
boodschap «E1» verschijnt, betekent
dit dat u uw handen niet correct op de
sensoren (R) (handgrip) geplaatst zijn.
Wanneer op het scherm de
boodschap «E2» verschijnt, betekent
dit dat de oefening nog niet is
afgelopen.
G. FUNCTIE BODY-FAT.-
Deze monitor beschikt over een
geheugen om het GESLACHT (man 1
- vrouw 0); LENGTE (100-200 cm);
GEWICHT (30-200 Kg); LEEFTIJD
(10-100) op te slaan.
1. Druk op een willekeurige toets om
de monitor in te schakelen.
2. Door op de toets BODY-FAT te
drukken gaat het silhouet van het
mannetje knipperen en door op de
toetsen UP - DOWN te drukken
selecteert u Man of Vrouw.
3. Druk op de toets BODY-FAT en op
het scherm verschijnt de lengte, (100
– 200 cm) en door middel van de
toetsen UP-DOWN kiest u uw lengte.
4. Druk op de toets BODY-FAT en op
het scherm verschijnt het gewicht,
(30–200 Kg) en door middel van de
toetsen UP-DOWN kiest u uw gewicht.
5. Druk op de toets BODY-FAT en op
het scherm verschijnt de leeftijd, (10–
100) en door middel van de toetsen
UP-DOWN kiest u uw leeftijd.
6. Wanneer u beide handen op de
sensoren (R) legt, zullen er op het
scherm een aantal aanduidingen
(
) van de vetmeting BMR
(Basaal Metabolisme, waarden tussen
de 1-9999), BMI verschijnen: (Body
Mass Index, waarden tussen 1,0-
99,9), FAT % (% lichaamsvet,
waarden tussen 5-50%) deze waarde
wordt getoond op het beeldscherm
van de monitor en de vorige waarden
worden getoond op de onderste
schermen van de monitor.
OPMERKING:
Wanneer het bericht «E3» op het
scherm verschijnt, betekent dit dat u
uw handen niet correct op de
sensoren (R), die zich op het stuur
bevinden, hebt geplaatst.
De persoonlijke gegevens worden niet
opgeslagen wanneer de monitor wordt
uitgeschakeld of ge-reset.
Raadpleeg de onderstaande tabel om
het LICHAAMSVET te meten
REFERENTIETABEL
PERCENTAGE
LICHAAMSVET % (BODY
FAT).-
GESLACHT/
VET%
LAAG LAAG /
GEMIDDELD
GEMID
DELD
HOOG
MAN < 13% 13%-25,8% 26%-30% >30%
VROUW <23% 23%-35,8% 36%-40% >40%

37
D. LICHAAMSTYPEN:
Er bestaan 9 lichaamstypen naar
gelang het berekende percentage
lichaamsvet.
TYPE 1 Intensief sportbeoefenende man
TYPE 2 Ideale sportbeoefenende man
TYPE 3 Zeer slank
TYPE 4 Sportbeoefenaar
TYPE 5 Ideale gezondheid
TYPE 6 Slank
TYPE 7 Te veel overgewicht
TYPE 8 Overgewicht
TYPE 9 Extreem overgewicht
PROBLEEMOPLOSSER.-
Probleem: De display licht op en
alleen de functie Tijd functioneert.
Oplossing:
a.- Controleer of de verbindingskabel
juist is aangesloten.
Probleem: De display licht niet op of
de segmenten in de display worden
slecht weergegeven.
Oplossing:
a.-Controleer of de batterijen correct
geplaatst zijn.
b.-Controleer of de batterijen geladen
zijn
c.-Wanneer ze onvoldoende geladen
zijn, vervang ze dan onmiddellijk.
Probleem: Wanneer een segment
van een functie niet oplicht of er
verschijnen foutieve meldingen in een
functie.
Oplossing:
a.- Haal de batterijen gedurende 15
seconden uit en plaats ze correct
b.- Controleer of de batterijen geladen
zijn Wanneer ze onvoldoende geladen
zijn, vervang ze dan onmiddellijk.
c.- Wanneer de voortgaande stappen
geen oplossing bieden, vervang dan
de elektronische monitor
U dient direct zonlicht op de monitor te
vermijden, omdat dit het vloeibaar
kristal in het beeldscherm kan
beschadigen. Zorg dat de monitor niet
in aanraking komt met water en
vermijd stoten.
BH BEHOUDT ZICH HET RECHT
VOOR DE PRODUCTSPECIFICA-
TIES TE VERANDEREN ZONDER
VOORAFGAAND BERICHT
.

BH FITNESS SPAIN
EXERCYCLE,S.L.
(Manufacturer)
P.O.BOX 195
01080 VITORIA (SPAIN)
Tel.: +34 945 29 02 58
Fax: +34 945 29 00 49
e-mail: [email protected]
www. bhfitness.com
BH FITNESS PORTUGAL
MAQUINASPORT, S.A.
Zona Industrial Giesteira
Terreirinho
3750-325 Agueda
(PORTUGAL )
Tel.: +351 234 729 510
Fax: +351 234 729 519
BH FITNESS FRANCE
Tel.: +33 (0)1429 61885
Fax: +33 (0)1429 66851
e-mail: [email protected]
BH FITNESS UK
Unit 1A Brittania Business Park
Union Road, The Valley
Bolton BL2 2HP
UK
Tel.: +44 (0)870 381 0277
Fax: +44 (0)870 381 0278
e-mail: [email protected]
BH FITNESS ASIA
No.139, Jhongshan Rd.
Daya Township
Taichung 428, Taiwan. R.O.C.
Tel.: +886 4 25609200
Fax: +886 4 25609280
BH FITNESS NORTH
AMERICA
20155 Ellipse
Foothill Ranch
CA 92610
Tel:+ 1 949 206 0330
Fax:+1 949 206 0350
www.bhnorthamerica.com
BH FITNESS MEXICO
BH Exercycle de México S.A.
de CV
Eje 132 / 136
Zona Industrial, 2A Secc.
78395 San Luis Potosi
S:L:P: MEXICO
Tel.: +52 (444) 824 00 29
Fax: +52 (444) 824 00 31
www.bh.com.mx
BH SE RESERVA EL DERECHO A MODIFICAR LAS ESPECIFICACIONES DE SUS PRODUCTOS
SIN PREVIO AVISO.
SPECIFICATIONS MAY BE CHANGED WITHOUT PRIOR NOTICE DUE TO OUR PROGRAMME OF
CONTINUOUS PRODUCT DEVELOPMENT.
BH SE RÉSERVE LE DROIT DE MODIFIER LES SPECIFICATIONS DE SES PRODUITS SANS
PRÉAVIS.
BH BEHALT SICH DAS RECHT VOR, ÄNDERUNGEN DER MODELL-ANGABEN OHRE
VORHERIGE ANKÜNDIGUNG VORZUNEHMEN.
DATI TECNICI E COMMERCIALI RELATIVI AGLI ARTICOLI DEL PRESENTE CATALOGO
POSSONO ESSERE SOGGETIL A VARIAZIONI SENZA ALGUN PREAVVISO.
BH SE RESERVA O DIREITO A MODIFICAÇÀO ESPECIFICAÇOES DOS SEUS PRODUCTOS SEM
PRÉVIO AVISO.
DOOR KONSTANTE PRODUKTVERNIEUWING EN VERBETERING HOUDEN WIJ ONS HET
RECHT VAN WIJZIGING VOOR ZONDER VOORAFGAAND BERICHT.
V1
Transcripción de documentos
H-283 UNIDAD ELECTRONICA ELECTRONIC MONITOR UNITÉ ÉLECTRONIQUE ELEKTRONIKEINHEIT UNIDADE ELECTRÓNICA IMPIANTO ELETTRONICO ELEKTRONISCHER MONITOR Español remo (4), teniendo cuidado de no pillar los cables, coloque los tornillos y apriete, conexione el terminal del hand-grip (24) en la parte trasera del monitor Fig.4. COLOCACION PILAS.Este monitor utiliza dos PILAS ALCALINAS de 1,5 voltios. Para colocar las pilas, suelte la tapa trasera del monitor, Fig.1, e inserte con precaución pilas alcalinas del tipo «R-6» en el compartimento de las pilas (A) orientando correctamente la polaridad de las pilas (haciendo coincidir el polo «+» de las pilas con la señal «+» del compartimento de las pilas y el polo «-» con la señal «-»). Cierre la tapa, como muestra la Fig.1. Si después de conectar el monitor electrónico, se produjeran indicaciones erróneas o sólo aparecen los segmentos parcialmente, extraiga las pilas y espere unos 15 segundos antes de volver a instalarlas. Las baterías débiles (descargadas) generan cifra débiles (sin contraste) e indicaciones erróneas. Cámbielas inmediatamente. MONITOR ELECTRONICO.Para hacer más cómodo y simple el control de su ejercicio este electrónico muestra simultáneamente la Velocidad, la distancia, el tiempo de ejercicio, las calorías consumidas y el pulso. La pantalla se encenderá automáticamente al comenzar el ejercicio o pulsando cualquier tecla. El monitor se apagará automáticamente cuando la unidad esté 3 minutos parada. A.FUNCIÓN SCAN.En el modo SCAN, el ordenador revisa y visualiza continuamente durante sus ejercicios todas las funciones. La función visualizada se indica por medio de parpadeos. Para seleccionar la función SCAN: 1. Al comenzar el ejercicio o pulsando cualquier tecla se enciende el monitor en la función SCAN, que cada 8 segundos se visualizará en la pantalla principal el TIEMPO, VELOCIDAD, DISTANCIA, CALORÍAS, PULSO y en la parte inferior del monitor también se visualizará el valor en forma de parpadeo. El monitor se apagara automáticamente cuando la unidad este 3 minutos parada . Importante: Deposite los componentes electrónicos en contenedores especiales, Fig.2. COLOCACION MONITOR ELECTRONICO.Suelte los tornillos de la parte trasera del monitor, conexione los terminales del reenvío (21) con los del monitor (32) Fig.3, seguido introduzca el monitor de arriba hacia abajo deslizándolo por la chapa del tubo 2. Pulse la tecla MODE y se eliminara la función SCAN. 3 durante 3 segundos, advirtiéndole que ha llegado al valor seleccionado, comenzando a contar la distancia hacia arriba. B.FUNCIÓN TIEMPO.La función cuenta o descuenta en incrementos de un segundo hasta un máximo de 99:00 segundos. Pulsando durante mas de dos segundos la tecla DOWN todos los valores pasan a cero a excepción de la información personal. 1. Pulse cualquier tecla, para poner en marcha el monitor. 2. Pulsando la tecla MODE parpadeara la ventana pequeña de TIME. 3. Pulsando las teclas UP ó DOWN seleccione el tiempo. 4. Comience el ejercicio y empezara a disminuir el tiempo, una vez haya llegado a cero emitirá unos pitidos durante 3 segundos, advirtiéndole que ha llegado al tiempo seleccionado, comenzando a contar el tiempo hacia arriba. D.FUNCIÓN CALORÍAS.La función cuenta y descuenta de una en una caloría, hasta un máximo de 999 calorías. Pulsando durante más de dos segundos la tecla DOWN todos los valores pasan a cero a excepción de la información personal. 1. Pulse cualquier tecla, para poner en marcha el monitor. 2. Pulsando la tecla MODE parpadeara la ventana pequeña de CAL (CALORIAS). 3. Pulsando las teclas UP ó DOWN seleccione las calorías. 4. Comience el ejercicio y empezará a disminuir las calorías, una vez haya llegado a cero emitirá unos pitidos durante 3 segundos, advirtiéndole que ha llegado al valor seleccionado, comenzando a contar las calorías hacia arriba. Cuando termine las calorías programadas, el monitor emite una señal acústica de 3 segundos, y empieza automáticamente a aumentar las calorías. C.FUNCIÓN DISTANCIA.La función cuenta o descuenta en incrementos de 0,1 Km/ml hasta un máximo de 999 Km/ml. Pulsando durante mas de dos segundos la tecla DOWN todos los valores pasan a cero a excepción de la información personal. 1. Pulse cualquier tecla, para poner en marcha el monitor. 2. Pulsando la tecla MODE parpadeara la ventana pequeña de DIST (DISTANCIA). E.FUNCIÓN PULSO.La función pulso le muestra las P.P.M (pulsaciones por minuto). Para ello coloque las manos Fig.5 sobre los sensores del manillar (R) y al cabo de unos segundos le mostrara su ritmo cardíaco. No es un aparato médico por lo cual el valor es orientativo. 3. Pulsando las teclas UP ó DOWN seleccione la distancia. 4. Comience el ejercicio y empezará a disminuir la distancia, una vez haya llegado a cero emitirá unos pitidos 4 Para seleccionar el THR (ritmo cardíaco objetivo ) siga los siguientes pasos: 1. Pulse cualquier tecla, para poner en marcha el monitor. pantalla del monitor y al cabo de unos segundos aproximadamente aparecerá el valor de su ritmo cardíaco. Si no tiene colocadas ambas manos correctamente como muestra Fig.6, el pulso no funciona. Si en pantalla aparece un «0» o no parpadea el corazón, asegúrese de que tiene colocadas ambas manos en los sensores y de que los conector (32) estén conectados en la parte de atrás del electrónico. 2. Pulsando la tecla MODE parpadeara la ventana pequeña de pulso y le saldrá THR. 3. Pulsando las teclas UP ó DOWN seleccione el valor del pulso que usted quiere hacer el ejercicio entre 40 y 199 (PPM), valor inicial programado en el monitor 150 PPM. F.MEDICION DEL TEST: ESTADO DE FORMA.- 4. Comience el ejercicio y visualizará en la pantalla PULSE, su ritmo cardíaco, una vez haya llegado al valor seleccionado emitirá unos pitidos, advirtiéndole que ha alcanzado el valor seleccionado. Este electrónico está equipado con la función de pulso de recuperación. Esto tiene la ventaja de que usted puede medir el pulso de recuperación después de terminado el ejercicio. Después de terminar su ejercicio y sin quitar las manos de los sensores de pulso, presione el botón de «Recovery Test: Estado de Forma» y comenzará la cuenta atrás de un minuto. Solamente estarán encendidas las líneas de las funciones de Tiempo y de Pulso. El electrónico medirá su pulso durante este minuto. El pulso de recuperación irá apareciendo en la línea del pulso. Cuando termine este minuto, el electrónico calcula y valoriza la diferencia y la nota de su estado de forma aparecerá en la pantalla: «F1, F2,..., F5, F6»; siendo «F1» el mejor (estado de forma: «Excelente») y «F6» el peor (estado de forma: «Muy Deficiente»). Presionando el botón de RECOVERY, volverá a la pantalla principal donde las funciones estarán en modo de que ha comenzado el TEST. NOTA: Si no visualiza ninguna señal de pulsaciones después de 15 segundos en la pantalla le mostrara «E 3», asegúrese de tener colocadas ambas manos sobre los sensores (R) del manillar, Fig.6. Si no hay ninguna señal después de transcurridos 5 segundos, la pantalla principal volverá a su función anterior. INSTRUCCIONES - USO DEL HAND-GRIP (PULSO).El pulso de este modelo se mide colocando ambas manos en los sensores (R), que están puestos en el manillar como se indica en la Fig.6. Una vez colocadas ambas manos en los sensores, comenzará a parpadear el corazón en la parte derecha de la pantalla que indica PULSE de la 5 las teclas UP-DOWN seleccione su peso. 5. Pulse la tecla BODY-FAT y le aparecerá la edad, (10–100), con las teclas UP-DOWN seleccione su edad. 6. Colocando ambas manos sobre los sensores de pulso del manillar (R) aparecerá en la pantalla unos caracteres ( ) de tiempo de medición de grasa BMR (Ritmo Basal Metabólico valores entre (1– 9999), BMI: (Indice de masa corporal valores entre (1,0–99,9), FAT % (% de grasa corporal valores entre (5–50%) se mostrara este valor el la pantalla del monitor y los anteriores valores se mostrarán en las pantallas inferiores del monitor. La comparación entre el pulso de esfuerzo y el pulso de recuperación es una posibilidad sencilla y rápida de controlar su estado de forma. La nota de su estado de forma es un valor orientativo para su capacidad de recuperación después de esfuerzos físicos. Si usted efectúa un entrenamiento regular, usted comprobará que su nota mejora. El test no funciona si los sensores no están conexionados adecuadamente o si en la pantalla aparece la letra «E1». El TEST no funciona si no tiene colocadas ambas manos sobre las sensores (R) (hand-grip) y usted ha parado de hacer el ejercicio. Si en la pantalla le aparece el mensaje «E1» significa que no tiene correctamente colocadas las manos sobre las sensores (R) (hand-grip). Si en la pantalla le aparece el mensaje «E2» significa que no ha detenido el ejercicio. NOTA: Si aparece el mensaje «E3» en la pantalla, significa que no ha colocado correctamente las manos sobre los sensores (R), situados en el manillar. Para medir el estado de GRASA CORPORAL, consulte la tabla siguiente G.FUNCION BODY-FAT.Este monitor dispone de una memoria para grabar el SEXO (Hombre 1 – Mujer 0 ); ALTURA (100 – 200 cm); PESO (30 – 200 Kg); EDAD (10 – 100). 1. Pulse cualquier tecla, para poner en marcha el monitor. 2. Pulsando la tecla BODY-FAT parpadeará la silueta hombre, pulsando las teclas UP–DOWN seleccione Hombre ó Mujer. 3. Pulse la tecla BODY-FAT y le aparecerá en pantalla la altura, (100 – 200 cm), con las teclas UP-DOWN seleccione su altura. 4. Pulse la tecla BODY-FAT y le aparecerá el peso, (30–200 Kg), con TABLA DE REF. PORCENTAJE GRASA CORPORAL % (BODY FAT).SEXO / GRASA% HOMBRE MUJER 6 BAJO < 13% <23% BAJO / MEDIO 13%25,8% 23%35,8% MEDIO ALTO 26%30% 36%40% >30% >40% c.- Si están bajas, cambie las pilas inmediatamente. Problema: Si algún segmento de alguna función no se enciende o si se producen indicaciones erróneas en alguna función. Solución: a.- Desconecte las pilas durante 15 segundos y vuelva a instalarlas correctamente. b.- Compruebe la carga de las pilas. Si están bajas, cambie las pilas. c.- Si los pasos anteriores no le ayudan, reemplace el monitor electrónico Evite que le dé a su monitor electrónico la luz directa del sol, pues se puede estropear la pantalla del cristal líquido. No lo exponga tampoco al agua ni a golpes. D. TIPOS DE CUERPO: Hay 9 tipos de cuero divididos según el porcentaje de grasa calculado. TIPO 1 TIPO 2 TIPO 3 TIPO 4 TIPO 5 TIPO 6 TIPO 7 TIPO 8 TIPO 9 Varón muy deportista Varón deportista ideal Muy esbelto Deportista Salud ideal Esbelto Demasiado obeso Obeso Ultra obeso GUIA DE PROBLEMAS.Problema: Se enciende el display y sólo funciona la función de Tiempo Solución: a.- Compruebe si el cable de conexión está conectado. Problema: El display no se enciende o la visualización de los segmentos del display es muy débil Solución: a.- Compruebe que las pilas estén colocadas correctamente b.- Compruebe la carga de las baterías BH SE RESERVA EL DERECHO A MODIFICAR LAS ESPECIFICACIONES DE SUS PRODUCTOS SIN PREVIO AVISO. 7 English FITTING THE BATTERIES.- ELECTRONIC MONITOR.- This monitor uses two 1.5 volt ALKALINE BATTERIES. To fit the batteries, remove the rear cover on the monitor, Fig.1, and carefully insert the two “R-6” type batteries into the battery compartment (A) making sure that the battery’s polarity is correct (matching the battery’s «+» terminal with the «+» sign inside the battery compartment, and the «-» terminal with the «-» sign). Close the cover, as shown in Fig.1. If, after having switched the monitor on, it displays errors or merely partial segments then remove the batteries and wait for about 15 seconds before reinstalling them. Weak batteries (run down) produce a weak digital display (poor contrast) and erroneous readings. Change them immediately. The monitor will switch itself off automatically if the unit remains motionless for 3 minutes. To give you greater control over the exercise, this electronic unit provides simultaneous read-outs of speed, distance, exercise time, calories burnt and pulse rate. The screen will switch itself on automatically as soon as you start exercising or by pressing any key. The monitor will switch itself off automatically if the unit stands idle for more than 3 minutes. A.SCAN FUNCTION.In SCAN mode the computer continuously scans and displays all of the functions during exercise. The function being displayed will flash on and off. To select the SCAN function: 1. The monitor starts in SCAN mode as soon as exercise begins or if any key is pressed, the main screen will display TIME, SPEED, DISTANCE, CALORIES, PULSE RATE values every 8 seconds, this value will also be displayed flashing on the lower section of the monitor. 2. Press the MODE key and this will cancel the SCAN function. Important: Deposit electronic components in special containers, Fig.2. FITTING THE ELECTRONIC MONITOR.Remove the screws from the base of the monitor, connect the terminals for the feedback cable (21) to those on the monitor (32), Fig.3, then slide the front of the monitor down onto the plate on the main post (4), making sure not to snag any of the wires, fit the screws and tighten, plug the terminal for the handgrip (24) into the rear of the monitor, Fig.4. B.TIME FUNCTION.This function counts up or down in steps of one second, up to a maximum of 99:00 seconds. Pressing the DOWN key for more than two seconds will reset all of the values, except those relating to personal information. 1. Press any key to switch the monitor on. 8 flashing. 3. Press the UP or DOWN keys to select the calories. 4. Begin the exercise and the calorie value will begin the countdown, when it reaches zero it will beep for 3 seconds, advising you that the selected calorie value has been reached , the calorie value will then start counting upward. When the programmed calories have finished, the monitor will beep for 3 seconds and begin to tally the new calories burnt automatically. 2. Press the MODE key to start the small TIME window flashing. 3. Press the UP or DOWN keys to select the time. 4. Begin the exercise and the time value will begin the countdown, when it reaches zero it will beep for 3 seconds, advising you that the selected time has elapsed, the time value will then start counting upward. C.DISTANCE FUNCTION.This function counts up or down in steps of 0.01 km/ml, up to a maximum of 99.99 km/ml. Pressing the DOWN key for more than two seconds will reset all of the values, except those relating to personal information. 1.Press any key to switch the monitor on. 2. Press the MODE key to start the small DIST (DISTANCE) window flashing. 3. Press the UP or DOWN keys to select the distance. 4. Begin the exercise and the distance value will begin the countdown, when it reaches zero it will beep for 3 seconds, advising you that the selected distance has been covered, the distance value will then start counting upward. E.PULSE FUNCTION.The pulse function shows you heart beats per minute (BPM). To use this function place your hands on the handlebar sensors (R), Fig.5, and your heart rate will be displayed after a few seconds. This is not a medical appliance and therefore these values are for guideline purposes only. To select the THR (Target Heart Rate) carry out the following steps: 1. Press any key to switch the monitor on. 2. Press the MODE key to start the small pulse window flashing and THR will appear. 3. Press the UP or DOWN keys to set the pulse rate value that you wish to use during the exercise, between 40 and 199 (BPM), the monitor’s default value is 150 BPM. 4. Begin exercising and your heart rate will be displayed in the PULSE window, when you reach the selected value the monitor will beep to advise you that you have reached the set pulse rate. NOTE: If, after 15 seconds, the sensor does not detect a signal then the error code D.CALORIE FUNCTION.This function counts up or down in steps of one calorie, up to a maximum of 999 calories. Pressing the DOWN key for more than two seconds will reset all of the values, except those relating to personal information. 1. Press any key to switch the monitor on. 2. Press the MODE key to start the small CAL (CALORIE) window 9 pulse rate during this minute. The heart rate recovery time will be displayed on the Heart rate line. When the minute is up, the electronic device will work out the difference and your fitness rating will be displayed up on the screen: “F1, F2,..., F5, F16; where F1 is the best (fitness “Excellent”) and F6 the worst (fitness “Very Poor”). Pressing the RECOVERY button will take you back to the main screen, where the functions will be in the same mode as when the TEST began. The comparison between the worked heart rate and the recovery heart rate provides a fast, simple method of gauging how fit you are. Your fitness rating is a guideline that shows you how fast your heart recovers after physical exertion. If you exercise regularly then you will see your fitness rating improve. The test will not work if the sensor is not positioned correctly or if the error code “E1” appears on the screen. The TEST will not work if you do not have both hands placed on the handgrip sensors (R) after you have stopped doing the exercise. If the error code “E1” is shown on the screen then this means that you do not have your hands positioned correctly on the hand-grip sensors (R). If the error code “E2” appears on the screen, this means that you have not stopped exercising. “E 3” will appear on the screen, make sure that both your hands are placed on the handlebar sensors (R), Fig. 6. If no signal is received after a further 5 seconds then the screen will revert to the previously displayed function. HAND-GRIP (PULSE) INSTRUCTIONS/USE.On this model the pulse rate is measured by placing both hands on the sensors (R), located on the handlebar, as shown in Fig.6. When both hands are placed on the sensors the heart symbol on the righthand side of the screen, marked PULSE, will begin to flash and after a few seconds a heart rate reading will be displayed. If both hands are not placed correctly as shown in Fig.6 then the pulse function will not work. If a “0” appears on the screen or the heart symbol does not flash then make sure that both hands are placed on the sensors and that the connectors (32) are connected at the back of the electronic unit. F.TEST MEASUREMENTS: FITNESS.This electronic device is equipped with a recovery test function. This offers you the advantage of being able to measure how long it takes your heart rate to recover after having finished the exercise. After finishing the exercise leave your hands on the pulse sensors (R) and press the “RECOVERY Fitness Test” button and this will start a one minute countdown. Only the Time and Pulse rate function read-outs will remain displayed. The electronic device will measure your G.BODY-FAT FUNCTION.This monitor has a memory to record SEX (Male 1 – Female 0); HEIGHT (100 – 200 cm); WEIGHT (30 – 200 kg); AGE (10 – 100). 1. Press any key to switch the monitor on. 10 2. Press the BODY FAT key and the male Fig. will start flashing, use the UP or DOWN keys to select Male or Female. REFERENCE TABLE: BODY FAT PERCENTAGE % SEX / FAT% MALE 3. Press the BODY FAT key and the height screen will appear, (100 – 200 cm), use the UP – DOWN keys to select your height. FEMALE LOW < 13% <23% LOW / AVERAGE 13%25.8% 23%35.8% AVERAGE HIGH 26%-30% >30% 36%-40% >40% D. BODY TYPES: There are 9 body types based on the percentage of fat calculated. 4. Press the BODY FAT key and the weight screen will appear, (30 – 200 kg), use the UP – DOWN keys to select your weight. TYPE 1 TYPE 2 TYPE 3 TYPE 4 TYPE 5 TYPE 6 TYPE 7 TYPE 8 TYPE 9 5. Press the BODY FAT key and the age screen will appear, (10 – 100), use the UP – DOWN keys to select your age. 6. Place both hands on the hand-grip sensors (R) and certain characters ( ) will appear on the screen displaying your BMR (Basal Metabolic Rate, values between 1 – 9999), BMI (Body Mass Index, values between 1.0 – 99.9), FAT% ( Body fat %, values between 5 – 50%), this last value will be shown on the main screen and the previous values on the bottom screens. Extremely athletic Ideal sportsman Very slender Sportsman Ideal health Slender Very overweight Overweight Extremely obese TROUBLESHOOTING GUIDE.Problem: The display comes on but only the Time function works Solution: a.- Make sure that the connection cable is connected. Problem: The display does not come on or the displayed segments are very weak Solution: a.- Check that the batteries are fitted correctly. b.- Check the battery charge c.- If they are run down change them immediately NOTE: If the error code “E3” is shown on the screen then this means that you do not have your hands positioned correctly on the hand-grip sensors (R). Personal data is not stored and will be lost when the monitor is reset or switched off. Refer to the following table to gauge your BODY FAT status: Problem: Display segments of a function read-out are not visible or error messages for a particular function appear. 11 the liquid crystal display. Similarly, do not expose it to water or knocks. Solution: a.- Remove the batteries for 15 seconds and then refit them correctly. b.- Check the battery charge If they are run down change the batteries c.- If the above steps do not help then replace the electronic monitor. Avoid leaving the electronic monitor in direct sunlight as this might damage BH RESERVES THE RIGHT TO MODIFY THE SPECIFICATIONS OF ITS PRODUCTS WITHOUT PRIOR NOTICE 12 Français Posez les vis et vissez-les, connectez le connecteur du hand-grip (24) en partie arrière du moniteur Fig.4. MISE EN PLACE DES PILES.Ce moniteur fonctionne avec deux PILES ALCALINES de 1,5 volts. Pour placer les piles, retirez le couvercle arrière du moniteur, Fig.1 et introduire avec précaution les piles alcalines type «R-6» dans le logement des piles (A) en orientant correctement la polarité des piles (en faisant coïncider le pôle «+» des piles avec le signe «+» du logement des piles et le pôle «-» avec le signe «»). Fermez le couvercle, comme indiqué dans la Fig.1. Si après avoir branché le moniteur électronique, vous constatez que les indications sont inexactes ou que les segments s’affichent partiellement, retirez les piles et attendez 15 secondes environ avant de les replacer. Des batteries faibles (déchargées) produisent des chiffres faibles (sans contraste) et des informations inexactes. Remplacez-les immédiatement. Si l’unité est 3 minutes arrêtée, l’écran s’éteint automatiquement. MONITEUR ÉLECTRONIQUE.Pour vous permettre de contrôler facilement et confortablement vos exercices, cet appareil électronique affiche simultanément, la vitesse, la distance, la durée de l’exercice, les calories brûlées et le pouls. Dès le démarrage de l’exercice, l’écran s’allume automatiquement, il s’allume également si vous appuyez sur une touche. Si l’unité est 3 minutes arrêtée, l’écran s’éteint automatiquement. A.FONCTION SCAN.Dans le mode SCAN, l’ordinateur révise et affiche toutes les fonctions continuellement durant la réalisation de vos exercices. La fonction affichée est indiquée par des clignotements. Pour sélectionner la fonction SCAN: 1. Au début de l’exercice ou si vous appuyez sur l’une des touches, le moniteur s’allume dans la fonction SCAN et toutes les 8 secondes, la DURÉE, la VITESSE, la DISTANCE, les CALORIES et le POULS seront affichés à l’écran principal. En outre, ces informations seront également affichées en bas de l’écran et en clignotant. 2. Pour annuler la fonction SCAN, appuyez sur la touche MODE. Remarque importante: Les composants électroniques hors d’usage doivent être déposés dans des conteneurs spécialement prévus à cet effet Fig.2. MISE EN PLACE DU MONITEUR ÉLECTRONIQUE.Dévissez les vis de la partie arrière du moniteur, connectez les connecteurs du renvoi (21) à ceux du moniteur (32) Fig.3, puis introduire le moniteur de haut en bas en le faisant glisser dans la rainure du tube rameur (4) en veillant à ne pas pincer les câbles. B:FONCTION DURÉE.Cette fonction ajoute ou soustrait par des incréments d’une seconde jusqu’à 13 un maximum de 99:00 secondes. En appuyant + de deux secondes sur la touche DOWN, toutes les valeurs reviennent sur zéro, excepté les informations personnelles. 1. Pour mettre en marche le moniteur, appuyez sur une touche quelconque. 2. En appuyant sur la touche MODE la petite fenêtre TIME clignotera. 3. Pour sélectionner la durée, appuyez sur les touches UP ou DOWN. 4. Commencez l’exercice, le compte à rebours commencera et à la fin de la durée programmée, le moniteur émet un signal sonore durant 3 secondes pour signaler que le temps sélectionné s’est écoulé et que le temps commence à augmenter. D:FONCTION CALORIES Cette fonction ajoute ou soustrait les calories, une à une, jusqu’à un maximum de 999 calories. En appuyant + de deux secondes sur la touche DOWN, toutes les valeurs reviennent sur zéro, excepté les informations personnelles. 1. Pour mettre en marche le moniteur, appuyez sur une touche quelconque. 2. En appuyant sur la touche MODE la petite fenêtre CAL (CALORIES) clignotera. 3. Pour sélectionner les calories, appuyez sur les touches UP ou DOWN. 4. Commencez l’exercice, les calories commenceront à diminuer et à la fin des calories programmées, le moniteur émet un signal sonore durant 3 secondes pour signaler que les calories sélectionnées ont été brûlées et qu’elles commencent à augmenter. C:FONCTION DISTANCE.Cette fonction ajoute ou soustrait par des incréments de 0.01 km/ml jusqu’à un maximum de 999 km/ml. En appuyant + de deux secondes sur la touche DOWN, toutes les valeurs reviennent sur zéro, excepté les informations personnelles. 1. Pour mettre en marche le moniteur, appuyez sur une touche quelconque. 2. En appuyant sur la touche MODE la petite fenêtre DIST (DISTANCE) clignotera. 3. Pour sélectionner la distance, appuyez sur les touches UP ou DOWN. 4. Commencez l’exercice, la distance commencera à diminuer et à la fin de la distance programmée, le moniteur émet un signal sonore durant 3 secondes pour signaler que la distance sélectionnée a été parcourue et qu’elle commence à augmenter. E. FONCTION POULS.La Fonction pouls affiche les P.P.M (pulsations par minute). Pour ce faire, posez les mains Fig.5 sur les senseurs du guidon (R) et dans les secondes suivantes votre fréquence cardiaque sera affichée. Ce moniteur n’est pas un appareil médical, par conséquent les valeurs sont données à titre purement indicatif. Pour sélectionner le THR (cadence cardiaque cible), faire comme indiqué ci-après: 1. Pour mettre en marche le moniteur, appuyez sur une touche quelconque. 2. En appuyant sur la touche MODE la petite fenêtre du pouls clignotera et la fréquence (THR) sera affichée. 3. En appuyant sur les touches UP ou DOWN, sélectionnez la valeur du pouls avec laquelle vous voulez 14 réaliser l’exercice entre 40 et 199 (PPM), valeur initiale programmée dans le moniteur 150 PPM. 4. Commencez l’exercice et votre fréquence cardiaque sera affichée à l’écran PULSE dès que la valeur sélectionnée sera atteinte, le moniteur émettra un signal sonore pour indiquer que cette valeur a été atteinte. F:MESURE DU TEST : ÉTAT DE LA FORME.Cet électronique est équipée de la fonction pouls de récupération. Grâce à cette fonction vous pourrez mesurer le pouls de récupération après avoir effectué l’exercice.À la fin de l’exercice et sans retirer les mains des senseurs de pouls, appuyez sur le bouton “RecoveryTest: État de forme” et au bout d’une minute, le compte à rebours commencera. Seules les lignes des fonctions Durée et Pouls seront allumées. L’électronique mesurera votre pouls au cours de cette minute. Le pouls de récupération s’affichera sur la ligne du pouls. À la fin de cette minute, l’électronique calcule et évalue la différence et la note de votre forme physique est affichée à l’écran: «F1, F2,..., F5, F6», «F1» étant le meilleur (état de forme: «Excellent») et «F6» le pire (état de forme: «Très insuffisant»). En appuyant sur le bouton RECOVERY, le moniteur reviendra à l’écran principal dans lequel les fonctions se trouvent dans le mode en service au moment du démarrage du TEST. La comparaison du pouls de l’effort et du pouls de récupération est une façon simple et rapide de contrôler l’état de votre forme. La note sur l’état de votre forme est une information donnée à titre purement indicatif quant à votre pouvoir de récupération après avoir effectué un exercice physique. Si vous vous entraînez régulièrement, vous pourrez constater une amélioration de votre note. Ce test ne fonctionnera pas si les senseurs ne sont pas correctement connectés ou si le message «E1» s’affiche à l’écran. NOTA: Si au bout de 15 secondes aucun signal de pulsations n’est affiché, le message «E 3» sera affiché à l’écran, vérifiez si vos deux mains sont bien posées sur les senseurs (R) du guidon, Fig.6. Si aucun signal n’est donné au bout de 5 secondes, l’écran reviendra à la fonction précédente. MODE D’EMPLOI DU HANDGRIP (POULS).Sur ce modèle, le pouls se mesure en posant les deux mains sur les senseurs (R) placés sur le guidon, comme indiqué dans la Fig.6. Dès que vos mains seront posées sur les senseurs, un cœur commencera à clignoter sur la droite de l’écran PULSE de l’écran du moniteur et votre fréquence cardiaque sera affichée dans les secondes suivantes. Si vos deux mains ne sont pas posées correctement comme indiqué dans la Fig.6, la fonction pouls ne fonctionnera pas. Si un “0” s’affiche à l’écran ou si le cœur ne clignote pas, vérifiez si vos mains sont bien posées sur les senseurs et si les connecteurs (32) sont bien connectés en partie arrière de l’électronique. 15 6. En posant les deux mains sur les senseurs de pouls du guidon (R), des caractères ( ) du temps de la mesure de la graisse BMR (Fréquence de Base Métabolique– valeurs entre 1–9999), BMI, seront affichés à l’écran: (Taux de masse corporelle–valeurs entre 1,0–99,9), FAT % (% de graisse corporelle – valeurs entre 5–50%), cette valeur sera affichée à l’écran du moniteur et les valeurs précédentes seront affichées sur les écrans inférieurs du moniteur. Ce TEST ne fonctionnera pas non plus si vos deux mains ne sont pas bien posées sur les senseurs (R) (hand-grip) et si vous avez arrêté l’exercice. Si le message «E1» s’affiche à l’écran, cela voudra dire que vos mains ne sont pas bien posées sur les senseurs (R) (hand-grip). Si le message «E2» s’affiche à l’écran, cela voudra dire que vous avez arrêté l’exercice. G.FONCTION BODY-FAT.Ce moniteur dispose d’une mémoire pour l’enregistrement du SEXE (homme 1 – femme 0 ), TAILLE (100 – 200 cm), POIDS (30 – 200 kg), ÂGE (10 – 100). NOTA: Si le message “E3” s’affiche à l’écran, cela voudra dire que vos mains ne sont pas bien posées sur les senseurs (R) du guidon. En cas d’extinction ou de mise à zéro, le moniteur ne conserve pas les informations personnelles de l’utilisateur. Pour mesurer le taux de GRAISSE CORPORELLE, voir le tableau ciaprès: 1. Pour mettre en marche le moniteur, appuyez sur une touche quelconque. 2. En appuyant sur la touche BODYFAT, une silhouette d’homme clignotera et pour sélectionner Homme ou Femme, appuyez sur les touches UP–DOWN. 3. Appuyez sur la touche BODY-FAT pour afficher l’écran de la taille (100 – 200 cm) qu’il faudra sélectionner par l’intermédiaire des touches UPDOWN. TABLEAU DE RÉFÉRENCE TAUX DE GRAISSE CORPORELLE % (Body Fat) 4. Appuyez sur la touche BODY-FAT pour afficher l’écran du poids (30 – 200 kg) qu’il faudra sélectionner par l’intermédiaire des touches UPDOWN. 5. Appuyez sur la touche BODY-FAT pour afficher l’écran de l’âge (10 – 100) qu’il faudra sélectionner par l’intermédiaire des touches UPDOWN. SEXE/ GRAISSE % HOMME FAIBLE FAIBLE/ MOYEN MOYEN ÉLEVÉ < 13% <23% 26%30% 36%40% >30% FEMME 13%25,8% 23%35,8% >40% D. TYPE DE PHYSIQUES.Les physiques classés selon le taux de graisse calculé, sont au nombre de 9, à savoir: 16 TYPE 1 TYPE 2 TYPE 3 TYPE 4 TYPE 5 TYPE 6 TYPE 7 TYPE 8 TYPE 9 Problème: Si un segment d’une fonction ne s’allume pas ou si les informations affichées sont faussées Solution: A. Déconnectez les piles 15 secondes et les remettre en place correctement. B: Vérifiez la charge des piles. Si la charge est faible, remplacez les piles. C: Si les problèmes persistent après avoir suivi ces instructions, remplacez le moniteur électronique. Garder le moniteur électronique à l’abri du rayonnement direct du soleil car cela risquerait d’endommager le verre liquide. Tenir le moniteur à l’écart de l’eau et éviter les coups. homme, très sportif Homme, sportif idéal Très svelte Sportif Santé idéale Svelte Trop obèse Obèse Super obèse GUIDE DES PROBLÈMES.Problème: Le display s’allume bien mais seule fonctionne la fonction durée. Solution: A. Vérifiez si le cordon de connexion est bien connecté. Problème: le display ne s’allume pas ou l’affichage des segments du display est très faible. Solution: A. Vérifiez si les piles sont bien placées. B: Vérifiez la charge des batteries C: Si la charge est faible, remplacez les piles immédiatement. BH SE RÉSERVE LE DROIT DE MODIFIER LES CARACTÉRISTIQUES DE SES PRODUITS SANS PRÉAVIS. 17 Deutsch dann den Monitor von oben nach unten ein, indem Sie ihn über das Blech des Ruderrohrs (4) rutschen lassen. Achten Sie dabei darauf, die Kabel nicht einzuklemmen. Schließen Sie die Endklemme des Hand-Grip (24) auf der Rückseite des Monitors an Fig.4. EINSETZEN DER BATTERIEN.Dieser Monitor funktioniert mit 1,5 Volt ALKALIBATTERIEN. Zum Einsetzen der Batterien lösen Sie bitte den hinteren Deckel des Monitors, Fig.1 und setzen Sie die Alkalibatterien des Typs «R-6» vorsichtig in das Batteriefach (A). Achten Sie dabei auf die korrekte Ausrichtung der Polarität der Batterien (der Pol «+” der Batterien muss mit dem «+» Zeichen im Batteriefach übereinstimmen, ebenso wie der «-» Pol mit dem «-» Zeichen). Verschließen Sie den Deckel wie auf Fig.1 dargestellt. Wenn nach dem Einschalten des Monitors falsche oder unvollständige Anzeigen erscheinen, entnehmen Sie bitte die Batterien, warten Sie 15 Sekunden und setzen Sie sie wieder ein. Schwache (entladene) Batterien führen zu schwachen (kontrastarmen) und falschen Anzeigen. Tauschen Sie sie umgehend aus. Der Monitor schaltet sich automatisch aus, wenn er 3 Minuten nicht benutzt wird. Wichtig: Entsorgen elektronischen Komponenten speziellen Containern. Fig.2. ELEKTRONIKMONITOR.Um Ihnen die Kontrolle Ihres Trainings zu erleichtern, zeigt dieser Monitor gleichzeitig Geschwindigkeit, Strecke, Trainingsdauer, verbrauchte Kalorien und Puls an Der Bildschirm schaltet automatisch zu Beginn der Übung bzw. bei Betätigen einer beliebigen Taste ein. Der Monitor schaltet automatisch aus, wenn das Gerät 3 Minuten nicht benutzt wird. A.SCAN-FUNKTION.Im SCAN-MODUS überprüft und aktualisiert der Computer kontinuierlich alle Funktionen während der Übung. Die angezeigte Funktion blinkt. Einstellen der SCAN-Funktion: 1. Zu Beginn der Übung oder bei Betätigen einer beliebigen Taste schaltet der Monitor in SCAN-Funktion ein. Dieser zeigt alle 8 Sekunden auf dem Hauptbildschirm DAUER, GESCHWINDIGKEIT, STRECKE, KALORIEN, PULS an. Im unteren Teil des Bildschirms wird der Wert ebenfalls angezeigt (blinkend). 2. Durch Betätigen der MODE-Taste wird die SCAN-Funktion annulliert. Sie in ANBRINGEN DES ELEKTRONISCHEN MONITORS.Lösen Sie die Schrauben auf der Rückseite des Monitors, schließen Sie die Feedbackklemmen (21) an die des Monitors (32) Fig.3 und setzen Sie 18 Sekunden lang ein Pfeifton, um anzuzeigen, dass der eingestellte Wert abgelaufen ist und dass die Strecke nun in positiver Richtung summiert wird. B.DAUER.Diese Funktion summiert oder subtrahiert in Sekundenschritten die Zeitdauer bis maximal 99:00 Sekunden. Betätigt man die DOWN Taste länger als zwei Sekunden, werden alle Werte auf Null gesetzt, mit Ausnahme der persönlichen Daten. 1. Betätigen Sie eine beliebige Taste, um den Monitor einzuschalten. 2. Betätigt man die MODE-Taste, blinkt das kleine Fenster DAUER. 3. Stellen Sie mit Hilfe der Tasten UP oder DOWN die Trainingsdauer ein. 4. Beginnen Sie die Übung und der eingestellte Wert verringert sich entsprechend der tatsächlich absolvierten Trainingsdauer. Sobald der Wert Null erreicht wird, ertönt 3 Sekunden lang ein Pfeifton, um anzuzeigen, dass der eingestellte Wert abgelaufen ist und dass die Dauer nun in positiver Richtung summiert wird. D.KALORIEN.Diese Funktion summiert oder subtrahiert in 1 Kalorien-Schritten die verbrauchte Kalorienzahl bis maximal 999 Kalorien. Betätigt man die DOWN -Taste länger als zwei Sekunden, werden alle Werte auf Null gesetzt, mit Ausnahme der persönlichen Daten. 1. Betätigen Sie eine beliebige Taste, um den Monitor einzuschalten. 2. Betätigt man die MODE-Taste, blinkt das kleine Fenster CAL (KALORIEN). 3. Stellen Sie mit Hilfe der Tasten UP oder DOWN die Kalorien ein. 4. Beginnen Sie die Übung und der eingestellte Kalorienwert verringert sich entsprechend. Sobald der Wert Null erreicht wird, ertönt 3 Sekunden lang ein Pfeifton, um anzuzeigen, dass der eingestellte Wert abgelaufen ist und dass die Dauer nun in positiver Richtung summiert wird. C.STRECKE.Diese Funktion summiert oder subtrahiert in 0,1 km/ml –Schritten die Strecke bis maximal 999 km/ml. Betätigt man die DOWN -Taste länger als zwei Sekunden, werden alle Werte auf Null gesetzt, mit Ausnahme der persönlichen Daten. 1. Betätigen Sie eine beliebige Taste, um den Monitor einzuschalten. 2. Betätigt man die MODE-Taste, blinkt das kleine Fenster DIST (STRECKE). 3. Stellen Sie mit Hilfe der Tasten UP oder DOWN die Strecke ein. 4. Beginnen Sie die Übung und der eingestellte Wert verringert sich entsprechend der tatsächlich zurückgelegten Strecke. Sobald der Wert Null erreicht wird, ertönt 3 E.PULS.Die Pulsfunktion zeigt die P.P.M (Pulsschlag pro Minute) an. Legen Sie dazu Ihre Hände auf die Sensoren des Lenkers (R), Fig.5. Nach einigen Sekunden wird Ihr Herzrhythmus angezeigt. Es handelt sich hier um kein medizinisches Gerät, die Angaben sind reine Richtwerte. Um den THR (objektiven Herzrhythmus ) einzustellen, gehen Sie bitte folgendermaßen vor: 1. Betätigen Sie eine beliebige Taste, um den Monitor einzuschalten. 19 Zeigt der Bildschirm “0” an oder das Herz blinkt, vergewissern Sie sich, dass beide Hände auf den Sensoren liegen und dass die Steckverbindungen (32) auf der Rückseite des Monitors angeschlossen sind. 2. Betätigt man die MODE-Taste, blinkt das kleine Puls-Fenster und der THR wird angezeigt. 3. Stellen Sie mit Hilfe der Tasten UP oder DOWN den Pulswert ein (zwischen 40 und 199 PPM) ein, mit dem Sie die Übung ausführen möchten. Der im Monitor programmierte Ausgangswert sind 150 PPM. 4. Beginnen Sie die Übung und auf dem PULSE-Bildschirm wird Ihr Herzrhythmus angezeigt. Wenn der eingestellte Wert erreicht wird, ertönt ein Pfeifton, der darauf hinweist, dass der Wert erreicht wurde. F.KONDITIONSTEST.Diese Elektronikeinheit ist mit einer Funktion zur Messung des Erholungspulses ausgestattet. Damit kann der Erholungspuls nach Beendigung der Übung gemessen werden. Wenn Sie mit der Übung fertig sind, lassen Sie dazu die Hände auf den Pulssensoren liegen und Betätigen die Taste «Recovery Test: Kondition». Es erfolgt eine Countdown-Zählung während einer Minute. Nur die Zeilen der Funktionen Dauer und Puls werden angezeigt. Während dieser Minute misst die Elektronikeinheit Ihren Puls. Der Erholungspuls wird dann in der Pulszeile angezeigt. Nach Ablauf der Minute, berechnet und bewertet die Elektronikeinheit den Unterschied und auf dem Bildschirm wird die Bewertung Ihrer Kondition angezeigt: «F1, F2,..., F5, F6»; dabei ist «F1» die beste (Kondition: «Exzellent») und «F6» die schlechteste Bewertung (Kondition: «Sehr Mangelhaft»). Betätigt man die RECOVERY-Taste, wird erneut der Hauptbildschirm angezeigt, auf dem die Funktionen sich im Status des laufenden Tests befinden. Der Vergleich zwischen Belastungspuls und Erholungspuls ist eine Möglichkeit, auf einfache und schnelle Weise Ihre Kondition zu überprüfen. Die Bewertung Ihrer physischen Kondition ist ein Richtwert ANMERKUNG: Wenn nach 15 Sekunden kein Pulssignal angezeigt wird, erscheint auf dem Bildschirm die Anzeige «E 3»; vergewissern Sie sich dann, dass Sie beide Hände auf den Sensoren (R) des Lenkers liegen haben Fig.6. Wenn nach 5 Sekunden kein Signal kommt, wechselt der Bildschirm auf die vorherige Funktion. ANLEITUNG ZUR BENUTZUNG DES HANDGRIP (PULS).In diesem Modell wird der Puls durch Auflegen beider Hände auf die Sensoren (R) gemessen. Diese Sensoren befinden sich im Lenker Fig.6. Wenn beide Hände auf den Sensoren liegen, beginnt das für PULSE stehende Herzsymbol auf der rechten Seite des Bildschirms zu blinken und nach einigen Sekunden erscheint der Wert Ihres Herzrhythmus. Wenn nicht beide Hände korrekt auf den Sensoren liegen Fig.6, funktioniert die Puls-Funktion nicht. 20 Ihr Gewicht eingeben können. 5. Betätigen Sie die Taste BODY-FAT, um nun den Bildschirm für das Alter (10–100) aufzurufen, das Sie ebenfalls mit den Tasten UP-DOWN einstellen können. 6. Legen Sie nun beide Hände auf die Pulssensoren am Lenker (R). Auf dem Bildschirm erscheinen Zeichen ( ) für die Messdauer der Fettmessung BMR (Basaler Stoffwechselfaktor mit Werten zwischen 1–9999), BMI: (Körpermassenindex mit Werten zwischen 1,0–99,9), FAT % (% Körperfett in Prozent mit Werten zwischen 5–50%). Dieser Wert wird auf dem Bildschirm des Monitors angezeigt, die anderen Werte auf den unteren Monitorbildschirmanzeigen. für Ihre Erholungsfähigkeit nach physischer Belastung. Wenn Sie ein regelmäßiges Training durchführen, werden Sie feststellen, dass sich diese Bewertung verbessern wird. Der Test funktioniert nicht, wenn die Sensoren nicht richtig angeschlossen sind oder wenn auf dem Bildschirm die Anzeige «E1» erscheint. Der TEST funktioniert nicht, wenn nicht beide Hände auf den Sensoren (R) (Hand-Grip) liegen und Sie das Training unterbrochen haben. Die Meldung «E1» auf dem Bildschirm bedeutet, dass die Hände nicht richtig auf den Sensoren (R) (Hand-Grip) liegen. Erscheint die Meldung «E2», wurde das Training nicht unterbrochen. G.BODY-FAT.ANMERKUNG: Dieser Monitor hat einen Speicher, in dem folgende Angaben eingegeben werden können: GESCHLECHT (männlich 1 – weiblich 0 ); KÖRPERGRÖSSE (100–200 cm); GEWICHT (30 – 200 Kg); ALTER (10– 100). 1. Betätigen Sie eine beliebige Taste, um den Monitor einzuschalten. 2. Betätigt man dann die Taste BODYFAT, blinkt das Personen-Symbol. Mit den Tasten UP–DOWN können Sie das entsprechende Geschlecht einstellen. 3. Betätigen Sie dann die Taste BODY-FAT, um den Bildschirm für die Körpergröße (100 – 200 cm) anzuzeigen, auf dem Sie Ihre Größe mit den Tasten UP-DOWN einstellen können. 4. Betätigen Sie erneut die Taste BODY-FAT, um den Bildschirm Gewicht (30–200 Kg) anzuzeigen, auf dem Sie mit den Tasten UP-DOWN Erscheint auf dem Bildschirm die Meldung «E3», haben Sie die Hände nicht korrekt auf die Sensoren (R) des Lenkers gelegt. Die persönlichen Daten werden beim Ausschalten des Monitors oder bei einer Rückstellung auf Null nicht gespeichert. Bezüglich der Messung des KÖRPERFETTS vergleichen Sie bitte nachfolgende Tabelle: REFERENZTABELLE KÖRPERFETT IN PROZENT % (Body Fat).GESCHL./ FETT % MÄNNER FRAUEN 21 NIED RIG < 13% <23% NIEDRIG/ MITTEL 13%25,8% 23%35,8% MITTEL HOCH 26%30% 36%40% >30% >40% tauschen Sie sie bitte umgehend aus. Problem: Eines der Segmente einer Funktion wird nicht angezeigt oder die Anzeigen einer der Funktionen sind nicht korrekt. Lösung: a.- Nehmen Sie die Batterien 15 Sekunden lang heraus und setzen Sie sie dann wieder ein. b.- Überprüfen Sie den Ladezustand der Batterien. Sollte dieser niedrig sein, tauschen Sie sie aus. c.- Sollten die vorgenannten Schritte keinen Erfolg haben, tauschen Sie den Monitor aus. Setzen Sie den elektronischen Monitor nicht der direkten Sonneneinstrahlung aus, da dies den Flüssigglasbildschirm beschädigen könnte. Vermeiden Sie Schläge und Kontakt mit Wasser. D. KÖRPERTYPEN: Nach dem berechneten Fettprozentsatz unterscheidet man 9 verschiedene Körpertypen. TYP 1 TYP 2 TYP 3 TYP 4 TYP 5 TYP 6 TYP 7 TYP 8 TYP 9 Sehr sportlicher Mann Idealer männl. Sportler Sehr schlank Sportler Ideale Gesundheit Schlank Zu übergewichtig Übergewichtig Stark übergewichtig FEHLERLÖSUNG.Problem: Das Display schaltet ein und es funktioniert nur die DauerFunktion Lösung: a.- Prüfen Sie, ob das Anschlusskabel korrekt angeschlossen ist. Problem: Das Display schaltet nicht ein oder die Anzeige der Segmente des Displays ist sehr schwach. Lösung: a.- Prüfen Sie, ob die Batterien korrekt eingesetzt sind. b.-Prüfen Sie den Ladezustand der Batterien. c.- Sollten die Batterien schwach sein, BH BEHÄLT SICH DAS RECHT VOR, DIE SPEZIFIZIERUNGEN SEINER PRODUKTE OHNE VORHERIGE ANKÜNDIGUNG ZU ÄNDERN. 22 Português traseira do monitor Fig.4. COLOCAÇÃO DAS PILHAS.Este monitor utiliza duas PILHAS ALCALINAS de 1,5 voltes. Para colocar as pilhas, solte a tampa de atrás do monitor, Fig.1, e coloque com precaução pilhas alcalinas do tipo «R6» no compartimento das pilhas (A), orientando correctamente a polaridade das pilhas (deverá coincidir o polo «+» das pilhas com o sinal «+» do compartimento das pilhas e o polo «-» com o sinal «-»). Feche a tampa, como se mostra na Fig.1. Se depois de ligar o monitor electrónico, aparecerem indicações erróneas ou só aparecerem segmentos parciais, deverá retirar as pilhas e esperar uns 15 segundos antes de voltar a instalá-las. As baterias fracas (descarregadas) produzem cifras débeis (sem contraste) e indicações erróneas. Deverá mudá-las imediatamente. O monitor apagar-se-á automaticamente quando a unidade estiver parada durante 3 minutos. MONITOR ELECTRONICO.Para tornar mais cómodo e mais simples o controle do seu exercício este electrónico mostra simultaneamente a velocidade, a distância, o tempo de duração do exercício, as calorias gastas e a pulsação. O ecrã acender-se-á automaticamente ao começar o exercício ou apertando qualquer tecla. O monitor apagar-se-á automaticamente quando a unidade estiver parada durante 3 minutos. A. FUNÇÃO SCAN.No modo SCAN, o computador revê e visualiza continuamente durante os seus exercícios todas as funções. A função visualizada estará indicada através de uma intermitência. Para seleccionar a função SCAN: 1. Ao começar o exercício ou apertando qualquer tecla o monitor acender-se-á na função SCAN, que cada 8 segundos mostrará no ecrã principal o TEMPO, VELOCIDADE, DISTÂNCIA, CALORIAS, PULSAÇÃO e na parte inferior do monitor também mostrará o valor em forma intermitente. 2. Aperte a tecla MODE e ficará eliminada a função SCAN. Importante: Deposite os componentes electrónicos em contentores especiais, Fig.2. COLOCAÇÃO MONITOR ELECTRÓNICO.Solte os parafusos da parte traseira do monitor, ligue os terminais de reenvio (21) com os do monitor (32) Fig.3. Depois introduza o monitor de cima para baixo deslizando-o pela chapa do tubo remo (4), tendo cuidado para não enganchar os cabos. B.FUNÇÃO TEMPO.A função conta ou desconta em incrementos de um segundo até um máximo de 99:00 segundos. Apertando durante mais de dois segundos a tecla DOWN todos os Coloque os parafusos e aperte. Ligue o terminal do hand-grip (24) na parte 23 dois segundos a tecla DOWN todos os valores passarão a zero, exceptuando a informação pessoal. 1. Aperte qualquer tecla para pôr em funcionamento o monitor. 2. Apertando a tecla MODE ficará intermitente a janela pequena de CAL (CALORIAS). 3. Apertando as teclas UP ou DOWN poderá seleccionar as calorias. 4. Comece o exercício e começará a diminuir as calorias; quando tiver chegado a zero emitirá um sinal acústico de 3 segundos, advertindo-o que chegou ao valor seleccionado e começará automaticamente a aumentar as calorias. Quando terminar as calorias programadas, o monitor emitirá um sinal acústico de 3 segundos, e começará automaticamente a aumentar as calorias. valores passarão a zero, exceptuando a informação pessoal. 1. Aperte qualquer tecla para pôr em funcionamento o monitor. 2. Apertando a tecla MODE ficará intermitente a janela pequena de TIME. 3. Apertando as teclas UP ou DOWN poderá seleccionar o tempo. 4. Comece o exercício e começará a diminuir o tempo; quando terminar o tempo programado o monitor emitirá um sinal acústico de 3 segundos, advertindo-o que terminou o tempo seleccionado e começará automaticamente a aumentar o tempo. C.FUNÇÃO DISTÂNCIA.A função conta ou desconta em incrementos de 0,1 Km/ml até um máximo de 999 Km/ml. Apertando durante mais de dois segundos a tecla DOWN todos os valores passarão a zero, exceptuando a informação pessoal. 1. Aperte qualquer tecla para pôr em funcionamento o monitor. 2. Apertando a tecla MODE ficará intermitente a janela pequena de DIST (DISTÂNCIA). 3. Apertando as teclas UP ou DOWN poderá seleccionar a distância. 4. Comece o exercício e começará a diminuir a distância; quando tiver chegado a zero emitirá um sinal acústico de 3 segundos, advertindo-o que chegou ao valor seleccionado e começará automaticamente a somar a distância percorrida. E.FUNÇÃO PULSAÇÃO.A função pulsação mostra-lhe as P.P.M. ( Pulsações por minuto). Para isso coloque as mãos Fig.5 sobre os sensores do guiador (R) e depois de uns segundos mostrar-lhe-á o seu ritmo cardíaco. Como não se trata de um aparelho médico o seu valor só lhe servirá de orientação. Para seleccionar o THR (ritmo cardíaco objectivo) siga os seguintes passos: 1. Aperte qualquer tecla para pôr em funcionamento o monitor. 2. Apertando a tecla MODE ficará intermitente a janela pequena de pulsação e aparecerá THR. D.FUNÇÃO CALORÍAS.- 3. Apertando as teclas UP ou DOWN poderá seleccionar o valor da pulsação em que deseja fazer o exercício, entre 40 e 199 (PPM), A função conta e desconta de uma em uma caloria, até um máximo de 999 calorias. Apertando durante mais de 24 sendo o valor inicial programado no monitor 150 PPM. 4. Comece o exercício e aparecerá no ecrã PULSAÇÃO, o seu ritmo cardíaco; quando tiver alcançado o valor seleccionado emitirá um sinal acústico, advertindo-o que atingiu o valor seleccionado. F.MEDIÇÃO DO ESTADO FÍSICO.- TESTE: Este electrónico vem equipado com a função de pulsação de recuperação. A vantagem desta função é a de que você poderá medir a pulsação de recuperação depois de ter terminado o exercício. Depois de ter terminado o seu exercício e sem tirar as mãos dos sensores de pulsação, aperte o botão de “Recovery Teste: Estado físico” e começará a contagem decrescente de um minuto. Só estarão acesas as linhas das funções de Tempo e de Pulsação. Durante este minuto o electrónico medirá a sua pulsação. A pulsação de recuperação irá aparecendo na linha da pulsação. Quando este minuto terminar, o electrónico calculará e comparará a diferença e a nota do seu estado físico aparecerá no ecrã: “F1, F2, ..., F5, F6”; sendo “F1” o melhor (estado físico: “Excelente”) e “F6” o pior (estado físico: “Muito Deficiente”). Apertando o botão de RECOVERYE, voltará ao ecrã principal onde as funções estarão no mesmo modo em que começou o TESTE. A comparação entre a pulsação de esforço e a pulsação de recuperação é uma maneira rápida e fácil de calcular o seu estado físico. A nota do seu estado físico é um valor que lhe dará uma ideia sobre a sua capacidade de recuperação depois de esforços físicos. Se você efectuar um treino regular poderá comprovar que a sua nota irá melhorando. O teste não funcionará se os sensores não estiverem colocados adecuadamente ou se no ecrã aparecer a letra “E1”. O TESTE não funcionará se não tiver ambas as mãos colocadas nos NOTA: Se não aparecer nenhum sinal de pulsações depois de 15 segundos, no ecrã aparecerá “E 3”. Verifique se tem ambas as mãos bem colocadas nos sensores (R) do guiador, Fig.6. Se não aparecer nenhum sinal depois de transcorridos 5 segundos, o ecrã principal voltará á sua função anterior. INSTRUÇÕES – USO DO HAND-GRIP (PULSAÇÃO).A pulsação neste modelo mede-se colocando ambas as mãos nos sensores (R), que estão colocados no guiador, como se indica na Fig.6. Depois de ter colocado ambas as mãos nos sensores, aparecerá um coração intermitente na parte direita do ecrã do monitor que indica PULSAÇÃO e depois de uns segúndos aproximadamente, aparecerá o valor do seu ritmo cardíaco. Se ambas as mãos não estiverem colocadas correctamente como mostra a Fig.6, a pulsação não aparecerá. Se aparecer no ecrã um “0” ou se o coração não aparecer intermitente, verifique se tem ambas as mãos colocadas nos sensores e se os conectores (32) estão ligados à parte de atrás do electrónico. 25 aparecerão nos ecrãs inferiores do monitor. sensores (R) (hand-grip) e se parou de fazer o exercício. Se no ecrã aparece a mensagem “E1” significa que as mãos não estão correctamente colocadas sobre os sensores (R) (hand-grip). Se no ecrã aparece a mensagem “E2” significa que não parou o exercício. NOTA: Se lhe aparecer a mensagem “E3” no ecrã, significa que não colocou correctamente as mãos sobre os sensores (R), situados no guiador. Os dados pessoais não ficam guardados no monitor quando se desliga ou se faz um reset e se colocam em zero os valores. Para medir o estado de GORDURA CORPORAL, consulta a seguinte tabela. G.FUNÇÃO BODY-FAT.Este monitor possui uma memória para registar o SEXO ( homem 1 – Mulher 0); ALTURA ( 100 - 200 cm); PESO (30 - 200 Kg); IDADE (10 - 100 anos). 1. Aperte qualquer tecla para pôr em funcionamento o monitor 2. Apertando a tecla BODY-FAT aparecerá de forma intermitente a silhueta de um homem, apertando as teclas UP-DOWN seleccione Homem ou Mulher. 3. Aperte a tecla BODY-FAT e aparecerá no ecrã a altura, (100 – 200 cm); com as teclas UP-DOWN seleccione a sua altura. 4. Aperte a tecla BODY-FAT e aparecerá o peso, (30 – 200 Kg); com as teclas UP-DOWN seleccione o seu peso. 5. Aperte a tecla BODY-FAT e aparecerá a idade (10 – 100), com as teclas UP-DOWN seleccione a sua idade. 6. Colocando ambas as mãos nos sensores de pulsação do guiador (R) aparecerá no ecrã uns caracteres ( ) de tempo de medição de gordura BMR (Ritmo Basal Metabólico, valores entre 1-9999), BMI: (Índice de massa corporal, valores entre 1,0-99,9), FAT % (% de gordura corporal, valores entre 5-50 %) aparecerão estes valores no ecrã do monitor e os anteriores valores TABELA DE REF. PERCENTAGEM GORDURA CORPORAL %(Body Fat).SEXO / GORDURA % HOMEM BAIXO MULHER <23% < 13% BAIXO / MÉDIO 13%25,8% 23%35,8% MÉDIO ALTO 26%30% 36%40% >30% >40% D. TIPOS DE CORPO.Há 9 tipos de corpo divididos segundo a percentagem de gordura calculada. TIPO 1 TIPO 2 TIPO 3 TIPO 4 TIPO 5 TIPO 6 TIPO 7 TIPO 8 TIPO 9 26 Homem muito desportista Homem desportista ideal Muito elegante Desportista Saúde ideal Elegante Demasiado obeso Obeso Ultra-obeso segundos e volte a instalá-las correctamente. b.- Verifique se as pilhas estão carregadas. Se estão fracas, mude as pilhas. c.- Se os passos anteriores não tiverem ajudado, substitua o monitor electrónico. Evite que a luz solar bata directamente no seu monitor electrónico, porque o ecrã de cristal líquido poderia estragar-se. Também deverá protegê-lo da água e de golpes. GUIA DE PROBLEMAS.Problema: Se ao acender o display só funcionar a função de Tempo Solução: a.- Verifique se o cabo de ligação está ligado. Problema: Não se consegue acender o display ou os segmentos do display só se podem ver de uma forma muito débil. Solução: a.- Verifique se as pilhas estão correctamente colocadas. b.- Verifique se as baterias estão carregadas. c.- Se estiverem fracas, mude as pilhas imediatamente. Problema: Se não conseguir acender algum segmento de uma função ou se aparecerem indicações erróneas em alguma função. Solução: a.- Desligue as pilhas durante 15 BH RESERVA O DIREITO DE PODER MODIFICAR AS ESPECIFICAÇÕES DOS SEUS PRODUTOS SEM PRÉVIO AVISO. 27 Italiano cavo, inserire le viti e stringere, inserire il terminale per la manopola (24) nel retro del monitor, Fig.4. COLLOCAZIONE PILE.Questo monitor funziona con due PILE ALCALINE da 1,5 volt. Per collocare le pile, tolga il coperchio posteriore del monitor, Fig.1, ed inserisca con attenzione le pile alcaline del tipo «R-6» nello scomparto delle pile (A) orientando correttamente la polarità delle pile (facendo coincidere il polo «+» delle pile con il marchio «+» dello scomparto delle pile ed il polo «-» con il marchio «-»). Chiuda il coperchio, come mostra la Fig.1. Se dopo aver collegato il monitor elettronico si dovessero verificare indicazioni di errore o solo apparissero i segmenti parzialmente, tolga le pile ed aspetti 15 secondi prima di introdurle di nuovo. Le pile deboli (scariche) producono cifre deboli (senza contrasto) ed indicazioni di errore. Le cambi inmediatamente. Il monitor si spegnerà automaticamente quando l’ apparecchio si trovi fermo più di 3 minuti. MONITOR ELECTTONICO.Per rendere più comodo e semplice il controllo del suo allenamento questo elettronico mostra allo stesso tempo la velocità, la distanza, il tempo dell’ allenamento, le calorie consumate ed il polso. Lo schermo si accenderà automaticamente nel cominciare l’ allenamento o premendo qualsiasi tasto. Il monitor si spegnerà automaticamente quando l’ apparecchio si trovi più di 3 minuti fermo. A.FUNZIONE SCAN.Nel modo SCAN, il computer controlla e visualizza continuamente durente i suoi allenamenti tutte le funzioni. La funzione visualizzata viene indicata con lampeggi. Per scegliere la funzione SCAN: 1. nel cominciare l’ allenamento o premendo qualsiasi tasto si accende il monitor nella funzione SCAN, ed ogni 8 secondi si visualizzerà nello schermo principale il TEMPO, VELOCITÀ, DISTANZA, CALORIE, POLSO ed anche nella parte inferiore del monitor si visualizzerà il valore sotto forma di lampeggio. Importante: Depositare i componenti elettronici negli appositi contenitori speciali, Fig.2. COLLOCAZIONE MONITOR ELETTRONICO.Rimuovere le viti dalla base del monitor, connettere i terminali per il cavo di ritorno (21) a quelli del monitor (32), Fig.3, dopodiché far scorrere la parte anteriore del monitor sulla piastra del tubo principale (4) facendo attenzione a non intralciare alcun 2. Prema il tasto MODE e si eliminerà la funzione SCAN. B.FUNZIONE TEMPO.La funzione conta o sconta in incrementi di un secondo fino ad un 28 si mettono a zero eccetto l’ informazione personale. 1. Prema qualsiasi tasto per mettere in funzionamento il monitor 2. Premendo il tasto MODE lampeggerà la finestra piccola di CAL (CALORIE). 3. Premendo i tasti UP o DOWN scelga le calorie. 4. Cominci l’ allenamento e cominceranno a diminuire le calorie, una volta arrivato a zero si sentiranno dei fischi durante 3 secondi, avvertendo che ha raggiunto il valore scelto, cominciando a contare le calorie in crescendo. Quando finisca le calorie programmate, il monitor emette un segnale acustico di 3 secondi, e comincia automaticamente ad aumentare le calorie. massimo di 99:00 secondi. Premendo durante più di due secondi il tasto DOWN tutti i valori si metteranno a zero eccetto l’ informazione personale. 1. Prema qualsiasi tasto per mettere in funzionamento il monitor. 2. Premendo il tasto MODE lampeggerà la finestra piccola di TIME. 3. Premendo i tasti UP o DOWN scelga il tempo. 4. Cominci l’ allenamento e comincerà a diminuire il tempo, una volta arrivato a zero si sentiranno dei fischi durante 3 secondi, avvertendo che ha raggiunto il tempo scelto, cominciando a contare il tempo in crescendo. C.FUNZIONE DISTANZA.La funzione conta o sconta in incrementi di 0,1 Km/ml fino ad un massimo di 999 Km/ml. Premendo durante più di due secondi il tasto DOWN tutti i valori si mettono a zero eccetto l’ informazione personale. 1. Prema qualsiasi tasto per mettere in funzionamento il monitor. 2. Premendo il tasto MODE lampeggerà la finestra piccola di DIST (DISTANZA). 3. Premendo i tasti UP o DOWN scelga la distanza. 4. Cominci l’ allenamento e comincerà a diminuire la distanza, una volta arrivato a zero si sentiranno dei fischi durante 3 secondi, avvertendo che ha raggiunto il valore scelto, cominciando a contare la distanza in crescendo. E.FUNZIONE POLSO.La funzione polso mostra le P.P.M (pulsazioni per minuto). Per fare questo collochi le mani Fig.5 sui sensori del manubrio (R) e passati alcuni secondi il monitor mostrerà il suo battito cardiaco. Non è un apparecchio medico quindi il valore è solamente orientativo. Per scegliere il THR (ritmo cardiaco obiettivo) segua i seguenti passi: 1. Prema qualsiasi tasto per mettere in funzionamento il monitor. 2. Premendo il tasto MODE lampeggerà la finestra piccola di polso e vedrà le THR. 3. Premendo i tasti UP o DOWN scelga il valore del polso con il quale lei desidera realizzare l’ allenamento, fra 40 e 199 (PPM), valore iniziale programmato nel monitor 150 PPM. 4. Cominci l’ allenamento e visualizzerà nello schermo PULSE, il D.FUNZIONE CALORIE.La funzione conta e sconta di una in una le calorie, fino ad un massimo di 999 calorie. Premendo durante più di due secondi il tasto DOWN tutti i valori 29 ha il vantaggio che lei può misurare il polso di recupero dopo aver finito l’ allenamento. Dopo aver finito il suo allenamento e senza togliere le mani dai sensori del polso, prema il tasto di “Recovery Test: stato di Forma» e comincerà il conteggio alla rovescia di un minuto. Solamente si troveranno accese le linee dell funzioni di Tempo e di Polso. L’ elettronico misurerà il suo polso durante questo minuto. Il polso di recupero apparirà poco a poco nella linea del polso. Quando finisca questo minuto, l’ elettronico calcola e valorizza la differenza ed il calcolo del suo stato di forma apparirà nello schermo: «F1, F2,..., F5, F6»; essendo «F1» il migliore (stato di forma: «Eccellente») ed «F6» il peggore (stato di forma: «Molto scarso»). Premendo il tasto di RECOVERY, tornerà allo schermo principale dove le funzioni si troverranno nel punto in cui ha cominciato il TEST. Il confronto fra il polso di sforzo ed il polso di recupero è una possibilità semplice e veloce per controllare il suo stato di forma fisica. Il calcolo del suo stato di forma è un valore orientativo per controllare la sua capacità di recupero dopo aver realizzato sforzi fisici. Se lei realizza un allenamento regolare, potrà osservare che questo calcolo sarà migliore. Il testo non funziona se i sensori non sono stati collegati correttamente o se nello schermo appare la lettera «E1». Il TEST no funziona se non ha collocato ambedue le mani sui sensori (R) (hand-grip) e se lei ha fermato l’ allenamento. Se nello schermo appare il messaggio «E1» significa che non ha collocato ritmo del suo battito cardiaco, una volta abbia raggiunto il valore scelto, il monitor emetterà dei fischi, avvertendo così che ha raggiunto il valore scelto. NOTA: Se non visualizza nessun segnale di pulsazioni passati 15 secondi nello schermo apparirà la lettera “E 3”, si assicuri di aver ben collocate le mani sui sensori (R) del manubrio, Fig.6. Se non riceve nessun segnale trascorsi 5 secondi, lo schermo principale tornerà alla sua funzione anteriore. ISTRUZIONI - USO HAND-GRIP (POLSO).- DEL Il polso di questo modello si misura collocando ambedue le mani nei sensori (R), che si trovano nel manubrio come viene indicato nella Fig.6. Una volta collocate ambedue le mani nei sensori, comincerà a lampeggiare il cuore nella parte destra dello schermo che indica PULSE dello schermo del monitor e passati alcuni secondi apparirà il valore del ritmo del suo battito cardiaco. Se non ha collocato correttamente ambedue le mani come mostra la Fig.6, il polso non funzionerà. Se nello schermo appare uno “0” o non lampeggia il cuore, si assicuri di aver collocato ambedue le mani nei sensori e che i connettori (32) sono ben collegati nella parte posteriore dell’ elettronico. F.MISURA DEL TEST: STATO DI FORMA.Questo elettronico include anche la funzione di polso di recupero. Questo 30 correttamente le mani sui sensori (R) (hand-grip). Se nello schermo appare il messaggio «E2» significa che non ha fermato l’ allenamento. sensori (R), che si trovano nel manubrio. I dati personali non si registrano nel monitor quando si spegne o si mette a zero. Per misurare lo stato di GRASSO CORPORALE, osservi questa tabella. G.FUNZIONE BODY-FAT.Questo monitor ha una memoria per registrare il SESSO (Uomo 1 – Donna 0 ); ALTEZZA (100 – 200 cm); PESO (30 – 200 Kg); ETÀ (10 – 100). 1. Premi qualsiasi tasto per mettere in funzionamento il monitor. 2. Premendo il tasto BODY-FAT lampeggerà la sagoma uomo, premendo i tasti UP–DOWN scelga Uomo o Donna. 3. Prema il tasto BODY-FAT ed apparirà nello schermo l’ altezza, (100 – 200 cm), con i tasti UP-DOWN scelga la sua altezza. 4. Prema il tasto BODY-FAT ed apparirà il peso, (30–200 Kg), con i tasti UP-DOWN scelga il suo peso. 5. Prema il tasto BODY-FAT ed apparirà l’ età, (10 –100), con i tasti UP-DOWN scelga la sua età. 6. Collocando ambedue le mani nei sensori di polso del manubrio (R) appariranno nello schermo dei caratteri ( ) di tempo di misurazione del grasso BMR (Ritmo Basale Metabolico valori fra 1–9999), BMI: (Indice di massa corporale valori fra 1,0–99,9), FAT % (% di grasso corporale valori fra 5–50%) si mostrerà questo valore nello schermo del monitor ed i valori anteriori si mostreranno negli schermi inferiori del monitor. TABELLA DI RIF. PERCENTUALE DI GRASSO CORPORALE % (Body Fat).SESSO / GRASSO% BASSO UOMO < 13% DONNA <23% BASSO / MEDIO 13%25,8% 23%35,8% MEDIO ALTO 26%30% 36%40% >30% >40% D. TIPI DI CORPO: Ci sono 9 tipi di corpo divisi a seconda della percentuale di grasso calcolata. TIPO 1 TIPO 2 TIPO 3 TIPO 4 TIPO 5 TIPO 6 TIPO 7 TIPO 8 TIPO 9 Uomo molto sportivo Uomo sportivo ideale Molto snello Sportivo Salute ideale Snello Troppo grasso Grasso Ultra grasso SOLUZIONE DI PROBLEMI.Problema: Si accende il display e solo funziona la funzione di Tempo Solucióne: a.- Verifichi se il cavo di collegamento è stato collegato. Problema: Il display non si accende o la visualizzazione dei segmenti del display è molto debole. Soluzione: a.- Verifichi che le pile siano state NOTA: Se appare il messaggio “E3” nello schermo, significa che non ha collocato correttamente le mani sui 31 Eviti che il suo monitor elettronico riceva la luce diretta del sole, perchè si potrebbe danneggiare lo schermo di cristallo liquido. Non esporlo neanche all’ acqua ed a colpi. collocate correttamente. b.- Verifichi al carica delle pile c.- Se sono scariche, cambi le pile immediatamente. Problema: Si il segmento de qualsiasi funzione non si accende o se si verificano indicazioni di errore in qualche funzione. Soluzione: a.- Tolga le pile durante 15 secondi e le collochi di nuovo correttamente. b.- Verifichi la carica delle pile. Se sono scariche, cambi le pile. c.- Se i passi anteriori non sono d’ aiuto rimpiazzi il monitor elettronico. BH SI RISERVA IL DIRITTO DI MODIFICARE LE SPECIFICHE TECNICHE DEI SUOI PRODOTTI SENZA AVVERTIMENTO PREVIO. 32 Nederlands van boven naar beneden schuivend over de plaat van de greepbeugel (4), waarbij u er rekening mee dient te houden dat de kabels niet bekneld raken. Plaats de schroeven en draai dezen vast, verbind de terminal van de hand-grip (24) aan de achterkant van de monitor Fig.4. PLAATSING BATTERIJEN.Deze monitor functioneert op twee ALKALINE BATTERIJEN van 1,5 Volt. Om de batterijen te plaatsen, opent u het klepje aan de achterkant, Fig.1, en plaatst voorzichtig alkaline batterijen van het type «R-6» in het batterijhuis (A) waarbij u er voor zorgt dat de batterijen correct geplaatst worden (zorg dat de «+» pool van de batterijen samenvalt met het «+» teken in het batterijhuis en de «-» pool van de batterijen met het «-» teken). Sluit het klepje, zoals wordt getoond in Fig.1. Wanneer, na aansluiting van de monitor, blijkt dat er foutieve of gedeeltelijke meldingen op het beeldscherm verschijnen, haalt u de batterijen uit en wacht ongeveer 15 seconden voordat u ze weer opnieuw plaatst. Batterijen die bijna op zijn veroorzaken moeilijk leesbare cijfers (zonder contrast) en foutieve indicaties. Vervang ze onmiddellijk. De monitor gaat vanzelf uit wanneer het apparaat langer dan 3 minuten niet in gebruik is. ELEKTRONISCHE MONITOR.Om de controle van uw oefeningen te vergemakkelijken en te vereenvoudigen toont het elektronisch gedeelte tegelijkertijd de snelheid, afstand, tijdsduur van de oefening, de verbrandde calorieën en hartslag. Het beeldscherm licht automatisch op bij het starten van de oefening of wanneer u op een toets drukt. De monitor gaat vanzelf uit wanneer het apparaat langer dan 3 minuten niet in gebruik is. A. SCAN FUNCTIE.Tijdens de SCAN modus controleert en toont de computer tijdens de oefeningen continu alle functies. De getoonde functie wordt door middel van knipperen weergegeven. Om de SCAN functie te kiezen: 1. Bij het begin van de oefening of door op een willekeurige toets te drukken schakelt de monitor in op de SCAN modus en elke 8 seconden wordt er op het hoofdscherm de TIJD, SNELHEID, AFSTAND, CALORIEËN en HARTSLAG getoond. Op het onderste gedeelte van het scherm wordt ook de waarde knipperend weergegeven. 2. Druk op de toets MODE en de functie SCAN wordt uitgeschakeld. Belangrijk: Deponeer elektronische componenten in speciale containers, Fig.2. PLAATSING VAN DE ELEKTRONISCHE MONITOR.Draai de schroeven aan de achterkant van de monior los, verbind de terminals van de verbindingskabel (21) met die van de monitor (32) Fig.3. Vervolgens plaatst u de monitor, deze 33 piepsignaal horen, wat u waarschuwt dat de gekozen afstand is bereikt en de computer begint door te tellen. B. FUNCTIE TIJD.Deze functie telt per seconde op of af tot een maximum van 99:00 seconden. Door langer dan twee seconden op de toets DOWN te drukken, springen alle waarden op nul, behalve de persoonlijke gegevens. 1. Druk op een willekeurige toets om de monitor in te schakelen. 2. Door op de toets MODE te drukken gaat het kleine venster van de TIJD knipperen. 3. Door op de toetsen UP of DOWN te drukken, kiest u de tijd. 4. Wanneer u de oefening start, begint de computer met het aftellen van de tijd en wanneer deze de nulwaarde heeft bereikt, zult u gedurende 3 seconden een piepsignaal horen, wat u waarschuwt dat de gekozen tijd is bereikt en de computer begint door te tellen. D. FUNCTIE CALORIEËN.Deze functie telt per calorie op of af tot een maximum van 999 calorieën. Door langer dan twee seconden op de toets DOWN te drukken, springen alle waarden op nul, behalve de persoonlijke gegevens. 1. Druk op een willekeurige toets om de monitor in te schakelen. 2. Door op de toets MODE te drukken gaat het kleine venster van de CAL (CALORIEËN) knipperen. 3. Door op de toetsen UP of DOWN te drukken, kiest u de hoeveelheid calorieën. 4. Wanneer u de oefening start, begint de computer met het aftellen van de calorieën en wanneer deze de nulwaarde heeft bereikt, zult u gedurende 3 seconden een piepsignaal horen, wat u waarschuwt dat de gekozen waarde is bereikt en de computer begint de calorieën door te tellen. Wanneer het aantal geprogrammeerde calorieën is bereikt, laat de monitor gedurende 3 seconden een piepsignaal horen en begint automatisch de calorieën door te tellen. C. FUNCTIE AFSTAND.Deze functie telt per 0,1 Km/ml op of af tot een maximum van 999 Km/ml. Door langer dan twee seconden op de toets DOWN te drukken, springen alle waarden op nul, behalve de persoonlijke gegevens. 1. Druk op een willekeurige toets om de monitor in te schakelen. 2. Door op de toets MODE te drukken gaat het kleine venster van de DIST (AFSTAND) knipperen. 3. Door op de toetsen UP of DOWN te drukken, kiest u de afstand. 4. Wanneer u de oefening start, begint de computer met het aftellen van de afstand en wanneer deze de nulwaarde heeft bereikt, zult u gedurende 3 seconden een E. FUNCTIE HARTSLAG.De functie hartslag toont u het aantal P.P.M (hartslagen per minuut). Hiervoor plaatst u uw handen Fig.5 over de sensoren op het stuur (R) en na enkele seconden wordt uw hartslagfrequentie getoond. Dit is geen medisch apparaat en deze waarde is slechts een indicatie. 34 Om de THR (streefwaarde hartslag) te kiezen, dient u de volgende stappen te volgen: 1. Druk op een willekeurige toets om de monitor in te schakelen. 2. Door op de toets MODE te drukken gaat het kleine venster van de hartslag knipperen en verschijnt THR. 3. Door op de toetsen UP of DOWN te drukken, kiest u een hartslagfrequentie tussen de 40 en 199 (PPM) waarop u de oefening wilt doen. De geprogrammeerde beginwaarde staat ingesteld op 150 PPM. 4. Wanneer u de oefening start, wordt op het beeldscherm PULSE getoond met uw hartslagfrequentie en wanneer de gekozen waarde is bereikt, zult u gedurende 3 seconden een piepsignaal horen, wat u waarschuwt dat de gekozen waarde is bereikt. hartje, rechts in het scherm van de monitor, aangeduid door PULSE, te knipperen en na enkele seconden verschijnt de waarde van uw hartslag. Wanneer u uw beide handen niet correct op de sensoren heeft gelegd, zoals getoond in Fig.6, functioneert de hartslagmeting niet. Wanneer er een “0” in het scherm verschijnt of het hartje niet knippert, controleer dan of u uw handen juist op de sensoren heeft gelegd en of de connectoren (32) aangesloten zijn op de achterkant van het elektronisch gedeelte. F. TESTMETING: LICHAMELIJKE CONDITIE.De elektronische eenheid is uitgerust met de mogelijkheid het herstel van de hartslag te meten. Dit heeft het voordeel dat u het herstel van de hartslag kunt meten nadat u de oefening gedaan heeft. Nadat u de oefening beëindigd heeft en zonder de handen van de sensoren te nemen, drukt u op de toets «Recovery Test: conditie» en de elektronische eenheid begint een minuut terug te tellen. Alleen de functielijnen Tijd en Hartslag lichten op. De elektronische eenheid meet gedurende deze minuut de hartslag. Het herstel van de hartslag verschijnt op de hartslag lijn. Na het verstrijken van deze minuut, berekent en waardeert de elektronische eenheid het verschil en de beoordeling van uw lichamelijke conditie verschijnt op het scherm: «F1, F2,..., F5, F6»; waarbij «F1» het beste (lichamelijke conditie: «Zeer goed») en «F6» het slechtste (lichamelijke conditie: «Zeer slecht») resultaat is. Wanneer u op de toets Test drukt, keert u terug naar het hoofdscherm, OPMERKING: Wanneer er, na 15 seconden, geen enkel hartslagsignaal wordt weergegeven, wordt er op het scherm “E 3” getoond. Controleer of u beide handen over de sensoren (R) op het stuur, Fig.6, heeft gelegd. Wanneer er geen signaal binnen 5 seconden wordt waargenomen, keert het beeldscherm naar zijn vorige stand terug. INSTRUCTIES - GEBRUIK HANDGRIP (HARTSLAG).De hartslag van dit model wordt gemeten door beide handen over de sensoren (R), die zich op het stuur bevinden, te leggen, zoals wordt getoond in Fig.6 Wanneer u beide handen op de sensoren heeft gelegd, begint het 35 4. Druk op de toets BODY-FAT en op het scherm verschijnt het gewicht, (30–200 Kg) en door middel van de toetsen UP-DOWN kiest u uw gewicht. 5. Druk op de toets BODY-FAT en op het scherm verschijnt de leeftijd, (10– 100) en door middel van de toetsen UP-DOWN kiest u uw leeftijd. 6. Wanneer u beide handen op de sensoren (R) legt, zullen er op het scherm een aantal aanduidingen ( ) van de vetmeting BMR (Basaal Metabolisme, waarden tussen de 1-9999), BMI verschijnen: (Body Mass Index, waarden tussen 1,099,9), FAT % (% lichaamsvet, waarden tussen 5-50%) deze waarde wordt getoond op het beeldscherm van de monitor en de vorige waarden worden getoond op de onderste schermen van de monitor. waar de u functies aantreft, zoals ze waren bij het begin van de TEST. De vergelijking van de hartslag tijdens inspanning en de hersteltijd is een eenvoudige en snelle manier om de lichamelijke conditie te controleren. De beoordeling is een indicatieve waarde om uw herstelvermogen na een fysieke inspanning te meten. Wanneer u regelmatig traint, zult u merken dat de beoordeling verbetert. De test functioneert niet wanneer de sensoren niet juist geplaatst zijn of wanneer de letter «E1» in het scherm verschijnt. De TEST functioneert niet, wanneer u beide handen niet op de sensoren (R) (handgrip) houdt, wanneer u de oefening beëindigt. Wanneer op het scherm de boodschap «E1» verschijnt, betekent dit dat u uw handen niet correct op de sensoren (R) (handgrip) geplaatst zijn. Wanneer op het scherm de boodschap «E2» verschijnt, betekent dit dat de oefening nog niet is afgelopen. OPMERKING: Wanneer het bericht «E3» op het scherm verschijnt, betekent dit dat u uw handen niet correct op de sensoren (R), die zich op het stuur bevinden, hebt geplaatst. De persoonlijke gegevens worden niet opgeslagen wanneer de monitor wordt uitgeschakeld of ge-reset. Raadpleeg de onderstaande tabel om het LICHAAMSVET te meten G. FUNCTIE BODY-FAT.Deze monitor beschikt over een geheugen om het GESLACHT (man 1 - vrouw 0); LENGTE (100-200 cm); GEWICHT (30-200 Kg); LEEFTIJD (10-100) op te slaan. 1. Druk op een willekeurige toets om de monitor in te schakelen. 2. Door op de toets BODY-FAT te drukken gaat het silhouet van het mannetje knipperen en door op de toetsen UP - DOWN te drukken selecteert u Man of Vrouw. 3. Druk op de toets BODY-FAT en op het scherm verschijnt de lengte, (100 – 200 cm) en door middel van de toetsen UP-DOWN kiest u uw lengte. REFERENTIETABEL PERCENTAGE LICHAAMSVET % (BODY FAT).- 36 GESLACHT/ VET% LAAG LAAG / GEMID GEMIDDELD DELD HOOG MAN VROUW < 13% <23% 13%-25,8% 23%-35,8% >30% >40% 26%-30% 36%-40% zijn c.-Wanneer ze onvoldoende geladen zijn, vervang ze dan onmiddellijk. Probleem: Wanneer een segment van een functie niet oplicht of er verschijnen foutieve meldingen in een functie. Oplossing: a.- Haal de batterijen gedurende 15 seconden uit en plaats ze correct b.- Controleer of de batterijen geladen zijn Wanneer ze onvoldoende geladen zijn, vervang ze dan onmiddellijk. c.- Wanneer de voortgaande stappen geen oplossing bieden, vervang dan de elektronische monitor U dient direct zonlicht op de monitor te vermijden, omdat dit het vloeibaar kristal in het beeldscherm kan beschadigen. Zorg dat de monitor niet in aanraking komt met water en vermijd stoten. D. LICHAAMSTYPEN: Er bestaan 9 lichaamstypen naar gelang het berekende percentage lichaamsvet. TYPE 1 TYPE 2 TYPE 3 TYPE 4 TYPE 5 TYPE 6 TYPE 7 TYPE 8 TYPE 9 Intensief sportbeoefenende man Ideale sportbeoefenende man Zeer slank Sportbeoefenaar Ideale gezondheid Slank Te veel overgewicht Overgewicht Extreem overgewicht PROBLEEMOPLOSSER.Probleem: De display licht op en alleen de functie Tijd functioneert. Oplossing: a.- Controleer of de verbindingskabel juist is aangesloten. Probleem: De display licht niet op of de segmenten in de display worden slecht weergegeven. Oplossing: a.-Controleer of de batterijen correct geplaatst zijn. b.-Controleer of de batterijen geladen BH BEHOUDT ZICH HET RECHT VOOR DE PRODUCTSPECIFICATIES TE VERANDEREN ZONDER VOORAFGAAND BERICHT. 37 BH FITNESS SPAIN EXERCYCLE,S.L. (Manufacturer) P.O.BOX 195 01080 VITORIA (SPAIN) Tel.: +34 945 29 02 58 Fax: +34 945 29 00 49 e-mail: [email protected] www. bhfitness.com BH FITNESS PORTUGAL MAQUINASPORT, S.A. Zona Industrial Giesteira Terreirinho 3750-325 Agueda (PORTUGAL ) Tel.: +351 234 729 510 Fax: +351 234 729 519 BH FITNESS FRANCE Tel.: +33 (0)1429 61885 Fax: +33 (0)1429 66851 e-mail: [email protected] BH FITNESS UK Unit 1A Brittania Business Park Union Road, The Valley Bolton BL2 2HP UK Tel.: +44 (0)870 381 0277 Fax: +44 (0)870 381 0278 e-mail: [email protected] BH FITNESS ASIA No.139, Jhongshan Rd. Daya Township Taichung 428, Taiwan. R.O.C. Tel.: +886 4 25609200 Fax: +886 4 25609280 [email protected] BH FITNESS NORTH AMERICA 20155 Ellipse Foothill Ranch CA 92610 Tel:+ 1 949 206 0330 Fax:+1 949 206 0350 [email protected] www.bhnorthamerica.com BH FITNESS MEXICO BH Exercycle de México S.A. de CV Eje 132 / 136 Zona Industrial, 2A Secc. 78395 San Luis Potosi S:L:P: MEXICO Tel.: +52 (444) 824 00 29 Fax: +52 (444) 824 00 31 www.bh.com.mx BH SE RESERVA EL DERECHO A MODIFICAR LAS ESPECIFICACIONES DE SUS PRODUCTOS SIN PREVIO AVISO. SPECIFICATIONS MAY BE CHANGED WITHOUT PRIOR NOTICE DUE TO OUR PROGRAMME OF CONTINUOUS PRODUCT DEVELOPMENT. BH SE RÉSERVE LE DROIT DE MODIFIER LES SPECIFICATIONS DE SES PRODUITS SANS PRÉAVIS. BH BEHALT SICH DAS RECHT VOR, ÄNDERUNGEN DER MODELL-ANGABEN OHRE VORHERIGE ANKÜNDIGUNG VORZUNEHMEN. DATI TECNICI E COMMERCIALI RELATIVI AGLI ARTICOLI DEL PRESENTE CATALOGO POSSONO ESSERE SOGGETIL A VARIAZIONI SENZA ALGUN PREAVVISO. BH SE RESERVA O DIREITO A MODIFICAÇÀO ESPECIFICAÇOES DOS SEUS PRODUCTOS SEM PRÉVIO AVISO. DOOR KONSTANTE PRODUKTVERNIEUWING EN VERBETERING HOUDEN WIJ ONS HET RECHT VAN WIJZIGING VOOR ZONDER VOORAFGAAND BERICHT. V1-
 1
1
-
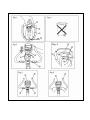 2
2
-
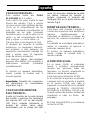 3
3
-
 4
4
-
 5
5
-
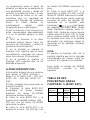 6
6
-
 7
7
-
 8
8
-
 9
9
-
 10
10
-
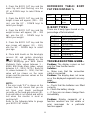 11
11
-
 12
12
-
 13
13
-
 14
14
-
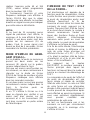 15
15
-
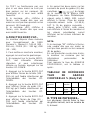 16
16
-
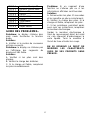 17
17
-
 18
18
-
 19
19
-
 20
20
-
 21
21
-
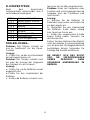 22
22
-
 23
23
-
 24
24
-
 25
25
-
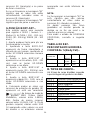 26
26
-
 27
27
-
 28
28
-
 29
29
-
 30
30
-
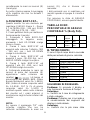 31
31
-
 32
32
-
 33
33
-
 34
34
-
 35
35
-
 36
36
-
 37
37
-
 38
38


En otros idiomas
- français: BH FITNESS H-283 Manuel utilisateur
- italiano: BH FITNESS H-283 Manuale utente
- English: BH FITNESS H-283 User manual
- Deutsch: BH FITNESS H-283 Benutzerhandbuch
- Nederlands: BH FITNESS H-283 Handleiding
- português: BH FITNESS H-283 Manual do usuário
Documentos relacionados
Otros documentos
-
Tunturi F20 El manual del propietario
-
Tunturi C20-R El manual del propietario
-
-
-
-
-
-
-
-
CARE FITNESS 55505 El manual del propietario