Danby DPA140HEAUWDB El manual del propietario
- Categoría
- Acondicionadores de aire móviles
- Tipo
- El manual del propietario
Este manual también es adecuado para

DANBY PRODUCTS LIMITED, ONTARIO, CANADA N1H 6Z9
DANBY PRODUCTS INC., FINDLAY, OHIO, USA 45840
OWNER’S MANUAL
MANUEL DU PROPRIÉTAIRE
MANUAL DEL PROPIETARIO
PORTABLE AIR CONDITIONER
Owner’s Manual.............................1 - 12
CLIMATISEUR PORTABLE
Manuel du propriétaire.................13 - 24
AIRE ACONDICIONADO PORTÁTIL
Manual del propietario.................25 - 36
MODEL • MODÈLE • MODELO
DPA140HEAUWDB
DPA140HEBUBDB
2017.11.23

Welcome
Welcome to the Danby family. We are proud of our quality products and we believe in
dependable service. We suggest that you read this owner’s manual before plugging in your new
appliance as it contains important operation information, safety information, troubleshooting and
maintenance tips to ensure the reliability and longevity of your appliance.
Visit www.Danby.com to access self service tools, FAQs and much more. For additional assistance
call 1-800-263-2629.
Note the information below; you will need this information to obtain service under warranty.
You must provide the original purchase receipt to validate your warranty and receive service.
Model Number: _________________________________________________
Serial Number: _________________________________________________
Date of Purchase: _______________________________________________
Need Help?
Before you call for service, here are a few things you can do to help us serve you better.
Read this owner’s manual:
It contains instructions to help you use and maintain your appliance properly.
If you receive a damaged appliance:
Immediately contact the retailer or builder that sold you the appliance.
Save time and money:
Check the troubleshooting section at the end of this manual before calling. This section
will help you solve common problems that may occur.
1-800-26- Danby
(1-800-263-2629)
1

SAFETY REQUIREMENTS
This appliance is not intended for use by persons
(including children) whose physical, sensory or
mental capabilities may be different or reduced,
or who lack experience or knowledge, unless such
persons receive supervision or training to operate
the appliance by a person responsible for their
safety.
Children should be supervised to ensure that they
do not play with the appliance.
To avoid risk of electric shock, do not operate this
appliance in an area that is likely to accumulate
standing water. If this condition develops, disconnect
the power supply before stepping into the water.
Do not store or use combustible materials such as
gasoline or other fl ammable vapors or liquids in the
vicinity of this or any other appliance.
Do not insert fi ngers or other objects into grills or
openings in the appliance.
Do not cover or block the intake and exhaust
openings.
Do not operate the appliance without the fi lter
installed.
Do not operate the appliance near heat sources.
This appliance is intended for indoor, residential
applications only. Do not use this appliance
outdoors. Do not use this appliance for commercial
or industrial applications.
If the air conditioner is transported on its back or
side, it must be allowed to stand upright for 6 hours
before plugging in to avoid damage to internal
components.
Keep the appliance away from walls, furniture and
curtains with a clearance of at least 30 cm (12
inches) on all sides.
GROUNDING INSTRUCTIONS
This appliance must be grounded. Grounding
reduces the risk of electrical shock by providing an
escape wire for the electrical current.
This appliance has a cord that has a grounding
wire with a 3-prong plug. The power cord must be
plugged into an outlet that is properly grounded.
If the outlet is a 2-prong wall outlet, it must be
replaced with a properly grounded 3-prong wall
outlet. The serial rating plate indicates the voltage
and frequency the appliance is designed for.
WARNING - Improper use of the grounding
plug can result in a risk of electric shock.
Consult a qualifi ed electrician or service agent
if the grounding instructions are not completely
understood, or if doubt exists as to whether the
appliance is properly grounded.
Do not connect the appliance to extension cords,
adapters or together with another appliance in the
same wall outlet.
Do not splice the power cord. Do not under any
circumstances cut or remove the third ground prong
from the power cord.
If the power supply cord is damaged, it must be
replaced by the manufacturer, its service agent or
similar qualifi ed person in order to avoid hazard.
Important Safety Information
READ AND FOLLOW ALL SAFETY INSTRUCTIONS
SAVE THESE INSTRUCTIONS!
2

INSTALLATION INSTRUCTIONS
3
ASSEMBLING THE WINDOW KIT
1. Attach the air outlet adapter and the window
slider adapter onto either end of the exhaust
hose.
2. Insert the air outlet adapter into the lower
groove of the air outlet on the back of the
appliance. Ensure that the hook of the adapter
is aligned with the hole seat of the air outlet and
then slide down
3. Measure the window opening where the window
kit will be installed. Assemble as many sliders as
necessary to fi t the window.
4. If the length of the window requires all three
sliders, use two bolts to fasten the sliders at the
correct length.
5. If the window opening is less than the minimum
length of a single slider, use the slider that has
the hole in it and cut it to the correct length.
Make sure not to cut the end that has the hole
as this is necessary to attach the exhaust hose
adapter.
2
3
1
REQUIRED TOOLS
1. Medium sized Phillips screwdriver
2. Tape measure or ruler
3. Knife or scissors
4. Saw (in the event that the window sliders need to
be cut to size)
ACCESSORIES
1. Air outlet adapter
2. Exhaust hose
3. Window slider adapter
4. Bolts
5. Window slider A
6. Window slider B and C
7. Caster locks
8. Foam seal A (adhesive)
9. Foam seal B (adhesive)
10. Foam seal C (non-adhesive)
11. Security bracket and 2 screws
12. Drain hose
13. Remote control
1
2
3
4
5
6
7
8
9
10
11
12
13

INSTALLATION INSTRUCTIONS
4
INSTALLING THE WINDOW KIT
There are two possible installation methods
depending on the available window type.
Hung Window Installation
1. Cut the adhesive foam seals A and B to the
correct length for the window. Attach them to the
window sash and frame as shown.
2. Insert the assembled window slider kit into the
window opening.
3. Cut the non-adhesive foal seal C to match
the width of the window. Insert the foam seal
between the glass and the window frame to
prevent air and insects from getting into the
room.
4. Install the security bracket in the window frame
with the two provided screws.
5. Attach the window slider adapter to the hole in
the window slider kit.
A
B
A
B
1
2
3
4
5
Note: Do not over extend or bend the hose as this
will impede air fl ow.

5
INSTALLATION INSTRUCTIONS
Sliding Window Installation
1. Cut the adhesive foam seals A and B to the
correct length for the window. Attach them to the
window sash and frame as shown.
2. Insert the assembled window slider kit into the
window opening.
3. Cut the non-adhesive foal seal C to match
the width of the window. Insert the foam seal
between the glass and the window frame to
prevent air and insects from getting into the
room.
4. Install the security bracket in the window frame
with the two provided screws.
5. Attach the window slider adapter to the hole in
the window slider kit.
B
B
A
A
1
2
3
4
5
Note: Do not over extend or bend the hose as this
will impede air fl ow.

OPERATING INSTRUCTIONS
FEATURES
Front
1. Control panel
2. Air outlet grill
3. LED display
4. Handle (both sides)
5. Air intake grill
6. Rollers
Rear
1. Air intake grill
2. Air outlet
3. Drain outlet
4. Power cord
LOCATION
Place the air conditioner on a smooth, level fl oor
that is strong enough to support it and all included
accessories.
Make sure the appliance is level to minimize noise
and vibration.
The appliance must be installed near a grounded
receptacle and the overfl ow drain outlet on the rear
of the appliance must be accessible.
Do not cover air inlets or outlets or the remote
control receiver on the control panel.
The appliance requires 30 cm (12 inches) of
clearance on the front and sides.
The appliance requires at least 50 cm (20 inches) of
clearance on the back.
6
1
2
3
4
5
6
1
2
3
4

OPERATING INSTRUCTIONS
CONTROL PANEL
1. Fan Button: Press to select fan speed; low,
medium, high.
2. Mode Button: Press to select the desired mode;
cool, dry, fan.
3. Power Button: Press to turn the appliance on or
off.
4. Up and Down Buttons:
• Used to adjust the set temperature in 1°
increments.
• Press and hold both up and down buttons for 3
seconds to change the temperature display from
°C to °F.
7
1
2
3
4
1
3
2
45
LED DISPLAY
1. Temperature and Timer Display: Shows the set
temperature of the timer setting.
2. Temperature Scale: Indicates whether the
temperature scale is set to °C or °F.
3. Timer Indicator: Illuminates if the timer is
activated.
4. Fan Speed Display: Shows the current fan speed
setting; low, med, high.
5. Mode Display: Shows the current mode; cool,
dry, fan.
REMOTE CONTROL
1. Fan Button: Press to select fan speed; low,
medium, high.
2. Swing Button: Press to start the auto swing
feature. When auto swing is activated, press
again to stop the louver at the desired angle.
3. Sleep: Press to start the sleep function.
4. Up and Down Buttons: Used to set the
temperature and timer.
5. Power Button: Press to turn the appliance on or
off.
6. Mode Button: Press to select the desired mode.
Modes will cycle in sequence with each press of
the button; cool, dry, fan.
7. Timer Button: Press to set the timer function.
8. °C/°F Button: Press to change the temperature
display from °C to °F.
1
2
3
4
5
6
7
8

Operating Modes
• Cool Mode
Choose cool mode to set the cooling function. Use
the up and down arrows to choose the desired
temperature. Press the fan button to adjust the fan
speed.
The temperature can be set within a range of 18 -
32°C (64 - 90°F).
The exhaust hose should be installed during cool
mode to ensure the best results.
• Dry Mode
Choose dry mode to remove excess moisture from
the air during periods of high humidity. All water
pulled from the air will collect inside the appliance
and evaporate due to the heat from the compressor.
In especially humid conditions, it may be necessary
to empty the drain pan when it becomes full. Press
the fan button to adjust the fan speed.
The exhaust hose should be installed during dry
mode to ensure the best results.
• Fan Mode
Choose fan mode to run the internal fan without
engaging the cooling function. Press the fan button
repeatedly to choose the fan speed, low, med, high.
• Heat Mode
Choose heat mode to set the heating function. Use
the up and down arrows to choose the desired
temperature. Press the fan button to adjust the fan
speed.
The temperature can be set within a range of 13 -
27°C (55 - 81°F).
OPERATING INSTRUCTIONS
Timer Function
To set the turn off timer:
1. Ensure the appliance is turned on.
2. Press the timer button, the time on the display
will fl ash.
3. Press the timer button to select the desired
amount of hours before the unit turns off.
To set the turn on timer:
1. Ensure the appliance is turned off.
2. Press the timer button, the time on the display
will fl ash.
3. Press the timer button to select the desired
amount of hours before the unit turns on.
Notes:
• The display will revert back to showing the
temperature setting if the appliance does not
receive a signal within a 5 second period during
programming.
• Turning the appliance on or off at any time
or adjusting the timer setting to 0.0 hours will
cancel the timer settings.
• The timer can be set between 1 - 24 hours.
Sleep Function
The sleep function can be used to conserve energy
during sleeping hours.
When selected, the set temperature will increase
by 2 degrees over a 2 hours period. The appliance
will hold the new set temperature for 7 hours before
automatically returning to normal operation.
The sleep function can be canceled at any time by
pressing the sleep button.
8

OPERATING INSTRUCTIONS
REPLACING THE REMOTE BATTERIES
The remote control will arrive with a CR2025 coin
battery pre-installed. It may be necessary to remove
a clear, plastic insulating strip before fi rst use of the
remote control.
Follow the steps below to replace the battery.
1. Use a screwdriver to remove the screw that
secures the battery cover.
2. Push the battery cover hook to the right to
release it from the remote control. Pull the
battery cover out.
9
IMPORTANT
Do not dispose of
batteries as unsorted
municipal waste. Refer
to local laws for proper
disposal of batteries.
Notes:
• The air conditioner will not respond if curtains,
doors or other materials block the signal from
the remote control to the appliance.
• If the infrared signal receiver on the indoor unit
is exposed to direct sunlight, the air conditioner
may not function properly. Use curtains to
prevent the sunlight from falling on the receiver.
• Do not allow the remote control to get wet.
• Do not expose the remote control to direct
sunlight or heat.
• Do not leave the battery in the remote control
if it is not going to be used for more than 2
months.
1
2
WATER DRAINAGE
When the internal drain pan becomes full the
appliance will beep 8 times and the digital display
will show error code P1. The air conditioning or
dehumidifying action will stop but the fan may
continue to operate.
Follow the steps below to drain the appliance.
1. Turn the appliance off and unplug it from the
power source.
2. Carefully move the appliance to a location
where the water can be drained.
3. Remove the drain plug and allow the water to
completely drain.
4. Replace the bottom drain plug, pressing fi rmly to
ensure a tight fi t and no leaks.
5. The P1 error symbol will disappear and the
appliance will resume regular function once
power is restored.

10
CLEANING
• Unplug the appliance before cleaning or
servicing.
• Clean the cabinet with a lukewarm damp cloth
and neutral detergent. Dry the cabinet with a
lint-free dry cloth.
• Do not use gasoline, paint thinner or other
chemicals to clean the appliance.
• Do not wash the appliance directly under a tap
or using a hose. It may cause electrical damage.
LONG-TERM STORAGE
1. Drain all water from the appliance.
2. Run the appliance on fan mode for half a day in
a warm room to dry the inside of the appliance
and prevent mold formation.
3. Turn off the appliance and unplug it, wrap the
cord and bundle it with tape.
4. Remove the battery from the remote control.
5. Clean the air fi lters and reinstall them.
6. Store the appliance in a cool, dark place.
Prolonged exposure to direct sunlight or extreme
heat can shorten the lifespan of the appliance.
DISPOSAL
This appliance should not be treated as regular
household waste. Check for local regulatory
compliance regarding the approved and safe
disposal of this appliance.
ERROR CODES
E1 - room temperature sensor error
E2 - evaporator temperature sensor error
E3 - condenser temperature sensor error
E4 - display panel communication error
E7 - zero crossing malfunction
P1 - water tray is full - attach drain hose and drain
excess water
CARE & MAINTENANCE
AIR FILTERS
There are three air fi lters in this appliance. Air
fi lters should be cleaned every two weeks to ensure
effi cient performance.
In households with animals, the air fi lters may need
to be cleaned more often and the external grills may
need to be wiped to prevent blocked air fl ow.
1
2
3

TROUBLESHOOTING
Danby Consumer Care: 1-800-263-2629
Hours of operation:
Monday to Thursday 8:30 am - 6:00 pm Eastern Standard Time
Friday 8:30 am - 4:00 pm Eastern Standard Time
Information in this manual is subject to change without notice.
PROBLEM POSSIBLE CAUSE
Appliance will not operate • Plug is not fully inserted into the wall outlet
• Blown fuse or circuit breaker
Insuffi cient cooling • Air fi lters are dirty
• Blocked air fl ow
• Appliance size is too small for application
Noise • The ground is not level
• Air fi lters are dirty
• Gurgling sounds are normal; this is the refrigerant moving inside
the appliance
Odors • Formation of mold or mildew on internal wet surfaces
• Place an algaecide tablet in base pan; push the tablet through
the grill on the back of the appliance
11

LIMITED IN-HOME APPLIANCE WARRANTY
This quality product is warranted to be free from manufacturer’s defects in material and workmanship, provided that the unit is used under the normal operating
conditions intended by the manufacturer.
This warranty is available only to the person to whom the unit was originally sold by Danby Products Limited (Canada) or Danby Products Inc. (U.S.A.) (hereafter
“Danby”) or by an authorized distributor of Danby, and is non-transferable.
TERMS OF WARRANTY
Plastic parts, are warranted for thirty (30) days only from purchase date, with no extensions provided.
First Year
During the rst twelve (12) months, any functional parts of this product found to be defective, will be repaired or replaced, at warrantor’s
option, at no charge to the ORIGINAL purchaser.
To obtain
Danby reserves the right to limit the boundaries of “In Home Service” to the proximity of an Authorized Service Depot. Any app liance
Service
requiring service outside the limited boundaries of “In Home Service” , it will be the consumer’s responsibility to transport the appliance (at
their own expense) to the original retailer (point of purchase) or a service depot for repair. See “Boundaries of In Home Serv ice” below.
Contact your dealer from whom your unit was purchased, or contact your nearest authorized Danby service depot, where service
must be performed by a qualied service technician.
If service is performed on the units by anyone other than an authorized service depot, or the unit is used for commercial appli cation, all
obligations of Danby under this warranty shall be void.
Boundaries of
If the appliance is installed in a location that is 100 kilometers (62 miles) or more from the nearest service center your unit must be
In Home Service
delivered to the nearest authorized Danby Service Depot, as service must only be performed by a technician qualied and certif ied for
warranty service by Danby. Transportation charges to and from the service location are not protected by this warranty and are t he
responsibility of the purchaser.
Nothing within this warranty shall imply that Danby will be responsible or liable for any spoilage or damage to food or other c ontents of this appliance, whether due
to any defect of the appliance, or its use, whether proper or improper.
EXCLUSIONS
Save as herein provided, Danby, there are no other warranties, conditions, representations or guarantees, express or implied, m ade or intended by Danby or its
authorized distributors and all other warranties, conditions, representations or guarantees, including any warranties, conditio ns, representations or guarantees
under any Sale of Goods Act or like legislation or statue is hereby expressly excluded. Save as herein provided, Danby shall no t be responsible for any damages
to persons or property, including the unit itself, howsoever caused or any consequential damages arising from the malfunction o f the unit and by the purchase of
the unit, the purchaser does hereby agree to indemnify and hold harmless Danby from any claim for damages to persons or propert y caused by the unit.
GENERAL PROVISIONS
No warranty or insurance herein contained or set out shall apply when damage or repair is caused by any of the following:
1) Power failure.
2) Damage in transit or when moving the appliance.
3) Improper power supply such as low voltage, defective house wiring or inadequate fuses.
4) Accident, alteration, abuse or misuse of the appliance such as inadequate air circulation in the room or abnormal operating con ditions
(extremely high or low room temperature).
5) Use for commercial or industrial purposes (ie. If the appliance is not installed in a domestic residence).
6) Fire, water damage, theft, war, riot, hostility, acts of God such as hurricanes, oods etc.
7) Service calls resulting in customer education.
8) Improper Installation (ie. Building-in of a free standing appliance or using an appliance outdoors that is not approved for out door application).
Proof of purchase date will be required for warranty claims; so, please retain bills of sale. In the event warranty service is required, present this document to our
AUTHORIZED SERVICE DEPOT.
Danby Products Limited
PO Box 1778, Guelph, Ontario, Canada N1H 6Z9
Telephone: (519) 837-0920 FAX: (519) 837-0449
Danby Products Inc.
PO Box 669, Findlay, Ohio, U.S.A. 45840
Telephone: (419) 425-8627 FAX: (419) 425-8629
04/09
1-800-263-2629
Warranty Service
In-home
Danby reserves the right to limit the boundaries of “In Home Service” to the proximity of an authorized service
depot. Any appliance requiring service outside the limited boundaries of “In Home Service”, will be the consumer’s
responsibility to transport at their own expense to the original point of purchase or a service depot for repair. If the
appliance is installed in a location that is 100 kilometers (62 miles) or more from the nearest service center, it must
be delivered to the nearest authorized Danby Service Depot by the purchaser.
Transportation charges to and from the service location are not protected by this warranty and are the
responsibility of the purchaser.
During the first twelve (12) months, any functional parts of this product found to be defective, will be repaired or
replaced, at warrantor’s option, at no charge to the original purchaser.
Contact the dealer where the unit was purchased, or contact the nearest authorized Danby service depot, where
service must be performed by a qualified service technician. If service is performed on the unit by anyone other
than an authorized service depot, all obligations of Danby under this warranty shall be void.
First 12 months
To obtain service
Boundaries of
in-home service
LIMITED “IN HOME” WARRANTY
This quality product is warranted to be free from manufacturer’s defects in material and workmanship, provided that the unit is used
under the normal operating conditions intended by the manufacturer.
This warranty is available only to the person to whom the unit was originally sold by Danby Products Limited (Canada) or Danby
Products Inc. (U.S.A.) (hereafter “Danby”) or by an authorized distributor of Danby, and is non-transferable.
TERMS OF WARRANTY
Plastic parts are warranted for thirty (30) days from the date of purchase, with no extensions provided.
Nothing within this warranty shall imply that Danby will be responsible or liable for any spoilage or damage to food or other
contents of this appliance, whether due to any defect of the appliance, or its use, whether proper or improper.
EXCLUSIONS
Save as herein provided, by Danby, there are no other warranties, conditions, representations or guarantees, express or implied, made
or intended by Danby or its authorized distributors and all other warranties, conditions, representations or guarantees, including any
warranties, conditions, representations or guarantees under any Sale of Goods Act or like legislation or statute is hereby expressly
excluded. Save as herein provided, Danby shall not be responsible for any damages to persons or property, including the unit itself,
howsoever caused or any consequential damages arising from the malfunction of the unit and by the purchase of the unit, the
purchaser does hereby agree to indemnify and hold harmless Danby from any claim for damages to persons or property caused by
the unit.
GENERAL PROVISIONS
No warranty or insurance herein contained or set out shall apply when damage or repair is caused by any of the following:
1) Power failure.
2) Damage in transit or when moving the appliance.
3) Improper power supply such as low voltage, defective house wiring or inadequate fuses.
4) Accident, alteration, abuse or misuse of the appliance such as inadequate air circulation in the room or abnormal operating
conditions (ie. extremely high or low room temperature).
5) Use for commercial or industrial purposes (ie. If the appliance is not installed in a domestic residence).
6) Fire, water damage, theft, war, riot, hostility, acts of God such as hurricanes, floods etc.
7) Service calls resulting in customer education.
8) Improper Installation (ie. Building-in of a free standing appliance or using an appliance outdoors that is not approved for outdoor
application, including but not limited to: garages, patios, porches or anywhere that is not properly insulated or climate controlled).
Proof of purchase date will be required for warranty claims; retain bills of sale. In the event that warranty service is required, present
the proof of purchase to our authorized service depot.
Warranty Service
In Home
Danby Products Limited
PO Box 1778, Guelph, Ontario, Canada N1H 6Z9
Telephone: (519) 837-0920 FAX: (519) 837-0449
Danby Products Inc.
PO Box 669, Findlay, Ohio, U.S.A. 45840
Telephone: (419) 425-8627 FAX: (419) 425-8629
1-800-263-2629
04/17

13
Bienvenue
Bienvenue à la famille Danby. Nous sommes fi ers de la qualité de nos produits et nous croyons
en le service fi able. Nous vous suggérons de lire ce manual d’utilisation avant de brancher
votre nouvel appareil car il contient des informations inportantes sur l’utilisation, la sécurité, le
dépannage et la maintenance, afi n d’assurer la fi abilité et la longévité de votre appareil.
Visitez www.Danby.com pour accéder aux outils d’autoservice, aux FAQ et bien plus encore. Pour
obtenir de l’aide supplémentaire, composez 1-800-263-2629.
Notez les informations ci-dessous; Vous aurez besoin de cette information pour obtenir un
service sous garantie.
Vous devez fournir le reçu d’achat original pour valider votre garantie et recevoir le service.
Numéro de modèle: _____________________________________________
Numéro de serie: _______________________________________________
Date d’achat: __________________________________________________
Besoin d’assistance?
Avant d’appeler pour service, voici quelques choses que vous pouvez faire pour nous
aider à mieux vous servir.
Lire ce manuel du propriétaire:
Il contient des instructions pour vous aider à utiliser et à maintenir votre appareil
correctement.
Si vous recevez un appareil endommagé:
Contactez immédiatement le revendeur ou l’entrepreneur qui vous a vendu l’appareil.
Gagnez du temps et de l’argent:
Avant d’appeler pour service, consultez la section de dépannage à la fi n de ce manuel.
Cette section vous aidera à résoudre les problèmes courants pouvant survenir.
1-800-26- Danby
(1-800-263-2629)

EXIGENCES DE SÉCURITÉ
Cet appareil n’est pas destiné à être utilisé par
des personnes (y compris des enfants) dont les
capacités physiques, sensorielles ou mentales
peuvent être différentes ou réduites, ou qui n’ont
pas d’expérience ou de connaissances, à moins
que ces personnes ne soient surveillées ou formées
pour faire fonctionner l’appareil par une personne
responsable de leur sécurité.
Les enfants devraient être surveillés pour s’assurer
qu’ils ne jouent pas avec l’appareil.
Pour éviter tout risque de choc électrique, ne pas
utiliser cet appareil dans une zone susceptible
d’accumuler de l’eau stagnante. Si cette condition
se développe, débranchez l’alimentation avant de
pénétrer dans l’eau.
Ne pas stocker ou utiliser des matériaux
combustibles tels que de l’essence ou d’autres
vapeurs ou liquides infl ammables à proximité de ce
ou d’un autre appareil.
Ne pas insérer de doigts ou d’autres objets dans
des grilles ou des ouvertures dans l’appareil.
Ne pas couvrir ou bloquer les ouvertures
d’admission et d’échappement.
N’utilisez pas l’appareil sans le fi ltre installé.
N’utilisez pas l’appareil à proximité de sources de
chaleur.
Cet appareil est destiné uniquement à des
applications résidentielles et intérieures. N’utilisez
pas cet appareil à l’extérieur. N’utilisez pas cet
appareil pour des applications commerciales ou
industrielles.
Si le climatiseur est transporté sur son dos
ou sur son côté, il doit être maintenu debout
pendant 6 heures avant de brancher pour éviter
d’endommager les composants internes.
Gardez l’appareil à l’écart des murs, des meubles
et des rideaux avec un jeu d’au moins 30 cm (12
pouces) sur tous les côtés.
INSTRUCTIONS DE MISE À LA TERRE
Cet appareil doit être mis à la terre. La mise à
la terre réduit le risque de choc électrique en
fournissant un câble d’échappement pour le courant
électrique.
Cet appareil possède un cordon doté d’un fi l de
mise à la terre avec une fi che à 3 broches. Le
cordon d’alimentation doit être branché sur une
prise correctement mise à la terre. Si la sortie
est une prise murale à 2 broches, elle doit être
remplacée par une prise murale à 3 broches
correctement mise à la terre. La plaque signalétique
en série indique la tension et la fréquence
auxquelles l’appareil est conçu.
AVERTISSEMENT - L’utilisation incorrecte de la
fi che de mise à la terre peut entraîner un risque
d’électrocution. Consultez un électricien qualifi é
ou un agent de service si les instructions de mise
à la terre ne sont pas complètement comprises ou
s’il existe un doute quant à savoir si l’appareil est
correctement mis à la terre.
Ne branchez pas l’appareil à des rallonges, des
adaptateurs ou à un autre appareil dans la même
prise murale.
Ne pas épisser le cordon d’alimentation. Ne coupez
ou retirez en aucun cas la troisième broche du
cordon d’alimentation.
Si le cordon d’alimentation est endommagé, il
doit être remplacé par le fabricant, son agent de
maintenance ou une personne qualifi ée similaire
afi n d’éviter tout risque.
Informations importantes de sécurité
LIRE ET SUIVRE TOUTES LES INSTRUCTIONS DE SÉCURITÉ
GARDEZ CES INSTRUCTIONS!
14

INSTRUCTIONS D’INSTALLATION
15
ASSEMBLAGE DU TROUSSE DE FENÊTRE
1. Fixez l’adaptateur de sortie d’air et l’adaptateur
de glissière de fenêtre sur l’extrémité du tuyau
d’échappement.
2. Insérez l’adaptateur de sortie d’air dans la
rainure inférieure de la sortie d’air à l’arrière
de l’appareil. Assurez-vous que le crochet de
l’adaptateur est aligné avec le siège du trou de
la sortie d’air, puis faites-le glisser vers le bas
3. Mesurez l’ouverture de la fenêtre où le kit
de fenêtre sera installé. Assembler autant de
curseurs que nécessaire pour s’adapter à la
fenêtre.
4. Si la longueur de la fenêtre nécessite les trois
curseurs, utilisez deux boulons pour fi xer les
curseurs à la bonne longueur.
5. Si l’ouverture de la fenêtre est inférieure à la
longueur minimale d’un seul curseur, utilisez
le curseur qui contient le trou et coupez-le
à la longueur correcte. Assurez-vous de ne
pas couper l’extrémité qui a le trou car il est
nécessaire d’attacher l’adaptateur de tuyau
d’échappement.
2
3
1
OUTILS REQUIS
1. Tournevis Phillips de taille moyenne
2. Ruban à mesurer ou règle
3. Couteau ou ciseaux
4. Scie (dans le cas où les curseurs de fenêtre
doivent être coupés en taille)
ACCESSORIES
1. Adaptateur de sortie d’air
2. Tuyau d’échappement
3. Adaptateur de curseur de fenêtre
4. Boulons
5. Curseur de la fenêtre A
6. Curseur de fenêtre B et C
7. Verrous de roulette
8. Joint en mousse A (adhésif)
9. Joint en mousse B (adhésif)
10. Joint en mousse C (non adhésif)
11. Support de sécurité et 2 vis
12. Tuyau de drainage
13. Télécommande
1
2
3
4
5
6
7
8
9
10
11
12
13

INSTRUCTIONS D’INSTALLATION
16
INSTALLATION DU TROUSSE DE FENÊTRE
Il existe deux méthodes d’installation possibles en
fonction du type de fenêtre disponible.
Installation dans une fenêtre à guillotine
1. Couper les joints de mousse adhésive A et B à la
longueur correcte pour la fenêtre. Fixez-les sur
le cadre de la fenêtre et l’image comme indiqué.
2. Insérez le kit de curseur de fenêtre assemblé
dans l’ouverture de la fenêtre.
3. Couper le joint d’étanchéité du pétre non
adhésif C pour correspondre à la largeur de la
fenêtre. Insérez le joint en mousse entre le verre
et le cadre de la fenêtre pour éviter que l’air et
les insectes ne pénètrent dans la pièce.
4. Installez le support de sécurité dans le cadre de
la fenêtre avec les deux vis fournies.
5. Fixez l’adaptateur du curseur de fenêtre au trou
dans le kit de curseur de fenêtre.
Remarque: Ne pas trop étendre ni plier le tuyau,
car cela entravera le fl ux d’air.
A
B
A
B
1
2
3
4
5

17
INSTRUCTIONS D'INSTALLATION
Installation dans une fenêtre coulissante
1. Couper les joints de mousse adhésive A et B à la
longueur correcte pour la fenêtre. Fixez-les sur
le cadre de la fenêtre et l’image comme indiqué.
2. Insérez le kit de curseur de fenêtre assemblé
dans l’ouverture de la fenêtre.
3. Couper le joint d’étanchéité du pétre non
adhésif C pour correspondre à la largeur de la
fenêtre. Insérez le joint en mousse entre le verre
et le cadre de la fenêtre pour éviter que l’air et
les insectes ne pénètrent dans la pièce.
4. Installez le support de sécurité dans le cadre de
la fenêtre avec les deux vis fournies.
5. Fixez l’adaptateur du curseur de fenêtre au trou
dans le kit de curseur de fenêtre.
Remarque: Ne pas trop étendre ni plier le tuyau,
car cela entravera le fl ux d’air.
B
B
A
A
1
2
3
4
5

INSTRUCTIONS D’UTILISATION
EMPLACEMENT
Placez le climatiseur sur un plancher lisse et plat
qui est assez solide pour le supporter et tous les
accessoires inclus.
Assurez-vous que l’appareil est à niveau pour
minimiser les bruits et les vibrations.
L’appareil doit être installé près d’une prise de
mise à la terre et la sortie de vidange à l’arrière de
l’appareil doit être accessible.
Ne pas couvrir les entrées d’air ou les prises de
courant ou le récepteur de la télécommande sur le
panneau de commande.
L’appareil nécessite un dégagement de 30 cm (12
pouces) sur le devant et sur les côtés.
L’appareil nécessite au moins 50 cm (20 pouces) de
dégagement sur le dos.
18
CARACTÉRISTIQUES
Avant
1. Panneau de contrôle
2. Grille de sortie d’air
3. Affi chage LED
4. Poignée (des deux côtés)
5. Grille d’admission d’air
6. Rouleaux
Arrière
1. Grille d’admission d’air
2. Sortie d’air
3. Sortie de vidange
4. Cordon d’alimentation
1
2
3
4
5
6
1
2
3
4

INSTRUCTIONS D’UTILISATION
19
PANNEAU DE CONTRÔLE
1. Bouton du ventilateur: Appuyez pour
sélectionner la vitesse du ventilateur; bas,
moyen, haut.
2. Bouton de mode: Appuyez pour sélectionner le
mode désiré; frais, sec, ventilateur.
3. Bouton d’alimentation: Appuyez pour allumer
ou éteindre l’appareil.
4. Boutons haut et bas:
• Utilisé pour ajuster la température de consigne
par incréments de 1°.
• Appuyez et maintenez les deux boutons haut
et bas pendant 3 secondes pour changer
l’affi chage de la température de °C à °F.
1
2
3
4
1
3
2
45
AFFICHAGE LED
1. Affi chage de la température et de la minuterie:
Affi che la température réglée du réglage de la
minuterie.
2. Échelle de température: Indique si l’échelle de
température est réglée sur °C ou °F.
3. Indicateur de minuterie: S’allume si la minuterie
est activée.
4. Affi chage de la vitesse du ventilateur: Affi che le
réglage actuel de la vitesse du ventilateur; bas,
med, haut.
5. Affi chage du mode: Affi che le mode actuel
frais, sec, ventilateur.
TÉLÉCOMMANDE
1. Bouton du ventilateur: Appuyez pour
sélectionner la vitesse du ventilateur; bas,
moyen, haut.
2. Bouton d’oscillation: Appuyez sur pour
démarrer la fonction d’oscillation automatique.
Lorsque le oscillation automatique est activé,
appuyez à nouveau pour arrêter le persienne à
l’angle souhaité.
3. Bouton de dormir: Appuyez sur pour démarrer
la fonction de dormir.
4. Boutons haut et bas: Utilisé pour régler la
température et la minuterie.
5. Bouton d’alimentation: Appuyez pour allumer
ou éteindre l’appareil.
6. Bouton de mode: Appuyez pour sélectionner le
mode désiré; frais, sec, ventilateur.
7. Bouton de minuterie: Appuyez sur pour régler
la fonction de minuterie.
8. Bouton de °C/°F: Appuyez sur pour changer
l’affi chage de la température de °C à °F.
1
2
3
4
5
6
7
8

Modes de fonctionnement
• Mode refroidissement (Cool)
Choisissez le mode cool pour régler la fonction
de refroidissement. Utilisez les fl èches haut et bas
pour choisir la température désirée. Appuyez sur
le bouton du ventilateur pour régler la vitesse du
ventilateur.
La température peut être réglée dans une plage de
18 à 32°C (64 à 90°F).
Le tuyau d’échappement doit être installé en mode
froid pour assurer les meilleurs résultats.
• Mode sec (Dry)
Choisissez le mode sec pour éliminer l’excès
d’humidité de l’air pendant les périodes de forte
humidité. Toute l’eau tirée de l’air va s’accumuler
à l’intérieur de l’appareil et s’évaporer à cause de
la chaleur du compresseur. Dans des conditions
particulièrement humides, il peut être nécessaire
de vider le bac de récupération lorsqu’il est plein.
Appuyez sur le bouton du ventilateur pour régler la
vitesse du ventilateur.
Le tuyau d’échappement doit être installé en mode
sec pour assurer les meilleurs résultats.
• Mode ventilateur (Fan)
Choisissez le mode ventilateur pour faire
fonctionner le ventilateur interne sans engager la
fonction de refroidissement. Appuyez plusieurs fois
sur le bouton du ventilateur pour choisir la vitesse
du ventilateur, faible, moyenne ou élevée.
• Mode de chauffage (Heat)
Choisissez le mode de chauffage pour régler la
fonction de chauffage. Utilisez les fl èches haut et
bas pour choisir la température désirée. Appuyez
sur le bouton du ventilateur pour régler la vitesse du
ventilateur.
La température peut être réglée entre 13 à 27°C (55
à 81°F).
INSTRUCTIONS D’UTILISATION
20
Fonction de minuterie
Pour régler la minuterie d’extinction:
1. Assurez-vous que l’appareil est allumé.
2. Appuyez sur le bouton de la minuterie, l’heure
sur l’écran clignotera.
3. Appuyez sur le bouton de la minuterie pour
sélectionner le nombre d’heures désiré avant
que l’appareil s’éteigne.
Pour régler le minuteur d’activation:
1. Assurez-vous que l’appareil est éteint.
2. Appuyez sur le bouton de la minuterie, l’heure
sur l’écran clignotera.
3. Appuyez sur le bouton de la minuterie pour
sélectionner le nombre d’heures désiré avant
que l’appareil s’allume.
Remarques:
• L’affi chage revient à l’affi chage du réglage de la
température si l’appareil ne reçoit pas de signal
pendant une période de 5 secondes pendant la
programmation.
• Allumer ou éteindre l’appareil à tout moment ou
ajuster le réglage de la minuterie à 0,0 heure
annulera les réglages de la minuterie.
• La minuterie peut être réglée entre 1 et 24
heures.
Fonction de dormir
La fonction de dormir peut être utilisée pour
conserver l’énergie pendant les heures de dormir.
Lorsqu’elle est sélectionnée, la température réglée
augmentera de 2 degrés sur une période de 2
heures. L’appareil maintient la nouvelle température
réglée pendant 7 heures avant de revenir au
fonctionnement normal.
La fonction de dormir peut être annulée à tout
moment en appuyant sur le bouton de dormir.

INSTRUCTIONS D’UTILISATION
21
IMPORTANT
Ne pas jeter les piles
en tant que déchets
municipaux non
triés. Reportez-vous
aux lois locales pour
l’élimination correcte
des piles.
REMPLACEMENT DES PILES DE LA
TÉLÉCOMMANDE
La télécommande arrivera avec une pile bouton
CR2025 préinstallée. Il peut être nécessaire de
retirer une bande isolante transparente en plastique
avant la première utilisation de la télécommande.
1. Suivez les étapes ci-dessous pour remplacer la
batterie.
2. Utilisez un tournevis pour retirer la vis qui fi xe
le couvercle de la batterie. Poussez le crochet
du couvercle de la batterie vers la droite pour le
libérer de la télécommande. Retirez le couvercle
de la batterie.
Remarques:
• Le climatiseur ne répondra pas si des rideaux,
des portes ou d’autres matériaux bloquent le
signal de la télécommande vers l’appareil.
• Si le récepteur de signal infrarouge sur l’unité
intérieure est exposé à la lumière directe du
soleil, le climatiseur peut ne pas fonctionner
correctement. Utilisez des rideaux pour
empêcher la lumière du soleil de tomber sur le
récepteur.
• Ne laissez pas la télécommande se mouiller.
• N’exposez pas la télécommande à la lumière
directe du soleil ou à la chaleur.
• Ne laissez pas la batterie dans la télécommande
si elle ne va pas être utilisée pendant plus de 2
mois.
1
2
DRAINAGE DE L’EAU
Lorsque le bac de vidange interne est plein,
l’appareil émet 8 bips et l’affi cheur numérique
affi che le code d’erreur P1. L’action de climatisation
ou de déshumidifi cation s’arrête, mais le ventilateur
peut continuer à fonctionner.
Suivez les étapes ci-dessous pour vider l’appareil.
1. Éteignez l’appareil et débranchez-le de la
source d’alimentation.
2. Déplacez soigneusement l’appareil dans un
endroit où l’eau peut être vidangée.
3. Retirez le bouchon de vidange et laissez l’eau
s’écouler complètement.
4. Replacez le bouchon de vidange inférieur, en
appuyant fermement pour assurer un ajustement
serré et sans fuites.
5. Le symbole d’erreur P1 disparaîtra et l’appareil
reprendra sa fonction normale une fois le
courant rétabli.

22
NETTOYAGE
• Débranchez l’appareil avant de le nettoyer ou
de l’entretenir.
• Nettoyez le boîtier avec un chiffon humide tiède
et un détergent neutre. Séchez le boîtier avec un
chiffon sec non pelucheux.
• N’utilisez pas d’essence, de diluant à peinture
ou d’autres produits chimiques pour nettoyer
l’appareil.
• Ne pas laver l’appareil directement sous un
robinet ou avec un tuyau. Cela pourrait causer
des dommages électriques.
STOCKAGE À LONG TERME
1. Vidangez toute l’eau de l’appareil.
2. Faites fonctionner l’appareil en mode ventilateur
pendant une demi-journée dans une pièce
chaude pour sécher l’intérieur de l’appareil et
éviter la formation de moisissure.
3. Éteignez l’appareil et débranchez-le, envelopper
le cordon et l’attacher avec du ruban adhésif.
4. Retirez la batterie de la télécommande.
5. Nettoyez les fi ltres à air et réinstallez-les.
6. Rangez l’appareil dans un endroit frais et
sombre. Une exposition prolongée à la lumière
directe du soleil ou à une chaleur extrême peut
réduire la durée de vie de l’appareil.
DISPOSITION
Cet appareil ne doit pas être traité comme un
déchet ménager ordinaire. Vérifi ez la conformité
réglementaire locale concernant l’élimination
approuvée et sûre de cet appareil.
CODES D’ERREUR
E1 - erreur du capteur de température ambiante
E2 - erreur du capteur de température de
l’évaporateur
E3 - erreur du capteur de température du
condenseur
E4 - erreur de communication du panneau
d’affi chage
E7 - Dysfonctionnement du passage à zéro
P1 - Bac à eau plein - Fixez le tuyau de vidange et
vidangez l’excès d’eau
FILTRES À AIR
Il y a trois fi ltres à air dans cet appareil. Les fi ltres
à air doivent être nettoyés toutes les deux semaines
pour assurer une performance effi cace.
Dans les ménages avec des animaux, les fi ltres à
air doivent être nettoyés plus souvent et les grilles
externes doivent être essuyées pour empêcher le fl ux
d’air bloqué.
1
2
3
SOINS ET MAINTENANCE

DÉPANNAGE
PROBLEME CAUSE POSSIBLE
L’appareil ne fonctionnera pas • La fi che n’est pas complètement insérée dans la prise murale
• Fusible souffl é ou disjoncteur
Refroidissement insuffi sant • Les fi ltres à air sont sales
• Flux d’air bloqué
• La taille de l’appareil est trop petite pour l’application
Bruit • Le terrain n’est pas au niveau
• Les fi ltres à air sont sales
• Les sons de gargouille sont normaux; c’est le fl uide frigorigène
qui se déplace à l’intérieur de l’appareil
Odeurs • Formation de moisissure sur des surfaces intérieures humides
• Placer un comprimé d’algaïcide dans un moule de base;
enfoncer la tablette à travers la grille à l’arrière de l’appareil
23
Danby soins du consommateur: 1-800-263-2629
Heures d’ouverture:
Lundi à Jeudi 8 h 30 à 18 h, heure normale de l’Est
Vendredi de 8 h 30 à 16 h, heure normale de l’Est
Les informations contenues dans ce manuel sont sujettes à modifi cation sans préavis.

LIMITED IN-HOME APPLIANCE WARRANTY
This quality product is warranted to be free from manufacturer’s defects in material and workmanship, provided that the unit is used under the normal operating
conditions intended by the manufacturer.
This warranty is available only to the person to whom the unit was originally sold by Danby Products Limited (Canada) or Danby Products Inc. (U.S.A.) (hereafter
“Danby”) or by an authorized distributor of Danby, and is non-transferable.
TERMS OF WARRANTY
Plastic parts, are warranted for thirty (30) days only from purchase date, with no extensions provided.
First Year
During the rst twelve (12) months, any functional parts of this product found to be defective, will be repaired or replaced, at warrantor’s
option, at no charge to the ORIGINAL purchaser.
To obtain
Danby reserves the right to limit the boundaries of “In Home Service” to the proximity of an Authorized Service Depot. Any app liance
Service
requiring service outside the limited boundaries of “In Home Service” , it will be the consumer’s responsibility to transport the appliance (at
their own expense) to the original retailer (point of purchase) or a service depot for repair. See “Boundaries of In Home Serv ice” below.
Contact your dealer from whom your unit was purchased, or contact your nearest authorized Danby service depot, where service
must be performed by a qualied service technician.
If service is performed on the units by anyone other than an authorized service depot, or the unit is used for commercial appli cation, all
obligations of Danby under this warranty shall be void.
Boundaries of
If the appliance is installed in a location that is 100 kilometers (62 miles) or more from the nearest service center your unit must be
In Home Service
delivered to the nearest authorized Danby Service Depot, as service must only be performed by a technician qualied and certif ied for
warranty service by Danby. Transportation charges to and from the service location are not protected by this warranty and are t he
responsibility of the purchaser.
Nothing within this warranty shall imply that Danby will be responsible or liable for any spoilage or damage to food or other c ontents of this appliance, whether due
to any defect of the appliance, or its use, whether proper or improper.
EXCLUSIONS
Save as herein provided, Danby, there are no other warranties, conditions, representations or guarantees, express or implied, m ade or intended by Danby or its
authorized distributors and all other warranties, conditions, representations or guarantees, including any warranties, conditio ns, representations or guarantees
under any Sale of Goods Act or like legislation or statue is hereby expressly excluded. Save as herein provided, Danby shall no t be responsible for any damages
to persons or property, including the unit itself, howsoever caused or any consequential damages arising from the malfunction o f the unit and by the purchase of
the unit, the purchaser does hereby agree to indemnify and hold harmless Danby from any claim for damages to persons or propert y caused by the unit.
GENERAL PROVISIONS
No warranty or insurance herein contained or set out shall apply when damage or repair is caused by any of the following:
1) Power failure.
2) Damage in transit or when moving the appliance.
3) Improper power supply such as low voltage, defective house wiring or inadequate fuses.
4) Accident, alteration, abuse or misuse of the appliance such as inadequate air circulation in the room or abnormal operating con ditions
(extremely high or low room temperature).
5) Use for commercial or industrial purposes (ie. If the appliance is not installed in a domestic residence).
6) Fire, water damage, theft, war, riot, hostility, acts of God such as hurricanes, oods etc.
7) Service calls resulting in customer education.
8) Improper Installation (ie. Building-in of a free standing appliance or using an appliance outdoors that is not approved for out door application).
Proof of purchase date will be required for warranty claims; so, please retain bills of sale. In the event warranty service is required, present this document to our
AUTHORIZED SERVICE DEPOT.
Danby Products Limited
PO Box 1778, Guelph, Ontario, Canada N1H 6Z9
Telephone: (519) 837-0920 FAX: (519) 837-0449
Danby Products Inc.
PO Box 669, Findlay, Ohio, U.S.A. 45840
Telephone: (419) 425-8627 FAX: (419) 425-8629
04/09
1-800-263-2629
Warranty Service
In-home
S’adresser au détaillant qui a vendu l’appareil, ou à la station technique agréée de service la plus proche, où
les réparations doivent être effectuées par un technicien qualifié. Si les réparations sont effectuées par
quiconque autre que la station de service agréée où à des fins commerciales, toutes les obligations de Danby
en vertu de cette garantie seront annulées.
Pendant les premiers douze (12) mois, toutes les pièces fonctionnelles de ce produit qui s’avèrent défectueuses
seront réparées ou remplacées, selon le choix du garant, sans frais à l’acheteur initial.
Danby se réserve le droit de limiter les limites de "Service au domicile" à proximité d'un dépôt de service
agréé. Tout appareil nécessitant un service en dehors des limites de "Service à domicile" sera la responsabilité
du consommateur de transporter l'appareil à laur propres frais le point d'achat original ou un dépôt de service
pour réparation. Si l'appareil est installé à plus de 100 kilomètres (62 milles) du centre de service le plus
proche, il doit être livré à l'atelier de réparation autorisé par Danby le plus proche, car l'entretien doit
uniquement être réalisé par un technicien qualifié et certifié pour effectuer un entretien couvert par la garantie
de Danby.
Les frais de transport entre votre domicile et le lieu de l'entretien ne sont pas couverts par la présente garantie
et doivent être acquittés par l'acheteur.
Premiers 12 mois
Pour bénéficier
du service
Limites de l’entretien
à domicile
GARANTIE LIMITÉE “À DOMICILE”
Cet appareil de qualité est garanti exempt de tout vice de matière première et de fabrication, s’il est utilisé dans les conditions
normales recommandées par le fabricant.
Cette garantie n’est offerte qu’à l’acheteur initial de l’appareil vendu par Danby Products Limited (Canada) ou Danby Products Inc.
(E.- U.A.) (ci-après « Danby ») ou par l’un des ses distributeurs agréés et elle ne peut être transférée.
CONDITIONS
Les pièces en plastique sont garanties pendant trente (30) jours seulement à partir de la date de l’achat, sans aucune prolongation
prévue.
Aucune partie de la garantie ne prévoit implicitement que le fabricant sera tenu responsable des dommages subis par les aliments ou
d’autres types de contenu, qu’ils soient causés par la défectuosité de l’appareil ou par son usage adéquat ou inadéquat.
EXCLUSIONS
En vertu de la présente, il n’existe aucune autre garantie, condition ou représentation, qu’elle soit exprimée ou tacite, de façon
manifeste ou intentionnelle, par Danby ou ses distributeurs agréés. De même, sont exclues toutes les autres garanties, conditions ou
représentations, y compris les garanties, conditions ou représentations en vertu de toute loi régissant la vente de produits ou de toute
autre législation ou règlement semblables. En vertu de la présente, Danby ne peut être tenue responsable en cas de blessures
corporelles ou des dégâts matériels, y compris à l’appareil, quelle qu’en soit les causes. Danby ne peut pas être tenue responsable
des dommages indirects dus au fonctionnement défectueux de l’appareil. En achetant l’appareil, l’acheteur accepte de mettre à
couvert et de dégager Danby de toute responsabilité en cas de réclamation pour toute blessure corporelle ou tout dégât matériel
causé par cet appareil.
CONDITIONS GÉNÉRALES
La garantie ou assurance ci-dessus ne s’applique pas si les dégâts ou réparations sont dus aux cas suivants:
1) Panne de courant.
2) Dommage subis pendant le transport ou le déplacement de l’appareil.
3) Alimentation électrique incorrecte (tension faible, câblage défectueux, fusibles incorrects).
4) Accident, modification, emploi abusif ou incorrect de l’appareil tel qu'une circulation d'air inadéquate dans la pièce ou des
conditions de fonctionnement anormales (température extrêmement élevée ou basse).
5) Utilisation dans un but commercial ou industriel (à savoir, si l'appareil n'est pas installé dans un domicile résidentiel).
6) Incendie, dommages causés par l’eau, vol, guerre, émeute, hostilités, cas de force majeure (ouragan, inondation, etc.).
7) Visites d’un technicien pour expliquer le fonctionnement de l’appareil au propriétaire.
8) Installation inappropriée (par exemple, encastrement d'un appareil autoportant, ou utilisation extérieure d'un appareil non conçu à
cet effet, y compris, mais sans s'y limiter: les garages, les patios, les porches ou ailleurs qui ne sont pas correctement isolés ou
climatisés).
La preuve de la date d'achat sera requise pour les réclamations de garantie; Conserver les factures de vente. Dans le cas où un
service de garantie est requis, présentez la preuve d'achat à notre dépôt de service agréé.
Service sous garantie
Service au domicile
Danby Products Limited
PO Box 1778, Guelph, Ontario, Canada N1H 6Z9
Téléphone : (519) 837-0920 Télécopieur: (519) 837-0449
Danby Products Inc.
PO Box 669, Findlay, Ohio, U.S.A. 45840
Téléphone: (419) 425-8627 Télécopieur: (419) 425-8629
1-800-263-2629
04/17

1-800-26- Danby
(1-800-263-2629)
Bienvenido
Bienvenido a la familia Danby. Estamos orgullosos de nuestros productos de calidad y creemos en
un servicio confi able. Sugerimos que lea este manual del propietario antes de conectar el nuevo
aparato ya que contiene información importante sobre la operación, información de seguridad,
solución de problemas y consejos de mantenimiento para garantizar la fi abilidad y longevidad de
su electrodoméstico.
Visite www.Danby.com para acceder a herramientas de autoservicio, preguntas frecuentes y
mucho más. Para asistencia adicional, llame al 1-800-263-2629.
Tenga en cuenta la información siguiente; Necesitará esta información para obtener un servicio
bajo garantía.
Debe proporcionar el recibo de compra original para validar su garantía y recibir servicio.
Número de modelo: _____________________________________________
Número de serie: _______________________________________________
Fecha de compra: _______________________________________________
Necesitas ayuda?
Antes de llamar al servicio, aquí hay algunas cosas que puede hacer para ayudarnos a
servirle mejor.
Lea este manual del propietario:
Contiene instrucciones para ayudarle a usar y mantener su aparato correctamente.
Si recibe un aparato dañado:
Inmediatamente póngase en contacto con el minorista o el constructor que le vendió el
aparato.
Ahorre tiempo y dinero:
Consulte la sección de solución de problemas al fi nal de este manual antes de llamar. Esta
sección le ayudará a resolver problemas comunes que pueden ocurrir.
25

REQUERIMIENTOS DE SEGURIDAD
Este aparato no está diseñado para ser utilizado
por personas (incluyendo niños) cuyas capacidades
físicas, sensoriales o mentales sean diferentes
o reducidas, o que carezcan de experiencia o
conocimiento, a menos que dichas personas
reciban supervisión o entrenamiento para operar el
aparato por una persona responsable de su uso. la
seguridad.
Los niños deben ser supervisados para asegurarse
de que no juegan con el aparato.
Para evitar el riesgo de descarga eléctrica, no
utilice este aparato en un área que pueda acumular
agua estancada. Si se desarrolla esta condición,
desconecte la fuente de alimentación antes de
entrar en el agua.
No almacene ni utilice materiales combustibles
tales como gasolina u otros vapores o líquidos
infl amables cerca de este o de cualquier otro
aparato.
No introduzca los dedos u otros objetos en las
parrillas o aberturas del aparato.
No cubra ni bloquee las aberturas de admisión y
de escape.
No opere el aparato sin el fi ltro instalado.
No utilice el aparato cerca de fuentes de calor.
Este aparato está destinado únicamente a
aplicaciones interiores y residenciales. No utilice
este aparato al aire libre. No utilice este aparato
para aplicaciones comerciales o industriales.
Si el acondicionador de aire es transportado en
su parte posterior o lateral, se debe permitir que
se mantenga erguido durante 6 horas antes de
enchufarlo para evitar daños a los componentes
internos.
Mantenga el aparato alejado de paredes, muebles
y cortinas con un espacio de al menos 30 cm (12
pulgadas) por todos lados.
INSTRUCCIONES DE CONEXION A TIERRA
Este aparato debe estar conectado a tierra. La
puesta a tierra reduce el riesgo de descarga
eléctrica proporcionando un cable de escape para
la corriente eléctrica.
Este aparato tiene un cable que tiene un cable de
conexión a tierra con un enchufe de 3 clavijas. El
cable de alimentación debe estar enchufado en
un tomacorriente que esté debidamente conectado
a tierra. Si el tomacorriente es un tomacorriente
de dos clavijas, debe ser reemplazado por un
tomacorriente de 3 clavijas con conexión a tierra
adecuada. La placa de características en serie
indica el voltaje y la frecuencia para los que está
diseñado el artefacto.
ADVERTENCIA - El uso incorrecto del enchufe de
conexión a tierra puede ocasionar un riesgo de
descarga eléctrica. Consulte a un electricista o
agente de servicio califi cado si las instrucciones de
conexión a tierra no se entienden completamente o
si existe duda sobre si el aparato está debidamente
conectado a tierra.
No conecte el aparato a cables de extensión,
adaptadores o junto con otro aparato en la misma
toma de corriente.
No empalme el cable de alimentación. No corte ni
extraiga en ningún caso la tercera clavija de tierra
del cable de alimentación.
Si el cable de alimentación está dañado, debe
ser reemplazado por el fabricante, su agente de
servicio o persona califi cada similar para evitar
riesgos.
Informacion de Seguridad Importante
LEA Y SIGA TODAS LAS INSTRUCCIONES DE SEGURIDAD
¡GUARDA ESTAS INSTRUCCIONES!
26

INSTRUCCIONES DE INSTALACIÓN
27
MONTAJE DEL KIT DE LA VENTANA
1. Conecte el adaptador de salida de aire y el
adaptador deslizante de la ventana en cualquier
extremo de la manguera de escape.
2. Inserte el adaptador de salida de aire en la
ranura inferior de la salida de aire en la parte
posterior del aparato. Asegúrese de que el
gancho del adaptador esté alineado con el
orifi cio de la salida de aire y luego deslice hacia
abajo
3. Mida la abertura de la ventana donde se
instalará el kit de la ventana. Ensamble todos los
controles deslizantes que sean necesarios para
adaptarse a la ventana.
4. Si la longitud de la ventana requiere los tres
controles deslizantes, use dos tornillos para fi jar
los controles deslizantes a la longitud correcta.
5. Si la apertura de la ventana es menor que la
longitud mínima de un solo control deslizante,
use el control deslizante que tiene el agujero y
córtelo a la longitud correcta. Asegúrese de no
cortar el extremo que tiene el orifi cio ya que
esto es necesario para conectar el adaptador de
la manguera de escape.
2
3
1
HERRAMIENTAS REQUERIDAS
1. Destornillador Phillips de tamaño mediano
2. Cinta métrica o regla
3. Cuchillo o tijeras
4. Sierra (en el caso de que los controles
deslizantes de la ventana deban cortarse a
medida)
ACCESORIOS
1. Adaptador de salida de aire
2. Manguera de escape
3. Adaptador deslizante de ventana
4. Pernos
5. Ventana deslizante A
6. Ventana deslizante B y C
7. Cerraduras de la rueda
8. Foam seal A (adhesivo)
9. Junta de espuma B (adhesivo)
10. Foam seal C (no adhesivo)
11. Soporte de seguridad y 2 tornillos
12. Manguera de drenaje
13. Control remoto
1
2
3
4
5
6
7
8
9
10
11
12
13

INSTRUCCIONES DE INSTALACIÓN
28
INSTALAR EL KIT DE VENTANA
Existen dos métodos de instalación posibles
según el tipo de ventana disponible.
Instalación de ventana colgante
1. Corte los sellos de espuma adhesiva A y B a la
longitud correcta para la ventana. Adjúntelos a
la hoja y marco de la ventana como se muestra.
2. Inserte el kit deslizante de la ventana
ensamblada en la abertura de la ventana.
3. Corte el sello de potro no adhesivo C para que
coincida con el ancho de la ventana. Inserte el
sello de espuma entre el vidrio y el marco de
la ventana para evitar que el aire y los insectos
entren en la habitación.
4. Instale el soporte de seguridad en el marco de
la ventana con los dos tornillos provistos.
5. Conecte el adaptador deslizante de la ventana
al orifi cio en el kit de control deslizante de la
ventana.
Nota: No extienda ni doble la manguera ya que
esto impedirá el fl ujo de aire.
A
B
A
B
1
2
3
4
5

29
INSTRUCCIONES DE INSTALACIÓN
Instalación de ventana deslizante
1. Corte los sellos de espuma adhesiva A y B a la
longitud correcta para la ventana. Adjúntelos a
la hoja y marco de la ventana como se muestra.
2. Inserte el kit deslizante de la ventana
ensamblada en la abertura de la ventana.
3. Corte el sello de potro no adhesivo C para que
coincida con el ancho de la ventana. Inserte el
sello de espuma entre el vidrio y el marco de
la ventana para evitar que el aire y los insectos
entren en la habitación.
4. Instale el soporte de seguridad en el marco de
la ventana con los dos tornillos provistos.
5. Conecte el adaptador deslizante de la ventana
al orifi cio en el kit de control deslizante de la
ventana.
Nota: No extienda ni doble la manguera ya que
esto impedirá el fl ujo de aire.
B
B
A
A
1
2
3
4
5

INSTRUCCIONES DE OPERACIÓN
UBICACIÓN
Coloque el acondicionador de aire en un piso liso
y nivelado que sea lo sufi cientemente fuerte para
soportarla y todos los accesorios incluidos.
Asegúrese de que el aparato esté nivelado para
minimizar el ruido y las vibraciones.
El electrodoméstico debe instalarse cerca de un
receptáculo puesto a tierra y debe tener acceso a
la salida de drenaje de desbordamiento en la parte
posterior del electrodoméstico.
No cubra las entradas o salidas de aire ni el
receptor de control remoto en el panel de control.
El aparato requiere 30 cm (12 pulgadas) de
espacio libre en el frente y los costados.
El aparato requiere al menos 50 cm (20 pulgadas)
de espacio libre en la parte posterior.
30
CARACTERISTICAS
Frente
1. Panel de control
2. Parrilla de salida de aire
3. Pantalla LED
4. Manija (ambos lados)
5. Rejilla de entrada de aire
6. Rodillos
Posterior
1. Rejilla de entrada de aire
2. Salida de aire
3. Desagüe
4. Cable de alimentación
1
2
3
4
5
6
1
2
3
4

INSTRUCCIONES DE OPERACIÓN
31
PANEL DE CONTROL
1. Botón de ventilador: Presione para seleccionar
la velocidad del ventilador; bajo medio alto.
2. Botón de modo: Presione para seleccionar el
modo deseado; fresco, seco, ventilador.
3. Botón de encendido: Presione para encender o
apagar la unidad.
4. Botones arriba y abajo:
• Se usa para ajustar la temperatura establecida
en incrementos de 1°.
• Mantenga presionados los botones hacia
arriba y hacia abajo durante 3 segundos para
cambiar la visualización de temperatura de °C
a °F.
1
2
3
4
1
3
2
45
PANTALLA LED
1. Pantalla para la temperatura y el
temporizador: Shows the set temperature of the
timer setting.
2. Escala de temperatura: Indica si la escala de
temperatura está ajustada a °C o °F.
3. Indicador del temporizador: Se ilumina si el
temporizador está activado.
4. Visualización de la velocidad del ventilador:
Muestra la confi guración actual de la velocidad
del ventilador; bajo, med, alto.
5. Pantalla de modo: Muestra el modo actual;
fresco, seco, ventilador.
CONTROL REMOTO
1. Botón de ventilador: Presione para seleccionar
la velocidad del ventilador; bajo medio alto.
2. Botón de oscilación: Presione para iniciar la
función de oscilación automática. Cuando la
oscilación automática está activada, presione
de nuevo para detener la persiana en el ángulo
deseado.
3. Botón de dormir: Pulse para iniciar la función
del dormir.
4. Botones arriba y abajo: Se usa para confi gurar
la temperatura y el temporizador.
5. Botón de encendido: Presione para encender o
apagar la unidad.
6. Botón de modo: Presione para seleccionar el
modo deseado; fresco, seco, ventilador.
7. Botón de temporizador: Presione para
confi gurar la función del temporizador.
8. Botón °C/°F: Presione para cambiar la
visualización de temperatura de °C a °F.
1
2
3
4
5
6
7
8

Modos de funcionamiento
• Modo frío (Cool)
Elija el modo frío para confi gurar la función de
enfriamiento. Use las fl echas hacia arriba y hacia
abajo para elegir la temperatura deseada. Presione
el botón del ventilador para ajustar la velocidad del
ventilador.
La temperatura puede ajustarse dentro de un rango
de 18 - 32°C (64 - 90°F).
La manguera de escape debe instalarse durante el
modo frío para garantizar los mejores resultados.
• Modo seco (Dry)
Elija el modo seco para eliminar el exceso de
humedad del aire durante los períodos de alta
humedad. Toda el agua extraída del aire se
acumulará dentro del aparato y se evaporará
debido al calor del compresor. En condiciones
especialmente húmedas, puede ser necesario vaciar
la bandeja de drenaje cuando esté llena. Presione
el botón del ventilador para ajustar la velocidad del
ventilador.
La manguera de escape debe instalarse durante el
modo seco para garantizar los mejores resultados.
• Modo de ventilador (Fan)
Elija el modo de ventilador para ejecutar el
ventilador interno sin activar la función de
enfriamiento. Presione el botón del ventilador
repetidamente para elegir la velocidad del
ventilador, baja, med, alta.
• Modo calor (Heat)
Elija el modo de calor para establecer la función de
calentamiento. Use las fl echas hacia arriba y hacia
abajo para elegir la temperatura deseada. Presione
el botón del ventilador para ajustar la velocidad del
ventilador.
La temperatura puede ajustarse dentro de un rango
de 13 - 27°C (55 - 81°F).
INSTRUCCIONES DE OPERACIÓN
32
Función del temporizador
Para confi gurar el temporizador de apagado:
1. Asegúrese de que el electrodoméstico esté
encendido.
2. Presione el botón del temporizador, el tiempo en
la pantalla parpadeará.
3. Presione el botón del temporizador para
seleccionar la cantidad deseada de horas antes
de que la unidad se apague.
Para confi gurar el temporizador de encendido:
1. Asegúrese de que el electrodoméstico esté
apagado.
2. Presione el botón del temporizador, el tiempo en
la pantalla parpadeará.
3. Presione el botón del temporizador para
seleccionar la cantidad deseada de horas antes
de que la unidad se encienda.
Notas:
• La pantalla volverá a mostrar la confi guración
de temperatura si el dispositivo no recibe una
señal dentro de un período de 5 segundos
durante la programación.
• Encender o apagar el aparato en cualquier
momento o ajustar la confi guración del
temporizador a 0.0 horas cancelará la
confi guración del temporizador.
• El temporizador se puede confi gurar entre 1 y
24 horas.
Función de dormir
La función de dormir se puede utilizar para
conservar la energía durante las horas de dormir.
Cuando se selecciona, la temperatura ajustada
aumentará en 2 grados durante un período de 2
horas. El aparato mantendrá la nueva temperatura
ajustada durante 7 horas antes de volver
automáticamente al funcionamiento normal.
La función sleep se puede cancelar en cualquier
momento pulsando el botón dormir.

INSTRUCCIONES DE OPERACIÓN
33
IMPORTANTE
No deseche las
baterías como
desechos municipales
no clasifi cados.
Consulte las leyes
locales para la
eliminación adecuada
de las baterías.
REEMPLAZO DE LAS BATERÍAS DEL
CONTROL REMOTO
El control remoto llegará con una batería de
monedas CR2025 preinstalada. Es posible que
sea necesario quitar una tira aislante plástica
transparente antes de usar por primera vez el
control remoto.
1. Siga los pasos a continuación para reemplazar
la batería.
2. Use un destornillador para quitar el tornillo que
asegura la tapa de la batería. Empuje el gancho
de la tapa de la batería hacia la derecha para
liberarlo del control remoto. Saca la tapa de la
batería.
Notas:
• El acondicionador de aire no responderá si
cortinas, puertas u otros materiales bloquean la
señal del control remoto al artefacto.
• Si el receptor de señal infrarroja de la unidad
interior está expuesto a la luz solar directa,
es posible que el acondicionador de aire no
funcione correctamente. Use cortinas para evitar
que la luz del sol caiga sobre el receptor.
• No permita que el control remoto se moje.
• No exponga el control remoto a la luz solar
directa o al calor.
• No deje la batería en el control remoto si no la
va a usar durante más de 2 meses.
1
2
EL DRENAJE DEL AGUA
Cuando la bandeja de drenaje interna se llena,
el aparato emitirá un pitido 8 veces y la pantalla
digital mostrará el código de error P1. La acción
de aire acondicionado o deshumidifi cación se
detendrá pero el ventilador puede continuar
funcionando.
Siga los pasos a continuación para drenar el
aparato.
1. Apague el aparato y desenchúfelo de la fuente
de alimentación.
2. Mueva cuidadosamente el aparato a un lugar
donde pueda drenar el agua.
3. Retire el tapón de drenaje y permita que el agua
se drene completamente.
4. Vuelva a colocar el tapón de drenaje inferior,
presionando fi rmemente para asegurar un
ajuste perfecto y sin fugas.
5. El símbolo de error P1 desaparecerá y el
dispositivo volverá a funcionar normalmente una
vez que se restablezca la energía.

34
LIMPIEZA
• Desenchufe el aparato antes de limpiarlo o
repararlo.
• Limpie el gabinete con un paño húmedo tibio
y detergente neutro. Seque el gabinete con un
paño seco sin pelusa.
• No use gasolina, diluyente de pintura ni otros
productos químicos para limpiar el aparato.
• No lave el aparato directamente debajo de un
grifo ni con una manguera. Puede causar daño
eléctrico.
ALMACENAMIENTO A LARGO PLAZO
1. Drene toda el agua del aparato.
2. Haga funcionar el aparato en modo ventilador
durante medio día en una sala cálida para
secar el interior del aparato y evitar la
formación de moho.
3. Apague el aparato y desenchúfelo, envuelva el
cable y agréguelo con cinta adhesiva.
4. Retire la batería del control remoto.
5. Limpie los fi ltros de aire y vuelva a instalarlos.
6. Guarde el aparato en un lugar fresco y oscuro.
La exposición prolongada a la luz solar directa
o al calor extremo puede acortar la vida útil del
artefacto.
DISPOSICIÓN
Este electrodoméstico no debe tratarse como
un desperdicio doméstico común. Verifi que
el cumplimiento normativo local con respecto
a la eliminación aprobada y segura de este
electrodoméstico.
CÓDIGOS DE ERROR
E1 - error del sensor de temperatura ambiente
E2 - error del sensor de temperatura del
evaporador
E3 - error del sensor de temperatura del
condensador
E4 - error de comunicación del panel de
visualización
E7 - mal funcionamiento del cruce por cero
P1 - la bandeja de agua está llena - conecte la
manguera de drenaje y drene el exceso de agua
FILTROS DE AIRE
Hay tres fi ltros de aire en este aparato. Los fi ltros
de aire deben limpiarse cada dos semanas para
garantizar un rendimiento efi ciente.
En hogares con animales, los fi ltros de aire pueden
necesitar una limpieza más frecuente y es posible
que las parrillas externas deban ser limpiadas para
evitar el fl ujo de aire bloqueado.
1
2
3
CUIDADO Y MANTENIMIENTO

SOLUCIÓN DE PROBLEMAS
PROBLEMA CAUSA POSIBLE
El aparato no funcionará • El enchufe no está completamente insertado en la toma de
corriente de la pared
• Fusible fundido o disyuntor
Enfriamiento insufi ciente • Los fi ltros de aire están sucios
• Flujo de aire bloqueado
• El tamaño del dispositivo es demasiado pequeño para la
aplicación
Ruido • El suelo no está nivelado
• Los fi ltros de aire están sucios
• Sonidos de gorjeo son normales; este es el refrigerante que se
mueve dentro del aparato
Olores • Formación del molde en superfi cies mojadas internas
• Coloque un comprimido de algicida en el molde de la base;
empuje la tableta a través de la parrilla en la parte posterior del
aparato
35
Danby cuidado del consumidor: 1-800-263-2629
Horas de operación:
Lunes a Jueves 8:30 am - 6:00 pm Hora estándar del este
Viernes 8:30 am - 4:00 pm Hora estándar del este
La información de este manual está sujeta a cambios sin previo aviso.

LIMITED IN-HOME APPLIANCE WARRANTY
This quality product is warranted to be free from manufacturer’s defects in material and workmanship, provided that the unit is used under the normal operating
conditions intended by the manufacturer.
This warranty is available only to the person to whom the unit was originally sold by Danby Products Limited (Canada) or Danby Products Inc. (U.S.A.) (hereafter
“Danby”) or by an authorized distributor of Danby, and is non-transferable.
TERMS OF WARRANTY
Plastic parts, are warranted for thirty (30) days only from purchase date, with no extensions provided.
First Year
During the rst twelve (12) months, any functional parts of this product found to be defective, will be repaired or replaced, at warrantor’s
option, at no charge to the ORIGINAL purchaser.
To obtain
Danby reserves the right to limit the boundaries of “In Home Service” to the proximity of an Authorized Service Depot. Any app liance
Service
requiring service outside the limited boundaries of “In Home Service” , it will be the consumer’s responsibility to transport the appliance (at
their own expense) to the original retailer (point of purchase) or a service depot for repair. See “Boundaries of In Home Serv ice” below.
Contact your dealer from whom your unit was purchased, or contact your nearest authorized Danby service depot, where service
must be performed by a qualied service technician.
If service is performed on the units by anyone other than an authorized service depot, or the unit is used for commercial appli cation, all
obligations of Danby under this warranty shall be void.
Boundaries of
If the appliance is installed in a location that is 100 kilometers (62 miles) or more from the nearest service center your unit must be
In Home Service
delivered to the nearest authorized Danby Service Depot, as service must only be performed by a technician qualied and certif ied for
warranty service by Danby. Transportation charges to and from the service location are not protected by this warranty and are t he
responsibility of the purchaser.
Nothing within this warranty shall imply that Danby will be responsible or liable for any spoilage or damage to food or other c ontents of this appliance, whether due
to any defect of the appliance, or its use, whether proper or improper.
EXCLUSIONS
Save as herein provided, Danby, there are no other warranties, conditions, representations or guarantees, express or implied, m ade or intended by Danby or its
authorized distributors and all other warranties, conditions, representations or guarantees, including any warranties, conditio ns, representations or guarantees
under any Sale of Goods Act or like legislation or statue is hereby expressly excluded. Save as herein provided, Danby shall no t be responsible for any damages
to persons or property, including the unit itself, howsoever caused or any consequential damages arising from the malfunction o f the unit and by the purchase of
the unit, the purchaser does hereby agree to indemnify and hold harmless Danby from any claim for damages to persons or propert y caused by the unit.
GENERAL PROVISIONS
No warranty or insurance herein contained or set out shall apply when damage or repair is caused by any of the following:
1) Power failure.
2) Damage in transit or when moving the appliance.
3) Improper power supply such as low voltage, defective house wiring or inadequate fuses.
4) Accident, alteration, abuse or misuse of the appliance such as inadequate air circulation in the room or abnormal operating con ditions
(extremely high or low room temperature).
5) Use for commercial or industrial purposes (ie. If the appliance is not installed in a domestic residence).
6) Fire, water damage, theft, war, riot, hostility, acts of God such as hurricanes, oods etc.
7) Service calls resulting in customer education.
8) Improper Installation (ie. Building-in of a free standing appliance or using an appliance outdoors that is not approved for out door application).
Proof of purchase date will be required for warranty claims; so, please retain bills of sale. In the event warranty service is required, present this document to our
AUTHORIZED SERVICE DEPOT.
Danby Products Limited
PO Box 1778, Guelph, Ontario, Canada N1H 6Z9
Telephone: (519) 837-0920 FAX: (519) 837-0449
Danby Products Inc.
PO Box 669, Findlay, Ohio, U.S.A. 45840
Telephone: (419) 425-8627 FAX: (419) 425-8629
04/09
1-800-263-2629
Warranty Service
In-home
Durante los primeros doce (12) meses, cualquier parte en buen estado de este producto que resulte defectuosa,
incluyendo cualquier sistema sellado, será reparado o reemplazado, a opción del
fabricante, sin cargo para el comprador ORIGINAL.
Danby se reserva el derecho de limitar la cobertura de "Servicio en Domicilio" sujeto a la proximidad de un
Taller de Servicio Autorizado. Para todo artefacto que requiera servicio fuera del área limitada de "Servicio en
Domicilio", el cliente será responsable por transportar dicho artefacto hasta el Taller de Servicio Autorizado
mas cercano. Si el electrodoméstico está instalado en un lugar que se encuentra a 100 kilómetros (62 millas)
o más del centro de servicios más cercano, se debe llevar la unidad al Centro de servicios Danby autorizado
más cercano, ya que dicho servicio sólo puede realizarlo un técnico calificado y certificado por Danby para
prestar servicios de garantía.
Los cargos por transporte desde y hacia el lugar en que se efectúe el servicio técnico no están cubiertos por
esta garantía y son de responsabilidad del comprador.
Primeros 12 meses
Para obtener
servicio
Límites del servicio
técnico a domicilio
GARANTÍA LIMITADA “A DOMICILIO”
Este producto de calidad está garantizado contra defectos de fabricación, incluyendo partes y mano de obra, siempre y
cuando la unidad se utilice bajo las condiciones normales de funcionamiento para las que fue diseñado.
Esta garantía está solamente disponible para la persona que haya comprado originalmente esta unidad directamente de Danby
Products Limited (Canada) o Danby Products Inc. (U.S.A.) (en adelante “Danby”) o uno de sus distribuidores
autorizados, y no es transferible.
CONDICIONES DE LA GARANTÍA
Las piezas plásticas, se autorizan por treinta (30) días solamente a partir de la fecha de la compra, sin las extensiones
proporcionadas.
Nada dentro de esta garantía implica que Danby será responsable por cualquier daño que hayan sufrido los alimentos u otros
contenidos de este aparato, ya sea debido a un defecto del aparato, o su uso, adecuado o inadecuado.
EXCLUSIONES
Salvo lo aquí indicado por Danby, no existen otras garantías, condiciones o representaciones, explícitas o implícitas, concretas o
intencionales por parte de Danby o sus distribuidores autorizados y todas las demás garantías, condiciones o representaciones,
incluyendo cualquier garantía, condiciones o representaciones bajo cualquier Acta de Venta de Productos o legislación o estatuto
similar, quedan de esta forma expresamente excluidas. Salvo lo aquí indicado, Danby no serán responsables por ningún daño a
personas o bienes, incluyendo la propia unidad, sin importar su causa, o de ningún daño indirecto causado por el desperfecto de la
unidad, y al comprar esta unidad, el comprador acepta por la presente, indemnizar y proteger a Danby contra cualquier reclamo
por daños a personas o bienes causados por la unidad.
CONDICIONES GENERALES
No se considerará ninguna de estas garantías o seguros cuando el daño o la necesidad de reparación sea el producto de los
siguientes casos:
1) Falla del suministro eléctrico.
2) Daños en tránsito o durante el transporte de la unidad.
3) Alimentación incorrecta, como bajo voltaje, instalación eléctrica defectuosa o fusibles inadecuados.
4) Accidente, modificación, abuso o uso incorrecto del artefacto, tal como insuficiente ventilación del ambiente o condiciones de
operación anormales (temperatura ambiente extremadamente alta o baja).
5) Utilización comercial o industrial (v.g., si el electrodoméstico no está instalado en una vivienda particular).
6) Incendio, daños por agua, robo, guerra, disturbios, hostilidades, actos de fuerza mayor como huracanes, inundaciones, etc.
7) Pedidos de servicio debido a desinformación del usuario.
8) Instalación inadecuada (v.g., instalación empotrada de un electrodoméstico diseñado como unidad independiente o uso de un
electrodoméstico al aire libre que no esté aprobado para dicho fin, incluyendo pero no limitado a: garajes, patios, porches o en
cualquier lugar que no esté bien aislado o controlado por el clima).
Se requerirá una prueba de la fecha de compra para reclamaciones de garantía; Retener las facturas de venta. En el caso de que se
requiera servicio de garantía, presente el comprobante de compra a nuestro depósito de servicio autorizado.
Servicio de Garantía
Servicio en Domicilio
Danby Products Limited
PO Box 1778, Guelph, Ontario, Canada N1H 6Z9
Telephone: (519) 837-0920 FAX: (519) 837-0449
Danby Products Inc.
PO Box 669, Findlay, Ohio, U.S.A. 45840
Telephone: (419) 425-8627 FAX: (419) 425-8629
1-800-263-2629
04/17
Comuníquese con el distribuidor donde haya comprado la unidad, o llame al Taller de Servicio Autorizado más
cercano, donde debe ser reparada por un técnico calificado. Si esta unidad es reparada en otro lugar que no
sea un Taller de Servicio Autorizado, o si la unidad se utiliza para aplicaciones comerciales, Danby no se hará
responsable de ninguna forma y la garantía será anulada.

NOTES / REMARQUES / NOTAS :
__________________________________________________________________________________________
__________________________________________________________________________________________
__________________________________________________________________________________________
__________________________________________________________________________________________
__________________________________________________________________________________________
__________________________________________________________________________________________
__________________________________________________________________________________________
__________________________________________________________________________________________
__________________________________________________________________________________________
__________________________________________________________________________________________
__________________________________________________________________________________________
__________________________________________________________________________________________
__________________________________________________________________________________________
__________________________________________________________________________________________
__________________________________________________________________________________________
__________________________________________________________________________________________
__________________________________________________________________________________________
__________________________________________________________________________________________
__________________________________________________________________________________________
__________________________________________________________________________________________
__________________________________________________________________________________________
__________________________________________________________________________________________

MODEL • MODÈLE • MODELO
Printed in China
Imprimé en Chine
Impreso en China
Danby Products Limited, Guelph, ON, Canada N1H 6Z9
Danby Products Inc., Findlay, Ohio, USA 45840
DPA140HEAUWDB
DPA140HEBUBDB
Transcripción de documentos
OWNER’S MANUAL MANUEL DU PROPRIÉTAIRE MANUAL DEL PROPIETARIO PORTABLE AIR CONDITIONER Owner’s Manual.............................1 - 12 MODEL • MODÈLE • MODELO CLIMATISEUR PORTABLE Manuel du propriétaire.................13 - 24 DPA140HEAUWDB DPA140HEBUBDB AIRE ACONDICIONADO PORTÁTIL Manual del propietario.................25 - 36 DANBY PRODUCTS LIMITED, ONTARIO, CANADA N1H 6Z9 DANBY PRODUCTS INC., FINDLAY, OHIO, USA 45840 2017.11.23 Welcome Welcome to the Danby family. We are proud of our quality products and we believe in dependable service. We suggest that you read this owner’s manual before plugging in your new appliance as it contains important operation information, safety information, troubleshooting and maintenance tips to ensure the reliability and longevity of your appliance. Visit www.Danby.com to access self service tools, FAQs and much more. For additional assistance call 1-800-263-2629. Note the information below; you will need this information to obtain service under warranty. You must provide the original purchase receipt to validate your warranty and receive service. Model Number: _________________________________________________ Serial Number: _________________________________________________ Date of Purchase: _______________________________________________ Need Help? Before you call for service, here are a few things you can do to help us serve you better. Read this owner’s manual: It contains instructions to help you use and maintain your appliance properly. If you receive a damaged appliance: Immediately contact the retailer or builder that sold you the appliance. Save time and money: Check the troubleshooting section at the end of this manual before calling. This section will help you solve common problems that may occur. 1-800-26- Danby (1-800-263-2629) 1 Important Safety Information READ AND FOLLOW ALL SAFETY INSTRUCTIONS SAFETY REQUIREMENTS GROUNDING INSTRUCTIONS This appliance is not intended for use by persons (including children) whose physical, sensory or mental capabilities may be different or reduced, or who lack experience or knowledge, unless such persons receive supervision or training to operate the appliance by a person responsible for their safety. This appliance must be grounded. Grounding reduces the risk of electrical shock by providing an escape wire for the electrical current. This appliance has a cord that has a grounding wire with a 3-prong plug. The power cord must be plugged into an outlet that is properly grounded. If the outlet is a 2-prong wall outlet, it must be replaced with a properly grounded 3-prong wall outlet. The serial rating plate indicates the voltage and frequency the appliance is designed for. Children should be supervised to ensure that they do not play with the appliance. To avoid risk of electric shock, do not operate this appliance in an area that is likely to accumulate WARNING - Improper use of the grounding standing water. If this condition develops, disconnect plug can result in a risk of electric shock. the power supply before stepping into the water. Consult a qualified electrician or service agent if the grounding instructions are not completely Do not store or use combustible materials such as understood, or if doubt exists as to whether the gasoline or other flammable vapors or liquids in the appliance is properly grounded. vicinity of this or any other appliance. Do not connect the appliance to extension cords, Do not insert fingers or other objects into grills or adapters or together with another appliance in the openings in the appliance. same wall outlet. Do not cover or block the intake and exhaust openings. Do not splice the power cord. Do not under any circumstances cut or remove the third ground prong from the power cord. Do not operate the appliance without the filter installed. If the power supply cord is damaged, it must be replaced by the manufacturer, its service agent or similar qualified person in order to avoid hazard. Do not operate the appliance near heat sources. This appliance is intended for indoor, residential applications only. Do not use this appliance outdoors. Do not use this appliance for commercial or industrial applications. If the air conditioner is transported on its back or side, it must be allowed to stand upright for 6 hours before plugging in to avoid damage to internal components. Keep the appliance away from walls, furniture and curtains with a clearance of at least 30 cm (12 inches) on all sides. SAVE THESE INSTRUCTIONS! 2 INSTALLATION INSTRUCTIONS ACCESSORIES ASSEMBLING THE WINDOW KIT 1. Air outlet adapter 2. Exhaust hose 3. Window slider adapter 4. Bolts 5. Window slider A 6. Window slider B and C 7. Caster locks 8. Foam seal A (adhesive) 9. Foam seal B (adhesive) 10. Foam seal C (non-adhesive) 11. Security bracket and 2 screws 12. Drain hose 13. Remote control 1. Attach the air outlet adapter and the window slider adapter onto either end of the exhaust hose. 2. Insert the air outlet adapter into the lower groove of the air outlet on the back of the appliance. Ensure that the hook of the adapter is aligned with the hole seat of the air outlet and then slide down 3. Measure the window opening where the window kit will be installed. Assemble as many sliders as necessary to fit the window. 4. If the length of the window requires all three sliders, use two bolts to fasten the sliders at the correct length. 1 2 5. If the window opening is less than the minimum length of a single slider, use the slider that has the hole in it and cut it to the correct length. Make sure not to cut the end that has the hole as this is necessary to attach the exhaust hose adapter. 3 4 5 1 6 7 8 2 9 10 11 12 13 3 REQUIRED TOOLS 1. 2. 3. 4. Medium sized Phillips screwdriver Tape measure or ruler Knife or scissors Saw (in the event that the window sliders need to be cut to size) 3 INSTALLATION INSTRUCTIONS INSTALLING THE WINDOW KIT 1 There are two possible installation methods depending on the available window type. B A Hung Window Installation A 1. Cut the adhesive foam seals A and B to the correct length for the window. Attach them to the window sash and frame as shown. 2. Insert the assembled window slider kit into the window opening. 2 3. Cut the non-adhesive foal seal C to match the width of the window. Insert the foam seal between the glass and the window frame to prevent air and insects from getting into the room. 4. Install the security bracket in the window frame with the two provided screws. 5. Attach the window slider adapter to the hole in the window slider kit. 3 Note: Do not over extend or bend the hose as this will impede air flow. 4 5 4 B INSTALLATION INSTRUCTIONS Sliding Window Installation 1 1. Cut the adhesive foam seals A and B to the correct length for the window. Attach them to the window sash and frame as shown. B A A 2. Insert the assembled window slider kit into the window opening. B 3. Cut the non-adhesive foal seal C to match the width of the window. Insert the foam seal between the glass and the window frame to prevent air and insects from getting into the room. 2 4. Install the security bracket in the window frame with the two provided screws. 5. Attach the window slider adapter to the hole in the window slider kit. Note: Do not over extend or bend the hose as this will impede air flow. 3 4 5 5 OPERATING INSTRUCTIONS FEATURES LOCATION Front Place the air conditioner on a smooth, level floor that is strong enough to support it and all included accessories. 1. 2. 3. 4. 5. 6. Control panel Air outlet grill LED display Handle (both sides) Air intake grill Rollers Make sure the appliance is level to minimize noise and vibration. The appliance must be installed near a grounded receptacle and the overflow drain outlet on the rear of the appliance must be accessible. 1 2 Do not cover air inlets or outlets or the remote control receiver on the control panel. The appliance requires 30 cm (12 inches) of clearance on the front and sides. 3 4 5 6 Rear 1. 2. 3. 4. Air intake grill Air outlet Drain outlet Power cord The appliance requires at least 50 cm (20 inches) of clearance on the back. 1 2 3 4 6 OPERATING INSTRUCTIONS CONTROL PANEL REMOTE CONTROL 1. Fan Button: Press to select fan speed; low, medium, high. 1. Fan Button: Press to select fan speed; low, medium, high. 2. Mode Button: Press to select the desired mode; cool, dry, fan. 2. Swing Button: Press to start the auto swing feature. When auto swing is activated, press again to stop the louver at the desired angle. 3. Power Button: Press to turn the appliance on or off. 3. Sleep: Press to start the sleep function. 4. Up and Down Buttons: • Used to adjust the set temperature in 1° increments. • Press and hold both up and down buttons for 3 seconds to change the temperature display from °C to °F. 4. Up and Down Buttons: Used to set the temperature and timer. 5. Power Button: Press to turn the appliance on or off. 6. Mode Button: Press to select the desired mode. Modes will cycle in sequence with each press of the button; cool, dry, fan. 2 1 7. Timer Button: Press to set the timer function. 3 8. °C/°F Button: Press to change the temperature display from °C to °F. 4 LED DISPLAY 6 1 1. Temperature and Timer Display: Shows the set temperature of the timer setting. 4 2 2. Temperature Scale: Indicates whether the temperature scale is set to °C or °F. 5 3. Timer Indicator: Illuminates if the timer is activated. 3 4. Fan Speed Display: Shows the current fan speed setting; low, med, high. 5. Mode Display: Shows the current mode; cool, dry, fan. 2 1 3 5 7 4 7 8 OPERATING INSTRUCTIONS Operating Modes Timer Function • Cool Mode To set the turn off timer: Choose cool mode to set the cooling function. Use the up and down arrows to choose the desired temperature. Press the fan button to adjust the fan speed. 1. Ensure the appliance is turned on. 2. Press the timer button, the time on the display will flash. 3. Press the timer button to select the desired amount of hours before the unit turns off. The temperature can be set within a range of 18 32°C (64 - 90°F). To set the turn on timer: The exhaust hose should be installed during cool mode to ensure the best results. 1. Ensure the appliance is turned off. 2. Press the timer button, the time on the display will flash. 3. Press the timer button to select the desired amount of hours before the unit turns on. • Dry Mode Choose dry mode to remove excess moisture from the air during periods of high humidity. All water pulled from the air will collect inside the appliance and evaporate due to the heat from the compressor. In especially humid conditions, it may be necessary to empty the drain pan when it becomes full. Press the fan button to adjust the fan speed. Notes: • The display will revert back to showing the temperature setting if the appliance does not receive a signal within a 5 second period during programming. • Turning the appliance on or off at any time or adjusting the timer setting to 0.0 hours will cancel the timer settings. • The timer can be set between 1 - 24 hours. The exhaust hose should be installed during dry mode to ensure the best results. • Fan Mode Sleep Function Choose fan mode to run the internal fan without engaging the cooling function. Press the fan button repeatedly to choose the fan speed, low, med, high. The sleep function can be used to conserve energy during sleeping hours. When selected, the set temperature will increase by 2 degrees over a 2 hours period. The appliance will hold the new set temperature for 7 hours before automatically returning to normal operation. • Heat Mode Choose heat mode to set the heating function. Use the up and down arrows to choose the desired temperature. Press the fan button to adjust the fan speed. The sleep function can be canceled at any time by pressing the sleep button. The temperature can be set within a range of 13 27°C (55 - 81°F). 8 OPERATING INSTRUCTIONS REPLACING THE REMOTE BATTERIES WATER DRAINAGE The remote control will arrive with a CR2025 coin battery pre-installed. It may be necessary to remove a clear, plastic insulating strip before first use of the remote control. When the internal drain pan becomes full the appliance will beep 8 times and the digital display will show error code P1. The air conditioning or dehumidifying action will stop but the fan may continue to operate. Follow the steps below to replace the battery. Follow the steps below to drain the appliance. 1. Use a screwdriver to remove the screw that secures the battery cover. 2. Push the battery cover hook to the right to release it from the remote control. Pull the battery cover out. 1. Turn the appliance off and unplug it from the power source. 2. Carefully move the appliance to a location where the water can be drained. 1 3. Remove the drain plug and allow the water to completely drain. 4. Replace the bottom drain plug, pressing firmly to ensure a tight fit and no leaks. 5. The P1 error symbol will disappear and the appliance will resume regular function once power is restored. IMPORTANT 2 Do not dispose of batteries as unsorted municipal waste. Refer to local laws for proper disposal of batteries. Notes: • The air conditioner will not respond if curtains, doors or other materials block the signal from the remote control to the appliance. • If the infrared signal receiver on the indoor unit is exposed to direct sunlight, the air conditioner may not function properly. Use curtains to prevent the sunlight from falling on the receiver. • Do not allow the remote control to get wet. • Do not expose the remote control to direct sunlight or heat. • Do not leave the battery in the remote control if it is not going to be used for more than 2 months. 9 CARE & MAINTENANCE AIR FILTERS CLEANING There are three air filters in this appliance. Air filters should be cleaned every two weeks to ensure efficient performance. • Unplug the appliance before cleaning or servicing. • Clean the cabinet with a lukewarm damp cloth and neutral detergent. Dry the cabinet with a lint-free dry cloth. • Do not use gasoline, paint thinner or other chemicals to clean the appliance. • Do not wash the appliance directly under a tap or using a hose. It may cause electrical damage. In households with animals, the air filters may need to be cleaned more often and the external grills may need to be wiped to prevent blocked air flow. 1 LONG-TERM STORAGE 1. Drain all water from the appliance. 2. Run the appliance on fan mode for half a day in a warm room to dry the inside of the appliance and prevent mold formation. 3. Turn off the appliance and unplug it, wrap the cord and bundle it with tape. 4. Remove the battery from the remote control. 5. Clean the air filters and reinstall them. 6. Store the appliance in a cool, dark place. Prolonged exposure to direct sunlight or extreme heat can shorten the lifespan of the appliance. 2 DISPOSAL This appliance should not be treated as regular household waste. Check for local regulatory compliance regarding the approved and safe disposal of this appliance. ERROR CODES 3 E1 - room temperature sensor error E2 - evaporator temperature sensor error E3 - condenser temperature sensor error E4 - display panel communication error E7 - zero crossing malfunction P1 - water tray is full - attach drain hose and drain excess water 10 TROUBLESHOOTING Danby Consumer Care: 1-800-263-2629 Hours of operation: Monday to Thursday 8:30 am - 6:00 pm Eastern Standard Time Friday 8:30 am - 4:00 pm Eastern Standard Time Information in this manual is subject to change without notice. PROBLEM Appliance will not operate POSSIBLE CAUSE • Plug is not fully inserted into the wall outlet • Blown fuse or circuit breaker Insufficient cooling • Air filters are dirty • Blocked air flow • Appliance size is too small for application Noise • The ground is not level • Air filters are dirty • Gurgling sounds are normal; this is the refrigerant moving inside the appliance Odors • Formation of mold or mildew on internal wet surfaces • Place an algaecide tablet in base pan; push the tablet through the grill on the back of the appliance 11 LIMITED “IN HOME” WARRANTY LIMITED IN-HOME APPLIANCE WARRANTY Thisquality quality product is warranted to be free manufacturer’s defects in material and workmanship, that the unit is provided used under thethe normal This product is warranted to from be free from manufacturer’s defects in materialprovided and workmanship, that unitoperating is used conditions intended by the manufacturer. under the normal operating conditions intended by the manufacturer. Thiswarranty warranty is isavailable only toonly the person whom thetounit was originally by Danby Products Limited (Canada)Products or Danby LimitedProducts Inc. (U.S.A.) (hereafter This available to thetoperson whom the unitsold was originally sold by Danby (Canada) or Danby “Danby”) Inc. or by(U.S.A.) an authorized distributor“Danby”) of Danby, and non-transferable. Products (hereafter or isby an authorized distributor of Danby, and is non-transferable. TERMS OF WARRANTY TERMSofOFpurchase, WARRANTY with no extensions provided. Plastic parts are warranted for thirty (30) days from the date Plastic parts, are warranted for thirty (30) days only from purchase date, with no extensions provided. First 12 months First Year To obtain service To obtain Service Boundaries of in-home service Boundaries of In Home Service During the first twelve (12) months, any functional parts of this product found to be defective, will be repaired or replaced, at warrantor’s option, at no charge to the original purchaser. During the first twelve (12) months, any functional parts of this product found to be defective, will be repaired or replaced, at warrantor’s option, at no charge to the ORIGINAL purchaser. Contact the dealer where the unit was purchased, or contact the nearest authorized Danby service depot, where service must be performed by a qualified service technician. If service is performed on the unit by anyone other Danby the rightservice to limit the boundaries of “In Home Service” to theunder proximity an Authorized Service liance than anreserves authorized depot, all obligations of Danby thisof warranty shall be Depot. void. Any app requiring service outside the limited boundaries of “In Home Service” , it will be the consumer’s responsibility to transport the appliance (at their own expense)the to the original retailerthe (point of purchase) of or a“In service depotService” for repair.to Seethe “Boundaries of Inof Home below. Danby reserves right to limit boundaries Home proximity an Serv authorizedice”service Contact your dealer from whom your unit was purchased, or contact your nearest authorized Danby service depot, where service depot. Any appliance requiring service outside the limited boundaries of “In Home Service”, will be the consumer’s must be performed by a qualified technician. responsibility to transport at service their own expense to the original point of purchase or a service depot for repair. If the If service is performed on the by anyone other than ankilometers authorized service depot, ororthe unit isfrom used the for commercial appli center, cation,itallmust appliance is installed in aunits location that is 100 (62 miles) more nearest service of Danby this warranty shall beDanby void. Service Depot by the purchaser. beobligations delivered to theunder nearest authorized If the appliance ischarges installed into a location that isthe 100service kilometerslocation (62 miles) are or more the nearest center your unit must be Transportation and from notfrom protected byservice this warranty and are the delivered to theof nearest authorized Danby Service Depot, as service must only be performed by a technician qualified and certif ied for responsibility the purchaser. warranty service by Danby. Transportation charges to and from the service location are not protected by this warranty and are t he responsibility of the purchaser. Nothing within this warranty shall imply that Danby will be responsible or liable for any spoilage or damage to food or other contents of this appliance, whether due to any defect of the appliance, or its use, whether proper or improper. Nothing within this warranty shall imply that Danby will be responsible or liable for any spoilage or damage to food or other c EXCLUSIONS to any defect of the appliance, or its use, whether proper or improper. ontents of this appliance, whether due Save as herein provided, by Danby, there are no other warranties, conditions, representations or guarantees, express or implied, made or intended by Danby or its authorized distributors and all other warranties, conditions, representations or guarantees, including any EXCLUSIONS warranties, conditions, representations or guarantees under any Sale oforGoods Actexpress or likeor legislation hereby Save as herein provided, Danby, there are no other warranties, conditions, representations guarantees, implied, m or statute ade orisintended byexpressly Danby or its excluded. Save as herein provided, Danby shall not be responsible forincluding any damages to persons including the unit itself, authorized distributors and all other warranties, conditions, representations or guarantees, any warranties, conditio or property, ns, representations or guarantees howsoever consequential damages from theSave malfunction of theDanby unit shall andno by the purchase of theforunit, the under any Salecaused of GoodsorActany or like legislation or statue is hereby arising expressly excluded. as herein provided, t be responsible any damages purchaser does hereby agree to indemnify and hold harmless Danby from any claim for damages to persons or property caused to persons or property, including the unit itself, howsoever caused or any consequential damages arising from the malfunction o f the unit and by the purchase of by the unit. the unit, the purchaser does hereby agree to indemnify and hold harmless Danby from any claim for damages to persons or propert y caused by the unit. GENERAL PROVISIONS GENERAL No warranty or insurance herein contained or set out shall applyPROVISIONS when damage or repair is caused by any of the following: No warranty or insurance herein contained or set out shall apply when damage or repair is caused by any of the following: 1) Power failure. 2) Damage in transit 1) Power failure. or when moving the appliance. 3) Improper power supply suchmoving as low 2) Damage in transit or when thevoltage, appliance. defective house wiring or inadequate fuses. 4) Accident, alteration, abuse or misuse of the appliance such as inadequate air circulation in the room or abnormal operating 3) Improper power supply such as low voltage, defective house wiring or inadequate fuses. conditions (ie. extremely high or low room temperature). alteration, or misuse of the appliance suchappliance as inadequateisairnot circulation in the or abnormal operating con ditions 5) Use4)forAccident, commercial or abuse industrial purposes (ie. If the installed in room a domestic residence). (extremely high or low room temperature). 6) Fire, water damage, theft, war, riot, hostility, acts of God such as hurricanes, floods etc. 5) Use for commercial or industrial purposes (ie. If the appliance is not installed in a domestic residence). 7) Service calls resulting in customer education. 8) Improper Building-in of a free appliance or using 6) Fire,Installation water damage,(ie. theft, war, riot, hostility, acts ofstanding God such as hurricanes, floods etc. an appliance outdoors that is not approved for outdoor application, including but not limited to: garages, patios, porches or anywhere that is not properly insulated or climate controlled). 7) Service calls resulting in customer education. 8) Improper Installation (ie. Building-in of a free standing appliance or using an appliance outdoors that is not approved for out door application). Proof of purchase date will be required for warranty claims; retain bills of sale. In the event that warranty service is required, present Proof of purchase date will be required for warranty claims; so, please retain bills of sale. In the event warranty service is required, present this document to our the proof of purchase to our authorized service depot. AUTHORIZED SERVICE DEPOT. Warranty Service Warranty Service In-home In Home Danby Products Limited Danby Products Limited PO 1778, Guelph, Ontario, N1H 6Z9 POBox Box 1778, Guelph, Ontario, Canada N1H Canada 6Z9 Telephone: (519) 837-0920 FAX: (519) 837-0449 Telephone: (519) 837-0920 FAX: (519) 837-0449 1-800-263-2629 1-800-263-2629 04/17 04/09 Danby Products Danby Products Inc. Inc. PO Box PO 669, Findlay, U.S.A. Box 669, Findlay,Ohio, Ohio, U.S.A. 45840 45840 Telephone: Telephone: (419) 425-8627 (419) 425-8629 (419) 425-8627 FAX: FAX: (419) 425-8629 Bienvenue Bienvenue à la famille Danby. Nous sommes fiers de la qualité de nos produits et nous croyons en le service fiable. Nous vous suggérons de lire ce manual d’utilisation avant de brancher votre nouvel appareil car il contient des informations inportantes sur l’utilisation, la sécurité, le dépannage et la maintenance, afin d’assurer la fiabilité et la longévité de votre appareil. Visitez www.Danby.com pour accéder aux outils d’autoservice, aux FAQ et bien plus encore. Pour obtenir de l’aide supplémentaire, composez 1-800-263-2629. Notez les informations ci-dessous; Vous aurez besoin de cette information pour obtenir un service sous garantie. Vous devez fournir le reçu d’achat original pour valider votre garantie et recevoir le service. Numéro de modèle: _____________________________________________ Numéro de serie: _______________________________________________ Date d’achat: __________________________________________________ Besoin d’assistance? Avant d’appeler pour service, voici quelques choses que vous pouvez faire pour nous aider à mieux vous servir. Lire ce manuel du propriétaire: Il contient des instructions pour vous aider à utiliser et à maintenir votre appareil correctement. Si vous recevez un appareil endommagé: Contactez immédiatement le revendeur ou l’entrepreneur qui vous a vendu l’appareil. Gagnez du temps et de l’argent: Avant d’appeler pour service, consultez la section de dépannage à la fin de ce manuel. Cette section vous aidera à résoudre les problèmes courants pouvant survenir. 1-800-26- Danby (1-800-263-2629) 13 Informations importantes de sécurité LIRE ET SUIVRE TOUTES LES INSTRUCTIONS DE SÉCURITÉ EXIGENCES DE SÉCURITÉ INSTRUCTIONS DE MISE À LA TERRE Cet appareil n’est pas destiné à être utilisé par des personnes (y compris des enfants) dont les capacités physiques, sensorielles ou mentales peuvent être différentes ou réduites, ou qui n’ont pas d’expérience ou de connaissances, à moins que ces personnes ne soient surveillées ou formées pour faire fonctionner l’appareil par une personne responsable de leur sécurité. Cet appareil doit être mis à la terre. La mise à la terre réduit le risque de choc électrique en fournissant un câble d’échappement pour le courant électrique. Les enfants devraient être surveillés pour s’assurer qu’ils ne jouent pas avec l’appareil. Pour éviter tout risque de choc électrique, ne pas utiliser cet appareil dans une zone susceptible d’accumuler de l’eau stagnante. Si cette condition se développe, débranchez l’alimentation avant de pénétrer dans l’eau. Ne pas stocker ou utiliser des matériaux combustibles tels que de l’essence ou d’autres vapeurs ou liquides inflammables à proximité de ce ou d’un autre appareil. Ne pas insérer de doigts ou d’autres objets dans des grilles ou des ouvertures dans l’appareil. Ne pas couvrir ou bloquer les ouvertures d’admission et d’échappement. N’utilisez pas l’appareil sans le filtre installé. N’utilisez pas l’appareil à proximité de sources de chaleur. Cet appareil est destiné uniquement à des applications résidentielles et intérieures. N’utilisez pas cet appareil à l’extérieur. N’utilisez pas cet appareil pour des applications commerciales ou industrielles. Cet appareil possède un cordon doté d’un fil de mise à la terre avec une fiche à 3 broches. Le cordon d’alimentation doit être branché sur une prise correctement mise à la terre. Si la sortie est une prise murale à 2 broches, elle doit être remplacée par une prise murale à 3 broches correctement mise à la terre. La plaque signalétique en série indique la tension et la fréquence auxquelles l’appareil est conçu. AVERTISSEMENT - L’utilisation incorrecte de la fiche de mise à la terre peut entraîner un risque d’électrocution. Consultez un électricien qualifié ou un agent de service si les instructions de mise à la terre ne sont pas complètement comprises ou s’il existe un doute quant à savoir si l’appareil est correctement mis à la terre. Ne branchez pas l’appareil à des rallonges, des adaptateurs ou à un autre appareil dans la même prise murale. Ne pas épisser le cordon d’alimentation. Ne coupez ou retirez en aucun cas la troisième broche du cordon d’alimentation. Si le cordon d’alimentation est endommagé, il doit être remplacé par le fabricant, son agent de maintenance ou une personne qualifiée similaire afin d’éviter tout risque. Si le climatiseur est transporté sur son dos ou sur son côté, il doit être maintenu debout pendant 6 heures avant de brancher pour éviter d’endommager les composants internes. Gardez l’appareil à l’écart des murs, des meubles et des rideaux avec un jeu d’au moins 30 cm (12 pouces) sur tous les côtés. GARDEZ CES INSTRUCTIONS! 14 INSTRUCTIONS D’INSTALLATION ACCESSORIES ASSEMBLAGE DU TROUSSE DE FENÊTRE 1. Adaptateur de sortie d’air 2. Tuyau d’échappement 3. Adaptateur de curseur de fenêtre 4. Boulons 5. Curseur de la fenêtre A 6. Curseur de fenêtre B et C 7. Verrous de roulette 8. Joint en mousse A (adhésif) 9. Joint en mousse B (adhésif) 10. Joint en mousse C (non adhésif) 11. Support de sécurité et 2 vis 12. Tuyau de drainage 13. Télécommande 1. Fixez l’adaptateur de sortie d’air et l’adaptateur de glissière de fenêtre sur l’extrémité du tuyau d’échappement. 1 2 3 4 5 2. Insérez l’adaptateur de sortie d’air dans la rainure inférieure de la sortie d’air à l’arrière de l’appareil. Assurez-vous que le crochet de l’adaptateur est aligné avec le siège du trou de la sortie d’air, puis faites-le glisser vers le bas 3. Mesurez l’ouverture de la fenêtre où le kit de fenêtre sera installé. Assembler autant de curseurs que nécessaire pour s’adapter à la fenêtre. 4. Si la longueur de la fenêtre nécessite les trois curseurs, utilisez deux boulons pour fixer les curseurs à la bonne longueur. 5. Si l’ouverture de la fenêtre est inférieure à la longueur minimale d’un seul curseur, utilisez le curseur qui contient le trou et coupez-le à la longueur correcte. Assurez-vous de ne pas couper l’extrémité qui a le trou car il est nécessaire d’attacher l’adaptateur de tuyau d’échappement. 6 1 7 8 2 9 10 11 12 13 OUTILS REQUIS 1. 2. 3. 4. 3 Tournevis Phillips de taille moyenne Ruban à mesurer ou règle Couteau ou ciseaux Scie (dans le cas où les curseurs de fenêtre doivent être coupés en taille) 15 INSTRUCTIONS D’INSTALLATION INSTALLATION DU TROUSSE DE FENÊTRE 1 Il existe deux méthodes d’installation possibles en fonction du type de fenêtre disponible. B A Installation dans une fenêtre à guillotine A 1. Couper les joints de mousse adhésive A et B à la longueur correcte pour la fenêtre. Fixez-les sur le cadre de la fenêtre et l’image comme indiqué. 2. Insérez le kit de curseur de fenêtre assemblé dans l’ouverture de la fenêtre. 2 3. Couper le joint d’étanchéité du pétre non adhésif C pour correspondre à la largeur de la fenêtre. Insérez le joint en mousse entre le verre et le cadre de la fenêtre pour éviter que l’air et les insectes ne pénètrent dans la pièce. 4. Installez le support de sécurité dans le cadre de la fenêtre avec les deux vis fournies. 5. Fixez l’adaptateur du curseur de fenêtre au trou dans le kit de curseur de fenêtre. 3 Remarque: Ne pas trop étendre ni plier le tuyau, car cela entravera le flux d’air. 4 5 16 B INSTRUCTIONS D'INSTALLATION Installation dans une fenêtre coulissante 1 1. Couper les joints de mousse adhésive A et B à la longueur correcte pour la fenêtre. Fixez-les sur le cadre de la fenêtre et l’image comme indiqué. B A A 2. Insérez le kit de curseur de fenêtre assemblé dans l’ouverture de la fenêtre. B 3. Couper le joint d’étanchéité du pétre non adhésif C pour correspondre à la largeur de la fenêtre. Insérez le joint en mousse entre le verre et le cadre de la fenêtre pour éviter que l’air et les insectes ne pénètrent dans la pièce. 2 4. Installez le support de sécurité dans le cadre de la fenêtre avec les deux vis fournies. 5. Fixez l’adaptateur du curseur de fenêtre au trou dans le kit de curseur de fenêtre. Remarque: Ne pas trop étendre ni plier le tuyau, car cela entravera le flux d’air. 3 4 5 17 INSTRUCTIONS D’UTILISATION CARACTÉRISTIQUES EMPLACEMENT Avant Placez le climatiseur sur un plancher lisse et plat qui est assez solide pour le supporter et tous les accessoires inclus. 1. 2. 3. 4. 5. 6. Panneau de contrôle Grille de sortie d’air Affichage LED Poignée (des deux côtés) Grille d’admission d’air Rouleaux Assurez-vous que l’appareil est à niveau pour minimiser les bruits et les vibrations. L’appareil doit être installé près d’une prise de mise à la terre et la sortie de vidange à l’arrière de l’appareil doit être accessible. 1 2 3 Ne pas couvrir les entrées d’air ou les prises de courant ou le récepteur de la télécommande sur le panneau de commande. L’appareil nécessite un dégagement de 30 cm (12 pouces) sur le devant et sur les côtés. 4 5 6 Arrière 1. 2. 3. 4. Grille d’admission d’air Sortie d’air Sortie de vidange Cordon d’alimentation L’appareil nécessite au moins 50 cm (20 pouces) de dégagement sur le dos. 1 2 3 4 18 INSTRUCTIONS D’UTILISATION PANNEAU DE CONTRÔLE TÉLÉCOMMANDE 1. Bouton du ventilateur: Appuyez pour sélectionner la vitesse du ventilateur; bas, moyen, haut. 1. Bouton du ventilateur: Appuyez pour sélectionner la vitesse du ventilateur; bas, moyen, haut. 2. Bouton de mode: Appuyez pour sélectionner le mode désiré; frais, sec, ventilateur. 2. Bouton d’oscillation: Appuyez sur pour démarrer la fonction d’oscillation automatique. Lorsque le oscillation automatique est activé, appuyez à nouveau pour arrêter le persienne à l’angle souhaité. 3. Bouton d’alimentation: Appuyez pour allumer ou éteindre l’appareil. 4. Boutons haut et bas: • Utilisé pour ajuster la température de consigne par incréments de 1°. • Appuyez et maintenez les deux boutons haut et bas pendant 3 secondes pour changer l’affichage de la température de °C à °F. 3. Bouton de dormir: Appuyez sur pour démarrer la fonction de dormir. 4. Boutons haut et bas: Utilisé pour régler la température et la minuterie. 5. Bouton d’alimentation: Appuyez pour allumer ou éteindre l’appareil. 2 1 6. Bouton de mode: Appuyez pour sélectionner le mode désiré; frais, sec, ventilateur. 3 7. Bouton de minuterie: Appuyez sur pour régler la fonction de minuterie. 8. Bouton de °C/°F: Appuyez sur pour changer l’affichage de la température de °C à °F. 4 AFFICHAGE LED 1. Affichage de la température et de la minuterie: Affiche la température réglée du réglage de la minuterie. 4 3. Indicateur de minuterie: S’allume si la minuterie est activée. 2 4. Affichage de la vitesse du ventilateur: Affiche le réglage actuel de la vitesse du ventilateur; bas, med, haut. 5. Affichage du mode: Affiche le mode actuel frais, sec, ventilateur. 2 1 3 5 6 1 2. Échelle de température: Indique si l’échelle de température est réglée sur °C ou °F. 4 19 7 5 3 8 INSTRUCTIONS D’UTILISATION Modes de fonctionnement Fonction de minuterie • Mode refroidissement (Cool) Pour régler la minuterie d’extinction: Choisissez le mode cool pour régler la fonction de refroidissement. Utilisez les flèches haut et bas pour choisir la température désirée. Appuyez sur le bouton du ventilateur pour régler la vitesse du ventilateur. 1. Assurez-vous que l’appareil est allumé. 2. Appuyez sur le bouton de la minuterie, l’heure sur l’écran clignotera. 3. Appuyez sur le bouton de la minuterie pour sélectionner le nombre d’heures désiré avant que l’appareil s’éteigne. La température peut être réglée dans une plage de 18 à 32°C (64 à 90°F). Pour régler le minuteur d’activation: Le tuyau d’échappement doit être installé en mode froid pour assurer les meilleurs résultats. 1. Assurez-vous que l’appareil est éteint. 2. Appuyez sur le bouton de la minuterie, l’heure sur l’écran clignotera. 3. Appuyez sur le bouton de la minuterie pour sélectionner le nombre d’heures désiré avant que l’appareil s’allume. • Mode sec (Dry) Choisissez le mode sec pour éliminer l’excès d’humidité de l’air pendant les périodes de forte humidité. Toute l’eau tirée de l’air va s’accumuler à l’intérieur de l’appareil et s’évaporer à cause de la chaleur du compresseur. Dans des conditions particulièrement humides, il peut être nécessaire de vider le bac de récupération lorsqu’il est plein. Appuyez sur le bouton du ventilateur pour régler la vitesse du ventilateur. Remarques: • L’affichage revient à l’affichage du réglage de la température si l’appareil ne reçoit pas de signal pendant une période de 5 secondes pendant la programmation. • Allumer ou éteindre l’appareil à tout moment ou ajuster le réglage de la minuterie à 0,0 heure annulera les réglages de la minuterie. • La minuterie peut être réglée entre 1 et 24 heures. Le tuyau d’échappement doit être installé en mode sec pour assurer les meilleurs résultats. • Mode ventilateur (Fan) Fonction de dormir Choisissez le mode ventilateur pour faire fonctionner le ventilateur interne sans engager la fonction de refroidissement. Appuyez plusieurs fois sur le bouton du ventilateur pour choisir la vitesse du ventilateur, faible, moyenne ou élevée. La fonction de dormir peut être utilisée pour conserver l’énergie pendant les heures de dormir. Lorsqu’elle est sélectionnée, la température réglée augmentera de 2 degrés sur une période de 2 heures. L’appareil maintient la nouvelle température réglée pendant 7 heures avant de revenir au fonctionnement normal. • Mode de chauffage (Heat) Choisissez le mode de chauffage pour régler la fonction de chauffage. Utilisez les flèches haut et bas pour choisir la température désirée. Appuyez sur le bouton du ventilateur pour régler la vitesse du ventilateur. La fonction de dormir peut être annulée à tout moment en appuyant sur le bouton de dormir. La température peut être réglée entre 13 à 27°C (55 à 81°F). 20 INSTRUCTIONS D’UTILISATION REMPLACEMENT DES PILES DE LA TÉLÉCOMMANDE La télécommande arrivera avec une pile bouton CR2025 préinstallée. Il peut être nécessaire de retirer une bande isolante transparente en plastique avant la première utilisation de la télécommande. 1. Suivez les étapes ci-dessous pour remplacer la batterie. 2. Utilisez un tournevis pour retirer la vis qui fixe le couvercle de la batterie. Poussez le crochet du couvercle de la batterie vers la droite pour le libérer de la télécommande. Retirez le couvercle de la batterie. 1 IMPORTANT 2 Ne pas jeter les piles en tant que déchets municipaux non triés. Reportez-vous aux lois locales pour l’élimination correcte des piles. DRAINAGE DE L’EAU Lorsque le bac de vidange interne est plein, l’appareil émet 8 bips et l’afficheur numérique affiche le code d’erreur P1. L’action de climatisation ou de déshumidification s’arrête, mais le ventilateur peut continuer à fonctionner. Suivez les étapes ci-dessous pour vider l’appareil. 1. Éteignez l’appareil et débranchez-le de la source d’alimentation. 2. Déplacez soigneusement l’appareil dans un endroit où l’eau peut être vidangée. 3. Retirez le bouchon de vidange et laissez l’eau s’écouler complètement. 4. Replacez le bouchon de vidange inférieur, en appuyant fermement pour assurer un ajustement serré et sans fuites. 5. Le symbole d’erreur P1 disparaîtra et l’appareil reprendra sa fonction normale une fois le courant rétabli. Remarques: • Le climatiseur ne répondra pas si des rideaux, des portes ou d’autres matériaux bloquent le signal de la télécommande vers l’appareil. • Si le récepteur de signal infrarouge sur l’unité intérieure est exposé à la lumière directe du soleil, le climatiseur peut ne pas fonctionner correctement. Utilisez des rideaux pour empêcher la lumière du soleil de tomber sur le récepteur. • Ne laissez pas la télécommande se mouiller. • N’exposez pas la télécommande à la lumière directe du soleil ou à la chaleur. • Ne laissez pas la batterie dans la télécommande si elle ne va pas être utilisée pendant plus de 2 mois. 21 SOINS ET MAINTENANCE FILTRES À AIR NETTOYAGE Il y a trois filtres à air dans cet appareil. Les filtres à air doivent être nettoyés toutes les deux semaines pour assurer une performance efficace. • Débranchez l’appareil avant de le nettoyer ou de l’entretenir. • Nettoyez le boîtier avec un chiffon humide tiède et un détergent neutre. Séchez le boîtier avec un chiffon sec non pelucheux. • N’utilisez pas d’essence, de diluant à peinture ou d’autres produits chimiques pour nettoyer l’appareil. • Ne pas laver l’appareil directement sous un robinet ou avec un tuyau. Cela pourrait causer des dommages électriques. Dans les ménages avec des animaux, les filtres à air doivent être nettoyés plus souvent et les grilles externes doivent être essuyées pour empêcher le flux d’air bloqué. 1 STOCKAGE À LONG TERME 2 1. Vidangez toute l’eau de l’appareil. 2. Faites fonctionner l’appareil en mode ventilateur pendant une demi-journée dans une pièce chaude pour sécher l’intérieur de l’appareil et éviter la formation de moisissure. 3. Éteignez l’appareil et débranchez-le, envelopper le cordon et l’attacher avec du ruban adhésif. 4. Retirez la batterie de la télécommande. 5. Nettoyez les filtres à air et réinstallez-les. 6. Rangez l’appareil dans un endroit frais et sombre. Une exposition prolongée à la lumière directe du soleil ou à une chaleur extrême peut réduire la durée de vie de l’appareil. DISPOSITION Cet appareil ne doit pas être traité comme un déchet ménager ordinaire. Vérifiez la conformité réglementaire locale concernant l’élimination approuvée et sûre de cet appareil. CODES D’ERREUR 3 E1 - erreur du capteur de température ambiante E2 - erreur du capteur de température de l’évaporateur E3 - erreur du capteur de température du condenseur E4 - erreur de communication du panneau d’affichage E7 - Dysfonctionnement du passage à zéro P1 - Bac à eau plein - Fixez le tuyau de vidange et vidangez l’excès d’eau 22 DÉPANNAGE Danby soins du consommateur: 1-800-263-2629 Heures d’ouverture: Lundi à Jeudi 8 h 30 à 18 h, heure normale de l’Est Vendredi de 8 h 30 à 16 h, heure normale de l’Est Les informations contenues dans ce manuel sont sujettes à modification sans préavis. PROBLEME L’appareil ne fonctionnera pas CAUSE POSSIBLE • La fiche n’est pas complètement insérée dans la prise murale • Fusible soufflé ou disjoncteur Refroidissement insuffisant • Les filtres à air sont sales • Flux d’air bloqué • La taille de l’appareil est trop petite pour l’application Bruit • Le terrain n’est pas au niveau • Les filtres à air sont sales • Les sons de gargouille sont normaux; c’est le fluide frigorigène qui se déplace à l’intérieur de l’appareil Odeurs • Formation de moisissure sur des surfaces intérieures humides • Placer un comprimé d’algaïcide dans un moule de base; enfoncer la tablette à travers la grille à l’arrière de l’appareil 23 GARANTIE LIMITÉEAPPLIANCE “À DOMICILE” LIMITED IN-HOME WARRANTY Cet de qualité est to garanti exempt de tout vice première et deprovided fabrication, s’il est Thisappareil quality product is warranted be free from manufacturer’s defectsdein matière material and workmanship, that the unit is utilisé useddans underles theconditions normal operating normales par le fabricant. conditionsrecommandées intended by the manufacturer. Cette garantie n’est offerte qu’à l’acheteur parProducts DanbyLimited Products Limited (Canada)Products ou Danby Products Inc. This warranty is available only to the person to whom initial the unitde wasl’appareil originally soldvendu by Danby (Canada) or Danby Inc. (U.S.A.) (hereafter (E.U.A.) (ci-après « Danby ») ou par l’un des ses distributeurs agréés et elle ne peut être transférée. “Danby”) or by an authorized distributor of Danby, and is non-transferable. CONDITIONS Les pièces en plastique sont garanties pendant trente (30)TERMS joursOFseulement WARRANTY à partir de la date de l’achat, sans aucune prolongation prévue. Plastic parts, are warranted for thirty (30) days only from purchase date, with no extensions provided. Premiers 12 mois First Year Pour bénéficier duToservice obtain Service Pendant les premiers douze (12) mois, toutes les pièces fonctionnelles de ce produit qui s’avèrent défectueuses seront réparées ou months, remplacées, selonparts le choix du garant, sans frais à l’acheteur initial. During the first twelve (12) any functional of this product found to be defective, will be repaired or replaced, option, at no charge to the ORIGINAL purchaser. at warrantor’s S’adresser au détaillant qui a vendu l’appareil, ou à la station technique agréée de service la plus proche, où les réparations doivent effectuées par un Service” technicien réparations sont effectuées Danby reserves the right to limitêtre the boundaries of “In Home to thequalifié. proximity ofSianles Authorized Service Depot. Any app parliance quiconque autre que la station de service agréée où à des fins commerciales, toutes les obligations de Danby requiring service outside the limited boundaries of “In Home Service” , it will be the consumer’s responsibility to transport the appliance (at en own vertu de cette seront annulées. their expense) to thegarantie original retailer (point of purchase) or a service depot for repair. See “Boundaries of In Home Serv ice” below. Contact your dealer from whom your unit was purchased, or contact your nearest authorized Danby service depot, where service Limites de l’entretien Danby se réserve le droit de limiter les limites de "Service au domicile" à proximité d'un dépôt de service must be performed by a qualified service technician. à domicile agréé. Tout appareil nécessitant un service en dehors des limites de "Service à domicile" sera la responsabilité If service is performed on the by anyonel'appareil other than anà authorized servicefrais depot, the unit is used for commercial applidépôt de cation, all du consommateur de units transporter laur propres le orpoint d'achat original ou un service obligations of Danby under this warranty shall be void. pour réparation. Si l'appareil est installé à plus de 100 kilomètres (62 milles) du centre de service le plus proche, il doit être livré à l'atelier de réparation autorisé par Danby le plus proche, car l'entretien doit Boundaries of If the appliance is être installed in a location is 100 kilometers (62 miles) or morepour from the nearest service center your unit par must be uniquement réalisé par unthat technicien qualifié et certifié effectuer un entretien couvert la garantie In Home Service delivered to the nearest authorized Danby Service Depot, as service must only be performed by a technician qualified and certif ied for de Danby. warranty service by Danby. Transportation charges to and from the service location are not protected by this warranty and are t he responsibility of the purchaser. Les frais de transport entre votre domicile et le lieu de l'entretien ne sont pas couverts par la présente garantie et doivent être acquittés par l'acheteur. Nothing within this warranty shall imply that Danby will be responsible or liable for any spoilage or damage to food or other c ontents of this appliance, whether due Aucune partie deappliance, la garantie ne whether prévoitproper implicitement to any defect of the or its use, or improper.que le fabricant sera tenu responsable des dommages subis par les aliments ou d’autres types de contenu, qu’ils soient causés par la défectuosité de l’appareil ou par son usage adéquat ou inadéquat. EXCLUSIONS EXCLUSIONS Save as herein provided, Danby, there are no other warranties, conditions, representations or guarantees, express or implied, m ade or intended by Danby or its En vertu de la présente, il n’existe aucune autre garantie, condition ou représentation, qu’elle soit exprimée ou tacite, de façon authorized distributors and all other warranties, conditions, representations or guarantees, including any warranties, conditio ns, representations or guarantees manifeste ou intentionnelle, par Danby ou ses distributeurs agréés. De même, sont exclues toutes les autres garanties, conditions ou under any Sale of Goods Act or like legislation or statue is hereby expressly excluded. Save as herein provided, Danby shall no t be responsible for any damages représentations, y compris les garanties, conditions ou représentations en vertu de toute loi régissant la vente de produits ou de toute to persons or property, including the unit itself, howsoever caused or any consequential damages arising from the malfunction o f the unit and by the purchase of autre législation ou règlement semblables. En vertu de la présente, Danby ne peut être tenue responsable en cas de blessures the unit, the purchaser does hereby agree to indemnify and hold harmless Danby from any claim for damages to persons or propert y caused by the unit. corporelles ou des dégâts matériels, y compris à l’appareil, quelle qu’en soit les causes. Danby ne peut pas être tenue responsable des dommages indirects dus au fonctionnement défectueux de l’appareil. En achetant l’appareil, l’acheteur accepte de mettre à GENERAL PROVISIONS pour toute blessure corporelle ou tout dégât matériel couvert et de dégager Danby de toute responsabilité en cas de réclamation causé par cet appareil. No warranty or insurance herein contained or set out shall apply when damage or repair is caused by any of the following: CONDITIONS GÉNÉRALES 1) Power failure. La garantie ou assurance ci-dessus ne s’applique pas si les dégâts ou réparations sont dus aux cas suivants: 2) Damage in transit or when moving the appliance. 1) Panne de courant. 3) Improper power supply such as low voltage, house wiring inadequate fuses. 2) Dommage subis pendant le transport ou ledefective déplacement deorl’appareil. 4) Accident, alteration, abuse or misuse of the appliance such as inadequate air circulation in theincorrects). room or abnormal operating con ditions 3) Alimentation électrique incorrecte (tension faible, câblage défectueux, fusibles (extremely high or lowemploi room temperature). 4) Accident, modification, abusif ou incorrect de l’appareil tel qu'une circulation d'air inadéquate dans la pièce ou des conditions deforfonctionnement anormales extrêmement ou basse). 5) Use commercial or industrial purposes(température (ie. If the appliance is not installedélevée in a domestic residence). 5) Utilisation un but theft, commercial ou industriel (à such savoir, si l'appareil 6) Fire,dans water damage, war, riot, hostility, acts of God as hurricanes, floods n'est etc. pas installé dans un domicile résidentiel). 6) Incendie, dommages causés par education. l’eau, vol, guerre, émeute, hostilités, cas de force majeure (ouragan, inondation, etc.). 7) Service calls resulting in customer 7) Visites d’un technicien pour expliquer l’appareil au propriétaire. 8) Improper Installation (ie. Building-in of alefreefonctionnement standing appliancede or using an appliance outdoors that is not approved for out door application). 8) Installation inappropriée (par exemple, encastrement d'un appareil autoportant, ou utilisation extérieure d'un appareil non conçu à Proof of purchase date will be required for warranty claims; so, please retain bills of sale. In the event warranty service is required, present this document cet effet, y compris, mais sans s'y limiter: les garages, les patios, les porches ou ailleurs qui ne sont pas correctement isolés outo our AUTHORIZED SERVICE DEPOT. climatisés). La preuve de la date d'achat sera requise pour les réclamations de garantie; Conserver les factures de vente. Dans le cas où un Warranty Service service de garantie est requis, présentez la preuve d'achat à notre dépôt de service agréé. In-home Service sous garantie Service au domicile Danby Products Limited Danby Limited PO Box Products 1778, Guelph, Ontario, Canada N1H 6Z9 PO Box 1778, Guelph, Canada N1H 6Z9 Telephone: (519) 837-0920 FAX:Ontario, (519) 837-0449 Téléphone : (519) 837-0920 Télécopieur: (519) 837-0449 1-800-263-2629 1-800-263-2629 04/17 04/09 Danby Products Inc. Danby Inc. PO Box 669, Findlay, Ohio, U.S.A. Products 45840 PO Box 669, Ohio, Telephone: (419)Findlay, 425-8627 FAX: (419)U.S.A. 425-862945840 Téléphone: (419) 425-8627 Télécopieur: (419) 425-8629 Bienvenido Bienvenido a la familia Danby. Estamos orgullosos de nuestros productos de calidad y creemos en un servicio confiable. Sugerimos que lea este manual del propietario antes de conectar el nuevo aparato ya que contiene información importante sobre la operación, información de seguridad, solución de problemas y consejos de mantenimiento para garantizar la fiabilidad y longevidad de su electrodoméstico. Visite www.Danby.com para acceder a herramientas de autoservicio, preguntas frecuentes y mucho más. Para asistencia adicional, llame al 1-800-263-2629. Tenga en cuenta la información siguiente; Necesitará esta información para obtener un servicio bajo garantía. Debe proporcionar el recibo de compra original para validar su garantía y recibir servicio. Número de modelo: _____________________________________________ Número de serie: _______________________________________________ Fecha de compra: _______________________________________________ Necesitas ayuda? Antes de llamar al servicio, aquí hay algunas cosas que puede hacer para ayudarnos a servirle mejor. Lea este manual del propietario: Contiene instrucciones para ayudarle a usar y mantener su aparato correctamente. Si recibe un aparato dañado: Inmediatamente póngase en contacto con el minorista o el constructor que le vendió el aparato. Ahorre tiempo y dinero: Consulte la sección de solución de problemas al final de este manual antes de llamar. Esta sección le ayudará a resolver problemas comunes que pueden ocurrir. 1-800-26- Danby (1-800-263-2629) 25 Informacion de Seguridad Importante LEA Y SIGA TODAS LAS INSTRUCCIONES DE SEGURIDAD REQUERIMIENTOS DE SEGURIDAD INSTRUCCIONES DE CONEXION A TIERRA Este aparato no está diseñado para ser utilizado por personas (incluyendo niños) cuyas capacidades físicas, sensoriales o mentales sean diferentes o reducidas, o que carezcan de experiencia o conocimiento, a menos que dichas personas reciban supervisión o entrenamiento para operar el aparato por una persona responsable de su uso. la seguridad. Este aparato debe estar conectado a tierra. La puesta a tierra reduce el riesgo de descarga eléctrica proporcionando un cable de escape para la corriente eléctrica. Los niños deben ser supervisados para asegurarse de que no juegan con el aparato. Para evitar el riesgo de descarga eléctrica, no utilice este aparato en un área que pueda acumular agua estancada. Si se desarrolla esta condición, desconecte la fuente de alimentación antes de entrar en el agua. No almacene ni utilice materiales combustibles tales como gasolina u otros vapores o líquidos inflamables cerca de este o de cualquier otro aparato. No introduzca los dedos u otros objetos en las parrillas o aberturas del aparato. No cubra ni bloquee las aberturas de admisión y de escape. No opere el aparato sin el filtro instalado. No utilice el aparato cerca de fuentes de calor. Este aparato está destinado únicamente a aplicaciones interiores y residenciales. No utilice este aparato al aire libre. No utilice este aparato para aplicaciones comerciales o industriales. Este aparato tiene un cable que tiene un cable de conexión a tierra con un enchufe de 3 clavijas. El cable de alimentación debe estar enchufado en un tomacorriente que esté debidamente conectado a tierra. Si el tomacorriente es un tomacorriente de dos clavijas, debe ser reemplazado por un tomacorriente de 3 clavijas con conexión a tierra adecuada. La placa de características en serie indica el voltaje y la frecuencia para los que está diseñado el artefacto. ADVERTENCIA - El uso incorrecto del enchufe de conexión a tierra puede ocasionar un riesgo de descarga eléctrica. Consulte a un electricista o agente de servicio calificado si las instrucciones de conexión a tierra no se entienden completamente o si existe duda sobre si el aparato está debidamente conectado a tierra. No conecte el aparato a cables de extensión, adaptadores o junto con otro aparato en la misma toma de corriente. No empalme el cable de alimentación. No corte ni extraiga en ningún caso la tercera clavija de tierra del cable de alimentación. Si el cable de alimentación está dañado, debe ser reemplazado por el fabricante, su agente de servicio o persona calificada similar para evitar riesgos. Si el acondicionador de aire es transportado en su parte posterior o lateral, se debe permitir que se mantenga erguido durante 6 horas antes de enchufarlo para evitar daños a los componentes internos. Mantenga el aparato alejado de paredes, muebles y cortinas con un espacio de al menos 30 cm (12 pulgadas) por todos lados. ¡GUARDA ESTAS INSTRUCCIONES! 26 INSTRUCCIONES DE INSTALACIÓN ACCESORIOS MONTAJE DEL KIT DE LA VENTANA 1. Adaptador de salida de aire 2. Manguera de escape 3. Adaptador deslizante de ventana 4. Pernos 5. Ventana deslizante A 6. Ventana deslizante B y C 7. Cerraduras de la rueda 8. Foam seal A (adhesivo) 9. Junta de espuma B (adhesivo) 10. Foam seal C (no adhesivo) 11. Soporte de seguridad y 2 tornillos 12. Manguera de drenaje 13. Control remoto 1. Conecte el adaptador de salida de aire y el adaptador deslizante de la ventana en cualquier extremo de la manguera de escape. 1 2 3 4 5 6 2. Inserte el adaptador de salida de aire en la ranura inferior de la salida de aire en la parte posterior del aparato. Asegúrese de que el gancho del adaptador esté alineado con el orificio de la salida de aire y luego deslice hacia abajo 3. Mida la abertura de la ventana donde se instalará el kit de la ventana. Ensamble todos los controles deslizantes que sean necesarios para adaptarse a la ventana. 4. Si la longitud de la ventana requiere los tres controles deslizantes, use dos tornillos para fijar los controles deslizantes a la longitud correcta. 5. Si la apertura de la ventana es menor que la longitud mínima de un solo control deslizante, use el control deslizante que tiene el agujero y córtelo a la longitud correcta. Asegúrese de no cortar el extremo que tiene el orificio ya que esto es necesario para conectar el adaptador de la manguera de escape. 1 7 8 9 2 10 11 12 13 HERRAMIENTAS REQUERIDAS 1. 2. 3. 4. 3 Destornillador Phillips de tamaño mediano Cinta métrica o regla Cuchillo o tijeras Sierra (en el caso de que los controles deslizantes de la ventana deban cortarse a medida) 27 INSTRUCCIONES DE INSTALACIÓN INSTALAR EL KIT DE VENTANA 1 Existen dos métodos de instalación posibles según el tipo de ventana disponible. B A Instalación de ventana colgante A 1. Corte los sellos de espuma adhesiva A y B a la longitud correcta para la ventana. Adjúntelos a la hoja y marco de la ventana como se muestra. 2. Inserte el kit deslizante de la ventana ensamblada en la abertura de la ventana. 2 3. Corte el sello de potro no adhesivo C para que coincida con el ancho de la ventana. Inserte el sello de espuma entre el vidrio y el marco de la ventana para evitar que el aire y los insectos entren en la habitación. 4. Instale el soporte de seguridad en el marco de la ventana con los dos tornillos provistos. 5. Conecte el adaptador deslizante de la ventana al orificio en el kit de control deslizante de la ventana. 3 Nota: No extienda ni doble la manguera ya que esto impedirá el flujo de aire. 4 5 28 B INSTRUCCIONES DE INSTALACIÓN Instalación de ventana deslizante 1 1. Corte los sellos de espuma adhesiva A y B a la longitud correcta para la ventana. Adjúntelos a la hoja y marco de la ventana como se muestra. B A A 2. Inserte el kit deslizante de la ventana ensamblada en la abertura de la ventana. B 3. Corte el sello de potro no adhesivo C para que coincida con el ancho de la ventana. Inserte el sello de espuma entre el vidrio y el marco de la ventana para evitar que el aire y los insectos entren en la habitación. 2 4. Instale el soporte de seguridad en el marco de la ventana con los dos tornillos provistos. 5. Conecte el adaptador deslizante de la ventana al orificio en el kit de control deslizante de la ventana. Nota: No extienda ni doble la manguera ya que esto impedirá el flujo de aire. 3 4 5 29 INSTRUCCIONES DE OPERACIÓN CARACTERISTICAS UBICACIÓN Frente Coloque el acondicionador de aire en un piso liso y nivelado que sea lo suficientemente fuerte para soportarla y todos los accesorios incluidos. 1. 2. 3. 4. 5. 6. Panel de control Parrilla de salida de aire Pantalla LED Manija (ambos lados) Rejilla de entrada de aire Rodillos Asegúrese de que el aparato esté nivelado para minimizar el ruido y las vibraciones. 1 2 3 El electrodoméstico debe instalarse cerca de un receptáculo puesto a tierra y debe tener acceso a la salida de drenaje de desbordamiento en la parte posterior del electrodoméstico. No cubra las entradas o salidas de aire ni el receptor de control remoto en el panel de control. El aparato requiere 30 cm (12 pulgadas) de espacio libre en el frente y los costados. 4 5 6 Posterior 1. 2. 3. 4. Rejilla de entrada de aire Salida de aire Desagüe Cable de alimentación El aparato requiere al menos 50 cm (20 pulgadas) de espacio libre en la parte posterior. 1 2 3 4 30 INSTRUCCIONES DE OPERACIÓN PANEL DE CONTROL CONTROL REMOTO 1. Botón de ventilador: Presione para seleccionar la velocidad del ventilador; bajo medio alto. 1. Botón de ventilador: Presione para seleccionar la velocidad del ventilador; bajo medio alto. 2. Botón de modo: Presione para seleccionar el modo deseado; fresco, seco, ventilador. 2. Botón de oscilación: Presione para iniciar la función de oscilación automática. Cuando la oscilación automática está activada, presione de nuevo para detener la persiana en el ángulo deseado. 3. Botón de encendido: Presione para encender o apagar la unidad. 4. Botones arriba y abajo: • Se usa para ajustar la temperatura establecida en incrementos de 1°. • Mantenga presionados los botones hacia arriba y hacia abajo durante 3 segundos para cambiar la visualización de temperatura de °C a °F. 4. Botones arriba y abajo: Se usa para configurar la temperatura y el temporizador. 5. Botón de encendido: Presione para encender o apagar la unidad. 6. Botón de modo: Presione para seleccionar el modo deseado; fresco, seco, ventilador. 2 1 3. Botón de dormir: Pulse para iniciar la función del dormir. 7. Botón de temporizador: Presione para configurar la función del temporizador. 3 8. Botón °C/°F: Presione para cambiar la visualización de temperatura de °C a °F. 4 PANTALLA LED 1. Pantalla para la temperatura y el temporizador: Shows the set temperature of the timer setting. 4 2. Escala de temperatura: Indica si la escala de temperatura está ajustada a °C o °F. 2 3. Indicador del temporizador: Se ilumina si el temporizador está activado. 3 5. Pantalla de modo: Muestra el modo actual; fresco, seco, ventilador. 2 3 5 7 5 4. Visualización de la velocidad del ventilador: Muestra la configuración actual de la velocidad del ventilador; bajo, med, alto. 1 6 1 4 31 8 INSTRUCCIONES DE OPERACIÓN Modos de funcionamiento Función del temporizador • Modo frío (Cool) Para configurar el temporizador de apagado: Elija el modo frío para configurar la función de enfriamiento. Use las flechas hacia arriba y hacia abajo para elegir la temperatura deseada. Presione el botón del ventilador para ajustar la velocidad del ventilador. 1. Asegúrese de que el electrodoméstico esté encendido. 2. Presione el botón del temporizador, el tiempo en la pantalla parpadeará. 3. Presione el botón del temporizador para seleccionar la cantidad deseada de horas antes de que la unidad se apague. La temperatura puede ajustarse dentro de un rango de 18 - 32°C (64 - 90°F). La manguera de escape debe instalarse durante el modo frío para garantizar los mejores resultados. • Modo seco (Dry) Elija el modo seco para eliminar el exceso de humedad del aire durante los períodos de alta humedad. Toda el agua extraída del aire se acumulará dentro del aparato y se evaporará debido al calor del compresor. En condiciones especialmente húmedas, puede ser necesario vaciar la bandeja de drenaje cuando esté llena. Presione el botón del ventilador para ajustar la velocidad del ventilador. La manguera de escape debe instalarse durante el modo seco para garantizar los mejores resultados. • Modo de ventilador (Fan) Elija el modo de ventilador para ejecutar el ventilador interno sin activar la función de enfriamiento. Presione el botón del ventilador repetidamente para elegir la velocidad del ventilador, baja, med, alta. • Modo calor (Heat) Elija el modo de calor para establecer la función de calentamiento. Use las flechas hacia arriba y hacia abajo para elegir la temperatura deseada. Presione el botón del ventilador para ajustar la velocidad del ventilador. Para configurar el temporizador de encendido: 1. Asegúrese de que el electrodoméstico esté apagado. 2. Presione el botón del temporizador, el tiempo en la pantalla parpadeará. 3. Presione el botón del temporizador para seleccionar la cantidad deseada de horas antes de que la unidad se encienda. Notas: • La pantalla volverá a mostrar la configuración de temperatura si el dispositivo no recibe una señal dentro de un período de 5 segundos durante la programación. • Encender o apagar el aparato en cualquier momento o ajustar la configuración del temporizador a 0.0 horas cancelará la configuración del temporizador. • El temporizador se puede configurar entre 1 y 24 horas. Función de dormir La función de dormir se puede utilizar para conservar la energía durante las horas de dormir. Cuando se selecciona, la temperatura ajustada aumentará en 2 grados durante un período de 2 horas. El aparato mantendrá la nueva temperatura ajustada durante 7 horas antes de volver automáticamente al funcionamiento normal. La función sleep se puede cancelar en cualquier momento pulsando el botón dormir. La temperatura puede ajustarse dentro de un rango de 13 - 27°C (55 - 81°F). 32 INSTRUCCIONES DE OPERACIÓN REEMPLAZO DE LAS BATERÍAS DEL CONTROL REMOTO EL DRENAJE DEL AGUA Cuando la bandeja de drenaje interna se llena, el aparato emitirá un pitido 8 veces y la pantalla digital mostrará el código de error P1. La acción de aire acondicionado o deshumidificación se detendrá pero el ventilador puede continuar funcionando. El control remoto llegará con una batería de monedas CR2025 preinstalada. Es posible que sea necesario quitar una tira aislante plástica transparente antes de usar por primera vez el control remoto. 1. Siga los pasos a continuación para reemplazar la batería. 2. Use un destornillador para quitar el tornillo que asegura la tapa de la batería. Empuje el gancho de la tapa de la batería hacia la derecha para liberarlo del control remoto. Saca la tapa de la batería. 1 1. Apague el aparato y desenchúfelo de la fuente de alimentación. 2. Mueva cuidadosamente el aparato a un lugar donde pueda drenar el agua. 3. Retire el tapón de drenaje y permita que el agua se drene completamente. IMPORTANTE 2 Siga los pasos a continuación para drenar el aparato. No deseche las baterías como desechos municipales no clasificados. Consulte las leyes locales para la eliminación adecuada de las baterías. 4. Vuelva a colocar el tapón de drenaje inferior, presionando firmemente para asegurar un ajuste perfecto y sin fugas. 5. El símbolo de error P1 desaparecerá y el dispositivo volverá a funcionar normalmente una vez que se restablezca la energía. Notas: • El acondicionador de aire no responderá si cortinas, puertas u otros materiales bloquean la señal del control remoto al artefacto. • Si el receptor de señal infrarroja de la unidad interior está expuesto a la luz solar directa, es posible que el acondicionador de aire no funcione correctamente. Use cortinas para evitar que la luz del sol caiga sobre el receptor. • No permita que el control remoto se moje. • No exponga el control remoto a la luz solar directa o al calor. • No deje la batería en el control remoto si no la va a usar durante más de 2 meses. 33 CUIDADO Y MANTENIMIENTO FILTROS DE AIRE LIMPIEZA Hay tres filtros de aire en este aparato. Los filtros de aire deben limpiarse cada dos semanas para garantizar un rendimiento eficiente. • Desenchufe el aparato antes de limpiarlo o repararlo. • Limpie el gabinete con un paño húmedo tibio y detergente neutro. Seque el gabinete con un paño seco sin pelusa. • No use gasolina, diluyente de pintura ni otros productos químicos para limpiar el aparato. • No lave el aparato directamente debajo de un grifo ni con una manguera. Puede causar daño eléctrico. En hogares con animales, los filtros de aire pueden necesitar una limpieza más frecuente y es posible que las parrillas externas deban ser limpiadas para evitar el flujo de aire bloqueado. 1 ALMACENAMIENTO A LARGO PLAZO 2 1. Drene toda el agua del aparato. 2. Haga funcionar el aparato en modo ventilador durante medio día en una sala cálida para secar el interior del aparato y evitar la formación de moho. 3. Apague el aparato y desenchúfelo, envuelva el cable y agréguelo con cinta adhesiva. 4. Retire la batería del control remoto. 5. Limpie los filtros de aire y vuelva a instalarlos. 6. Guarde el aparato en un lugar fresco y oscuro. La exposición prolongada a la luz solar directa o al calor extremo puede acortar la vida útil del artefacto. DISPOSICIÓN Este electrodoméstico no debe tratarse como un desperdicio doméstico común. Verifique el cumplimiento normativo local con respecto a la eliminación aprobada y segura de este electrodoméstico. CÓDIGOS DE ERROR 3 E1 - error del sensor de temperatura ambiente E2 - error del sensor de temperatura del evaporador E3 - error del sensor de temperatura del condensador E4 - error de comunicación del panel de visualización E7 - mal funcionamiento del cruce por cero P1 - la bandeja de agua está llena - conecte la manguera de drenaje y drene el exceso de agua 34 SOLUCIÓN DE PROBLEMAS Danby cuidado del consumidor: 1-800-263-2629 Horas de operación: Lunes a Jueves 8:30 am - 6:00 pm Hora estándar del este Viernes 8:30 am - 4:00 pm Hora estándar del este La información de este manual está sujeta a cambios sin previo aviso. PROBLEMA El aparato no funcionará CAUSA POSIBLE • El enchufe no está completamente insertado en la toma de corriente de la pared • Fusible fundido o disyuntor Enfriamiento insuficiente • Los filtros de aire están sucios • Flujo de aire bloqueado • El tamaño del dispositivo es demasiado pequeño para la aplicación Ruido • El suelo no está nivelado • Los filtros de aire están sucios • Sonidos de gorjeo son normales; este es el refrigerante que se mueve dentro del aparato Olores • Formación del molde en superficies mojadas internas • Coloque un comprimido de algicida en el molde de la base; empuje la tableta a través de la parrilla en la parte posterior del aparato 35 GARANTÍA LIMITADA “A DOMICILIO” LIMITED IN-HOME APPLIANCE WARRANTY Este de iscalidad contra defectos de fabricación, incluyendo mano obra, siempre y operating Thisproducto quality product warrantedestá to begarantizado free from manufacturer’s defects in material and workmanship, providedpartes that the yunit is deused under the normal cuando la intended unidadbysetheutilice bajo las condiciones normales de funcionamiento para las que fue diseñado. conditions manufacturer. Esta solamente para quesold haya comprado esta unidad directamente de Danby Thisgarantía warranty is está available only to thedisponible person to whom the la unitpersona was originally by Danby Productsoriginalmente Limited (Canada) or Danby Products Inc. (U.S.A.) (hereafter Products Limited (Canada) o Danby Products Inc. (U.S.A.) (en adelante “Danby”) o uno de sus distribuidores “Danby”) or by an authorized distributor of Danby, and is non-transferable. autorizados, y no es transferible. CONDICIONES DE LA GARANTÍA Las piezas plásticas, se autorizan por treinta (30) días solamente a partir de la fecha de la compra, sin las extensiones TERMS OF WARRANTY proporcionadas. Plastic parts, are warranted for thirty (30) days only from purchase date, with no extensions provided. Primeros 12 meses Durante los primeros doce (12) meses, cualquier parte en buen estado de este producto que resulte defectuosa, First Year During the first twelve (12) months,sellado, any functional of this product found to be defective, will be del repaired or replaced, at warrantor’s incluyendo cualquier sistema seráparts reparado o reemplazado, a opción option, at nosin charge to thepara ORIGINAL purchaser. ORIGINAL. fabricante, cargo el comprador Para obtener Comuníquese con el distribuidor donde haya comprado la unidad, o llame al Taller de Servicio Autorizado más servicio cercano, donde porofun calificado. Si esta unidad es reparada enAny otro To obtain Danby reserves thedebe right toser limitreparada the boundaries “In técnico Home Service” to the proximity of an Authorized Service Depot. applugar que lianceno sea un Taller deoutside Servicio Autorizado, o of si “In la Home unidad se utiliza para aplicaciones comerciales, Danby se hará Service requiring service the limited boundaries Service” , it will be the consumer’s responsibility to transport the no appliance (at responsable de ninguna forma y la(point garantía será oranulada. their own expense) to the original retailer of purchase) a service depot for repair. See “Boundaries of In Home Serv ice” below. Contact your dealer from whom your unit was purchased, or contact your nearest authorized Danby service depot, where service Límites del servicio Danby se reserva el derecho de limitar la cobertura de "Servicio en Domicilio" sujeto a la proximidad de un must be performed by a qualified service technician. técnico a domicilio Taller de Servicio Autorizado. Para todo artefacto que requiera servicio fuera del área limitada de "Servicio en If service is performed the units by anyone other an authorized service depot, or hasta the unitelis used forde commercial appli cation, all Domicilio", el clienteonserá responsable porthan transportar dicho artefacto Taller Servicio Autorizado obligations of Danby this warranty shallestá be void. mas cercano. Si elunder electrodoméstico instalado en un lugar que se encuentra a 100 kilómetros (62 millas) o más del centro de servicios más cercano, se debe llevar la unidad al Centro de servicios Danby autorizado Boundaries of If the appliance ya is installed in a location that issólo 100 kilometers (62 miles) orun more from thecalificado nearest service center your unit mustpara be más cercano, que dicho servicio puede realizarlo técnico y certificado por Danby In Home Service delivered to the nearest authorized Danby Service Depot, as service must only be performed by a technician qualified and certif ied for prestar servicios de garantía. warranty service by Danby. Transportation charges to and from the service location are not protected by this warranty and are t he responsibility of the purchaser. Los cargos por transporte desde y hacia el lugar en que se efectúe el servicio técnico no están cubiertos por esta garantía y son de responsabilidad del comprador. Nothing within this warranty shall imply that Danby will be responsible or liable for any spoilage or damage to food or other c ontents of this appliance, whether due Nada esta garantía será responsable por cualquier daño que hayan sufrido los alimentos u otros to any dentro defect of de the appliance, or its use,implica whetherque properDanby or improper. contenidos de este aparato, ya sea debido a un defecto del aparato, o su uso, adecuado o inadecuado. EXCLUSIONS EXCLUSIONES Save as herein provided, Danby, there are no other warranties, conditions, representations or guarantees, express or implied, m ade or intended by Danby or its Salvo lo aquí indicado noconditions, existen otras garantías, condiciones o representaciones, o implícitas,orconcretas authorized distributors and allpor otherDanby, warranties, representations or guarantees, including any warranties, conditioexplícitas ns, representations guarantees o intencionales por parte de Danby o sus distribuidores autorizados y todas las demás garantías, condiciones o representaciones, under any Sale of Goods Act or like legislation or statue is hereby expressly excluded. Save as herein provided, Danby shall no t be responsible for any damages incluyendo garantía, condiciones o representaciones bajo cualquier Actafrom dethe Venta de Productos o legislación estatuto to persons orcualquier property, including the unit itself, howsoever caused or any consequential damages arising malfunction o f the unit and by theopurchase of similar, quedan de esta forma expresamente excluidas. Salvo lo aquí indicado, Danby no serán responsables por ningún daño a the unit, the purchaser does hereby agree to indemnify and hold harmless Danby from any claim for damages to persons or propert y caused by the unit. personas o bienes, incluyendo la propia unidad, sin importar su causa, o de ningún daño indirecto causado por el desperfecto de la unidad, y al comprar esta unidad, el comprador acepta por la presente, indemnizar y proteger a Danby contra cualquier reclamo por daños a personas o bienes causados por la unidad. GENERAL PROVISIONS No warranty or insurance herein contained or set out shall apply when damage or repair is caused by any of the following: CONDICIONES GENERALES 1) Power failure. No se considerará ninguna de estas garantías o seguros cuando el daño o la necesidad de reparación sea el producto de los 2) Damage in transit or when moving the appliance. siguientes casos: 3) del Improper powereléctrico. supply such as low voltage, defective house wiring or inadequate fuses. 1) Falla suministro 2) Daños en tránsito o durante transporte de la unidad. 4) Accident, alteration, abuse orelmisuse of the appliance such as inadequate air circulation in the room or abnormal operating con ditions 3) Alimentación incorrecta, como bajo voltaje, instalación eléctrica defectuosa o fusibles inadecuados. (extremely high or low room temperature). 4) Accidente, abusopurposes o uso incorrecto del artefacto, talincomo insuficiente 5) Use formodificación, commercial or industrial (ie. If the appliance is not installed a domestic residence).ventilación del ambiente o condiciones de operación anormales (temperatura ambiente extremadamente alta o baja). 6) Fire, water damage,otheft, war, riot,(v.g., hostility, of God such as hurricanes, floodsinstalado etc. 5) Utilización comercial industrial si acts el electrodoméstico no está en una vivienda particular). 7) Service calls resulting in customer 6) Incendio, daños por agua, robo, education. guerra, disturbios, hostilidades, actos de fuerza mayor como huracanes, inundaciones, etc. 7) Pedidos de servicio debido a desinformación delappliance usuario. 8) Improper Installation (ie. Building-in of a free standing or using an appliance outdoors that is not approved for out door application). 8)Proof Instalación (v.g.,forinstalación empotrada de un diseñado como independiente o uso de un of purchaseinadecuada date will be required warranty claims; so, please retain billselectrodoméstico of sale. In the event warranty service is unidad required, present this document to our electrodoméstico aire libre que no esté aprobado para dicho fin, incluyendo pero no limitado a: garajes, patios, porches o en AUTHORIZED SERVICEalDEPOT. cualquier lugar que no esté bien aislado o controlado por el clima). Se requerirá una prueba de la fecha de compra para reclamaciones de garantía; Retener las facturas de venta. En el caso de que se Warranty Service requiera servicio de garantía, presente el comprobante de compra a nuestro depósito de servicio autorizado. In-home Danby Products Limited PO Box Products 1778, Guelph, Ontario, Canada N1H 6Z9 Danby Limited Telephone: (519) 837-0920 FAX:Ontario, (519) 837-0449 PO Box 1778, Guelph, Canada N1H 6Z9 Telephone: (519) 837-0920 FAX: (519) 837-0449 Servicio de Garantía Servicio en Domicilio 1-800-263-2629 1-800-263-2629 04/17 04/09 Danby Products Inc. PO Box 669, Findlay, Ohio, U.S.A. Products 45840 Danby Inc. Telephone: (419)Findlay, 425-8627 FAX: (419)U.S.A. 425-862945840 PO Box 669, Ohio, Telephone: (419) 425-8627 FAX: (419) 425-8629 NOTES / REMARQUES / NOTAS : __________________________________________________________________________________________ __________________________________________________________________________________________ __________________________________________________________________________________________ __________________________________________________________________________________________ __________________________________________________________________________________________ __________________________________________________________________________________________ __________________________________________________________________________________________ __________________________________________________________________________________________ __________________________________________________________________________________________ __________________________________________________________________________________________ __________________________________________________________________________________________ __________________________________________________________________________________________ __________________________________________________________________________________________ __________________________________________________________________________________________ __________________________________________________________________________________________ __________________________________________________________________________________________ __________________________________________________________________________________________ __________________________________________________________________________________________ __________________________________________________________________________________________ __________________________________________________________________________________________ __________________________________________________________________________________________ __________________________________________________________________________________________ NOTES / REMARQUES / NOTAS : __________________________________________________________________________________________ __________________________________________________________________________________________ __________________________________________________________________________________________ __________________________________________________________________________________________ __________________________________________________________________________________________ __________________________________________________________________________________________ __________________________________________________________________________________________ __________________________________________________________________________________________ __________________________________________________________________________________________ __________________________________________________________________________________________ __________________________________________________________________________________________ __________________________________________________________________________________________ __________________________________________________________________________________________ __________________________________________________________________________________________ __________________________________________________________________________________________ __________________________________________________________________________________________ __________________________________________________________________________________________ __________________________________________________________________________________________ __________________________________________________________________________________________ __________________________________________________________________________________________ __________________________________________________________________________________________ __________________________________________________________________________________________ MODEL • MODÈLE • MODELO DPA140HEAUWDB DPA140HEBUBDB Printed in China Imprimé en Chine Impreso en China Danby Products Limited, Guelph, ON, Canada N1H 6Z9 Danby Products Inc., Findlay, Ohio, USA 45840-
 1
1
-
 2
2
-
 3
3
-
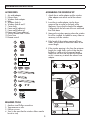 4
4
-
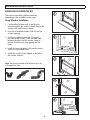 5
5
-
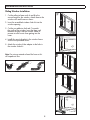 6
6
-
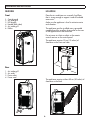 7
7
-
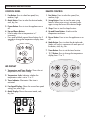 8
8
-
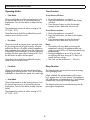 9
9
-
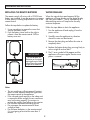 10
10
-
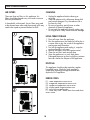 11
11
-
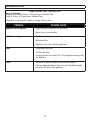 12
12
-
 13
13
-
 14
14
-
 15
15
-
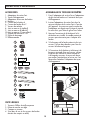 16
16
-
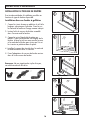 17
17
-
 18
18
-
 19
19
-
 20
20
-
 21
21
-
 22
22
-
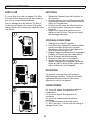 23
23
-
 24
24
-
 25
25
-
 26
26
-
 27
27
-
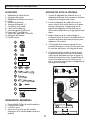 28
28
-
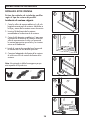 29
29
-
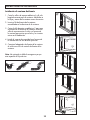 30
30
-
 31
31
-
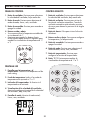 32
32
-
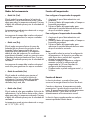 33
33
-
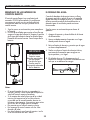 34
34
-
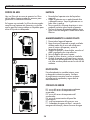 35
35
-
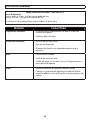 36
36
-
 37
37
-
 38
38
-
 39
39
-
 40
40


Danby DPA140HEAUWDB El manual del propietario
- Categoría
- Acondicionadores de aire móviles
- Tipo
- El manual del propietario
- Este manual también es adecuado para
en otros idiomas
- français: Danby DPA140HEAUWDB Le manuel du propriétaire
- English: Danby DPA140HEAUWDB Owner's manual
Artículos relacionados
-
Danby DPA140E3WDB-6 El manual del propietario
-
-
-
-
-
-
-
-
-