Trevi SLD 3875 Thermometer Digital Clock Manual de usuario
- Categoría
- Relojes de alarma
- Tipo
- Manual de usuario

SLD 3875
2
1
OROLOGIO / TERMOMETRO / CALENDARIO
Manuale d’uso
ALARM CLOCK / THERMOMETER / CALENDAR
Istruction manual
RÉVEIL / THERMOMETRE / CALENDRIER
Manual d’emploi
WECKER / THERMOMETER / KALENDER
Anleitungsheft
RELOJ DESPERTADOR / TERMOMETRO
Manual de instrucciones para el uso
3
5
7
8
9
11
10
6

2
SLD 3875
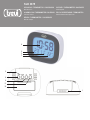
DESCRIZIONE COMANDI
1. Tasto Snooze/Light, disattivazione temporanea allarme/attivazione
retroilluminazione.
2. Tasto Alarm, attivazione/disattivazione/impostazione allarme.
3. Simbolo allarme.
4. Non utilizzato
5. Datario.
6. Orologio.
7. Temperatura.
Sul retro:
8. Tasto SET, impostazione formato orario/ora/anno/data.
9. Tasto UP, tasto incremento cifre in impostazione.
10. Vano batterie 2xAAA (non incluse).
11. Tasto DOWN, tasto diminuzione cifre in impostazione.
ALIMENTAZIONE
Aprire il vano batterie(10) posto sul retro dell’apparecchio ed inserire due pile
formato “AAA” rispettando le polarità indicate. All’inserimento delle batterie,
la sveglia si accende e riproduce un breve suono.
REGOLAZIONE DELL’OROLOGIO E DATA
1. Tenere premuto il tasto SET(8) per avviare la regolazione dell’orologio.
2. Premere il tasto UP(9) o DOWN(11) per selezionare la scala della
temperatura °C/°F , confermare con SET(8).
3. Impostare l’anno tramite i tasti UP(9) o DOWN(11) e confermare.
4. Impostare il formato della data tramite i tasti UP(9) o DOWN(11) e
confermare.
5. Impostare il mese tramite i tasti UP(9) o DOWN(11) e confermare.
6. Impostare il giorno tramite i tasti UP(9) o DOWN(11) e confermare.
7. Impostare il formato dell’ora (12/24H) tramite i tasti UP(9) o DOWN(11)
e confermare.
8. Impostare l’ora tramite i tasti UP(9) o DOWN(11) e confermare.
9. Impostare i minuti tramite i tasti UP(9) o DOWN(11) e confermare.
REGOLAZIONE E ATTIVAZIONE ALLARME
1. Tenere premuto il tasto Alarm(2) per impostare l’allarme.
2. Impostare l’ora tramite i tasti UP(9) o DOWN(11).
3. Premere il tasto Alarm(2), sul display cominceranno a lampeggiare i
minuti.
4. Impostare i minuti tramite i tasti UP(9) o DOWN(11).
5. Premere il tasto Alarm(2) per confermare.
6. In modalità visualizzazione ora, premere il tasto Alarm(2) per attivare
l’allarme. Ad allarme attivo sul display comparirà il simbolo(3).
DISATTIVAZIONE ALLARME
In modalità visualizzazione ora, premere il tasto Alarm(2) per disattivare
l’allarme. Ad allarme disattivato il simbolo(3) sul display scomparirà.
FUNZIONE SNOOZE
La funzione snooze permette la ripetizione della suoneria più volte dopo
averla sospesa con il tasto Snooze(1) (simbolo(ZZ) sul display lampeggerà).
La suoneria verrà ripetuta ad intervalli di 5 minuti no a quando non si
premerà un tasto qualsiasi (escluso il tasto Snooze/Light).
DATI TECNICI
Alimentazione: .................... 2 x AAA, 1,5V
Italiano English
COMMANDS DESCRIPTION
1. Snooze / Light button, temporary alarm deactivation / backlight activation.
2. Alarm button, alarm activation / deactivation / setting.
3. Alarm symbol.
4. Not used
5. Date.
6. Clock.
7. Temperature.
On the back:
8. SET button, setting time format / time / year / date.
9. UP key, key to increase digits in setting.
10. Battery compartment.
11. DOWN key, key to decrease digits in setting.
POWER SUPPLY
Open the battery compartment (10) on the back of the device and insert two
“AAA” size batteries respecting the indicated polarity. When the batteries
are inserted, there will be a beep sound. When powered, the alarm cannot
be turned on automatically, but there is just a beep to remind normal
working of buzzer.
LOCK AND DATE
1. Press and hold the SET button (8) to start clock adjustment.
2. Press the UP (9) or DOWN (11) key to select the ° C / ° F temperature
scale, conrm with SET (8).
3. Set the year using the UP (9) or DOWN (11) keys and conrm.
4. Set the date format using the UP (9) or DOWN (11) keys and conrm.
5. Set the month using the UP (9) or DOWN (11) keys and conrm.
6. Set the day using the UP (9) or DOWN (11) keys and conrm.
7. Set the time format (12 / 24H) using the UP (9) or DOWN (11) buttons
and conrm.
8. Set the hour using the UP (9) or DOWN (11) keys and conrm.
9. Set the minutes using the UP (9) or DOWN (11) keys and conrm.
ALARM
1. Press and hold the Alarm button (2) to set the alarm.
2. Set the hour using the UP (9) or DOWN (11) buttons.
3. Press the Alarm button (2), the minutes will start ashing on the display.
4. Set the minutes using the UP (9) or DOWN (11) keys.
5. Press the Alarm button (2) to conrm.
6. In time view mode, press the Alarm button (2) to activate the alarm.
When the alarm is active, the symbol (3) will appear on the display.
ALARM DEACTIVATION
When the alarm sounds, press any button except the SNOOZE/LIGHT button,
then the alarm will be activated after 24 hours.
When the alarm is deactivated, the symbol (3) on the display will disappear.
SNOOZE FUNCTION
The snooze function allows you to repeat the ringtone several times after
having suspended it with the Snooze button (1) (symbol (ZZ) on the display
will ash).
The ringtone will be repeated innitely times at 5 minute intervals.
To turn off Snooze function press any button except the SNOOZE/LIGHT
button.
TECHNICAL DATA
Power supply: .................... 2 x AAA, 1.5V

3
SLD 3875
Française Deutsch
DESCRIPTION DE FONCTIONS
1. Bouton Snooze / Light, désactivation temporaire de l’alarme / activation
du rétroéclairage.
2. Bouton d’alarme, activation / désactivation / réglage de l’alarme.
3. Symbole d’alarme.
4. Non utilisé
5. Date.
6. Horloge.
7. Température.
Sur le dos:
8. Bouton SET, réglage du format de l’heure / heure / année / date.
9. Touche HAUT, touche pour augmenter les chiffres dans le réglage.
10. Compartiment à piles.
11. Touche BAS, touche pour diminuer les chiffres dans le réglage.
SOURCE DE COURANT
Ouvrez le compartiment à piles (10) à l’arrière de l’appareil et insérez deux
piles de taille «AAA» en respectant la polarité indiquée. Lorsque les piles
sont insérées, l’alarme se met en marche et émet un bref son.
HORLOGE ET DATE
1. Appuyez sur le bouton SET (8) et maintenez-le enfoncé pour démarrer
le réglage de l’horloge.
2. Appuyez sur la touche HAUT (9) ou BAS (11) pour sélectionner l’échelle
de température ° C / ° F, conrmez avec SET (8).
3. Réglez l’année à l’aide des touches HAUT (9) ou BAS (11) et conrmez.
4. Réglez le format de la date à l’aide des touches HAUT (9) ou BAS (11)
et conrmez.
5. Réglez le mois à l’aide des touches HAUT (9) ou BAS (11) et conrmez.
6. Réglez le jour à l’aide des touches HAUT (9) ou BAS (11) et conrmez.
7. Réglez le format de l’heure (12 / 24H) à l’aide des boutons UP (9) ou
DOWN (11) et conrmez.
8. Réglez l’heure à l’aide des touches HAUT (9) ou BAS (11) et conrmez.
9. Réglez les minutes à l’aide des touches HAUT (9) ou BAS (11) et
conrmez.
ALARME
1. Appuyez sur le bouton Alarme (2) et maintenez-le enfoncé pour régler
l’alarme.
2. Réglez l’heure à l’aide des boutons HAUT (9) ou BAS (11).
3. Appuyez sur le bouton d’alarme (2), les minutes commenceront à
clignoter sur l’afchage.
4. Réglez les minutes à l’aide des touches HAUT (9) ou BAS (11).
5. Appuyez sur le bouton Alarme (2) pour conrmer.
6. En mode d’afchage horaire, appuyez sur le bouton Alarme (2) pour
activer l’alarme. Lorsque l’alarme est active, le symbole (3) apparaît à
l’écran.
DÉSACTIVATION D’ALARME
En mode d’afchage de l’heure, appuyez sur le bouton Alarme (2) pour
désactiver l’alarme. Lorsque l’alarme est désactivée, le symbole (3) sur
l’afcheur disparaît.
FONCTION DE RÉPÉTITION
La fonction snooze vous permet de répéter la sonnerie plusieurs fois après
l’avoir suspendue avec le bouton Snooze (1) (le symbole (ZZ) sur l’écran
clignotera).
La sonnerie sera répétée plusieurs fois à des intervalles de 5 minutes.
DONNÉES TECHNIQUES
Alimentation: ......................2 x AAA, 1,5 V
BESCHREIBUNG DER FUNKTIONEN
1. Snooze / Light-Taste, vorübergehende Deaktivierung des Alarms /
Aktivierung der Hintergrundbeleuchtung.
2. Alarmtaste, Alarmaktivierung / -deaktivierung / -einstellung.
3. Alarmsymbol.
4. Nicht verwendet
5. Date.
6. Uhr.
7. Temperatur.
Auf dem Rücken:
8. SET-Taste, mit der Zeitformat / Uhrzeit / Jahr / Datum.
9. UP-Taste, Taste zum Erhöhen der Ziffern in der Einstellung.
10. Batteriefach.
11. AB-Taste, Taste zum Verringern der Ziffern in der Einstellung.
ENERGIEVERSORGUNG
Öffnen Sie das Batteriefach (10) auf der Rückseite des Geräts und legen
Sie zwei Batterien der Größe „AAA“ mit der angegebenen Polarität ein.
Wenn die Batterien eingelegt sind, wird der Alarm eingeschaltet und es
ertönt ein kurzer Ton.
UHR UND DATUM
1. Halten Sie die SET-Taste (8) gedrückt, um die Uhreinstellung zu starten.
2. Drücken Sie die Taste UP (9) oder DOWN (11), um die Temperaturskala
° C / ° F auszuwählen. Bestätigen Sie dies mit SET (8).
3. Stellen Sie das Jahr mit den Tasten UP (9) oder DOWN (11) ein und
bestätigen Sie.
4. Stellen Sie das Datumsformat mit den Tasten UP (9) oder DOWN (11)
ein und bestätigen Sie.
5. Stellen Sie den Monat mit den Tasten UP (9) oder DOWN (11) ein und
bestätigen Sie.
6. Stellen Sie den Tag mit den Tasten UP (9) oder DOWN (11) ein und
bestätigen Sie.
7. Stellen Sie das Zeitformat (12 / 24H) mit den Tasten UP (9) oder
DOWN (11) ein und bestätigen Sie.
8. Stellen Sie die Uhrzeit mit den Tasten UP (9) oder DOWN (11) ein und
bestätigen Sie.
9. Stellen Sie die Minuten mit den Tasten UP (9) oder DOWN (11) ein und
bestätigen Sie.
ALARM
1. Halten Sie die Alarmtaste (2) gedrückt, um den Alarm einzustellen.
2. Stellen Sie die Uhrzeit mit den Tasten UP (9) oder DOWN (11) ein.
3. Drücken Sie die Alarmtaste (2). Die Minuten beginnen auf dem Display
zu blinken.
4. Stellen Sie die Minuten mit den Tasten UP (9) oder DOWN (11) ein.
5. Drücken Sie zur Bestätigung die Alarmtaste (2).
6. Drücken Sie im Zeitansichtsmodus die Alarmtaste (2), um den Alarm zu
aktivieren. Wenn der Alarm aktiv ist, erscheint das Symbol (3) im Display.
ALARM DEAKTIVIERUNG
Drücken Sie im Zeitanzeigemodus die Alarmtaste (2), um den Alarm zu
deaktivieren. Wenn der Alarm deaktiviert ist, verschwindet das Symbol (3)
auf dem Display.
SNOOZE-FUNKTION
Mit der Schlummerfunktion können Sie den Klingelton mehrmals wiederho-
len, nachdem Sie ihn mit der Schlummertaste (1) angehalten haben (das
Symbol (ZZ) auf dem Display blinkt).
Der Klingelton wird mehrmals im Abstand von 5 Minuten wiederholt.
TECHNISCHE DATEN
Stromversorgung: .............. 2 x AAA, 1,5V

4
SLD 3875
Español
DESCRIPCIÓN DE FUNCIONES
1. Botón Snooze / Light, desactivación temporal de alarma / activación de
luz de fondo.
2. Botón de alarma, activación / desactivación / conguración de alarma.
3. Símbolo de alarma.
4. No utilizado
5. Fechador.
6. Reloj.
7. Temperatura.
En la espalda:
8. Botón SET, conguración de formato de hora / hora / año / fecha.
9. Tecla ARRIBA, tecla para aumentar los dígitos en la conguración.
10. Compartimento de la batería.
11. Tecla ABAJO, tecla para disminuir los dígitos en la conguración.
FUENTE DE ALIMENTACIÓN
Abra el compartimento de la batería (10) en la parte posterior del dispositivo e
inserte dos baterías tamaño “AAA” respetando la polaridad indicada. Cuando
se insertan las pilas, la alarma se enciende y reproduce un sonido breve.
RELOJ Y FECHA
1. Mantenga presionado el botón SET (8) para iniciar el ajuste del reloj.
2. Presione la tecla ARRIBA (9) o ABAJO (11) para seleccionar la escala
de temperatura ° C / ° F, conrme con SET (8).
3. Congure el año con las teclas ARRIBA (9) o ABAJO (11) y conrme.
4. Congure el formato de la fecha usando las teclas ARRIBA (9) o ABAJO
(11) y conrme.
5. Congure el mes con las teclas ARRIBA (9) o ABAJO (11) y conrme.
6. Congure el día con las teclas ARRIBA (9) o ABAJO (11) y conrme.
7. Congure el formato de hora (12 / 24H) usando los botones ARRIBA (9)
o ABAJO (11) y conrme.
8. Congure la hora con las teclas ARRIBA (9) o ABAJO (11) y conrme.
9. Congure los minutos con las teclas ARRIBA (9) o ABAJO (11) y conrme.
ALARMA
1. Mantenga presionado el botón de alarma (2) para congurar la alarma.
2. Congure la hora usando los botones ARRIBA (9) o ABAJO (11).
3. Presione el botón de alarma (2), los minutos comenzarán a parpadear
en la pantalla.
4. Congure los minutos usando las teclas ARRIBA (9) o ABAJO (11).
5. Presione el botón Alarma (2) para conrmar.
6. En el modo de visualización de la hora, presione el botón Alarma (2)
para activar la alarma. Cuando la alarma está activa, el símbolo (3)
aparecerá en la pantalla.
DESACTIVACIÓN DE ALARMA
En el modo de visualización de la hora, presione el botón de alarma (2)
para desactivar la alarma. Cuando la alarma está desactivada, el símbolo
(3) en la pantalla desaparecerá.
FUNCIÓN SNOOZE
La función de repetición le permite repetir el tono de llamada varias veces
después de haberlo suspendido con el botón de repetición (1) (el símbolo
(ZZ) en la pantalla parpadeará).
El tono de llamada se repetirá varias veces a intervalos de 5 minutos.
DATOS TÉCNICOS
Fuente de alimentación: .... 2 x AAA, 1,5 V
GARANZIA
1. L’apparecchio è garantito per 24 mesi dalla data di fabbricazione indicata
sull’etichetta applicata sul prodotto.
2. La garanzia si applica solo ad apparecchi, non manomessi, riparati da
centri assistenza TREVI, essa comprende la riparazione dei componenti
per difetti di fabbricazione con l’esclusione di etichette, manopole e parti
asportabili.
3. TREVI non risponde di danni diretti o indiretti a cose o/e persone causati
dall’uso o sospensione d’uso dell’apparecchio.
WARRANTY
1. This unit is guaranteed for a period of 24 months from the date of
production printed on the product itself or on label on product.
2. The warranty is valid only if the unit has not been tampered with. The
warranty is valid only at authorized TREVI assistance centres, that
will repair manufacturing defects, excluded replacement of labels and
removable parts.
3. TREVI is not liable for damage to people or things caused by the use of
this unit or by the interrUption in the use of this unit.
GARANTIE
1. L’appareil est garanti pendant une période de 24 mois de la date de
fabrication indiquée sur l’étiquette se trouvant sur le produit.
2. La garantie n’est appliquée que sur les appareils non altérés, ayant été
réparés chez un Service Après-Vente TREVI. Elle comprend la répara-
tion des composantes à la suite de défauts de fabrication, à l’exclusion
d’étiquettes, boutons de réglage et parties amovibles.
3. TREVI ne répond pas des dommages directs ou indirects aux choses et/
ou aux personnes entraînés pendant l’usage ou la suspension d’usage
de l’appareil.
GARANTIEBESTIMMUNGEN
1. Das Gerät hat eine Garantie von 24 Monaten ab dem Herstellungsdatum.
Das Herstellungsdatum ist auf der am Produkt angebrachten Etikette
angegeben.
2. Die Garantie gilt nur für Geräte, an denen nicht selbst ausgeführte
Reparaturen erfolgt sind, sondern die von TREVI-Kundendienststellen
durchgeführt wurden. Die Garantie umfaßt die Reparatur von Bauteilen,
wenn diese auf Herstellungsfehler zurückzuführen sind. Die Garantie gilt
hingegen nicht für Etiketten, Drucktasten, Knöpfe und entfernbare Teile.
3. TREVI haftet nicht für direkte oder indirekte Sach- und/oder Personen-
schäden, die vom Gebrauch des Gerätes verursacht worden sind.
GARANTIA
1. El aparato tiene una garantía de 24 meses a partir de la fecha de
fabricación indicada en la tarjeta sobre el producto.
2. La garantía está aplicada solamente a los productos no desarreglados
y reparados por los centros de asistencia TREVI. Además, la garantía
incluye la reparación de los componentes a causa de defectos de
fabricación, con la exclusión de etiquetas, botones y partes removibles.
3. TREVI no es responsable por daños directos o indirectos a cosas y/o
personas causados por el uso o suspensión del uso del aparato.
Warranty

5
SLD 3875
Correct disposal of the product
INFORMAZIONI AGLI UTENTI ai sensi del Decreto Legislativo N°
49 del 14 Marzo 2014
“Attuazione della Direttiva 2012/19/UE sui riuti di apparecchiature
elettriche ed elettroniche (RAEE)”
Il simbolo del cassonetto barrato riportato sull’apparecchiatura indica che il
prodotto alla ne della propria vita utile deve essere raccolto separatamente
dagli altri riuti. L’utente dovrà, pertanto, conferire l’apparecchiatura integra
dei componenti essenziali giunta a ne vita agli idonei centri di raccolta
differenziata dei riuti elettronici ed elettrotecnici, oppure riconsegnarla
al rivenditore al momento dell’acquisto di nuova apparecchiatura di tipo
equivalente, in ragione di uno a uno, oppure 1 a zero per le apparecchiature
aventi lato maggiore inferiore a 25 cm. L’adeguata raccolta differenziata per
l’avvio successivo dell’apparecchiatura dimessa al riciclaggio, al trattamento
e allo smaltimento ambientale compatibile contribuisce ad evitare possibili
effetti negativi sull’ambiente e sulla salute e favorisce il riciclo dei materiali
di cui è composta l’apparecchiatura. Lo smaltimento abusivo del prodotto
da parte dell’utente comporta l’applicazione delle sanzioni amministrative di
cui al D.Lgs n. Decreto Legislativo N° 49 del 14 Marzo 2014.
INFORMATION TO USERS
Precautions for correct disposal of the product
The symbol shown on the equipment indicates that waste must be disposed
of in “separate collection” and so the product must not be disposed of
together with urban waste.
The user must take the product to special “separate waste collection cen-
tres” provided by local government, or deliver it to the retailer against the
purchase of a new product.
Separate collection of waste and subsequent treatment, recycling and
disposal operations promotes the production of equipment with recycled
materials and limits negative effects on the environment and on health
caused by improper handling of waste.
Illegal disposal of the product leads to the enforcement of administrative
penalties.
INFORMATIONS AUX UTILISATEURS
Précautions pour l’élimination correcte du produit
Le symbole gurant sur l’équipement indique que les déchets doivent être
éliminés dans une «collecte séparée» et que le produit ne doit donc pas
être éliminé avec les déchets urbains.
L’utilisateur doit apporter le produit aux «centres de collecte des déchets
séparés» spéciaux fournis par le gouvernement local, ou le livrer au détaillant
contre l’achat d’un nouveau produit.
La collecte séparée des déchets et les opérations ultérieures de traitement,
de recyclage et d’élimination favorisent la production d’équipements avec
des matériaux recyclés et limitent les effets négatifs sur l’environnement et
la santé causés par une mauvaise manipulation des déchets.
L’élimination illégale du produit entraîne l’application de sanctions admi-
nistratives.
INFORMATIONEN FÜR BENUTZER
Vorsichtsmaßnahmen für die ordnungsgemäße Entsorgung des
Produkts
Das auf dem Gerät angezeigte Symbol weist darauf hin, dass Abfälle in einer
„getrennten Sammlung“ entsorgt werden müssen und das Produkt daher
nicht zusammen mit Siedlungsabfällen entsorgt werden darf.
Der Benutzer muss das Produkt zu speziellen „separaten Abfallsammel-
stellen“ bringen, die von der örtlichen Regierung bereitgestellt werden,
oder es gegen den Kauf eines neuen Produkts an den Einzelhändler liefern.
Die getrennte Sammlung von Abfällen und die anschließende Behandlung,
das Recycling und die Entsorgung fördern die Herstellung von Geräten
mit recycelten Materialien und begrenzen negative Auswirkungen auf die
Umwelt und die Gesundheit, die durch unsachgemäßen Umgang mit Abfällen
verursacht werden.
Die illegale Entsorgung des Produkts führt zur Durchsetzung von Verwal-
tungsstrafen.
INFORMACION A LOS USUARIOS
Precauciones para la correcta eliminación del producto
El símbolo que se muestra en el equipo indica que los residuos deben
eliminarse en “recogida selectiva”, por lo que el producto no se debe eliminar
junto con los residuos urbanos.
El usuario debe llevar el producto a “centros de recolección de residuos
separados” especiales proporcionados por el gobierno local, o entregarlo
al minorista contra la compra de un nuevo producto.
La recogida selectiva de residuos y las operaciones posteriores de tratamien-
to, reciclaje y eliminación promueve la producción de equipos con materiales
reciclados y limita los efectos negativos sobre el medio ambiente y la salud
provocados por el manejo inadecuado de los residuos.
La eliminación ilegal del producto conlleva la aplicación de sanciones
administrativas.

6
SLD 3875
TREVI S.p.A.
Strada Consolare Rimini-San Marino, 62
47924 Rimini (RN) Italy
Tel. 0541-756420 - Fax 0541-756430
E-mail - [email protected] www.trevi.it
Made in CHINA
-
 1
1
-
 2
2
-
 3
3
-
 4
4
-
 5
5
-
 6
6


Trevi SLD 3875 Thermometer Digital Clock Manual de usuario
- Categoría
- Relojes de alarma
- Tipo
- Manual de usuario