smartheart 01-742 Talking Blood Pressure Arm Monitor Guía del usuario
- Categoría
- Unidades de presión arterial
- Tipo
- Guía del usuario

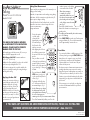
Applying the Arm Cuff
Remove any constrictive clothing or
jewelry that may interfere with cuff
placement. Wrap the cuff snugly
around your left arm. Position the
cuff’s bottom edge half an inch
ABOVE the elbow joint. Position the
air tubing over the main artery (on
the inside of your arm). You should
be able to insert one nger between
your arm and cuff.
Talking
Blood Pressure Arm Monitor
Model # 01-742T
IF YOU HAVE ANY QUESTIONS OR ARE EXPERIENCING DIFFICULTIES, PLEASE CALL THE TOLL-FREE
CUSTOMER SERVICE HELP LINE FOR FURTHER ASSISTANCE AT 1-866-326-1313.
QUICK START GUIDE • ENGLISH
#93-2185 07/2022
©2022 Veridian Healthcare
THIS QUICK START GUIDE IS INTENDED
AS A SUPPLEMENT TO THE INSTRUCTION
MANUAL. PLEASE READ THE COMPLETE
MANUAL PRIOR TO FIRST USE.
Before applying your blood pressure cuff, be sure you
have selected the appropriate size cuff:
Wide-Range Adult Cuff ts arm circumference:
8.6”—16.5” (22—42 cm).
Additional cuffs are available for order on the included
order form or by calling 866-326-1313.
A 15 minute resting period is needed to stabilize the
body prior to taking a reading. No eating, drinking or
smoking while resting.
Taking Your Measurement
Please read the preceding portions of this manual prior to
taking your rst reading.
Reminder, it is important to avoid smoking, eating, taking
medication, alcohol consumption or physical activity 30
minutes prior to taking a reading.
User will default to the last User Bank used; consult the
manual for instructions on how to change the User to
ensure accurate memory
storage and review.
1. Position the monitor
on a at, stable
surface with the
digital display in view.
Be seated with your
feet at on the oor
and legs uncrossed.
2. After applying the cuff insert
the cuff tubing connector into
the port on the left side of your
monitor.
3. Rest your elbow on a solid
surface with your palm facing
upward. Elevate your arm so
that the cuff is at the same level
as your heart, Fig 1. Relax your
left hand.
4. Press and release the START/
STOP button to turn the unit
on; the unit will briey ash a
self-test, Fig 2.
5. The display will briey show
a ‘0’ and up arrow before the
measurement begins, Fig 3.
6. As the ination process begins,
the display may briey show
a downward arrow indicating
the cuff is releasing any air
remaining in the cuff prior to measurement ination.
7. The cuff will automatically inate; you will see the
numbers increase on the display
screen and feel the cuff inate.
8. When the measurement
is complete, the cuff will
automatically deate, then your
blood pressure measurement and
pulse reading results will appear
on the display screen at the same
time, Fig 4.
9. Consult the included Instruction
Manual for information on interpreting your
reading results.
10. The reading will automatically be stored in memory,
up to 199 readings.
11. Select START/STOP to turn the unit off and conserve
energy and battery life. The unit will automatically
shut-off approximately 1 minute after use.
Please Note:
• You can stop the ination or deation process of the
cuff at any time by pressing the START/STOP button.
• Many factors such as genetics, age, sex, altitude,
physical activity, anxiety, muscular development,
certain medications or even the time of day can
inuence blood pressure.
• Blood pressure varies from moment to moment; even
readings taken after proper rest periods can vary.
Home blood pressure readings may vary as much as
10-20 points from ones taken at your doctor’s ofce.
• Variations in your individual readings should only be
interpreted by your physician or trained health care
professional.
• We encourage you to consult with your physician
to achieve the maximum benet from your blood
pressure monitor.
~0.5/1-2cm
Fig. 1
Fig. 2
Fig. 3
Fig. 4

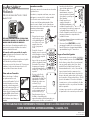
Cómo colocar el brazalete
Quítese toda la ropa o las alhajas
que pudieran interferir con la
colocación del brazalete. Deslice el
cilindro del brazalete en su brazo
izquierdo y alinee la manguera de
aire sobre la arteria principal en el
lado interno de su brazo. Coloque
el borde inferior del manguito media
pulgada ARRIBA de la articulación
del codo. Debe poder insertar un
dedo fácilmente entre el brazo y el
brazalete.
SI TIENE ALGUNA DUDA O EXPERIMENTA PROBLEMAS, LLAME A LA LÍNEA GRATUITA DE ASISTENCIA AL
CLIENTE PARA OBTENER ASISTENCIA ADICIONAL, 1-866-326-1313.
GUÍA DE REFERENCIA RÁPIDA • ESPAÑOL
#93-2185 07/2022
©2022 Veridian Healthcare
ESTA GUÍA DE REFERENCIA RÁPIDO SE PIENSA COMO
SUPLEMENTO AL MANUAL DE LA INSTRUCCIÓN. LEA EL
MANUAL COMPLETO ANTES DEL PRIMER USO.
Antes de colocarse el brazalete para medición de la
presión arterial, asegúrese de haber seleccionado el
tamaño de brazalete adecuado:
Un brazalete adulto para adultos de amplia
gama se adapta a una circunferencia de brazo entre
8.6”—16.5” (22—42 cm).
Hay disponibles otros brazaletes para efectuar el pedido
en el formulario de pedido que se adjunta.
Es necesario un período de descanso de 15 minutos para
estabilizar el cuerpo antes de tomarse la presión. No
coma, no beba ni fume mientras descansa.
Tomando su medida
Lea las partes anteriores de este manual antes de realizar
su primera lectura.
Recordatorio, es importante evitar fumar, comer, tomar
medicamentos, consumir alcohol o realizar actividad
física 30 minutos antes de tomar una lectura.
El usuario usará de forma predeterminada el último
banco de usuario utilizado; consulte el manual para
obtener instrucciones sobre cómo cambiar el usuario para
garantizar un almacenamiento
y una revisión precisos de la
memoria.
1. Coloque el monitor en una
supercie plana y estable,
con la pantalla digital a la
vista. Siéntese con los pies
apoyados al ras sobre
el suelo y las piernas sin
cruzar.
2. Después de colocarse el
brazalete, inserte el conector de
tubo del brazalete en el puerto
que está en el lado izquierdo
de su tensiómetro.
3. Apoye el codo en una supercie
plana con la palma de la mano
hacia arriba. Eleve su brazo
de manera que el brazalete
quede a la misma altura de su
corazón, Fig. 1. Relaje su mano
izquierda.
4. Presione y suelte el botón
START/STOP (inicio/alto)
para encender la unidad. Ésta
parpadeará por un instante
indicando que conduce una
vericación (Fig. 2).
5. La pantalla mostrará un número
«0» y una echa hacia arriba
por unos momentos antes de
iniciar la medición (Fig. 3).
6. Cuando comienza el proceso
de inado, en la pantalla podrá
aparecer brevemente una echa hacia abajo; esto
indica que antes de inarse con la medición el
brazalete está soltando el aire
que pudo haber quedado en él.
7. El brazalete se inará
automáticamente; verá que los
números aumentan en la pantalla
de visualización y sentirá que se
ina el brazalete.
8. Cuando la medición esté
completa, el brazalete se
desinará automáticamente, y los
resultados de la medición de su
presión arterial y lectura del pulso aparecerán
en la pantalla al mismo tiempo (Fig. 4).
9. Consulte el Manual de instrucciones que se incluye
para mayor información en interpretación de
resultados de lectura.
10. La lectura se almacenará de manera automática en la
memoria (hasta 199 lecturas).
11. Seleccione el botón START/STOP (inicio/alto)
para apagar la unidad y así conservar energía y
batería. El dispositivo se apagará automáticamente
aproximadamente luego de 1 minuto de uso.
Tenga en Cuenta lo Siguiente
• Para interrumpir el proceso de inado o desinado en
cualquier momento, presione el botón START/STOP.
• Muchos factores pueden inuir en la presión arterial,
como por ejemplo genética, edad, sexo, altitud,
actividad física, ansiedad, desarrollo muscular,
determinada medicación o, incluso, la hora del día.
• La presión arterial varía de un momento al otro;
incluso las lecturas tomadas después de períodos de
descanso adecuados pueden variar. Las lecturas de
presión arterial en el hogar pueden diferir en 10 a 20
puntos de las tomadas en el consultorio del médico.
• Las variaciones en sus lecturas individuales sólo debe
interpretarlas su médico o un profesional de cuidados
médicos capacitado.
• Lo instamos a que consulte con su médico para lograr
el óptimo benecio de su monitor de presión arterial.
~0.5/1-2cm
Fig. 1
Hablando
Monitor de brazo de Presión Arterial
Model # 01-742T
Fig. 2
Fig. 3
Fig. 4
-
 1
1
-
 2
2


smartheart 01-742 Talking Blood Pressure Arm Monitor Guía del usuario
- Categoría
- Unidades de presión arterial
- Tipo
- Guía del usuario