Schumacher Farm & Ranch El manual del propietario

Categoría
Cargadores de batería de coche
Tipo
El manual del propietario

Este manual también es adecuado para

0099002320E-00
Jump Starter and DC Power Source
Arrancadory Fuente de Poder de CC
OWNERS MANUAL / MANUAL DEL USUARIO
PLEASE SAVE THIS OWNERS MANUAL AND READ BEFORE EACH USE. This manual
will explain how to use the portable power safely and effectively. Please read and follow these
instructions and precautions carefully.
POR FAVOR CONSERVE ESTE MANUAL DEL USUARIO Y LEALO ANTES DE CADA
USO. En este manual le explica cómo utilizar la fuente de poder de manera segura y conable.
Por favor, lea y siga las siguientes instrucciones y precauciones.
CONTENTS
IMPORTANT SAFETY INSTRUCTIONS – SAVE THESE INSTRUCTIONS. .............................................4
PERSONAL SAFETY PRECAUTIONS .......................................................................................................5
FEATURES .................................................................................................................................................5
CHARGING THE INTERNAL BATTERY OF THE JUMP STARTER...........................................................5
OPERATING INSTRUCTIONS ...................................................................................................................6
MAINTENANCE INSTRUCTIONS ..............................................................................................................7
MOVING AND STORAGE INSTRUCTIONS ...............................................................................................8
TROUBLESHOOTING ................................................................................................................................8
REPLACEMENT PARTS .............................................................................................................................9
ACCESSORIES ..........................................................................................................................................9
BEFORE RETURNING FOR REPAIRS ......................................................................................................9
LIMITED WARRANTY .................................................................................................................................9
CONTENIDOS
INSTRUCCIONES IMPORTANTES DE SEGURIDAD – GUARDE ESTAS INSTRUCCIONES. ..............10
PRECAUCIONES DE SEGURIDAD PERSONAL .....................................................................................10
CARACTERÍSTICAS ................................................................................................................................11
PARA CARGAR LA BATERIA INTERNA DEL ARRANCADOR.................................................................11
INSTRUCCIONES DE OPERACIÓN ........................................................................................................12
INSTRUCCIONES DE MANTENIMIENTO ...............................................................................................13
INSTRUCCIONES PARA EL MANEJO Y ALMACENAMIENTO ...............................................................14
LOCALIZACIÓN Y SOLUCIÓN DE PROBLEMAS ...................................................................................14
REPUESTOS ............................................................................................................................................15
ACCESORIOS ..........................................................................................................................................15
ANTES DE DEVOLVER A REPARACIONES ............................................................................................15
GARANTÍA LIMITADA ...............................................................................................................................15
• 4 •
CONTAINS SEALED, NON-SPILLABLE LEAD-ACID BATTERY. MUST BE DISPOSED OF PROPERLY.
WARNING: Possible explosion hazard. Contact with battery acid may cause severe burns and
blindness. Keep out of reach of children.
1. IMPORTANT SAFETY INSTRUCTIONS – SAVE THESE INSTRUCTIONS.
WARNING: RISK OF EXPLOSIVE GASES.
WORKING IN THE VICINITY OF A LEAD-ACID BATTERY IS DANGEROUS. BATTERIES GENERATE
EXPLOSIVE GASES DURING NORMAL OPERATION. IT IS IMPORTANT THAT YOU FOLLOW
THESE INSTRUCTIONS EACH TIME YOU USE THE UNIT.
To reduce the risk of battery explosion, follow these instructions and those published by the battery
manufacturer and the manufacturer of any equipment you intend to use in the vicinity of a battery.
Review cautionary markings on these products and on the engine.
WARNING! RISK OF ELECTRIC SHOCK OR FIRE.
1.1 Keep out of reach of children.
1.2 Do not disassemble the jump starter. Take it to a qualied service professional if service or repair is
required. Incorrect assembly may result in re or electrical shock.
1.3 Do not use the jump starter to jump a vehicle while charging the internal battery.
1.4 Do not recharge the jump starter with a damaged extension cord.
1.5 The jump starter gets hot during charging and must have proper ventilation.
1.6 Do not set the jump starter on ammable materials, such as carpeting, upholstery, paper, cardboard, etc.
1.7 Place the jump starter as far away from the battery being jumped as the cables will permit.
1.8 Do not expose the jump starter to rain or snow.
1.9 Never attempt to jump start a frozen battery.
1.10 Never place the jump starter directly above battery being jumped.
1.11 To prevent arcing, never allow the clamps to touch together or to contact the same piece of metal.
1.12 Use of an attachment not recommended or sold by the jump starter manufacturer may result in damage
to the unit or personal injury.
1.13 Never operate the jump starter if it is damaged.
1.14 If someone else uses the jump starter, ensure they are well informed on how to use it safely, and have
read and understood the operating instructions.
1.15 The jump starter is NOT designed to be installed as a replacement for a vehicle battery.
1.16 Use ONLY on vehicles, boats and garden tractors powered with a 12V DC battery system.
1.17 If the engine fails to start after the recommended number of attempts, disconnect the unit and look for
other problems that may need to be corrected.
1.18 Use the jump starter for jump starting lead-acid batteries only. Do not use for dry cell batteries that are
commonly used with home appliances.
Jump Starter and DC Power Source
OWNERS MANUAL
PLEASE SAVE THIS OWNERS MANUAL AND READ BEFORE EACH USE.
This manual will explain how to use the jump starter safely and effectively. Please
read and follow these instructions and precautions carefully.
• 5 •
2. PERSONAL SAFETY PRECAUTIONS
2.1 Wear complete eye protection and protective clothing when working near lead-acid batteries. Always
have someone nearby for help.
2.2 Have plenty of fresh water, soap and baking soda nearby for use, in case battery acid contacts your
eyes, skin, or clothing. Wash immediately with soap and water and seek medical attention.
2.3 If battery acid comes in contact with eyes, ush eyes immediately for a minimum 10 minutes and get
medical attention.
2.4 Neutralize any acid spills thoroughly with baking soda before attempting to clean up.
2.5 Remove all personal metal items from your body, such as rings, bracelets, necklaces and watches. A
battery can produce a short circuit current high enough to weld a ring to metal, causing a severe burn.
2.6 Never smoke or allow a spark or ame in the vicinity of the battery or engine.
3. FEATURES
1. Worklight ON/OFF switch
2. Rotary switch for USB and jump starter
3. Built-in work light
4. Battery status indicators
5. Battery status button
6. USB port
7. 12V DC power outlet
8. Battery clamps
9. Air compressor gauge
10. Air compressor ON/OFF switch
11. Internal battery charger port
12. Air compressor hose wrap cleats
13. Air compressor hose
14. Air compressor adapters and storage bag
3
5
4
6
7
8
1
2
9
14
13
10
11
12
4. CHARGING THE INTERNAL BATTERY OF THE JUMP STARTER
IMPORTANT: CHARGE IMMEDIATELY AFTER PURCHASE, AFTER EACH USE AND EVERY 30 DAYS,
TO KEEP THE UNIT’S INTERNAL BATTERY FULLY CHARGED AND PROLONG BATTERY LIFE.
4.1 CHECKING THE LEVEL OF THE INTERNAL BATTERY
Press the Battery Status button on the front of the unit. The LED lights will indicate the current charge
level as follows:
RED – less than 20% of full charge; immediately charge the unit.
YELLOW/ORANGE – 20-80% of full charge.
GREEN – more than 80% of full charge.
4.2 CHARGING THE INTERNAL BATTERY
Charge the unit’s internal battery using an extension cord (not included).
NOTE: Use of an improper extension cord could result in a risk of re and electric shock.
1. To charge, ip the AC connector on the back of the unit DOWN and plug in an 18 AWG or larger
extension cord.
2. Plug the extension cord into a 120VAC electrical wall outlet.
3. While the jump starter is charging, the RED LED will be on. Complete charging may take up to 72 hours.
When the RED LED turns off, the jump starter is ready to use.
• 6 •
4. When the internal battery is fully charged, the charger will automatically go into maintain mode and
maintain the battery at full charge without damaging it. When in maintain mode, the GREEN LED will
light, as long as there is an AC cord connected to the charging port.
5. Charge the jump starter as soon as possible after use.
4.3 CHARGING THE INTERNAL BATTERY WHILE DRIVING
You may also charge the internal battery while driving, using a male-to-male charger cable (part number
94500109 – not included).
IMPORTANT: DO NOT CHARGE INTERNAL BATTERY FOR MORE THAN 30 MINUTES OR LEAVE THE
BATTERY UNATTENDED. IT COULD EXPLODE, CAUSING PROPERTY DAMAGE OR PERSONAL INJURY.
1. Make sure the car is running.
2. Insert one end of the accessory cable into the 12V DC power outlet.
3. Insert the other end of the accessory cable into the vehicle’s accessory outlet (lighter socket).
NOTE: The RED LED does not operate during this method of charging. Using this method to charge the
battery overrides the maintain mode and the battery can be overcharged.
4. Monitor the progress of the charge by pressing the Battery Status button on the front of the unit. When
the battery is fully charged, disconnect the accessory cable from the unit, and then from the lighter
socket of the vehicle.
NOTE: Completely disconnect the charger cable when the engine is not running.
5. OPERATING INSTRUCTIONS
5.1 JUMP STARTING A VEHICLE
IMPORTANT: Using the Engine Start feature without a battery installed in the vehicle will damage the
vehicle’s electrical system.
1. Turn the ignition OFF.
2. Lay the DC cables away from any fan blades, belts, pulleys and other moving parts.
3. For a negative-ground vehicle (as in most vehicles), connect the Instant Power’s POSITIVE (RED)
clamp to the POSITIVE (POS, P, +) battery post. Next, connect the NEGATIVE (BLACK) clamp to the
vehicle chassis or engine block, away from the battery.
4. For a positive-ground vehicle, connect the Instant Power’s NEGATIVE (BLACK) clamp to the
NEGATIVE (NEG, N, -) battery post. Next, connect the POSITIVE (RED) clamp to the vehicle chassis
or engine block away from the battery.
5. Turn the switch to the ON position
6. Crank the engine for no more than 8 seconds. If the engine does not start, wait 2 minutes before
cranking again.
7. After the engine starts, turn the switch to the OFF position and remove the unit from the battery.
8. Charge the unit.
5.2 USING THE USB PORT
The USB port provides up to 2A at 5V DC.
1. Ensure the battery clamps are securely clipped on the storage holders.
2. Turn the unit ON.
3. Plug your device into the USB port.
4. When nished using the USB port, turn the switch to the OFF position.
5. Charge the unit.
5.3 USING THE WORK LIGHT
The work light is controlled by a sliding ON/OFF switch located on the front of the unit.
Make sure the lamp is turned OFF when the unit is being recharged or stored.
Position the unit on a at, stable surface near the intended work area.
Ensure the battery clamps are securely clipped on the storage holders.
• 7 •
5.4 POWERING A 12V DC DEVICE
The unit is a power source for all 12V DC accessories that are equipped with a 12V accessory plug. Use
it for power outages and on shing or camping trips.
NOTE: Do not power a 12V device with the unit while charging the internal battery.
1. Make sure the device to be powered is OFF before inserting the 12V DC accessory plug into the 12V
DC accessory outlet.
2. Open the protective cover of the DC power outlet on the unit.
3. Plug the 12V DC device into the DC power outlet and turn on the 12V DC device (if required).
4. When nished, turn off the DC device (if required) and unplug from the DC power outlet.
CAUTION: Do not use the unit to run appliances that draw more than 20A DC.
NOTE: Extended operation of a 12V DC device may result in excessive battery drain. Recharge the unit
immediately after unplugging the 12V DC device.
Estimated run-times
APPLIANCE TYPE EST WATTAGE APPROX. USAGE
Cell phone, uorescent light 4 watts 34 hrs
Radio, fan, depth nder 9 watts 14 hrs
Camcorder 15 watts 7 hrs
Electrical tool 24 watts 5 hrs
Electric cooler 48 watts 2 hours
Car vacuum, air compressor 80 watts 1.8 hrs
NOTE: Actual time may vary. Times are based on the internal battery being fully charged.
5.5 USING THE AIR COMPRESSOR
WARNING. Read the instructions of the product being inated before using the compressor. Avoid
overination; do not exceed the manufacturer’s recommended pressures. Do not leave the air
compressor unattended during use.
NOTE: Wrap cleats are provided for convenient storage of the air compressor hose. Wrap the hose
around these cleats when the hose is not in use.
1. Ensure the battery clips are securely on the storage holders.
2. Remove the air compressor hose from the storage cleats.
3. Connect the adapter to the valve stem by threading it onto the end. If necessary, use one of the
additional adaptors.
4. Press the air compressor power switch to turn ON and inate to the desired pressure or fullness (refer
to the gauge next to the switch).
5. When the desired pressure is reached, press the air compressor power switch to turn OFF and remove
the connector from the valve stem.
6. Allow unit to cool.
7. Recharge the unit before storing.
NOTE: The air compressor is rated for 150 PSI.
Estimated time for inating
Vehicle tires 13-16" 6-24 minutes
Bike tires 1-3 minutes
Sports balls 30 seconds
These times are approximate. Use the air compressor gauge to ensure the proper pressure has been reached.
Do not overinate.
6. MAINTENANCE INSTRUCTIONS
6.1 After use and before performing maintenance, unplug and disconnect the jump starter.
6.2 Use a dry cloth to wipe all battery corrosion and other dirt or oil from the battery clips, cords and the
jump starter case.
6.3 Ensure that all of the jump starter components are in place and in good working condition.
6.4 All servicing should be performed by qualied service personnel.
• 8 •
7. MOVING AND STORAGE INSTRUCTIONS
7.1 Store inside, in a cool, dry place.
7.2 Do not store the clips on the handle, clipped together, on or around metal, or clipped to cables. The clips
on the jump starter are live when the switch is in the ON position and will produce arcing or sparking if
they come in contact with each other. To prevent accidental arcing, always place the switch in the OFF
position and keep the clips on the storage holders when not using it to jump start a vehicle.
7.3 If the jump starter is moved around the shop or transported to another location, take care to avoid/
prevent damage to the cords, clips and jump starter. Failure to do so could result in personal injury or
property damage.
IMPORTANT: Do not use and/or store the jump starter in or on any area or surface where damage
could occur if the internal battery should unexpectedly leak acid.
7.4 IMPORTANT:
CHARGE IMMEDIATELY AFTER PURCHASE
KEEP FULLY CHARGED
Charge the jump starter’s internal battery immediately after purchase, after every use and every 30 days.
All batteries are affected by temperature. The ideal storage temperature is at 70°F. The internal battery will
gradually self-discharge (lose power) over time, especially in warm environments. Leaving the battery in a
discharged state may result in permanent battery damage. To ensure satisfactory performance and avoid
permanent damage, charge the internal battery every month.
8. TROUBLESHOOTING
PROBLEM POSSIBLE CAUSE SOLUTION
The unit won’t jump start my car. Clamps are not making a good
connection to the battery.
Connections are reversed.
The internal battery is not
charged.
The vehicle’s battery is defective.
The unit is not turned on.
Check for poor connection to
battery and frame. Make sure
connection points are clean.
Disconnect the unit and reverse
the clamps.
Press the Battery Status button on
the front of the unit. The LEDs will
indicate the status of charge.
Have the battery checked.
Turn the unit’s ON/OFF switch to
the ON position.
The unit won’t power my 12V
device.
The 12V device is not turned on.
The internal battery is not
charged.
The 12V device draws more than
20A, has a short circuit, or the
internal fuse has blown.
Turn on the 12V device.
Check the battery charge status by
pressing the Battery Status button.
Disconnect the 12V device.
The internal 20A fuse needs
replacement by a qualied service
person.
The internal battery won’t hold a
charge.
The battery is bad (will not accept
a charge).
Have the battery checked.
The compressor shuts off. The compressor is overheated. Allow to cool for a few minutes,
then try again.
• 9 •
9. REPLACEMENT PARTS
Air compressor accessory kit (3 hose adapters) ................................................................ 2299001425Z
10. ACCESSORIES
Male-to-male accessory cable ..................................................................................................94500109
11. BEFORE RETURNING FOR REPAIRS
For REPAIRS OR RETURNS, visit 365rma.com
Visit batterychargers.com for Replacement Parts.
12. LIMITED WARRANTY
Go to batterychargers.com to register your product online.
SCHUMACHER ELECTRIC CORPORATION, 801 BUSINESS CENTER DRIVE, MOUNT
PROSPECT, IL 60056-2179, MAKES THIS LIMITED WARRANTY TO THE ORIGINAL RETAIL
PURCHASER OF THIS PRODUCT. THIS LIMITED WARRANTY IS NOT TRANSFERABLE OR
ASSIGNABLE.
Schumacher Electric Corporation (the “Manufacturer”) warrants this jump starter for one (1) year and
the internal battery for ninety (90) days from the date of purchase at retail against defective material
or workmanship that may occur under normal use and care. If your unit is not free from defective
material or workmanship, Manufacturer’s obligation under this warranty is solely to repair or replace
your product with a new or reconditioned unit at the option of the Manufacturer. It is the obligation of
the purchaser to forward the unit, along with proof of purchase and mailing charges prepaid to the
Manufacturer or its authorized representatives in order for repair or replacement to occur.
Manufacturer does not provide any warranty for any accessories used with this product that are
not manufactured by Schumacher Electric Corporation and approved for use with this product.
This Limited Warranty is void if the product is misused, subjected to careless handling, repaired, or
modied by anyone other than Manufacturer or if this unit is resold through an unauthorized retailer.
Manufacturer makes no other warranties, including, but not limited to, express, implied or statutory
warranties, including without limitation, any implied warranty of merchantability or implied warranty of
tness for a particular purpose. Further, Manufacturer shall not be liable for any incidental, special or
consequential damage claims incurred by purchasers, users or others associated with this product,
including, but not limited to, lost prots, revenues, anticipated sales, business opportunities, goodwill,
business interruption and any other injury or damage. Any and all such warranties, other than the
limited warranty included herein, are hereby expressly disclaimed and excluded. Some states do not
allow the exclusion or limitation of incidental or consequential damages or length of implied warranty,
so the above limitations or exclusions may not apply to you. This warranty gives you specic legal
rights and it is possible you may have other rights which vary from this warranty.
THIS LIMITED WARRANTY IS THE ONLY EXPRESS LIMITED WARRANTY AND THE
MANUFACTURER NEITHER ASSUMES OR AUTHORIZES ANYONE TO ASSUME OR MAKE
ANY OTHER OBLIGATION TOWARDS THE PRODUCT OTHER THAN THIS WARRANTY.
• 10 •
Arrancador y Fuente de Poder de CC
MANUAL DEL USUARIO
POR FAVOR CONSERVE ESTE MANUAL DEL USUARIO Y LEALO ANTES DE
CADA USO. En este manual le explica cómo utilizar la fuente de poder de manera
segura y conable. Por favor, lea y siga las siguientes instrucciones y precauciones.
CONTIENE UNA BATERÍA SELLADA DE ÁCIDO-PLOMO NO DERRAMABLE QUE DEBE
DESECHARSE APROPIADAMENTE.
ADVERTENCIA: Posible riesgo de una explosión. El contacto con una batería de ácido puede causar
quemaduras y ceguera. Manténgase alejado de los niños.
1. INSTRUCCIONES IMPORTANTES DE SEGURIDAD – GUARDE ESTAS INSTRUCCIONES.
ADVERTENCIA: RIESGO DE GASES EXPLOSIVOS.
TRABAJAR CERCA DE UNA BATERÍA DE PLOMO-ÁCIDO ES PELIGROSO. LAS BATERÍAS GENERAN
GASES EXPLOSIVOS DURANTE SU FUNCIONAMIENTO NORMAL. ES IMPORTANTE QUE SIGA LAS
INSTRUCCIONES CADA VEZ QUE UTILICE LA UNIDAD.
Para disminuir el riesgo de explosión de la batería, siga estas instrucciones, al igual que las
recomendaciones publicadas por el fabricante de la batería y de cualquier equipo que se utilizará cerca
de la batería. Verique las señales de advertencia que se hayan colocado en estos productos y en el motor.
ADVERTENCIA: EL RIESGO DE DESCARGA ELÉCTRICA O INCENDIO.
1.1 Manténgase alejado de los niños.
1.2 No desarme la unidad; hágalo revisar por una persona capacitada que efectúe reparaciones cuando necesite
servicio de mantenimiento o una reparación. Volver a ensamblar la unidad en forma incorrecta puede provocar
riesgo de incendio o descarga eléctrica.
1.3 No utilice la unidad para pasar corriente a un vehículo mientras se carga la batería interna.
1.4 No recargue la unidad con una extensión dañada.
1.5 La unidad se calienta durante la carga y debe tener una ventilación adecuada.
1.6 No coloque la unidad sobre materiales inamables como alfombras, tapicería, papel, cartón, etc.
1.7 Coloque la unidad tan lejos de la batería que se está cargando como los cables lo permitan.
1.8 No exponga la unidad a la lluvia o la nieve.
1.9 Nunca intente arrancar una batería congelada.
1.10 Nunca coloque la unidad directamente sobre la batería que se está cargando.
1.11 Para evitar la formación de arcos eléctricos, nunca permita que las pinzas se toquen entre sí o estén en
contacto con la misma pieza de metal.
1.12 El uso de un accesorio no recomendado ni vendido por el fabricante del arrancador puede ocasionar daños
en la unidad o lesiones corporales.
1.13 Nunca opere la unidad si está dañado.
1.14 Si otra persona usa la unidad, asegúrese de que esté bien informada sobre cómo usarlo de manera segura y
además, de que haya leído y comprendido las instrucciones de funcionamiento.
1.15 La unidad NO está diseñado para ser instalado como reemplazo de la batería del vehículo.
1.16 Utilícelo SOLO en vehículos, barcos y tractores de jardín alimentados con un sistema de batería de 12 V CC.
1.17 Si el motor no arranca luego de realizar el número recomendado de intentos, desconecte y verique la unidad
en busca de otros problemas.
1.18 Utilice la unidad para recargar baterías de plomo-ácido solamente. No lo utilice para cargar las baterías de
celdas secas que habitualmente se colocan en los aparatos domésticos.
2. PRECAUCIONES DE SEGURIDAD PERSONAL
2.1 Use protección completa para los ojos y ropa protectora cuando trabaje cerca de baterías de plomo-ácido.
Siempre cuente con la presencia de otra persona para obtener ayuda.
2.2 Tenga a la mano bastante agua fresca, jabón y bicarbonato de sodio en caso de que el ácido de la batería entre
en contacto con los ojos, la piel o la ropa. Lave inmediatamente con agua y jabón y busque atención médica.
• 11 •
2.3 Si el ácido de la batería entra en contacto con los ojos, enjuague inmediatamente durante 10 minutos como
mínimo y busque atención médica.
2.4 Neutralice el ácido derramado abundantemente con bicarbonato de sodio antes de intentar limpiarlo.
2.5 Retire todos los objetos metálicos de su cuerpo (anillos, pulseras, collares y relojes). Una batería puede producir
una corriente de cortocircuito lo sucientemente alta como para soldar un anillo al metal, lo que ocasionaría una
quemadura grave.
2.6 NUNCA fume o permita la presencia de chispas o llamas en la proximidad de una batería o motor.
3. CARACTERÍSTICAS
1. Interruptor de APAGADO/ENCENDIDO para lámpara
2. Interruptor giratorio para USB y arranque auxiliar
3. Lámpara integrada
4. Indicadores del estado de la batería
5. Botón de estado de la batería
6. Puerto USB
7. Indicadores del estado de la batería
8. Pinzas de la batería
9. Medidor del compresor de aire
10. Interruptor de APAGADO/ENCENDIDO
para el compresor de aire
11. Puerto interno del cargador de batería
12. Sujetador para la manguera del compresor de aire
13. Manguera del compresor de aire
14. Adaptadores del compresor de aire
y estuche para guardar
3
5
4
6
7
8
1
2
9
14
13
10
11
12
4. PARA CARGAR LA BATERIA INTERNA DEL ARRANCADOR
IMPORTANTE: CARGUE LA UNIDAD INMEDIATAMENTE DESPUÉS DE ADQUIRIRLA, AL TÉRMINO
DE CADA USO Y CADA 30 DÍAS PARA MANTENER LA BATERÍA INTERNA DE LA UNIDAD
COMPLETAMENTE CARGADA Y PROLONGARÁ SU VIDA ÚTIL.
4.1 COMPROBACIÓN DEL NIVEL DE CARGA DE LA BATERÍA INTERNA
Pulse el botón Estado de la batería en la parte frontal de la unidad. Las luces de LED indican el nivel de
carga de la siguiente manera:
ROJO – menos del 20% de la carga completa; inmediatamente cargar la unidad.
AMARILLO/NARANJA – 20-80% de la carga completa.
VERDE – más de 80% de la carga completa.
4.2 LA CARGA DE LA BATERÍA INTERNA
Para cargar la batería interna de la unidad, utilice un cable de extensión (no incluido).
NOTA: Al utilizar una extensión inadecuada, se corre el riesgo de ocasionar un incendio o descargas eléctricas.
1. Para cargar, dar la vuelta al conector de CA en la parte posterior de la unidad hacia abajo y conecte un
AWG 18 o un cable de extensión.
2. Conecte el cable de extensión en un tomacorriente eléctrico de 120VCA.
3. Mientras que el Arrancador Portátil está cargando, la luz LED rojo se mantendrá encendida. Una carga
completa se puede tardar hasta 72 horas. Cuando la luz LED rojo se apagará, el arrancador portátil
estará listo para usar.
4. El cargador se jará automáticamente en modo de mantenimiento y mantendrá la batería a plena
carga sin dañarla. Cuando en modo de mantenimiento, el LED VERDE se iluminará, siempre y cuando
no hay un cable de CA conectado al puerto de carga.
5. Cargue el arrancador portátil tan pronto como sea posible después de cada uso.
• 12 •
4.3 CÓMO CARGAR LA BATERÍA INTERNA CON EL VEHÍCULO EN MARCHA
También puede cargar la batería interna durante la conducción, utilizando un cable de carga de varón a
varón (p/n 94500109 – no incluido).
IMPORTANTE: NO CARGAR LA BATERÍA INTERNA POR MÁS DE 30 MINUTOS, NI DEJAR LA BATERÍA SIN
SUPERVISIÓN. PODRÍA EXPLOTAR Y OCASIONAR DAÑOS MATERIALES O LESIONES CORPORALES.
1. Asegúrese de que el vehículo esté en marcha.
2. Inserte un extremo del cable auxiliar en la toma de corriente de 12V CC.
3. Inserte el otro extremo del cable auxiliar en el enchufe auxiliar del vehículo (encendedor).
NOTA: La luz LED ROJO no opera durante este método de carga. Al utilizar este método para cargar la
batería, se anula el modo de mantenimiento y la batería podría sobrecargarse.
4. Para supervisar el progreso de la carga, presione el botón Estado de la batería en la parte frontal de
la unidad. Cuando la batería esta completamente cargada, primero desconecte el cable auxiliar del
Instant Power y luego, de la toma del encendedor del vehículo.
NOTA: Desconectar completamente el cable del cargador cuando el motor no está funcionando.
5. INSTRUCCIONES DE OPERACIÓN
5.1 DE ARRANCAR UN VEHÍCULO
IMPORTANTE: Utilización de la función arranque del motor sin una batería instalada en el vehículo
dañará el sistema eléctrico del vehículo.
1. APAGUE el motor.
2. Ponga los cables de CD lejos de las aspas del ventilador, bandas, poleas u otras partes móviles.
3. En los vehículos con carga negativa a tierra (como en la mayoría de los vehículos), conecte la pinza
con el polo POSITIVO (ROJO) del Instant Power al borne POSITIVO (POS, P, +) de la batería. A
continuación, conecte la pinza con el polo NEGATIVO (NEGRO) al chasis del vehículo o al bloque del
motor, lejos de la batería.
4. En los vehículos con carga positiva a tierra, conecte la pinza con el polo NEGATIVO (NEGRO) del
Instant Power al borne NEGATIVO (NEG, N, -) de la batería. A continuación, conecte la pinza con el
polo POSITIVO (ROJO) al chasis del vehículo o al bloque del motor, lejos de la batería.
5. Coloque el interruptor en la posición de Encendido (ON).
6. Accione el encendido del motor durante no más de 8 segundos. Si el motor no enciende, espere 2
minutos antes de arrancar de nuevo.
7. Una vez que haya arrancado el motor, coloque el interruptor en la posición de Apagado (OFF) y retire
la unidad de la batería.
8. Cargue la unidad.
5.2 EL USO DE PUERTO USB
El puerto USB provee poco más de 2A por 5V de CD.
1. Asegúrese que las pinzas estén jas en el compartimiento.
2. Encienda la unidad (ON).
3. Conecte su aparato en el puerto USB.
4. Cuando termine de usar el puerto USB, coloque el interruptor en la posición de Apagado (OFF).
5. Cargue la unidad
5.3 CÓMO UTILIZAR LA LUZ DE TRABAJO
La luz de trabajo se controla mediante un interruptor deslizante de Encendido/Apagado (ON/OFF)
situado en la parte frontal de la unidad.
Asegúrese de que la lámpara esté apagada (OFF) cuando la unidad se esté recargando o
permanezca almacenada.
Coloque la unidad sobre una supercie plana cerca del área de trabajo.
Asegúrese que las pinzas estén jas en el compartimiento.
• 13 •
5.4 PARA HACER FUNCIONAR UN APARATO DE 12V DE CD:
La unidad es una fuente de poder para cualquier accesorio de 12V de corriente directa que estén
equipados con enchufe de 12V. Utilícelo durante apagones, pesca o días de campo.
NOTA: no encienda un dispositivo de 12V mientras se esté cargando la batería interna de la unidad.
1. Asegúrese de que el dispositivo que desea cargar esté apagado (OFF) antes de insertar el enchufe
auxiliar de 12V CC en la toma auxiliar de 12V CC.
2. Abra la tapa protectora de la toma de alimentación de CC de la unidad.
3. Conecte el dispositivo de 12V CC a la toma de alimentación de CC y enciéndalo (si es necesario).
4. Cuando haya terminado de cargarse, apague el dispositivo de CC (si es necesario) y desenchúfelo de
la toma de alimentación de CC.
PRECAUCIÓN: no utilice la unidad en aparatos que consuman más de 20A de CC.
NOTA: si hace funcionar un dispositivo de 12 V CC durante mucho tiempo con la unidad, la batería se agotará
por completo. Recargue la unidad inmediatamente después de desconectar los dispositivos de 12V CC.
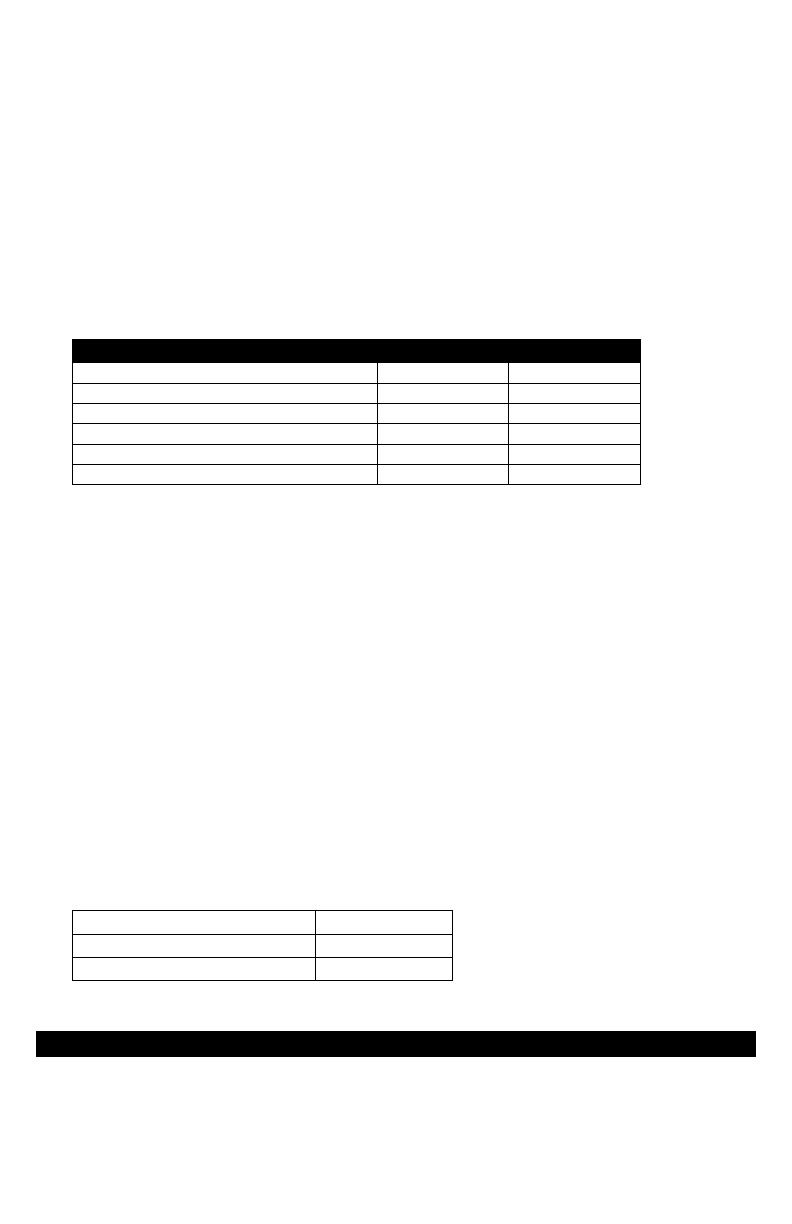
Tiempo estimado de funcionamiento
TIPO DE DISPOSITIVO POTENCIA APROX. TIEMPO DE USO
Teléfono celular, luz uorescente 4 vatios 34 hrs
Radios, ventiladores, Localizador de profundidad 9 vatios 14 hrs
Videocámara 15 vatios 7 hrs
Herramientas eléctricas 24 vatios 5 hrs
Refrigerador eléctrico 48 vatios 2 hrs
Aspiradora de auto, compresor de aire 80 vatios 1,8 hrs
NOTA: El tiempo real de funcionamiento puede variar. Los tiempos están basados en una batería
interna completamente cargada.
5.5 USO DEL COMPRESOR DE AIRE
ADVERTENCIA. Antes de usar el compresor, lea las instrucciones del objeto a inar. Evite sobre inar, no
exceda la presión de aire recomendado por el fabricante. Durante el uso, no desatienda el compresor.
NOTA: Sujetadores se proporcionan para un almacenamiento conveniente de la manguera del compresor
de aire. Enrolle la manguera del compresor alrededor de los sujetadores cuando no se esté utilizando.
1. Asegúrese que las pinzas estén jas en el compartimiento.
2. Retire la manguera del compresor de aire de los sujetadores de almacenamiento.
3. Conecte el adaptador al vástago de la válvula por roscado sobre el extremo. Si es necesario, utilice
uno de los adaptadores adicionales.
4. Pulse el interruptor de encendido del compresor de aire para encender e inar a la presión o plenitud
deseada (consulte el medidor al lado del interruptor).
5. Cuando se alcanza la presión deseada, presione el interruptor de encendido del compresor de aire
para apagar, y retire el conector del pivote de la válvula.
6. Deje que la unidad se enfríe.
7. Cargue la unidad nuevamente antes de guardarla.
NOTA: El Compresor de aire esta diseñado para 150 PSI.
Tiempo estimado para inar
Neumáticos para vehículos de 13 a 16˝ 6 a 24 minutos
Llantas para bicicleta 1 a 3 minutos
Balones deportivos 30 segundos
Estos valores son aproximados. Utilice el medidor del compresor de aire para
asegurarse de que se ha alcanzado el nivel de presión adecuado. No ine en exceso.
6. INSTRUCCIONES DE MANTENIMIENTO
6.1 Después de usar y antes de realizar mantenimiento, desenchufe y desconecte la unidad (ver secciones 3 y 4).
6.2 Utilice un paño seco para limpiar la corrosión de toda la batería y otra suciedad o aceite de los terminales,
cables y carcasa de la unidad.
6.3 Asegúrese de que todas las piezas de la unidad estén bien instaladas y en buenas condiciones para su función.
6.4 Cualquier servicio debe realizarse por personal calicado en el ramo.
• 14 •
7. INSTRUCCIONES PARA EL MANEJO Y ALMACENAMIENTO
7.1 Almacene en el interior, en un lugar fresco y seco.
7.2 No guarde las pinzas en asas, enganchados entre sí, en o cerca de metales o enganchados en cables. Las
pinzas en la unidad están energizadas. Cuando el interruptor se encuentra en la posición ON y producen arco
o chispas si hacen contacto entre sí. Para evitar arco accidental, siempre mantenga las pinzas en los soportes
de almacenaje y el interruptor en la posición OFF cuando el arrancador no se está usando para arranque
inmediato de un vehículo.
7.3 Si la unidad se mueve alrededor del taller o se transporta a otra localidad, trate de evitar/prevenir daño a los cables,
pinzas y al arrancador. El ignorar estas recomendaciones, podría llegar a causarle daños personales o de inmueble.
IMPORTANTE: No use o almacene la unidad, bajo ninguna circustancia, en áreas donde puede causar
daño alguno en caso de que la batería derrame ácido.
7.4 IMPORTANTE:
CARGUE INMEDIATAMENTE DESPUÉS DE CADA USO.
MANTENGA LA UNIDAD COMPLETAMENTE CARGADA.
Cargue la fuente de poder inmediatamente después de comprarla, después de cada uso y cada 30 días.
La temperatura afecta a todas las baterías. La temperatura ideal de almacenaje es a los 70 grados
Fahrenheit. La batería interna se va descargando (pierde potencia) con el pasar del tiempo, especialmente
en los ambientes cálidos. Si se deja la batería en estado de descarga, puede sufrir daños permanentes.
Para asegurar el rendimiento satisfactorio y evitar daños permanentes, cargue la batería interna mensualmente.
8. LOCALIZACIÓN Y SOLUCN DE PROBLEMAS
PROBLEMA CAUSA POSIBLE SOLUCIÓN
La unidad no arranca mi
auto.
Las pinzas no hacen buena
conexión a la batería.
Las conexiones están a la inversa.
La batería interna no está cargada.
La batería del vehículo esta
defectuosa.
La unidad no está encendida.
Asegúrese de que existe buena
conexión a la batería y la carrocería.
También que los puntos de las
conexiones estén limpios. Gire las
pinzas para una conexión efectiva.
Desconecte la unidad y coloque las
pinzas en forma correcta.
Verique la condición de carga de la
batería girando el interruptor situado
enfrente de la fuente de poder.
Consulte la sección de Indicadores
LED en este manual.
Haga un chequeo de la batería.
Gire el interruptor de la unidad ON /
OFF a la posición de encendido.
La unidad no pone a
funcionar mi aparato
de 12V.
El aparato de 12V no enciende.
La batería interna no está cargada.
El aparato de 12V absorbe más
de 20A, tiene un corto circuito, o el
fusible interno se ha dañado.
Encienda el aparato de 12V.
Verique la condición de carga de la
batería girando el interruptor situado
enfrente de la unidad.
Desconecte el aparato de 12V. El
fusible interno de 20A necesita ser
reemplazado por un técnico calicado.
La batería de la unidad no
retiene la carga.
La batería está en malas condiciones
(No recibirá carga).
Haga un chequeo de la batería.
El compresor se apaga. El compresor está sobrecalentado. Dejar enfriar por unos minutos y
vuelva a intentarlo.
• 15 •
9. REPUESTOS
Juego de accesorios del compresor de aire (3 adaptadores de manguera) ..................... 2299001425Z
10. ACCESORIOS
Cable accesorio macho a macho .............................................................................................94500109
11. ANTES DE DEVOLVER A REPARACIONES
Para REPARACIONES O DEVOLUCIONES, visite 365rma.com
Visite batterychargers.com para obtener piezas de repuesto.
12. GARANTÍA LIMITADA
Visite nuestra página en batterychargers.com para registrar su producto en línea.
SCHUMACHER ELECTRIC CORPORATION, 801 BUSINESS CENTER DRIVE, MOUNT PROSPECT,
IL 60056-2179, REALIZA LA PRESENTE GARANTÍA LIMITADA AL COMPRADOR MINORISTA
ORIGINAL DE ESTE PRODUCTO. LA PRESENTE GARANTÍA LIMITADA NO PUEDE TRANSFERIRSE
NI CEDERSE.
Schumacher Electric Corporation (el “Fabricante”) otorga garantía por esta unidad por un (1) año y
la batería interna por noventa (90) días contados a partir de la fecha de compra, contra cualquier
material defectuoso o de mano de obra de la unidad que pudieran surgir durante su uso y bajo
cuidado normal. Si su unidad cuenta con material defectuoso o defectos de mano de obra, la
obligación de los Fabricantes, conforme a la presente garantía, será simplemente reparar o sustituir
el producto por uno nuevo o por una unidad reparada, a elección del fabricante. Es la obligación
del comprador enviar la unidad con comprobante de compra y los gastos de envío prepagos al
Fabricante o a sus representantes autorizados para que estos reparen o reemplacen el producto.
El Fabricante no presta garantía por lo accesorios utilizados con este producto que no sean los
fabricados por Schumacher Electric Corporation y que no estén aprobados para su uso con este
producto. La presente Garantía Limitada será nula si el producto se utiliza en forma errónea, se trata
de manera inadecuada, es reparado o modicado por personas que nos sean el Fabricante o si esta
unidad es revendida a través de un vendedor minorista no autorizado.
El Fabricante no realiza ninguna otra garantía, incluidas, a título enunciativo, las garantías expresas,
implícitas o legales, incluidas, a modo de ejemplo, las garantías implícitas de comerciabilidad o
adecuación a un n especíco. Asimismo, el Fabricante no será responsable ante reclamos por daños
accidentales, especiales ni directos en los que incurran los compradores, usuarios u otras personas
asociadas al producto, incluidas, a título enunciativo, los ingresos y ganancias no percibidas, ventas
anticipadas, oportunidades comerciales, el buen nombre, la interrupción de la actividad comercial o
cualquier otro daño que haya provocado. Todas las garantías, excepto la garantía limitada incluida
en el presente, por medio de la presente, quedan expresamente anuladas y excluidas. Algunos
estados no permiten la exclusión ni la limitación de los daños accidentales ni directos o el plazo de
garantía implícita, por lo que las limitaciones o exclusiones mencionadas anteriormente podrían no
corresponder con su caso. La presente garantía le otorga derechos legales especícos y es probable
que usted cuente con otros derechos que podrían diferir de los incluidos en la presente garantía.
LA PRESENTE GARANTÍA LIMITADA ES LA ÚNICA GARANTÍA LIMITADA EXPRESA Y EL FABRICANTE
NO ASUME NI AUTORIZA A NADIE A ASUMIR O A ADQUIRIR NINGUNA OTRA OBLIGACIÓN RESPECTO
DEL PRODUCTO QUE NO SEA LA PRESENTE GARANTÍA.
  • Page 1 1
  • Page 2 2
  • Page 3 3
  • Page 4 4
  • Page 5 5
  • Page 6 6
  • Page 7 7
  • Page 8 8
  • Page 9 9
  • Page 10 10
  • Page 11 11
  • Page 12 12
  • Page 13 13
  • Page 14 14
  • Page 15 15

Schumacher Farm & Ranch El manual del propietario

Categoría
Cargadores de batería de coche
Tipo
El manual del propietario
Este manual también es adecuado para

En otros idiomas