Groupe Brandt RHD98XE1 El manual del propietario
- Tipo
- El manual del propietario

Bedienungsanleitung
Instructions Booklet
Mode d’emploi
Libretto Istruzioni
Gebruiksaanwijzing
Manual de instrucciones
Manual de instruções
Instruktionsbog
NL
IT
FR
GB
DE
ES
PT
DK
La página se está cargando...
La página se está cargando...
La página se está cargando...

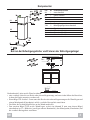
6GB
9
12c
2.1
2.2
2
7.2.1
12c
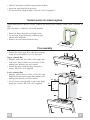
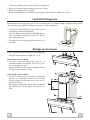
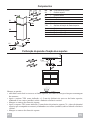
• Drill ø 8 mm holes at all the centre points marked.
• Insert the wall plugs 11 in the holes.
• Fix the brackets using the 12a screws (4,2 x 44,4) supplied.
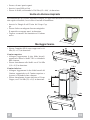
Ducted version air exhaust system
When installing the ducted version, connect the hood to the chimney using either a fl exible or
rigid
pipe, the choice of which is left to the installer.
• Insert the fl ange 9 on the hood body outlet.
• Fix the pipe in position using suffi cient pipe
clamps (not supplied).
• Remove any activated charcoal fi lters.
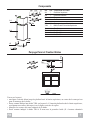
Flue assembly
• Fasten the angle iron 15 to the hood canopy
using the screws 12d (2.9 x 9.5) provided.
Upper exhaust fl ue
• Slightly widen the two sides of the upper fl ue
and hook them behind the brackets 7.2.1,
making sure that they are well seated.
• Secure the sides to the brackets using the 4
screws 12c (2,9 x 9,5) supplied.
Lower exhaust fl ue
• Slightly widen the two sides of the fl ue and
hook them between the upper fl ue and the wall,
making sure that they are well seated.
• Fix the lower part laterally to the hood body
using the 2 screws 12c (2,9 x 9,5) supplied.
La página se está cargando...
La página se está cargando...
La página se está cargando...
La página se está cargando...
La página se está cargando...
La página se está cargando...
La página se está cargando...

14ES
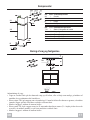
• Marcar los centros de los orifi cios de la brida.
• Perforar ø 8 mm los puntos marcados.
• Introducir los tarugos 11 en los orifi cios.
• Fijar las bridas, usando los tornillos 12a (4,2 x 44,4) en dotación.
• Si existe, fi jar el fondo, usando los tornillos 12a (4,2 x 44,4) en dotación.
Salida del aire versión aspirante
Para la instalación de la versión aspirante, conectar la campana al tubo de salida mediante un tubo
rígido o fl exible, a discreción del instalador.
• Introducir la brida 9 en la salida del cuerpo de la
campana.
• Fijar el tubo con abrazaderas adecuadas. Este
material no se proporciona en dotación.
• Quitar los fi ltros antiolor al carbón activo.
Montaje de la chimenea
• Sujetar el angular 12c al cuerpo de la campana
con 4 tornillos 12d (2,9x9,5).
Chimenea superior
• Ensanchar ligeramente las dos faldas laterales,
engancharlas detrás de las bridas 7.2.1 cerrarlas
hasta el tope.
• Fijar a los lados de las bridas con los 4 tornillos
12e (2,9 x 9,5) en dotación
Chimenea inferior
• Ensanchar ligeramente las dos faldas laterales
de la chimenea, engancharlas entre la chimenea
superior y la pared y cerrarlas hasta el tope.
• Fijar lateralmente la parte inferior en el cuerpo
de la campana, con los 2 tornillos 12c (2,9 x
9,5) en dotación.
9
12c
2.1
2.2
2
7.2.1
12c

15PT
X
1÷2
7.2.1
12d
2.1
2.2
12c
9
15
12a
7.2.1 11
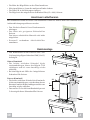
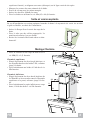
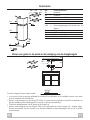
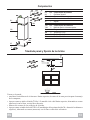
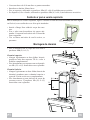
Componentes
Ref. Qtd Componentes do produto
2.1 1 Chaminé superior
2.2 1 Chaminé inferior
9 1 Flange
15 1 cantoneira
Ref. Qtd Componentes de instalação
7.2.1 2 Suportes de fi xação da chaminé superior
11 4 Buchas
12a 4 Parafusos 4,2 x 44,4
12c 6 Parafusos 2,9 x 6,5
12d 4 Parafusos 2,9 x 9,5
Perfuração da parede e fi xação dos suportes
Marque na parede:
• uma linha vertical até ao tecto ou ao limite superior, no centro da zona prevista para a montagem
do exaustor;
• Apoie o suporte 7.2.1 como indicado, a 1-2 mm de distância do tecto ou do limite superior,
alinhando o seu centro (entalhes) so bre a linha de referência vertical.
• Marque os centros dos furos do suporte.
• Apoie o suporte 7.2.1 como indicado, X mm abaixo do primeiro suporte (X = altura da chaminé
superior que acompanha o exaus tor), alinhando o seu centro (entalhes) sobre a linha de re fe rên cia
vertical.
• Marque os centros dos furos do suporte.
La página se está cargando...
La página se está cargando...

18DK
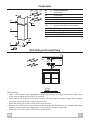
9
12c
2.1
2.2
2
7.2.1
12c
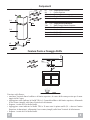
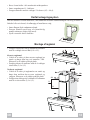
• Bor ø 8 mm huller i alle markerede midterpunkter.
• Insæt vægudtagene 11 i hullerne.
• Fastgør støtterne med de vedlagte 12a skruer (4,2 × 44,4).
Rørført udsugningssystem
Når den rørførte version installeres, skal emhætten tilsluttes afskærmningen ved brug af enten en
fl eksibel eller stiv kanal, alt afhængig af installørens valg.
• Insæt fl angen 9 på emhættens aftræk.
• Fastgør kanalen med brug af tilstrækkelig
mange rørbærere (følger ikke med).
• Fjern eventuelle aktive kulfi ltre.
Montage af røgkanal
• Fastgør vinkeljernet 15 til emhættens baldakin
med de vedlagte skruer 12d (2.9 x 9.5).
Øverste røgkanal
• Udvid de to sider på den øverste røgkanal en
smule og hægt dem bag ved støtterne 7.2.1.
Efterprøv at de sidder godt på plads.
• Fastgør siderne til støtterne med de 4 vedlagte
skruer 12c (2,9 x 9,5).
Nederste røgkanal
• Udvid de to sider på røgkanalen en smule og
hægt dem mellem den øverste røgkanal og
væggen. Efterprøv at de sidder godt på plads.
• Fastgør den nederste del sidelæns til emhætten
med de to skruer 12c (2,9 x 9,5).
-
 1
1
-
 2
2
-
 3
3
-
 4
4
-
 5
5
-
 6
6
-
 7
7
-
 8
8
-
 9
9
-
 10
10
-
 11
11
-
 12
12
-
 13
13
-
 14
14
-
 15
15
-
 16
16
-
 17
17


Groupe Brandt RHD98XE1 El manual del propietario
- Tipo
- El manual del propietario
en otros idiomas
- français: Groupe Brandt RHD98XE1 Le manuel du propriétaire
- italiano: Groupe Brandt RHD98XE1 Manuale del proprietario
- English: Groupe Brandt RHD98XE1 Owner's manual
- Deutsch: Groupe Brandt RHD98XE1 Bedienungsanleitung
- Nederlands: Groupe Brandt RHD98XE1 de handleiding
- português: Groupe Brandt RHD98XE1 Manual do proprietário
- dansk: Groupe Brandt RHD98XE1 Brugervejledning