
Installation Instructions
1 | P a g e
V 1 . 0 p u b l i c a t i o n o n 0 1 . 2 0 1 7
AIRFUSION CLIMATE LIGHT KIT
SKU# 21024901, 21025001, 21025101, 21025201
Rated Voltage 120V~ 60Hz
Thank you for purchasing this quality Lucci product. To ensure correct function and safety, please read and follow all
instructions carefully before using the product. Please keep instructions for future reference.
Warranty
This fitting is covered by a 2 year warranty from the date of purchase. Please retain proof of purchase.
Warranty will be void if there is any damage due to improper usage or modification to the fitting.
Failure to comply with the instructions in this manual may increase the risk of damage or injury and will void
warranty.
Installation requirements
Must be installed by a licensed electrician.
All wiring and installation of the light fitting must adhere to local and national wiring rules.
Do not exceed the maximum wattage rating.
Select a suitable location for installation:
- This product is suitable for indoor use only.
Take care not to pull any electrical wires during unpacking as this may damage the connection.
Lay out all the components on a smooth surface and make sure there are no components missing before
assembling.
Check whether the fitting has been damaged during transport. Do not operate/install any product which appears
damaged in any way. Return the complete product to the place of purchase for inspection, repair or replacement.
Ensure power to the circuit you are working on has been switched OFF.
Installation directions
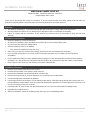
1. Remove all packaging material from the product.
2. Remove the fan bottom cover from the shaft of the fan.
3. Remove the shrinkable sleeve from light wires connector (B).
4. Remove the lamp shade (G) from the light base (C) by turning it from anticlockwise.
5. Connect the light wire connectors (B) together.
6. Lift and align the base of the light (C) to the light base bracket (A), allow the bolt go through the keyhole slots and
turn the light base anticlockwise. Align the screw holes between the light base (C) and the light base bracket (A) and
use the 3 mounting screws (F) to secure.
7. Install the bulbs (E, not included) into the lamp holders (D). Do not exceed the maximum wattage rating.
8. Reposition the lamp shade (G).
9. After the installation, switch on the fitting to test and enjoy your new lighting product.

Installation Instructions
2 | P a g e
V 1 . 0 p u b l i c a t i o n o n 0 1 . 2 0 1 7
Safety tips
Always ensure the power is OFF and the fitting has cooled down before performing any maintenance, cleaning,
changing the globe or adjustment to the fitting.
Do not touch the globe with bare hands. Use a clean cloth, gloves or a tissue.
To avoid injury or damage to the fitting, ensure that power leads and screws are secure before connecting the
power.
Select a suitable location away from liquids and hazards.
Ensure that the fitting does not come in contact with corrosive chemicals, etc.
To clean, wipe with a damp clean cloth. Never soak the fitting with water.
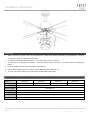
Specifications
SKU #
21024901
21025001
21025101
21025201
Color
White
Brushed Chrome
Antique Brass
Charcoal
Rated Voltage
120V~ 60Hz
Rated Wattage
Max.40W x 2
Lamp Holder
Type B, E12
Weight
1.34 lb
Dimensions
H:3.74 inch Dia: 6 inch
Bulb
Bulb not included

Instrucciones de instalación
1 | Página
V1.0 publicada en 01.2017
KIT DE LUZ DEL VENTILADOR DE TECHO AIRFUSION
SKU# 21024901, 21025001, 21025101, 21025201
Tensión nominal: 120 V~ 60 Hz
Gracias por adquirir este producto Lucci de gran calidad. Para garantizar un funcionamiento correcto y seguro, lea y
siga todas las instrucciones detenidamente antes de usar el producto. Por favor, guarde estas instrucciones para
futuras consultas.
Garantía
Esta luz está cubierta por una garantía de 2 años desde la fecha de compra. Por favor, conserve la prueba de
compra.
La garantía quedará invalidada si se produce algún daño como consecuencia de un uso inapropiado o
modificaciones en la luz.
El incumplimiento de las instrucciones contenidas en este manual pueden aumentar el riesgo de daños o lesiones y
anularán la garantía.
Requisitos de instalación
Debe ser instalada por un electricista acreditado.
Tanto el cableado como la instalación de la luz deben cumplir con los reglamentos locales y nacionales sobre
instalaciones eléctricas.
No exceda la potencia nominal máxima admitida.
Seleccione una ubicación apropiada para la instalación:
- Este producto ha sido diseñado solamente para uso en interiores.
Procure no tirar de ninguno de los cables cuando desembale el producto, ya que esto podría dañar las conexiones.
Deposite todos los componentes sobre una superficie lisa y asegúrese de que no falte ninguno antes de comenzar
el montaje.
Compruebe que la luz no haya sufrido algún daño durante el transporte. Nunca utilice o instale un producto que
parezca sufrir algún daño. Devuelva el producto completo al lugar donde realizó la compra para que lo examinen,
reparen o reemplacen.
Asegúrese de que el circuito eléctrico en el que esté trabajando esté desconectado de la corriente.
Instrucciones de instalación
1. Quite todo el material de embalaje del producto.
2. Desmonte la tapa inferior del ventilador del eje del ventilador.
3. Retire la funda retráctil del conector (B) de los cables de las luces.
4. Retire la pantalla (G) de la lámpara de su base (C) girándola en sentido antihorario.
5. Conecte los conectores (B) de los cables de la luz unos a otros.
6. Eleve y alinee la base (C) de la luz a su soporte (A) haciendo pasar el perno por los orificios de llave y gire en
sentido antihorario. Alinee los orificios de los tornillos entre la base (C) de la luz y el soporte (A) de la base y utilice 3
tornillos (F) para asegurarla.
7. Instale las bombillas (E, no incluidas) en los portalámparas (D). No exceda la potencia nominal máxima admitida.
8. Vuelva a colocar la pantalla (G).
9. Una vez finalizada la instalación, pruebe a encender la luz y disfrute de su nuevo producto de iluminación.

Instrucciones de instalación
2 | Página
V1.0 publicada en 01.2017
Consejos sobre seguridad
Asegúrese siempre de que el aparato esté apagado y se haya enfriado antes de realizar tareas de mantenimiento,
limpieza, cambiar la pantalla o llevar a cabo algún ajuste.
No toque la pantalla con las manos desnudas. Utilice un paño limpio, unos guantes o un pañuelo.
Para evitar lesiones o daños en la luz, asegúrese de que los cables de corriente y los tornillos estén bien
asegurados antes de conectar la corriente.
Seleccione una ubicación apropiada que esté alejada de los líquidos y otros peligros.
Asegúrese de que la luz no entre en contacto con químicos corrosivos, etc.
Utilice un paño limpio y humedecido para limpiarla. Nunca remoje la luz en el agua.
Especificaciones
SKU #
21024901
21025001
21025101
21025201
Color
Blanco
Cromado bruñido
Latón envejecido
Gris antracita
Tensión
nominal
120 V ~ 60 Hz
Potencia
nominal
Máx. 40 W x 2
Portalámparas
Tipo B, E12
Peso
1,34 lb (0,61 kg)
Dimensiones:
Al.: 3,74" (9,5 cm); Ø: 6" (15,24 cm)
Bombilla
Bombilla no incluida
-
 1
1
-
 2
2
-
 3
3
-
 4
4


en otros idiomas
Artículos relacionados
-
Lucci Air 210254010 Instrucciones de operación
-
-
-
-
LUCCI Airfusion Radar DC Ceiling Fan Manual de usuario
-
-
-
