Kenwood UBZ-LJ9SETE UBZ Twin Pack Licence Free Radio Manual de usuario
- Categoría
- Radios bidireccionales
- Tipo
- Manual de usuario

PMR446 FM Handfunkgeräte
UBZ-LJ9SETE (EU Version)
UBZ-LJ9SETT (UK Version)
BEDIENUNGSANLEITUNG
DEUTSCH FRANÇAIS ITALIANOENGLISH NEDERLANDS
ESPAÑOL

2
DEUTSCH
Inhaltsverzeichnis
Inhalt Seite
1. Sicherheitshinweise
1.1 Vorsichtsmaßregeln
1.2 Informationen zum Akku
1.3 Konformitätserklärung
1.4 EU / UK-Kontaktadresse
2. Vor der Inbetriebnahme
2.1 Auspacken
2.2 Kompontenten und Funktionen
2.3 Li-Ionen Akku installieren
2.4 Laden des Akkus
2.5 Montage des Gürtelclips
2.6 Verwenden eines optionalen Headsets
3. Benutzung des Funkgerätes
3.1 Ein- und Ausschalten des Gerätes
3.2 Einstellen der Lautstärke
3.3 Senden und Empfangen
3.4 Full Reset Funktion
4. Einstellen des Funkgerätes
4.1 Wechseln von Kanälen
4.2 Rauschsperre (Squelch)
4.3 QT-Ton und DQT-Code Einstellungen
4.4 Sprachgesteuertes Senden (VOX) einrichten
4.5 Rufton
4.6 Tastenton
4.7 Roger-Beep
4.8 Feedback Tone
4.9 Akku Ladestand
4.10 Monitorfunktion
4.11 Kanalsuchlauf (Scan)
4.12 Energiesparfunktion
5. Fehlerbehebung
6. Entsorgung
7. Technische Daten
8. Garantie
9. SAR Werte
3
3
4
5
5
6
6
6
7
8
8
9
10
10
10
10
10
11
12
12
12
13
14
14
14
14
15
15
15
15
16
16
17
18
19

3
1. Sicherheitshinweise
WICHTIGE SICHERHEITSINSTRUKTIONEN
Achtung: Lesen Sie diese Seiten aufmerksam durch, um den sicheren Betrieb des Gerätes zu gewähr-
leisten.
Hinweise aufmerksam lesen!
•
Befolgen Sie alle Sicherheits- und Bedienungsanweisungen, wenn Sie dieses Produkt in Betrieb nehmen.
Hinweise sorgfältig aufbewahren!
• Sie sollten die Sicherheits- und Bedienungsanweisungen für spätere Nachschlagezwecke aufbewahren.
Alle Warnhinweise beachten!
• Sie sollten alle an dem Produkt angegebenen und in der Bedienungsanleitung aufgeführten
Warnungen strikt befolgen.
1.1 Vorsichtsmaßregeln
• Laden Sie Funkgerät und Akku nicht in nassem Zustand.
• Achten Sie darauf, dass keine metallischen Objekte zwischen Funkgerät und Akku geraten.
• Verwenden Sie nur von KENWOOD empfohlenes Zubehör.
• Wenn ein Teil des Funkgerätes beschädigt ist, berühren Sie nicht die beschädigten Teile.
Reduzieren Sie beim Anschluss von Kopfhörern oder einer Sprechgarnitur die Lautstärke des Funk-
gerätes. Beachten Sie auch, dass sich beim Ausschalten der Rauschsperre (Squelch) die Lautstärke
ändern kann.
• Legen Sie nicht das Kabel eines Clipmikrofons mit dem Ohrhörer/Halter um Ihren Hals, während
Sie in der Nähe von Maschinen sind, in denen sich das Kabel verfangen könnte.
• Legen Sie das Funkgerät nicht auf einer instabilen Fläche ab. Wenn das Funkgerät wegen
Herunterfallen oder starker Erschütterungen ein-/ausschaltet, können die Lautstärke und Kanal
kongurationen zurückgesetzt werden.
• Achten Sie darauf, sich mit dem Ende der Antenne nicht am Auge zu verletzen.
• Das Funkgerät nicht in Wasser tauchen.
• Schalten Sie das Funkgerät zum Anschluss von Zubehör immer aus.
• Das Gerät wird am Netzgerät vom Netz getrennt. Sorgen Sie dafür, dass der Stecker des Netzge-
rätes gut zugänglich ist.
• Bei der Entsorgung der Batterien sind die anwendbaren gesetzlichen Vorschriften und örtlichen
Bestimmungen Ihres Landes bzw. Ihrer Region einzuhalten.
• Wenn ein handelsüblicher Halsriemen verwendet wird, achten Sie darauf, dass sich der Halsriemen
nicht in Maschinenteilen in der Nähe verfängt.
Warnung!
Schalten Sie das Funkgerät an diesen Orten aus:
• In explosionsfähiger Atmosphäre (entzündliches Gas, Staubpartikel, Metallpulver, Holzstaub usw.).
• Beim Tanken und beim Aufenthalt an Tankstellen.
• An Orten, an denen Explosionsgefahr besteht oder Sprengarbeiten stattnden.
• Im Flugzeug. (Ein etwaiger Einsatz des Funkgerätes darf nur auf Anordnung und nach Weisung
der Besatzung erfolgen.)
• Überall dort, wo Schilder usw. zum Ausschalten von Funkgeräten auffordern, u. a. in medizini-
schen Einrichtungen.
• In der Nähe von Personen mit Herzschrittmacher.
Inhaltsverzeichnis
Inhalt Seite
1. Sicherheitshinweise
1.1 Vorsichtsmaßregeln
1.2 Informationen zum Akku
1.3 Konformitätserklärung
1.4 EU / UK-Kontaktadresse
2. Vor der Inbetriebnahme
2.1 Auspacken
2.2 Kompontenten und Funktionen
2.3 Li-Ionen Akku installieren
2.4 Laden des Akkus
2.5 Montage des Gürtelclips
2.6 Verwenden eines optionalen Headsets
3. Benutzung des Funkgerätes
3.1 Ein- und Ausschalten des Gerätes
3.2 Einstellen der Lautstärke
3.3 Senden und Empfangen
3.4 Full Reset Funktion
4. Einstellen des Funkgerätes
4.1 Wechseln von Kanälen
4.2 Rauschsperre (Squelch)
4.3 QT-Ton und DQT-Code Einstellungen
4.4 Sprachgesteuertes Senden (VOX) einrichten
4.5 Rufton
4.6 Tastenton
4.7 Roger-Beep
4.8 Feedback Tone
4.9 Akku Ladestand
4.10 Monitorfunktion
4.11 Kanalsuchlauf (Scan)
4.12 Energiesparfunktion
5. Fehlerbehebung
6. Entsorgung
7. Technische Daten
8. Garantie
9. SAR Werte

4
Vorsicht!
• Modizieren Sie das Funkgerät nicht.
• Legen Sie das Funkgerät während der Fahrt nicht auf oder in die Nähe von Airbags. Wenn der
Airbag auslöst, kann das Funkgerät zum Geschoss werden und den Fahrer oder Mitfahrer treffen.
• Berühren Sie beim Senden nicht den Antennenanschluss, und senden Sie nicht, wenn an der
Antennenabdeckung Metall freiliegt. Es besteht Gefahr, dass Sie sich eine Hochfrequenzverbren-
nung zuziehen.
• Wenn vom Funkgerät eine ungewöhnliche Geruchs- oder Rauchentwicklung ausgeht, schalten
Sie das Funkgerät sofort aus, entnehmen den Akku und wenden sich bitte an Ihren KENWOOD
Händler.
• Der Gebrauch des Funkgerätes während der Fahrt kann gegen die Straßenverkehrsordnung versto-
ßen. Prüfen und beachten Sie die verkehrsrechtlichen Vorschriften in Ihrem Gebiet.
• Setzen Sie das Funkgerät keiner extremen Hitze oder Kälte aus.
• Tragen Sie den Akku nicht mit Metallgegenständen, da dabei die Batteriekontakte kurzgeschlossen
werden können.
• Explosionsgefahr, wenn der Akku falsch ersetzt wird; nur mit Akkus des gleichen Typs ersetzen.
• Wenn das Funkgerät in Bereichen mit trockener Umgebungsluft eingesetzt wird, können sich leicht
elektrische Ladungen aufbauen (statische Elektrizität). Wenn bei solchen Bedingungen ein Ohrhö-
rer als Zubehör eingesetzt wird, besteht die Möglichkeit, dass darüber ein Stromschlag vom Funk
gerät zum Ohr übertragen wird. Verwenden Sie nicht Ohrhörer/Mikrofonzubehörteile in Bereichen,
wo leicht statische Elektrizität erzeugt wird.
• Überprüfen Sie bei der Anbringung einer handelsüblichen Halteschlaufe, dass diese strapazierfähig
ist. Schwingen Sie das Funkgerät niemals am Band hin und her; Sie könnten dabei unbeabsichtigt
eine andere Person mit dem Gerät treffen und verletzen.
1.2 Informationen zum Akku
Der Akku enthält entammbare Stoffe wie z. B. organisches Lösungsmittel. Bei falscher Handhabung
kann der Akku bersten und Feuer fangen oder extreme Hitze freisetzen, in seiner Leistungsfähigkeit
nachlassen oder andere Schäden entwickeln. Beachten Sie bitte insbesondere diese Hinweise, welche
Behandlung sich verbietet.
Gefahr!
Den Akku nicht zerlegen oder reparieren!
Der Akku verfügt über eine Sicherheitsfunktion und eine Schutzschaltung. Wenn diese defekt sind
oder außer Kraft gesetzt werden, kann der Akku Hitze und Rauch entwickeln, bersten und Feuer
fangen.
Den Akku nicht kurzschließen!
Der Pluspol (+) und der Minuspol (-) dürfen nicht durch einen Metallgegenstand (wie z. B. einer
Büroklammer oder einem Stück Draht) miteinander verbunden werden. Tragen oder verwahren Sie
den Akku darum nicht in Behältern zusammen mit metallischen Gegenständen (Werkzeug, Metall-
schmuck, Haarklammern usw.). In einem kurzgeschlossenen Akku ießt ein hoher Strom, und der
Akku kann Hitze und Rauch entwickeln, bersten und Feuer fangen. Der überbrückende Metallgegen-
stand wird außerdem heiß.
Den Akku nicht verbrennen oder hohen Temperaturen aussetzen!
Wenn der Isolierkörper schmilzt, wird die Gasentlüftung oder die Sicherheitseinrichtung beschädigt
oder der Elektrolyt entzündet. Der Akku kann Hitze und Rauch entwickeln, bersten und Feuer fangen.
Den Akku nicht in der Nähe von offenen Flammen, Öfen oder anderen Hitzequellen (Orten,
an denen Temperaturen über 60°C entstehen) gebrauchen oder lagern!
Wenn durch die Hitze der Polymerseparator schmilzt, können die einzelnen Zellen intern einen Kurz-

5
schluss entwickeln, und der Akku kann Hitze und Rauch entwickeln, bersten und Feuer fangen.
Auch wenn der Separator nicht beschädigt ist, kann sich der Akku aufblähen, verformen oder Risse
bekommen. Verwenden Sie solche Akkus nicht.
Die Batterie nicht in Wasser tauchen oder anderweitig nass werden lassen!
Wenn die Schutzschaltung des Akkus defekt ist, kann der Akku überladen, und es zu einer unerwarte-
ten chemische Reaktion kommen. Der Akku kann Hitze und Rauch entwickeln, bersten und Feuer
fangen.
Vorsicht!
Explosionsgefahr, wenn die Batterie durch einen falschen Typ ersetzt wird;
• extrem hohe oder niedrige Temperaturen, denen eine Batterie während der Verwendung, Lagerung
oder des Transports ausgesetzt sein kann;
• niedriger Luftdruck in großer Höhe;
• den Austausch einer Batterie durch einen falschen Typ, der eine Sicherung umgehen kann (z.B. bei
einigen Lithium-Batterietypen);
• die Entsorgung einer Batterie in Feuer oder einem heißen Ofen, oder das mechanische Quetschen
oder Schneiden einer Batterie;
• das Belassen einer Batterie in einer Umgebung mit extrem hohen Temperaturen, die zu einer
Explosion oder dem Austreten brennbarer Flüssigkeiten oder Gase führen kann; eine Batterie,
die einem extrem niedrigen Luftdruck ausgesetzt ist, der zu einer Explosion oder dem Austreten
brennbarer Flüssigkeiten oder Gase führen kann.
1.3 Konformitätserklärung
Hiermit erklärt die JVCKENWOOD Europe B.V., dass der Funkanlagentyp [KENWOOD] UBZ-LJ9E der
Richtlinie 2014/53/EU entspricht. Der vollständige Text der EU-Konformitätserklärung ist unter der
folgenden Internetadresse verfügbar: https://www.kenwood.com/cs/com/ecdoc/
Hersteller:
JVCKENWOOD Corporation
3-12. Moriya-cho, Kanagawa-ku, Yokohama-shi, Kanagawa 221-0022, JAPAN
1.4 EU / UK-Kontaktadresse
EU-Kontaktadresse:
JVCKENWOOD Europe B.V.
Amsterdamseweg 37, 1422 AC Uithoorn, THE NETHERLANDS
UK-Kontaktadresse:
JVCKENWOOD U.K. Limited
First Floor, Gleneagles, the Belfry, Colonial Way, Watford, Hertfordshire WD24 4WH
UNITED KINGDOM

6
2. Vor der Inbetriebnahme
2.1 Auspacken
Packen Sie die Geräte vorsichtig aus und achten Sie darauf, dass alle Zubehörteile vorhanden sind:
• Funkgerät UBZ-LJ9E x 2
• Li-Ionen Akku KNB-86L x 2
• Gürtelclip inkl. Schrauben x 2
• Netzgerät mit zweifach USB-Anschluss
• USB-C Ladekabel x 2
• diese Bedienungsanleitung
2.2 Komponenten und Funktionen
1 - Antenne 9 - Mikrofon
2 - Push-to-Talk-Taste - PTT 10 - LED Funktionsanzeige
3 - Funktionstaste Hoch 11 - Gürtelclip
4 - Funktionstaste Runter 12 - Li-Ionen Akku
5 - Ein / Aus / Lautstärke 13 - LED Ladeanzeige
6 - RX / TX LED 14 - USB-C Ladebuchse
7 - Lautsprecher 15 - Akku Entriegelungstaste
8 - Kopfhörer- / Mikrofonbuchse

7
2.3 Li-Ionen Akku installieren
• Richten Sie die Laschen der Batterieabdeckung an den Schlitzen des Funkgeräts aus, halten Sie dann die
Abdeckung fest und drücken Sie sie nach oben, bis ein „Klick“ zu hören ist.
• Um den Akku zu entfernen, schalten Sie bitte zuerst das Funkgerät aus, halten Sie dann die Verriege-
lungstaste des Akkus gedrückt, schieben Sie den Akku 5 mm nach hinten und ziehen Sie den Akku dann
nach oben ab.
Achtung!
• Es dürfen nur Originalakkus verwendet werden.
• Schließen Sie die Anschlusskontakte nicht kurz und setzen Sie den Akku keinen hohen Tempe-
raturen oder Feuer aus.
• Versuchen Sie nicht, das Gehäuse des Akkupacks zu öffnen.
• Installieren Sie den Akku nicht in gefährlichen Umgebungen, da Funkenbildung eine Explosion
verursachen kann.

8
2.5 Montage des Gürtelclips
Richten Sie den Gürtelclip an den Befestigungspunkten auf der Rückseite des Funkgerätes aus und befestigen
Sie ihn mit den mitgelieferten Schrauben. Verwenden Sie dazu einen geeigneten Schraubendreher. Das
Entfernen des Akkus erleichtert die Montage.
2.4 Laden des Akkus
Bitte laden Sie den Akku vor der Verwendung
vollständig auf.
• Stecken Sie das USB-Netzgerät in eine Netzsteck-
dose, und verbinden Sie das USB-C Ladekabel mit
dem Akku-Ladeanschluss des Funkgerätes und dem
USB-Anschluss des Ladegerätes. Mit dem Netzgerät
können 2 Akkus gleichzeitig geladen werden. Der
Akku kann auch ohne Funkgerät separat
aufgeladen werden.
• Während des Ladevorgangs leuchtet die Ladeanzei-
ge rot und zeigt damit an, dass der Akku geladen
wird. Ist der Akku vollständig aufgeladen, so
wechselt die Anzeige auf grün.
Achtung!
• Verwenden Sie nur das originale Netzgerät.
• Bitte laden Sie den Akku nur in Innenräumen.
• Ziehen Sie nach Beendigung des Ladevergangs
das USB-Kabel vom Akku ab und das Netzgerät
aus der Netzsteckdose.

9
2.6 Verwenden eines optionalen Headsets
An dieses Funkgerät können Sie Headsets mit
Kenwood Doppelklinke (2,5 / 3,5 mm) anschliessen.
Informationen zu kompatiblem Zubehör nden Sie auf
der KENWOOD-Webseite.
• Heben Sie die Kunststofasche der Abdeckung
oben leicht an und drehen Sie sie vorsichtig im
Uhrzeigersinn um 90 Grad nach hinten.
• Stecken Sie die Stecker vollständig in die Klinken-
buchsen. Sollten die Klinkenstecker nicht korrekt
eingesteckt sein, so können Kontaktfehler
auftreten und Rauschen verursachen. Falls das
Headset mit einer PTT-Taste ausgestattet ist, kann
diese entsprechend verwendet werden.
Achtung!
Um Hörschäden vorzubeugen, reduzieren Sie bitte
vor der Verwendung eines Headsets die Lautstärke
des Funkgerätes.

10
3. Benutzung des Funkgerätes
3.1 Ein- und Ausschalten des Gerätes
Drehen Sie den Lautstärkeregler im Uhrzeigersinn über den Rastpunkt, um das Funkgerät einzuschal-
ten. Die LED-Anzeige leuchtet komplett auf, der Ladezustand des Akkus und der aktuelle Funkkanal
werden kurz angezeigt. Danach geht das Gerät in den Standby-Modus. Um das Funkgerät auszu-
schalten, drehen Sie den Lautstärkeregler über den Rastpunkt hinaus in die andere Richtung.
3.2 Einstellen der Lautstärke
Drehen Sie den Lautstärkeregler im Uhrzeigersinn um die Lautstärke zu erhöhen und gegen den
Uhrzeigersinn, um sie zu verringern.
3.3 Senden und Empfangen
Im eingeschalteten Zustand bendet sich das Funkgerät im Modus „Empfang“ und kann Sprache
oder Tonsignale auf dem eingestellten Kanal empfangen. Um eine Nachricht zu senden, drücken Sie
die Sendetaste „PTT“ und sprechen in das Mikrofon. Halten Sie die <PTT-Taste> so lange gedrückt,
bis Sie die Übertragung beendet haben. Danach geht das Funkgerät automatisch wieder in den
Empfangsmodus. Für eine optimale Sprachübertragung sollte beim Senden das Mikrofon ca. 2 - 3
Zentimeter vom Mund entfernt sein.
Hinweis: Beide Funkgeräte müssen auf den gleichen Kanal und den gleichen QT/DQT-Code
eingestellt sein. Wird die <PTT-Taste> losgelassen so ertönt, wenn aktiviert, am anderen Gerät ein
Tonsignal (Roger Beep) um zu signalisieren, dass der Sendevorgang beendet wurde. Informationen
dazu unter „Einstellen des Funkgerätes“ in dieser Bedienungsanleitung.
3.4 Full Reset Funktion
Um das Funkgerät in den Werkszustand zu versetzen, gehen Sie bitte wie folgt vor:
Halten Sie die Tasten <Funktionstaste Hoch> und <Funktionstaste Runter> gleichzeitig für 3
Sekunden gedrückt. Die orange LED zeigt den Start des Full Reset an. Nach erfolgreichem Reset
erscheint “LJ9” im Display.

11
4. Einstellen des Funkgerätes
Um Einstellungen, wie z.B. Kanalwahl oder QT/DQT-Code vorzunehmen, besitzt dieses Funkgerät ein
Einstellmenü. Dieses Menü wird wie folgt bedient:
• Ein langer Druck auf die Taste <Funktionstaste Hoch> schaltet in die erste Menüebene. Jeder
weitere lange Tastendruck schaltet eine Ebene weiter.
• Im jeweiligen Menü werden die Einstellungen durch einen kurzen Druck auf die Tasten
<Funktionstaste Hoch> oder <Funktionstaste Runter> vorgenommen
• Durch Drücken der <PTT-Taste> wird das Einstellmenü beendet, und dass Funkgerät bendet sich
wieder im Empfangsmodus
Hinweis: Werden 10 Sekunden lang keine Tasten gedrückt, so wird das Einstellmenü beendet und
das Gerät bendet sich wieder im Empfangsmodus.
Einstellmenü Übersicht:
Ebene Funktion Einstellungen Anzeige
0Empfangs-
modus
1 Kanalwahl CH01 - CH32
2Squelch
Level SQ 0 - SQ 9
3QT/DQT-
Code
OFF,
CT01 - CT38,
DT01 - DT83
4 VOX V.of / 1 / 2 / 3
5 Rufton CA01 - CA20
6 Tastenton KTOF / KTOn
7 Roger Beep RBOF / RBOn
8Feedback
Tone FTOF / FTOn
9Akku
Ladestand 3 / 2 / 1 / 0

12
4.1 Wechseln von Kanälen
Um auf einen anderen Kanal zu wechseln, gehen Sie bitte wie folgt vor:
• Drücken Sie 1 x lang auf die Taste <Funktionstaste Hoch>, die aktuelle Kanalnummer blinkt
im Display.
• Durch kurzen Druck auf die Tasten <Funktionstaste Hoch> oder <Funktionstaste Runter>
kann der gewünschte Kanal eingestellt werden
• Durch Drücken der <PTT-Taste> wird das Einstellmenü beendet, und dass Funkgerät bendet sich
wieder im Empfangsmodus.
Achtung: Die Kanäle 1 bis 16 sind standardmäßig verfügbar. Die Kanäle 17 bis 32 müssen vom
Benutzer aktiviert werden. Die Kanäle 17 bis 32 dürfen nur in Ländern verwendet werden, in denen
diese Frequenzen von den Behörden zugelassen sind
Um die Kanäle 17 bis 32 zu aktivieren, gehen Sie bitte wie folgt vor:
• Halten Sie die <PTT-Taste> und die <Funktionstaste Runter> gedrückt und schalten Sie das
Funkgerät ein. Lassen Sie beide Tasten nach 3 Sekunden los, nun sind 32 Kanäle aktiviert.
Um die Kanäle 17 bis 32 zu deaktivieren, gehen Sie bitte wie folgt vor:
• Halten Sie <Funktionstaste Hoch> & <Funktionstaste Runter> gedrückt und schalten Sie das
Funkgerät ein. Lassen Sie beide Tasten nach 3 Sekunden los. Das Funkgerät führt einen vollständi-
gen Reset durch und bendet sich dann im 16-Kanal-Modus..
4.2 Rauschsperre (Squelch)
Mit der Einstellung des Rauschsperrenpegels legen Sie fest, bis zu welcher Stärke des ankommenden
Signals das Funkgerät stummgeschaltet bleibt. Das bedeutet, je höher der Pegel eingestellt ist, um so
stärker muss das eingehende Signal sein damit es hörbar wird. Sie können den Pegel zwischen „0“
und „9“ einstellen, wobei „3“ die Standardeinstellung ist. Um die Einstellungen zu ändern, gehen
Sie bitte wie folgt vor:
• Drücken Sie 2 x lang auf die Taste <Funktionstaste Hoch>, und die aktuelle Einstellung wird
blinkend im Display angezeigt.
• Durch kurzen Druck auf die Tasten <Funktionstaste Hoch> oder <Funktionstaste Runter>
kann der gewünschte Wert (0 - 9) eingestellt werden
• Durch Drücken der <PTT-Taste> wird das Einstellmenü beendet, und dass Funkgerät bendet sich
wieder im Empfangsmodus.
4.3
QT-Ton und DQT-Code Einstellungen
QT und DQT sind Funktionen, die unerwünschte Signale auf Ihrem Kanal zurückweisen. Sie hören
einen Ruf nur, wenn Sie ein Signal erhalten, das einen passenden QT-Ton bzw. DQT-Code enthält.
Wenn ein Ruf mit einem anderen Ton bzw. Code empfangen wird, bleibt die Squelch- Funktion aktiv,
und Sie hören diesen Ruf nicht. Ebenso muss die Empfangsstation einen passenden Ton bzw. Code
haben, um Ihren Ruf zu hören, wenn Sie mit QT oder DQT senden.
Bitte beachten Sie, dass Dritte Ihre Rufe weiterhin hören können, wenn sie ihr Funkgerät auf den
gleichen Ton bzw. Code einstellen. Um die Einstellungen zu ändern, gehen Sie bitte wie folgt vor:
• Drücken Sie 3 x lang auf die Taste <Funktionstaste Hoch>, und die aktuelle Einstellung wird
blinkend im Display angezeigt.
• Durch kurzen Druck auf die Tasten <Funktionstaste Hoch> oder <Funktionstaste Runter>
kann der gewünschte QT- oder DQT-Code eingestellt werden.
• Durch Drücken der <PTT-Taste> wird das Einstellmenü beendet, und dass Funkgerät bendet sich
wieder im Empfangsmodus.

13
Die KENWOOD QT/DQT-Standardeinstellungen für jeden Kanal sind in der nachfolgenden
Tabelle aufgeführt. Eine vollständige Liste nden Sie auf Seite 20 dieser Bedienungsanleitung.
Ka. Freq. (MHz) QT/DQT Ka. Freq. (MHz) QT/DQT
1 446.00625 CT10 / 94.8 Hz 17* 446.10625 CT10 / 94.8 Hz
2 446.09375 CT08 / 88.5 Hz 18* 446.19375 CT08 / 88.5 Hz
3 446.03125 CT13 / 103.5 Hz 19* 446.13125 CT13 / 103.5 Hz
4 446.06875 CT05 / 79.7 Hz 20* 446.16875 CT05 / 79.7 Hz
5 446.04375 CT17 / 118.8 Hz 21* 446.14375 CT17 / 118.8 Hz
6 446.01875 CT18 / 123.0 Hz 22* 446.11875 CT18 / 123.0 Hz
7 446.08125 CT19 / 127.3 Hz 23* 446.18125 CT19 / 127.3 Hz
8 446.05625 CT07 / 85.4 Hz 24* 446.15625 CT07 / 85.4 Hz
9 446.00625 CT14 / 107.2 Hz 25* 446.10625 CT14 / 107.2 Hz
10 446.09375 CT15 / 110.9 Hz 26* 446.19375 CT15 / 110.9 Hz
11 446.03125 CT16 / 114.8 Hz 27* 446.13125 CT16 / 114.8 Hz
12 446.06875 CT06 / 82.5 Hz 28* 446.16875 CT06 / 82.5 Hz
13 446.04375 DT20 / D132N 29* 446.14375 DT20 / D132N
14 446.01875 DT24 / D155N 30* 446.11875 DT24 / D155N
15 446.05625 DT21 / D134N 31* 446.15625 DT21 / D134N
16 446.08125 DT33 / D243N 32* 446.18125 DT33 / D243N
*Die Kanäle 1 bis 16 sind standardmäßig verfügbar. Die Kanäle 17 bis 32 müssen vom Benutzer
aktiviert werden. Die Kanäle 17 bis 32 dürfen nur in Ländern verwendet werden, in denen diese
Frequenzen von den Behörden zugelassen sind.
4.4 Sprachgesteuertes Senden (VOX) einrichten
Das Funkgerät ist in der Lage, stimmgesteuert (VOX) zu senden. Im VOX-Modus sendet das Funkgerät
ein Signal, wenn es durch Ihre Stimme oder andere Geräusche in Ihrer Umgebung aktiviert wird. Die
Empndlichkeit ist ein 3 Stufen (1/2/3) einstellbar, wobei Stufe 3 die empndlichste Stufe ist.
Um die Einstellungen zu ändern, gehen Sie bitte wie folgt vor:
• Drücken Sie 4 x lang auf die Taste <Funktionstaste Hoch>, und die aktuelle Einstellung wird
blinkend im Display angezeigt.
• Durch kurzen Druck auf die Tasten <Funktionstaste Hoch> oder <Funktionstaste Runter>
kann der gewünschte Wert (V.OF - V. 3) eingestellt werden
• Durch Drücken der <PTT-Taste> wird das Einstellmenü beendet, und dass Funkgerät bendet sich
wieder im Empfangsmodus.

14
Hinweis: Drücken der <PTT-Taste> beendet VOX-Modus. Die Verwendung dieser Funktion in lauten
oder windigen Umgebungen ist nicht empfohlen.
4.5 Rufton
Rufsignaltöne helfen, sich gegenüber anderen Teilnehmern zu identizieren und sie über Ihren Ruf zu
informieren. Dazu stehen 20 verschiedene Signaltöne (CA01 - CA20) zur Verfügung.
Wenn jeder Teilnehmer einen anderen Ton verwendet, ist der Rufer leicht zu erkennen. Der Rufton
wird ausgelöst, indem die <PTT-Taste> gedrückt und gehalten wird und dann zusätzlich ein kurzer
Druck der Taste <Funktionstaste Hoch> erfolgt.
Um die Einstellungen zu ändern, gehen Sie bitte wie folgt vor:
• Drücken Sie 5 x lang auf die Taste <Funktionstaste Hoch>, und die aktuelle Einstellung wird
blinkend im Display angezeigt.
• Durch kurzen Druck auf die Tasten <Funktionstaste Hoch> oder <Funktionstaste Runter>
kann der gewünschte Wert (CA01 - CA20) eingestellt werden
• Durch Drücken der <PTT-Taste> wird das Einstellmenü beendet, und dass Funkgerät bendet sich
wieder im Empfangsmodus.
4.6 Tastenton ein/aus
Ist der Tastenton aktiviert, so gibt das Funkgerät beim Drücken von Tasten eine akustische Rück-
meldung. Sie können den Tastenton ein- oder ausschalten (KTOF / KTOn). Um die Einstellungen zu
ändern, gehen Sie bitte wie folgt vor:
• Drücken Sie 6 x lang auf die Taste <Funktionstaste Hoch>, und die aktuelle Einstellung wird
blinkend im Display angezeigt.
• Durch kurzen Druck auf die Tasten <Funktionstaste Hoch> oder <Funktionstaste Runter>
kann der gewünschte Wert (KTOF / KTOn) eingestellt werden
• Durch Drücken der <PTT-Taste> wird das Einstellmenü beendet, und dass Funkgerät bendet sich
wieder im Empfangsmodus.
4.7 Roger-Beep ein/aus
Der Roger-Beep ist ein vom Funkgerät generiertes Tonsignal, das automatisch am Ende jedes
Sendevorgangs übertragen wird. Dies signalisiert der Gegenstelle, dass Sie Ihren Ruf beendet haben.
Sie können den Roger-Beep ein- oder ausschalten (RBOF / RBOn). Um die Einstellungen zu ändern,
gehen Sie bitte wie folgt vor:
• Drücken Sie 7 x lang auf die Taste <Funktionstaste Hoch>, und die aktuelle Einstellung wird
blinkend im Display angezeigt.
• Durch kurzen Druck auf die Tasten <Funktionstaste Hoch> oder <Funktionstaste Runter>
kann der gewünschte Wert (RBOF / RBOn) eingestellt werden
• Durch Drücken der <PTT-Taste> wird das Einstellmenü beendet, und dass Funkgerät bendet sich
wieder im Empfangsmodus.
4.8 Feedback-Ton ein/aus
Der Feedback-Ton ist ein vom Funkgerät generierter Ton, der dem Sender eines Ruftons (siehe Punkt
4.5) am eigenen Gerät Rückmeldung gibt, dass der Klingelton gerade bei der Gegenstelle zu hören
ist, indem der gleiche Ton zeitgleich am eigenen Gerät ertönt. Sie können den Feedback-Ton ein- oder
ausschalten (FTOn / FTOF). Um die Einstellung zu ändern, gehen Sie bitte wie folgt vor:
• Drücken Sie 8 x lang auf die Taste <Funktionstaste Hoch>, und die aktuelle Einstellung wird
blinkend im Display angezeigt.
• Durch kurzen Druck auf die Tasten <Funktionstaste Hoch> oder <Funktionstaste Runter>
kann der gewünschte Wert (FTOn / FTOF) eingestellt werden
• Durch Drücken der <PTT-Taste> wird das Einstellmenü beendet, und dass Funkgerät bendet sich
wieder im Empfangsmodus.

15
4.9 Akku Ladestand
Der Akku Ladestand wird über Balkensymbole angezeigt. Zusätzlich ertönt bei niedrigem Akkustand
ein Signalton und die Ladeanzeige blinkt rot.
Um den Akku Ladestand anzuzeigen, gehen Sie bitte wie folgt vor:
• Drücken Sie 9 x lang auf die Taste <Funktionstaste Hoch>, und der aktuelle Ladestand wird im
Display angezeigt.
• Durch Drücken der <PTT-Taste> wird das Einstellmenü beendet, und dass Funkgerät bendet sich
wieder im Empfangsmodus.
4.10 Monitorfunktion
Die Monitorfunktion kann dazu verwendet werden, um schwächere Signale auf dem aktuellen Kanal
zu empfangen. Die Überwachung schalten Sie wie folgt ein:
• Durch kurzen Druck auf die Taste <Funktionstaste Runter> kann die Funktion ein- und
ausgeschaltet werden.
Hinweis: Die Monitorfunktion funktioniert unabhängig vom eingestellten QT- oder DQT-Code.
4.11 Kanalsuchlauf (Scan)
Mit dem Kanalsuchlauf können Sie nach aktiven Kanälen suchen. Wird ein entsprechender Kanal
gefunden, stoppt der Suchlauf und die Kommunikation wird wiedergegeben. Endet die Übertragung
auf dem gefundenen Kanal, wird der Kanalsuchlauf automatisch fortgesetzt.
Um den Kanalsuchlauf zu starten, gehen Sie bitte wie folgt vor:
• Drücken Sie 1 x lang auf die Taste <Funktionstaste Runter>, und der Suchlauf von Kanal 1 bis
Kanal 16 (oder Kanal 1 bis 32, je nach Einstellung) wird gestartet.
• Wenn Sie während des Suchlaufs kurz auf die Tasten <Funktionstaste Hoch> oder
<Funktionstaste Runter> drücken, wird die Reihenfolge des Suchlaufs umgekehrt.
Hinweis:
Wenn Sie die <PTT-Taste> drücken, während Sie einen gefunden Kanal abhören, geht das
Funkgerät auf dem aktuellen Kanal zurück in den Standby-Modus.
4.12 Energiesparfunktion
Wird das Funktgerät länger als 10 Sekunden nicht verwendet, so schaltet es automatisch in den Ener-
giesparmodus. Dies hat keinen Einuss auf den Empfang von Übertragungen und der Normalmodus
wird automatisch wieder aktiviert, sobald ein Signal erkannt wird.
Akku voll
Akku 2/3 geladen
Akku 1/3 geladen
Akku leer

16
5. Fehlerbehebung
Hinweise zur Fehlersuche
Problem Lösung
Das Funkgerät lässt sich nicht einschalten.
• Der Akku ist entladen. Laden Sie den Akku
oder ersetzen Sie die Batterien.
• Der Akku ist nicht korrekt eingesetzt.
Entnehmen Sie den Akku und setzen Sie ihn
wieder ein.
Bei wiederholter Auadung des Akkus
verschlechtert sich die Akkuleistung.
• Die Lebensdauer des Akkus ist erschöpft.
Ersetzen Sie den Akku durch einen neuen.
Sie können die anderen Gruppenmitglieder
nicht hören oder mit Ihnen sprechen.
• Vergewissern Sie sich, dass Sie den gleichen
Kanal und QT/DQT- Einstellungen wie die
anderen Gruppenmitglieder verwenden.
• Die anderen Gruppenmitglieder sind zu
weit entfernt. Vergewissern Sie sich, dass Sie
sich in der Reichweite der anderen Funkgeräte
benden.
Andere Funkteilnehmer (außer Gruppenmit-
glieder) sind auf dem Kanal zu hören.
• Ändern Sie die DQ/DQT-Einstellungen.
Vergewissern Sie sich, dass alle Grup-
penmitglieder die Einstellungen auf ihren
Funkgeräten ändern, um zu den neuen QT/
DQT-Einstellungen zu passen.
Hinweis:
Sollte das Problem weiterhin bestehen, so wenden Sie sich bitte an den KENWOOD-Service.
6. Entsorgung
Entsorgung von gebrauchten elektrischen und elektronischen Geräten und Batterien.
Das Symbol (durchgestrichene Mülltonne) auf dem Produkt oder seiner Verpackung weist darauf hin, dass
dieses Produkt nicht als normaler Haushaltsabfall behandelt werden darf, sondern an einer Annahmestelle
für das Recycling von elektrischen und elektronischen Geräten und Batterien abgegeben werden muss.
Durch Ihren Beitrag zur korrekten Entsorgung dieses Produktes schützen Sie die Umwelt und die Gesundheit
Ihrer Mitmenschen. Unsachgemässe oder falsche Entsorgung gefährden Umwelt und Gesundheit. Weitere
Informationen über das Recycling dieses Produktes erhalten Sie von Ihrer Gemeinde oder den kommunalen
Entsorgungsbetrieben.
Informationen zur Entsorgung in der Türkei nden Sie in türkischer Sprache auf Seite 18.

17
Frequenzbereich 446,0 - 446,2 MHz (PMR446)
Kanäle 32
Untercodes QT 38 + DQT 83
Hochfrequenz-Leistung ≤ 500mW ERP
Maximale Sendeleistung max. 26,59 dBm
Reichweite bis zu 6 km*
Betriebstemperatur -20°C bis +55°C
Betriebsspannung 3,7 V
Schutzart IP32
Betriebszeit / Ladezeit max. 18 Std.* / ca. 3 Std.
Abmessungen (B x H x T) 52 x 157 x 28 mm
Gewicht inkl. Akku & Gürtelclip 138 g
* Kann je nach Gelände und Bedingungen variieren.
Li-Ionen Akku
Typ KNB-86L
Spannung 3,7 V
Kapazität 1150 mAh
Energiegehalt 4,3 Wh
UN Nummer UN3481 Lithium-Ionen-Batterien, enthalten /
verpackt in der Ausstattung
Netzgerät
Hersteller Netzgerät
SHENZHEN MERRYKING ELECTROINCS CO., LTD.
801, Bldg B, No. 1, Tianyang 2nd Road, Oriental
Community, Songgang Street, Bao’an District,
Shenzhen 518105, Guangdong, CHINA
Marke und Modellkennung Ladegerät MKC-0502000VEUT / MKC-0502000VUKT
Eingangsspannung Wechselspannung 100 - 240 V
Eingangswechselstromfrequenz 50 / 60 Hz
Ausgangspannung / -strom / -leistung Gleichspannung 5,0 V / 2,0 A / 10,0 W
Durchschnittliche aktiver Wirkungsgrad im
Betrieb
81,1 %
Leistungsaufnahme im Bereitschaftsbetrieb 0,07 W
Technische Änderungen vorbehalten.
7. Technische Daten UBZ-LJ9E

18
8. Garantie
Sehr geehrter Kunde,
wir danken Ihnen für den Kauf dieses KENWOOD-Produkts. Sollte
dieses Produkt unter normalen Betriebsbedingungen Material- oder
Verarbeitungsmängel aufweisen, werden wir diese in Übereinstim-
mung mit den geltenden Garantiebedingungen kostenlos beseitigen
beziehungsweise das Gerät umtauschen.
Ausgenommen von den Garantieleistungen sind Verbrauchs- oder
Verschleißteile, die im Rahmen des normalen Kundendienstes auszu-
tauschen sind wie zum Beispiel wiederauadbare Akkus.
Kontaktadresse:
JVCKENWOOD DEUTSCHLAND GmbH
Konrad-Adenauer-Allee 1-11, 61118 Bad Vilbel
Tel. 06101 / 4988-0, www.kenwood.de
Entsorgung in der Türkei:
Eski Elektrikli ve Elektronik Cihazların ve Pillerin İmhası Hakkında Bilgi (ayrı atık toplama sistemlerine
sahip olan ülkelerde geçerlidir).
Bu sembolü (üzeri çizili çöp bidonu) içeren ürün ve piller evsel atı k çöpleri ile birlikte atılamaz.
Kullanılmış elektrikli ve elektronik cihaz ve piller, bu tür maddeleri ve bunların yan ürünlerini iş
lemeye elverişli bir geri kazanım tesisine gönderilmelidir.
Size en yakın geri kazanım tesisinin konumunu öğrenmek üzere yerel yetkililerinize danışın.
Doğru geri kazanım ve atık uzaklaştırma y öntemleri, sadece öz kaynakların korunmasına
yardımcı olmakla kalmayıp ayrıca sağlığımıza ve çevreye olacak zararlı etkilerini engellemeye
yardımcı olur.
Bu ürün 28300 sayılı Resmi Gazete’de yayımlanan Atik Elektrikli ve Elektronik
Eşyalarin Kontrolü Yönetmeliğe uygun olarak üretilmiştir.

19
9. SAR Werte für das Funkgerät UBZ-LJ9E
Modell SAR Frontseite SAR Rückseite
UBZ-LJ9E 0,4 W/kg 0,45 W/kg
HF-Grenzwerte für das Funkgerät UBZ-LJ9E
ACHTUNG:
Bevor Sie dieses PMR446-Funkgerät verwenden, lesen Sie diese einfache Anleitung.
Dieses PMR446-Funkgerät verwendet elektromagnetische Hochfrequenz (HF), um die Kom-
munikation zwischen zwei oder mehreren Benutzern über eine Entfernung zu ermöglichen.
Er verwendet Radiofrequenz (RF)-Energie oder Funkwellen, um Anrufe zu senden und zu
empfangen.
Das KENWOOD Funkgerät UBZ-LJ9E wurde so entwickelt, hergestellt und getestet, dass es
der Empfehlung 1999/519/EC der EU für HF-Exposition Grenzwerte entspricht.
Diese Grenzwerte geben empfohlene Expositionswerte für die Allgemeinheit vor.
Um die HF-Belastung innerhalb der zulässigen Grenzwerte zu halten, sollten Sie nicht länger
als 50 % der gesamten Nutzungszeit des Funkgerätes senden.
Das Senden von mehr als 50 % der Gesamtbetriebszeit kann die Grenzwerte gemäß den
FCC-HF-Expositionsanforderungen überschreiten.
Um die Einhaltung der Grenzwerte sicherzustellen, halten Sie das Funkgerät senkrecht vor Ihr
Gesicht, wobei das Mikrofon und andere Teile des Funkgerätes einschließlich der Antenne
mindestens 2,5 cm von der Nase oder den Lippen entfernt sind.
Ein größerer Abstand zwischen Ihrem Gesicht und der Antenne verringert die HF-Belastung.

© 2022
QT-Codes
CT01/67.0 Hz CT14/107.2 Hz CT27/167.9 Hz CT02/71.9 Hz CT15/110.9 Hz
CT28/173.8 Hz CT03/74.4 Hz CT16/114.8 Hz CT29/179.9 Hz CT04/77.0 Hz
CT17/118.8 Hz CT30/186.2 Hz CT05/79.7 Hz CT18/123.0 Hz CT31/192.8 Hz
CT06/82.5 Hz CT19/127.3 Hz CT32/203.5 Hz CT07/85.4 Hz CT20/131.8 Hz
CT33/210.7 Hz CT08/88.5 Hz CT21/136.5 Hz CT34/218.1 Hz CT09/91.5 Hz
CT22/141.3 Hz CT35/225.7 Hz CT10/94.8 Hz CT23/146.2 Hz CT36/233.6 Hz
CT11/97.4 Hz CT24/151.4 Hz CT37/241.8 Hz CT12/100.0 Hz CT25/156.7 Hz
CT38/250.3 Hz CT13/103.5 Hz CT26/162.2 Hz
DQT-Codes
DT01/D023N DT29/D174N DT57/D445N DT02/D025N DT30/D205N
DT58/D464N DT03/D026N DT31/D223N DT59/D465N DT04/D031N
DT32/D226N DT60/D466N DT05/D032N DT33/D243N DT61/D503N
DT06/D043N DT34/D244N DT62/D506N DT07/D047N DT35/D245N
DT63/D516N DT08/D051N DT36/D251N DT64/D532N DT09/D054N
DT37/D261N DT65/D546N DT10/D065N DT38/D263N DT66/D565N
DT11/D071N DT39/D265N DT67/D606N DT12/D072N DT40/D271N
DT68/D612N DT13/D073N DT41/D306N DT69/D624N DT14/D074N
DT42/D311N DT70/D627N DT15/D114N DT43/D315N DT71/D631N
DT16/D115N DT44/D331N DT72/D632N DT17/D116N DT45/D343N
DT73/D654N DT18/D125N DT46/D346N DT74/D662N DT19/D131N
DT47/D351N DT75/D664N DT20/D132N DT48/D364N DT76/D703N
DT21/D134N DT49/D365N DT77/D712N DT22/D143N DT50/D371N
DT78/D723N DT23/D152N DT51/D411N DT79/D731N DT24/D155N
DT52/D412N DT80/D732N DT25/D156N DT53/D413N DT81/D734N
DT26/D162N DT54/D423N DT82/D743N DT27/D165N DT55/D431N
DT83/D754N DT28/D172N DT56/D432N

PMR446 FM Transceivers
UBZ-LJ9SETE (EU version)
UBZ-LJ9SETT (UK version)
INSTRUCTION MANUAL
DEUTSCH FRANÇAIS ITALIANOENGLISH NEDERLANDS
ESPAÑOL

2
ENGLISH
Table of contents
Content Page
1. Safety instructions
1.1 Precautions
1.2 Battery information
1.3 Declaration of Conformity
1.4 EU / UK contact address
2. Before Start-up
2.1 Unpacking
2.2 Components and functions
2.3 Install Li-ion battery
2.4 Charging the battery
2.5 Installation of the belt clip
2.6 Using an optional headset
3. Using the transceiver
3.1 Switching the device On and Off
3.2 Adjusting the volume
3.3 Sending and receiving
3.4 Full Reset Function
4. Setting the transceiver
4.1 Switching channels
4.2 Squelch
4.3 QT tone and DQT code settings
4.4 Voice controlled transmission Set up (VOX)
4.5 Ringing tone
4.6 Key tone
4.7 Roger beep
4.8 Feedback tone
4.9 Battery charge level
4.10 Monitor function
4.11 Channel search (Scan)
4.12 Energy saving function
5. Troubleshooting
6. Disposal
7. Technical specifications
8. Guarantee
9. SAR values
3
3
4
5
5
6
6
6
7
8
8
9
10
10
10
10
10
11
12
12
12
13
14
14
14
14
15
15
15
15
16
16
17
18
19

3
1. Safety instructions
IMPORTANT SAFETY INSTRUCTIONS
Attention: Read this page carefully to ensure safe operation of the device.
Read instructions carefully!
•
Follow all safety and operating instructions when using this product.
Keep the instructions in a safe place!
• You should keep the safety and operating instructions for future reference.
Follow the warning instructions!
• You should strictly follow all warnings provided on the product and listed in the operating
instructions.
1.1 Precautions
• Do not charge the transceiver or battery when they are wet.
• Make sure that no metallic objects get between the transceiver and the battery.
• Only use accessories recommended by KENWOOD.
• If any part of the transceiver is damaged, do not touch the damaged parts.
When connecting headphones or a headset, reduce the volume of the transceiver. Also note that
turning off the squelch can change the volume.
• Do not place a clip microphone cord with the earphone/holder around your neck while around
machinery where the cord may become entangled.
• Do not place the transceiver on an unstable surface. If the transceiver turns On/Off due to drop-
ping or severe shock, the volume and channel congurations may be reset.
• Be careful not to injure your eyes with the end of the antenna.
• Do not immerse the transceiver in water.
• Always switch off the transceiver when connecting accessories.
• The device is disconnected from the mains at the power supply. Make sure that the power supply
plug is easily accessible.
• When disposing of the batteries, the applicable legal regulations and local regulations in your
country or region must be complied with.
• If a commercially available neck strap is used, be careful not to get the neck strap caught in nearby
machine parts.
Warning!
Turn off the transceiver in these locations:
• In an explosive atmosphere (ammable gas, dust particles, metal powder, wood dust, etc.).
• When refuelling and when staying at gas stations.
• In locations where there is a risk of explosion or where blasting work is taking place.
• On the plane. (Any use of the transceiver may only be carried out by order and according to the
instructions of the crew.)
• Wherever there are signs, etc. asking to switch off transceivers, among other things, among other,
in medical institutions.
• In the vicinity of people with pacemakers.
Table of contents
Content Page
1. Safety instructions
1.1 Precautions
1.2 Battery information
1.3 Declaration of Conformity
1.4 EU / UK contact address
2. Before Start-up
2.1 Unpacking
2.2 Components and functions
2.3 Install Li-ion battery
2.4 Charging the battery
2.5 Installation of the belt clip
2.6 Using an optional headset
3. Using the transceiver
3.1 Switching the device On and Off
3.2 Adjusting the volume
3.3 Sending and receiving
3.4 Full Reset Function
4. Setting the transceiver
4.1 Switching channels
4.2 Squelch
4.3 QT tone and DQT code settings
4.4 Voice controlled transmission Set up (VOX)
4.5 Ringing tone
4.6 Key tone
4.7 Roger beep
4.8 Feedback tone
4.9 Battery charge level
4.10 Monitor function
4.11 Channel search (Scan)
4.12 Energy saving function
5. Troubleshooting
6. Disposal
7. Technical specifications
8. Guarantee
9. SAR values

4
Caution!
• Do not modify the transceiver.
• Do not place the transceiver on or near airbags while driving. When the airbag is deployed, the
transceiver can become a projectile and hit the driver or passenger.
• Do not touch the antenna connector while transmitting, or transmit if metal is exposed on the
antenna cover. There is a risk of high frequency burns.
• If the transceiver emits an unusual smell or smoke, switch the transceiver off immediately, remove
the battery and contact your KENWOOD dealer.
• The use of the transceiver while driving can violate the road trafc regulations. Check and observe
the trafc regulations in your area.
• Do not expose the transceiver to extreme heat or cold.
• Do not carry the battery with metal objects as this can short-circuit the battery contacts.
• Risk of explosion if the battery is incorrectly replaced; Replace only with batteries of the same type.
• If the transceiver is used in areas with dry ambient air, electrical charges can easily build up (static
electricity). If an earphone is used as an accessory in such conditions, there is a possibility
that an electric shock could be transmitted from the transceiver to the ear. Do not use earphones/
microphone accessories in areas where static electricity is easily generated.
• When attaching a commercially available hand strap, check that it is hard-wearing. Never swing
the transceiver back and forth on the belt; You could accidentally hit and injure someone with the
device.
1.2 Battery information
The battery contains ammable substances such as organic solvent. If handled incorrectly, the battery
can burst and catch re or release extreme heat, deteriorate in its performance or develop other
damage. Please pay particular attention to these instructions, which treatment is prohibited.
Danger!
Do not disassemble or repair the battery!
The battery has a safety function and a protective circuit. If these are defective or disabled, the battery
can generate heat, smoke, burst and catch re.
Do not short-circuit the battery!
The positive pole (+) and the negative pole (-) must not be connected to one another with a metal
object (e.g. a paper clip or a piece of wire). Therefore, do not carry or store the battery in containers
together with metallic objects (tools, metal jewellery, hair clips, etc.). A short-circuited battery pack
has a high current owing through it and the battery pack can generate heat, smoke, burst, and
catch re. The bridging metal object also becomes hot.
Do not burn the battery or expose it to high temperatures!
If the insulator melts, the gas vent or safety device will be damaged or the electrolyte ignited. The
battery can generate heat and smoke, burst and catch re.
Do not use or store the battery in the vicinity of open flames, ovens or other heat sources
(places where temperatures exceed 60° C)!
If the heat melts the polymer separator, the individual cells can short circuit internally and the battery
can generate heat, smoke, burst, and catch re. Even the separator is not damaged, battery may
inate, deform, or cracked. Do not use such battery.

5
Do not immerse the battery in water or allow it to get wet in any other way!
If the protective circuit of the battery is defective, the battery can be overcharged and an unexpected
chemical reaction can occur. The battery can generate heat and smoke, burst and catch re.
Caution!
Danger of explosion if the battery is replaced by an incorrect type;
• High or low extreme temperatures to which a battery may be exposed during use, storage or
transport;
• Low air pressure at high altitude;
• The replacement of a battery by an incorrect type that can bypass a fuse (for example, some
lithium battery types);
• The disposal of a battery in re or a hot oven, or the mechanical crushing or cutting of a battery;
• Leaving a battery in an environment with extremely high temperatures, which can lead to an
explosion or leakage of ammable liquids or gases; a battery that is exposed to extremely low air
pressure, which can lead to an explosion or the escape of ammable liquids or gases.
1.3 Declaration of Conformity
For EU:
Hereby, JVCKENWOOD Europe B.V. declares that the radio equipment type [KENWOOD] UBZ-LJ9E
complies with Directive 2014/53/EU. The full text of the “EU Declaration of Conformity” is available
at the following Internet address: https://www.kenwood.com/cs/com/ecdoc/
For UK:
Hereby, JVCKENWOOD U.K. Limited declares that the radio equipment type [KENWOOD] UBZ-LJ9E
complies with the Radio Equipment Regulations 2017. The full text of the “Declaration of Conformity”
is available at the following internet address: https://www.kenwood.com/cs/com/ecdoc/
Manufacturer:
JVCKENWOOD Corporation
3-12. Moriya-cho, Kanagawa-ku, Yokohama-shi, Kanagawa 221-0022, JAPAN
1.4 EU / UK Contact Address
EU Contact Address:
JVCKENWOOD Europe B.V.
Amsterdamseweg 37, 1422 AC Uithoorn, THE NETHERLANDS
UK Contact Address:
JVCKENWOOD U.K. Limited
First Floor, Gleneagles, the Belfry, Colonial Way, Watford, Hertfordshire WD24 4WH, UNITED KINGDOM

6
2. Before Start-up
2.1 Unpacking
Carefully unpack the devices and make sure all accessories are present:
• UBZ-LJ9E transceiver x 2
• Li-ion battery KNB-86L x 2
• Belt clip incl. screws x 2
• USB power supply with two ports
• USB-C charging cable x 2
• These Operating Instructions
2.2 Components and functions
1 - Antenna 9 - Microphone
2 - Push-to-talk key - PTT 10 - LED Function Display
3 - Function key up 11 - Belt clip
4 - Function key down 12 - Li-ion battery
5 - On / Off / Volume 13 - LED Charge Indicator
6 - RX / TX LED 14 - USB-C Charging Socket
7 - Speaker 15 - Battery release button
8 - Headphone / Microphone jack

7
2.3 Install Li-ion battery
• Align the tabs on the battery cover with the slots on the transceiver, then hold the cover and press
up until you hear a “click”.
• To remove the battery, please switch off the transceiver rst, then press and hold the battery lock
button, slide the battery 5 mm backwards and then pull the battery up and out.
Attention!
• Only original batteries may be used.
• Do not short-circuit the connector terminals or expose the battery to high temperatures or re.
• Do not try to open the housing of the battery pack.
• Do not install the battery in hazardous locations as sparks can cause an explosion.

8
2.5 Installation of the belt clip
Align the belt clip with the attachment points on the back of the transceiver and secure it with the
screws provided. Use a suitable screwdriver. Removing the battery facilitates installation.
2.4 Charging the battery
Please fully charge the battery before use.
• Plug the USB power supply into a mains socket
and connect the USB-C charging cable to the
battery charging port on the transceiver and the
USB port on the power supply. Using the power
supply, 2 batteries can be charged at the same
time. The battery can also be charged separately
without the transceiver.
• During the charging process, the charging
indicator lights up red, indicating that the
battery is being charged. When the battery is
fully charged, the display changes to green.
Attention!
• Use only the original power supply.
• Please only charge the battery indoors.
• When the charging process is complete,
disconnect the USB cable from the battery
and the power supply from the mains socket.

9
2.6 Using an optional headset
You can connect headsets with a Kenwood
double jack (2.5 / 3.5 mm) to this transceiver. For
information on compatible accessories, see the
KENWOOD website.
• Slightly lift the plastic tab of the cover at the
top and carefully turn it clockwise 90 degrees
backwards.
• Insert the plugs completely into the jack
sockets. If the jack plug is not inserted correctly,
contact errors can occur and cause noise. If the
headset is equipped with a PTT key, this can be
used accordingly.
Attention!
To prevent hearing damage, please reduce the
volume of the transceiver before using a headset.

10
3. Using the transceiver
3.1 Switching the device On and Off
Turn the volume control clockwise past the rest-point to turn on the transceiver. The LED display
lights up completely, the charge status of the battery and the current transceiver channel are briey
displayed. The device then goes into standby mode. To switch off the transceiver, turn the volume
control past the rest-point in the other direction.
3.2 Adjusting the volume
Turn the volume control clockwise to increase the volume and counterclockwise to decrease it.
3.3 Sending and receiving
When switched on, the transceiver is in "Receive" mode and can receive voice or audio signals on the
set channel. To send a message, press the PTT button and speak into the microphone. Press and hold
the <PTT key> until you have nished the transmission. The transceiver then automatically returns to
reception mode. For optimal voice transmission, the microphone should be approx. 2 - 3 centimetres
away from the mouth when transmitting.
Note: Both transceivers must be set to the same channel and the same QT/DQT code. If the <PTT
key> is released, an acoustic signal (Roger Beep) sounds on the other device, if activated, to signal
that the transmission process has been completed. Information on this can be found under “Setting
the transceiver” in this manual.
3.4 Full Reset Function
To reset the transceiver to factory settings, please proceed as follows:
Press and hold the <Function button up> and <Function button down> buttons simultaneously
for 3 seconds. The orange LED indicates the start of the full reset. After a successful reset, “LJ9”
appears in the display.

11
4. Setting the transceiver
In order to make settings such as channel selection or QT/DQT code, this transceiver has a settings
menu. This menu is operated as follows:
• A long press on the <Function key up> switches to the rst menu level. Each further long press
of the key advances one level.
• In the respective menu, the settings are made by briey pressing the <Function key up> or
<Function key down> keys.
• Press the <PTT key> exits the settings menu and the transceiver is back in reception mode.
Note: If no buttons are pressed for 10 seconds, the settings menu is closed and the device is in
reception mode again.
Settings menu overview:
Level Function Settings Display
0Reception
mode
1Channel
selection CH01 - CH32
2Squelch
level SQ 0 - SQ 9
3QT/DQT
code
OFF,
CT01 - CT38,
DT01 - DT83
4 VOX V.of / 1/2/3
5Ringing
tone CA01 - CA20
6 Key tone KTOF / KTOn
7 Roger beep RBOF / RBOn
8Feedback
Tone FTOF / FTOn
9Battery char-
ge level 3 / 2 / 1 / 0

12
4.1 Switching channels
To switch to another channel, please proceed as follows:
• Press 1 x long on the <Function key up> key, the current channel number ashes in the display.
• The desired channel can be set by briey pressing the <Function key up> or <Function key
down> keys.
• Press the <PTT key> exits the settings menu and the transceiver is back in reception mode.
Note: Channels 1 to 16 are available by default. Channels 17 to 32 need to be activated by user
before they can be selected. Channels 17 to 32 should only be used in countries where these
frequencies are allowed by government authorities.
To activate channels 17 to 32, please proceed as follows:
• Press and hold <PTT key> & <Function key down> and turn on the transceiver. Release both
buttons after 3 seconds, now 32 channels are activated.
To deactivate channels 17 to 32, please proceed as follows:
• Press and hold <Function key up> & <Function key down> and turn on the transceiver. Release
both buttons after 3 seconds. The transceiver will perform a full reset, and it will be in 16 channel
mode.
4.2 Squelch
With the setting of the squelch level you determine the strength of the incoming signal up to which
the transceiver remains muted. This means that the higher the level is set, the stronger the incoming
signal has to be in order to be audible. You can adjust the level between “0” and “9”, with “3”
being the default setting. To change the settings, please proceed as follows:
• Press 2 x long on the <Function key up> key and the current setting will ash on the display.
• The desired value (0 - 9) can be set by briey pressing the <Function key up> or <Function key
down> keys.
• Press the <PTT key> exits the settings menu and the transceiver is back in reception mode.
4.3
QT tone and DQT code settings
QT and DQT are functions that reject unwanted signals on your channel. You will only hear a call if
you receive a signal that contains a suitable QT tone or DQT code. If a call with a different tone or
code is received, the squelch function remains active and you will not hear this call. The receiving
station must also have a suitable tone or code in order to hear your call when you transmit with QT
or DQT.
Please note that third parties can still hear your calls if they set their transceiver set to the same tone
or code. To change the settings, please proceed as follows:
• Press 3 x long on the <Function key up>, key and the current setting will ash on the display.
• The desired QT or DQT code can be set by briey pressing on the <Function key up> or <Func-
tion key down> keys.
• Press the <PTT key> exits the settings menu and the transceiver is back in reception mode.

13
The KENWOOD QT/DQT default settings for each channel are shown in the table below. For
a complete list, see page 20 of this manual.
Ch. Freq. (MHz) QT/DQT Ch. Freq. (MHz) QT/DQT
1 446.00625 CT10 / 94.8 Hz 17* 446.10625 CT10 / 94.8 Hz
2 446.09375 CT08 / 88.5 Hz 18* 446.19375 CT08 / 88.5 Hz
3 446.03125 CT13 / 103.5 Hz 19* 446.13125 CT13 / 103.5 Hz
4 446.06875 CT05 / 79.7 Hz 20* 446.16875 CT05 / 79.7 Hz
5 446.04375 CT17 / 118.8 Hz 21* 446.14375 CT17 / 118.8 Hz
6 446.01875 CT18 / 123.0 Hz 22* 446.11875 CT18 / 123.0 Hz
7 446.08125 CT19 / 127.3 Hz 23* 446.18125 CT19 / 127.3 Hz
8 446.05625 CT07 / 85.4 Hz 24* 446.15625 CT07 / 85.4 Hz
9 446.00625 CT14 / 107.2 Hz 25* 446.10625 CT14 / 107.2 Hz
10 446.09375 CT15 / 110.9 Hz 26* 446.19375 CT15 / 110.9 Hz
11 446.03125 CT16 / 114.8 Hz 27* 446.13125 CT16 / 114.8 Hz
12 446.06875 CT06 / 82.5 Hz 28* 446.16875 CT06 / 82.5 Hz
13 446.04375 DT20 / D132N 29* 446.14375 DT20 / D132N
14 446.01875 DT24 / D155N 30* 446.11875 DT24 / D155N
15 446.05625 DT21 / D134N 31* 446.15625 DT21 / D134N
16 446.08125 DT33 / D243N 32* 446.18125 DT33 / D243N
*Channels 1 to 16 are available by default. Channels 17 to 32 need to be activated by user before
they can be selected. Channels 17 to 32 should only be used in countries where these frequencies are
allowed by government authorities.
4.4 Voice controlled transmission Set up (VOX)
The transceiver is able to transmit voice-controlled (VOX). In VOX mode, the transceiver sends a signal
when activated by your voice or other noises in your environment. The sensitivity can be set in 3 levels
(1/2/3), with level 3 being the most sensitive level.
To change the settings, please proceed as follows:
• Press 4 x long on the <Function key up>, key and the current setting will ash on the display.
• The desired value (V.OF - V. 3) can be set by briey pressing the <Function key up> or <Function
key down> keys.
• Press the <PTT key> exits the settings menu and the transceiver is back in reception mode.
Note: Pressing the <PTT key> exits the VOX mode. Using this feature in noisy or windy environments
is not recommended.

14
4.5 Ringing tone
Ring tones help identify yourself to other participants and inform them of your call. 20 different signal
tones (CA01 - CA20) are available for this.
If each participant uses a different tone, the caller is easy to identify. The ringing tone is triggered by
pressing and holding the <PTT key> and then additionally briey pressing the <Function key up>.
To change the settings, please proceed as follows:
• Press 5 x long on the <Function key up>, key and the current setting will ash on the display.
• The desired value (CA01 - CA20) can be set by briey pressing the <Function key up> or
<Function key down> keys.
• Press the <PTT key> exits the settings menu and the transceiver is back in reception mode.
4.6 Key tone On / Off
If the key tone is activated, the transceiver gives an acoustic feedback when keys are pressed. You can
switch the key tone On or Off (KTOF / KTOn). To change the settings, please proceed as follows:
• Press 6 x long on the <Function key up>, key and the current setting will ash on the display.
• The desired value (KTOF / KTOn) can be set by briey pressing the <Function key up> or
<Function key down> keys.
• Press the <PTT key> exits the settings menu and the transceiver is back in reception mode.
4.7 Roger Beep On / Off
The Roger Beep is a sound signal generated by the transceiver that is automatically transmitted at the
end of each transmission. This signals to the remote station that you have ended your call. You can
switch the Roger Beep On or Off (RBOF / RBOn). To change the settings, please proceed as follows:
• Press 7 x long on the <Function key up>, key and the current setting will ash on the display.
• The desired value (RBOF / RBOn) can be set by briey pressing the <Function key up> or
<Function key down> keys.
• Press the <PTT key> exits the settings menu and the transceiver is back in reception mode.
4.8 Feedback Tone On / Off
The feedback tone is a tone generated by the transceiver that gives the sender of a ringing tone (see
point 4.5) feedback at its own device that the ringing tone is currently being heard at the remote
device by sounding the same tone at the same time at its own device. You can switch the feedback
tone on or off (FTOn / FTOF). To change the settings, please proceed as follows:
• Press 8 x long on the <Function key up>, key and the current setting will ash on the display.
• The desired value (FTOn / FTOF) can be set by briey pressing the <Function key up> or <Func-
tion key down> keys.
• Press the <PTT key> exits the settings menu and the transceiver is back in reception mode.

15
4.9 Battery charge level
The battery charge level is indicated by bar symbols. In addition, a signal tone sounds when the
battery level is low and the charge indicator ashes red.
To display the battery charge level, please proceed as follows:
• Press 9 x long on the <Function key up>, key and the current charge level is shown in the
display.
• Press the <PTT key> exits the settings menu and the transceiver is back in reception mode.
4.10 Monitor function
The monitor function can be used to receive weaker signals on the current channel. You can activate
the monitoring as follows:
• By briey pressing the <Function key down> key the function can be switched On and Off.
Note: The monitor function works independently of the set QT/DQT code.
4.11 Channel search (Scan)
With the channel search you can search for active channels. If a corresponding channel is found, the
search stops and communication is played back. If the transmission ends on the found channel, the
channel search is automatically continued.
To start the channel search, please proceed as follows:
• Press 1 x long on the <Function key down>, key and the search from channel 1 to channel 16
(or channels 1 to 32, depending on the setting) will start.
• If you briey press the <Function key up> or <Function key down> keys during the search, the
sequence of the search is reversed.
Note:
If you press the <PTT key> while listening to a found channel, the transceiver will return to
standby mode on the current channel.
4.12 Energy saving function
If the transceiver is not used for more than 10 seconds, it automatically switches to energy-saving
mode. This has no effect on the reception of transmissions and the normal mode is automatically
reactivated as soon as a signal is detected.
Battery fully charged
Battery 2/3 charged
Battery 1/3 charged
Battery empty

16
5. Troubleshooting
Notes on troubleshooting
Problem Solution
The transceiver does not turn on.
• The battery is discharged. Charge the
battery or replace the batteries.
• The battery is not inserted correctly. Remo-
ve and reinsert the battery.
If the battery is charged repeatedly, the battery
performance deteriorates.
• The battery life is exhausted. Replace the
battery with a new one.
You cannot hear or speak to the other group
members.
• Make sure you are using the same channel
and QT/DQT settings as the other group
members.
• The other group members are too far away.
Make sure you are within range of the other
transceivers.
Other transceiver participants (except group
members) can be heard on the channel.
• Change the QT/DQT settings. Make sure
that all group members change the settings
on their transceivers to match the new QT/
DQT settings.
Note:
If the problem persists, please contact the KENWOOD service.
6. Disposal
Disposal of used electrical and electronic equipment and batteries.
The crossed-out wheeled bin symbol on the product or its packaging indicates that this product
must not be treated as normal household waste, but must be returned to a collection point for the
recycling of electrical and electronic equipment and batteries. By helping to properly dispose of this
product, you are protecting the environment and the health of your fellow human beings. Improper
or incorrect disposal endangers the environment and health. For more information about the recycling
of this product, please contact your local authority or your municipal waste disposal service.
Information on disposal in Turkey can be found in Turkish on page 18.

17
Frequency range 446,0 - 446,2 MHz (PMR446)
Channels 32
Subcodes QT 38 + DQT 83
Radio-frequency power ≤ 500mW ERP
Maximum transmission power Max. 26,59 dBm
Reach Up to 6 km*
Operating temperature -20°C to +55°C
Operating voltage 3.7 V
Protection class IP32
Operating time / Charging time Max. 18 hrs.* / approx. 3 hrs.
Dimensions (W x H x D) 52 x 157 x 28 mm
Weight incl. battery & belt clip 138 g
* May vary depending on terrain and conditions.
Li-ion battery
Type KNB-86L
Voltage 3.7 V
Capacity 1150 mAh
Energy content 4.3 Wh
UN number UN3481 Lithium-Ion Batteries contained in /
packed with equipment
Power supply
Manufacturer power supply
SHENZHEN MERRYKING ELECTROINCS CO., LTD.
801, Bldg B, No. 1, Tianyang 2nd Road, Oriental
Community, Songgang Street, Bao’an District,
Shenzhen 518105, Guangdong, CHINA"
Power supply brand and model identier MKC-0502000VEUT / MKC-0502000VUKT
Input voltage AC voltage 100 - 240 V
Input AC frequency 50 / 60 Hz
Output voltage / current / power DC voltage 5.0 V / 2.0 A / 10.0 W.
Average active efciency 81.1 %
No-load power Consumption 0.07 W
Technical modications reserved.
7. Technical Specications UBZ-LJ9E

18
8. Guarantee
Dear Customer,
Thank you for purchasing this KENWOOD product. If this product
is found to be defective in materials or workmanship under nor-
mal use, we will repair or replace it free of charge in accordance
with the applicable warranty terms.
The warranty does not cover consumables or parts subject to wear
and tear, such as rechargeable batteries, which must be replaced
as part of normal servicing.
UK Contact Address:
JVCKENWOOD U.K. Limited
First Floor, Gleneagles, the Belfry, Colonial Way,
Watford, Hertfordshire WD24 4WH, UNITED KINGDOM
Email : [email protected]
www.kenwoodsupport.co.uk
EU Contact Address:
JVCKENWOOD Europe B.V.
Amsterdamseweg 37, 1422 AC - Uithoorn, THE NETHERLANDS
Tel. 0297-519 900, www.kenwood.nl
Disposal in Turkey:
Eski Elektrikli ve Elektronik Cihazların ve Pillerin İmhası Hakkında Bilgi (ayrı atık toplama sistemlerine
sahip olan ülkelerde geçerlidir).
Bu sembolü (üzeri çizili çöp bidonu) içeren ürün ve piller evsel atı k çöpleri ile birlikte atılamaz.
Kullanılmış elektrikli ve elektronik cihaz ve piller, bu tür maddeleri ve bunların yan ürünlerini iş
lemeye elverişli bir geri kazanım tesisine gönderilmelidir.
Size en yakın geri kazanım tesisinin konumunu öğrenmek üzere yerel yetkililerinize danışın.
Doğru geri kazanım ve atık uzaklaştırma y öntemleri, sadece öz kaynakların korunmasına
yardımcı olmakla kalmayıp ayrıca sağlığımıza ve çevreye olacak zararlı etkilerini engellemeye
yardımcı olur.
Bu ürün 28300 sayılı Resmi Gazete’de yayımlanan Atik Elektrikli ve Elektronik
Eşyalarin Kontrolü Yönetmeliğe uygun olarak üretilmiştir.

19
9. SAR values for UBZ-LJ9E transceiver
Model SAR face SAR trunk
UBZ-LJ9E 0,4 W/kg 0,45 W/kg
RF EXPOSURE LIMITS FOR UBZ-LJ9E TRANSCEIVER
ATTENTION:
Before using this PMR446 transceiver, read this simple guide.
This PMR446 transceiver uses radio frequency (RF) electromagnetic energy to allow commu-
nication between two or more users over a distance.
It uses radio frequency (RF) energy or radio waves to send and receive calls.
KENWOOD UBZ-LJ9E transceiver is designed, manufactured and tested to meet Council
Recommendation 1999/519/EC RF exposure limits, and exposure limits provide recommen-
ded exposure levels to the general public.
To keep RF exposure within acceptable limits, do not transmit for more than 50% of the
transceiver total usage time.
Transmitting over 50% of the total use time may exceed the limits in accordance to the FCC
RF exposure requirements.
To ensure compliance, hold the transceiver in a vertical position in front of your face, with
the microphone and other parts of the transceiver including the antenna at least 2.5 cm
away from the nose or lips.
Longer distance between your face and the antenna reduces RF exposure.

© 2022
QT-Codes
CT01/67.0 Hz CT14/107.2 Hz CT27/167.9 Hz CT02/71.9 Hz CT15/110.9 Hz
CT28/173.8 Hz CT03/74.4 Hz CT16/114.8 Hz CT29/179.9 Hz CT04/77.0 Hz
CT17/118.8 Hz CT30/186.2 Hz CT05/79.7 Hz CT18/123.0 Hz CT31/192.8 Hz
CT06/82.5 Hz CT19/127.3 Hz CT32/203.5 Hz CT07/85.4 Hz CT20/131.8 Hz
CT33/210.7 Hz CT08/88.5 Hz CT21/136.5 Hz CT34/218.1 Hz CT09/91.5 Hz
CT22/141.3 Hz CT35/225.7 Hz CT10/94.8 Hz CT23/146.2 Hz CT36/233.6 Hz
CT11/97.4 Hz CT24/151.4 Hz CT37/241.8 Hz CT12/100.0 Hz CT25/156.7 Hz
CT38/250.3 Hz CT13/103.5 Hz CT26/162.2 Hz
DQT-Codes
DT01/D023N DT29/D174N DT57/D445N DT02/D025N DT30/D205N
DT58/D464N DT03/D026N DT31/D223N DT59/D465N DT04/D031N
DT32/D226N DT60/D466N DT05/D032N DT33/D243N DT61/D503N
DT06/D043N DT34/D244N DT62/D506N DT07/D047N DT35/D245N
DT63/D516N DT08/D051N DT36/D251N DT64/D532N DT09/D054N
DT37/D261N DT65/D546N DT10/D065N DT38/D263N DT66/D565N
DT11/D071N DT39/D265N DT67/D606N DT12/D072N DT40/D271N
DT68/D612N DT13/D073N DT41/D306N DT69/D624N DT14/D074N
DT42/D311N DT70/D627N DT15/D114N DT43/D315N DT71/D631N
DT16/D115N DT44/D331N DT72/D632N DT17/D116N DT45/D343N
DT73/D654N DT18/D125N DT46/D346N DT74/D662N DT19/D131N
DT47/D351N DT75/D664N DT20/D132N DT48/D364N DT76/D703N
DT21/D134N DT49/D365N DT77/D712N DT22/D143N DT50/D371N
DT78/D723N DT23/D152N DT51/D411N DT79/D731N DT24/D155N
DT52/D412N DT80/D732N DT25/D156N DT53/D413N DT81/D734N
DT26/D162N DT54/D423N DT82/D743N DT27/D165N DT55/D431N
DT83/D754N DT28/D172N DT56/D432N

Transceptor FM portátil PMR446
UBZ-LJ9SETT (Versión UE)
UBZ-LJ9SETT (Versión RU)
MANUAL DE INSTRUCCIONES
DEUTSCH FRANÇAIS ITALIANOENGLISH NEDERLANDS
ESPAÑOL

2
Índice de contenido
Contenido Página
1. Indicaciones de seguridad
1.1 Medidas de precaución
1.2 Información sobre la batería
1.3 Declaración de conformidad
1.4 Dirección de contacto en la UE / Reino Unido
2. Antes de la puesta en servicio
2.1 Desembalaje
2.2 Componentes y funciones
2.3 Instalación de la batería de iones de litio
2.4 Carga de la batería
2.5 Montaje del clip para cinturón
2.6 Uso de un auricular opcional
3. Uso del transceptor
3.1 Encendido y apagado del equipo
3.2 Ajuste del volumen
3.3 Transmisión y recepción
3.4 Función de reinicio completo
4. Ajuste del transceptor
4.1 Cambio de canales
4.2 Silenciamiento (Squelch)
4.3 Ajustes de tono QT y código DQT
4.4 Transmisión activada por voz (VOX) - Ajuste
4.5 Tono de llamada
4.6 Tono de teclas
4.7 Pitido de recibido (Roger-Beep)
4.8 Tono de confirmación (Feedback)
4.9 Nivel de carga de la batería
4.10 Función de monitor
4.11 Exploración de canales (Scan)
4.12 Función de ahorro de energía
5. Resolución de problemas
6. Eliminación
7. Datos técnicos
8. Garantía
9. Valores SAR
ESPAÑOL
3
3
4
5
5
6
6
6
7
8
8
9
10
10
10
10
10
11
12
12
12
13
14
14
14
14
15
15
15
15
16
16
17
18
19

3
Índice de contenido
Contenido Página
1. Indicaciones de seguridad
1.1 Medidas de precaución
1.2 Información sobre la batería
1.3 Declaración de conformidad
1.4 Dirección de contacto en la UE / Reino Unido
2. Antes de la puesta en servicio
2.1 Desembalaje
2.2 Componentes y funciones
2.3 Instalación de la batería de iones de litio
2.4 Carga de la batería
2.5 Montaje del clip para cinturón
2.6 Uso de un auricular opcional
3. Uso del transceptor
3.1 Encendido y apagado del equipo
3.2 Ajuste del volumen
3.3 Transmisión y recepción
3.4 Función de reinicio completo
4. Ajuste del transceptor
4.1 Cambio de canales
4.2 Silenciamiento (Squelch)
4.3 Ajustes de tono QT y código DQT
4.4 Transmisión activada por voz (VOX) - Ajuste
4.5 Tono de llamada
4.6 Tono de teclas
4.7 Pitido de recibido (Roger-Beep)
4.8 Tono de confirmación (Feedback)
4.9 Nivel de carga de la batería
4.10 Función de monitor
4.11 Exploración de canales (Scan)
4.12 Función de ahorro de energía
5. Resolución de problemas
6. Eliminación
7. Datos técnicos
8. Garantía
9. Valores SAR
1. Indicaciones de seguridad
INSTRUCCIONES IMPORTANTES DE SEGURIDAD
Atención: Lea atentamente estas páginas para garantizar un funcionamiento seguro del equipo.
¡Lea atentamente las indicaciones!
•
Siga todas las instrucciones de seguridad y manejo cuando ponga en funcionamiento este
producto.
¡Conserve las indicaciones en un lugar seguro!
• Debe conservar las instrucciones de seguridad y manejo para futuras consultas.
¡Respete todas las advertencias!
• Debe seguir estrictamente todas las advertencias indicadas en el producto y mencionadas en el
manual de instrucciones.
1.1 Medidas de precaución
• No cargue el transceptor y la batería cuando estén húmedos.
• Asegúrese de que ningún objeto metálico se interponga entre el transceptor y la batería.
• Utilice únicamente los accesorios recomendados por KENWOOD.
• Si alguna parte del transceptor está dañada, no toque las partes dañadas.
Cuando conecte unos auriculares o unos cascos, reduzca el volumen del transceptor. Tenga en
cuenta también que cuando se desactiva el silenciamiento (Squelch) el volumen puede cambiar.
• No coloque el cable de un micrófono de pinza con el auricular/soporte alrededor de su cuello,
mientras esté cerca de máquinas en las que el cable pueda enredarse.
• No deposite el transceptor sobre una supercie inestable. Si el transceptor se enciende o apaga
debido a una caída o a un golpe fuerte, se pueden restablecer las conguraciones del volumen y
de los canales.
• Tenga cuidado de no lesionarse los ojos con el extremo de la antena.
• No sumergir el transceptor en el agua.
• Apague siempre el transceptor para conectar los accesorios.
• El aparato se desconecta de la red eléctrica con el cargador. Procure que el enchufe del cargador
sea fácilmente accesible.
• Al desechar las baterías, se deberán respetar las normativas y reglamentos locales aplicables en su
país o región.
• Cuando utilice un cordón para el cuello disponible en el comercio, tenga cuidado de que dicho
cordón no pueda enredarse en partes cercanas de una máquina.
¡Advertencia!
Apague el transceptor en estos lugares:
• En atmósferas explosivas (gas inamable, partículas de polvo, polvo metálico, polvo de madera, etc.).
• Al repostar y detenerse en gasolineras.
• En lugares con riesgo de explosión o donde se realicen operaciones de voladura.
• En un avión. (Cualquier uso del transceptor sólo debe tener lugar a la orden y según las
instrucciones de la tripulación.)
• En cualquier lugar donde haya carteles, etc. que pidan que se apaguen los equipos de radio,
entre otras las instalaciones médicas.
• En las proximidades de personas con marcapasos.

4
¡Cuidado!
• No modique el transceptor.
• No coloque el transceptor sobre o cerca de los airbags mientras conduce. Si el airbag se despliega,
el transceptor puede convertirse en un proyectil y golpear al conductor o al acompañante.
• No toque el conector de la antena cuando transmita, y no transmita si hay metal expuesto en la
cubierta de la antena. Existe el riesgo de que sufra una quemadura de alta frecuencia.
• Si del transceptor saliera un olor inusual o humo, apague inmediatamente el transceptor, retire la
batería y póngase en contacto con su distribuidor KENWOOD.
• El uso del transceptor durante la conducción puede ir en contra de las normas de tráco. Com-
pruebe y respete las normas de tráco de su zona.
• No exponga el transceptor al calor o al frío extremo.
• No transporte la batería con objetos metálicos, ya que esto podría provocar un cortocircuito en los
contactos de la batería.
• Riesgo de explosión si se reemplaza la batería de forma incorrecta; reemplácela sólo por baterías
del mismo tipo.
• Si el transceptor se utiliza en zonas con aire ambiente seco, pueden acumularse fácilmente cargas
eléctricas (electricidad estática). Si se utiliza un auricular como accesorio en tales condiciones,
existe la posibilidad de que a través de él se transmita una descarga eléctrica del transceptor al
oído. No utilice accesorios como auriculares/micrófonos en zonas donde se genere fácilmente
electricidad estática.
• Al colocar una correa de sujeción del tipo disponible en el comercio, compruebe que ésta sea
resistente y duradera. Nunca balancee el transceptor de un lado a otro al tomarlo por la correa;
podría golpear accidentalmente a otra persona con el transceptor y lesionarla.
1.2 Información sobre la batería
La batería contiene sustancias inamables como por ej. disolventes orgánicos. Si se manipulara de
forma incorrecta, la batería podría estallar e incendiarse o liberar calor extremo, disminuir su rendi-
miento o provocar otros daños. Preste especial atención en estas indicaciones a los procedimientos
que están prohibidos.
¡Peligro!
¡No desmonte ni repare la batería!
La batería dispone de una función de seguridad y un circuito de protección. Si estuvieran defectuosos
o se anularan, la batería podría generar calor y humo, estallar e incendiarse.
¡No cortocircuite la batería!
Los terminales positivo (+) y negativo (-) no deben puentearse con un objeto metálico (como por ej.
un clip o un trozo de cable). Por lo tanto, no transporte ni guarde la batería en contenedores con
objetos metálicos (herramientas, bisutería de metal, pinzas para el pelo, etc.). En una batería en corto-
circuito circula una corriente elevada, y la batería puede generar calor y humo, estallar e incendiarse.
El objeto metálico que produce el puente también se calienta.
No queme la batería ni la exponga a altas temperaturas.
Si el aislante se funde, la descarga de gases o el dispositivo de seguridad se dañará, o el electrolito se
inamará. La batería puede generar calor y humo, estallar e incendiarse.
¡Nunca utilice ni almacene la batería cerca de llamas abiertas, hornos u otras fuentes de
calor (sitios en donde las temperaturas superen los 60°C)!
Si por acción del calor se funde el separador de polímero, las celdas individuales pueden desarrollar
un cortocircuito interno, y la batería puede generar calor y humo, estallar e incendiarse. Aunque el
separador no esté dañado, la batería puede inarse, deformarse o agrietarse. No utilice este tipo
de pilas.

5
¡Nunca sumerja la batería en agua ni permita que se moje!
Si el circuito de protección de la batería estuviera defectuoso, la batería podría sobrecargarse y produ-
cirse una reacción química inesperada. La batería puede generar calor y humo, estallar e incendiarse.
¡Cuidado!
Riesgo de explosión si se reemplaza la batería por una de tipo incorrecto;
• temperaturas extremadamente altas o bajas a las que puede estar expuesta una batería durante su
uso, almacenamiento o transporte;
• baja presión de aire a gran altitud;
• reemplazar una batería por un tipo incorrecto que pueda puentear una protección (por ej. algunos
tipos de baterías de litio);
• eliminar una batería arrojándola al fuego o a un horno caliente, o aplastar mecánicamente o cortar
una batería;
• dejar una batería en un entorno con temperaturas extremadamente altas, lo cual puede provocar
una explosión o una fuga de líquidos o gases inamables; una batería expuesta a una presión
de aire extremadamente baja, lo cual puede provocar una explosión o una fuga de líquidos o gases
inamables.
1.3 Declaración de conformidad
Por la presente, JVCKENWOOD Europe B.V. declara que el equipo de radio tipo [KENWOOD] UBZ-LJ9E
cumple con la Directiva 2014/53/UE. El texto completo de la declaración de conformidad de la UE
está disponible en la siguiente dirección de Internet: https://www.kenwood.com/cs/com/ecdoc/
Fabricante:
JVCKENWOOD Corporation
3-12. Moriya-cho, Kanagawa-ku, Yokohama-shi, Kanagawa 221-0022, JAPAN
1.4 Dirección de contacto en la UE / Reino Unido
Dirección de contacto en la UE:
JVCKENWOOD Europe B.V.
Amsterdamseweg 37, 1422 AC Uithoorn, THE NETHERLANDS
Dirección de contacto en el Reino Unido:
JVCKENWOOD U.K. Limited
First Floor, Gleneagles, the Belfry, Colonial Way, Watford, Hertfordshire WD24 4WH
UNITED KINGDOM

6
2. Antes de la puesta en servicio
2.1 Desembalaje
Desembale las unidades con cuidado y asegúrese de que todos los accesorios están presentes:
• Transceptor UBZ-LJ9E x 2
• Batería de iones de litio KNB-86L x 2
• Clip de cinturón con tornillos x 2
• Cargador con doble puerto USB
• Cable de carga USB-C x 2
• Este manual de instrucciones
2.2 Componentes y funciones
1 - Antena 9 - Micrófono
2 - Botón pulsar para hablar - PTT (push to talk) 10 - Indicador de función LED
3 - Tecla de función arriba 11 - Clip de cinturón
4 - Tecla de función abajo 12 - Batería de iones de litio
5 - Encendido / Apagado / Volumen 13 - Indicador de carga LED
6 - RX / TX LED 14 - Puerto de carga USB-C
7 - Altavoz 15 - Tecla de desbloqueo de batería
8 - Jack de auriculares/micrófono

7
2.3 Instalación de la batería de iones de litio
• Alinee las lengüetas de la cubierta de la batería con las ranuras del transceptor, a continuación
sostenga la cubierta y empújela hacia arriba hasta que escuche un “clic”.
• Para extraer la batería, apague primero el transceptor, a continuación mantenga pulsada la tecla de
bloqueo de la batería, deslice la batería 5 mm hacia atrás y tire de ella hacia arriba para extraerla.
¡Atención!
• Sólo se deben utilizar baterías originales.
• No cortocircuite los terminales de conexión ni exponga la batería a altas temperaturas o al fuego.
• No intente abrir la carcasa de la batería.
• No instale la batería en entornos peligrosos, ya que la formación de chispas pueden provocar una
explosión.

8
2.5 Montaje del clip para cinturón
Alinee el clip del cinturón con los puntos de jación en la parte posterior del transceptor y fíjelo con
los tornillos suministrados. Utilice para ello un destornillador adecuado. El retiro de la batería facilita
el montaje.
2.4 Carga de la batería
Cargue por completo la batería antes de usarla.
• Enchufe el cargador USB a una toma de corrien
te y conecte el cable de carga USB-C al puerto
de carga de la batería del transceptor y al
puerto USB del cargador. Con el cargador se
pueden cargar 2 baterías al mismo tiempo. La
batería también se puede cargar por separado
sin el transceptor.
• Durante la carga, el indicador de carga se
ilumina en rojo para indicar que la batería se
está cargando. Cuando la batería está comple
tamente cargada, el indicador se pone en verde.
¡Atención!
• Utilice únicamente el cargador original.
• Cargue la batería únicamente en interiores.
• Una vez nalizado el proceso de carga, desco
necte el cable USB de la batería y desenchufe el
cargador de la toma de corriente.

9
2.6 Uso de un auricular opcional
A este transceptor puede conectar auriculares con
conector miniatura doble Kenwood (2,5 / 3,5 mm).
Para obtener información sobre los accesorios
compatibles, visite el sitio web de KENWOOD.
• Levante ligeramente la lengüeta de plástico de
la parte superior de la tapa y gírela con cuidado
en sentido horario 90 grados hacia atrás.
• Inserte los enchufes completamente en los jacks
miniatura. Si los conectores miniatura no se
insertan correctamente, pueden producirse
fallos de contacto y provocar ruidos. Si el auricu
lar estuviera equipado con un botón PTT, se
podrá utilizar en consecuencia.
¡Atención!
Para prevenir daños auditivos, reduzca el volumen
del transceptor antes de utilizar los auriculares.

10
3. Uso del transceptor
3.1 Encendido y apagado del equipo
Gire el control de volumen en sentido horario, más allá del punto de clic para encender el transceptor.
El display LED se ilumina por completo, el nivel de carga de la batería y el canal de radio actual se
muestran brevemente. A continuación, el equipo entra en modo de espera. Para apagar el transcep-
tor, gire el control de volumen en el sentido opuesto, más allá del punto de clic.
3.2 Ajuste del volumen
Gire el control de volumen en sentido horario para aumentar el volumen y en sentido antihorario
para disminuirlo.
3.3 Transmisión y recepción
Cuando está encendido, el transceptor está en modo “Recepción” y puede recibir señales de voz o
audio en el canal establecido. Para transmitir un mensaje, pulse el botón de transmisión “PTT” y hable
por el micrófono. Mantenga pulsado el <Botón PTT> hasta que haya terminado la transmisión. A
continuación, el transceptor volverá automáticamente al modo de recepción. Para una transmisión
óptima de la voz, el micrófono debe estar a unos 2 ó 3 centímetros de la boca cuando se transmite.
Aviso: Ambos transceptores deben estar congurados en el mismo canal y con el mismo código QT/
DQT. Cuando se suelte el <Botón PTT> sonará, si está activada, una señal de audio (Roger Beep) en
el otro equipo para indicar que el proceso de transmisión ha nalizado. Encontrará información al
respecto en “Ajuste del transceptor” en este manual de instrucciones.
3.4 Función de reinicio completo
Para restablecer el estado de fábrica de la radio, siga el siguiente procedimiento:
Mantenga pulsados los botones <Botón de función arriba> y <Botón de función abajo> simultá-
neamente durante 3 segundos. El LED naranja indica el inicio del reinicio completo. Después de un
reinicio exitoso, aparecerá „LJ9“ en la pantalla.

11
4. Ajuste del transceptor
Para realizar ajustes como por ej. la selección del canal o el código QT/DQT, este transceptor dispone
de un menú de ajustes. Este menú se maneja de la siguiente forma:
• Una pulsación larga en la <Tecla de función arriba> cambia al primer nivel de menú. Cada
pulsación larga adicional avanza un nivel.
• En el menú correspondiente, los ajustes se realizan pulsando brevemente las teclas <Tecla de
función arriba> o <Tecla de función abajo>
• Al pulsar el <Botón PTT> el menú de ajuste naliza y el transceptor vuelve al modo de recepción.
Aviso: Si no se pulsa ningún botón durante 10 segundos, se sale del menú de ajuste y el transceptor
vuelve al modo de recepción.
Vista general del menú de ajuste:
Nivel Función Ajustes Indicación
0Modo de
recepción
1Selección
del canal CH01 - CH32
2
Nivel de
silencia-
miento
SQ 0 - SQ 9
3Código QT/
DQT
OFF,
CT01 - CT38,
DT01 - DT83
4 VOX V.of / 1 / 2 / 3
5Tono de
llamada CA01 - CA20
6Tono de
teclas KTOF / KTOn
7 Roger Beep RBOF / RBOn
8
Tono de
conr-
mación
(Feedback)
FTOF / FTOn
9
Nivel de
carga de la
batería
3 / 2 / 1 / 0

12
4.1 Cambio de canales
Para cambiar a otro canal, proceda de la siguiente forma:
• Efectúe 1 x pulsación larga en la tecla <Tecla de función arriba>, el número de canal actual
parpadea en el display.
• Mediante una pulsación corta en la tecla <Tecla de función arriba> o <Tecla de función abajo>
se puede ajustar el canal deseado.
• Al pulsar el <Botón PTT> el menú de ajuste naliza y el transceptor vuelve al modo de recepción.
Atención: los canales 1 a 16 están disponibles por defecto. Los canales 17 a 32 deben ser activados
por el usuario. Los canales 17 a 32 sólo pueden utilizarse en los países en los que estas frecuencias
están autorizadas por las autoridades.
Para activar los canales 17 a 32, proceda de la siguiente forma:
• Mantenga pulsados el <Botón PTT>> y el <Tecla de función abajo> y encienda la radio. Suelte
ambos botones después de 3 segundos, ahora se activan 32 canales.
Para desactivar los canales 17 a 32, proceda de la siguiente forma:
• Mantenga pulsado <Tecla de función arriba> y <Tecla de función abajo> y encienda la radio.
Suelte ambos botones después de 3 segundos. La radio realizará un reinicio completo y estará
entonces en modo de 16 canales.
4.2 Silenciamiento (Squelch)
Con el ajuste del nivel de silenciamiento se dene la intensidad de la señal entrante hasta la cual el
transceptor permanece silenciado. Esto signica que cuanto más alto se ajuste el nivel, tanto más
fuerte deberá ser la señal entrante para que sea audible. Se puede ajustar el nivel entre “0” y “9”,
siendo “3” el ajuste por defecto. Para modicar los ajustes, proceda de la siguiente forma:
• Efectúe 2 x pulsaciones largas en la tecla <Tecla de función arriba>, y el ajuste actual se
mostrará parpadeando en el display.
• Mediante una pulsación corta en la tecla <Tecla de función arriba> o <Tecla de función abajo>
se puede ajustar el valor (0 - 9) deseado
• Al pulsar el <Botón PTT> el menú de ajuste naliza y el transceptor vuelve al modo de recepción.
4.3
Ajustes de tono QT y código DQT
QT y DQT son funciones que permiten rechazar las señales no deseadas en su canal. Sólo escuchará
una llamada si recibe una señal que contenga un tono QT o un código DQT coincidente. Si se recibe
una llamada con un tono o código diferente, la función de silenciamiento permanecerá activa y no
escuchará esta llamada. Asimismo, la estación receptora deberá tener un tono o código correspon-
diente para escuchar su llamada cuando transmita con QT o DQT.
Tenga en cuenta que terceros podrán seguir escuchando sus llamadas si conguran su transceptor
con el mismo tono o código. Para modicar los ajustes, proceda de la siguiente forma:
• Efectúe 3 x pulsaciones largas en la tecla <Tecla de función arriba>, y el ajuste actual se
mostrará parpadeando en el display.
• Mediante una pulsación corta en la tecla <Tecla de función arriba> o <Tecla de función abajo>
se puede ajustar el código QT o DQT deseado
• Al pulsar el <Botón PTT> el menú de ajuste naliza y el transceptor vuelve al modo de recepción.

13
Los ajustes por defecto de QT/DQT de KENWOOD para cada canal se muestran en la siguien-
te tabla. Para ver la lista completa, consulte la página 20 de estas instrucciones de uso.
Ca. Frec. (MHz) QT/DQT Ca. Frec. (MHz) QT/DQT
1 446.00625 CT10 / 94.8 Hz 17* 446.10625 CT10 / 94.8 Hz
2 446.09375 CT08 / 88.5 Hz 18* 446.19375 CT08 / 88.5 Hz
3 446.03125 CT13 / 103.5 Hz 19* 446.13125 CT13 / 103.5 Hz
4 446.06875 CT05 / 79.7 Hz 20* 446.16875 CT05 / 79.7 Hz
5 446.04375 CT17 / 118.8 Hz 21* 446.14375 CT17 / 118.8 Hz
6 446.01875 CT18 / 123.0 Hz 22* 446.11875 CT18 / 123.0 Hz
7 446.08125 CT19 / 127.3 Hz 23* 446.18125 CT19 / 127.3 Hz
8 446.05625 CT07 / 85.4 Hz 24* 446.15625 CT07 / 85.4 Hz
9 446.00625 CT14 / 107.2 Hz 25* 446.10625 CT14 / 107.2 Hz
10 446.09375 CT15 / 110.9 Hz 26* 446.19375 CT15 / 110.9 Hz
11 446.03125 CT16 / 114.8 Hz 27* 446.13125 CT16 / 114.8 Hz
12 446.06875 CT06 / 82.5 Hz 28* 446.16875 CT06 / 82.5 Hz
13 446.04375 DT20 / D132N 29* 446.14375 DT20 / D132N
14 446.01875 DT24 / D155N 30* 446.11875 DT24 / D155N
15 446.05625 DT21 / D134N 31* 446.15625 DT21 / D134N
16 446.08125 DT33 / D243N 32* 446.18125 DT33 / D243N
* Los canales 1 a 16 están disponibles por defecto. Los canales 17 a 32 deben ser activados por el
usuario. Los canales 17 a 32 sólo pueden utilizarse en los países en los que estas frecuencias están
autorizadas por las autoridades.
4.4 Transmisión activada por voz (VOX) - Ajuste
El transceptor es capaz de transmitir con activación por voz (VOX). En el modo VOX, el transceptor
emitirá una señal cuando sea activado por su voz u otros sonidos en su entorno. La sensibilidad puede
ajustarse en 3 niveles (1/2/3), siendo el nivel 3 el más sensible.
Para modicar los ajustes, proceda de la siguiente forma:
• Efectúe 4 x pulsaciones largas en la tecla <Tecla de función arriba>, y el ajuste actual se
mostrará parpadeando en el display.
• Mediante una pulsación corta en la tecla <Tecla de función arriba> o <Tecla de función abajo>
se puede ajustar el valor (V.OF - V. 3) deseado.
• Al pulsar el <Botón PTT> el menú de ajuste naliza y el transceptor vuelve al modo de recepción.

14
Aviso: Al pulsar el <Botón PTT> naliza el modo VOX. El uso de esta función no se recomienda en
entornos ruidosos o con viento.
4.5 Tono de llamada
Los tonos de aviso de llamada le ayudan a identicarse ante otros usuarios y a informarles que está
realizando la llamada. Para ello se dispone de 20 tonos de aviso diferentes (CA01 – CA20).
Si cada usuario utiliza un tono diferente será más fácil reconocer quién realiza la llamada. El tono de
llamada se activa manteniendo pulsado el <Botón PTT> y a continuación, haciendo una pulsación
corta adicional en la tecla <Tecla de función arriba>.
Para modicar los ajustes, proceda de la siguiente forma:
• Efectúe 5 x pulsaciones largas en la tecla <Tecla de función arriba>, y el ajuste actual se
mostrará parpadeando en el display.
• Mediante una pulsación corta en la tecla <Tecla de función arriba> o <Tecla de función abajo>
se puede ajustar el valor (CA01 - CA20) deseado.
• Al pulsar el <Botón PTT> el menú de ajuste naliza y el transceptor vuelve al modo de recepción.
4.6 Tono de teclas enc./apag.
Si el tono de teclas está activado, el transceptor emitirá una respuesta acústica cuando se pulsen
las teclas. El tono de teclas puede activarse o desactivarse (KTOF / KTOn). Para modicar los ajustes,
proceda de la siguiente forma:
• Efectúe 6 x pulsaciones largas en la tecla <Tecla de función arriba>, y el ajuste actual se
mostrará parpadeando en el display.
• Mediante una pulsación corta en la tecla <Tecla de función arriba> o <Tecla de función abajo>
se puede ajustar el valor (KTOF / KTOn) deseado.
• Al pulsar el <Botón PTT> el menú de ajuste naliza y el transceptor vuelve al modo de recepción.
4.7 Roger-Beep enc./apag.
El pitido de recibido (Roger-Beep) es una señal de audio generada por el transceptor, la cual se emite
automáticamente al nal de cada transmisión. Esto indica a la otra estación que usted ha nalizado
su llamada. El pitido de recibido (Roger-Beep) puede activarse o desactivarse (RBOF / RBOn). Para
modicar los ajustes, proceda de la siguiente forma:
• Efectúe 7 x pulsaciones largas en la tecla <Tecla de función arriba>, y el ajuste actual se
mostrará parpadeando en el display.
• Mediante una pulsación corta en la tecla <Tecla de función arriba> o <Tecla de función abajo>
se puede ajustar el valor (RBOF / RBOn) deseado.
• Al pulsar el <Botón PTT> el menú de ajuste naliza y el transceptor vuelve al modo de recepción.
4.8 Tono de conrmación (Feedback) enc./apag.
El tono de conrmación es un sonido generado por el transceptor, que le da una respuesta al emisor
de un tono de llamada (véase el punto 4.5) en su propio equipo, indicándole que el tono de llamada
se está escuchando en ese momento en la otra estación, para lo cual el mismo tono suena al mismo
tiempo en su propio equipo. El tono de conrmación (Feedback) puede activarse o desactivarse (FTOn
/ FTOF). Para modicar el ajuste, proceda de la siguiente forma:
• Efectúe 8 x pulsaciones largas en la tecla <Tecla de función arriba>, y el ajuste actual se
mostrará parpadeando en el display.
• Mediante una pulsación corta en la tecla <Tecla de función arriba> o <Tecla de función abajo>
se puede ajustar el valor (FTOn / FTOF) deseado.
• Al pulsar el <Botón PTT> el menú de ajuste naliza y el transceptor vuelve al modo de recepción.

15
4.9 Nivel de carga de la batería
El nivel de carga de la batería se indica mediante iconos de barras. Además, cuando la batería tiene
poca carga suena un pitido y el indicador de carga parpadea en rojo.
Para mostrar el nivel de carga de la batería, proceda de la siguiente forma:
• Efectúe 9 x pulsaciones largas en la tecla <Tecla de función arriba>, y el nivel de carga actual
se mostrará en el display.
• Al pulsar el <Botón PTT> el menú de ajuste naliza y el transceptor vuelve al modo de recepción.
4.10 Función de monitor
La función de monitor puede utilizarse para recibir señales más débiles en el canal actual. La supervi-
sión se activa de la siguiente forma:
• Mediante una pulsación corta en la tecla <Tecla de función abajo> la función puede activarse o
desactivarse.
Aviso: La función de monitor funciona independientemente del código QT o DQT ajustado.
4.11 Exploración de canales (Scan)
Con la exploración de canales se puede buscar canales activos. Si se encuentra un canal correspon-
diente, la exploración se detiene y se reproduce la comunicación. Si naliza la transmisión en el canal
encontrado, la exploración de canales se reanuda automáticamente.
Para iniciar la exploración de canales, proceda de la siguiente forma:
• Efectúe 1 x pulsación larga en la tecla <Tecla de función abajo>, y se iniciará la exploración
desde el canal 1 hasta el canal 16 (o del canal 1 al 32, según la conguración).
• Si durante la exploración se pulsa brevemente en la tecla <Tecla de función arriba> o <Tecla de
función abajo> , se invertirá el sentido de la exploración.
Aviso:
Si se pulsa el <Botón PTT>, mientras se escucha un canal encontrado, el transceptor volverá al
modo de espera en el canal actual.
4.12 Función de ahorro de energía
Si el transceptor no se utiliza durante más de 10 segundos, pasa automáticamente al modo de ahorro
de energía. Esto no afectará la recepción de transmisiones y el modo normal se reactivará automática-
mente en cuanto se detecte una señal.
Batería con plena carga
Batería con 2/3 de carga
Batería con 1/3 de carga
Batería sin carga

16
5. Resolución de problemas
Indicaciones para la localización de fallos
Problema Solución
El transceptor no se enciende.
• La batería está descargada. Cargue la
batería o reemplace las baterías.
• La batería no está insertada correctamente.
Retire la batería y vuelva a insertarla.
Cuando la batería se carga repetidas veces, su
rendimiento disminuye.
• La vida útil de la batería está agotada.
Reemplace la batería por una nueva.
No puede escuchar a los demás miembros del
grupo o no puede hablar con ellos.
• Asegúrese de estar utilizando el mismo
canal y los mismos ajustes QT/DQT que los
demás miembros del grupo.
• Los demás miembros del grupo están
demasiado lejos. Asegúrese de estar dentro
del alcance de los demás transceptores.
Otras estaciones de radio (excepto los
miembros del grupo) se pueden escuchar
en el canal.
• Modique los ajustes QT/DQT. Asegúrese
de que todos los miembros del grupo modi-
quen los ajustes de sus transceptores, para
que coincidan con los nuevos ajustes QT/DQT.
Aviso:
Si el problema persiste, póngase en contacto con el servicio técnico de KENWOOD.
6. Eliminación
Eliminación de equipos eléctricos y electrónicos usados y baterías.
El símbolo (contenedor de basura tachado) que aparece en el producto o en su embalaje indica que
este producto no debe tratarse como un residuo doméstico normal, sino que debe llevarse a un
punto de recogida para el reciclaje de aparatos eléctricos y electrónicos, y baterías. Si contribuye a
eliminar este producto correctamente, estará protegiendo el medio ambiente y la salud de los que lo
rodean. La eliminación inadecuada o incorrecta pone en peligro el medio ambiente y la salud. Para
más información sobre el reciclaje de este producto, póngase en contacto con su municipio o los
servicios municipales de eliminación de residuos.
La información sobre la eliminación de residuos en Turquía se encuentra en turco en la
página 18.

17
Gama de frecuencias 446,0 - 446,2 MHz (PMR446)
Canales 32
Subcódigos QT 38 + DQT 83
Potencia de radiofrecuencia ≤ 500mW ERP
Potencia máxima de transmisión máx. 26,59 dBm
Alcance hasta 6 km*
Temperatura de funcionamiento -20°C a +55°C
Tensión de funcionamiento 3,7 V
Clase de protección IP32
Tiempo de funcionamiento / Tiempo de carga máx. 18 h* / aprox. 3 h
Dimensiones (A x H x P) 52 x 157 x 28 mm
Peso con batería y clip para cinturón 138 g
* Puede variar según el terreno y las condiciones.
Batería de iones de litio
Tipo KNB-86L
Tensión 3,7 V
Capacidad 1150 mAh
Contenido energético 4,3 Wh
Número de la UN UN3481 Baterías de iones de litio contenidas/
embaladas en el equipo
Cargador
Fabricante del cargador
SHENZHEN MERRYKING ELECTROINCS CO., LTD.
801, Bldg B, No. 1, Tianyang 2nd Road, Oriental
Community, Songgang Street, Bao’an District,
Shenzhen 518105, Guangdong, CHINA
Marca e identicación de modelo del cargador MKC-0502000VEUT / MKC-0502000VUKT
Tensión de entrada Tensión alterna 100 - 240 V
Frecuencia de entrada de CA 50 / 60 Hz
Tensión / corriente / potencia de salida Tensión continua 5,0 V / 2,0 A / 10,0 W
Eciencia media en funcionamiento 81,1 %
Consumo de potencia en modo de espera 0,07 W
Reservado el derecho a modicaciones técnicas.
7. Datos técnicos UBZ-LJ9E

18
8. Garantía
Estimado cliente:
Muchas gracias por comprar este producto KENWOOD. En el caso
de que este producto presentara defectos en cuanto a materiales
o mano de obra en condiciones normales de funcionamiento, lo
repararemos o sustituiremos sin costo alguno de conformidad con
las condiciones de garantía aplicables.
Quedarán excluidas de la garantía las piezas consumibles o de
desgaste que deban ser sustituidas como parte del servicio normal
al cliente, como por ejemplo las baterías recargables.
Dirección de contacto:
JVCKENWOOD Europe B.V. Sucursal en España
Carretera de Rubí, 88 Planta 1A
08174 Sant Cugat del Vallès
(Barcelona) ESPAÑA
Tel. 34(93)507-5252, www.kenwood.es
Eliminación de residuos en Turquía:
Eski Elektrikli ve Elektronik Cihazların ve Pillerin İmhası Hakkında Bilgi (ayrı atık toplama sistemlerine
sahip olan ülkelerde geçerlidir).
Bu sembolü (üzeri çizili çöp bidonu) içeren ürün ve piller evsel atı k çöpleri ile birlikte atılamaz.
Kullanılmış elektrikli ve elektronik cihaz ve piller, bu tür maddeleri ve bunların yan ürünlerini iş
lemeye elverişli bir geri kazanım tesisine gönderilmelidir.
Size en yakın geri kazanım tesisinin konumunu öğrenmek üzere yerel yetkililerinize danışın.
Doğru geri kazanım ve atık uzaklaştırma y öntemleri, sadece öz kaynakların korunmasına
yardımcı olmakla kalmayıp ayrıca sağlığımıza ve çevreye olacak zararlı etkilerini engellemeye
yardımcı olur.
Bu ürün 28300 sayılı Resmi Gazete’de yayımlanan Atik Elektrikli ve Elektronik
Eşyalarin Kontrolü Yönetmeliğe uygun olarak üretilmiştir.

19
9. Valores SAR para la radio UBZ-LJ9E
Modelo SAR delantero SAR trasero
UBZ-LJ9E 0,4 W/kg 0,45 W/kg
Límites de RF para la radio UBZ-LJ9E
ATENCIÓN:
Antes de utilizar esta radio PMR446, lea estas sencillas instrucciones.
Esta radio PMR446 utiliza la radiofrecuencia electromagnética (RF) para permitir la comuni-
cación entre dos o más usuarios a distancia.
Utiliza energía de radiofrecuencia (RF) u ondas de radio para enviar y recibir llamadas.
La radio KENWOOD UBZ-LJ9E ha sido diseñada, fabricada y probada para cumplir con la
Recomendación 1999/519/CE de la UE sobre los límites de exposición a RF.
Estos límites proporcionan niveles de exposición recomendados para el público en general.
Para mantener la exposición a RF dentro de los límites aceptables, no transmita durante más
del 50% del tiempo total de uso de la radio.
Transmitir más del 50% del tiempo total de funcionamiento puede superar los límites
establecidos por los requisitos de exposición a RF de la FCC.
Para garantizar el cumplimiento de los límites, sostenga la radio verticalmente frente a su
cara con el micrófono y otras partes de la radio, incluida la antena, a un mínimo de 5 cm de
su nariz o labios.
Una mayor distancia entre su cara y la antena reducirá la exposición a las radiofrecuencias.

© 2022
Códigos QT
CT01/67.0 Hz CT14/107.2 Hz CT27/167.9 Hz CT02/71.9 Hz CT15/110.9 Hz
CT28/173.8 Hz CT03/74.4 Hz CT16/114.8 Hz CT29/179.9 Hz CT04/77.0 Hz
CT17/118.8 Hz CT30/186.2 Hz CT05/79.7 Hz CT18/123.0 Hz CT31/192.8 Hz
CT06/82.5 Hz CT19/127.3 Hz CT32/203.5 Hz CT07/85.4 Hz CT20/131.8 Hz
CT33/210.7 Hz CT08/88.5 Hz CT21/136.5 Hz CT34/218.1 Hz CT09/91.5 Hz
CT22/141.3 Hz CT35/225.7 Hz CT10/94.8 Hz CT23/146.2 Hz CT36/233.6 Hz
CT11/97.4 Hz CT24/151.4 Hz CT37/241.8 Hz CT12/100.0 Hz CT25/156.7 Hz
CT38/250.3 Hz CT13/103.5 Hz CT26/162.2 Hz
Códigos DQT
DT01/D023N DT29/D174N DT57/D445N DT02/D025N DT30/D205N
DT58/D464N DT03/D026N DT31/D223N DT59/D465N DT04/D031N
DT32/D226N DT60/D466N DT05/D032N DT33/D243N DT61/D503N
DT06/D043N DT34/D244N DT62/D506N DT07/D047N DT35/D245N
DT63/D516N DT08/D051N DT36/D251N DT64/D532N DT09/D054N
DT37/D261N DT65/D546N DT10/D065N DT38/D263N DT66/D565N
DT11/D071N DT39/D265N DT67/D606N DT12/D072N DT40/D271N
DT68/D612N DT13/D073N DT41/D306N DT69/D624N DT14/D074N
DT42/D311N DT70/D627N DT15/D114N DT43/D315N DT71/D631N
DT16/D115N DT44/D331N DT72/D632N DT17/D116N DT45/D343N
DT73/D654N DT18/D125N DT46/D346N DT74/D662N DT19/D131N
DT47/D351N DT75/D664N DT20/D132N DT48/D364N DT76/D703N
DT21/D134N DT49/D365N DT77/D712N DT22/D143N DT50/D371N
DT78/D723N DT23/D152N DT51/D411N DT79/D731N DT24/D155N
DT52/D412N DT80/D732N DT25/D156N DT53/D413N DT81/D734N
DT26/D162N DT54/D423N DT82/D743N DT27/D165N DT55/D431N
DT83/D754N DT28/D172N DT56/D432N

Émetteurs-récepteurs portatifs PMR446 FM
UBZ-LJ9SETE (Version UE)
UBZ-LJ9SETT (Version UK)
NOTICE D’EMPLOI
DEUTSCH FRANÇAIS ITALIANOENGLISH NEDERLANDS
ESPAÑOL

2
Sommaire
Sommaire Page
1. Consignes de sécurité
1.1 Mesures de précaution
1.2 Informations au sujet de l’accu
1.3 Déclaration de conformité
1.4 Adresse de contact de l´UE / au Royaume-Uni
2. Avant la mise en service
2.1 Déballage
2.2 Éléments et fonctions
2.3 Installer l’accu li-ions
2.4 Charger l'accu
2.5 Montage du clip ceinture
2.6 Utilisation d’un casque optionnel
3. Utilisation de l’émetteur-récepteur
3.1 Mise en marche et arrêt de l’appareil
3.2 Réglage du volume
3.3 Émission et réception
3.4 Fonction de réinitialisation complète
4. Réglage de l’émetteur-récepteur
4.1 Changement de canal
4.2 Silencieux (squelch)
4.3 Réglages de la tonalité QT et du code DQT
4.4 Émission à commande vocale Réglage de la fonction (VOX)
4.5 Tonalité d’appel
4.6 Tonalité des touches
4.7 Signal de fin de transmission
4.8 Feedback Tone
4.9 État de charge de l’accu
4.10 Fonction d'écran
4.11 Recherche de canaux (balayage)
4.12 Mode éco
5. Élimination des défaillances
6. Mise au rebut
7. Caractéristiques techniques
8. Garantie
9. Valeurs SAR
FRANÇAIS
3
3
4
5
5
6
6
6
7
8
8
9
10
10
10
10
10
11
12
12
12
13
14
14
14
14
15
15
15
15
16
16
17
18
19

3
Sommaire
Sommaire Page
1. Consignes de sécurité
1.1 Mesures de précaution
1.2 Informations au sujet de l’accu
1.3 Déclaration de conformité
1.4 Adresse de contact de l´UE / au Royaume-Uni
2. Avant la mise en service
2.1 Déballage
2.2 Éléments et fonctions
2.3 Installer l’accu li-ions
2.4 Charger l'accu
2.5 Montage du clip ceinture
2.6 Utilisation d’un casque optionnel
3. Utilisation de l’émetteur-récepteur
3.1 Mise en marche et arrêt de l’appareil
3.2 Réglage du volume
3.3 Émission et réception
3.4 Fonction de réinitialisation complète
4. Réglage de l’émetteur-récepteur
4.1 Changement de canal
4.2 Silencieux (squelch)
4.3 Réglages de la tonalité QT et du code DQT
4.4 Émission à commande vocale Réglage de la fonction (VOX)
4.5 Tonalité d’appel
4.6 Tonalité des touches
4.7 Signal de fin de transmission
4.8 Feedback Tone
4.9 État de charge de l’accu
4.10 Fonction d'écran
4.11 Recherche de canaux (balayage)
4.12 Mode éco
5. Élimination des défaillances
6. Mise au rebut
7. Caractéristiques techniques
8. Garantie
9. Valeurs SAR
1. Consignes de sécurité
CONSIGNES DE SÉCURITÉ IMPORTANTES
Attention: Lisez attentivement cette page afin d’assurer l’utilisation sûre de l’appareil !
Lire attentivement ces consignes!
•
Respectez toutes les consignes de sécurité et d’action lorsque vous mettez ce produit en service.
Conserver soigneusement ces consignes!
• Conservez les consignes de sécurité et d’action afin de pouvoir vous y reporter ultérieurement.
Respecter toutes les mises en garde!
• Respectez scrupuleusement toutes les mises en garde figurant sur le produit et dans la notice
d’emploi.
1.1 Mesures de précaution
• Ne chargez pas l’émetteur-récepteur et l’accu lorsqu’ils sont mouillés.
• Veillez à ce qu’aucun objet métallique ne vienne se placer entre l’émetteur-récepteur et l’accu.
• Utilisez exclusivement les accessoires recommandés par KENWOOD.
• Si un élément de l’émetteur-récepteur est endommagé, il convient de ne pas toucher cet élément.
Baissez le volume de l’émetteur-récepteur lorsque vous connectez un casque ou un micro-casque.
Tenez également compte du fait que la désactivation du silencieux (squelch) peut modifier le
volume.
• Ne posez pas le câble d’un micro avec clip et oreillettes/casque autour de votre cou lorsque vous
êtes à proximité d’une machine dont les éléments peuvent entraîner le câble.
• Ne posez pas l’émetteur-récepteur sur une surface instable. Si l’émetteur-récepteur s’allume
ou s’éteint suite à une chute ou de fortes vibrations, le volume et les configurations de canaux
peuvent avoir été réinitialisés.
• Veillez à ne pas vous blesser aux yeux avec l’extrémité de l’antenne.
• N’immergez pas l’émetteur-récepteur dans l’eau.
• Éteignez toujours l’émetteur-récepteur pour y connecter des accessoires.
• L’appareil est isolé du secteur en débranchant le chargeur. Veillez à ce que la fiche du chargeur
soit toujours facilement accessible.
• Lors de la mise au rebut des accus, il convient d’observer les dispositions légales applicables et les
réglementations locales en vigueur dans votre pays ou région.
• Si vous utilisez une bandoulière du commerce, veillez à ce qu’elle ne puisse pas s’accrocher aux
éléments des machines à proximité.
Avertissement!
Coupez l’émetteur-récepteur aux endroits suivants:
• dans les environnements explosibles (gaz inflammables, particules de poussières, poudres métal
liques, poussières de bois, etc.)
• lorsque vous faites le plein d’un véhicule ou dans les stations service.
• aux endroits présentant un risque d’explosion ou à proximité d’interventions à l’explosif.
• en avion. (L’utilisation éventuelle de l’émetteur-récepteur est soumise à la demande et aux
instructions du personnel de bord.)
• partout, où des panneaux, etc. exigent la désactivation des émetteurs-récepteur, notamment dans
les institutions médicales.
• à proximité de personnes équipées d’un stimulateur cardiaque.

4
Prudence!
• Ne modifiez pas l’émetteur-récepteur.
• Lorsque vous circulez en voiture, ne posez pas l’émetteur-récepteur sur ou à proximité d’un airbag.
Lorsque l’airbag se déclenche, l’émetteur-récepteur peut se transformer en projectile et blesser le
conducteur ou le passager.
• Ne touchez pas le connecteur d’antenne lors de l’émission, et n’émettez pas lorsque des surfaces
métalliques sont visibles au niveau du cache de l’antenne. Vous pourriez subir une brûlure haute
fréquence.
• Si l’émetteur-récepteur émet une odeur inhabituelle ou de la fumée, vous devez immédiatement
éteindre l’émetteur-récepteur, retirer l’accu et vous adresser à votre revendeur KENWOOD.
• L’utilisation de l’émetteur-récepteur en conduisant un véhicule peut être contraire au code de la
route. Consultez les réglementations de circulation applicables à votre région et observez-les.
• N’exposez pas l’émetteur-récepteur à des températures chaudes ou froides extrêmes.
• Ne portez pas l’accu avec des objets métalliques, puisque cela peut provoquer un court-circuit
entre les contacts de l’accu.
• Risque d’explosion en cas de remplacement erroné de l’accu ; ne remplacer l’accu que par un
modèle du même type.
• Si l’émetteur-récepteur est exposé à un environnement dans lequel l’air est très sec, des charges
électrostatiques peuvent s’accumuler facilement (électricité statique). Si vous utilisez des oreillettes
dans un tel environnement, vous pouvez subir une électrisation au niveau de l’oreille. N’utilisez
pas d’oreillettes / d’accessoires à microphone dans des zones présentant souvent de l’électricité
statique.
• Si vous installez une dragonne du commerce, assurez-vous auparavant de sa solidité. Ne balancez
jamais l’émetteur-récepteur au bout de la sangle. Vous pourriez toucher une autre personne avec
l’appareil et la blesser.
1.2 Informations au sujet de l’accu
L’accu contient des substances inflammables telles que par ex. des solvants organiques. En cas de
manipulation inadaptée, l’accu peut se rompre et prendre feu ou dégager une chaleur extrême,
subir une perte de performances ou développer d’autres dysfonctionnements. Observez surtout les
consignes au sujet des actions à omettre.
Danger!
Ne pas démonter ou réparer l’accu!
L’accu dispose d’une fonction de sécurité et d’un circuit de protection. S’ils sont défectueux ou
désactivés, l’accu peut développer de la chaleur et de la fumée, se rompre et prendre feu.
Ne pas court-circuiter l’accu!
Les pôles Plus (+) et Moins (–) ne doivent pas être reliés entre eux au moyen d’un objet métallique
(par ex. un trombone ou un bout de fil métallique). De ce fait, vous ne devez pas porter ou ranger
l’accu dans un récipient contenant aussi des objets métalliques (outils, bijoux métalliques, pinces
pour les cheveux, etc.). Un courant de grande intensité circule dans un accu court-circuité, et l’accu
peut dégager de la chaleur et de la fumée, se rompre et prendre feu. De plus, l’objet métallique
court-circuitant devient très chaud.
Ne pas jeter l’accu au feu, ni l’exposer à des températures élevées!
Si le corps isolant fond, le système de dégazage ou le dispositif de sécurité est endommagé ou l’élect-
rolyte s’enflamme. L’accu peut dégager de la chaleur et de la fumée, se rompre et prendre feu.
Ne pas utiliser ou stocker l’accu à proximité de flammes nues, de fours ou d’autres sources
de chaleur (endroits exposés à des températures supérieures à 60°C)!
Si la chaleur fait fondre le séparateur polymère, les différentes cellules peuvent développer un

5
court-circuit interne. L’accu peut alors dégager de la chaleur et de la fumée, se rompre et prendre feu.
Même si le séparateur n‘est pas endommagé, la batterie peut se gonfler, se déformer ou se fissurer.
N‘utilisez pas de tels accumulateurs.
Ne pas immerger l’accu dans l’eau ou l’exposer à l’humidité!
Si le circuit de protection de l’accu est défectueux, l’accu peut surcharger, ce qui peut conduire à
une réaction chimique inopinée. L’accu peut dégager de la chaleur et de la fumée, se rompre et
prendre feu.
Prudence!
Risque d’explosion en cas de remplacement de la pile par une pile d’un type inadapté ;
• de températures élevées ou basses extrêmes auxquelles une pile peut être exposée pendant
l’utilisation, le stockage ou le transport ;
• d’une pression atmosphérique faible à grande altitude ;
• du remplacement de la pile par un type inadapté, qui peut shunter une sécurité (par ex. certains
types de piles au lithium) ;
• la mise au feu ou dans un four chaud d’une pile, ou l’écrasement ou le sectionnement mécanique
d’une pile ;
• de l’exposition prolongée d’une pile à un environnement à températures très élevées, qui peuvent
conduire à l’explosion ou à la fuite de liquides ou gaz inflammables ; de l’exposition prolongée
d’une pile à une pression atmosphérique très faible, qui peut conduire à l’explosion ou à la fuite
de liquides ou gaz inflammables.
1.3 Déclaration de conformité
Par la présente, la société JVCKENWOOD Europe B.V. déclare que le type de dispositif radio
[KENWOOD] UBZ-LJ9E satisfait aux exigences de la directive 2014/53/UE. Le texte complet de la
déclaration de conformité UE est disponible via l’adresse Internet suivante :
https://www.kenwood.com/cs/com/ecdoc/
Fabricant :
JVCKENWOOD Corporation
3-12. Moriya-cho, Kanagawa-ku, Yokohama-shi, Kanagawa 221-0022, JAPAN
1.4 Adresse de contact de l´UE / au Royaume-Uni
Adresse de contact de l‘UE :
JVCKENWOOD Europe B.V.
Amsterdamseweg 37, 1422 AC Uithoorn, THE NETHERLANDS
Adresse de contact au Royaume-Uni :
JVCKENWOOD U.K. Limited
First Floor, Gleneagles, the Belfry, Colonial Way, Watford, Hertfordshire WD24 4WH,
UNITED KINGDOM

6
2. Avant la mise en service
2.1 Déballage
Déballez les appareils avec précaution et veillez à ce que tous les accessoires soient présents.
• Émetteur-récepteur UBZ-LJ9E x 2
• Accu li-ions KNB-86L x 2
• Clip de ceinture avec vis x 2
• Chargeur avec double port USB
• Câble de chargeur USB-C x 2
• La présente notice d’emploi
2.2 Éléments et fonctions
1 - Antenne 9 - Microphone
2 - Touche Push-to-Talk – PTT 10 - Voyant de fonction à LED
3 - Touche de fonction Haut 11 - Clip de ceinture
4 - Touche de fonction Bas 12 - Accu li-ions
5 - Marche / Arrêt / Volume 13 - Témoin de charge à LED
6 - RX / TX LED 14 - Port de charge USB-C
7 - Baffles 15 - Touche de déverrouillage d’accu
8 - Port casque/microphone

7
2.3 Installer l’accu li-ions
• Alignez les languettes du cache du compartiment d’accu sur les fentes dans l’émetteur-récepteur,
puis appuyez sur le cache et faites-le glisser vers le haut jusqu’à ce qu’il s’enclenche avec un
« clic ».
• Pour retirer l’accu, commencez par éteindre l’émetteur-récepteur, appuyez ensuite sur la touche
de verrouillage de l’accu tout en glissant l’accu de 5 mm vers l’arrière, puis retirez l’accu par le
haut.
Attention!
• Utilisez uniquement des accus d’origine.
• Ne court-circuitez pas les contacts de l’accu et ne l’exposez pas à des températures élevées ou des
flammes.
• Ne tentez pas d’ouvrir le boîtier de l’accu.
• N’installez pas l’accu dans un environnement dangereux, puisque la formation d’étincelles peut
occasionner une explosion.

8
2.5 Montage du clip ceinture
Alignez le clip de ceinture sur les points de fixation au dos de l’émetteur-récepteur, puis fixez-le à
l’aide des vis fournies. Utilisez un tournevis adapté à cet effet. Le retrait de l’accu facilite le montage.
2.4 Charger l'accu
Chargez entièrement l’accu avant de l’utiliser.
• Branchez le chargeur USB à une prise secteur et
branchez le câble de chargeur USB-C au port de
charge d’accu de l’émetteur-récepteur d’une
part, et au port USB du chargeur d’autre part.
Le chargeur permet de charger 2 accus simulta
nément. La batterie peut également être
chargée séparément sans la radio.
• Pendant le processus de charge, le témoin de
charge s’allume en rouge pour indiquer que
l’accu est en cours de chargement. Lorsque
l’accu est entièrement chargé, le voyant
s’allume en vert.
Attention!
• Utilisez uniquement le chargeur d’origine.
• Ne chargez l’accu qu’à l’intérieur d’un local.
• Lorsque la charge est terminée, débranchez
Le câble USB de l’accu et le chargeur de la fiche
secteur.

9
2.6 Utilisation d’un casque optionnel
Cet émetteur-récepteur permet le branchement de
casques avec micro équipés d’un connecteur jack
double Kenwood (2,5 / 3,5 mm). Vous trouverez
des informations au sujet des accessoires compa-
tibles sur le site Internet KENWOOD.
• Soulevez légèrement la languette en plastique
du cache supérieur et tournez-la avec précau-
tion de 90 degrés vers l’arrière, en procédant
dans le sens horaire.
• Insérez les connecteurs entièrement dans les
ports de jack. Si le connecteur jack n’est pas
correctement branché, des défauts de contact
peuvent se produire et occasionner des bruits.
Si le casque avec micro est équipé d’une touche
PTT, elle peut être utilisée à la place de celle de
l’appareil.
Attention!
Pour prévenir les lésions auditives, il convient de
réduire le volume de l’émetteur-récepteur avant
d’utiliser un casque avec micro.

10
3. Utilisation de l’émetteur-récepteur
3.1 Mise en marche et arrêt de l’appareil
Tournez le bouton de volume dans le sens horaire au-delà du point de résistance pour allumer l’émet-
teur-récepteur. Le voyant à LED s’allume intégralement, et l’état de charge de l’accu ainsi que le canal
radio actuel s’affichent brièvement. Ensuite, l’appareil commute en mode veille. Pour étendre l’émet-
teur-récepteur, tournez le bouton de volume dans l’autre sens jusqu’au-delà du point de résistance.
3.2 Réglage du volume
Tournez le bouton de volume dans le sens horaire pour augmenter le volume et dans le sens antiho-
raire pour diminuer le volume.
3.3 Émission et réception
Lorsqu’il est allumé, l’émetteur-récepteur est en mode « Réception » et peut recevoir des signaux
vocaux ou sonores sur le canal réglé. Pour envoyer un message, il suffit d’appuyer sur la touche
d’émission « PTT » et de parler dans le microphone. Appuyez sur la <Touche PTT> jusqu’à la fin de
la transmission. Ensuite, l’émetteur-récepteur recommute automatiquement en mode réception. Pour
une transmission vocale optimale, il convient de tenir le microphone à env. 2 ou 3 mm de la bouche.
Remarque: Les deux émetteurs-récepteurs doivent être réglés sur le même canal et le même code
QT/DQT. Lorsque vous relâchez la <Touche PTT>, un signal sonore (signal de fin de transmission)
retentit sur l’autre appareil (dès lors que cette fonction est activée) pour signaler la fin du processus
d’émission. Vous trouverez des informations à ce sujet sous «Réglage de l’émetteur-récepteur»
dans la présente notice d’emploi.
3.4 Fonction de réinitialisation complète
Pour réinitialiser la radio à l‘état d‘usine par défaut, veuillez suivre la procédure ci-dessous :
Appuyez simultanément sur les boutons <bouton de fonction haut> et <bouton de fonction
bas> et maintenez-les enfoncés pendant 3 secondes. Le voyant orange indique le début de la réinitia-
lisation complète. Après une réinitialisation réussie, „LJ9“ apparaît à l‘écran.

11
4. Réglage de l’émetteur-récepteur
Cet émetteur-récepteur dispose d’un menu de réglage pour procéder à des réglages tels que par ex.
le choix du canal ou du code QT/DQT. Ce menu fonctionne comme suit :
• Un actionnement prolongé de la touche <Touche de fonction Haut> ouvre le premier niveau de
menu. Tout actionnement prolongé supplémentaire ouvre le prochain menu secondaire.
• Le menu respectif permet de procéder au réglages en actionnant brièvement les touches <Touche
de fonction Haut> ou <Touche de fonction Bas>.
• Pour fermer le menu de réglage, il suffit d’actionner la <Touche PTT>. L’émetteur-récepteur
commute alors de nouveau en mode réception.
Remarque: Si aucune touche n’est actionnée pendant 10 secondes, le menu de réglage se ferme et
l’appareil recommute en mode réception.
Vue d’ensemble du menu de réglage:
Ni-
veau Fonction Réglages Afchage
0Mode de
réception
1Sélection
de canal CH01 - CH32
2Niveau de
silencieux SQ 0 - SQ 9
3QT/DQT-
Code
OFF,
CT01 - CT38,
DT01 - DT83
4 VOX V.of / 1 / 2 / 3
5Tonalité
d’appel CA01 - CA20
6Tonalité des
touches KTOF / KTOn
7
Signal de
n de trans-
mission
RBOF / RBOn
8Feedback
Tone FTOF / FTOn
9
État de
charge de
l’accu
3 / 2 / 1 / 0

12
4.1 Changement de canal
Pour passer à un autre canal, procédez comme suit :
• Appuyez 1 x de manière prolongée sur la <Touche de fonction Haut>. Le numéro du canal
actuel clignote à l’écran.
• L’actionnement bref des <Touche de fonction Haut> ou <Touche de fonction Bas> permet de
régler le canal souhaité.
• Pour fermer le menu de réglage, il suffit d’actionner la <Touche PTT>. L’émetteur-récepteur
commute alors de nouveau en mode réception.
Attention : les canaux 1 à 16 sont disponibles par défaut. Les canaux 17 à 32 doivent être activés
par l‘utilisateur. Les canaux 17 à 32 ne peuvent être utilisés que dans les pays où ces fréquences sont
autorisées par les autorités.
Pour activer les canaux 17 à 32, veuillez procéder comme suit :
• Maintenez la touche <Touche PTT> et la <Touche de fonction Bas> enfoncées et allumez la
radio. Relâchez les deux touches après 3 secondes, 32 canaux sont maintenant activés.
Pour désactiver les canaux 17 à 32, veuillez procéder comme suit :
• Maintenez <Touche de fonction Haut> & <Touche de fonction Bas> enfoncés et allumez la
radio. Relâchez les deux touches après 3 secondes. La radio effectue une réinitialisation complète et
se trouve alors en mode 16 canaux.
4.2 Silencieux (squelch)
Le réglage du niveau de silencieux vous permet de définir jusqu’à quelle intensité du signal de récepti-
on l’émetteur-récepteur reste muet. Cela signifie que plus le réglage du niveau est élevé, plus le signal
de réception doit être puissant afin d’être audible. Vous pouvez régler le niveau entre « 0 » et « 9 »,
le réglage standard étant de « 3 ». Procéder comme suit pour modifier les réglages :
• Appuyez 2 x de manière prolongée sur la <Touche de fonction Haut>. Le réglage actuel
clignote à l’écran.
• L’actionnement bref des <Touche de fonction Haut> ou <Touche de fonction Bas> permet de
régler la valeur souhaitée (0 - 9).
• Pour fermer le menu de réglage, il suffit d’actionner la <Touche PTT>. L’émetteur-récepteur
commute alors de nouveau en mode réception.
4.3
Réglages de la tonalité QT et du code DQT
Les fonctions QT et DQT rejettent les signaux indésirables de votre canal. Vous n’entendez un appel
que si vous recevez un signal contenant une tonalité QT ou un code DQT approprié. Si vous recevez
un appel avec une autre tonalité ou un autre code, la fonction de silencieux reste active et vous
n’entendez pas cet appel. De plus, la tonalité ou le code de la station de réception doit correspondre
également afin de pouvoir entendre votre appel si vous émettez avec QT ou DQT.
Veuillez noter que les tiers pourront toujours entendre vos appels s’ils règlent leur émetteur-récepteur
à la même tonalité ou au même code. Procéder comme suit pour modifier les réglages :
• Appuyez 3 x de manière prolongée sur la <Touche de fonction Haut>. Le réglage actuel
clignote à l’écran.
• L’actionnement bref des <Touche de fonction Haut> ou <Touche de fonction Bas> permet de
régler le code QT ou DQT souhaité.
• Pour fermer le menu de réglage, il suffit d’actionner la <Touche PTT>. L’émetteur-récepteur
commute alors de nouveau en mode réception.

13
Les paramètres standard QT/DQT KENWOOD de chaque canal sont indiqués dans le tableau
ci-dessous. Vous trouverez une liste complète à la page 20 de ce mode d‘emploi.
Ca. Fréqu. (MHz) QT/DQT Ca. Fréqu. (MHz) QT/DQT
1 446.00625 CT10 / 94.8 Hz 17* 446.10625 CT10 / 94.8 Hz
2 446.09375 CT08 / 88.5 Hz 18* 446.19375 CT08 / 88.5 Hz
3 446.03125 CT13 / 103.5 Hz 19* 446.13125 CT13 / 103.5 Hz
4 446.06875 CT05 / 79.7 Hz 20* 446.16875 CT05 / 79.7 Hz
5 446.04375 CT17 / 118.8 Hz 21* 446.14375 CT17 / 118.8 Hz
6 446.01875 CT18 / 123.0 Hz 22* 446.11875 CT18 / 123.0 Hz
7 446.08125 CT19 / 127.3 Hz 23* 446.18125 CT19 / 127.3 Hz
8 446.05625 CT07 / 85.4 Hz 24* 446.15625 CT07 / 85.4 Hz
9 446.00625 CT14 / 107.2 Hz 25* 446.10625 CT14 / 107.2 Hz
10 446.09375 CT15 / 110.9 Hz 26* 446.19375 CT15 / 110.9 Hz
11 446.03125 CT16 / 114.8 Hz 27* 446.13125 CT16 / 114.8 Hz
12 446.06875 CT06 / 82.5 Hz 28* 446.16875 CT06 / 82.5 Hz
13 446.04375 DT20 / D132N 29* 446.14375 DT20 / D132N
14 446.01875 DT24 / D155N 30* 446.11875 DT24 / D155N
15 446.05625 DT21 / D134N 31* 446.15625 DT21 / D134N
16 446.08125 DT33 / D243N 32* 446.18125 DT33 / D243N
*Les canaux 1 à 16 sont disponibles par défaut. Les canaux 17 à 32 doivent être activés par l‘utilisa-
teur. Les canaux 17 à 32 ne peuvent être utilisés que dans les pays où ces fréquences sont autorisées
par les autorités.
4.4 Émission à commande vocale Réglage de la fonction (VOX)
L’émetteur-récepteur est en mesure d’émettre sur commande vocale (VOX). En mode VOX, l’émet-
teur-récepteur émet un signal lorsqu’il est activé par votre voix ou par d’autres bruits à proximité. La
sensibilité est réglable selon 3 niveaux (1/2/3), le niveau 3 étant le plus sensible.
Procéder comme suit pour modifier les réglages :
• Appuyez 4 x de manière prolongée sur la <Touche de fonction Haut>. Le réglage actuel
clignote à l’écran.
• L’actionnement bref des <Touche de fonction Haut> ou <Touche de fonction Bas> permet de
régler la valeur souhaitée (V.OF - V.3).
• Pour fermer le menu de réglage, il suffit d’actionner la <Touche PTT>. L’émetteur-récepteur
commute alors de nouveau en mode réception.

14
Remarque: L’actionnement de la <Touche PTT> désactive le mode VOX. Nous recommandons de
ne pas activer cette fonction dans les environnements bruyants ou venteux.
4.5 Tonalité d’appel
Les tonalités d’appel permettent de s’identifier vis-à-vis des autres usagers et de les informer de votre
appel. À cet effet, 20 tonalités différentes sont disponibles (CA01 - CA20).
Si chaque usager utilise une autre tonalité, l’appelant est facile à identifier. La tonalité d’appel est
déclenchée en appuyant sur le bouton <Touche PTT> et en le maintenant enfoncé, puis en appuyant
également brièvement sur le bouton <Touche de fonction haut>.
Procéder comme suit pour modifier les réglages :
• Appuyez 5 x de manière prolongée sur la <Touche de fonction Haut>. Le réglage actuel
clignote à l’écran.
• L’actionnement bref des <Touche de fonction Haut> ou <Touche de fonction Bas> permet de
régler la valeur souhaitée (CA01 - CA20).
• Pour fermer le menu de réglage, il suffit d’actionner la <Touche PTT>. L’émetteur-récepteur
commute alors de nouveau en mode réception.
4.6 Tonalité des touches Marche/Arrêt
Si la tonalité des touches est activée, l’émetteur-récepteur émet un signal sonore à chaque actionne-
ment d’une touche. Vous pouvez activer ou désactiver la tonalité des touches (KTOF/KTON). Procéder
comme suit pour modifier les réglages :
• Appuyez 6 x de manière prolongée sur la <Touche de fonction Haut>. Le réglage actuel
clignote à l’écran.
• L’actionnement bref des <Touche de fonction Haut> ou <Touche de fonction Bas> permet de
régler la valeur souhaitée (KTOF / KTOn).
• Pour fermer le menu de réglage, il suffit d’actionner la <Touche PTT>. L’émetteur-récepteur
commute alors de nouveau en mode réception.
4.7 Signal de n de transmission Marche/Arrêt
Le signal de fin de transmission est un signal sonore généré par l’émetteur-récepteur et transmis au-
tomatiquement à la fin de chaque processus d’émission. Il signale au récepteur que vous avez terminé
votre appel. Vous pouvez activer ou désactiver le signal de fin de transmission (RBOF/RBOn). Procéder
comme suit pour modifier les réglages :
• Appuyez 7 x de manière prolongée sur la <Touche de fonction Haut>. Le réglage actuel
clignote à l’écran.
• L’actionnement bref des <Touche de fonction Haut> ou <Touche de fonction Bas> permet de
régler la valeur souhaitée (RBOF/RBOn).
• Pour fermer le menu de réglage, il suffit d’actionner la <Touche PTT>. L’émetteur-récepteur
commute alors de nouveau en mode réception.
4.8 Feedback Tone Marche/Arrêt
La tonalité de feedback est une tonalité générée par la radio, qui permet à l’expéditeur d’une sonnerie
(voir point 4.5) de savoir sur son propre appareil que la sonnerie peut être entendue à la station
distante, en émettant la même tonalité simultanément sur son propre appareil. Vous pouvez activer
ou désactiver la tonalité de retour (FTOn / FTOF). Procéder comme suit pour modifier les réglages :
• Appuyez 8 x de manière prolongée sur la <Touche de fonction Haut>. Le réglage actuel
clignote à l’écran.
• L’actionnement bref des <Touche de fonction Haut> ou <Touche de fonction Bas> permet de
régler la valeur souhaitée (FTOn / FTOF).
• Pour fermer le menu de réglage, il suffit d’actionner la <Touche PTT>. L’émetteur-récepteur
commute alors de nouveau en mode réception.

15
4.9 État de charge de l’accu
L’état de charge de l’accu est indiqué par des symboles de barres. De plus, lorsque l’état de charge de
l’accu est faible, un signal sonore retentit et le témoin de charge clignote en rouge.
Procéder comme suit pour afficher l’état de charge de l’accu :
• Appuyez 9 x de manière prolongée sur la <Touche de fonction Haut>. L’état de charge actuel
s’affiche à l’écran.
• Pour fermer le menu de réglage, il suffit d’actionner la <Touche PTT>. L’émetteur-récepteur
commute alors de nouveau en mode réception.
4.10 Fonction d'écran
La fonction de surveillance peut servir à recevoir des signaux plus faibles sur le canal actuel. Procédez
comme suit pour activer la surveillance :
• L’actionnement bref de la <Touche de fonction Bas> permet d’activer ou de désactiver la
fonction.
Remarque: La fonction de surveillance est indépendante du code QT ou DQT réglé.
4.11 Recherche de canaux (balayage)
La recherche automatique de canaux vous permet de rechercher des canaux actifs. Si l’appareil trouve
un canal approprié, la recherche est interrompue et la communication est transmise. Lorsque la trans-
mission sur le canal trouvé est terminée, la recherche de canaux se poursuit automatiquement.
Procéder comme suit pour lancer la recherche automatiquement de canaux. :
• Appuyez 1 x de manière prolongée sur la <Touche de fonction Bas>, pour lancer la recherche
automatique des canaux 1 à 16 ((ou canal 1 à 32, selon le réglage).
• Si vous appuyez brièvement sur les <Touche de fonction Haut> ou <Touche de fonction Bas>
pendant la recherche automatique de canaux, le sens de recherche est inversé.
Remarque:
Si vous appuyez sur la <Touche PTT> pendant l’écoute d’un canal trouvé, l’émet-
teur-récepteur recommute vers le canal actuel et reprend le mode veille.
4.12 Mode éco
Si l’émetteur-récepteur n’est pas utilisé pendant plus de 10 secondes, il commute automatiquement
en mode basse consommation. Cela n’influence pas la réception des transmissions, et le mode normal
est réactivé automatiquement dès qu’un signal est détecté.
Accu chargé intégralement
Accu chargé au 2/3
Accu chargé au 1/3
Accu épuisé

16
5. Élimination des défaillances
Remarques concernant la recherche de défaillances
Problème Solution
L’émetteur-récepteur ne s’allume pas.
• L’accu est épuisé. Chargez l’accu ou
remplacez-le.
• L’accu n’est pas correctement inséré.
Retirez l’accu et insérez-le de nouveau.
Suite aux charges répétées, les performances
de l’accu diminuent.
• La durée de vie de l’accu est arrivée à
son terme. Remplacez l’accu usagé par un
accu neuf.
Vous n’entendez pas les autres membres du
groupe ou ne pouvez pas leur parler.
• Assurez-vous que vous utilisez le même
canal et les mêmes réglages QT/DQT que les
autres membres du groupe.
• Les autres membres du groupe sont hors
de portée. Assurez-vous d’être à portée des
autres émetteurs-récepteurs.
D’autres usagers de transmissions radio
(n’appartenant pas au groupe) sont audibles
sur le canal.
• Modifiez les réglages QT/DQT. Assurez-vous
que tous les membres de votre groupe mo-
difient les réglages de leurs émetteurs-récep-
teurs, afin qu’ils correspondent aux nouveaux
réglages QT/DQT.
Remarque:
Si le problème persiste, veuillez-vous adresser au service KENWOOD.
6. Mise au rebut
Mise au rebut d’appareils électriques et électroniques usagés et de piles.
Le symbole (poubelle barrée) sur le produit ou son emballage indique que ce produit ne doit pas être
jeté aux ordures ménagères, mais doit être remis à un point de collecte pour le recyclage d’appareils
électriques et électroniques et de piles. Par votre contribution à l’élimination correcte de ce produit,
vous protégez l’environnement et la santé de vos concitoyens. Une mise au rebut non conforme ou
erronée occasionne des risques pour l’environnement et la santé. Vous pouvez obtenir des informa-
tions plus détaillées au sujet du recyclage de ce produit auprès de votre commune ou des entreprises
de traitement de déchets communaux.
Vous trouverez des informations en turc sur l‘élimination des déchets en Turquie à la page 18.

17
Plage de fréquences 446,0 - 446,2 MHz (PMR446)
Canaux 32
Codes secondaires QT 38 + DQT 83
Puissance radiofréquence ≤ 500mW ERP
Puissance émettrice maximale max. 26,59 dBm
Portée jusqu’à 6 km*
Température de service -20°C à 55°C
Tension de service 3,7 V
Type de protection IP32
Durée de service / durée de charge max. 18 heures * / approx. 3 heures
Dimensions (l x h x p) 52 x 157 x 28 mm
Poids avec accu et clip de ceinture 138 g
* Peut varier en fonction du terrain et des conditions.
Accu li-ions
Type KNB-86L
Tension 3,7 V
Capacité 1150 mAh
Contenu énergétique 4,3 Wh
Numéro UN UN3481 Piles au lithium-ion dans / emballées
avec l’équipement
Chargeur
Marque et identifiant du modèle du bloc
d’alimentation
SHENZHEN MERRYKING ELECTROINCS CO., LTD.
801, Bldg B, No. 1, Tianyang 2nd Road, Oriental
Community, Songgang Street, Bao’an District,
Shenzhen 518105, Guangdong, CHINA
Marque et identifiant du modèle du chargeur MKC-0502000VEUT / MKC-0502000VUKT
Tension d’alimentation Tension alternative 100- 240 V
Fréquence d’entrée AC 50 / 60 Hz
Tension / intensité / puissance de sortie Tension continue 5,0 V/ 2,0 A / 10,0 W
Rendement moyen en mode actif 81,1 %
Consommation d’électricité en mode de veille 0,07 W
Sous réserve de modications techniques.
7. Caractéristiques techniques – UBZ-LJ9E

18
8. Garantie
Cher client,
Merci d‘avoir acheté ce produit KENWOOD. Si ce produit présente un
défaut de matériaux ou de fabrication dans des conditions normales
d‘utilisation, nous le réparerons ou le remplacerons gratuitement, con-
formément aux conditions de garantie applicables.
Sont exclues du service de garantie les pièces consommables ou d‘usu-
re qui doivent être remplacées dans le cadre d‘un service normal, telles
que les piles rechargeables.
Adresse:
JVCKENWOOD EUROPE B.V. Succursale France
7 Allee des Barbanniers,
92632 Gennevilliers CEDEX
Tel. 09-69-390-811 www.kenwood-electronics.fr
Élimination des déchets en Turquie :
Eski Elektrikli ve Elektronik Cihazların ve Pillerin İmhası Hakkında Bilgi (ayrı atık toplama sistemlerine
sahip olan ülkelerde geçerlidir).
Bu sembolü (üzeri çizili çöp bidonu) içeren ürün ve piller evsel atı k çöpleri ile birlikte atılamaz.
Kullanılmış elektrikli ve elektronik cihaz ve piller, bu tür maddeleri ve bunların yan ürünlerini iş
lemeye elverişli bir geri kazanım tesisine gönderilmelidir.
Size en yakın geri kazanım tesisinin konumunu öğrenmek üzere yerel yetkililerinize danışın.
Doğru geri kazanım ve atık uzaklaştırma y öntemleri, sadece öz kaynakların korunmasına
yardımcı olmakla kalmayıp ayrıca sağlığımıza ve çevreye olacak zararlı etkilerini engellemeye
yardımcı olur.
Bu ürün 28300 sayılı Resmi Gazete’de yayımlanan Atik Elektrikli ve Elektronik
Eşyalarin Kontrolü Yönetmeliğe uygun olarak üretilmiştir.

19
9. Valeurs SAR pour la radio UBZ-LJ9E
Modèle SAR tête SAR tronc
UBZ-LJ9E 0,4 W/kg 0,45 W/kg
Limites RF pour la radio UBZ-LJ9E
ATTENTION:
Avant d‘utiliser cette radio PMR446, lisez ces instructions simples.
Cette radio PMR446 utilise la radiofréquence électromagnétique (RF) pour permettre la
communication à distance entre deux ou plusieurs utilisateurs.
Il utilise l‘énergie de la radiofréquence (RF) ou les ondes radio pour envoyer et recevoir des
appels.
L’équipement est conforme aux limites d’exposition aux rayonnements de la directive
2014 / 53 / UE pour les environnements non contrôlés. L‘utilisateur final doit se conformer à
des instructions d‘exploitation spécifiques afin de respecter la conformité à l‘exposition aux
radiofréquences. L‘émetteur ne doit pas être au même endroit ni fonctionner avec une autre
antenne ou un autre émetteur.
Les appareils portables sont conçus pour répondre aux exigences d‘exposition aux ondes
radio fixées par le marché de l‘Union européenne (France). Ces exigences fixent une limite
moyenne de R - S de 2 W / kg sur 10 g de tissu.
Lors de la certification du produit, la valeur SAR maximale déclarée conformément à la
présente norme est de 0,40 W / kg lorsqu‘elle est utilisée à l‘avant.
Lors de la certification du produit, la valeur SAR maximale déclarée conformément à la
présente norme est de 0,45 W / kg lorsque l‘arrière de la attelle est utilisé.

© 2022
Codes QT
CT01/67.0 Hz CT14/107.2 Hz CT27/167.9 Hz CT02/71.9 Hz CT15/110.9 Hz
CT28/173.8 Hz CT03/74.4 Hz CT16/114.8 Hz CT29/179.9 Hz CT04/77.0 Hz
CT17/118.8 Hz CT30/186.2 Hz CT05/79.7 Hz CT18/123.0 Hz CT31/192.8 Hz
CT06/82.5 Hz CT19/127.3 Hz CT32/203.5 Hz CT07/85.4 Hz CT20/131.8 Hz
CT33/210.7 Hz CT08/88.5 Hz CT21/136.5 Hz CT34/218.1 Hz CT09/91.5 Hz
CT22/141.3 Hz CT35/225.7 Hz CT10/94.8 Hz CT23/146.2 Hz CT36/233.6 Hz
CT11/97.4 Hz CT24/151.4 Hz CT37/241.8 Hz CT12/100.0 Hz CT25/156.7 Hz
CT38/250.3 Hz CT13/103.5 Hz CT26/162.2 Hz
Codes DQT
DT01/D023N DT29/D174N DT57/D445N DT02/D025N DT30/D205N
DT58/D464N DT03/D026N DT31/D223N DT59/D465N DT04/D031N
DT32/D226N DT60/D466N DT05/D032N DT33/D243N DT61/D503N
DT06/D043N DT34/D244N DT62/D506N DT07/D047N DT35/D245N
DT63/D516N DT08/D051N DT36/D251N DT64/D532N DT09/D054N
DT37/D261N DT65/D546N DT10/D065N DT38/D263N DT66/D565N
DT11/D071N DT39/D265N DT67/D606N DT12/D072N DT40/D271N
DT68/D612N DT13/D073N DT41/D306N DT69/D624N DT14/D074N
DT42/D311N DT70/D627N DT15/D114N DT43/D315N DT71/D631N
DT16/D115N DT44/D331N DT72/D632N DT17/D116N DT45/D343N
DT73/D654N DT18/D125N DT46/D346N DT74/D662N DT19/D131N
DT47/D351N DT75/D664N DT20/D132N DT48/D364N DT76/D703N
DT21/D134N DT49/D365N DT77/D712N DT22/D143N DT50/D371N
DT78/D723N DT23/D152N DT51/D411N DT79/D731N DT24/D155N
DT52/D412N DT80/D732N DT25/D156N DT53/D413N DT81/D734N
DT26/D162N DT54/D423N DT82/D743N DT27/D165N DT55/D431N
DT83/D754N DT28/D172N DT56/D432N

Radio portatili PMR446 FM
UBZ-LJ9SETE (Versione UE)
UBZ-LJ9SETT (Versione RU)
MANUALE OPERATIVO
DEUTSCH FRANÇAIS ITALIANOENGLISH NEDERLANDS
ESPAÑOL

2
ITALIANO
Indice
Contenuto Pagina
1. Indicazioni di sicurezza
1.1 Regole precauzionali
1.2 Informazioni sulla batteria
1.3 Dichiarazione di conformità
1.4 Indirizzo di contatto UE / UK
2. Prima della messa in servizio
2.1 Sconfezionamento
2.2 Componenti e funzioni
2.3 Installare la batteria agli ioni di litio
2.4 Caricamento batteria
2.5 Montaggio della clip da cintura
2.6 Utilizzo di una cuffia opzionale
3. Uso della radio
3.1 Accensione e spegnimento del dispositivo
3.2 Regolazione del volume
3.3 Invio e ricezione
3.4 Funzione di reset completo
4. Impostazione della radio
4.1 Cambiare canale
4.2 Blocco antirumore (Squelch)
4.3 Impostazioni del tono QT e del codice DQT
4.4 Trasmissione vocale Impostare (VOX)
4.5 Tono di chiamata
4.6 Tono dei tasti
4.7 Beep di conferma
4.8 Feedback Tone
4.9 Livello di carica della batteria
4.10 Funzione di monitoraggio
4.11 Ricerca di canali (Scansione)
4.12 Funzione di risparmio energetico
5. Eliminazione errori
6. Smaltimento
7. Dati tecnici
8. Garanzia
9. Valori SAR
3
3
4
5
5
6
6
6
7
8
8
9
10
10
10
10
10
11
12
12
12
13
14
14
14
14
15
15
15
15
16
16
17
18
19

3
1. Indicazioni di sicurezza
IMPORTANTI ISTRUZIONI DI SICUREZZA
Attenzione: Leggere attentamente questa pagina per garantire un funzionamento sicuro dell'unità.
Leggere attentamente queste istruzioni!
•
Seguire tutte le istruzioni di sicurezza e d'uso durante l'utilizzo di questo prodotto.
Conservare le note in un luogo sicuro!
• Conservare le istruzioni di sicurezza e d'uso per future consultazioni.
Osservare tutte le indicazioni di avvertenza!
• Seguire scrupolosamente tutte le avvertenze riportate sul prodotto e nelle istruzioni per l'uso.
1.1 Regole precauzionali
• Non caricare la radio e la batteria quando sono bagnate.
• Assicuratevi che nessun oggetto metallico si metta tra la radio e la batteria.
• Utilizzare solo gli accessori raccomandati da KENWOOD.
• Se una qualsiasi parte della radio è danneggiata, non toccare le parti danneggiate.
Quando si collegano le cuffie o un auricolare, ridurre il volume della radio. Notate anche che
quando il soppressore di rumori (squelch) è disattivato, il volume può cambiare.
• Non mettere il cavo di un microfono a clip con l'auricolare/supporto intorno al collo mentre si è
vicino a macchinari in cui il cavo potrebbe impigliarsi.
•
P
osizionare la radio su una superficie piana e non instabile. Se la radio si accende/spegne a causa
di una caduta o di un forte urto, le configurazioni del volume e dei canali possono essere ripristinate.
• Fate attenzione a non ferirvi l'occhio con l'estremità dell'antenna.
• Non immergere la radio in acqua.
• Spegnere sempre la radio quando si collegano gli accessori.
• Il dispositivo è scollegato dalla rete al caricatore. Assicurarsi che la spina del caricatore sia
facilmente accessibile.
• Quando si smaltiscono le batterie, rispettare le leggi e i regolamenti locali applicabili nel proprio
paese o regione.
• Quando si usa una tracolla disponibile in commercio, fare attenzione a non far impigliare la
tracolla in parti della macchina vicine.
Avvertenza!
Spegnere la radio in questi luoghi:
•
In atmosfera esplosiva (gas infiammabile, particelle di polvere, polvere di metallo, polvere di legno, ecc.).
• Quando si fa rifornimento e ci si ferma nelle stazioni di servizio.
• In luoghi dove c'è un rischio di esplosione o dove si svolgono operazioni di sabbiatura.
• Sull'aereo. (Qualsiasi uso della radio deve essere solo su ordine e sotto la direzione dell'equipaggio)
• Ovunque ci siano obblighi, ecc., che chiedono di spegnere le radio, comprese le strutture mediche.
• In prossimità di persone con pacemaker.
Indice
Contenuto Pagina
1. Indicazioni di sicurezza
1.1 Regole precauzionali
1.2 Informazioni sulla batteria
1.3 Dichiarazione di conformità
1.4 Indirizzo di contatto UE / UK
2. Prima della messa in servizio
2.1 Sconfezionamento
2.2 Componenti e funzioni
2.3 Installare la batteria agli ioni di litio
2.4 Caricamento batteria
2.5 Montaggio della clip da cintura
2.6 Utilizzo di una cuffia opzionale
3. Uso della radio
3.1 Accensione e spegnimento del dispositivo
3.2 Regolazione del volume
3.3 Invio e ricezione
3.4 Funzione di reset completo
4. Impostazione della radio
4.1 Cambiare canale
4.2 Blocco antirumore (Squelch)
4.3 Impostazioni del tono QT e del codice DQT
4.4 Trasmissione vocale Impostare (VOX)
4.5 Tono di chiamata
4.6 Tono dei tasti
4.7 Beep di conferma
4.8 Feedback Tone
4.9 Livello di carica della batteria
4.10 Funzione di monitoraggio
4.11 Ricerca di canali (Scansione)
4.12 Funzione di risparmio energetico
5. Eliminazione errori
6. Smaltimento
7. Dati tecnici
8. Garanzia
9. Valori SAR

4
Prudenza!
• Non modificare la radio.
• Non mettere la radio sopra o vicino agli airbag durante la guida. Se l'airbag si apre, la radio può
diventare un proiettile e colpire il conducente o il passeggero.
• Non toccare il connettore dell'antenna durante la trasmissione e non trasmettere se il metallo
è esposto sul coperchio dell'antenna. Si corre il rischio di ottenere un danno a causa dell’alta
frequenza.
• Se la radio emette un odore insolito o fumo, spegnere immediatamente la radio, rimuovere la
batteria e contattare il rivenditore KENWOOD.
• L'uso della radio durante la guida può essere contrario al codice della strada. Controlla e osserva le
regole del traffico nella tua zona.
• Non esporre la radio a calore o freddo estremi.
• Non trasportare la batteria con oggetti metallici, poiché ciò potrebbe causare un cortocircuito dei
contatti della batteria.
• Rischio di esplosione se la batteria viene sostituita in modo errato; sostituire solo con batterie dello
stesso tipo.
• Se la radio viene usata in aree con aria ambiente secca, le cariche elettriche possono facilmente
accumularsi (elettricità statica). Se un auricolare viene usato come accessorio in tali condizioni, c'è
la possibilità che una scossa elettrica possa essere trasmessa dalla radio all'orecchio attraverso di
esso. Non utilizzare accessori per cuffie/microfoni in aree in cui si genera facilmente elettricità
statica.
• Quando si collega un altro supporto ad anello, controllare che sia resistente. Non fate mai oscillare
la radio avanti e indietro sulla cintura; potreste accidentalmente colpire un'altra persona con la
radio e ferirla.
1.2 Informazioni sulla batteria
La batteria contiene sostanze infiammabili come il solvente organico. Se maneggiata male, la batteria
può scoppiare e prendere fuoco o rilasciare calore estremo, degradare le prestazioni o sviluppare altri
danni. Si prega di prestare particolare attenzione a queste istruzioni, quale trattamento è vietato.
Pericolo!
Non smontare o riparare la batteria!
La batteria ha una funzione di sicurezza e un circuito di protezione. Se questi sono difettosi o non
rispettati, la batteria può generare calore e fumo, scoppiare e prendere fuoco.
Non cortocircuitare la batteria!
Non collegare i terminali positivo (+) e negativo (-) con un oggetto metallico (come una graffetta o un
pezzo di filo). Pertanto, non trasportare o conservare la batteria in contenitori con oggetti metallici
(utensili, gioielli in metallo, fermagli per capelli, ecc.) Una corrente elevata scorre in una batteria in
corto circuito e la batteria può generare calore e fumo, scoppiare e prendere fuoco. Anche l'oggetto
metallico a contatto diventa caldo.
Non bruciare la batteria o esporla ad alte temperature!
Se l'isolante si fonde, lo sfiato del gas o il dispositivo di sicurezza saranno danneggiati o l'elettrolita si
infiammerà. La batteria può generare calore e fumo, scoppiare e prendere fuoco.
Non utilizzare o conservare la batteria vicino a fiamme libere, forni o altre fonti di calore
(luoghi in cui le temperature superano i 60°C)!
Se il calore provoca la fusione del separatore polimerico, le singole celle possono sviluppare un corto
circuito interno e la batteria può generare calore e fumo, scoppiare e prendere fuoco. Anche se il
separatore non è danneggiato, la batteria può gonfiarsi, deformarsi o incrinarsi. Non utilizzare tali
batterie.

5
Non immergere la batteria in acqua o permettere che si bagni in altro modo!
Se il circuito di protezione della batteria è difettoso, la batteria può essere sovraccaricata e può
verificarsi una reazione chimica imprevista. La batteria può generare calore e fumo, scoppiare e
prendere fuoco.
Prudenza!
Pericolo di esplosione se la batteria viene sostituita con una di tipo non corretto;
• Alte o basse temperature estreme alle quali una batteria può essere esposta durante l'uso, lo
stoccaggio o il trasporto;
• Bassa pressione dell'aria ad alte quote;
• Sostituzione di una batteria con una batteria di tipo errato che può bypassare un fusibile (ad
esempio, alcuni tipi di batterie al litio);
• Lo smaltimento di una batteria nel fuoco o in una stufa calda, o lo schiacciamento meccanico o il
taglio di una batteria;
• Il lasciare una batteria in un ambiente con temperature estremamente elevate che possono causare
un'esplosione o una perdita di liquidi o gas infiammabili; il lasciare una batteria esposta a una
pressione atmosferica estremamente bassa che può causare un'esplosione o una perdita di liquidi o
gas infiammabili.
1.3 Dichiarazione di conformità
JVCKENWOOD Europe B.V. dichiara che l'apparecchiatura radio tipo [KENWOOD] UBZ-LJ9E è con-
forme alla Direttiva 2014/53/UE. Il testo integrale della dichiarazione di conformità UE è disponibile al
seguente indirizzo Internet: https://www.kenwood.com/cs/com/ecdoc/
Produttore:
JVCKENWOOD Corporation
3-12. Moriya-cho, Kanagawa-ku, Yokohama-shi, Kanagawa 221-0022, JAPAN
1.4 Indirizzo di contatto UE / UK
Indirizzo di contatto UE:
JVCKENWOOD Europe B.V.
Amsterdamseweg 37, 1422 AC Uithoorn, THE NETHERLANDS
Indirizzo di contatto UK:
JVCKENWOOD U.K. Limited
First Floor, Gleneagles, the Belfry, Colonial Way, Watford, Hertfordshire WD24 4WH,
UNITED KINGDOM

6
2. Prima della messa in servizio
2.1 Sconfezionamento
Disimballare le unità con attenzione e assicurarsi che tutti gli accessori siano presenti.
• Radio UBZ-LJ9E x 2
• Batteria Li-Ion KNB-86L x 2
• Clip da cintura incl. viti x 2
• Caricatore con doppia porta USB
• Cavo di ricarica USB-C x 2
• Il presente manuale di istruzioni
2.2 Componenti e funzioni
1 - Antenna 9 - Microfono
2 - Pulsante push-to-talk - PTT 10 - Display di funzione a LED
3 - Tasto funzione Su 11 - Clip da cintura
4 - Tasto funzione Giù 12 - Batteria agli ioni di litio
5 - On / Off / Volume 13 - Indicatore di carica a LED
6 - RX / TX LED 14 - Porta di ricarica USB-C
7 - Altoparlante 15 - Pulsante di rilascio della batteria
8 - Presa per cuffie/microfono

7
2.3 Installare la batteria agli ioni di litio
• Allinea le linguette del coperchio della batteria con le fessure della radio, poi tieni il coperchio e
spingilo verso l'alto finché non senti un "clic".
• Per rimuovere la batteria, si prega di spegnere prima la radio, poi tenere premuto il pulsante di
blocco della batteria, far scorrere la batteria 5 mm all'indietro, quindi tirare la batteria verso l'alto
per rimuoverla.
Attenzione!
• Si possono usare solo batterie originali.
• Non cortocircuitare i terminali o esporre la batteria ad alte temperature o al fuoco.
• Non tentare di aprire l'involucro del pacco batteria.
• Non installare la batteria in ambienti pericolosi perché le scintille possono causare un'esplosione.

8
2.5 Montaggio della clip da cintura
Allinea la clip da cintura con i punti di montaggio sul retro della radio e fissala con le viti fornite. Usare
un cacciavite adatto a questo scopo. La rimozione della batteria facilita il montaggio.
2.4 Caricamento batteria
Si prega di caricare completamente la batteria
prima dell'uso.
• Inserire il caricatore USB in una presa di corrente
e collega il cavo di ricarica USB-C alla porta di
ricarica della batteria della radio e alla porta USB
del caricatore. Il caricatore può caricare 2 bat-
terie allo stesso tempo. La batteria può anche
essere caricata separatamente senza la radio.
• Durante la carica, l'indicatore di carica si
illumina di rosso per indicare che la batteria è
in carica. Quando la batteria è completamente
carica, l'indicatore diventa verde.
Attenzione!
• Usare solo il caricatore originale.
• Caricare la batteria solo al chiuso.
• Quando la carica è completa, scollegare il cavo
USB dalla batteria e scollegare il caricabatterie
dalla presa di corrente.

9
2.6 Utilizzo di una cufa opzionale
È possibile collegare le cuffie con doppio jack
Kenwood (2,5 / 3,5 mm) a questa radio. Per
informazioni sugli accessori compatibili, visitare il
sito web KENWOOD.
• Sollevare leggermente la linguetta di plastica
sulla parte superiore del coperchio e ruotarla
attentamente in senso orario di 90 gradi
verso la parte posteriore.
• Inserire completamente le spine nelle prese jack.
Se le spine jack non sono inserite correttamente,
possono verificarsi errori di contatto e causare
rumore. Se l'auricolare è dotato di un pulsante
PTT, può essere utilizzato di conseguenza.
Attenzione!
Per evitare danni all'udito, riduci il volume della
radio prima di usare le cuffie.

10
3. Uso della radio
3.1 Accensione e spegnimento del dispositivo
Ruotare il controllo del volume in senso orario oltre il punto di arresto per accendere la radio. Il display
a LED si accende completamente, lo stato di carica della batteria e il canale radio corrente vengono
visualizzati brevemente. Il dispositivo va quindi in modalità standby. Per spegnere la radio, girare il
controllo del volume oltre il punto di arresto nella direzione opposta.
3.2 Regolazione del volume
Ruotare la manopola del volume in senso orario per aumentare il volume e in senso antiorario per
diminuirlo.
3.3 Invio e ricezione
Quando è accesa, la radio è in modalità "Receive" e può ricevere segnali vocali o audio sul canale
impostato. Per inviare un messaggio, premere il pulsante di invio "PTT" e parlare nel microfono.
Tenere premuto il tasto <Tasto PTT> finché non è terminata la trasmissione. La radio torna quindi
automaticamente in modalità di ricezione. Per una trasmissione ottimale del discorso, il microfono
dovrebbe essere a circa 2 - 3 centimetri dalla bocca durante la trasmissione.
Avvertenza: Entrambe le radio devono essere impostate sullo stesso canale e sullo stesso codice QT/
DQT. Quando il <Tasto PTT> viene rilasciato, l'altro dispositivo emetterà un segnale acustico (Beep di
conferma), se attivato, per segnalare che il processo di trasmissione è stato completato. Per ulteriori
informazioni, vedere "Impostare la radio" in queste istruzioni per l'uso.
3.4 Funzione di reset completo
Per ripristinare la radio allo stato di fabbrica, seguire la procedura seguente:
Tenere premuti i pulsanti <Tasto funzione Su> e <Tasto funzione Giù> simultaneamente per 3
secondi. Il LED arancione indica l‘inizio del Full Reset. Dopo aver eseguito con successo il reset, sul
display apparirà „LJ9“.

11
4. Impostazione della radio
Per effettuare impostazioni come la selezione del canale o il codice QT/DQT, questa radio ha un menu
di impostazioni. Questo menu funziona come segue:
• Una lunga pressione sul <Tasto funzione Su> passa al primo livello di menu. Ogni ulteriore
pressione lunga del tasto fa avanzare di un livello.
• Nel rispettivo menu, le impostazioni vengono effettuate premendo brevemente i tasti <Tasto
funzione Su> o <Tasto funzione Giù>.
• Premendo il tasto <Tasto PTT> il menu di impostazione viene chiuso e la radio torna in modalità
di ricezione.
Avvertenza: Se non viene premuto alcun pulsante per 10 secondi, il menu di impostazione viene
terminato e l'unità ritorna in modalità di ricezione.
Panoramica del menu delle impostazioni:
Livello Funzione Impostazioni Visualizzazione
0Modalità di
ricezione
1Selezione
del canale CH01 - CH32
2Livello di
squelch SQ 0 - SQ 9
3QT/DQT-
Code
OFF,
CT01 - CT38,
DT01 - DT83
4 VOX V.of / 1 / 2 / 3
5Tono di
chiamata CA01 - CA20
6Tono dei
tasti KTOF / KTOn
7 Roger Beep RBOF / RBOn
8Feedback
Tone FTOF / FTOn
9
Livello di
carica della
batteria
3 / 2 / 1 / 0

12
4.1 Cambiare canale
Per passare a un altro canale, procedere come segue:
• Premere 1 x lungo sul pulsante <Tasto funzione Su>, il numero del canale corrente lampeggia
sul display.
• Premendo brevemente i tasti <Tasto funzione Su> o <Tasto funzione Giù> il canale desiderato
può essere impostato.
• Premendo il tasto <Tasto PTT> il menu di impostazione viene chiuso e la radio torna in modalità
di ricezione.
Attenzione: I canali da 1 a 16 sono disponibili di default. I canali da 17 a 32 devono essere attivati
dall‘utente. I canali da 17 a 32 possono essere utilizzati solo nei paesi in cui queste frequenze sono
autorizzate dalle autorità.
Per attivare i canali da 17 a 32, procedere come segue:
• Tenere premuto il <Tasto PTT> e il <Tasto funzione Giù> e accendere la radio. Rilasciare entrambi
i pulsanti dopo 3 secondi, ora 32 canali sono attivati.
Per disattivare i canali da 17 a 32, procedere come segue:
• Tenere premuti i pulsanti <Tasto funzione Su> e <Tasto funzione Giù> e accendere la radio.
Rilasciare entrambi i pulsanti dopo 3 secondi. La radio eseguirà un reset completo e sarà quindi in
modalità 16 canali.
4.2 Blocco antirumore (Squelch)
L'impostazione del livello di soppressione del rumore determina la forza del segnale in arrivo fino
alla quale la radio rimane muta. Ciò significa che più alto è il livello impostato, più forte deve essere
il segnale in entrata per essere udibile. È possibile impostare il livello tra "0" e "9", con "3" come
impostazione predefinita. Per effettuare le impostazioni bisogna procedere nel modo seguente:
• Premere 2 x lungo sul pulsante <Tasto funzione Su>, e l'impostazione corrente viene mostrata
lampeggiante sul display.
• Premendo brevemente i tasti <Tasto funzione Su> o Tasto funzione Giù> il valore desiderato
(0 - 9) può essere impostato.
• Premendo il tasto <Tasto PTT> il menu di impostazione viene chiuso e la radio torna in modalità
di ricezione.
4.3
Impostazioni del tono QT e del codice DQT
QT e DQT sono funzioni che respingono i segnali indesiderati sul tuo canale. Si sente una chiamata
solo se si riceve un segnale che contiene un tono QT o un codice DQT corrispondente. Se si riceve una
chiamata con un tono o un codice diverso, la funzione Squelch rimane attiva e non si sente questa
chiamata. Allo stesso modo, la stazione ricevente deve avere un tono o un codice corrispondente per
sentire la vostra chiamata quando si trasmette con QT o DQT.
Si prega di notare che altri soggetti terzi possono ancora sentire le vostre chiamate se impostano
la loro radio sullo stesso tono o codice. Per effettuare le impostazioni bisogna procedere nel modo
seguente:
• Premere 3 x lungo sul pulsante <Tasto funzione Su>, e l'impostazione corrente viene mostrata
lampeggiante sul display.
• Premendo brevemente i tasti <Tasto funzione Su> o Tasto funzione Giù> può essere impostato
il codice QT o DQT desiderato.
• Premendo il tasto <Tasto PTT> il menu di impostazione viene chiuso e la radio torna in modalità
di ricezione

13
Le impostazioni predenite QT/DQT di KENWOOD per ogni canale sono riportate nella ta-
bella seguente. Per un elenco completo, vedere pagina 20 delle presenti istruzioni per l‘uso.
Ca. Freq. (MHz) QT/DQT Ca. Freq. (MHz) QT/DQT
1 446.00625 CT10 / 94.8 Hz 17* 446.10625 CT10 / 94.8 Hz
2 446.09375 CT08 / 88.5 Hz 18* 446.19375 CT08 / 88.5 Hz
3 446.03125 CT13 / 103.5 Hz 19* 446.13125 CT13 / 103.5 Hz
4 446.06875 CT05 / 79.7 Hz 20* 446.16875 CT05 / 79.7 Hz
5 446.04375 CT17 / 118.8 Hz 21* 446.14375 CT17 / 118.8 Hz
6 446.01875 CT18 / 123.0 Hz 22* 446.11875 CT18 / 123.0 Hz
7 446.08125 CT19 / 127.3 Hz 23* 446.18125 CT19 / 127.3 Hz
8 446.05625 CT07 / 85.4 Hz 24* 446.15625 CT07 / 85.4 Hz
9 446.00625 CT14 / 107.2 Hz 25* 446.10625 CT14 / 107.2 Hz
10 446.09375 CT15 / 110.9 Hz 26* 446.19375 CT15 / 110.9 Hz
11 446.03125 CT16 / 114.8 Hz 27* 446.13125 CT16 / 114.8 Hz
12 446.06875 CT06 / 82.5 Hz 28* 446.16875 CT06 / 82.5 Hz
13 446.04375 DT20 / D132N 29* 446.14375 DT20 / D132N
14 446.01875 DT24 / D155N 30* 446.11875 DT24 / D155N
15 446.05625 DT21 / D134N 31* 446.15625 DT21 / D134N
16 446.08125 DT33 / D243N 32* 446.18125 DT33 / D243N
*I canali da 1 a 16 sono disponibili di default. I canali da 17 a 32 devono essere attivati dall‘utente.
I canali da 17 a 32 possono essere utilizzati solo nei paesi in cui queste frequenze sono autorizzate
dalle autorità.
4.4 Trasmissione vocale (VOX) impostato
La radio è in grado di trasmettere tramite attivazione vocale (VOX). In modalità VOX, la radio invia un
segnale quando viene attivata dalla vostra voce o da altri suoni nel vostro ambiente. La sensibilità è
regolabile in 3 fasi (1/2/3), con la fase 3 che è la più sensibile.
Per effettuare le impostazioni bisogna procedere nel modo seguente:
• Premere 4 x lungo sul pulsante <Tasto funzione Su>, e l'impostazione corrente viene mostrata
lampeggiante sul display.
• Premendo brevemente i tasti <Tasto funzione Su> o Tasto funzione Giù> può essere impostato
il valore desiderato (V.OF - V. 3).
• Premendo il tasto <Tasto PTT> il menu di impostazione viene chiuso e la radio torna in modalità
di ricezione.

14
Avvertenza: Premendo il tasto <Tasto PTT> viene terminata la modalità VOX. L‘uso di questa
funzione in ambienti rumorosi o ventosi non è raccomandato.
4.5 Tono di chiamata
I toni di chiamata aiutano a identificarsi agli altri partecipanti e a informarli della vostra chiamata. A
questo scopo, sono disponibili 20 diversi toni di segnale (CA01 - CA20).
Se ogni partecipante usa un tono diverso, il chiamante è facile da identificare. Il tono di chiamata si
attiva premendo e tenendo premuto il tasto <Tasto PTT> e poi anche premendo brevemente il tasto
<Tasto funzione su>.
Per effettuare le impostazioni bisogna procedere nel modo seguente:
• Premere 5 x lungo sul pulsante <Tasto funzione Su>, e l'impostazione corrente viene mostrata
lampeggiante sul display.
• Premendo brevemente i tasti <Tasto funzione Su> o <Tasto funzione Giù> il valore desiderato
(CA01 - CA20) può essere impostato.
• Premendo il tasto <Tasto PTT> il menu di impostazione viene chiuso e la radio torna in modalità di ricezione.
4.6 Tono dei tasti on/off
Se il tono dei tasti è attivato, la radio dà un feedback acustico quando i tasti vengono premuti. È
possibile attivare o disattivare il tono dei tasti (KTOF / KTOn). Per effettuare le impostazioni bisogna
procedere nel modo seguente:
• Premere 6 x lungo sul pulsante <Tasto funzione Su>, e l'impostazione corrente viene mostrata
lampeggiante sul display.
• Premendo brevemente i tasti <Tasto funzione Su> o <Tasto funzione Giù> il valore desiderato
(KTOF / KTOn) può essere impostato.
• Premendo il tasto <Tasto PTT> il menu di impostazione viene chiuso e la radio torna in modalità
di ricezione.
4.7 Beep di conferma on/off
Il Beep di conferma è un segnale di tono generato dalla radio che viene trasmesso automaticamente
alla fine di ogni trasmissione. Questo segnala alla stazione remota che avete terminato la chiamata.
È possibile attivare o disattivare il Beep di conferma (RBOF / RBOn). Per effettuare le impostazioni
bisogna procedere nel modo seguente:
• Premere 7 x lungo sul pulsante <Tasto funzione Su>, e l'impostazione corrente viene mostrata
lampeggiante sul display.
• Premendo brevemente i tasti <Tasto funzione Su> o <Tasto funzione Giù> il valore desiderato
(RBOF / RBOn) può essere impostato.
• Premendo il tasto <Tasto PTT> il menu di impostazione viene chiuso e la radio torna in modalità di ricezione.
4.8 Feedback Tone on/off
Il tono di feedback è un tono generato dalla radio, che dà al mittente di un tono di chiamata (vedi
punto 4.5) un feedback sul proprio dispositivo che il tono di chiamata può essere attualmente sentito
sulla stazione remota, suonando lo stesso tono simultaneamente sul proprio dispositivo. È possibile
attivare o disattivare il tono di feedback (FTOn / FTOF). Per effettuare le impostazioni bisogna procede-
re nel modo seguente:
• Premere 8 x lungo sul pulsante <Tasto funzione Su>, e l’impostazione corrente viene mostrata
lampeggiante sul display.
• Premendo brevemente i tasti <Tasto funzione Su> o <Tasto funzione Giù> il valore desiderato
(RBOF / RBOn) può essere impostato.
• Premendo il tasto <Tasto PTT> il menu di impostazione viene chiuso e la radio torna in modalità di ricezione.

15
Batteria carica
Batteria 2/3 carica
Batteria 1/3 carica
Batteria scarica.
4.9 Livello di carica della batteria
Il livello di carica della batteria è indicato da icone a barre. Inoltre, un bip suona quando la batteria è
scarica e l'indicatore di carica lampeggia in rosso.
Per visualizzare il livello di carica della batteria, procedere come segue:
• Premere 9 x lungo sul pulsante <Tasto funzione Su>, e il livello di carica attuale viene mostrato
sul display.
• Premendo il tasto <Tasto PTT> il menu di impostazione viene chiuso e la radio torna in modalità
di ricezione.
4.10 Funzione di monitoraggio
La funzione di monitoraggio può essere usata per ricevere segnali più deboli sul canale corrente. Si
accende il monitor come segue:
• Premendo brevemente il pulsante <Tasto funzione Giù> la funzione può essere attivata e
disattivata.
Avvertenza: La funzione di monitoraggio funziona indipendentemente dal codice QT o DQT
impostato.
4.11 Ricerca di canali (scansione)
È possibile usare la funzione di ricerca dei canali per cercare i canali attivi. Se viene trovato un canale
corrispondente, la ricerca si ferma e la comunicazione viene riprodotta. Se la trasmissione finisce sul
canale trovato, la ricerca del canale continua automaticamente.
Per avviare la scansione dei canali, procedere come segue:
• Premere 1 x lungo sul pulsante <Tasto funzione Giù>, e viene avviata la ricerca dal canale 1 al
canale 16 (o il canale da 1 a 32, a seconda dell‘impostazione).
• Se si premono brevemente i pulsanti <Tasto funzione Su> o <Tasto funzione Giù> durante la
ricerca, l'ordine della ricerca sarà invertito.
Avvertenza:
Se si preme il tasto <Tasto PTT> mentre si ascolta un canale trovato, la radio tornerà in
modalità standby sul canale corrente.
4.12 Funzione di risparmio energetico
Se il dispositivo wireless non viene utilizzato per più di 10 secondi, passa automaticamente alla
modalità di risparmio energetico. Questo non influisce sulla ricezione delle trasmissioni e la modalità
normale si riattiva automaticamente non appena viene rilevato un segnale.

16
5. Eliminazione errori
Suggerimenti per la risoluzione dei problemi
Problema Soluzione
La radio non si accende.
• La batteria è scarica. Caricare la batteria o
sostituire le batterie.
• La batteria non è inserita correttamente.
Rimuovere la batteria e reinserirla.
La ricarica ripetuta della batteria causerà
il deterioramento delle prestazioni della
batteria stessa.
• La carica della batteria è esaurita. Sostituire
la batteria con una nuova.
Non è possibile sentire gli altri membri del
gruppo o parlare con loro.
• Assicurarsi di usare lo stesso canale e le
stesse impostazioni QT/DQT degli altri membri
del gruppo.
• Gli altri membri del gruppo sono troppo
lontani. Assicurarsi di essere nel raggio
d'azione delle altre radio.
Gli altri utenti della radio (tranne i membri del
gruppo) possono essere ascoltati sul canale.
• Cambia le impostazioni QT/DQT. Assicurarsi
che tutti i membri del gruppo cambino le
impostazioni delle loro radio per farle cor-
rispondere alle nuove impostazioni QT/DQT.
Avvertenza:
Se il problema persiste, contattare il servizio assistenza KENWOOD.
6. Smaltimento
Smaltimento delle apparecchiature elettriche ed elettroniche e delle batterie usate.
Il simbolo (cestino barrato) sul prodotto o sulla sua confezione indica che questo prodotto non deve
essere trattato come un normale rifiuto domestico, ma deve essere riconsegnato ad un punto di rac-
colta per il riciclaggio di apparecchiature elettriche, elettroniche e batterie. Contribuendo al corretto
smaltimento di questo prodotto, si protegge l'ambiente e la salute degli altri esseri umani. Uno smalti-
mento improprio o non corretto mette in pericolo l'ambiente e la salute. Per ulteriori informazioni sul
riciclaggio di questo prodotto, contattare l'autorità locale o l'azienda comunale di gestione dei rifiuti.
Le informazioni sullo smaltimento in Turchia si trovano in turco a pagina 18.

17
Intervallo di frequenza 446,0 - 446,2 MHz (PMR446)
Canali 32
Sottocodici QT 38 + DQT 83
Potenza a radiofrequenza ≤ 500mW ERP
Massima potenza di trasmissione max. 26,59 dBm
Autonomia Fino a 6 km*
Temperatura di esercizio -20°C / +55°C
Tensione di esercizio 3,7 V
Tipo di protezione IP32
Tempo di funzionamento / tempo di ricarica Max. 18 ore*/ ca. 3 ore
Dimensioni (L x A x P) 52 x 157 x 28 mm
Peso con batteria e clip da cintura 138 g
* Può variare a seconda del luogo e delle condizioni.
Batteria Li-Ion
Tipo KNB-86L
Tensione 3,7 V
Capacità 1150 mAh
Contenuto energetico 4,3 Wh
Numero UN UN3481 Batterie agli ioni di litio contenute in /
imballate con apparecchiature
Caricatore
Caricatore del produttore
SHENZHEN MERRYKING ELECTROINCS CO., LTD.
801, Bldg B, No. 1, Tianyang 2nd Road, Oriental
Community, Songgang Street, Bao’an District,
Shenzhen 518105, Guangdong, CHINA
Identificatore di marca e modello del caricatore MKC-0502000VEUT / MKC-0502000VUKT
Tensione d’ingresso Tensione alternata 100 – 240 V
Frequenza di corrente alternata in ingresso 50 / 60 Hz
Tensione / Corrente / Potenza in uscita Tensione continua 5,0 V / 2,0 A / 10,0 W
Efficienza attiva media 81,1 %
Consumo di energia in modo stand-by 0,07 W
Con riserva di modiche tecniche.
7. Dati tecnici UBZ-LJ9E

18
8. Garantie
Gentile cliente,
Grazie per aver acquistato questo prodotto KENWOOD. Se questo
prodotto si rivela difettoso nei materiali o nella lavorazione in condizioni
di uso normale, lo ripareremo o sostituiremo gratuitamente in base ai
termini di garanzia.
La garanzia non copre le parti di consumo o usurabili che devono
essere sostituite come parte del normale servizio, come le batterie
ricaricabili.
Indirizzo:
JVCKENWOOD ITALIA S.p.A.
Via G. Sirtori 7/9, 20129 Milano
Tel. +39(02)204821
www.kenwood.it [email protected]
Smaltimento dei rifiuti in Turchia:
Eski Elektrikli ve Elektronik Cihazların ve Pillerin İmhası Hakkında Bilgi (ayrı atık toplama sistemlerine
sahip olan ülkelerde geçerlidir).
Bu sembolü (üzeri çizili çöp bidonu) içeren ürün ve piller evsel atı k çöpleri ile birlikte atılamaz.
Kullanılmış elektrikli ve elektronik cihaz ve piller, bu tür maddeleri ve bunların yan ürünlerini iş
lemeye elverişli bir geri kazanım tesisine gönderilmelidir.
Size en yakın geri kazanım tesisinin konumunu öğrenmek üzere yerel yetkililerinize danışın.
Doğru geri kazanım ve atık uzaklaştırma y öntemleri, sadece öz kaynakların korunmasına
yardımcı olmakla kalmayıp ayrıca sağlığımıza ve çevreye olacak zararlı etkilerini engellemeye
yardımcı olur.
Bu ürün 28300 sayılı Resmi Gazete’de yayımlanan Atik Elektrikli ve Elektronik
Eşyalarin Kontrolü Yönetmeliğe uygun olarak üretilmiştir.

19
9. Valori SAR per la radio UBZ-LJ9E
Modello SAR anteriore SAR posteriore
UBZ-LJ9E 0,4 W/kg 0,45 W/kg
Limiti RF per la radio UBZ-LJ9E
ATTENZIONE:
Prima di usare questa radio PMR446, leggete queste semplici istruzioni.
Questa radio PMR446 utilizza la radiofrequenza elettromagnetica (RF) per permettere la
comunicazione tra due o più utenti a distanza.
Utilizza l‘energia di radiofrequenza (RF) o le onde radio per inviare e ricevere chiamate.
La radio KENWOOD UBZ-LJ9E è stata progettata, fabbricata e testata per essere conforme
alla raccomandazione EU 1999/519/EC per i limiti di esposizione RF.
Questi limiti forniscono livelli di esposizione raccomandati per il pubblico.
Per mantenere l‘esposizione RF entro limiti accettabili, non trasmettere per più del 50% del
tempo totale di utilizzo della radio.
Trasmettere più del 50% del tempo totale di funzionamento può superare i limiti sotto i
requisiti di esposizione RF della FCC.
Per assicurare il rispetto dei limiti, tenete la radio verticalmente di fronte al vostro viso con
il microfono e le altre parti della radio, compresa l‘antenna, ad almeno 2,5 pollici dal vostro
naso o dalle labbra.
Una maggiore distanza tra il tuo viso e l‘antenna ridurrà l‘esposizione alle RF.

© 2022
Codici QT
CT01/67.0 Hz CT14/107.2 Hz CT27/167.9 Hz CT02/71.9 Hz CT15/110.9 Hz
CT28/173.8 Hz CT03/74.4 Hz CT16/114.8 Hz CT29/179.9 Hz CT04/77.0 Hz
CT17/118.8 Hz CT30/186.2 Hz CT05/79.7 Hz CT18/123.0 Hz CT31/192.8 Hz
CT06/82.5 Hz CT19/127.3 Hz CT32/203.5 Hz CT07/85.4 Hz CT20/131.8 Hz
CT33/210.7 Hz CT08/88.5 Hz CT21/136.5 Hz CT34/218.1 Hz CT09/91.5 Hz
CT22/141.3 Hz CT35/225.7 Hz CT10/94.8 Hz CT23/146.2 Hz CT36/233.6 Hz
CT11/97.4 Hz CT24/151.4 Hz CT37/241.8 Hz CT12/100.0 Hz CT25/156.7 Hz
CT38/250.3 Hz CT13/103.5 Hz CT26/162.2 Hz
Codici DQT
DT01/D023N DT29/D174N DT57/D445N DT02/D025N DT30/D205N
DT58/D464N DT03/D026N DT31/D223N DT59/D465N DT04/D031N
DT32/D226N DT60/D466N DT05/D032N DT33/D243N DT61/D503N
DT06/D043N DT34/D244N DT62/D506N DT07/D047N DT35/D245N
DT63/D516N DT08/D051N DT36/D251N DT64/D532N DT09/D054N
DT37/D261N DT65/D546N DT10/D065N DT38/D263N DT66/D565N
DT11/D071N DT39/D265N DT67/D606N DT12/D072N DT40/D271N
DT68/D612N DT13/D073N DT41/D306N DT69/D624N DT14/D074N
DT42/D311N DT70/D627N DT15/D114N DT43/D315N DT71/D631N
DT16/D115N DT44/D331N DT72/D632N DT17/D116N DT45/D343N
DT73/D654N DT18/D125N DT46/D346N DT74/D662N DT19/D131N
DT47/D351N DT75/D664N DT20/D132N DT48/D364N DT76/D703N
DT21/D134N DT49/D365N DT77/D712N DT22/D143N DT50/D371N
DT78/D723N DT23/D152N DT51/D411N DT79/D731N DT24/D155N
DT52/D412N DT80/D732N DT25/D156N DT53/D413N DT81/D734N
DT26/D162N DT54/D423N DT82/D743N DT27/D165N DT55/D431N
DT83/D754N DT28/D172N DT56/D432N

PMR446 FM portofoons
UBZ-LJ9SETE (EU Versie)
UBZ-LJ9SETT (VK Versie)
GEBRUIKSAANWIJZING
DEUTSCH FRANÇAIS ITALIANOENGLISH NEDERLANDS
ESPAÑOL

2
Inhoudsopgave
Inhoud Pagina
1. Veiligheidsinstructies
1.1 Voorzorgsmaatregelen
1.2 Informatie over de accu
1.3 Conformiteitsverklaring
1.4 EU / UK contactadres
2. Vóór de ingebruikname
2.1 Uitpakken
2.2 Componenten en functies
2.3 Lithium-ion-accu installeren
2.4 Laden van de accu
2.5 Montage van de riemclip
2.6 Gebruiken van een optionele headset
3. Gebruik van de portofoon
3.1 In- en uitschakelen van het toestel
3.2 Instellen van het volume
3.3 Zenden en ontvangen
3.4 Volledige reset-functie
4. Instellen van de portofoon
4.1 Wisselen van kanalen
4.2 Ruisonderdrukker (Squelch)
4.3 Instellingen QT-geluid en DQT-code
4.4 Spraakgestuurd zenden (VOX) instellen
4.5 Belgsignaal
4.6 Toetsgeluid
4.7 Roger-Beep
4.8 Feedback Tone
4.9 Laadstand van de accu
4.10 Monitorfunctie
4.11 Kanaal-zoekfunctie (Scan)
4.12 Energiebesparingsfunctie
5. Oplossing van fouten
6. Afvalverwerwijdering
7. Technische gegevens
8. Garantie
9. SAR-waarden
NEDERLANDS
3
3
4
5
5
6
6
6
7
8
8
9
10
10
10
10
10
11
12
12
12
13
14
14
14
14
15
15
15
15
16
16
17
18
19

3
Inhoudsopgave
Inhoud Pagina
1. Veiligheidsinstructies
1.1 Voorzorgsmaatregelen
1.2 Informatie over de accu
1.3 Conformiteitsverklaring
1.4 EU / UK contactadres
2. Vóór de ingebruikname
2.1 Uitpakken
2.2 Componenten en functies
2.3 Lithium-ion-accu installeren
2.4 Laden van de accu
2.5 Montage van de riemclip
2.6 Gebruiken van een optionele headset
3. Gebruik van de portofoon
3.1 In- en uitschakelen van het toestel
3.2 Instellen van het volume
3.3 Zenden en ontvangen
3.4 Volledige reset-functie
4. Instellen van de portofoon
4.1 Wisselen van kanalen
4.2 Ruisonderdrukker (Squelch)
4.3 Instellingen QT-geluid en DQT-code
4.4 Spraakgestuurd zenden (VOX) instellen
4.5 Belgsignaal
4.6 Toetsgeluid
4.7 Roger-Beep
4.8 Feedback Tone
4.9 Laadstand van de accu
4.10 Monitorfunctie
4.11 Kanaal-zoekfunctie (Scan)
4.12 Energiebesparingsfunctie
5. Oplossing van fouten
6. Afvalverwerwijdering
7. Technische gegevens
8. Garantie
9. SAR-waarden
1. Veiligheidsinstructies
BELANGRIJKE VEILIGHEIDSINSTRUCTIES
Let op: Lees deze pagina aandachtig door om de veilige werking van het apparaat te garanderen.
Opmerkingen aandachtig lezen!
•
Geef gevolg aan alle veiligheids- en bedieningsinstructies wanneer u dit product in gebruik neemt.
Instructies zorgvuldig bewaren!
• U dient de veiligheids- en bedieningsinstructies te bewaren om ze later te kunnen raadplegen.
Alle waarschuwingsinstructies in acht nemen!
• U dient aan alle aan het product aangegeven en in de gebruiksaanwijzing vermelde
waarschuwingen strikt gevolg te geven.
1.1 Voorzorgsmaatregelen
• Laad portofoon en accu niet in natte toestand.
• Let erop dat er geen metalen objecten tussen portofoon en accu geraken.
• Gebruik alleen door KENWOOD aanbevolen accessoires.
• Als er een onderdeel van de portofoon beschadigd is, raakt u de beschadigde onderdelen niet aan.
Verlaag bij de aansluiting van hoofdtelefoons of van een spreekgarnituur het volume van de
portofoon. Neem ook in acht dat bij het uitschakelen van de ruisonderdrukker (Squelch) het
volume kan veranderen.
• Leg de kabel van een clipmicrofoon met de oortelefoon/houder niet rond uw hals, terwijl u zich in
de nabijheid van machines bevindt, waarin de kabel zou kunnen vastraken.
• Leg de portofoon niet op een instabiel oppervlak neer. Als de portofoon door neer te vallen of
door sterke schokken in-/uitschakelt, kunnen het volume en de kanaalconguraties gereset
worden.
• Let erop, uzelf door het uiteinde van de antenne niet aan uw oog te verwonden.
• De portofoon niet in water dompelen.
• Schakel de portofoon voor de aansluiting van accessoires altijd uit.
• Het toestel wordt aan het laadtoestel van het stroomnet verbroken. Zorg ervoor dat de stekker van
het laadtoestel goed toegankelijk is.
• Bij de afvoer van de batterijen dienen de toepasselijke wettelijke voorschriften en de lokale, in uw
land resp. in uw regio geldende bepalingen nageleefd te worden.
• Als er een in de handel verkrijgbare halsriem gebruikt wordt, let u erop dat de halsriem niet in
nabijgelegen machineonderdelen vastraakt.
Waarschuwing!
Schakel de portofoon op deze plaatsen uit:
• Op een plaats waar ontplofngsgevaar kan heersen (brandbaar gas, stofdeeltjes, metaalpoeder,
houtstof, enz.).
• Tijdens het tanken en wanneer u zich aan benzinestations bevindt.
• Op plaatsen waar ontplofngsgevaar bestaat of waar er besproeiingswerkzaamheden plaatsvin-
den.
• In het vliegtuig. (Een eventueel gebruik van de portofoon mag alleen op aanwijzing en instructie
van de bemanning plaatsvinden.)
• Overal daar, waar borden enz. aanmanen, portofoons uit te schakelen, zo o.a. in ziekenhuisvoor-
zieningen.
• In de nabijheid van personen met pacemakers.

4
Opgepast!
• Onderwerp de portofoon niet aan aanpassingen.
• Leg de portofoon tijdens de rit niet op of in de nabijheid van airbags. Wanneer de airbag in
werking treedt, kan de portofoon een projectiel worden en de bestuurder of bijrijder raken.
• Raak bij het zenden de antenneaansluiting niet aan en zend niet wanneer er aan de antenneaf-
dekking metaal vrij ligt. Er bestaat omwille van hoge frequentie gevaar dat u een brandwonde
oploopt.
• Als er van de portofoon een ongewone geur- of rookontwikkeling uitgaat, schakelt u de porto-
foon onmiddellijk uit, verwijdert u de accu en richt u zich a.u.b. tot uw KENWOOD dealer.
• Het gebruik van de portofoon tijdens de rit kan tegen de Duitse Wegenverkeerswet indruisen.
Gelieve de verkeersrechtelijke voorschriften in uw regio na te gaan en in acht te nemen.
• Stel de portofoon niet bloot aan extreme hitte of kou.
• Draag de accu niet met metalen voorwerpen, omdat daarbij de batterijcontacten kortgesloten
kunnen worden.
• Explosiegevaar wanneer de accu verkeerd vervangen wordt, alleen met accu’s van hetzelfde type
vervangen.
• Als de portofoon in een regio met droge omgevingslucht gebruikt wordt, kunnen er gemakkelijk
elektrische ladingen opgebouwd worden (statische elektriciteit). Als er in dergelijke omstandig-
heden een oortelefoon als accessoire gebruikt wordt, bestaat de mogelijkheid dat door middel
daarvan een elektrische schok van de portofoon aan het oor overgedragen wordt. Gebruik geen
oortelefoons/microfoonaccessoires in een omgeving, waarin er gemakkelijk statische elektriciteit
opgewekt wordt.
• Controleer bij het aanbrengen van een in de handel verkrijgbare grijplus dat deze duurzaam is.
Slinger de portofoon nooit aan de band heen en weer, u zou daarbij iemand anders met het
toestel kunnen raken en verwonden.
1.2 Informatie over de accu
De accu bevat brandbare stof, zoals bv. organisch oplosmiddel. Bij een verkeerde hantering kan de
accu barsten en vuur vatten of extreme hitte doen vrijkomen, kan het prestatievermogen van de accu
afnemen of kunnen er andere beschadigingen tot ontwikkeling komen. Gelieve in het bijzonder deze
aanwijzingen, welke (be)handeling verboden is, in acht te nemen.
Gevaar!
De accu niet demonteren of repareren!
De accu beschikt over een veiligheidsfunctie en een beschermingsschakeling. Als deze defect zijn of
buten werking gesteld worden, kan de accu hitte en rook ontwikkelen, barsten en vuur vatten.
De accu niet kortsluiten!
De pluspool (+) en de minpool (-) mogen niet door een metalen voorwerp (zoals bv. een paperclip
of een stuk draad) met elkaar verbonden worden. Gelieve de accu daarom niet in reservoirs samen
met metalen voorwerpen (gereedschap, metalen sieraden, haarklemmetjes, enz.) te bewaren of op
te bergen. In een kortgesloten accu vloeit er hoge stroom en kan de accu hitte en rook ontwikkelen,
barsten en vuur vatten. Het overbruggende metalen voorwerp wordt bovendien heet.
De accu niet verbranden of aan hoge temperaturen blootstellen!
Als het isolatiemateriaal smelt, wordt de gasontluchting of de veiligheidsvoorziening beschadigd of
ontbrandt de elektrolyt. De accu kan hitte en rook ontwikkelen, barsten en vuur vatten.
De accu niet in de nabijheid van open vuur, ovens of andere hittebronnen (plaatsen, waar er
temperaturen van meer dan 60°C ontstaan) gebruiken of opbergen!
Als door de hitte de polymeerseparator smelt, kunnen de individuele cellen intern een kortsluiting

5
ontwikkelen en kan de accu hitte en rook ontwikkelen, barsten en vuur vatten. Zelfs als de separator
niet beschadigd is, kan de batterij opblazen, vervormen of barsten. Gebruik dergelijke batterijen niet.
De batterij niet in water dompelen of op een andere manier nat laten worden!
Als de beschermingsschakeling van de accu defect is, kan de accu te hoog geladen worden en kan
het tot en onverwachtse chemische reactie komen. De accu kan hitte en rook ontwikkelen, barsten
en vuur vatten.
Opgepast!
Explosiegevaar als de batterij door een verkeerd type vervangen wordt;
• hoge of lage extreme temperaturen, waaraan een batterij tijdens het gebruik, de opslag of het
transport blootgesteld kan zijn;
• lage luchtdruk op grote hoogte;
• de vervanging van een batterij door een verkeerd type dat een beveiliging kan omzeilen (bv. bij een
aantal lithiumbatterijtypes);
• het weggooien van een batterij in vuur of in een hete oven of het mechanisch kneuzen of snijden
van een batterij;
• het achterlaten van een batterij in een omgeving met extreem hoge temperaturen die tot een
explosie of tot het vrijkomen van brandbare vloeistoffen of gassen kan leiden; een batterij die
blootgesteld is aan een extreem lage luchtdruk die tot een explosie of tot het vrijkomen van
brandbare vloeistoffen kan leiden.
1.3 Conformiteitsverklaring
Hiermee verklaart de JVCKENWOOD Europe B.V. dat de radio-installatie van het type UBZ-LJ9E aan
de richtlijn 2014/53/EU voldoet. De volledige tekst van de EU-conformiteitsverklaring is op volgende
website beschikbaar: https://www.kenwood.com/cs/com/ecdoc/
Fabrikant:
JVCKENWOOD Corporation
3-12. Moriya-cho, Kanagawa-ku, Yokohama-shi, Kanagawa 221-0022, JAPAN
1.4 Contactadres:
EU Contactadres:
JVCKENWOOD Europe B.V.
Amsterdamseweg 37, 1422 AC Uithoorn, THE NETHERLANDS
UK Contactadres:
JVCKENWOOD U.K. Limited
First Floor, Gleneagles, the Belfry, Colonial Way, Watford, Hertfordshire WD24 4WH,
UNITED KINGDOM

6
2. Vóór de ingebruikname
2.1 Uitpakken
Pak de toestellen voorzichtig uit en let erop dat alle accessoires aanwezig zijn:
• Portofoon UBZ-LJ9E x 2
• Lithium-ion-accu KNB-86L x 2
• Riemclip incl. schroeven x 2
• Laadtoestel met tweevoudige USB-aansluiting
• USB-C laadkabel x 2
• Deze gebruiksaanwijzing
2.2 Componenten en functies
1 - Antenne 9 - Microfoon
2 - Push-to-Talk-Toets - PTT 10 - LED functie-indicator
3 - Functietoets Omhoog 11 - Riemclip
4 - Functietoets Omlaag 12 - Lithium-ion-accu
5 - Aan / Uit / Volume 13 - LED laadindicator
6 - RX / TX LED 14 - USB-C laadbus
7 - Luidspreker 15 - Accu-ontgrendelingstoets
8 - Hoofdtelefoon- / microfoonbus

7
2.3 Lithium-ion-accu installeren
• Lijn de lipjes van de batterijafdekking met de sleuven van de portofoon uit, houd dan de
afdekking vast en duw ze naar boven totdat er een „klik“ te horen is.
• Gelieve, om de accu te verwijderen, eerst de portofoon uit te schakelen, houd dan de vergrende
lingstoets van de accu ingedrukt, schuif de accu 5 mm naar achteren en trek de accu dan langs
boven af.
Let op!
• Er mogen alleen originele accu’s gebruikt worden.
• De aansluitcontacten niet kortsluiten en de accu niet aan hoge temperaturen of vuur blootstellen.
• Tracht niet, de behuizing van het accupack te openen.
• Installeer de accu niet in gevaarlijke omgevingen, omdat het ontstaan van vonken een explosie
kan veroorzaken.

8
2.5 Montage van de riemclip
Lijn de riemclip met de bevestigingspunten aan de achterzijde van de portofoon uit en bevestig deze
met de bijgeleverde schroeven. Gebruik daarvoor een geschikte schroevendraaier. Het verwijderen van
de accu vergemakkelijkt de montage.
2.4 Laden van de accu
Gelieve de accu vóór gebruik volledig op te laden.
• Steek het USB-laadtoestel in een wandcon
tactdoos en verbind de USB-C laadkabel met
de accu-laadaansluiting van de portofoon en
de USB-aansluiting van het laadtoestel. Met het
laadtoestel kunnen er 2 accu’s gelijktijdig
geladen worden. De batterij kan ook afzonder-
lijk worden opgeladen zonder de radio.
• Tijdens het laadproces is de laadindicator rood
verlicht en geeft daarmee aan dat de accu
geladen wordt. Is de accu volledig opgeladen,
dan krijgt de indicator een groene kleur.
Let op!
• Gebruik alleen het originele laadtoestel.
• Gelieve de accu alleen binnenshuis te laden.
• Trek na beëindiging van het laadproces de
USB-kabel van de accu af te trekken en het
laadtoestel uit de wandcontactdoos te trekken.

9
2.6 Gebruiken van een optionele headset
Op deze portofoon kunt u headsets met dubbele
Kenwood klink (2,5 / 3,5 mm) aansluiten. Infor-
matie over compatibele accessoires vindt u op de
KENWOOD-website.
• Breng het kunststof lipje van de afdekking
bovenaan lichtjes omhoog en draai het
voorzichtig in de richting van de wijzers van
de klok 90 graden naar achteren.
• Steek de stekkers volledig in de stekkerbussen.
Indien de klinkstekkers niet correct ingestoken
zijn, kunnen er zich contactfouten voordoen
en geruis veroorzaken. Indien de headset van
een PTT-toets voorzien is, kan deze dienovereen
komstig gebruikt worden.
Let op!
Gelieve, om gehoorschade te voorkomen, vóór
gebruik van een headset het volume van de
portofoon te verlagen.

10
3. Gebruik van de portofoon
3.1 In- en uitschakelen van het toestel
Draai de volumeregelaar in de richting van de wijzers van de klok tot over het vergrendelingspunt om
de portofoon in te schakelen. De LED-indicator itst compleet aan, de laadtoestand van de accu en
het actuele radiokanaal worden even aangegeven. Daarna gaat het toestel naar de modus “Stand-
by” over. Om de portofoon uit te schakelen, draait u de volumeregelaar tot over het vergrendelings-
punt in de andere richting.
3.2 Instellen van het volume
Draai de volumeregelaar in de richting van de wijzers van de klok om het volume te verhogen en
tegen de richting van de wijzers van de klok in om het volume te verlagen.
3.3 Zenden en ontvangen
In de ingeschakelde toestand bevindt de portofoon zich in de modus „Ontvangst“ en kan hij spraak
of geluidssignalen op het ingestelde kanaal ontvangen. Om een bericht te zenden, drukt u de
zendtoets „PTT“ in en spreekt u in de microfoon. Houd de <PTT-toets> zolang ingedrukt totdat u de
transmissie beëindigd hebt. Daarna gaat de portofoon automatisch weer naar de ontvangstmodus
over. Voor een optimale spraaktransmissie dient bij het zenden de microfoon zich op een afstand van
ca. 2 - 3 centimeter tot de mond te bevinden.
Opmerking: Beide portofoons moeten op hetzelfde kanaal en dezelfde QT/DQT-code ingesteld zijn.
Wordt de <PTT-toets> losgelaten, dan weerklinkt, indien geactiveerd, aan het andere toestel een
geluidssignaal (Roger Beep) om te signaleren dat het zendproces beëindigd werd. Informatie daarover
onder „Instellen van de portofoon“ in deze gebruiksaanwijzing.
3.4 Volledige reset-functie
Volg de onderstaande procedure om de radio terug te zetten naar de fabrieksinstellingen:
Houd de knoppen <Functietoets Omhoog> en <Functietoets Omlaag> tegelijkertijd 3 seconden
lang ingedrukt. De oranje LED geeft het begin van de Volledige Reset aan. Na een succesvolle reset
verschijnt „LJ9“ op het display.

11
4. Instellen van de portofoon
Om instellingen, zoals bv. kanaalkeuze of QT/DQT-code, door te voeren, beschikt deze portofoon over
een instelmenu. Dit menu wordt als volgt bediend:
• Door de toets <Functietoets Omhoog> lang in te drukken, wordt er naar het eerste menuniveau
geschakeld. Telkens wanneer deze toets lang ingedrukt wordt, wordt er één niveau verder
geschakeld.
• In het betreffende menu worden de instellingen door het kort indrukken van de toets
<Functietoets Omhoog> of <Functietoets Omlaag> doorgevoerd.
• Door het indrukken van de <PTT-toets> wordt het instelmenu beëindigd en bevindt de portofoon
zich weer in de ontvangstmodus.
Opmerking: Worden er 10 seconden lang geen toetsen ingedrukt, dan wordt het instelmenu
beëindigd en bevindt het toestel zich weer in de ontvangstmodus.
Overzicht van het instelmenu:
Ni-
veau Functie Instellingen Indicatie
0Ontvangst-
modus
1Kanaal-
keuze CH01 - CH32
2Squelch
Level SQ 0 - SQ 9
3QT/DQT-
Code
OFF,
CT01 - CT38,
DT01 - DT83
4 VOX V.of / 1 / 2 / 3
5 Belgsignaal CA01 - CA20
6 Toetsgeluid KTOF / KTOn
7 Roger Beep RBOF / RBOn
8Feedback
Tone FTOF / FTOn
9
Laadstand
van de
accu
3 / 2 / 1 / 0

12
4.1 Wisselen van kanalen
Gelieve, om naar een ander kanaal over te gaan, als volgt te werk te gaan:
• Druk 1 x lang op de toets <Functietoets Omhoog>, het actuele kanaalnummer knippert op het
display.
• Door de toets <Functietoets Omhoog> of <Functietoets Omlaag> kort in te drukken, kan het
gewenste kanaal ingesteld worden.
• Door het indrukken van de <PTT-toets> wordt het instelmenu beëindigd en bevindt de portofoon
zich weer in de ontvangstmodus.
Opmerking: Kanalen 1 tot 16 zijn standaard beschikbaar. Kanalen 17 tot 32 moeten door de gebru-
iker worden geactiveerd. De kanalen 17 tot en met 32 mogen alleen worden gebruikt in landen waar
deze frequenties door de autoriteiten zijn toegestaan.
Om de kanalen 17 tot 32 te activeren, gaat u als volgt te werk:
• Houd de <PTT-toets> en de <Functietoets Omlaag> ingedrukt en schakel de radio in. Laat beide
knoppen na 3 seconden los, nu zijn 32 kanalen geactiveerd.
Om de kanalen 17 tot 32 te deactiveren, gaat u als volgt te werk:
• Houd <Functietoets Omhoog> en <Functietoets Omlaag> ingedrukt en schakel de radio in.
Laat beide knoppen na 3 seconden los. De radio voert een volledige reset uit en zal dan in
16-kanaals modus zijn.
4.2 Ruisonderdrukker (Squelch)
Met de instelling van het niveau van de ruisonderdrukker legt u vast, tot welke sterkte van het
aangekomen signaal de portofoon stil afgestemd blijft. Dat betekent; hoe hoger het niveau ingesteld
is, hoe sterker het binnenkomende signaal zijn, opdat het hoorbaar wordt. U kunt het niveau tussen
„0“ en „9“ instellen, waarbij „3“ de standaardinstelling is. Gelieve, om de instellingen te wijzigen,
als volgt te werk te gaan:
• Druk 2 x lang de toets <Functietoets Omhoog>, in en de actuele instelling wordt knipperend
op het display aangegeven.
• Door de toets <Functietoets Omhoog> of <Functietoets Omlaag> kort in te drukken, kan de
gewenste waarde (0 - 9) ingesteld worden.
• Door het indrukken van de <PTT-toets> wordt het instelmenu beëindigd en bevindt de portofoon
zich weer in de ontvangstmodus.
4.3 Instellingen QT-geluid en DQT-code
QT en DQT zijn functies die ongewenste signalen op uw kanaal afwijzen. U hoort een oproep alleen
wanneer u een signaal ontvangt dat een passend QT-geluid resp. een passende DQT-code omvat.
Wanneer er een oproep met een ander geluid resp. met een andere code ontvangen wordt, blijft de
Squelch-functie actief en hoort u deze oproep niet. Evenzeer moet het ontvangststation een passend
geluid resp. een passende code hebben om uw oproep te horen wanneer u met QT of DQT zendt.
Gelieve in acht te nemen dat derden uw oproepen kunnen blijven horen als u uw portofoon op
hetzelfde geluid resp. op dezelfde code instelt. Gelieve, om de instellingen te wijzigen, als volgt te
werk te gaan:
• Druk 3 x lang de toets <Functietoets Omhoog>, in en de actuele instelling wordt knipperend
op het display aangegeven.
• Door de toets <Functietoets Omhoog> of <Functietoets Omlaag> kort in te drukken, kan de
gewenste QT- of DQT-code ingesteld worden.
• Door het indrukken van de <PTT-toets> wordt het instelmenu beëindigd en bevindt de portofoon
zich weer in de ontvangstmodus.

13
De KENWOOD QT/DQT-standaardinstellingen voor ieder kanaal staan in de hiernavolgende
tabel vermeld. Zie blz. 20 van deze gebruiksaanwijzing voor een volledige lijst.
Ka. Freq. (MHz) QT/DQT Ka. Freq. (MHz) QT/DQT
1 446.00625 CT10 / 94.8 Hz 17* 446.10625 CT10 / 94.8 Hz
2 446.09375 CT08 / 88.5 Hz 18* 446.19375 CT08 / 88.5 Hz
3 446.03125 CT13 / 103.5 Hz 19* 446.13125 CT13 / 103.5 Hz
4 446.06875 CT05 / 79.7 Hz 20* 446.16875 CT05 / 79.7 Hz
5 446.04375 CT17 / 118.8 Hz 21* 446.14375 CT17 / 118.8 Hz
6 446.01875 CT18 / 123.0 Hz 22* 446.11875 CT18 / 123.0 Hz
7 446.08125 CT19 / 127.3 Hz 23* 446.18125 CT19 / 127.3 Hz
8 446.05625 CT07 / 85.4 Hz 24* 446.15625 CT07 / 85.4 Hz
9 446.00625 CT14 / 107.2 Hz 25* 446.10625 CT14 / 107.2 Hz
10 446.09375 CT15 / 110.9 Hz 26* 446.19375 CT15 / 110.9 Hz
11 446.03125 CT16 / 114.8 Hz 27* 446.13125 CT16 / 114.8 Hz
12 446.06875 CT06 / 82.5 Hz 28* 446.16875 CT06 / 82.5 Hz
13 446.04375 DT20 / D132N 29* 446.14375 DT20 / D132N
14 446.01875 DT24 / D155N 30* 446.11875 DT24 / D155N
15 446.05625 DT21 / D134N 31* 446.15625 DT21 / D134N
16 446.08125 DT33 / D243N 32* 446.18125 DT33 / D243N
* De kanalen 1 tot en met 16 zijn standaard beschikbaar. Kanalen 17 tot 32 moeten door de gebrui-
ker worden geactiveerd. De kanalen 17 tot en met 32 mogen alleen worden gebruikt in landen waar
deze frequenties door de autoriteiten zijn toegestaan.
4.4 Spraakgestuurd zenden (VOX) instellen
De portofoon is in staat om stil afgestemd (VOX) te zenden. In de VOX-modus zendt de portofoon
een signaal wanneer het door uw stem of door andere geluiden in uw omgeving geactiveerd wordt.
De gevoeligheid is in 3 trappen (1/2/3) instelbaar, waarbij trap 3 de gevoeligste trap is.
Gelieve, om de instellingen te wijzigen, als volgt te werk te gaan:
• Druk 4 x lang de toets <Functietoets Omhoog>, in en de actuele instelling wordt knipperend
op het display aangegeven.
• Door de toets <Functietoets Omhoog> of <Functietoets Omlaag> kort in te drukken, kan de
gewenste waarde (V.OF - V. 3) ingesteld worden.
• Door het indrukken van de <PTT-toets> wordt het instelmenu beëindigd en bevindt de portofoon
zich weer in de ontvangstmodus.

14
Opmerking: Door de <PTT-toets> i te drukken, wordt de VOX-modus beëindigd. De gebruikmaking
van deze functie in lawaaierige of winderige omgevingen is niet aanbevelenswaardig.
4.5 Belgsignaal
Belsignalen helpen om zich tegenover andere abonnees te identiceren en hen over uw oproep te
informeren. Daarvoor staan er 20 verschillende geluidssignalen (CA01 - CA20) ter beschikking.
Als elke abonnee van een ander geluid gebruik maakt, is de opbeller gemakkelijk te herkennen. Het
belsignaal wordt geactiveerd door de <PTT-toets> ingedrukt te houden en vervolgens ook kort op de
<Functietoets Omhoog> toets te drukken.
Gelieve, om de instellingen te wijzigen, als volgt te werk te gaan:
• Druk 5 x lang de toets <Functietoets Omhoog>, in en de actuele instelling wordt knipperend
op het display aangegeven.
• Door de toets <Functietoets Omhoog> of <Functietoets Omlaag> kort in te drukken, kan de
gewenste waarde (CA01 - CA20) ingesteld worden.
• Door het indrukken van de <PTT-toets> wordt het instelmenu beëindigd en bevindt de portofoon
zich weer in de ontvangstmodus.
4.6 Toetsgeluid Aan/Uit
Is het toetsgeluid geactiveerd, dan geeft de portofoon bij het indrukken van toetsen een akoestisch
signaal af. U kunt het toetsgeluid in- of uitschakelen (KTOF / KTOn). Gelieve, om de instellingen te
wijzigen, als volgt te werk te gaan:
• Druk 6 x lang de toets <Functietoets Omhoog>, in en de actuele instelling wordt knipperend
op het display aangegeven.
• Door de toets <Functietoets Omhoog> of <Functietoets Omlaag> kort in te drukken, kan de
gewenste waarde (KTOF / KTOn) ingesteld worden.
• Door het indrukken van de <PTT-toets> wordt het instelmenu beëindigd en bevindt de portofoon
zich weer in de ontvangstmodus.
4.7 Roger-Beep Aan/Uit
De Roger-Beep is een door de portofoon gegenereerd geluidssignaal dat automatisch op het einde
van elk zendproces overgedragen wordt. Dit signaleert de gesprekspartner dat u uw oproep beëin-
digd hebt. U kunt de Roger-Beep in- of uitschakelen (RBOF / RBOn). Gelieve, om de instellingen te
wijzigen, als volgt te werk te gaan:
• Druk 7 x lang de toets <Functietoets Omhoog>, in en de actuele instelling wordt knipperend
op het display aangegeven.
• Door de toets <Functietoets Omhoog> of <Functietoets Omlaag> kort in te drukken, kan de
gewenste waarde (RBOF / RBOn) ingesteld worden.
• Door het indrukken van de <PTT-toets> wordt het instelmenu beëindigd en bevindt de portofoon
zich weer in de ontvangstmodus.
4.8 Feedback Tone Aan/Uit
De Feedback toon is een door de radio gegenereerde toon, die de verzender van een belsignaal (zie
punt 4.5) op zijn eigen toestel terugkoppelt dat het belsignaal op dat moment op het externe station
te horen is, door dezelfde toon op hetzelfde moment op zijn eigen toestel te laten klinken. U kunt
de feedbacktoon aan- of uitzetten (FTOn / FTOF). Gelieve, om de instellingen te wijzigen, als volgt
te werk te gaan:
• Druk 8 x lang de toets <Functietoets Omhoog>, in en de actuele instelling wordt knipperend
op het display aangegeven.
• Door de toets <Functietoets Omhoog> of <Functietoets Omlaag> kort in te drukken, kan de
gewenste waarde (FTOn / FTOF) ingesteld worden.
• Door het indrukken van de <PTT-toets> wordt het instelmenu beëindigd en bevindt de portofoon-

15
zich weer in de ontvangstmodus.
4.9 Laadstand van de accu
De laadstand van de accu wordt door middel van balksymbolen aangegeven. Aanvullen weerklinkt er
bij een lage accustand een geluidssignaal en knippert de laadindicator rood.
Gelieve, om de laadstand van de accu aan te geven, als volgt te werk te gaan:
• Druk 9 x de toets <Functietoets Omhoog> lang in en de actuele laadstand wordt op het display
aangegeven.
• Door het indrukken van de <PTT-toets> wordt het instelmenu beëindigd en bevindt de portofoon
zich weer in de ontvangstmodus.
4.10 Monitorfunctie
De monitorfunctie kan gebruikt worden om zwakkere signalen op het actuele kanaal te ontvangen.
De functie “Monitoring” schakelt u als volgt in:
• Door de toets <Functietoets Omlaag> kan de functie in- en uitgeschakeld worden.
Opmerking: De monitorfunctie functioneert onafhankelijk van de ingestelde QT- of DQT-code.
4.11 Kanaal-zoekfunctie (Scan)
Met de kanaal-zoekfunctie kunt u naar actieve kanalen zoeken. Wordt er een passend kanaal gevon-
den, dan stopt de zoekfunctie en wordt de communicatie weergegeven. Eindigt de transmissie op het
gevonden kanaal, dan wordt de kanaal-zoekfunctie automatisch voortgezet.
Gelieve, om de kanaal-zoekfunctie te starten, als volgt te werk te gaan:
• Druk 1 x de toets <Functietoets Omlaag> lang in en de zoekfunctie van kanaal 1 tot kanaal 16
wordt gestart.
• Als u, terwijl de zoekfunctie actief is, de toets <Functietoets Omhoog> of <Functietoets
Omlaag> kort indrukt, wordt de volgorde van de zoekfunctie omgekeerd.
Opmerking:
Wanneer de <PTT-toets> indrukt, terwijl u naar een gevonden kanaal luistert, gaat de
portofoon op het actuele kanaal terug naar de modus “Stand-by” over.
4.12 Energiebesparingsfunctie
Wordt de portofoon langer dan 10 seconden niet gebruikt, dan schakelt het automatisch naar de
energiebesparingsmodus over. Dit heeft geen invloed op de ontvangst van transmissies en de normale
modus wordt automatisch weer geactiveerd, zodra er een signaal gedetecteerd wordt.
Accu vol
Accu 2/3 geladen
Accu 1/3 geladen
Accu leeg

16
5. Oplossing van fouten
Aanwijzingen voor de foutopsporing
Probleem Oplossing
De portofoon kan niet ingeschakeld worden.
• De accu is ontladen. Laad de accu of
vervang de batterijen.
• De accu is niet correct geplaatst. Verwijder-
de accu en breng deze weer aan.
Als de accu herhaaldelijk opgeladen wordt,
verslechtert de accucapaciteit.
• De levensduur van de accu is verstreken.
Vervang de accu door een nieuwe.
U kunt de andere groepsleden niet horen of
met hen spreken.
• Vergewis u ervan dat u van hetzelfde
kanaal en van dezelfde QT/DQT-instellingen
als de andere groepsleden gebruik maakt.
• De andere groepsleden bevinden zich op
een te grote afstand. Vergewis u ervan dat
u zich binnen de reikwijdte van de andere
portofoons bevindt.
Andere abonnees (behalve groepsleden) zijn
op het kanaal te horen.
• Wijzig de QT/DQT-instellingen. Vergewis u
ervan dat alle groepsleden de instellingen op
hun portofoons wijzigen om bij de nieuwe
QT/DQT-instellingen te passen.
Opmerking:
Gelieve u, indien het probleem blijft bestaan, tot de KENWOOD-service te richten.
6. Afvalverwerwijdering
Afvoer van gebruikte elektrische en elektronische apparaten en batterijen.
Het symbool (doorgestreepte vuilnisbak) op het product of op de verpakking daarvan wijst erop dat
dit product niet als normaal huishoudelijk afval behandeld mag worden, maar op een recyclingpunt
voor de recycling van elektrische en elektronische apparaten en batterijen afgegeven moet worden
Door uw bijdrage aan een correcte afvoer van dit product beschermt u het milieu en de gezondheid
van uw medemens. Een onvakkundige of verkeerde afvoer brengt milieu en gezondheid in gevaar.
Bijkomende informatie over de recycling van dit product krijgt u van uw gemeente of van de gemeen-
telijke afvalverwerkende bedrijven.
Informatie over afvalverwijdering in Turkije vindt u in het Turks op bladzijde 18.

17
Frequentiegebied 446,0 - 446,2 MHz (PMR446)
Kanalen 32
Subcodes QT 38 + DQT 83
Radiofrequentie vermogen ≤ 500mW ERP
Maximaal zendvermogen max. 26,59 dBm
Reikwijdte maximaal 6 km*
Bedrijfstemperatuur -20°C tot +55°C
Bedrijfsspanning 3,7 V
Beschermingsklasse IP32
Inschakelduur / laadtijd max. 18 Std.* / ca. 3 Std.
Afmetingen (b x h x d) 52 x 157 x 28 mm
Gewicht incl. accu & riemclip 138 g
* Kan afhankelijk van terrein en omstandigheden variëren.
Lithium-ion-accu
Type KNB-86L
Spanning 3,7 V
Capaciteit 1150 mAh
Energie-inhoud 4,3 Wh
UN-nummer UN3481 Lithium-Ion Batterijen in / verpakt met
apparatuur
Laadtoestel
Fabrikant laadtoestel
SHENZHEN MERRYKING ELECTROINCS CO., LTD.
801, Bldg B, No. 1, Tianyang 2nd Road, Oriental
Community, Songgang Street, Bao’an District,
Shenzhen 518105, Guangdong, CHINA
Merk en modelidenticatie laadtoestel MKC-0502000VEUT / MKC-0502000VUKT
Ingangsspanning Wisselspanning 100 - 240 V
Ingangswisselstroomfrequentie 50 / 60 Hz
Uitgangsspanning / -stroom / -vermogen Gelijkspanning 5,0 V / 2,0 A / 10,0 W
Gemiddelde actieve efciëntie 81,1 %
Elektriciteitsverbruik in stand-by 0,07 W
Technische wijzigingen voorbehouden.
7. Technische gegevens UBZ-LJ9E

18
8. Garantie
Beste klant,
Dank u voor de aanschaf van dit KENWOOD product. Indien dit
product bij normaal gebruik materiaal- of fabricagefouten vertoont,
zullen wij het gratis repareren of vervangen in overeenstemming met
de garantievoorwaarden.
De garantie dekt geen verbruiksgoederen of onderdelen die aan
slijtage onderhevig zijn, zoals oplaadbare batterijen, die als onderdeel
van het normale onderhoud moeten worden vervangen.
Contactadres:
JVCKENWOOD Europe B.V.
Amsterdamseweg 37, 1422AC - Uithoorn
Tel. 0297-519 900, www.kenwood.nl
Afvalverwijdering in Turkije:
Eski Elektrikli ve Elektronik Cihazların ve Pillerin İmhası Hakkında Bilgi (ayrı atık toplama sistemlerine
sahip olan ülkelerde geçerlidir).
Bu sembolü (üzeri çizili çöp bidonu) içeren ürün ve piller evsel atı k çöpleri ile birlikte atılamaz.
Kullanılmış elektrikli ve elektronik cihaz ve piller, bu tür maddeleri ve bunların yan ürünlerini iş
lemeye elverişli bir geri kazanım tesisine gönderilmelidir.
Size en yakın geri kazanım tesisinin konumunu öğrenmek üzere yerel yetkililerinize danışın.
Doğru geri kazanım ve atık uzaklaştırma y öntemleri, sadece öz kaynakların korunmasına
yardımcı olmakla kalmayıp ayrıca sağlığımıza ve çevreye olacak zararlı etkilerini engellemeye
yardımcı olur.
Bu ürün 28300 sayılı Resmi Gazete’de yayımlanan Atik Elektrikli ve Elektronik
Eşyalarin Kontrolü Yönetmeliğe uygun olarak üretilmiştir.

19
9. SAR-waarden voor de radio UBZ-LJ9E
Model SAR Voor SAR Achter
UBZ-LJ9E 0,4 W/kg 0,45 W/kg
RF-grenswaarden voor de radio UBZ-LJ9E
LET OP:
Lees deze eenvoudige instructies voordat u deze PMR446 radio gaat gebruiken.
Deze PMR446 radio maakt gebruik van elektromagnetische radiofrequentie (RF) om commu-
nicatie tussen twee of meer gebruikers over een afstand mogelijk te maken.
Het maakt gebruik van radiofrequentie (RF) energie of radiogolven om oproepen te verzen-
den en te ontvangen.
De KENWOOD UBZ-LJ9E radio is ontworpen, gefabriceerd en getest om te voldoen aan
EU-aanbeveling 1999/519/EG voor RF-blootstellingslimieten.
Deze grenswaarden geven aanbevolen blootstellingsniveaus voor het grote publiek.
Om de blootstelling aan RF binnen aanvaardbare grenzen te houden, mag u niet meer dan
50% van de totale gebruikstijd van de radio zenden.
Als u meer dan 50% van de totale bedrijfstijd uitzendt, kunt u de limieten volgens de
RF-blootstellingsvoorschriften van de FCC overschrijden.
Houd de radio verticaal voor uw gezicht met de microfoon en andere delen van de radio,
met inbegrip van de antenne, op ten minste 2,5 centimeter van uw neus of lippen, om
ervoor te zorgen dat u aan de limieten voldoet.
Een grotere afstand tussen uw gezicht en de antenne vermindert de blootstelling aan RF.

© 2022
QT-codes
CT01/67.0 Hz CT14/107.2 Hz CT27/167.9 Hz CT02/71.9 Hz CT15/110.9 Hz
CT28/173.8 Hz CT03/74.4 Hz CT16/114.8 Hz CT29/179.9 Hz CT04/77.0 Hz
CT17/118.8 Hz CT30/186.2 Hz CT05/79.7 Hz CT18/123.0 Hz CT31/192.8 Hz
CT06/82.5 Hz CT19/127.3 Hz CT32/203.5 Hz CT07/85.4 Hz CT20/131.8 Hz
CT33/210.7 Hz CT08/88.5 Hz CT21/136.5 Hz CT34/218.1 Hz CT09/91.5 Hz
CT22/141.3 Hz CT35/225.7 Hz CT10/94.8 Hz CT23/146.2 Hz CT36/233.6 Hz
CT11/97.4 Hz CT24/151.4 Hz CT37/241.8 Hz CT12/100.0 Hz CT25/156.7 Hz
CT38/250.3 Hz CT13/103.5 Hz CT26/162.2 Hz
DQT-codes
DT01/D023N DT29/D174N DT57/D445N DT02/D025N DT30/D205N
DT58/D464N DT03/D026N DT31/D223N DT59/D465N DT04/D031N
DT32/D226N DT60/D466N DT05/D032N DT33/D243N DT61/D503N
DT06/D043N DT34/D244N DT62/D506N DT07/D047N DT35/D245N
DT63/D516N DT08/D051N DT36/D251N DT64/D532N DT09/D054N
DT37/D261N DT65/D546N DT10/D065N DT38/D263N DT66/D565N
DT11/D071N DT39/D265N DT67/D606N DT12/D072N DT40/D271N
DT68/D612N DT13/D073N DT41/D306N DT69/D624N DT14/D074N
DT42/D311N DT70/D627N DT15/D114N DT43/D315N DT71/D631N
DT16/D115N DT44/D331N DT72/D632N DT17/D116N DT45/D343N
DT73/D654N DT18/D125N DT46/D346N DT74/D662N DT19/D131N
DT47/D351N DT75/D664N DT20/D132N DT48/D364N DT76/D703N
DT21/D134N DT49/D365N DT77/D712N DT22/D143N DT50/D371N
DT78/D723N DT23/D152N DT51/D411N DT79/D731N DT24/D155N
DT52/D412N DT80/D732N DT25/D156N DT53/D413N DT81/D734N
DT26/D162N DT54/D423N DT82/D743N DT27/D165N DT55/D431N
DT83/D754N DT28/D172N DT56/D432N
-
 1
1
-
 2
2
-
 3
3
-
 4
4
-
 5
5
-
 6
6
-
 7
7
-
 8
8
-
 9
9
-
 10
10
-
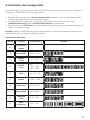 11
11
-
 12
12
-
 13
13
-
 14
14
-
 15
15
-
 16
16
-
 17
17
-
 18
18
-
 19
19
-
 20
20
-
 21
21
-
 22
22
-
 23
23
-
 24
24
-
 25
25
-
 26
26
-
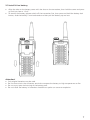 27
27
-
 28
28
-
 29
29
-
 30
30
-
 31
31
-
 32
32
-
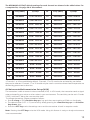 33
33
-
 34
34
-
 35
35
-
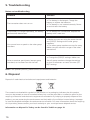 36
36
-
 37
37
-
 38
38
-
 39
39
-
 40
40
-
 41
41
-
 42
42
-
 43
43
-
 44
44
-
 45
45
-
 46
46
-
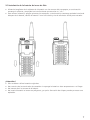 47
47
-
 48
48
-
 49
49
-
 50
50
-
 51
51
-
 52
52
-
 53
53
-
 54
54
-
 55
55
-
 56
56
-
 57
57
-
 58
58
-
 59
59
-
 60
60
-
 61
61
-
 62
62
-
 63
63
-
 64
64
-
 65
65
-
 66
66
-
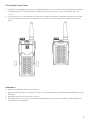 67
67
-
 68
68
-
 69
69
-
 70
70
-
 71
71
-
 72
72
-
 73
73
-
 74
74
-
 75
75
-
 76
76
-
 77
77
-
 78
78
-
 79
79
-
 80
80
-
 81
81
-
 82
82
-
 83
83
-
 84
84
-
 85
85
-
 86
86
-
 87
87
-
 88
88
-
 89
89
-
 90
90
-
 91
91
-
 92
92
-
 93
93
-
 94
94
-
 95
95
-
 96
96
-
 97
97
-
 98
98
-
 99
99
-
 100
100
-
 101
101
-
 102
102
-
 103
103
-
 104
104
-
 105
105
-
 106
106
-
 107
107
-
 108
108
-
 109
109
-
 110
110
-
 111
111
-
 112
112
-
 113
113
-
 114
114
-
 115
115
-
 116
116
-
 117
117
-
 118
118
-
 119
119
-
 120
120


Kenwood UBZ-LJ9SETE UBZ Twin Pack Licence Free Radio Manual de usuario
- Categoría
- Radios bidireccionales
- Tipo
- Manual de usuario
en otros idiomas
- français: Kenwood UBZ-LJ9SETE UBZ Twin Pack Licence Free Radio Manuel utilisateur
- italiano: Kenwood UBZ-LJ9SETE UBZ Twin Pack Licence Free Radio Manuale utente
- Deutsch: Kenwood UBZ-LJ9SETE UBZ Twin Pack Licence Free Radio Benutzerhandbuch
- Nederlands: Kenwood UBZ-LJ9SETE UBZ Twin Pack Licence Free Radio Handleiding