Contours KF008 Instrucciones de operación
- Categoría
- Muebles de bebe
- Tipo
- Instrucciones de operación

Manufactured by:
Kolcraft Enterprises, Inc.
1100 W Monroe St
Chicago, IL 60607
(800) 453-7673
www.kolcraft.com
Model #: KF008-WHT
Q056-R2 06/2020
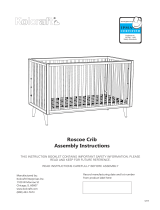
ROSCOE
CONVERTIBLE CRIB ASSEMBLY INSTRUCTIONS
INSTRUCCIONES DE MONTAJE DE LA CUNA CONVERTIBLE
ContoursBaby.com
THIS INSTRUCTION BOOKLET CONTAINS IMPORTANT SAFETY INFORMATION.
PLEASE READ AND KEEP FOR FUTURE REFERENCE.
READ INSTRUCTIONS CAREFULLY BEFORE ASSEMBLY.
Record manufacturing date and lot number
from product label here:
Love us . . . leave a review!

ContoursBaby.com | 2
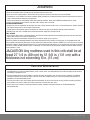
• Failure to follow these warnings and the assembly instructions could result in serious injury or death.
• Read all instructions before assembling crib. Keep instructions for future use.
• Never use plastic shipping bags or other plastic film as mattress covers because they can cause suffocation.
• To reduce the risk of sudden infant death syndrome (SIDS), pediatricians recommend healthy infants be placed on their backs to
sleep, unless otherwise advised by your physician.
• Infants can suffocate on soft bedding. Never add a pillow or comforter. Never place additional padding under an infant.
• Infants can suffocate in gaps between crib sides and a mattress that is too small.
STRANGULATION HAZARD
• Strings can cause strangulation! Do not place items with a string around a child’s neck, such as hood strings or pacifier cords. Do
not suspend strings over a crib or attach strings to toys.
• To help prevent strangulation, tighten all fasteners. A child can trap parts of the body or clothing on loose fasteners.
• DO NOT place crib near a window where cords from blinds or drapes may strangle a child.
FALL HAZARD
• When child is able to pull to a standing position, set mattress to lowest position and remove bumper pads, large toys and other
objects that could serve as steps for climbing out.
• Stop using crib when child begins to climb out or reaches the height of 35 in. (89 cm)
Check this product for damaged hardware, loose joints, loose bolts or other fasteners, missing parts, or sharp edges before and
after assembly and frequently during use. Securely tighten loose bolts and other fasteners. DO NOT use crib if any parts are missing,
damaged, or broken. Contact Kolcraft Enterprises, Inc. (www.contoursbaby.com/contact-us/) for replacement parts and instructional
literature if needed. DO NOT substitute parts. If refinishing, use a non-toxic finish specified for children’s products Follow warnings
on all products in a crib.
mCAUTION: Any mattress used in this crib shall be at
least 27 1/4 in. (69 cm) by 51 5/8 in. (131 cm) with a
thickness not exceeding 6 in. (15 cm).
mWARNING
• Wood is a natural material and as such it can be affected by changes in temperature and humidity. Extreme changes in humidity
and temperature can cause the wood to warp, swell, crack or shrink, thus compromising the structural integrity of the furniture
and making it dangerous to use.
• Furniture should always be stored indoors in climate controlled, dry locations. Use care when using a vaporizer or humidifier
around the furniture. Do not aim the vapor at the crib or any other wooden furniture in the nursery. Avoid using vaporizers or
humidifiers for extended periods of time.
• To clean the furniture, wipe with a damp cloth and immediately dry the surface. Do not use any chemical cleaners or polishes.
Such products can leave a residue on the finish and come in contact with your child.
• Please refer to your furniture’s instruction manual for proper assembly. Instruction manuals can be downloaded from
ContoursBaby.com
Care and Maintenance

888.226.4469 | 3
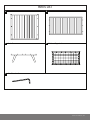
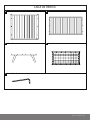
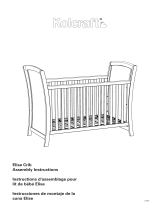
PARTS LIST
AEnd x2
CFeet x2 DMattress Support x1
BSide x2
EAllen Wrench x1

ContoursBaby.com | 4
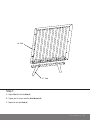
Step 1:
A. Align a Foot (C) with the End (A).
B. Tighten the six screws with the Allen Wrench (E).
C. Repeat for the other End (A).
C - Foot
A - End

888.226.4469 | 5
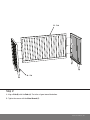
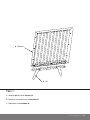
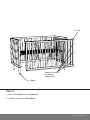
Step 2:
A. Align a Side (B) with the Ends (A). The taller rail goes toward the bottom.
B. Tighten the screws with the Allen Wrench (E).
A - End
B - Side

ContoursBaby.com | 6
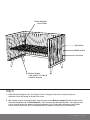
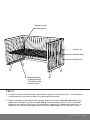
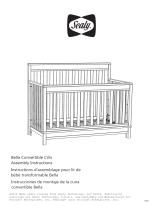
Step 3:
A. Flip the Mattress Support so the “This Side Up” label is facing up. If the label is missing, the correct
orientation is with the springs at the top of the frame.
B. With a helper to hold it at the right height, align the screws on the Mattress Support (D) with the holes on the
crib sides and tighten with the Allen Wrench (E). There are three possible height positions. The support should
start at the high position for newborns, then be moved lower as the child grows and becomes more mobile.
Once the child is able to pull up to a standing position, the support must be set to its lowest position.
High Position
Middle Position
Low Position
D - Mattress Support
Label reading “This Side Up”
should be facing up
Thread and tighten
all four screws

ContoursBaby.com | 7
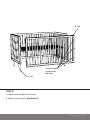
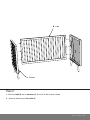
Step 4:
A. Align the other Side (B) with the Ends (A).
B. Tighten the screws with the Allen Wrench (E).
Thread and tighten
all three screws
(both sides)
A - End
B - Side

888.226.4469 | 8
• Si no sigue las advertencias y las instrucciones de montaje, podría sufrir lesiones graves o la muerte.
• Lea todas las instrucciones antes de armar la cuna. Guárdelas para futura referencia.
• Nunca use bolsas de embalaje de plástico u otro tipo de película plástica para cubrir el colchón, ya que pueden causar asfixia.
• Para reducir el riesgo de síndrome de muerte súbita del lactante (SMLS), los pediatras recomiendan recostar sobre la espalda a
los lactantes sanos al momento de dormir, a menos que su médico indique lo contrario.
• Los bebés pueden sofocarse a causa de la ropa de cama suave. Nunca coloque más acolchado debajo del bebé.
• Las separaciones entre las barandillas de la cuna y los colchones muy pequeños pueden asfixiar al bebé.
RIESGO DE ESTRANGULACIÓN
• ¡Las cuerdas pueden causar estrangulación! No coloque elementos con cuerdas alrededor de cuello del bebé, por ejemplo,
cuerdas de gorros o chupetes. No cuelgue cuerdas sobre la cuna ni ate cuerdas a los juguetes.
• Para prevenir la estrangulación, ajuste todos los sujetadores. Si están flojos, la ropa o alguna parte del cuerpo del bebé puede
quedar atrapada.
• NO coloque la cuna cerca de una ventana con cuerdas de persianas o cortinas, ya que pueden causar estrangulación.
RIESGO DE CAÍDA
• Cuando el bebé pueda pararse solo, coloque el colchón en la posición más baja y quite los acolchados, los juguetes grands y
otros objetos que puedan usarse como escalones.
• No use más la cuna cuando el bebé empiece a treparse o alcance una altura de 89 cm (35 in).
Tanto antes como después de armar el producto y con frecuencia durante el uso, revise que no haya elementos dañados,
conexiones sueltas, pernos u otros sujetadores flojos, piezas faltantes o bordes filosos. Ajusted con firmeza los pernos y otros
sujetadores flojos. NO use la cuna si alguna de sus partes falta, está dañada o está rota. Contáctese con Kolcraft Enterprises, Inc.
(
www.contoursbaby.com/contact-us/)
si necesita piezas de repuesto u otras instrucciones impresas. NO sustituya piezas. Si va a
aplicar otro acabado, use uno no tóxico y específico para productos infantiles. Respete las advertencias de todos los productos de
la cuna.
mPRECAUCIÓN: Los colchones para esta cuna deben
tener al menos 69 cm (27-1/4 in) por 131 cm (51-5/8
in) y su espesor no debe superar los 15 cm (6 in).
mADVERTENCÍA
• La madera es un material natural y, como tal, los cambios en la temperatura y la humedad pueden afectarla. Los cambios
extremos de humedad y temperatura pueden producir que la madera se deforme, hinche, agriete o contraiga, poniendo en riesgo
la integridad estructural del mueble, lo que lo convierte en peligroso a la hora del uso.
• Los muebles siempre deben guardarse en interiores, en ubicaciones aclimatadas y secas. Tenga cuidado cuando utilice
vaporizador o humidificador cerca de los muebles. No apunte el vapor hacia la cuna ni hacia ningún otro mueble de madera de la
habitación para niños. Evite usar vaporizadores o humidificadores durante largos períodos de timepo.
• Para limpiar los muebles, utilice un paño húmedo y seque inmediatamente la superficie. No utilice limpiadores químicos ni
lustradores. Dichos productos pueden dejar residuos en el acabado y entrar en contacto con los niños.
• Consulte el manual de instrucciones del mueble para ver el armado correcto. Los manuales de instrucciones pueden descargarse
de ContoursBaby.com.
Cuidado y Mantenimiento

888.226.4469 | 9
AExtremo x2
CPies x2 DSoporte de colchón x1
BLados x2
ELlave Allen x1
LISTA DE PARTES

ContoursBaby.com | 10
Paso 1:
A. Alinee un pie (C) con el extremo (A).
B. Apriete los seis tornillos con la llave allen (E).
C. Repita para el otro extremo (A).
C - Pie
A - Extremo

888.226.4469 | 11
Paso 2:
A. Alinee una lado (B) con los extremos (A). El carril más alto va hacia el fondo.
B. Ajuste los tornillos con la llave allen (E).
A - Extremo
B - Lado

ContoursBaby.com | 12
Paso 3:
A. Dé vuelta la base del colchón siguiendo la indicación de la etiqueta “Este lado hacia arriba”. Si no hay etiqueta,
el lado correcto es el que tiene los resortes en la parte superior del bastidor.
B. Busque un soporte para mantener la altura adecuada, alinee los tornillos de la base del colchón (D) con los
agujeros de las barandillas y ajuste con la llave allen (E). Se puede configurar en tres alturas. La base debe
configurarse en la posición más alta para los recién nacidos y luego bajarse a medida que el bebé crece y se
vuelve más activo. Cuando el bebé pueda pararse solo, la base debe configurarse en la posición más baja.
Posición alta
Posición media
Posición baja
Enrosque y ajuste
los cuatro tornillos
D - Soporte de colchón
La etiqueta que dice
"This Side Up" debe
estar hacia arriba

888.226.4469 | 13
Paso 4:
A. Alinee la otra lado (B) con los extremos (A).
B. Ajuste los tornillos con la llave allen (E).
Enrosque y ajuste los
tres tornillos
(ambos lados)
A - Extremo
B - Lado
-
 1
1
-
 2
2
-
 3
3
-
 4
4
-
 5
5
-
 6
6
-
 7
7
-
 8
8
-
 9
9
-
 10
10
-
 11
11
-
 12
12
-
 13
13


Contours KF008 Instrucciones de operación
- Categoría
- Muebles de bebe
- Tipo
- Instrucciones de operación
en otros idiomas
Artículos relacionados

Otros documentos
-
 Payson Studios PF001 Product Instruction
-
 Kolcraft KF008 Product Instruction
-
 Kolcraft Elise Product Instruction
-
 Kolcraft KF006 Product Instruction
-
 Sealy Batavia Crib Product Instruction
-
 Kolcraft KF005 Product Instruction
-
 Sealy EF002 Product Instruction
-
 Mira Studios RF003 Product Instruction
-
 Kolcraft KF001 Manual de usuario
-
 Kolcraft EF001 Manual de usuario


