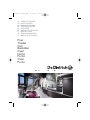
De Dietrich DOP740BH El manual del propietario
- Categoría
- Microondas
- Tipo
- El manual del propietario
Este manual también es adecuado para

FR GUIDE D'UTILISATION
CS NÁVOD K POUŽITÍ
DA BRUGERVEJLEDNING
DE BETRIEBSANLEITUNG
EN USER GUIDE
ES MANUAL DE UTILIZACIÓN
IT MANUALE D'USO
NL GEBRUIKSAANWIJZING
PT MANUAL DE UTILIZAÇÃO
Four
Trouba
Ovn
Backofen
Oven
Horno
Forno
Oven
Forno
99641511_A_MULTI.qxp 20/03/2007 12:09 Page 1
La página se está cargando...
La página se está cargando...
La página se está cargando...

5
FR
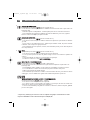
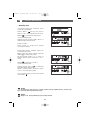
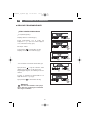
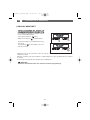
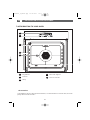
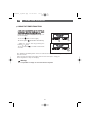
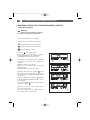
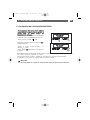
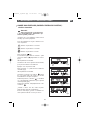
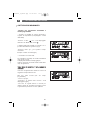
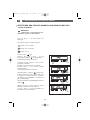
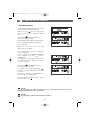
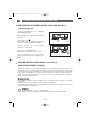
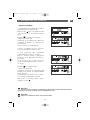
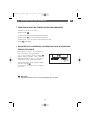
1 / DESCRIPTION DE VOTRE APPAREIL
••
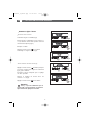
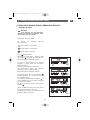
PRESENTATION DU PROGRAMMATEUR
A
P
A
B
Affichage des modes de cuisson
Affichage de la température du four
Indicateur de gradins et du mode
de cuisson choisis
Indicateur de montée en température
Touches de réglages
Touches de validation des réglages
Affichage de l’horloge ou de la minuterie
Réglage des durées/fin de cuisson et
mise à l’heure
Indicateur de minuterie
C
D
E
Indicateur de verrouillage clavier (sécurité enfant)
Réglage de température
Start/Stop
Affichage fin de cuisson
Indicateur fin de cuisson
Indicateur durée de cuisson
Affichage durée de cuisson
Indicateur de nettoyage
Verrouillage pyrolyse (modèle DOP740*)
F
G
H
I
C
D
F
E
H
K
L
O
N
Q
J
I
G
B
M
J
K
L
M
N
O
P
Q
R
R
99641511_A_MULTI.qxp 20/03/2007 12:09 Page 5

6
FR
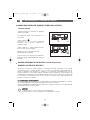
2 / UTILISATION DE VOTRE APPAREIL
•
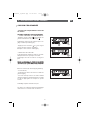
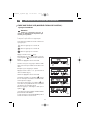
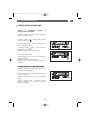
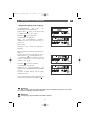
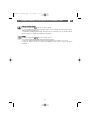
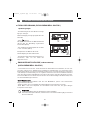
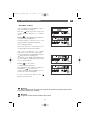
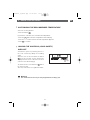
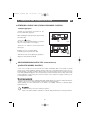
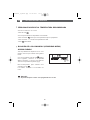
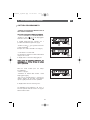
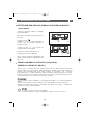
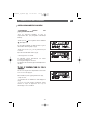
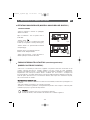
Comment régler l’heure
--
A la mise sous tension
L’afficheur clignote à 12H00 (fig.1)
Réglez l’heure en appuyant sur les touches +
et - (le maintien de la touche permet d’obtenir
un défilement rapide) (fig.2).
Exemple : 12H30.
Appuyez sur la touche pour valider.
L’affichage ne clignote plus (fig.3).
fig.1
fig.2
fig.2
fig.3
fig.1
- Pour remettre à l’heure l’horloge
Appuyez sur la touche pendant quelques
secondes jusqu’à faire clignoter l’afficheur
(fig.1), puis relâchez.
Des bips sonores indiquent que le réglage
est alors possible.
Ajustez le réglage de l’heure avec les
touches + et - (fig.2).
Appuyez sur la touche
OOKK
pour valider.
Attention
S’il n’y a pas de validation par la
touche OK, l’enregistrement est automa-
tique au bout de quelques secondes.
99641511_A_MULTI.qxp 20/03/2007 12:09 Page 6
La página se está cargando...
La página se está cargando...
La página se está cargando...
La página se está cargando...
La página se está cargando...
La página se está cargando...
La página se está cargando...
La página se está cargando...
La página se está cargando...
La página se está cargando...
La página se está cargando...
La página se está cargando...

19
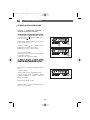
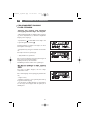
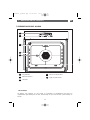
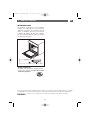
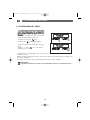
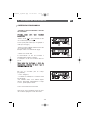
1 / POPIS VAŠEHO SPOTŘEBIČE
CS
19
POPIS PŘÍSTROJE
••
A
B
Programový panel
Ovládací lišta
Žárovka
C
D
E
Vodicí lišta
Otvor pro rožeň
D
C
B
A
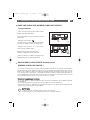
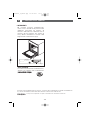
•Příslušenství
Váš přístroj je vybaven dvěmi bezpečnostními mřížkami s úchytkou, jedním grilem s úchytkou
pro plech o 45mm, formou na pečení Lissium a plechem 45mm.
E
99641511_A_MULTI.qxp 20/03/2007 12:10 Page 19

20
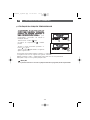
1 / POPIS VAŠEHO SPOTŘEBIČE
CS
20
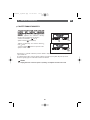
POPIS PROGRAMAČNÍHO PANELU
••
A
P
A
B
Zobrazení způsobu pečení
Zobrazení teploty v troubě
Ukazatel zvoleného stupně a
způsobu pečení.
Ukazatel zvyšování teploty
Tlačítka nastavení.
Tlačítka potvrzení nastavení.
Zobrazení hodin nebo minutky
Nastavení doby/konce pečení a
nastavení času
Ukazatel minutky
C
D
E
Ukazatel uzamčení klávesnice (dětská pojistka)
Nastavení teploty
Start/Stop
Zobrazení ukončení pečení
Ukazatel konce pečení
Ukazatel doby pečení
Zobrazení doby pečení
Ukazatel čistění
Uzamknutí pyrolýzy (model DOP740*)
F
G
H
I
C
D
F
E
H
K
L
O
N
Q
J
I
G
B
M
J
K
L
M
N
O
P
Q
R
R
99641511_A_MULTI.qxp 20/03/2007 12:10 Page 20

21
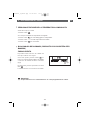
2 / POUŽITÍ PŘÍSTROJE
CS
21
OVLÁDÁNÍ PROGRAMAČNÍHO PANELU
•
Jak nastavit čas
--
Při zapojení do elektrické sítě
Na displeji bliká údaj 12:00 (obr.1).
Nastavte hodinu stiskem tlačítka + nebo -
(přidržením prstu na tlačítku umožníte rychlejší
změnu hodin) (obr.2)
Příklad: 12H30
Potvrďte stlačením tlačítka .
Zobrazení již nebliká (obr.3).
obr.1
obr.2
obr.2
obr.3
obr.1
- Chcete-li na hodinách nastavit správný čas
Tiskněte tlačítko několik vteřin, až začne
zobrazení blikat (obr.1), potom tlačítko uvolněte.
Zvukové signály značí, že je možno provést
nastavení.
Nastavte hodiny pomocí tlačítek + nebo -
(obr.2).
Stiskem tlačítka
OOKK
nastavení potvrdíte.
Pozor
Nepotvrdíte-li nastavení tlačítkem OK,
nastavení se za několik vteřin potvrdí
automaticky.
••
99641511_A_MULTI.qxp 20/03/2007 12:10 Page 21
La página se está cargando...

23
2 / POUŽITÍ PŘÍSTROJE
CS
23
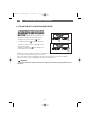
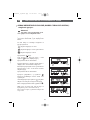
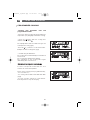
--
Pečení s okamžitým startem a
naprogramovanou dobou.
- Vyberte si způsob pečení a nastavte teplotu (viz
odstavec okamžité pečení .
- Tiskněte tlačítko “ ”, dokud nezačne blikat
ukazatel doby pečení “ ”.
Na displeji bliká 0h00, což Vám oznamuje, že lze
provést nastavení (obr.
1).
- Stiskněte tlačítko
++
nebo
--
, čímž nastavíte
požadovanou dobu pečení.
Příklad: Pečení po dobu 30 min (obr.
2
).
— Ppotvrďte tlačítkem OK.
Uložení doby pečení se provede automaticky po
několika vteřinách.
Zobrazená doba pečení už nebliká.
Doba pečení se začne odpočítávat ihned po
nastavení.
PPoo ttěěcchhttoo 33 úúkkoonneecchh ssee ttrroouubbaa zzaaččnnee vvyyhhřříívvaatt::
Jakmile trouba dosáhne nastavené teploty, ozve
se série zvukových signálů.
Na konci pečení (konec naprogramovaného času)
- trouba se zastaví,
- ukazatel doby pečení zhasne a 0:00 blikají
(obr.
3),
- během několika minut se vydávají zvukové
signály. Definitivne je zastavíte stlačením
jakéhokoliv tlačítka.
obr.2
PEČENÍ NAPROGRAMOVANÉ
••
obr.1
obr.3
99641511_A_MULTI.qxp 20/03/2007 12:10 Page 23

24
2 / POUŽITÍ PŘÍSTROJE
CS
24
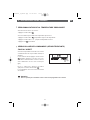
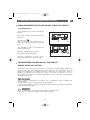
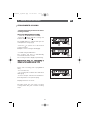
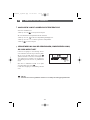
--
Pečení s odloženým začátkem a
zvoleným časem konce pečení
PPoossttuuppuujjttee jjaakkoo uu nnaapprrooggrraammoovvaannééhhoo ppeeččeenníí..
- Stiskněte tlačítko “ ”, až začne blikat symbol
konce pečení “ ”.
Symbol bliká, čímž oznamuje, že je možné
provést nastavení (obr.
1).
- Stiskněte tlačítko
++
nebo
--
, čímž nastavíte
požadovanou hodinu konce pečení.
Příklad: konec pečení v 16hod (obr.
2).
— Potvrďte tlačítkem OK.
Uložení konce pečení se provede automaticky
po několika vteřinách.
Zobrazení konce pečení již nebliká.
PPoo ttěěcchhttoo 33 úúkkoonneecchh jjee zzaaččáátteekk vvyyhhřříívváánníí
ooddlloožžeenn ttaakk,, aabbyy ppeeččeenníí sskkoonnččiilloo vvee 1166hhoodd..
Na konci pečení (konec naprogramovaného
času)
- trouba se zastaví,
- symbol doby pečení a 0:00 blikají (obr.
3),
- během několika minut se vydávají zvukové
signály. Definitivne je zastavíte stlačením
jakéhokoliv tlačítka.
Displej znovu ukazuje hodiny.
Vnitřek trouby je osvětlen od začátku pečení a
zhasne na konci pečení.
obr.1
obr.2
obr.3
PEČENÍ NAPROGRAMOVANÉ
••
99641511_A_MULTI.qxp 20/03/2007 12:10 Page 24
La página se está cargando...
La página se está cargando...

27
3 / RŮZNÉ ZPŮSOBY PEČENÍ V TROUBĚ
CS
27
*
Sekvence používaná(é) pro oznámení uvedené na energetické etiketě podle evropské normy EN 50304 a
podle Evropské směrnice 2002/40/ES.
VVÍÍŘŘEENNÍÍ HHOORRKKÉÉHHOO VVZZDDUUCCHHUU
(doporučná teplota
118800°°CC
min. 35°C max. 235°C)
•
Trouba se vyhřívá vyhřívacím tělesem umístěným v zadní části za současného
rozhánění vzduchu ventilátorem rozhánění vzduchu.
•
Rychlý vzestup teploty. Některé pokrmy je možno vložit do nevyhřáté trouby.
•
Doporučuje se k uchování lahodné měkkosti bílých mas, ryb, zeleniny.
Pro různé typy pečení do 3 úrovní
KKOOMMBBIINNOOVVAANNÝÝ HHOORRKKÝÝ VVZZDDUUCCHH
doporučená teplota
220055°°CC
min. 35°C max. 275°C)
•
Pečení zespodu a shora a rozháněním vzduchu ventilátorem.
•
Tři spojené zdroje tepla: Silné vyhřívání odspodu, mírný horkovzdušný oběh a lehké
dávkování grilu.
•
Doporučuje se pro slané koláče quiche, koláče s náplní, šťavnaté ovocné koláče,
nejlépe v hliněné formě.
EECCOO
(doporučená teplota
220000°°CC
min. 35°C max. 275°C)
•
Pečení shora a zespodu?
•
Tato poloha umožňuje dosáhnout úspory energie a přitom zachovat skvělé vlastnosti
pečení.
•
Poloha ECO se používá pro energetické etikety.
•
Pečení se děje
bbeezz ppřřeeddeehhřřááttíí..
DDVVOOJJIITTÝÝ GGRRIILL ++ OOTTÁÁČČEECCÍÍ RROOŽžEEŇŇ
(doporučená teplota
220000°°CC
min. 180°C max. 230°C)
•
Peče se střídavě shora a s rozháněním vzduchu ventilátorem rozhánění vzduchu.
•
Předehřátí není nutné. Drůbež a pečeně šťavnaté a křupavé ze všech stran.
•
Otočný rožeň je dále v provozu až do otevření dvířek.
•
Zasuňte plech na zachytávání tuku do spodní vodící lišty.
•
Doporučuje se pro drůbeží maso nebo pečeně na rožni, pro jejich uchycení a dobré
propečení, pro hovězí žebírka. Pro zachování šťavnatosti kousků ryb.
VVAARRIIAABBIILLNNII GGRRIILLYY SSTTŘŘEEDDNNÍÍ aa SSIILLNNÝÝ ++ RROOŽžEEŇŇ
(doporučené pozice
22 nneebboo 44
- min. 1 - max. 4)
•
Ohřev shora
•
Dvojitý gril pokrývá celou plochu roštu. Střední gril vykazuje stejnou účinnost jako silný
gril, ale u menších množství.
•
Doporučeno pro grilování kotlet, klobás, plátků chleba, obřích krevet položených na
grilu.
*
*
99641511_A_MULTI.qxp 20/03/2007 12:10 Page 27
La página se está cargando...
La página se está cargando...
La página se está cargando...
La página se está cargando...
La página se está cargando...
La página se está cargando...
La página se está cargando...

35
1 / BESKRIVELSE AF APPARATET
DA
OVERSIGT OVER PROGRAMVÆLGER
••
A
P
A
B
Display af fremgangsmåder for bagning
og stegning
Display til ovntemperatur
Trin- eller rilleindikator og indikator for den
valgte fremgangsmåde for bagning eller
stegning.
Indikator for temperaturstigning
Indstillingstaster
Taster til godkendelse afvalgte indstillinger
Display af ur eller minutur
Regulering af varighed/sluttidspunkt og
indstilling af ur
Indikator for minutur
C
D
E
Indikator for låsning af tastatur (børnesikring).
Indstilling af temperatur
Start/Stop
Display for endt tilberedning
Indikator for endt tilberedning
Indikator for varighed af bagning eller stegning
Display for varighed af bagning eller stegning
Indikator for rengøring
Fastlåsning ved pyrolyse (model DOP740*)
F
G
H
I
C
D
F
E
H
K
L
O
N
Q
J
I
G
B
M
J
K
L
M
N
O
P
Q
R
R
99641511_A_MULTI.qxp 20/03/2007 12:10 Page 35

36
2 / ANVENDELSE AF APPARATET
DA
BRUG AF PROGRAMVÆLGER
•
Sådan indstilles klokkeslættet
--
Ved spændingsføring
Displayet blinker ved 12h00 (fig.1).
Indstil klokkeslættet ved at trykke på
knapperne + og - (hvis du holder knappen
nede, ruller tallene forbi) (fig.2).
Eksempel: 12H30
Tryk på tasten for at bekræfte dit valg.
Displayet holder op med at blinke (fig.3).
fig.1
fig.2
fig.2
fig.3
fig.1
- For at indsætte det aktuelle klokkeslæt igen
Tryk på tasten i nogle få sekunder, indtil
displayet (fig.1) blinker, og slip tasten igen.
Nogle biplyde angiver, at indstillingen nu kan
udføres.
Foretag en indstilling af klokkeslættet ved
hjælp af tasterne + og - (fig.2).
Tryk på tasten
OOKK
for at bekræfte dit valg.
Advarsel!
Hvis der ikke bekræftes ved tryk på
tasten OK, sker registreringen automatisk
efter nogle få sekunder.
••
99641511_A_MULTI.qxp 20/03/2007 12:10 Page 36

37
2 / ANVENDELSE AF APPARATET
DA
•Omgående kogning eller stegning
— Programvælgeren skal kun vise
klokkeslættet. Den skal ikke blinke.
Tryk på tasten (fig.1), og foretag dit valg
ved hjælp af tasterne + eller - (fig.2).
Eksempel: —> trin 2 anbefales.
— Tryk på OK for at godkende.
Bage- eller stegeindikatoren fastfryser.
Indikatoren for riste og de elementer, der er i
gang, vises.
Ovnen starter.
Sæt fadet i ovnen i henhold til angivelsen i
displayet.
Ovnen foreslår den optimale temperatur til den
valgte ret.
Du kan også regulere temperaturen ved at
trykke på tasten under displayet (fig.3).
“°C” blinker på displayet og angiver, at du kan
regulere temperaturen ved at trykke på
tasterne + eller - (fig.4).
Eksempel: —> justeret ved 220°C.
— Tryk på OK for at godkende.
Indikatoren for temperaturstigning
angiver forløbet af temperaturstigningen inden
i ovnen.
Der lyder en række biplyde, når den valgte
temperatur er nået.
For at stoppe bagningen eller stegningen skal
du trykke i nogle sekunder på knappen .
fig.2
Advarsel!
Al bagning og stegning udføres med lukket ovnlåge.
Advarsel!
Efter en bage- eller stegecyklus fortsætter ovnens ventilator med at køre i en periode
for at sikre en nedkøling af ovnens elementer.
fig.1
fig.3
fig.4
99641511_A_MULTI.qxp 20/03/2007 12:10 Page 37

38
DA
2 / ANVENDELSE AF APPARATET
--
Bagning eller stegning med omgående
start og programmeret bage- eller stegetid
- Vælg fremgangsmåde for bagning eller stegning,
og juster temperaturen (se afsnittet: Omgående
bagning eller stegning).
- Tryk på tasten , indtil indikatoren for bage- eller
stegetid begynder at blinke .
Displayet blinker ved 0:00 for at angive, at du nu
kan regulere tiden (fig.
1).
- Tryk på tasten
++
eller
--
for at indstille den ønskede
tid.
Eksempel: 30 min. kogetid (fig.
2).
— Tryk på OK for at godkende.
Efter nogle få sekunder sker tidsregistreringen af
bage- eller stegetiden automatisk.
Displayet holder op med at blinke.
Nedtællingen starter straks efter reguleringen.
NNåårr ddiissssee ttrree hhaannddlliinnggeerr eerr uuddfføørrtt,, ooppvvaarrmmeess
oovvnneenn::
Der lyder en række biplyde, når den valgte
temperatur er nået.
Efter endt bagning eller stegning (programmerede
tid).
- stopper ovnen,
- indikatoren for bage- og stegetid angiver 0:00 og
begynder at blinke (fig.
3),
- der udsendes en række biplyde i et par minutter.
For at stoppe disse biplyde kan du trykke på en
vilkårlig tast.
fig.2
PROGRAMMERET BAGNING
ELLER STEGNING
••
fig.1
fig.3
99641511_A_MULTI.qxp 20/03/2007 12:10 Page 38
La página se está cargando...
La página se está cargando...
La página se está cargando...
La página se está cargando...
La página se está cargando...
La página se está cargando...
La página se está cargando...
La página se está cargando...

47
FR
02
DE
47
EN
92
ES
77
IT
92
NL
107
PT
122
DA
32
CS
17
Liebe Kundin, lieber Kunde,
Sie haben soeben einen
DDEE DDIIEETTRRIICCHH
Backofen erworben, und wir
danken Ihnen dafür.
Unsere Forschungsteams haben für Sie diese neue Generation von
Geräten entwickelt, die durch Qualität, Ästhetik, Funktionen und
technische Fortentwicklung Ausnahmeprodukte sind und unser
Know-how unter Beweis stellen.
Ihr neuer
DDEE DDIIEETTRRIICCHH
Ofen fügt sich harmonisch in Ihre Küche ein
und verbindet perfekt Kochleistung mit einfacher Benutzung. Wir
wollten Ihnen ein exzellentes Produkt bieten.
In der
DDEE DDIIEETTRRIICCHH
Produktpalette finden Sie auch eine große
Auswahl an Küchenherden, Kochfeldern, Dunstabzugshauben,
Geschirrspülern und Einbaukühlschränken, die Sie auf Ihren neuen
DDEE DDIIEETTRRIICCHH
Ofen abstimmen können.
Wir sind stets darum bemüht, Ihrer Anforderungen an unsere
Produkte so gut wie möglich zu erfüllen. Unser Verbraucherservice
steht Ihnen daher selbstverständlich immer zur Verfügung und geht
auf alle Ihre Fragen und Anregungen ein (Adresse am Schluss dieser
Anleitung).
Besuchen Sie uns auch unter:
wwwwww..ddeeddiieettrriicchh--eelleeccttrroommeennaaggeer
r..ccoomm
. Dort finden Sie unsere letzten
Innovationen und weitere nützliche Information.
DDEE DDIIEETTRRIICCHH
DDiiee nneeuueenn WWeerrttoobbjjeekkttee
Da wir unsere Produkte ständig verbessern möchten, behalten wir uns im Zuge der technischen
Weiterentwicklung das Recht vor, ihre technischen, funktionellen und ästhetischen Merkmale zu
verändern.
Wichtig:
Bitte lesen Sie die vorliegenden Hinweise zu Einbau und Gebrauch aufmerksam vor
der ersten Inbetriebnahme durch, damit Sie Ihr Gerät schnell beherrschen.
99641511_A_MULTI.qxp 20/03/2007 12:11 Page 47
La página se está cargando...

49
1 / BESCHREIBUNG DES GERÄTS
DE
ÜBERSICHT ÜBER DEN OFEN
••
A
B
Programmierer
Bedienleiste
Lampe
C
D
E
Einschubleistenhalter
Loch für Spieß
D
C
B
A
•Zubehör
Ihr Ofen wird mit zwei Sicherheitsrosten mit Griff, einem Rost mit Griff für ein 45 mm Blech,
einem Lissium-Backblech und einem Blech 45 mm geliefert.
E
99641511_A_MULTI.qxp 20/03/2007 12:11 Page 49

50
1 / BESCHREIBUNG DES GERÄTS
DE
BESCHREIBUNG DES PROGRAMMIERERS
••
A
P
A
B
Anzeige der Gararten
Anzeige der Ofentemperatur
Anzeige der gewählten Einschubleiste
und Garart
Anzeige für den Temperaturanstieg
Einstelltasten
Tasten zur Bestätigung der
Einstellungen
Anzeige der Uhr oder des
Kurzzeitweckers
Einstellung der Gardauer/Ende des
Garvorgangs und Uhrzeiteinstellung
Anzeige des Kurzzeitweckers
C
D
E
Anzeiger für die Tastatursperre (Kindersicherung)
Temperatureinstellung
Start/Stopp
Anzeige für Ende des Garvorgangs
Anzeige des Endes der Garzeit
Anzeiger der Gardauer
Anzeige der Gardauer
Reinigungsanzeige
Pyrolyseverriegelung (Modell DOP740*)
F
G
H
I
C
D
F
E
H
K
L
O
N
Q
J
I
G
B
M
J
K
L
M
N
O
P
Q
R
R
99641511_A_MULTI.qxp 20/03/2007 12:11 Page 50

51
2 / BENUTZUNG DES GERÄTS
DE
NUTZUNG DES PROGRAMMIERERS
•
Einstellung der Uhr
--
Bei Anschluss an den Strom
Die Anzeiger blinkt auf 12.00 Uhr. (Abb.1)
Die Uhrzeit durch Drücken der Tasten + und -
einstellen (bei Festhalten der Taste erfolgt ein
Schnelldurchlauf) (Abb.2).
Beispiel: 12.30 Uhr
Zur Bestätigung die Taste drücken.
Die Anzeige blinkt nicht mehr (Abb.3)
.
Abb.1
Abb.2
Abb.2
Abb.3
Abb.1
- Einstellung der korrekten Uhrzeit
Taste einige Sekunden lang gedrückt
halten, bis die Anzeige blinkt (Abb.1), dann
loslassen.
Signaltöne geben an, dass eine Einstellung
vorgenommen werden kann.
Die Uhrzeit mit den Tasten + und - einstellen
(Abb.2).
Zur Bestätigung Taste
OOKK
drücken.
Achtung
Wenn nicht mit der Taste OK bestätigt
wird, ist die Aufzeichnung nach einigen
Sekunden automatisch.
••
99641511_A_MULTI.qxp 20/03/2007 12:11 Page 51
La página se está cargando...
La página se está cargando...
La página se está cargando...
La página se está cargando...
La página se está cargando...
La página se está cargando...
La página se está cargando...
La página se está cargando...
La página se está cargando...
La página se está cargando...

62
FR
02
DE
47
EN
62
ES
77
IT
92
NL
107
PT
122
DA
32
CS
17
Dear Customer,
You have just acquired a
DDEE DDIIEETTRRIICCHH
oven and we would like to
thank you.
Our research teams have created this new generation of appliances
for you. Their quality, appearance, functions and technological
advances make them exceptional products, showcases of our unique
know-how.
Your new
DDEE DDIIEETTRRIICCHH
oven will blend harmoniously into your
kitchen and perfectly combine cooking performance and ease of use.
We wanted to offer you a product of excellence.
In the line of
DDEE DDIIEETTRRIICCHH
products, you will also find a wide range of
cookers, hobs, ventilation hoods, dishwashers, and refrigerators, all of
which can be built in and coordinated with your new
DDEE DDIIEETTRRIICCHH
oven.
Of course, in an ongoing effort to better satisfy your demands with
regard to our products, our after-sales service department is at your
disposal and ready to listen in order to respond to all of your questions
and suggestions (contact information at the end of this booklet).
You can also log onto our site:
wwwwww..ddeeddiieettrriicchh--eelleeccttrroommeennaaggeer
r..ccoomm
where you will find our latest
new ideas and useful additional information.
DDEE DDIIEETTRRIICCHH
SSeettttiinngg NNeeww VVaalluueess
As part of our commitment to constantly improving our products, we reserve the right to make
changes to them based on advances to their technical, functional and/or aesthetic properties.
Important:
Before installing and using your appliance, please read this Installation and Usage
Guide carefully, as it will allow you to quickly familiarise yourself with its operation.
99641511_A_MULTI.qxp 20/03/2007 12:11 Page 62
La página se está cargando...
La página se está cargando...

65
1 / DESCRIPTION OF YOUR APPLIANCE
EN
INTRODUCTION TO THE PROGRAMMER
••
A
P
A
B
Cooking modes display
Oven temperature display
Shelf support indicator and
selected cooking mode indicator.
Temperature rise indicator
Adjustment buttons
Buttons for confirming settings
Clock and timer display
Setting cooking time / cooking end
time and clock
Timer display
C
D
E
Control panel lock indicator (child safety device).
Setting the temperature
Start/Stop
Cooking end time display
Cooking end time indicator
Cooking time indicator
Cooking time display
Cleaning indicator
Pyrolysis lock (DOP740* model)
F
G
H
I
C
D
F
E
H
K
L
O
N
Q
J
I
G
B
M
J
K
L
M
N
O
P
Q
R
R
99641511_A_MULTI.qxp 20/03/2007 12:11 Page 65

66
2 / USING YOUR APPLIANCE
EN
USING THE PROGRAMMER
•
How to set the time
--
When plugged in
The displays flashes 12:00 (fig.1).
Set the time by pressing the + or - buttons
(holding your finger on the button allows you
to scroll through the numbers rapidly) (fig.2).
Example: 12:30
Press the button to confirm.
The display stops flashing (fig.3).
fig.1
fig.2
fig.2
fig.3
fig.1
- To set the time on the clock
Press and hold the button for a few
seconds until the display starts flashing
(fig.2), then release.
Audible beeps indicate that it is now possible
to set the time.
Adjust the clock setting with the + and -
buttons (fig.2).
Press the button
OOKK
to confirm.
Warning
If the OK button is not pressed, the
adjustment will be automatically recorded
after a few seconds.
••
99641511_A_MULTI.qxp 20/03/2007 12:12 Page 66
La página se está cargando...

68
EN
2 / USING YOUR APPLIANCE
--
Cooking with immediate start and
programmed duration
- Select the desired cooking mode and adjust the
temperature (see paragraph: immediate cooking).
- Press the button until the cooking time
indicator starts to flash .
“
The display flashes 0:00 to indicate that you can
now adjust the setting (fig.
1).
- Press the
++
or
--
buttons to set the desired time.
Example: 30 mins cooking time (fig.
2).
— Confirm using the OK button.
The cooking time is automatically recorded after a
few seconds.
The cooking time display stops flashing.
The countdown of the cooking time begins
immediately after it has been set.
AAfftteerr tthheessee tthhrreeee sstteeppss,, tthhee oovveenn hheeaattss uupp::
A series of beeps will sound when the oven
reaches the selected temperature.
At the end of cooking (end of programmed time),
- the oven turns off,
- the cooking time indicator and 00:00 both flash
(fig.
3),
- a series of beeps sounds for a few minutes.
Press any button to stop the beeping.
fig.2
PROGRAMMED COOKING
••
fig.1
fig.3
99641511_A_MULTI.qxp 20/03/2007 12:12 Page 68
La página se está cargando...
La página se está cargando...
La página se está cargando...
La página se está cargando...
La página se está cargando...
La página se está cargando...
La página se está cargando...
La página se está cargando...
La página se está cargando...

78
ÍNDICE
ES
1 / DESCRIPCIÓN DEL APARATO
••
Presentación del horno
_____________________________________
79
••
Accesorios
________________________________________________
79
••
Presentación del programador
_______________________________
80
2 / UTILIZACIÓN DEL APARATO
••
Utilización del programador
º
Cómo ajustar la hora
___________________________________
81
º
Cocción inmediata
_____________________________________
82
••
Cocción programada
º
Puesta en marcha inmediata
_____________________________
83
º
Puesta en marcha retardada
_____________________________
84
••
Utilización de la función minutería
_____________________________
85
••
Personalización de la temperatura recomendada
________________
86
••
Bloqueo de los comandos
___________________________________
86
3 / MODOS DE COCCIÓN DEL HORNO
_____________________________
87
4 / MANTENIMIENTO Y LIMPIEZA DEL HORNO
______________________
89
5 / SERVICIO TÉCNICO
••
Intervenciones
_____________________________________________
91
99641511_A_MULTI.qxp 20/03/2007 12:12 Page 78

79
1 / DESCRIPCIÓN DEL APARATO
ES
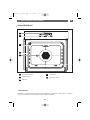
PRESENTACIÓN DEL HORNO
••
A
B
Programador
Barra de mandos
Lámpara
C
D
E
Niveles de altura cable
Agujero para asador
D
C
B
A
•Accesorios
Su aparato está equipado con dos rejillas de seguridad con empuñadura, una rejilla con
empuñaduras para bandeja de 45 mm, una bandeja de repostería Lissium y una bandeja de
45 mm.
E
99641511_A_MULTI.qxp 20/03/2007 12:12 Page 79

80
1 / DESCRIPCIÓN DEL APARATO
ES
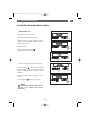
PRESENTACIÓN DEL PROGRAMADOR
••
A
P
A
B
Visualización de los modos de cocción
Visualización de la temperatura del
horno
Indicador de niveles de altura y del
modo de cocción seleccionados
Indicador de aumento de temperatura
Mandos de control
Mandos de validaciónn de los ajustes
Visualización del reloj o del minutero
Ajuste de los tiempos/final de cocción
y puesta en hora
Indicador de minutería
C
D
E
Indicador de bloqueo del teclado (seguridad
niños)
Regulación de temperatura
Start/Stop
Visualización de fin del tiempo de cocción
Indicador de final de cocción
Indicador de duración de cocción
Visualización de duración de cocción
Indicador de limpieza
Bloqueo pirólisis (modelo DOP740*)
F
G
H
I
C
D
F
E
H
K
L
O
N
Q
J
I
G
B
M
J
K
L
M
N
O
P
Q
R
R
99641511_A_MULTI.qxp 20/03/2007 12:12 Page 80

81
2 / UTILIZACIÓN DEL APARATO
ES
UTILIZACIÓN DEL PROGRAMADOR
•
Cómo ajustar la hora
--
Al conectar el horno
El visualizador parpadea a las 12:00 h (fig.1)
Regule la hora pulsando los mandos + y -
(manteniendo pulsado el mando, los números
pasan rápidamente) (fig.2).
Ejemplo: 12H30
Pulse el mando para validar.
La visualización ya no parpadea (fig.3).
fig.1
fig.2
fig.2
fig.3
fig.1
- Para volver a poner el reloj en hora
Pulse el mando durante unos segundos
hasta que parpadee el visor (fig.1) y luego
suéltelo.
Unos pitidos indican que se puede comenzar
la regulación.
Regule la hora con los mandos + y - (fig.2).
Pulse la tecla
OOKK
para validar.
Atención
Si no se valida con la tecla OK, el
registro es automático al cabo de unos
segundos.
••
99641511_A_MULTI.qxp 20/03/2007 12:12 Page 81

82
2 / UTILIZACIÓN DEL APARATO
ES
•Cocción inmediata
— El programador sólo debe indicar la hora.
Ésta no debe parpadear.
Pulse el mando (fig.1) y luego seleccione
con los mandos + o - la cocción elegida (fig.2).
Ejemplo: —> altura 2 recomendada.
— Valide con la tecla OK.
El indicador de cocción se queda fijo. El
indicador de niveles y los elementos en
funcionamiento aparecen.
El horno se pone en marcha.
Coloque la bandeja en el horno siguiendo las
instrucciones del visor.
El horno le propone la temperatura óptima
para este tipo de cocción.
No obstante, puede ajustar la temperatura
utilizando el mando situado bajo el visor
(fig.3).
La “C” parpadea en el visor e indica que puede
ajustar la temperatura pulsando los mandos +
o - (fig.4).
Ejemplo: —> ajustada a 220°C.
— Valide con la tecla OK.
El indicador de aumento de temperatura
señala la progresión de la temperatura en el
interior del horno.
Se emite una serie de pitidos cuando el horno
alcanza la temperatura seleccionada.
Para parar la cocción, pulse unos segundos el
mando .
fig.2
Atención
Todas las cocciones se realizan con la puerta cerrada.
Atención
Después de un ciclo de cocción, la turbina de enfriamiento sigue funcionando durante
cierto tiempo, para garantizar una buena fiabilidad del horno.
fig.1
fig.3
fig.4
99641511_A_MULTI.qxp 20/03/2007 12:12 Page 82

83
2 / UTILIZACIÓN DEL APARATO
ES
--
Cocción con puesta en marcha inmediata y
duración programada
- Elija el modo de cocción deseado y ajuste la
temperatura (consulte el punto: cocción
inmediata).
- Pulse el mando hasta que el indicador de
duración de la cocción parpadee.
La visualización parpadea a 0,00 h para indicar
que es posible realizar el ajuste (fig.
1).
- Pulse el mando
++
o
--
para ajustar el tiempo
deseado.
Ejemplo: 30 min de cocción (fig.
2).
— Valide con la tecla OK.
El registro del tiempo de cocción es automático al
cabo de unos segundos.
El visor del tiempo deja de parpadear.
La cuenta atrás del tiempo se efectúa
inmediatamente después del ajuste.
DDeessppuuééss ddee eessttaass 33 aacccciioonneess,, eell hhoorrnnoo ccaalliieennttaa::
Se emite una serie de pitidos cuando el horno
alcanza la temperatura seleccionada.
Al final de la cocción (fin del tiempo programado),
- el horno se para,
- el indicador de duración de cocción y 0:00
parpadean (fig.
3),
- se emite una serie de pitidos durante unos
minutos. La parada definitiva de estos pitidos se
realiza pulsando cualquier mando.
fig.2
COCCIÓN PROGRAMADA
••
fig.1
fig.3
99641511_A_MULTI.qxp 20/03/2007 12:12 Page 83

84
2 / UTILIZACIÓN DEL APARATO
ES
--
Cocción con puesta en marcha
retardada y hora de fin de cocción
elegida
PPrroocceeddaa ccoommoo ppaarraa uunnaa ccoocccciióónn pprrooggrraammaaddaa..
- Pulse el mando hasta que el indicador de
fin de la cocción parpadee.
La visualización parpadea para indicar que es
posible realizar el ajuste (fig.
1).
- Pulse el mando
++
o
--
para regular la hora de
fin de cocción deseada.
Ejemplo: fin de cocción a las 16h (fig.
2).
— Valide con la tecla OK.
El final de cocción queda registrado
automáticamente al cabo de unos segundos.
El visor del fin de cocción deja de parpadear.
UUnnaa vveezz eeffeeccttuuaaddaass eessttaass ooppeerraacciioonneess,, llaa
ppuueessttaa eenn mmaarrcchhaa qquueeddaa rreettaarrddaaddaa ppaarraa qquuee llaa
ccoocccciióónn tte
errmmiinnee aa llaass 1166hh..
Al final de la cocción (fin del tiempo
programado),
- el horno se para,
- el indicador de duración de cocción y 0:00
parpadean (fig.
3).
- se emite una serie de pitidos durante unos
minutos. La parada definitiva de estos pitidos
se realiza pulsando cualquier mando.
La visualización pasa de nuevo a la hora del
día.
El interior del horno queda iluminado desde el
inicio de la cocción y se apaga al final de la
cocción.
fig.1
fig.2
fig.3
COCCIÓN PROGRAMADA
••
99641511_A_MULTI.qxp 20/03/2007 12:12 Page 84

85
2 / UTILIZACIÓN DEL APARATO
ES
-- EEll pprrooggrraammaaddoorr ddeell hhoorrnnoo ppuueeddee uuttiilliizzaarrssee
ccoommoo mmiinnuutteerrííaa iinnddeeppeennddiieennttee qquuee ppeerrmmiittee llaa
ccuueennttaa aattrrááss
ddee cciieerrttoo ttiieemmppoo ssiinn
ffuunncciioonnaammiieennttoo ddeell hhoorrnnoo..
En ese caso, la visualización de la minutería
predomina sobre la visualización de la hora.
- Pulse 3 veces el mando (fig.1)
El símbolo correspondiente a la minutería y
0m00s parpadean.
- Ajuste el tiempo elegido pulsando los
mandos
++
o
--
(fig.2).
- Pulse la tecla
OOKK
para validar o esperar unos
segundos.
Atención
Se puede modificar o anular en cualquier momento la programación del minutero.
fig.1
fig.2
UTILIZACIÓN DE LA FUNCIÓN MINUTERÍA
••
El visualizador deja de parpadear al cabo de unos segundos y el minutero se pone en marcha y
descuenta el tiempo de segundo en segundo.
Una vez transcurrido el tiempo, el minutero emite una serie de pitidos para advertirle.
La parada de estos pitidos se realiza pulsando cualquier mando.
99641511_A_MULTI.qxp 20/03/2007 12:12 Page 85

86
2 / UTILIZACIÓN DEL APARATO
ES
PERSONALIZACIÓN DE LA TEMPERATURA RECOMENDADA
Seleccione la función de cocción:
- Pulse la tecla
OOKK..
Si desea personalizar la temperatura recomendada:
- Pulse el mando hasta que la temperatura empiece a parpadear.
- Pulse el mando + o – hasta la temperatura deseada.
- Pulse
OOKK
para validar.
••
BLOQUEO DE LOS COMANDOS (SEGURIDAD NIÑOS)
HORNO PARADO
Tiene la posibilidad de impedir el acceso a los
mandos del horno procediendo de la siguiente
forma:
Con el horno parado, pulse la tecla
OOKK
durante
unos segundos, entonces en la pantalla
aparece una “llave” -> el acceso a los mandos
del horno ha quedado bloqueado (fig.1).
Para desbloquearlo, pulse durante unos
segundos la tecla
OOKK
.
Los mandos del horno son accesibles de
nuevo.
••
Atención
No puede bloquear el horno si ha programado una cocción.
fig.1
99641511_A_MULTI.qxp 20/03/2007 12:12 Page 86

87
3 / MODOS DE COCCIÓN DEL HORNO
ES
*
Secuencia o secuencias utilizadas para el anuncio escrito en la etiqueta energética de conformidad con
la norma europea EN 50304 y según la directiva europea 2002/40/CE.
CCAALLOORR GGIIRRAATTOORRIIOO
(temperatura recomendada
118800°°CC
mín. 35°C máx. 235°C)
•
La cocción se efectúa con el elemento calefactor situado al fondo del horno y con la
hélice para mover el aire.
•
Aumento rápido de la temperatura. Algunos platos se pueden introducir en el horno frío.
•
Recomendado para conservar tiernas las carnes blancas, pescados y verduras.
Para las cocciones múltiples de hasta 3 niveles.
CCAALLOORR CCOOMMBBIINNAADDOO
(temperatura recomendada
220055°°CC
mín. 35°C máx. 275°C)
•
La cocción se efectúa con la resistencia inferior y la superior y con la hélice de
movimiento de aire.
•
Tres fuentes de calor asociadas: mucho calor en la parte inferior, un poco de calor
giratorio y un toque de grill para dorar.
•
Recomendado para quiches, empanadas, tartas de frutas jugosas, colocadas
preferentemente en una bandeja de barro.
EECCOO
(temperatura recomendada
220000°°CC
mín. 35°C máx. 275°C)
•
La cocción se efectúa con la resistencia inferior y superior.
•
Esta posición permite una ganancia de energía conservando las cualidades de cocción.
•
La posición ECO se utiliza para el etiquetado energético.
•
Todas las cocciones se realizan
ssiinn pprreeccaalleennttaammiieennttoo..
GGRRIILLLL PPUULLSSAADDOO ++ AASSAADDOORR
(temperatura recomendada
220000°°CC
mín. 180°C máx. 230°C)
•
La cocción se realiza alternativamente con el elemento superior y con la hélice para
mover el aire.
•
No hace falta precalentamiento. Aves y asados jugosos y crujientes por todos los lados.
•
El asador rotativo continua funcionando hasta que se abre la puerta.
•
Coloque la bandeja para recoger la grasa en la posición más baja.
•
Recomendado para todas las aves o asados hechos con el asador, para soasar y
cocinar hasta el centro piernas de cordero y chuletas de buey. Para que los bloques de
pescado queden jugosos y tiernos.
GGRRIILLLLSS VVAARRIIAABBLLEESS MMEEDDIIOO yy FFUUEERRTTEE ++ AASSAADDOORR RROOTTAATTIIVVOO
(posiciones recomendadas
22 óó 44
- mín. 1 - máx. 4)
•
La cocción se efectúa con la resistencia superior.
•
El grill fuerte cubre toda la superficie de la rejilla. El grill medio ofrece la misma eficacia
que el grill fuerte, para cantidades más pequeñas.
•
Recomendados para asar chuletillas, salchichas, rebanadas de pan, langostinos a la
parrilla.
*
*
99641511_A_MULTI.qxp 20/03/2007 12:12 Page 87

88
3 / MODOS DE COCCIÓN DEL HORNO
ES
MMAANNTTEENNIIMMIIEENNTTOO CCAALLIIEENNTTEE
(temperatura recomendada
8800°°CC
mín. 35°C máx. 100°C)
•
Esta posición permite mantener calientes sus alimentos mediante dosificación del
elemento situado al fondo del horno con el movimiento de aire.
•
Recomendado para levantar las masas de pan brioche, kouglof… sin superar los 40°C
(calienta-platos, descongelación).
PPAANN
(temperatura recomendada
222200°°CC
mín. 35°C máx. 275°C)
•
Secuencia de cocción recomendada para la cocción del pan.
•
Tras un precalentamiento, coloque la bola de pan en la bandeja de repostería - 2º nivel.
•
No olvide colocar un molde de agua en la solera para obtener una corteza crujiente y
dorada.
99641511_A_MULTI.qxp 20/03/2007 12:12 Page 88

89
4 / MANTENIMIENTO Y LIMPIEZA DEL HORNO
ES
--
Verifique que el programador indica la hora
del día y que ésta no parpadea.
Tiene la posibilidad de elegir 3 duraciones de
ciclo de pirólisis:
duración de pirólisis de 1 hora 30.
duración de pirólisis de 1 hora 45.
duración de pirólisis de 2 horas.
Pulse el mando (fig.1).
A continuación, pulse una vez el mando - para
obtener el símbolo “
PP””
parpadeando en el visor
(fig.2).
Valide pulsando la tecla OK.
La duración del ciclo de pirólisis muestra 2h00,
pero puede modificar esta duración.
Ejemplo: ciclo de pirólisis 1h45.
Pulse el mando + ó - para obtener la duración
deseada (fig.3).
Valide pulsando la tecla OK.
La pirólisis comienza y el símbolo queda
fijo. La cuenta atrás del tiempo se efectúa
inmediatamente después del ajuste.
Durante la pirólisis, el símbolo se visualiza
en el programador indicándole que la puerta
está bloqueada (fig.4).
Al final de la pirólisis, 0:00 parpadea así como
el símbolo .
--
Cuando el horno esté frío, utilice un paño
húmedo para retirar la ceniza blanca.
El horno está limpio y puede ser utilizado de
nuevo para efectuar la cocción que desee.
HACER UNA PIRÓLISIS (MODELO PIRÓLISIS: DOP740*)
•Pirólisis inmediata
••
fig.1
fig.2
fig.3
Atención
Retire la batería de cocina del horno
y los desbordamientos importantes que
hubieran podido producirse.
fig.4
99641511_A_MULTI.qxp 20/03/2007 12:13 Page 89

90
4 / MANTENIMIENTO Y LIMPIEZA DEL HORNO
ES
fig.1
•Pirólisis diferida
- Siga las instrucciones descritas en el párrafo
“Pirólisis inmediata”
A continuación, valide el ciclo de pirólisis con
la tecla OK:
- Pulse el mando .
El símbolo de fin de cocción parpadea
indicando que se puede comenzar la
regulación (fig.1).
- Pulse el mando + o - para regular la hora de
fin de cocción que desea (fig.2).
Ejemplo: fin de cocción a las 18 horas.
Valide pulsando la tecla OK.
- Una vez hecho esto, la puesta en marcha de
la pirólisis queda retardada para que finalice a
las 18:00.
HACER UNA PIRÓLISIS (MODELO PIRÓLISIS: DOP740*)
••
fig.2
HORNO DE ESMALTE CATALÍTICO (autodesengrasante)
(MODELO CATÁLISIS: DOC740*)
••
- Este horno consta de un recinto equipado con paredes amovibles recubiertas con un esmalte
especial microporoso (esmalte catalítico) que le confiere sus cualidades autodesengrasantes.
Desde su aparición, las manchas se extienden y se propagan considerablemente por las
microporosidades. Se encuentran oxidadas en ambas caras y desaparecen progresivamente. El
esmalte autodesengrasante está especialmente adaptado a los cuerpos grasos pero no al azúcar.
Por esta razón, el revestimiento de la solera, que ya no está sujeto a los desbordamientos de
azúcar, no contiene este esmalte.
LLee rreeccoommeennddaammooss eennccaarreecciiddaammeennttee::
- No rascar las paredes catalíticas con un cepillo metálico, instrumentos puntiagudos o cortantes.
- No intentar limpiarlas con productos para fregar de venta en comercios.
- Al hacer parrilladas, la temperatura de las paredes no siempre es suficiente como para eliminar
gran cantidad de proyecciones grasas.
LLIIMMPPIIEEZZAA
•
Tras la cocción, seleccione la secuencia de limpieza.
Si quedan rastros, éstos se atenuarán con las próximas cocciones.
99641511_A_MULTI.qxp 20/03/2007 12:13 Page 90

91
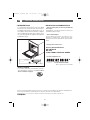
5 / SERVICIO TÉCNICO
ES
Las posibles intervenciones en su aparato
deberán ser realizadas por un profesional
cualificado depositario de la marca. Cuando
realice su llamada, mencione la referencia
completa del aparato (modelo, tipo, número
de serie). Esta información figura en la placa
de características
(fig.1).
PIEZAS ORIGINALES
Al realizar una intervención de mantenimiento,
solicite el uso exclusivo de
piezas de recambio
certificadas originales.
•INTERVENCIONES
**
Servicio proporcionado por Brandt Customer Services, sociedad por acciones simplificada con un capital
de 2.5000.000 euros, 5/7 avenue des Béthunes, 95310 Saint Ouen l’Aumône - RCS Pontoise 440 303 303
BBrraannddtt AApppplliiaanncceess
- sociedad por acciones simplificada con un capital de 10.000.000 euros RCS Nanterre 440 302 347.
BRANDT APPLIANCES SAS
7 rue Henri Becquerel
92500 RUEIL MALMAISON
230V ~ 50 Hz
MADE IN FRANCE
fig.1
99641511_A_MULTI.qxp 20/03/2007 12:13 Page 91

92
FR
02
DE
47
EN
62
ES
77
IT
92
NL
107
PT
122
DA
32
CS
17
Cara Cliente, Caro Cliente,
Grazie per avere acquistato un forno
DDEE DDIIEETTRRIICCHH..
I nostri team di ricerca hanno progettato per Lei questa nuova
generazione di forni che, per la loro qualità, il design, le funzionalità e
le evoluzioni tecnologiche, sono prodotti eccezionali, frutto del nostro
know-how.
Il nuovo forno
DDEE DDIIEETTRRIICCHH
s'integrerà perfettamente nella Sua
cucina associando performance di cottura e facilità di utilizzo.
Abbiamo voluto offrirLe un prodotto d'eccellenza.
Troverà, inoltre, nella gamma dei prodotti
DDEE DDIIEETTRRIICCHH
, un'ampia
scelta di cucine, piani di cottura, cappe, lavastoviglie e frigoriferi a
incasso, che potrà coordinare con questo nuovo forno
DDEE DDIIEETTRRIICCHH
.
Al fine di soddisfare al meglio le esigenze della clientela, il nostro
servizio consumatori è a Sua disposizione per rispondere a tutte le
Sue domande o ascoltare i Suoi suggerimenti (estremi alla fine del
presente manuale).
E' possibile inoltre collegarsi al nostro sito:
wwwwww..ddeeddiieettrriicchh--eelleeccttrroommeennaaggeerr.
.ccoomm
nel quale troverà le nostre ultime
novità e tante informazioni utili e complementari.
DDEE DDIIEETTRRIICCHH
II nnuuoovvii ooggggeettttii ddii vvaalloorree
Al fine di migliorare sempre i nostri prodotti, ci riserviamo il diritto di modificarne le
caratteristiche tecniche, funzionali o estetiche, conformemente alla loro evoluzione.
Importante:
Prima di utilizzare il forno, leggere attentamente il presente manuale d'installazione e
d'uso per conoscerne meglio il funzionamento.
99641511_A_MULTI.qxp 20/03/2007 12:13 Page 92
La página se está cargando...

94
1 / DESCRIZIONE DEL FORNO
IT
PRESENTAZIONE DEL FORNO
••
A
B
Programmatore
Quadro comandi
Lampada
C
D
E
Scanalature
Foro per lo spiedo
D
C
B
A
•Accessori
Il forno ha due griglie di sicurezza con manico, una griglia con manici per teglia di 45 mm, una
teglia per dolci Lissium e una teglia di 45 mm.
E
99641511_A_MULTI.qxp 20/03/2007 12:13 Page 94

95
1 / DESCRIZIONE DEL FORNO
IT
PRESENTAZIONE DEL PROGRAMMATORE
••
A
P
A
B
Visualizzazione delle modalità di cottura
Visualizzazione della temperatura del
forno
Indicatore della scanalatura e della
modalità di cottura scelti
Indicatore di temperarura elevata
Tasti di regolazione
Tasti di conferma delle regolazioni
Visualizzazione orologio o timer
Regolazione della durata/fine cottura e
avviamento ora
Indicatore timer
C
D
E
Indicatore di bloccaggio tastiera (dispositivo di
sicurezza per i bambini)
Regolazione della temperatura
Start/stop
Visualizzazione fine cottura
Indicatore di fine cottura
Indicatore durata della cottura
Visualizzazione durata della cottura
Indicatore di pulizia
Bloccaggio pirolisi (modello DOP740*)
F
G
H
I
C
D
F
E
H
K
L
O
N
Q
J
I
G
B
M
J
K
L
M
N
O
P
Q
R
R
99641511_A_MULTI.qxp 20/03/2007 12:13 Page 95

96
2 / UTILIZZAZIONE DEL FORNO
IT
UTILIZZAZIONE DEL PROGRAMMATORE
•
Regolazione dell’ora
--
Al momento dell'accensione
Il display lampeggia alle ore 12 (fig.1).
Regolare l'ora premendo i tasti + e - (tenendo il
tasto premuto è possible far scorrere
rapidamente i numeri) (fig.2).
Esempio: Ore 12,30
Premere il tasto per confermare.
Il display non lampeggia più (fig.3).
fig.1
fig.2
fig.2
fig.3
fig.1
- Per ripristinare l'ora dell'orologio
Premere il tasto per pochi secondi fino a far
lampeggiare il display (fig.1); lasciare il tasto.
Una serie di segnali acustici indica che la
regolazione può essere effettuata.
Regolare l'ora con i tasti + e - (fig.2).
Premere il tasto
OOKK
per confermare.
Attenzione
Se la regolazione non viene
confermata con il tasto OK, la registrazione
diventa automatica dopo pochi secondi.
••
99641511_A_MULTI.qxp 20/03/2007 12:13 Page 96

97
2 / UTILIZZAZIONE DEL FORNO
IT
•Cottura immediata
— Sul programmatore deve apparire soltanto
l'ora e quest'ultima non deve lampeggiare.
Premere il tasto (fig.1) e selezionare con i
tasti + o - la cottura desiderata (fig.2).
Esempio: —> viene consigliato l'uso della
scanalatura 2.
— Confermare con il tasto OK.
L'indicatore di cottura si ferma. Appaiono
l'indicatore delle scanalature e gli elementi in
fase di funzionamento.
Il forno si accende.
Mettere il piatto nel forno seguendo i consigli
indicati sul display.
Il forno propone la temperatura ottimale per
questo tipo di cottura.
Ciononostante, è possibile regolare la
temperatura premendo il tasto posto sotto
il display (fig.3).
La "°C" lampeggia sul display e indica che è
possibile regolare la temperatura premendo i
tasti + o - (fig.4).
Esempio: —> regolata a 220°C.
— Confermare con il tasto OK.
L'indicatore di aumento della temperatura
segnala l'aumento di quest'ultima
all'interno del forno.
Una serie di segnali acustici indica che il forno
ha raggiunto la temperatura scelta.
Per interrompere la cottura, premere per pochi
secondi il tasto .
fig.2
Attenzione
Tutti i tipi di cottura devono essere effettuati con la porta del forno chiusa.
Attenzione
Dopo un ciclo di cottura, la turbina di raffreddamento continua a funzionare per un
certo lasso di tempo, al fine di garantire il corretto funzionamento del forno.
fig.1
fig.3
fig.4
99641511_A_MULTI.qxp 20/03/2007 12:13 Page 97
La página se está cargando...
La página se está cargando...
La página se está cargando...
La página se está cargando...
La página se está cargando...
La página se está cargando...
La página se está cargando...
La página se está cargando...
La página se está cargando...
La página se está cargando...
La página se está cargando...

109
1 / BESCHRIJVING VAN HET APPARAAT
NL
VOORSTELLING VAN DE OVEN
••
A
B
Programmaschakelaar
Bedieningsstrip
Lamp
C
D
E
Draadrichels
Gat voor draaispit
D
C
B
A
• Accessoires
Uw apparaat is uitgerust met twee roosters met kantelbeveiligngen en handgreep, een rooster
met handgrepen voor platen 45 mm, een gebakplaat Lissium en een plaat 45 mm.
E
99641511_A_MULTI.qxp 20/03/2007 12:13 Page 109

110
1 / BESCHRIJVING VAN HET APPARAAT
NL
VOORSTELLING VAN DE PROGRAMMASCHAKELAAR
••
A
P
A
B
Weergave van de bakwijzen
Weergave van de oventemperatuur
Weergave nummer richel en gekozen
bakwijze
Indicator temperatuurstijging
Regeltoetsen
Toetsen bevestiging regeling
Weergave van de klok of van de
schakelklok
Instelling van bakduur/eindtijd van het
bakken en tijd instellen
Indicator schakelklok
C
D
E
Indicator vergrendeling van de toetsen
(kinderbeveiliging).
Instellen van temperatuur
Start/Stop
Weergave einde van het bakken
Indicator einde van het bakken
Indicator duur van het bakken
Weergave duur van het bakken
Indicator reiniging
Vergrendeling pyrolyse (model DOP740*)
F
G
H
I
C
D
F
E
H
K
L
O
N
Q
J
I
G
B
M
J
K
L
M
N
O
P
Q
R
R
99641511_A_MULTI.qxp 20/03/2007 12:13 Page 110

111
2/ GEBRUIK VAN HET APPARAAT
NL
GEBRUIK VAN DE PROGRAMMASCHAKELAAR
•
Instellen van de tijd
--
Tijdens het aansluiten van de oven
Het display knippert op 12u00. (fig.1)
Stel de tijd in met de toetsen + of - (houd de
toetsen ingedrukt als u de cijfers sneller wilt
laten gaan) (fig.2).
Bijvoorbeeld: 12U30
Druk op de toets om de tijd te bevestigen.
De display stopt met knipperen (fig.3).
fig.1
fig.2
fig.2
fig.3
fig.1
- De tijd weer instellen
Druk enkele seconden op de toets tot de
display begint te knipperen (fig.1), daarna
loslaten.
Een reeks van pieptonen geeft aan dat de
instelling mogelijk is.
Pas de instelling van de tijd aan met de toetsen
+ en 1 (fig.2).
Druk op de toets
OOKK
om de tijd te bevestigen.
Let op
Indien u de nieuwe tijd niet met de
toets OK bevestigt, zal de display na
enkele seconden zelf de tijd bevestigen.
••
99641511_A_MULTI.qxp 20/03/2007 12:13 Page 111
La página se está cargando...
La página se está cargando...
La página se está cargando...

115
2/ GEBRUIK VAN HET APPARAAT
NL
-- DDee pprrooggrraammmmaasscchhaakkeellaaaarr vvaann uuww oovveenn kkaann
aallss oonnaaffhhaannkkeelliijjkkee sscchhaakkeellkkllookk wwoorrddeenn ggeebbrruuiikktt
zzooddaatt uu eeeenn t
tiijjdd kkuunntt aafftteelllleenn zzoonnddeerr ddee oovveenn ttee
llaatteenn wweerrkkeenn..
Bij het gebruik van de schakelklok wordt op de
display de tijdweergave vervangen door
weergave van de schakelklok.
- Druk 3 keer op de toets (fig.1).
Het symbool van de schakelklok en 0m00s
knipperen.
- Stel de gewenste tijd in door op de toetsen
++
of
--
te drukken (fig.2).
- Druk op de toets
OOKK
om te bevestigen of
enkele seconden wachten.
Let op
U kunt op elk moment de programmering van de schakelklok annuleren of wijzigen.
fig.1
fig.2
GEBRUIK VAN DE FUNCTIE SCHAKELKLOK
••
De display stopt met knipperen na een paar seconden en de schakelklok begint te lopen en telt
de tijd in seconden af.
Als deze duur is afgelopen hoort u een reeks piepjes van de schakelklok om u te waarschuwen
U stopt de pieptonen door op een willekeurige toets te drukken.
99641511_A_MULTI.qxp 20/03/2007 12:14 Page 115
La página se está cargando...

117
3 / BAKWIJZEN VAN DE OVEN
NL
*
Bakwijzen waarnaar verwezen wordt in het energielabel overeenkomstig de Europese norm EN 50304
en de Europese richtlijn 2002/40/EG.
HHEETTEELLUUCCHHTT
(aanbevolen temperatuur
118800°°CC
mini 35°C maxi 235°C)
•
Het bakken gebeurt met een verwarmingselement dat zich achter in de oven bevindt en
door de schroef voor de luchtvermenging.
•
Snelle temperatuurstijging: Voor sommige gerechten is het niet nodig de oven voor te
verwarmen.
•
Aanbevolen om blank vlees, vis en groenten zacht te houden.
Om tot 3 gerechten samen te bereiden.
CCOOMMBBIINNAATTIIEEWWAARRMMTTEE
(aanbevolen temperatuur
220055°°CC
mini 35°C maxi 275°C)
•
Het bakken gebeurt met het onderste en het bovenste verwarmingselement en met de
luchtvermengingsschroef.
•
Drie gezamenlijke warmtebronnen: veel warmte onder, een beetje hetelucht en een lage
grillstand om bruin te bakken.
•
Aanbevolen voor quiches, taarten, taarten met saphoudende vruchten, bij voorkeur in
een aardewerken schotel.
EECCOO
(aanbevolen temperatuur
220000°°CC
mini 35°C maxi 275°C)
•
Het bakken gebeurt met het onderste en het bovenste verwarmingselement.
•
In deze stand kunt u energie besparen zonder de bakkwaliteit te beïnvloeden.
•
De ECO stand wordt gebruikt voor de energielabeling.
•
Alle bereidingen gebeuren
zzoonnddeerr vvoooorrvveerrwwaarrmmiinngg..
GGRRIILLLL HHEETTEELLUUCCHHTT ++ DDRRAAAAIISSPPIITT
(aanbevolen temperatuur
220000°°CC
mini 180°C maxi 230°C)
•
Het bakken gebeurt afwisselend door het bovenste verwarmingselement en de schroef
voor de luchtvermenging.
•
Voorverwarmen niet nodig. Gevogelte en gebraad blijven sappig en krokant.
•
Het draaispit blijft draaien tot u de ovendeur opent.
•
Schuif de braadslee op de laagste richel.
•
Aanbevolen voor alle gevogelte of vlees op het draaispit, voor het aanbraden en
doorbakken van lamsbout en runderrib. Om stukken vis zacht te houden.
VVAARRIIAABBEELLEE eenn SSTTEERRKKEE GGRRIILLLL ++ DDRRAAAAIISSPPIITT
(aanbevolen posities
22 ooff 44
- mini 1 - maxi 4)
•
Het bakken gebeurt met het bovenste verwarmingselement van de oven.
•
De sterke grill bedekt het gehele oppervlakte van het rooster. De grill met variabel
vermogen is even krachtig als de sterke grill voor kleinere hoeveelheden voedsel.
•
Aanbevolen voor het roosteren van karbonade, worstjes, plakjes brood, gamba’s
rechtstreeks op het rooster.
*
*
99641511_A_MULTI.qxp 20/03/2007 12:14 Page 117
La página se está cargando...
La página se está cargando...
La página se está cargando...
La página se está cargando...
La página se está cargando...
La página se está cargando...
La página se está cargando...

125
1 / DESCRIÇÃO DO SEU APARELHO
PT
••
APRESENTAÇÃO DO PROGRAMADOR
A
P
A
B
Apresentação dos modos de
cozedura
Visualização da temperatura do forno
Indicador de encaixes e do modo de
cozedura escolhidos
Indicador de aumento da temperatura
Botões de regulação
Botões de validação das regulações
Visualização do relógio ou do
temporizador
Regulação dos tempos/fim de
cozedura e acerto da hora
Indicador do temporizador
C
D
E
Indicador de bloqueio de teclado (segurança
para as crianças)
Regulação da temperatura
Start/Stop
Indicação de fim de cozedura
Indicador de fim de cozedura
Indicador de duração da cozedura
Indicação da duração da cozedura
Indicador de limpeza
Bloqueio de pirólise (modelo DOP740*)
F
G
H
I
C
D
F
E
H
K
L
O
N
Q
J
I
G
B
M
J
K
L
M
N
O
P
Q
R
R
99641511_A_MULTI.qxp 20/03/2007 12:14 Page 125

126
2 / UTILIZAÇÃO DO SEU APARELHO
PT
UTILIZAÇÃO DO PROGRAMADOR
•
Como acertar a hora
--
Aquando da ligação eléctrica
O visor está a piscar em 12h00 (fig.1).
Acerte a hora, premindo os botões + e - (para
obter um desfile rápido, premir continuamente
o botão) (fig.2).
Exemplo: 12H30
Prima o botão para validar.
O visor pára de piscar (fig.3).
fig.1
fig.2
fig.2
fig.3
fig.1
- Para acertar o relógio
Prima o botão durante alguns segundos
até que o visor esteja a piscar (fig.1), depois
solte.
Os bips sonoros indicam que a regulação é
possível.
Acerte a hora com os botões + e - (fig.2).
Prima o botão
OOKK
para validar.
Atenção!
Se não houver validação através do
botão OK, a memorização será automática
após alguns segundos.
••
99641511_A_MULTI.qxp 20/03/2007 12:14 Page 126

127
2 / UTILIZAÇÃO DO SEU APARELHO
PT
•Cozedura imediata
— O programador deve apenas apresentar a
hora. Esta não deve estar a piscar.
Prima o botão (fig.1) em seguida escolha
com os botões + ou - a cozedura escolhida
(fig. 2).
Exemplo: —> encaixe 2 aconselhado.
— Valide com o botão OK.
O indicador de cozedura fica fixo. Aparecem
o indicador de encaixes e os elementos em
funcionamento
O forno coloca-se em funcionamento
Coloque o seu tabuleiro no forno, de acordo
com a recomendação indicada no visor.
O forno propõe-lhe uma temperatura
optimizada para este tipo de cozedura.
Pode, no entanto, regular a temperatura
premindo o botão situado por baixo do
visor (fig.3).
O “°C” pisca no visor e indica que pode
regular a temperatura premindo os botões +
ou - (fig.4).
Exemplo: —> regulada a 220°C.
— Valide com o botão OK.
O indicador de aumento de temperatura
assinala a progressão da temperatura no
interior do forno.
É emitida uma série de bips sonoros quando
o forno atinge a temperatura escolhida.
Para parar a cozedura, prima alguns
segundos o botão .
fig.2
Atenção!
Todas as cozeduras são feitas com a porta fechada.
Atenção!
Após um ciclo de cozedura, a ventoinha de arrefecimento continua a funcionar durante
algum tempo, de modo a garantir uma boa fiabilidade do forno.
fig.1
fig.3
fig.4
99641511_A_MULTI.qxp 20/03/2007 12:14 Page 127
La página se está cargando...

129
PT
2 / UTILIZAÇÃO DO SEU APARELHO
--
Cozedura com início diferido e hora de
fim escolhida
PPrroocceeddaa ccoommoo ppaarraa uummaa ccoozzeedduurraa
pprrooggrraammaaddaa..
- Prima o botão até que o indicador de fim
de cozedura fique a piscar .
O visor pisca para indicar que a regulação é
então possível (fig.
1).
- Prima o botão
++
ou
--
para definir a hora de fim
de cozedura pretendida.
Exemplo: fim de cozedura às 16h (fig.
2).
— Valide com o botão OK.
A memorização do fim da cozedura é
automática após alguns segundos.
A indicação do fim da cozedura deixa de
piscar.
AAppóóss eessttaass ttrrêêss ooppeerraaççõõeess,, oo iinníícciioo ddoo
aaqquueecciimmeennttoo éé ddiiffeerriiddoo,, ddee mmooddoo aa qquuee aa
ccoozzeedduurraa tteerrmmiinnee
ààss 1166hh..
Em fim de cozedura (fim do tempo
programado),
- o forno desliga-se,
- o indicador de duração de cozedura e 0:00
piscam (fig.
3),
- são emitidos vários sons durante alguns
minutos. Para parar definitivamente os bips
sonoros, prima qualquer botão.
O visor volta a indicar a hora actual.
O interior do forno é iluminado desde do início
da cozedura e apaga-se no fim da mesma.
fig.1
fig.2
fig.3
COZEDURA PROGRAMADA
••
99641511_A_MULTI.qxp 20/03/2007 12:14 Page 129
La página se está cargando...
La página se está cargando...
La página se está cargando...
La página se está cargando...
La página se está cargando...
La página se está cargando...

5 / SERVIÇO PÓS-VENDA
PT
As eventuais intervenções no seu aparelho
devem ser efectuadas por um profissional
qualificado representante da marca. Durante o
seu telefonema, indique a referência completa
do seu aparelho (modelo, tipo, número de
série). Estas informações figuram na placa
informativa
(fig.1).
PEÇAS DE ORIGEM
Durante uma intervenção de manutenção,
peça para utilizar exclusivamente
peças de
substituição certificadas de origem.
•INTERVENÇÕES
**
Serviço fornecido por Brandt Customer Services, sociedade por acções simplificada com um capital social
de 2.5000.000 euros, 5/7 avenue des Béthunes, 95310 Saint Ouen l’Aumône - RCS Pontoise 440 303 303
BBrraannddtt AApppplliiaanncceess
- sociedade por acções simplificada com um capital de 10.000.000 euros RCS Nanterre 440 302 347.
BRANDT APPLIANCES SAS
7 rue Henri Becquerel
92500 RUEIL MALMAISON
230V ~ 50 Hz
MADE IN FRANCE
9999664411551111
03/07
DDOOCC774400** // DDOOPP774400**
fig.1
Translation by Technicis - Boulogne Billancourt - France
99641511_A_MULTI.qxp 20/03/2007 12:14 Page 136
-
 1
1
-
 2
2
-
 3
3
-
 4
4
-
 5
5
-
 6
6
-
 7
7
-
 8
8
-
 9
9
-
 10
10
-
 11
11
-
 12
12
-
 13
13
-
 14
14
-
 15
15
-
 16
16
-
 17
17
-
 18
18
-
 19
19
-
 20
20
-
 21
21
-
 22
22
-
 23
23
-
 24
24
-
 25
25
-
 26
26
-
 27
27
-
 28
28
-
 29
29
-
 30
30
-
 31
31
-
 32
32
-
 33
33
-
 34
34
-
 35
35
-
 36
36
-
 37
37
-
 38
38
-
 39
39
-
 40
40
-
 41
41
-
 42
42
-
 43
43
-
 44
44
-
 45
45
-
 46
46
-
 47
47
-
 48
48
-
 49
49
-
 50
50
-
 51
51
-
 52
52
-
 53
53
-
 54
54
-
 55
55
-
 56
56
-
 57
57
-
 58
58
-
 59
59
-
 60
60
-
 61
61
-
 62
62
-
 63
63
-
 64
64
-
 65
65
-
 66
66
-
 67
67
-
 68
68
-
 69
69
-
 70
70
-
 71
71
-
 72
72
-
 73
73
-
 74
74
-
 75
75
-
 76
76
-
 77
77
-
 78
78
-
 79
79
-
 80
80
-
 81
81
-
 82
82
-
 83
83
-
 84
84
-
 85
85
-
 86
86
-
 87
87
-
 88
88
-
 89
89
-
 90
90
-
 91
91
-
 92
92
-
 93
93
-
 94
94
-
 95
95
-
 96
96
-
 97
97
-
 98
98
-
 99
99
-
 100
100
-
 101
101
-
 102
102
-
 103
103
-
 104
104
-
 105
105
-
 106
106
-
 107
107
-
 108
108
-
 109
109
-
 110
110
-
 111
111
-
 112
112
-
 113
113
-
 114
114
-
 115
115
-
 116
116
-
 117
117
-
 118
118
-
 119
119
-
 120
120
-
 121
121
-
 122
122
-
 123
123
-
 124
124
-
 125
125
-
 126
126
-
 127
127
-
 128
128
-
 129
129
-
 130
130
-
 131
131
-
 132
132
-
 133
133
-
 134
134
-
 135
135
-
 136
136


De Dietrich DOP740BH El manual del propietario
- Categoría
- Microondas
- Tipo
- El manual del propietario
- Este manual también es adecuado para
en otros idiomas
- français: De Dietrich DOP740BH Le manuel du propriétaire
- italiano: De Dietrich DOP740BH Manuale del proprietario
- English: De Dietrich DOP740BH Owner's manual
- Deutsch: De Dietrich DOP740BH Bedienungsanleitung
- Nederlands: De Dietrich DOP740BH de handleiding
- português: De Dietrich DOP740BH Manual do proprietário
- dansk: De Dietrich DOP740BH Brugervejledning
- čeština: De Dietrich DOP740BH Návod k obsluze