
USE AND CARE GUIDE
SHIRI 36 IN. VANITY
THANK YOU
We appreciate the trust and condence you have placed in Home Decorators Collection through the purchase of this vanity. We
strive to continually create quality products designed to enhance your home. Visit us online to see our full line of products available for your
home improvement needs. Thank you for choosing Home Decorators Collection!
Questions, problems, missing parts? Before returning to the store,
call Home Decorators Collection Customer Service
8 a.m. - 7 p.m., EST, Monday-Friday, 9 a.m. - 6 p.m., EST, Saturday
1-800-986-3460
HOMEDEPOT.COM/HomeDecorators
Item #1003050431
#1003050441
Model #SYNVT3618D
#SYGVT3618D

2
Table of Contents
Safety Information
WARNING: Handle with care. Do not drop, handle
roughly, or overtighten screws as this will cause
NOTICE: Observe local plumbing and building codes.
Warranty
damage to the wood.
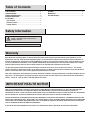
Table of Contents .............................................................2
Safety Information...................................................
.........
2
Lifetime Limited Warranty........................................
.........
2
Important Health Notice....................................................2
Pre-Assembly...................................................
................
3
Tools Required.....................................................
..........
3
Hardware Included.................................................
.......
..3
Package Contents..................................................
.......
..3
Assembly.......................................................................4
Maintenance................................
..............................
.....7
Care and Cleaning...........................................................7
Home Decorators Collection products are manufactured with superior quality standards and workmanship and are backed by a 1-Year
Manufacturer’s warranty. Home Decorators Collection products are warranted to the original consumer purchaser to be free of defects in
materials or workmanship. We will replace FREE OF CHARGE any product or parts that proves defective. Simply, return the product / part
to
any of The Home Depot retail locations or call 1-800-986-3460 to receive the replacement item. Proof of purchase (original sales receipt)
from the original consumer purchaser must be made available for all Home Decorators Collection warranty claims.
This warranty excludes incidental/inconsequential damages and failures due to misuse, abuse or normal wear and tear. This warranty
excludes all industrial, commercial & business usage, whose purchasers are hereby,
extended a ve year limited warranty from the date of
purchase, with all other terms of this warranty applying except the duration of warranty.
Some states and provinces do not allow the exclusion or limitation of incidental or consequential damages, so the above limitations may not
apply to you. This warranty gives you specic legal rights and you may also have other rights that vary from state to state and province to
p
rovince. Please see a store or contact 1-800-986-3460 for more details.
IMPORTANT HEALTH NOTICE
SOME OF THE BUILDING MATERIALS USED IN THIS HOME (OR THESE BUILDING MATERIALS) EMIT FORMALDEHYDE. EYE, NOSE, AND THROAT IRRITATION,
HEADACHE, NAUSEA AND A VARIETY OF ASTHMA-LIKE SYMPTOMS, INCLUDING SHORTNESS OF BREATH, HAVE BEEN REPORTED AS A RESULT OF
FORMALDEHYDE EXPOSURE. ELDERLY PERSONS AND YOUNG CHILDREN, AS WELL AS ANYONE WITH A HISTORY OF ASTHMA, ALLERGIES, OR LUNG PROBLEMS,
MAY BE AT GREATER RISK. RESEARCH IS CONTINUING ON THE POSSIBLE LONG-TERM EFFECTS OF EXPOSURE TO FORMALDEHYDE.
REDUCED VENTILATION MAY ALLOW FORMALDEHYDE AND OTHER CONTAMINANTS TO ACCUMULATE IN THE INDOOR AIR. HIGH INDOOR TEMPERATURES AND
HUMIDITY RAISE FORMALDEHYDE LEVELS. WHEN A HOME IS TO BE LOCATED IN AREAS SUBJECT TO EXTREME SUMMER TEMPERATURES, AN AIR-CONDITIONING
SYSTEM CAN BE USED TO CONTROL INDOOR TEMPERATURE LEVELS. OTHER MEANS OF CONTROLLED MECHANICAL VENTILATION CAN BE USED TO REDUCE
LEVELS OF FORMALDEHYDE AND OTHER INDOOR AIR CONTAMINANTS.
IF YOU HAVE ANY QUESTIONS REGARDING THE HEALTH EFFECTS OF FORMALDEHYDE, CONSULT YOUR DOCTOR OR LOCAL HEALTH DEPARTMENT.

F
E
G
D
B
A
3
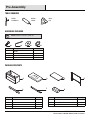
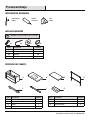
Part Description Quantity
A Cabinet 1
B Top
Shelf
Metal frame
1
C 1
2
HOMEDEPOT.COM/HomeDecorators
Please contact 1-800-986-3460 for further assistance.
TOOLS REQUIRED
Pre-Assembly
HARDWARE INCLUDED
Phillips
Screwdriver
NOTE: Hardware not shown to actual size.
Silicone
sealant
Clean
rag
PACKAGE CONTENTS
C
AA BB CC DD
Part Description Quantity
AA
BB 1
CC 20
36
DD
Screw
Hex key
Washer
Lock washer
20
D
Part Description Quantity
E Top side rail 2
F Bottom side rail
Drawer divider
2
G 2

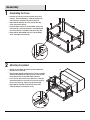
Assembly
2
1
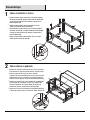
Assembling the frame
□
□
□
□
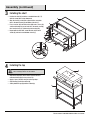
Attaching the cabinet
□
□
□
□
Carefully lay the cabinet (A) down on its back to expose the
drill holes on the underside.
Align the metal stand (D) and top side rails (E) of the assembled
frame with the bottom of the cabinet (A) so the screw hole tabs
line up with the holes in the bottom of the cabinet (A).
Place a washer (CC) and lock washer (DD) onto a screw (AA)
and thread through the screw hole tab in the metal stand (D),
then into the cabinet (A). T
ighten using the hex key (BB).
Repeat with the ve other screw hole tabs in the metal
stands (D) and two in each top side rail (E).
Insert one top side rail (E) into the top corner of the metal
frame (D). Secure by threading a screw (AA) through each
of the two holes, and tighten using the hex key (BB).
Repeat with the other top side rail (E) into the other top
corner of the metal frame (D).
Insert one bottom side rail (F) into the bottom corner of the
metal frame (D). Secure by threading a screw (AA) through
each of the two holes, and tighten using the hex key (BB).
Repeat with the other bottom side rail (F) into the bottom
corner of the other metal frame (D).
E
D
DD
CC
AA
BB
A
A
D
D
E
E
4
D
F
E
E
AA
D
D
BB
E
F

B
A
Assembly (continued)
4
3
HOMEDEPOT.COM/HomeDecorators
Please contact 1-800-986-3460 for further assistance.
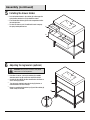
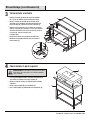
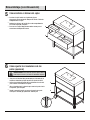
Installing the top
□ Wipe off the top edges of the cabinet (A) that will be in
contact with the top (B) using a clean rag.
Apply a layer of silicone along all of the top edges.
Align the top (B) with the cabinet (A).
Slowly lower the top (B) onto the cabinet (A).
□
□
□
Installing the shelf
A
D
D
F
F
F
D
DD
CC
AA
BB
C
C
□
□
□
□
Position the shelf (C) inside the assembled frame (D, E, F)
with the screw holes facing downward.
Align the shelf (C) so the holes align with the screw hole
tabs in the metal frame (D) and bottom side rails (F).
Place a washer (CC) and lock washer (DD) onto a screw (AA)
and thread through the screw hole tab in the metal stand (D),
then into the shelf (C). T
ighten using the hex key (BB).
Repeat with the ve other screw hole tabs in the metal
stands (D) and two in each bottom side rail (F).
5
CAUTION: Two people are needed to safely lift the top
and accurately position it onto the cabinet.
E

G
A
A
□
□
□
Push the bottom drawer in the cabinet (A) to disengage the
spring locking mechanism. Fully extend the drawer.
Place the drawer dividers (G) into each compartment on the
left and right sides.
To close the drawer, push it in with both hands to engage
the spring locking mechanism.
Installing the drawer divider
Assembly (continued)
6
5
Adjusting the leg levelers (optional)
CAUTION:
Two people are needed to safely tilt the
cabinet and access the leg levelers.
□ If the oor is uneven, causing the cabinet (A) to wobble,
determine which leg (D) needs to be adjusted in height.
Carefully tilt the cabinet (A) either backwards or forwards to
access the leg (D) leveler.
Turn the leveler clockwise to make the leg (D) shorter, or
counterclockwise to make it longer.
Repeat as needed with the other legs (D) until the cabinet (A)
stands solidly on the oor.
□
□
□
D
6

Maintenance
To protect your bath furniture, we suggest the following:.
□ Avoid placing your furniture in direct sunlight, as sunlight causes fading.
Clean up spills immediately. Use a blotting rather than a wiping action. Water left over a long period of time will cause white spots in
the nish.
Alcohol, perfume, after-shave and medications can cause severe damage to the nish.
□
□
Care and Cleaning
For best results in cleaning and polishing your bath furniture, we recommend the following:
□
Dust frequently with a clean, soft, dry, lint-free cloth. Clean the surface by rubbing in the direction of the grain.
Polish your furniture approximately every six months with a product that contains detergents, emulsiers and mineral oil. The
detergents clean dirt from the furniture; the emulsiers give it body to clean and last longer; the mineral oil is left behind as a barrier
for dirt and moisture that can harm the nish. There is no grit to harm the nish, no wax build-up, and no silicone to raise the sheen
and act as a barrier for touch-ups and renishing.
Clean up spills immediately. Use a blotting rather than a wiping action. Water left over a long period of time will cause white spots in
the nish.
Clean the outside surface with mild soap, warm water, and a soft cloth.
On stubborn stains, use a powdered detergent and damp sponge or nylon scouring pad.
Never use abrasive scouring powders, cleansers, or pads because they will scratch, damage, and dull the surface.
Clean the sink surface with mild soap and warm water, then dry with a soft cloth.
□
□
□
□
□
□
HOMEDEPOT.COM/HomeDecorators
Please contact 1-800-986-3460 for further assistance.
7

Retain this manual for future use.
Questions, problems, missing parts? Before returning to the store,
call Home Decorators Collection Customer Service
8 a.m. - 7 p.m., EST, Monday-Friday, 9 a.m. - 6 p.m., EST, Saturday
1-800-986-3460
HOMEDEPOT.COM/HomeDecorators

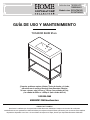
TOCADOR SHIRI 91cm
GRACIAS POR TU COMPRA
¿Preguntas, problemas o piezas faltantes? Antes de devolver a la tienda,
comunícate con el servicio al cliente de Home Decorators Collection
De lunes a viernes, entre 8:00 a.m. y 7:00 p.m. (hora estándar del Este),
y los sábados de 9:00 a.m. a 6:00 p.m. (hora estándar del Este)
1-800-986-3460
HOMEDEPOT.COM/HomeDecorators
Apreciamos la conanza que has depositado en Home Decorators Collection al comprar este tocador. Nos esforzamos
continuamente en crear productos de calidad diseñados para mejorar tu hogar. Visítanos por Internet para ver nuestra línea completa
de productos disponibles con vistas a las necesidades de mejora de tu hogar. ¡Gracias por elegir Home Decorators Collection!
GUÍA DE USO Y MANTENIMIENTO
Artículo núm. 1003050431
1003050441
Modelo núm. SYNVT3618D
SYGVT3618D

Tabla de contenido
Información de seguridad
ADVERTENCIA: Manipular con cuidado. No lo dejes caer,
AVISO: Cumple con las normas locales de plomería y construcción.
Garantía
no lo manipules bruscamente, ni aprietes demasiado los
tornillos pues esto causará daños a la madera.
Los productos de Home Decorators Collection se fabrican con normas y mano de obra de calidad superior, y están respaldados por una
garantía del fabricante durante un (1) año. Los productos de Home Decorators Collection están garantizados para el comprador original
contra defectos materiales o de fabricación. Reemplazaremos GRATIS cualquier producto o pieza defectuosa. Simplemente retorne el
producto / pieza a cualquier tienda de The Home Depot, o llame al 1-800-986-3460 para recibir el artículo de reemplazo. La prueba de
compra (recibo original de ventas) del comprador original debe estar disponible para cualquier reclamación de garantía de Home
Decorators Collection.
Esta garantía excluye fallas y daños directos/indirectos debido al uso incorrecto, abuso o uso y desgaste normales. Esta garantía excluye
todo uso industrial, comercial y de negocios, a cuyos compradores se les extiende una garantía limitada de cinco años a partir de la fecha
de compra, manteniendo todos los demás términos de la garantía, con excepción de la duración.
Algunos estados y provincias no permiten la exclusión o limitación de daños directos o indirectos, por ello las limitaciones previamente
enunciadas pueden no aplicarse a su caso. Esta garantía le otorga derechos legales especícos y es posible que también goce de otros
derechos que varían de un estado a otro y de una provincia a otra. Consulte a un asociado de la tienda o comuníquese al 1-800-986-3460
para obtener más detalles.
Ensamblaje.....................................................................4
Mantenimiento................................................................7
Mantenimiento y limpieza................................................7
Tabla de contenido ...........................................................2
Información de seguridad.........................................
.........
2
Garantía limitada de por vida........
...........
.................
.........
2
Aviso importante para la salud
..........................................
2
Preensemblaje........................................
..........
...
.............
3
Herramientas necesarias....................................
........
.....
3
Herrajes incluidos...........................................
................
3
Contenido del paquete............................................
.......
..3
AVISO IMPORTANTE PARA LA SALUD:
ALGUNOS DE LOS MATERIALES DE CONSTRUCCIÓN USADOS EN ESTA VIVIENDA (O ESTOS MATERIALES DE CONSTRUCCIÓN) EMITEN FORMALDEHÍDO. SE HAN
REPORTADO IRRITACIÓN DE LOS OJOS, NARIZ Y GARGANTA, DOLOR DE CABEZA, NÁUSEA Y UNA VARIEDAD DE SÍNTOMAS PARECIDOS AL ASMA, COMO
RESULTADO DE LA EXPOSICIÓN AL FORMALDEHÍDO. LAS PERSONAS DE LA TERCERA EDAD Y LOS NIÑOS PEQUEÑOS, ASÍ COMO QUIENQUIERA QUE HAYA
PADECIDO DE ASMA, ALERGIAS O PROBLEMAS PULMONARES, PUEDEN ENFRENTAR MAYOR RIESGO. ES CONTINUA LA INVESTIGACIÓN DE LAS POSIBLES
CONSECUENCIAS A LARGO PLAZO POR EXPOSICIÓN AL FORMALDEHÍDO.
LA POCA VENTILACIÓN PUEDE CAUSAR QUE EL FORMALDEHÍDO U OTROS CONTAMINANTES SE ACUMULEN EN LA ATMÓSFERA INTERIOR. LAS ALTAS
TEMPERATURA Y HUMEDAD EN INTERIORES INCREMENTAN LOS NIVELES DE FORMALDEHÍDO. PARA VIVIENDAS UBICADAS EN ZONAS DE TEMPERATURAS
EXTREMAS DURANTE EL VERANO PUEDE USARSE UN SISTEMA DE AIRE ACONDICIONADO A FIN DE CONTROLAR LOS NIVELES DE TEMPERATURA EN
INTERIORES. OTROS MEDIOS DE VENTILACIÓN MÉCANICA CONTROLADA PUEDEN USARSE PARA REDUCIR LOS NIVELES DE FORMALDEHÍDO Y OTROS
CONTAMINANTES DEL AIRE EN INTERIORES.
SI TIENES ALGUNA PREGUNTA O DUDA CON RESPECTO A LOS EFECTOS DEL FORMALDEHÍDO EN LA SALUD, CONSULTA A TU MÉDICO O LLAMA AL DEPARTA-
MENTO DE SALUD LOCAL.
2

3
HOMEDEPOT.COM/HomeDecorators
Para obtener asistencia, llama al 1-800-986-3460.
HERRAMIENTAS NECESARIAS
Preensemblaje
Destornillador
Phillips
Sellador
de silicona
Paño
limpio
HERRAJES INCLUIDOS
NOTA:
No se muestra el tamaño real de los herrajes.
CONTENIDO DEL PAQUETE
AA BB CC DD
AA
BB 1
CC 20
36
DD
Tornillo
Llave hexagonal
Arandela
Arandela de seguridad
20
Pieza
Descripción Cantidad
F
E
G
D
B
A
A Gabinete 1
B Parte superior
Espejo
Marco de metal
1
C 1
2
C
D
E Barra lateral superior 2
F Barra lateral inferior
Divisor de cajones
2
G 2
Pieza
Descripción
Cantidad
Pieza
Descripción
Cantidad

4
Ensemblaje
1
2
Cómo ensamblar el marco
□
□
□
□
Cómo colocar el gabinete
□
□
□
□
Coloque con cuidado el gabinete (A) sobre su parte posterior
para exponer los agujeros de perforación en la parte inferior
Alinee el marco de metal (D) y las barras laterales
superiores (E) del ensamblado marco con la parte inferior del
gabinete (A) para que las lengüetas del agujero del tornillo
alinearse con los agujeros en la parte inferior del gabinete (A).
Coloque una arandela (CC) y una arandela de seguridad (DD)
en un tornillo (AA) y enrosque a través de la lengüeta del
oricio del tornillo en el marco de metal (D), luego en el
gabinete (A). Apretar usando la llave hexagonal (BB).
Repita con las otras cinco lengüetas del agujero del tornillo en
el marco de metal (D) y dos en cada barra lateral superior (E).
Inserte una barra lateral superior (E) en la esquina superior
del marco de metal (D). Asegure enroscando un tornillo (AA)
a través de cada uno de los dos oricios y apriete con la
llave hexagonal (BB).
Repita con el otro barra lateral superior (E) en la otra
esquina superior del marco de metal (D).
Inserte una barra lateral inferior (F) en la esquina inferior
del marco de metal (D). Asegure enhebrado un tornillo (AA)
a través de cada uno de los dos oricios y apriete con la
llave hexagonal (BB).
Repita con el otro barra lateral inferior (F) en la esquina
inferior del otro marco de metal (D).
E
D
DD
CC
AA
BB
A
A
D
D
E
E
D
F
E
E
AA
D
D
BB
E
F

5
HOMEDEPOT.COM/HomeDecorators
Para obtener asistencia, llama al 1-800-986-3460.
Ensemblaje (continuación)
B
A
4
3
□
□
□
□
A
D
D
F
F
F
D
DD
CC
AA
BB
C
C
□
□
□
□
Coloque el estante (C) dentro del marco ensamblado
(D, E, F) con los oricios de los tornillos hacia abajo.
Alinee el estante (C) de modo que los oricios estén
alineados con las lengüetas del oricio del tornillo en el
marco de metal (D) y los barras laterales inferiores (F).
Coloque una arandela (CC) y una arandela de seguridad
(DD) en un tornillo (AA) y enrosque a través de la lengüeta
del oricio del tornillo en el marco de metal (D), luego en
el estante (C). Apretar usando la llave
hexagonal (BB).
Repita con las otras cinco lengüetas del oricio del
tornillo en el marco de metal (D) y dos en cada barra
lateral inferior (F).
Cómo instalar el estante
Cómo instalar la parte superior
PRECAUCIÓN: Se necesitan dos personas para cargar la
parte superior de forma segura y colocarla adecuadamente
sobre el gabinete.
Pasa un paño limpio los bordes superiores del gabinete (A)
que estarán en contacto con la parte superior (B).
Aplica una capa de silicona a lo largo de todos los bordes
superiores.
Alinea la parte superior (B) con el gabinete (A).
Baja la parte superior (B) lentamente hacia el gabinete (A).
E

6
5
Cómo ajustar los niveladores de las
patas (opcional)
PRECAUCIÓN: Se necesitan dos personas para inclinar de
forma segura el tocador y acceder a los niveladores de patas.
□ Si el piso está desnivelado, provocando que el tocador (A) se
balancee, determina qué pata necesita un ajuste de altura.
Inclina con cuidado el tocador (A) hacia delante o hacia atrás
para acceder al nivelador de las patas.
Gira el nivelador hacia la derecha para acortar la pata o hacia
la izquierda, para alargarla.
Repite la operación según sea necesario para la otra pata
hasta que el tocador (A) quede rme sobre el piso.
□
□
□
6
Presione el cajón inferior en el gabinete (A) para
desconectar el mecanismo de bloqueo de resorte. Extienda
completamente el cajón.
Coloque los divisores del cajón (G) en cada compartimento
en el lados izquierdo y derecho.
Para cerrar el cajón, empújelo con ambas manos para el
mecanismo de bloqueo de resorte.
Cómo instalar el divisor del cajón
Ensemblaje (continuación)
G
A
A
D
□
□
□

Mantenimiento
Para proteger tus muebles de baño, recomendamos lo siguiente:.
□ Evita poner tus muebles bajo la luz directa del sol pues esta ocasiona decoloración.
Limpia los derrames al momento. Es mejor que absorbas los derrames con un paño seco y no que pases el paño. Si dejas agua por
mucho tiempo, esto producirá manchas blancas en el acabado.
El alcohol, los perfumes, las lociones para después de afeitar y las medicinas líquidas pueden causar graves daños al acabado.
□
□
Mantenimiento y limpieza
Para lograr mejores resultados al limpiar y pulir tus muebles de baño, recomendamos los siguiente:
□
Quita el polvo frecuentemente con un paño sin pelusas, seco, suave y limpio. Limpia la supercie restregando en la dirección de la veta.
Pule tus muebles cada seis meses aproximadamente con algún producto que contenga detergentes, emulsionantes y aceite mineral.
Los detergentes limpian la suciedad del mueble; los emulsionantes le dan cuerpo para limpiar y durar más; el aceite mineral
permanece como una barrera para la suciedad y la humedad que pueden dañar el acabado. No hay polvo para dañar el acabado, ni
acumulación de cera, ni silicona para aumentar el brillo y actuar como una barrera para retoques y renovación del acabado.
Limpia los derrames al momento. Es mejor que absorbas los derrames con un paño seco y no que pases el paño. Si dejas agua por
mucho tiempo, esto producirá manchas blancas en el acabado.
Limpia la supercie exterior con jabón suave, agua tibia y un paño suave.
Para manchas difíciles, usa un detergente en polvo y una esponja húmeda o una esponjilla de nylon.
Nunca uses polvos, limpiadores, o esponjillas abrasivas porque rayarán, dañarán y opacarán la supercie.
Limpia la supercie del lavamanos con jabón suave, agua tibia y luego seca con un paño suave.
□
□
□
□
□
□
7
HOMEDEPOT.COM/HomeDecorators
Para obtener asistencia, llama al 1-800-986-3460.

Conserva este manual para uso en el futuro.
¿Preguntas, problemas o piezas faltantes? Antes de devolver a la tienda,
comunícate con el servicio al cliente de Home Decorators Collection
De lunes a viernes, entre 8:00 a.m. y 7:00 p.m. (hora estándar del Este),
y los sábados de 9:00 a.m. a 6:00 p.m. (hora estándar del Este)
1-800-986-3460
HOMEDEPOT.COM/HomeDecorators
-
 1
1
-
 2
2
-
 3
3
-
 4
4
-
 5
5
-
 6
6
-
 7
7
-
 8
8
-
 9
9
-
 10
10
-
 11
11
-
 12
12
-
 13
13
-
 14
14
-
 15
15
-
 16
16


Home Decorators Collection SYNVT3618D Guía de instalación
- Tipo
- Guía de instalación
- Este manual también es adecuado para
en otros idiomas
Artículos relacionados
-
Home Decorators Collection RMGRF2236 Guía de instalación
-
-
-
-
-
-
-
-
-