LG LRG3194BM Manual de usuario
- Categoría
- Cocinas
- Tipo
- Manual de usuario
Este manual también es adecuado para

ENGLISH ESPAÑOL
www.lg.com
MFL33029628
(REV.07 181130)
LRG3060** LRG3061** LRG3193** LRG3194**
OWNER’S MANUAL
GAS RANGE
Read this owner’s manual thoroughly before operating the appliance
and keep it handy for reference at all times.
•
Do not store or use gasoline or other flammable vapors and liquids in the
vicinity of this or any other appliance.
•
WHAT TO DO IF YOU SMELL GAS
- Do not try to light any appliance.
- Do not touch any electrical switch.
- Do not use any phone in your building.
- Immediately call your gas supplier from a neighbor's phone. Follow the
gas supplier's instructions.
- If you cannot reach your gas supplier, call the fire department.
•
Installation and service must be performed by a qualified installer, service
agency, or the gas supplier.
If the information in this manual is not followed exactly, a fire or explosion
may result causing property damage, personal injury or death.
WARNING
Copyright © 2017 - 2018 LG Electronics Inc. All Rights Reserved.

2
TABLE OF CONTENTS
TABLE OF CONTENTS
3
PRODUCT FEATURES
4
IMPORTANT SAFETY
INSTRUCTIONS
12
PRODUCT OVERVIEW
12 Parts
12 Accessories
13
INSTALLATION
13 Before Installing the Range
14 Installing the Range
16 Providing Adequate Gas Supply
16 Connecting the Range to Gas
17 Electrical Connections
18 Sealing the Openings
18 Assembling the Surface Burners
18 Checking Ignition of the Surface Burners
19 Leveling the Range
19 Engaging the Anti-tip Device
20
OPERATION
20 Gas Surface Burners
20 Burner Locations
21 Using the Gas Surface Burners
21 Setting the Flame Size
21 In Case of Power Failure
21 Range-Top Cookware
22 Using a Wok
22 Using Stove-Top Grills
22 Using the Griddle
23 The Oven
24 Control Panel Overview
25 Changing Oven Settings
25 Clock
25 Oven Light
25 Minimum & Maximum Default Settings
26 Timer On/Off
26 Settings
-
Setting the Hour Mode
-
Adjusting the Oven Thermostat
-
Turning the Preheat Alarm Light On/Off
-
Adjusting the Beeper Volume
-
Selecting Fahrenheit or Celsius
-
Setting the Convection Auto Conversion
Function (For Model: LRG3193,
LRG3194)
28 Lockout
28 Cook Time (Timed Cook)
28 Removing and Replacing the Oven Racks
29 Recommended Baking and Roasting Guide
29 Bake
30 Convection Bake (For Model: LRG3193,
LRG3194)
31 Broil
33
MAINTENANCE
33 Gas Surface Burners
34 Burner Grates
34 Cleaning the Cooktop Surface
34 Oven Air Vents
35 Control Panel
35 Front Manifold Panel and Knobs
35 Cleaning the Exterior
36 Door Care Instructions
36 EasyClean
®
38 Self Clean (For Model : LRG3194)
40 Changing the Oven Light
40 Removing and Replacing the Lift-Off Oven
Doors and Drawer
42
TROUBLESHOOTING
42 FAQs
44 Before Calling for Service
46
SMART DIAGNOSIS™ FUNCTION
47
LIMITED WARRANTY

3
PRODUCT FEATURES
ENGLISH
PRODUCT FEATURES
Multiple Gas Burner Sizes
Choose a burner to fit the size of the cookware.
Cooking multiple items at once is possible by using different burners at the
same time.
Safe and Convenient Gas Range
Provides safety and convenience for cooking.
Self Clean & EasyClean®
Useful for easy cleaning.

4
IMPORTANT SAFETY INSTRUCTIONS
IMPORTANT SAFETY INSTRUCTIONS
Read and follow all instructions when using the range to prevent the risk of fire, electric
shock, personal injury, or damage. This guide does not cover all possible conditions that
may occur. Always contact your service agent or manufacturer about problems that you do
not understand.
Download this owner's manual at: http://www.lg.com
This is the safety alert symbol. This symbol alerts you to potential hazards that
can result in property damage and/or serious bodily harm or death.
All safety messages will follow the safety alert symbol and either the word
WARNING or CAUTION. These words mean:
WARNING
-
Indicates a hazardous situation which, if not avoided, could result
in death or serious injury.
CAUTION
-
Indicates a hazardous situation which, if not avoided, could result
in minor or moderate injury.
ANTI-TIP DEVICE
WARNING
•
ALL RANGES CAN TIP
•
INJURY TO PERSONS COULD RESULT
•
INSTALL ANTI-TIP DEVICES PACKED WITH RANGE
•
SEE INSTALLATION INSTRUCTIONS
•
A child or adult can tip the range and be killed.
•
Install the anti-tip device to the structure and/or the range. Verify the anti-tip device
has been properly installed and engaged by following the guide of the Anti tip bracket
template.
•
Engage the range to the anti-tip device by following the guide of the Anti tip bracket
template. Ensure the anti-tip device is re-engaged when the range is moved by
following the guide of the Anti tip bracket template.
•
Re-engage the anti-tip device if the range is moved. Do not operate the range without
the anti-tip device in place and engaged.
•
See installation instructions for details.
•
Failure to do so can result in death or serious burns to children or adults.
•
To avoid tipping, do not step or sit on the door. Install the anti-tip bracket packed with this
range.
- The range could be tipped and injury might result from spilled hot liquid, food, or the
range itself.
- If the range is pulled away from the wall for cleaning, service, or any other reason,
ensure that the anti-tip device is properly reengaged when the range is pushed back
against the wall.
Anti-tip bracket
Approximately
0.65" (16.5 mm)
Screw must
enter wood or
concrete
Wall plate

5
IMPORTANT SAFETY INSTRUCTIONS
ENGLISH
•
To reduce the risk of the range tipping over, the range must be secured by properly
installing the anti-tip device.
•
To check that the anti-tip bracket is properly installed: Remove any items on the cooktop.
Grasp the top rear edge of the range back guard and carefully attempt to tilt it forward.
Verify that the anti-tip device is engaged.
•
Remove the warming or storage drawers and visually inspect that the rear leveling leg is
fully inserted into the anti-tip bracket.
•
Refer to the installation section of the manual for proper anti-tip bracket installation.
IMPORTANT SAFETY NOTICE
Gas appliances can cause minor exposure to four of these substances, namely benzene,
carbon monoxide, formaldehyde and soot, caused primarily by the imperfect combustion
of natural or LP gas. Correctly adjusted burners, indicated by a bluish rather than a yellow
flame, will minimize imperfect combustion. Exposure to these substances can be minimized
by opening windows or using a ventilation fan or hood.
WARNING
•
Never use your range as a space heater to heat or warm the room. Doing so may result
in carbon monoxide poisoning and overheating of the oven.
•
Never wear loose fitting or hanging garments while using the appliance. Be careful
when reaching for items placed in cabinets over the range. Flammable materials could
be ignited if brought in contact with flame or hot oven surfaces and may cause severe
burns.
•
Do not place or use combustible materials such as gasoline or other flammable vapors
and liquids in the vicinity of this or any other appliance.
•
Do not place flammable materials in the oven or near the cooktop.
•
Do not allow cooking grease or other flammable materials in or near the range.
•
Do not use water on grease fires. Never touch a flaming pan. Turn the controls off.
Smother a flaming pan on a surface burner by covering the pan completely with a well-
fitting lid, cookie sheet or flat tray. Use a multi-purpose dry chemical or foam-type fire
extinguisher.
A grease fire can be put out by covering it with baking soda or, if available, by using a
multi-purpose dry chemical or foam-type fire extinguisher.
Flame in the oven or the drawer can be smothered completely by closing the oven door
or drawer and turning the control to off or by using a multi-purpose dry chemical or
foam-type fire extinguisher.
•
Do not use the oven or the drawer for storage.
•
Let the burner grates and other surfaces cool before touching them.
•
Never block the vents (air holes) of the range. They provide the air inlet and outlet
necessary for the range to operate properly with correct combustion. Air openings are
located at the rear of the cooktop, at the top and bottom of the oven door, and at the
bottom of the range.
•
Never obstruct the flow of combustion and ventilation air by blocking the oven vent
or air intakes. Doing so restricts air to the burner and may result in carbon monoxide
poisoning.

6
IMPORTANT SAFETY INSTRUCTIONS
WARNING
•
Never cover any slots, holes or passages in the oven bottom or cover an entire rack
with materials such as aluminum foil. Doing so blocks air flow through the oven and
may cause carbon monoxide poisoning. Aluminum foil linings may also trap heat,
causing a fire hazard.
•
Large scratches or impacts to glass doors can lead to broken or shattered glass.
•
Stepping, leaning or sitting on the doors or drawers of this range can result in serious
injuries and also cause damage to the range. Do not allow children to climb or play
around the range. The weight of a child on an open door may cause the range to tip,
resulting in serious burns or other injury.
•
Leak testing of the appliance must be conducted according to the manufacturer’s
instructions.
•
Gas leaks may occur in the system and result in a serious hazard. Gas leaks may
not be detected by smell alone. Gas suppliers recommend you purchase and install
a UL-approved gas detector. Install and use in accordance with the gas detector
manufacturer’s instructions.
•
Do not use commercial oven cleaners on the oven finish or around any part of the
oven. They will damage the finish.
•
To prevent staining or discoloration, clean appliance after each use.
•
Do not attempt to open or close the door or operate the oven until the door is properly
installed.
•
Never place fingers between the hinge and front oven frame. Hinge arms are spring
mounted. If accidentally hit, the hinge will slam shut against the oven frame and injure
fingers.
CAUTION
•
Items of interest to children should not be placed in cabinets above the range or on
the backsplash of the range - children climbing on the range to reach items could be
seriously injured.
•
Do not leave children alone or unattended where a range is hot or in operation. They
could be seriously burned.
•
Do not let anyone climb, stand or hang on the oven door, warming drawer or cooktop.
They could damage the range or tip it over, causing severe personal injury.
•
Wear gloves when cleaning the range to avoid injury or burns.
•
Do not use the oven for storing food or cookware.
•
To prevent damage to the oven door, do not attempt to open the door when Lock is
displayed.
•
Do not stand or place excessive weight on an open door. This could tip the range,
break the door, or injure the user.
•
Do not use delayed baking for highly perishable foods such as dairy products, pork,
poultry, or seafood.

7
IMPORTANT SAFETY INSTRUCTIONS
ENGLISH
INSTALLATION SAFETY PRECAUTIONS
Have the installer show you the location of the range gas shut-off valve and how to shut it
off if necessary.
WARNING
•
Make sure your range is properly installed and grounded by a qualified installer,
according to the installation instructions. Any adjustment and service should be
performed only by qualified gas range installers or service technicians.
•
Make sure your range is properly adjusted by a qualified service technician or installer
for the type of gas (natural or LP) that is to be used. The range can be converted for
use with either type of gas. See the installation instructions.
•
These adjustments must be done by a qualified service technician according to the
manufacturer’s instructions and all codes and requirements of the authority having
jurisdiction. Failure to follow these instructions could result in serious injury or property
damage. The qualified agency performing these adjustments assumes responsibility for
the conversion.
•
Disconnect the electrical supply before servicing the appliance.
•
Never use the appliance door as a step stool or seat, as this may result in possible
tipping of the appliance and serious injuries.
•
This product should not be installed below ventilation type hood systems that direct air
in a downward direction.
Doing so may cause ignition and combustion problems with the gas burners resulting in
personal injury and may affect the cooking performance of the unit.
•
Plug your range into a 120-volt grounded outlet only. Do not remove the round
grounding prong from the plug. If in doubt about the grounding of the home electrical
system, it is your personal responsibility and obligation to have an ungrounded outlet
replaced with a properly grounded, three-prong outlet in accordance with the National
Electrical Code. Do not use an extension cord with this range.
•
To prevent fire hazard or electrical shock, do not use an adapter plug, an extension
cord, or remove the grounding prong from the electrical power cord. Failure to follow
this warning can cause serious injury, fire or death.
•
To prevent poor air circulation, place the range out of the kitchen traffic path and out of
drafty locations.
•
Do not attempt to repair or replace any part of the range unless it is specifically
mentioned in this manual. All other services should be referred to a qualified technician.
•
Make sure that all packaging materials are removed from the range before operating it
to prevent fire or smoke damage should the packaging material ignite.

8
IMPORTANT SAFETY INSTRUCTIONS
WARNING
•
To shut off the gas supply to the range, close the range gas shutoff valve by turning it
clockwise.
1
/
2
"
Adapter
1
/
2
"
Adapter
Gas pressure
regulator valve
Range gas shutoff valve
Gas Flow into Range
Installer: Inform the consumer of the location of the gas shut-off valve.
•
After using the range for an extended period of time high floor temperatures may result.
Many floor coverings will not withstand this kind of use.
•
Never install the range over vinyl tile or linoleum that cannot withstand such type of
use. Never install it directly over interior kitchen carpeting.
SURFACE BURNERS
WARNING
•
Even if the top burner flame goes out, gas is still flowing to the burner until the knob is
turned to the Off position. If you smell gas, immediately open a window and ventilate
the area for five minutes prior to using the burner. Do not leave the burners on
unattended.
•
Use proper pan size. Do not use pans that are unstable or that can be easily tipped.
Select cookware with flat bottoms large enough to cover burner grates. To avoid
spillovers, make sure the cookware is large enough to contain the food properly. This
will both save cleaning time and prevent hazardous accumulations of food, since heavy
spattering or spillovers left on the range can ignite. Use pans with handles that can be
easily grasped and remain cool.

9
IMPORTANT SAFETY INSTRUCTIONS
ENGLISH
CAUTION
•
Be sure that all surface controls are set in the Off position prior to supplying gas to the
range.
•
Never leave the surface burners unattended at high flame settings. Boilovers may
cause smoke and greasy spillovers that may ignite.
•
Always turn the knobs to the Lite position when igniting the top burners and make sure
the burners have ignited.
•
Control the top burner flame size so it does not extend beyond the edge of the
cookware. Excessive flame is hazardous.
•
Only use dry pot holders- moist or damp pot holders on hot surfaces may result in
burns from steam. Do not let pot holders come near open flames when lifting cookware.
Do not use towels or other bulky cloth items. Use a pot holder.
•
If using glass cookware, make sure the cookware is designed for range-top cooking.
•
To prevent burns from ignition of flammable materials and spillage, turn cookware
handles toward the side or back of the range without extending them over adjacent
burners.
•
Never leave any items on the cooktop. The hot air from the vent may ignite flammable
items and will increase pressure in closed containers, which may cause them to burst.
•
Carefully watch foods being fried at a high flame setting.
•
Always heat fat slowly, and watch as it heats.
•
If frying combinations of oils and fats, stir together before heating.
•
Use a deep fat thermometer if possible to prevent overheating fat from heating beyond
the smoking point.
•
Use the least possible amount of fat for effective shallow or deep fat frying. Filling the
pan with too much fat can cause spillovers when food is added.
•
Do not cook foods directly on an open flame on the cooktop.
•
Do not use a wok on the surface burners if the wok has a round metal ring that is
placed over the burner grate to support the wok. This ring acts as a heat trap, which
may damage the burner grate and burner head. It may also cause the burner to work
improperly. This may cause carbon monoxide levels which are higher than what is
allowed by current standards, resulting in a health hazard.
•
Foods for frying should be as dry as possible. Frost or moisture on foods can cause hot
fat to bubble up and spill over the sides of the pan.
•
Never try to move a pan of hot fat, especially a deep fryer. Wait until the fat is cool.
•
Do not place plastic items on the cooktop- they may melt if left too close to the vent.
•
Keep all plastics away from the surface burners.
•
To prevent burns, always be sure that the controls for all burners are in the Off position
and all grates are cool before attempting to remove them.
•
If you smell gas, turn off the gas to the range and call a qualified service technician.
Never use an open flame to locate a leak.
•
Always turn the knobs to the Off position before removing cookware.
•
Do not lift the cooktop. Lifting the cooktop can cause damage and improper operation
of the range.
•
If the range is located near a window, do not hang long curtains that could blow over
the surface burners and catch on fire.
•
Use care when cleaning the cooktop. The pointed metal ends on the electrodes could
cause injury.

10
IMPORTANT SAFETY INSTRUCTIONS
BROILER
Always use a broiler pan and a grid for excess fat and grease drainage. This will help to
reduce splatter, smoke, and flare-ups.
WARNING
When using the broiler, the temperature inside the oven will be extremely high. Take
caution to avoid possible burns by:
•
Keeping the door closed when broiling (refer to Broil section of the manual)
•
Always wearing oven mitts when inserting or removing food items
COOK MEAT AND POULTRY THOROUGHLY
To protect against food-borne illnesses, cook meat and poultry thoroughly—ground beef to at
least an INTERNAL temperature of 160 °F, poultry to at least an INTERNAL temperature of 165
°F and beef, pork, veal & lamb steaks & chops to at least an INTERNAL temperature of 145 °F.
SELF CLEANING OVEN
Make sure to wipe off excess spillage before operating the self clean function.
CAUTION
•
Do not leave food, cooking utensils, racks, etc. in the oven during the self clean cycle.
•
Do not use oven cleaners. No commercial oven cleaner or oven liner protective coating
of any kind should be used in or around any part of the oven. Residue from oven
cleaners will damage the inside of the oven when the self clean cycle is used.
•
Remove oven racks and other items from both upper and lower ovens before starting
the self clean cycle.
•
Only clean the parts listed in this manual.
•
Do not clean the door gasket. The door gasket is necessary for a good seal. Care
should be taken not to rub, damage or move the gasket.
•
If the self cleaning mode malfunctions, turn the range off and disconnect the power
supply. Have the range serviced by a qualified technician.
•
It is normal for parts of the oven to become hot during a self clean cycle.
•
Avoid touching the door, window or oven vent area during a clean cycle.
OVEN
When opening the door of a hot oven, stand away from the range. The hot air and steam
that escape can cause burns to hands, face and eyes.
WARNING
•
Never block any slots, holes or passages in the oven bottom or cover an entire rack
with materials such as aluminum foil. Doing so blocks air flow through the oven and
may cause carbon monoxide poisoning. Aluminum foil linings may trap heat, causing a
fire hazard.
•
Do not heat food in closed containers. Pressure inside the container could increase and
cause the container to burst, resulting in injury.

11
IMPORTANT SAFETY INSTRUCTIONS
ENGLISH
WARNING
•
Do not line oven walls or bottom with aluminum foil or allow them to contact exposed
heating elements in the oven. Doing so could create a fire hazard or cause damage to
the range.
•
Do not use the oven for storage. Items stored in the oven can catch on fire.
•
Keep the oven free from grease buildup.
•
Insert the oven racks in the desired position while the oven is cool.
•
To prevent burns when removing food, slide racks out until the stop engages, then
remove food items. This may also protect you from getting burnt by touching hot
surfaces of the door or oven walls.
•
When placing or removing a griddle, always wear oven mitts.
•
When using cooking or roasting bags in the oven, follow the manufacturer’s directions.
•
Use only glass cookware that is recommended for use in gas ovens.
•
Always remove the broiler pan from the range after you finish broiling. Grease left in the
pan can catch fire if the oven is used without removing the grease from the broiler pan.
•
If meat is too close to the flame while broiling, the fat may ignite. Trim excess fat to
prevent excessive flare-ups.
•
Make sure the broiler pan is in place correctly to minimize the possibility of grease fires.
•
If you have a grease fire in the broiler pan, press the Clear/Off and keep the oven door
closed to contain the fire until it burns out.
•
For safety and better cooking performance, always bake and broil with the oven door
closed. Open door baking or broiling can cause damage to the knobs or valves.
Do not leave the oven door open during cooking or while the oven is cooling down.
ENERGY SAVING TIPS
•
Multiple-rack cooking saves time and energy. Whenever possible, cook foods requiring the
same cooking temperature together in one oven.
•
For optimal performance and energy savings, follow the guides on page 29 for proper rack
and pan placements.
•
Match the size of the cookware to the amount of food being cooked to save energy when
heating. Heating ½ quart of water requires more energy in a 3-quart pot than in a 1-quart
pot.
•
Use cookware with flat bottoms to provide the best contact with the cooktop surface when
cooking on the glass-ceramic cooktop.
•
Match the size of the cooktop burner or element to the size of the cookware in use. Using
a large element for a small pan wastes heating energy, and the exposed surface of the
element is a burn or fire hazard.
•
Reduce energy use by cleaning light oven soils with the EasyClean
®
feature instead of
self-clean.
•
Avoid opening the oven door more than necessary during use. This helps the oven
maintain temperature, prevents unnecessary heat loss, and saves on energy use.
Read all instructions before using the appliance.
SAVE THESE INSTRUCTIONS

12
PRODUCT OVERVIEW
PRODUCT OVERVIEW
Parts
Grate
Oven control panel
Cooktop
Automatic oven light switch
Door gasket
Anti-tip bracket
Oven vent
Model and serial
number plate
Burner control knob
Rack
Oven door
Storage drawer
Accessories
Included Accessories
Standard rack (2ea) Griddle (1ea)
(LRG3061, LRG3193,
LRG3194)
Owner’s manual (1ea)
Anti-tip kit
Anti-tip (1ea) Screws (4ea) Anchors (4ea) Template (1ea)
LP nozzle conversion kit
Optional Accessories
Broiler pan
Grid
Cooktop Nozzles (5ea) Oven Nozzles (2ea) Choke (1ea) Set screw (1ea)
EasyClean
®
kit (LRG3061, LRG3193)
Spray bottle (1ea) Non-scratch scouring pad (1ea)
NOTE
•
Contact LG Customer Service at 1-800-243-0000 (1-888-542-2623 in Canada) if any accessories are missing.
•
For your safety and for extended product life, only use authorized components.
•
The manufacturer is not responsible for product malfunction or accidents caused by the use of separately
purchased, unauthorized components or parts.
•
The images in this guide may be different from the actual components and accessories, which are subject
to change by the manufacturer without prior notice for product improvement purposes.

13
INSTALLATION
ENGLISH
INSTALLATION
Before Installing the Range
Make sure the range is properly installed and grounded by a qualified installer, according to the installation
instructions. Any adjustment and service should be performed only by qualified gas range installers or service
technicians.
In the Commonwealth of Massachusetts
•
This product must be installed by a licensed plumber or gas fitter.
•
When using ball type gas shut-off valves, they must be the T-handle type.
•
When using a flexible gas connector, it must not exceed 3 feet in length.
Preparing for Installation
Tools Needed
Phillips screwdriver
Open-end or adjustable
wrench
Pencil and ruler
Level
Flat-blade screwdriver
Pipe wrench (2)
(one for support)
Flat-blade screwdriver
(simmer adjustment)
Diameter: 3/32" (2.4 mm)
L: 3" (76.2 mm)
L
Materials You May Need
•
Gas line shut-off valve
•
Pipe joint sealant that resists action of natural and LP gases
•
Flexible metal appliance connector (
3
/
4
" or
1
/
2
" NPT x
1
/
2
" I.D.)
Never use an old connector when installing a new range.
•
Flare union adapter for connection to gas supply line (
3
/
4
" or
1
/
2
" NPT x
1
/
2
" I.D.)
•
Flare union adapter for connection to pressure regulator on range (
1
/
2
" NPT x
1
/
2
" I.D.)
•
Liquid leak detector or soapy water
•
Lag bolt or
1
/
2
" O.D. sleeve anchor (for concrete floors only)

14
INSTALLATION
Installing the Range
Unpacking and Moving the Range
CAUTION
•
You should use two or more people to move
and install the range. (Excessive Weight
Hazard) Failure to do so can result in back or
other injury.
•
Do not use the door handles to push or
pull the range during installation or when
moving the range out for cleaning or
service. Doing so can result in serious damage
to the door of the range.
Remove packing material, tape and any temporary
labels from your range before using. Do not remove
any warning-type labels, the model and serial number
label, or the Tech Sheet that is located on the back of
the range.
To remove any remaining tape or glue, rub the area
briskly with your thumb. Tape or glue residue can also
be easily removed by rubbing a small amount of liquid
dish soap over the adhesive with your fingers. Wipe
with warm water and dry.
Do not use sharp instruments, rubbing alcohol,
flammable fluids, or abrasive cleaners to remove tape
or glue. These products can damage the surface of
your range.
Your range is heavy and can be installed on soft
floor coverings such as cushioned vinyl or carpeting.
Use care when moving the range on this type of
flooring. Use a belt when moving the range to prevent
damaging the floor. Or slide the range onto cardboard
or plywood to avoid damaging the floor covering.
Choosing the Proper Location
Do not locate your range where it may be subject to
strong drafts. Any openings in the floor or wall behind
the range should be sealed. Make sure the openings
around the base of the range that supply fresh air
for combustion and ventilation are not blocked by
carpeting or woodwork.
Your range, like many other household units, is heavy
and can be installed on soft floor coverings such as
cushioned vinyl or carpeting. Use care when moving
the range on this type of flooring.
This appliance must not be installed with a ventilation
system that blows air downward toward the range.
This type of ventilation system may cause ignition and
combustion problems with the gas cooking appliance
resulting in personal injury or unintended operation.
When the floor covering ends at the front of the
range, the area that the range will be installed on
should be built up with plywood to the same level
or higher than the floor covering. This will allow the
range to be moved for cleaning and servicing, as well
as provide proper air flow to the range.
Also, make sure the floor covering can resist
temperatures of at least 167 °F (75 °C). See the
Installation Safety Precautions included in this
manual.
Make sure the wall coverings around your range can
resist the heat generated up to 194 °F (90 °C) by
the range. See the Precautions Safety Precautions
included in this manual.
Gas Pipe and Electrical Outlet
Locations
30"
(76.2 cm)
3"
(7.6 cm)
24
1
/
32
"
(61 cm)
12
1
/
32
"
(30.6 cm)
2"
(5.1 cm)
10
7
/
16
"
(26.5 cm)

15
INSTALLATION
ENGLISH
Dimensions and Clearances
Provide proper clearance between the range and adjacent combustible surfaces. These dimensions must be met
for safe use of your range. The location of the electrical outlet and pipe opening (see Gas Pipe and Electrical
Outlet Locations, page 14) may be adjusted to meet specific requirements. The range may be placed with 0"
clearance (flush) at the back wall.
Maximum
depth for
cabinets
above
coutertops
Minimum
clearance
to left wall
Minimum to
cabinets on
either side
of the range
Minimum
clearance
to right wall
Front edge
of the range
side panel
forward from
cabinet
To cabinets
below
cooktop and
at the range
back
Depth with door closed
(includes door handle)
30"
(76.2 cm)
30" (76.2 cm)
Minimum
18"
(45.72 cm)
5"
5" (12.7 cm)
1
/
4
"
(0.6 cm)
27
9
/
16
"
(70 cm)
36
1
/
32
"
(91.5 cm)
Height
47
7
/
16
"
(120.5 cm)
Depth with door open
46
5
/
16
"
(117.5 cm)
30"
(76.2 cm)
13" (33 cm)
0"
Dimensions
Installation Clearances
36"
(91.4 cm)

16
INSTALLATION
Installing the Anti-tip Device
Anti-tip
bracket
Wall plate
Screw must
enter wood or
concrete
The anti-tip bracket is packaged with an installation
template. The instructions include necessary
information to complete the installation. Read and
follow the range installation instruction sheet.
WARNING
•
Range must be secured with an approved
anti-tip device.
•
The range could be tipped by standing, sitting
or leaning on an open door if the range or
anti-tip device is not properly installed.
•
After installing the anti-tip device, verify that it is
in place by carefully attempting to tilt the range
forward.
•
This range has been designed to meet all
recognized industry tip standards for all normal
conditions.
•
The installation of the anti-tip device must meet
all local codes for securing the appliance.
•
The use of this device does not preclude tipping
of the range when not properly installed.
•
A child or adult can tip the range and be killed.
•
Install the anti-tip device to the structure and/
or the range. Verify the anti-tip device has been
properly installed and engaged by following the
guide of the Anti tip bracket template.
•
Engage the range to the anti-tip device by
following the guide of the Anti tip bracket
template. Ensure the anti-tip device is re-
engaged when the range is moved by following
the guide of the Anti tip bracket template.
•
Re-engage the anti-tip device if the range is
moved. Do not operate the range without the
anti-tip device in place and engaged.
•
See installation instructions for details.
•
Failure to do so can result in death or serious
burns to children or adults.
Providing Adequate Gas
Supply
The range is designed to operate at a pressure of
5" of water column on natural gas or 10" of water
column on LP.
Make sure you are supplying your range with the type
of gas for which it is configured.
This range is convertible for use on natural or LP gas.
When using this range on LP gas, conversion must
be made by a qualified LP installer before attempting
to operate the range.
For proper operation, the pressure of natural gas
supplied to the regulator must be between 5" and 13"
of water column.
For LP gas, the pressure supplied to the regulator
must be between 10" and 13" of water column. When
checking for correct operation of the regulator, the
inlet pressure must be at least 1" more than the
operating (manifold) pressure as given above.
The pressure regulator located at the inlet of the
range must remain in the supply line regardless of
which type of gas is being used.
A flexible metal appliance connector used to connect
the range to the gas supply line should have an I.D.
of
5
/
8
" and a maximum length of 5 feet. In Canada,
flexible connectors must be single wall metal
connectors less than 6 feet in length.
Connecting the Range to Gas
Shut off the range gas supply valve before
removing the old range and leave it off until the
new hook-up has been completed.
Because hard piping restricts movement of the range,
the use of a CSA International-certified flexible metal
appliance connector should be used unless local codes
require a hard-piped connection.
A manual valve shall be installed in an accessible
location in the gas piping external to the appliance for the
purpose of turning on or shutting off gas to the appliance.
Never reuse an old connector when installing a new
range.
To protect against gas leaks, use a qualified pipe joint
sealant on all external threads.
1
Install a male
1
/
2
" or
3
/
4
" flare union adapter to the
NPT internal thread of the manual shut-off valve,
taking care to back-up the shut-off valve to keep
it from turning.
2
Install a male
1
/
2
" flare union adapter to the
1
/
2
"
NPT internal thread at the inlet of the pressure
regulator. Use a backup wrench on the pressure
regulator fitting to prevent damage.
Check that the gas pressure regulator valve is in the
open position.
Lever’s open
position
Lever’s closed
position

17
INSTALLATION
ENGLISH
NOTE
•
The gas pressure regulator valve is open when
shipped. If the range does not work properly
after installation, make sure the regulator valve
is still open.
3
Connect a flexible metal appliance connector to
the adapter on the range. Position the range to
permit connection at the shut-off valve.
4
When all connections have been made, be sure
all range controls are in the OFF position and the
pressure regulator valve is open before turning on
the main gas supply valve. Gas leaks may occur
in
your system and create a hazard. Gas leaks
may not
be detected by smell alone.
Check all gas connection joints and fittings for
leaks with a non-corrosive leak detection fluid,
then wipe off.
Gas suppliers recommend you purchase and
install a UL approved gas detector. Install and use
in accordance with the installation instructions.
WARNING
•
Do not use a flame to check for gas leaks.
•
Isolate the range from the gas supply system by
closing its individual shut-off valve during any
pressure testing of the gas supply system at test
pressures equal to or less than
1
/
2
" psig (3.5 kPa).
Flexible Connector Hookup
1
/
2
"
Adapter
1
/
2
"
Adapter
Pressure regulator
Flex connector
(6 ft. max.)
Adapter
Gas shut-off
valve
1
/
2
" or
3
/
4
" Gas pipe
Gas Flow into Range
Installer: Inform the consumer of the location of the gas
shut-off valve
.
Pressure Regulator Position
Pressure Regulator
Electrical Connections
Electrical Requirements
120 Volt, 60 Hz, properly grounded dedicated circuit
protected by a 15 or 20 Amp circuit breaker, or slow
blow fuse.
If an external electrical source is utilized, the
appliance, when installed, must be electrically
grounded in accordance with local codes or, in the
absence of local codes, with the National Electrical
Code, ANSI/NFPA 70.
Grounding
IMPORTANT: FOR PERSONAL SAFETY, THIS
APPLIANCE MUST BE PROPERLY GROUNDED.
The power cord of this appliance is equipped with
a 3-prong (grounding) plug which mates with a
standard 3-prong grounding wall receptacle to
minimize the possibility of electric shock hazard from
this appliance.
The customer should have the wall receptacle and
circuit checked by a qualified electrician to make sure
the receptacle is properly grounded.
Where a standard two-prong wall receptacle is
encountered, it is the personal responsibility and
obligation of the customer to have it replaced with a
properly grounded three-prong wall receptacle.
DO NOT, UNDER ANY CIRCUMSTANCES, CUT OR
REMOVE THE THIRD (GROUND) PRONG FROM
THE POWER CORD.
A word about GFCI’s – GFCI’s are not required or
recommended for gas range receptacles.
Ground Fault Circuit Interrupters (GFCI’s) are
devices that sense leakage of current in a circuit
and automatically switch off power when a threshold
leakage level is detected. These devices must
be manually reset by the consumer. The National
Electrical Code requires the use of GFCI’s in kitchen
receptacles installed to serve countertop surfaces.
Performance of the range will not be affected
if operated on a GFCI-protected circuit but the
occasional resetting of the circuit can become an
annoyance.
Ensure proper ground
exists before use
Preferred
Method
CAUTION
Have the circuit checked by a qualified electrician
to make sure the receptacle is properly grounded.

18
INSTALLATION
Do not use an adapter plug. Disconnecting of the
power cord places undue strain on the adapter and
leads to eventual failure of the adapter ground terminal.
Installation must conform with local codes or, in the
absence of local codes, with the National Fuel Gas
Code, ANSI Z223.1/NFPA 54.
The installation of appliances designed for mobile
home installation must conform with the Manufactured
Home Construction and Safety Standard, Title 24
CFR, Part 3280 (formerly the Federal Standard
for Mobile Home Construction and Safety, Title
24, HUD, Part 280) or, when such standard is not
applicable, the Standard for Manufactured Home
Installations, latest edition (Manufactured Home Sites,
Communities and Set-Ups), ANSI A225.1, latest
edition, or with local codes. In Canada, mobile home
installation must be in accordance with the current
CAN/CSA Z240/MH Mobile Home Installation Code.
Sealing the Openings
Seal any openings in the wall and floor after electrical
and gas supplies are completed.
Assembling the Surface
Burners
CAUTION
Do not operate the burners without all parts in place.
Place the burner caps and heads on the cooktop.
Make sure that the caps and heads are placed in the
correct locations. There is one small, one medium,
one large, and one extra large burner head and cap.
Center Burner
Oval (Center) burner
head/cap assembly
Small burner
head and
cap
Medium
burner
head
and cap
Large burner
head and cap
Front of range
Extra large burner
head and cap
Hole
Electrode
Make sure the hole in the burner head is positioned
over the electrode.
Checking Ignition of the
Surface Burners
Electric Ignition
Select a surface burner knob and simultaneously
push in and turn to the Lite position. You will hear
a clicking sound indicating proper operation of the
spark module.
Once the air has been purged from the supply lines
the burner should ignite within 4 seconds. After the
burner ignites, rotate the knob out of the Lite position.
Try each burner in succession until all burners have
been checked.
Quality of Flames
The combustion quality of the burner flames needs to
be confirmed visually.
A Yellow flames - Call for service.
B Yellow tips on outer cones - This
is normal for LP gas.
C Soft blue flames - This is normal
for natural gas.
NOTE
•
With LP gas, some yellow tipping on outer
cones is normal.
Adjusting the Surface Burner to the
Low Flame (Simmer) Setting
1
Light all surface burners.
2
Turn the knob on the burner being adjusted to
Lo.
3
Remove the knob.
4
Insert a small, flat-blade screwdriver with a
minimum length of 3" (76.2 mm) and a diameter
of
3
/
32
" (2.4 mm) into the valve shaft.
Valve shaft
Center adjustment screw
NOTE
Hold the valve shaft with one hand while turning
the screw to adjust with the other.

19
INSTALLATION
ENGLISH
5
Replace the knob.
6
Test the flame stability.
Test 1: Turn the knob from Hi to Lo quickly. If the
flame goes out, increase the flame size and test
again.
Test 2: With the burner on a Lo setting, open
and close the oven door quickly. If the flame is
extinguished by the air currents created by the
door movement, increase the flame height and
test again.
7
Repeat steps 1-6 for each surface burner.
Checking Operation of Bake / Broil
Burners
To check ignition of the Bake burner, follow the steps
below
1
Remove all packing materials from inside the
oven cavity.
2
Press the Bake. 350 °F appears in the display.
3
Press the Start.
It may take between 30 and 90 seconds for the
burner to start heating.
To check ignition of the Broil burner, follow the steps
below
1
Press the Broil. Hi appears in the display.
2
Make sure the door is closed.
3
Press the Start.
It may take between 30 and 90 seconds for the
burner to start heating.
NOTE
Do not try to light either the Bake or Broil burners
during a power outage. The range has an
electrical ignition system and cannot be used
without power.
Adjusting Air Shutters (for LP
Conversions)
The range comes from the factory with the air
shutters adjusted for proper air flow for natural gas.
If converted to LP, follow the instructions provided in
the conversion kit to properly adjust the air shutters.
LP conversion must be performed by a qualified
technician.
Leveling the Range
Level the range by adjusting the leveling legs.
Extending the legs slightly may also make it easier to
insert the rear leg into the anti-tip bracket.
Leg leveler
Raise range
Lower
range
Use a level to check your adjustments. Place the level
diagonally on the oven rack, and check each direction
for level.
First check direction
.
Then check direction
. If the level doesn’t show level
on the rack, adjust the leveling legs.
1
2
Engaging the Anti-tip Device
Anti-tip
bracket
Leveling leg
1
Slide the range against the wall, making sure
the back leg slides into and engages the anti-tip
bracket.
2
Check for proper installation by grasping
the front edge of the cooktop and carefully
attempting to tilt the range forward.

20
OPERATION
OPERATION
Gas Surface Burners
Before Use
Read all instructions before using.
Make sure that all burners are properly placed.
Make sure that all grates are properly placed
before using the burner.
CAUTION
Do not operate the burner for an extended period
of time without cookware on the grate.
The finish on the grate may chip without cookware
to absorb the heat.
Make sure the burners and grates are cool before
touching them, or placing a pot holder, cleaning
cloth, or other materials on them.
Touching grates before they cool down may cause burns.
CAUTION
WHAT TO DO IF YOU SMELL GAS
•
Open windows.
•
Do not try to light any appliance.
•
Do not touch any electrical switch.
•
Do not use any phone in your building.
•
Immediately call your gas supplier from a
neighbor’s phone. Follow the gas supplier’s
instructions.
•
If you cannot reach your gas supplier, call the
fire department.
NOTE
Electric spark igniters from the burners cause
a clicking noise. All the spark igniters on the
cooktop will activate when igniting just one burner.
Burner Locations
Your gas range cooktop has four or five sealed gas
burners, depending on the model. These can be
assembled and separated. Follow the guide below.
1
4
2
3
1
Medium and Large Burners
The medium and large burners are the primary
burners for most cooking. These general
purpose burners can be turned down from Hi to
Lo to suit a wide range of cooking needs.
2
Small Burner
The smallest burner is used for delicate foods
such as sauces or foods that require low heat for
a long cooking time.
3
Extra Large Burner
The extra large burner is the maximum output
burner. Like the other four burners, it can be
turned down from Hi to Lo for a wide range
of cooking applications. This burner is also
designed to quickly bring large amounts of liquid
to a boil. It can be used with cookware 10 inches
or larger in diameter.
4
Oval Burner
The center, oval burner is for use with a griddle
or oval pots.

21
OPERATION
ENGLISH
Using the Gas Surface Burners
1
Be sure that all of the surface burners and grates
are placed in the correct positions.
2
Place cookware on the grate.
3
Push the control knob and turn to the Lite position.
The electric spark ignition system makes a
clicking noise. Once the burner is lit, turn the
knob counterclockwise to the HI position to stop
hearing the clicking noise.
4
Turn the control knob to control the flame size.
CAUTION
Do not attempt to disassemble or clean around
any burner while another burner is on. All the
burners spark when any burner is turned to Lite.
An electric shock may result causing you to knock
over hot cookware.
Setting the Flame Size
Watch the flame, not the knob, as you reduce heat.
Match the flame size on a gas burner to the cookware
being used for fastest heating.
CAUTION
Never let the flames extend up the sides of the
cookware.
NOTE
•
The flames on the surface burners may burn
yellow in the presence of high humidity, such as
a rainy day or a nearby humidifier.
•
After LP gas conversion, flames can be bigger
than normal when you put a pot on the surface
burner.
In Case of Power Failure
In case of a power failure, you can light the gas
surface burners on the range with a match.
Surface burners in use when an electrical power
failure occurs will continue to operate normally.
1
Hold a lit match to the burner, then push in the
control knob.
2
Turn the control knob to the Lo position.
CAUTION
Use extreme caution when lighting burners with a
match. It can cause burns and other damage.
Range-Top Cookware
Aluminum
Medium-weight cookware is
recommended because it heats
quickly and evenly. Most foods
brown evenly in an aluminum
skillet. Use saucepans with tight
fitting lids when cooking with
minimum amounts of water.
Cast-Iron
If heated slowly, most skillets will
give satisfactory results.
Stainless Steel
This metal alone has poor
heating properties and is usually
combined with copper, aluminum
or other metals for improved heat
distribution. Combination metal
skillets work satisfactorily if they
are used with medium heat as the
manufacturer recommends.
Enamelware
Under some conditions, the
enamel of this cookware may melt.
Follow cookware manufacturer’s
recommendations for cooking
methods.
Glass
There are two types of glass
cookware. Those for oven use only
and those for top-of-range cooking.
Heatproof
Glass Ceramic
Can be used for either surface or
oven cooking. It conducts heat very
slowly and cools very slowly. Check
cookware manufacturer’s directions
to be sure it can be used on gas
ranges.

22
OPERATION
Using a Wok
If using a wok, use a 14-inch or smaller flat-bottomed
wok. Make sure that the wok bottom sits flat on the
grate.
Use at-bottomed
wok
CAUTION
Do not use a wok support ring. Placing the ring
over the burner or grate may cause the burner
to work improperly, resulting in carbon monoxide
levels above allowable standards. This can be
hazardous to your health.
Using Stove-Top Grills
Do not place stove-top grills on the burner.
CAUTION
Do not use stove top grills on the surface burners.
Using a stove top grill on the surface burner will
cause incomplete combustion and can result
in exposure to carbon monoxide levels above
allowable current standards. This can be a health
hazard.
Using the Griddle
The non-stick coated griddle provides an extra-large
cooking surface for meats, pancakes or other food
usually prepared in a frying pan or skillet.
NOTE
It is normal for the griddle to become discolored
over time.
How to Place the Griddle: The griddle can only be
used with the center burner. The griddle must be
properly placed on the center grate, as shown below.
Front
CAUTION
•
Do not remove the center grate when using the
griddle.
•
Do not remove the griddle plate until the
cooktop grates, surfaces and griddle plate have
completely cooled.
•
The griddle plate on the cooktop may become
very hot when using the cooktop, oven or
broiler systems. Always use oven mitts when
placing or removing the griddle plate.
Preheat the griddle according to the guide below and
adjust for the desired setting.
Type of Food
Preheat
Conditions
Cook
Setting
Warming Tortillas - HI
Pancakes HI 10 min. HI
Hamburgers HI 10 min. HI
Fried Eggs HI 5 min. HI
Bacon HI 10 min. HI
Breakfast Sausage
Links
HI 10 min. HI
Hot Sandwiches HI 10 min. HI
NOTE
After cooking on the griddle for an extended
period, adjust the griddle temperature settings as
the griddle retains heat.
IMPORTANT NOTES
•
Avoid cooking extremely greasy foods as grease
spillover can occur.
•
The griddle can become hot when surrounding
burners are in use.
•
Do not overheat the griddle. This can damage the
non-stick coating.
•
Do not use metal utensils that can damage the
griddle surface. Do not use the griddle as a cutting
board.
•
Do not place or store items on the griddle.

23
OPERATION
ENGLISH
The Oven
Before Use
Read all instructions before using.
Make sure the electrical power cord and the gas
valve are properly connected.
Confirm the correct use of the range for the type
of food you will cook.
Make sure you know how to use the oven
(temperature setting, time setting and recipe) for best
results.
CAUTION
WHAT TO DO IF YOU SMELL GAS
•
Open windows.
•
Do not try to light any appliance.
•
Do not touch any electrical switch.
•
Do not use any phone in your building.
•
Immediately call your gas supplier from a
neighbor’s phone. Follow the gas supplier’s
instructions.
•
If you cannot reach your gas supplier, call the
fire department.
NOTE
If using an oven thermometer in the oven cavity,
temperatures may differ from the actual set oven
temperature with all modes.
In case of power failure, do not use the oven.
The oven and broiler cannot be used during a power
outage. If the oven is in use when a power failure
occurs, the oven burner shuts off and cannot be re-
lite until power is restored. Once power is restored,
you will need to reset the oven (or Broil function).
BlackOut
CAUTION
Do not attempt to operate the electric ignition
during an electrical power failure.
Do not block, touch or place items around the
oven vent during cooking.
Your oven is vented through ducts at the center above
the burner grate. Do not block the oven vent when
cooking to allow for proper air flow. Do not touch
vent openings or nearby surfaces during any cooking
operation.
– NEVER block this vent.
VENT
Do not cover the cooktop surface with aluminum
foil. Blocking the oven vent can damage the
control panel.
CAUTION
•
Do not place plastic or flammable items on the
cooktop. They may melt or ignite if left too close
to the vent.
•
Do not place closed containers on the cooktop.
The pressure in closed containers may
increase, which may cause them to burst.
•
Metal items will become very hot if they are left
on the cooktop, and could cause burns.
•
Handles of pots and pans on the cooktop may
become hot if left too close to the vent.
Do not cover racks or oven bottom with aluminum
foil.
You may see condensation on the oven door
glass.
As the oven heats up, the heated air in the oven
may cause condensation to appear on the oven
door glass. These water drops are harmless and will
evaporate as the oven continues to heat up.

24
OPERATION
Control Panel Overview
For Model: LRG3060**, LRG3061**
1
6 7 8 9 10 11
2 3 4 5
For Model: LRG3193**
1
12 7 8 9 6 11
2 3 4 5
For Model: LRG3194**
12
2 6 8 7 13 11
1 3 4 5

25
OPERATION
ENGLISH
1
Bake
Press the button to enter the normal bake function.
2
Broil
Press the button to select the broil function.
3
Cook Time
•
Press and then use the + and – buttons to set the
desired cook time.
•
The oven shuts off when the cooking time runs out.
•
Press and hold the button for 3 seconds to set the
time of day (for model: LRG3194).
4
Timer On/Off
•
Press to select the timer feature.
•
Press and hold the button for 3 seconds to select
and adjust oven settings (for model: LRG3194).
5
START
Must be pressed to start any cooking or cleaning
function.
6
Oven Light
Press the button to turn the oven light on or off.
7
EasyClean
®
Cleans a lightly soiled oven automatically. See
EasyClean
®
in the Care and Cleaning section.
8
+/–
Enters or changes time and oven temperature.
Sets HI or LO broil.
9
Clock
•
Press and then use the + and - buttons to set the
time of day.
•
Press and hold the button for 3 seconds to change
the special settings (for model: LRG3193).
10
Setting
Press the Settings key repeatedly to toggle through
and change oven settings.
11
CLEAR OFF / Lockout
•
Press to cancel all oven operations except the
clock and timer.
•
Press and hold the button for 3 seconds to activate/
deactivate the oven Lockout function.
12
Conv. Bake (for model: LRG3193, LRG3194)
Press the button to select baking wit the convection
function.
13
Self Clean (for model: LRG3194)
Press the button to select the self-cleaning function.
Changing Oven Settings
Clock
The clock must be set to the correct time of day in
order for the automatic oven timing functions to work
properly.
1
Press Clock (for model: LRG3060, LRG3061,
LRG3193).
Press and hold Cook Time button for 3 seconds
(for model: LRG3194).
2
Press +/– button to set the time of day.
3
Press Start.
NOTE
•
The time of day cannot be changed during a
timed baking.
•
If no other keys are pressed within 25 seconds
of pressing Clock, the display reverts to the
original setting.
•
If the display time is blinking, there may have
been a power failure. Reset the time.
Oven Light
The interior oven light automatically turns on when
the door is opened. Press Light to manually turn the
oven light on.
Minimum & Maximum Default Settings
All of the features listed have a minimum and a
maximum time or temperature setting that can be
entered into the control. A beep sounds each time a
button is pressed.
Two short tones sound if the entry of the temperature
or time is below the minimum or above the maximum
setting for the feature.
Feature
min. Temp.
/Time
max. Temp.
/ Time
Default
Clock
12 Hr.
1:00
Hr. / min.
12:59
Hr. / min.
24 Hr.
0:00
Hr. / min.
23:59
Hr. / min.
Timer
12 Hr.
0:10
min. / sec.
11:59
Hr. / min.
24 Hr.
0:10
min. / sec.
11:59
Hr. / min.
Cook Time
12 Hr.
0:01
Hr. / min.
11:59
Hr. / min.
24 Hr.
0:01
Hr. / min.
11:59
Hr. / min.
Broil Lo Hi
Bake
170 °F /
80 °C
500 °F /
260 °C
350 °F /
175 °C
EasyClean
®
20 min.
(10 min.
for LRG3194)
Self Clean
(For Model:
LRG3194)
2 Hr. 4 Hr. 3 Hr.

26
OPERATION
Timer On/Off
The Timer On/Off feature serves as an extra timer in
the kitchen that beeps when the set time has run out.
It does not start or stop cooking.
The Timer On/Off feature can be used during any of
the other oven control functions.
1
Press Timer On/Off button once to set the time
in hours and minutes, or press the button twice
to set the time in minutes and seconds. TIMER
flashes in the display.
2
Press + or – button until the desired time
appears in the display.
3
Press Timer On/Off to start the Timer. The
remaining time countdown appears in the display.
NOTE
If Timer On/Off is not pressed, the timer returns
to the time of day.
4
When the timer reaches 0:00, End shows in the
display. The clock beeps 15 seconds until the
Timer On/Off button is pressed.
NOTE
If the remaining time is not in the display, recall
the remaining time by pressing Timer On/Off.
Cancelling the Timer
1
Press Timer On/Off once.
The display returns to the time of day.
Settings
For Model: LRG3193, LRG3194
Press and hold Clock for 3 seconds. Then press the
Clock key repeatedly to toggle through and change
oven settings (for model: LRG3193).
Press and hold Timer On/Off for 3 seconds. Then
press the Timer On/Off key repeatedly to toggle
through and change oven settings (for model:
LRG3194).
For Model: LRG3060, LRG3061
Press the Settings button repeatedly to toggle
through and change oven settings.
The Settings button allows you to:
•
set the hour mode on the clock (12 or 24 hours)
•
adjust the oven temperature
•
activate/deactivate the preheating alarm light
•
set the beeper volume
•
switch the temperature scale between Fahrenheit
and Celsius
•
Set the Convection Auto Conversion Function
(for model: LRG3193)
Setting the Hour Mode
The control is set to use a 12-hour clock. To reset the
clock to 24-hour mode, follow the steps below.
For Model: LRG3193, LRG3194
1
Press and hold the Clock button for 3 seconds
(for model: LRG3193).
Press and hold the Timer On/Off button for 3
seconds (for model: LRG3194).
2
Press +/– to toggle between a 12-hour and 24-
hour clock.
3
Press Start to accept the change.
For Model: LRG3060, LRG3061
1
Press Settings once.
2
Press +/– to toggle between a 12-hour and 24-
hour clock.
3
Press Start to accept the change.
Adjusting the Oven Thermostat
This oven may cook differently from the one it
replaced. Use the oven for a few weeks to become
more familiar with it before changing the temperature
settings. After becoming more familiar with the oven,
if you notice a pattern of over- or underheating, follow
these steps to adjust the thermostat.
NOTE
To begin, either raise or lower the thermostat
15 °F (8 °C). Try the oven with the new setting. If
the oven still needs adjustment, raise or lower the
thermostat again, using the first adjustment as a
gauge. For example, if the adjustment was too
much, raise or lower the thermostat 10 °F (5 °C).
If the adjustment was not enough, raise or lower
the thermostat 20 °F (12 °C). Proceed in this way
until the oven is adjusted to your satisfaction.
For Model: LRG3193, LRG3194
1
Press and hold the Clock button for 3 seconds
(for model: LRG3193).
Press and hold the Timer On/Off button for 3
seconds (for model: LRG3194).
2
Press Clock repeatedly until AdJU appears in
the display (for model: LRG3193).
Press Timer On/Off repeatedly until AdJU
appears in the display (for model: LRG3194).
3
Using the + button, enter the amount you wish to
increase the temperature.
4
Using the – button, enter the amount you wish to
decrease the temperature.
5
Press Start to accept the change.

27
OPERATION
ENGLISH
For Model: LRG3060, LRG3061
1
Press Settings repeatedly until AdJU appears
in the display.
2
Using the + button, enter the amount you wish to
increase the temperature.
3
Using the – button, enter the amount you wish to
decrease the temperature.
4
Press Start to accept the change.
NOTE
•
This adjustment does not affect the broiling.
The adjustment is retained in memory after
a power failure. The oven thermostat can be
increased (+) or decreased (-) as much as 35
°F or 19 °C.
•
Once the thermostat is increased or decreased,
the display shows the adjusted temperature
until it readjusts.
Turning the Preheat Alarm Light On/Off
When the oven reaches its set temperature, the
preheating alarm light flashes 5 times or until the
oven door is opened.
You can activate or deactivate the preheating alarm
light.
For Model: LRG3193, LRG3194
1
Press and hold the Clock button for 3 seconds
(for model: LRG3193).
Press and hold the Timer On/Off button for 3
seconds (for model: LRG3194).
2
Press Clock repeatedly until PrE appears in the
display (for model: LRG3193).
Press Timer On/Off repeatedly until PrE
appears in the display (for model: LRG3194).
3
Press +/– to turn the light on/off.
4
Press Start to accept the change.
For Model: LRG3060, LRG3061
1
Press Settings repeatedly until PrE appears in
the display.
2
Press +/– to turn the light on/off.
3
Press Start to accept the change.
Adjusting the Beeper Volume
For Model: LRG3193, LRG3194
1
Press and hold the Clock button for 3 seconds
(for model: LRG3193).
Press and hold the Timer On/Off button for 3
seconds (for model: LRG3194).
2
Press Clock repeatedly until Beep appears in
the display (for model: LRG3193).
Press Timer On/Off repeatedly until Beep
appears in the display (for model: LRG3194).
3
Press +/– to select Hi, Lo or Off.
4
Press Start to accept the change.
For Model: LRG3060, LRG3061
1
Press Settings repeatedly until Beep appears in
the display.
2
Press +/– to select Hi, Lo or Off.
3
Press Start to accept the change.
Selecting Fahrenheit or Celsius
Set the oven temperature display to show either
Fahrenheit (°F) or Celsius (°C) units. The oven
defaults to Fahrenheit unless changed by the user.
For Model: LRG3193, LRG3194
1
Press and hold the Clock button for 3 seconds
(for model: LRG3193).
Press and hold the Timer On/Off button for 3
seconds (for model: LRG3194).
2
Press Clock repeatedly until Unit appears in the
display (for model: LRG3193).
Press Timer On/Off repeatedly until Unit
appears in the display (for model: LRG3194).
3
Press +/– to select F (Fahrenheit) or C (Celsius).
4
Press Start to accept the change.
For Model: LRG3060, LRG3061
1
Press Settings repeatedly until Unit appears in
the display.
2
Press +/– to select F (Fahrenheit) or C (Celsius).
3
Press Start to accept the change.

28
OPERATION
Setting the Convection Auto Conversion Function
(For Model: LRG3193, LRG3194)
When using convection bake, the convection auto
conversion feature will automatically convert entered
regular baking temperatures to convection baking
temperatures. This feature is activated so that the
display will show the actual converted temperature.
For example, if you enter a regular recipe temperature
of 350°F and press the START button, the display will
show the converted temperature of 325˚F.
1
Press and hold the Clock button for 3 seconds
(for model: LRG3193).
Press and hold the Timer On/Off button for 3
seconds (for model: LRG3194).
2
Press Clock repeatedly until Auto appears in
the display (for model: LRG3193).
Press Timer On/Off repeatedly until Auto
appears in the display (for model: LRG3194).
3
Press the +/- button to switch Auto Conversion
on or off.
4
Press START to accept the change.
Lockout
The Lockout feature disables most oven controls. It
does not disable the timer or interior oven light or lock
the oven door.
1
Press and hold the Clear/Off button for three
seconds. A melody sounds and appears
in the display.
2
To deactivate the Lockout feature, press and
hold the Clear/Off button for three seconds.
Cook Time (Timed Cook)
Set the oven to cook for a specific length of time
using the Timed Cook feature. This feature can only
be used with the Bake modes.
Setting a Timed Cook
1
Press Cook Time.
2
Press +/– button to set the time of day.
3
Press the Start button. The clock is set, and the
display reflects the change after a short delay.
Removing and Replacing the Oven
Racks
CAUTION
•
Replace the oven racks before turning the oven
on to prevent burns.
•
Do not cover the racks with aluminum foil, or
any other material, or place anything on the
bottom of the oven. Doing so will result in poor
baking performance and may damage the oven
bottom.
•
Only arrange oven racks when the oven is cool.
Removing Racks
1
While wearing oven mitts, grasp the oven rack*.
2
Pull the rack straight out until it stops.
3
Lift up the front of the rack.
4
Pull out the rack.
* When possible, adjust oven racks before using the
oven. Always wear oven mitts if adjusting racks while
the oven is on.
Replacing Racks
1
While wearing oven mitts, place the end of the
rack on the support*
2
Tilt the front end of the rack up.
3
Push the rack in.
4
Check that the rack is properly in place.
*When possible, adjust oven racks before using the
oven. Always wear oven mitts if adjusting racks while
the oven is on.

29
OPERATION
ENGLISH
Recommended Baking and Roasting
Guide
•
Center pans on racks for best baking results. If
baking with more than one pan, place the pans so
that each one has at least 1" to 1
1
/
2
" of air space
around it. Do not allow pans to touch the walls of
the oven.
•
If cooking on single rack, place the standard rack in
the position suggested in the charts on the following
pages. Center the cookware as shown in the single
rack baking image.
•
If cooking on multiple racks in the oven, place
standard racks in positions 3 and 5. For best
results, place the cookware as shown.
Multiple Rack Baking
For Model: LRG3193, LRG3194
Standard rack
(Position 3)
Standard rack
(Position 5)
For Model: LRG3060, LRG3061
Standard rack
(Position 3)
Standard rack
(Position 5)
Single Rack Baking
Standard rack
Bake
Bake is used to prepare foods such as pastries,
breads and casseroles. The oven can be programmed
to bake at any temperature from 170 °F (80 °C) to
500 °F (260 °C). The default temperature is 350 °F
(175 °C).
1
Press Bake. 350° appears in the display and
BAKE flashes.
2
Select the oven temperature.
Press or press and hold the + or – buttons.
•
Press the + button to increase the
temperature.
•
Press the – button to decrease the
temperature.
3
Press Start to accept the temperature change.
As the oven preheats, the temperature is
displayed and rises in 5-degree increments.
Once the oven reaches the set temperature, a
tone sounds and the oven light blinks on and off.
4
When cooking is complete, press Clear/Off.
5
Remove food from the oven.
Changing the Temperature while Cooking
1
Press Bake.
2
Press + or – button until the desired temperature
is displayed.
3
Press Start.

30
OPERATION
Convection Bake (For Model:
LRG3193, LRG3194)
Convection baking allows for even cooking and
excellent results when using multiple racks at the
same time. It can also shorten the cooking time.
Benefits of Convection Bake
•
Evenly baked results using multiple racks.
•
Faster cooking time.
Setting the Convection Bake Function
1
Press the Conv. Bake button. The display will
flash 350°F.
2
Select the oven temperature. Press or press and
hold the + or - touch pads until the display shows
375°F.
3
Press the START button.
4
When cooking has finished or to cancel, press
the CLEAR OFF button.
As the oven preheats, the display will show increasing
temperatures in 5 degree increments. Once the oven
reaches the set adjusted temperature, a tone will
sound and the oven light will flash on and off.
The display will show the auto converted oven
temperature 350°F, CONV.
NOTE
•
When cooking using the convection cycle, the
oven temperature is automatically reduced
by 25°F. The display will show the changed
temperature.
This feature is called ”AUTO CONVERSION”.
Your range comes with this feature ENABLED.
To DISABLE the auto conversion feature, see
“Setting Convection Auto Conversion Function”
in the Operating Instructions section of this
manual.
•
You will hear a fan while cooking with
convection. The fan will stop when the door
is open, but the heat will not turn off. The fan
will not start until the preheat temperature is
reached.
Baking Chart
This chart is only for reference. Adjust the cook time
according to the recipe.
Type of Food Rack Position
Frozen pies (on cookie sheet) 2 or 3
Angel food cake, bundt or pound
cakes
3
Biscuits, muffins, brownies, cookies,
cupcakes, layer cakes, pies
4
Casseroles 4
Roasting 1 or 2
NOTE
•
Because the oven temperature cycles, an oven
thermometer placed in the oven cavity may not
show the same temperature that is set on the
oven.

31
OPERATION
ENGLISH
Broil
The oven is designed for closed-door broiling. Broil
uses an intense heat radiation from the upper gas
burner.
The Broil function works best when broiling thin,
tender cuts of meat (1" or less), poultry or fish.
CAUTION
•
Do not use a broiler pan without a grid. The oil
can cause a grease fire.
•
Do not cover the grid and broiler pan with
aluminum foil. Doing so will cause a fire.
•
Always use a broiler pan and grid for excess fat
and grease drainage. This will help to reduce
splatter, smoke, and flare-ups.
•
Never use a broiler pan that is not thoroughly
cleaned and at room temperature. If your
broiler pan is damaged, warped, or has heavy
permanent soiling, consider replacing it to
reduce the amount of smoke experienced
during broiling.
NOTE
•
Use Lo broil to broil foods such as poultry and
thick cuts of meat.
•
Remove the pan from the oven to cool down for
easy cleaning.
•
For best results, use a pan designed for
broiling, as shown below. The broiler pan will
catch grease spills and the grid will help prevent
grease splatters.
Grid
Broiler pan
When broiling refer to the broiling guide for placing
the rack.
Setting the Oven to Broil
1
Press Broil once for Hi and twice for Lo.
2
Press Start.
3
Allow the broiler to preheat for five minutes.
4
Place food in the oven.
5
Close the oven door. The oven door must be
closed during broiling.
WARNING
When using the broiler, the temperature inside
the oven is extremely hot. Use caution and avoid
possible burns by:
•
Keeping the door closed when broiling
•
Always wearing oven mitts when inserting/
removing food items
Improper use of the broiler may result in
excessive smoke or a grease fire. Improper use
conditions include, but are not limited to:
•
Setting the broiler to a higher power level than
recommended.
•
Using dirty/greasy broiler pans.
•
Broiling beyond recommended cooking times.
NOTE
•
This range is designed for closed-door broiling.
Close the door to set the Broil function. If the
door is open, the Broil function cannot be set
and door appears on the display. Close the
door and reset the Broil function. Opening the
door turns off the broil burner during broiling.
If the door is opened during broiling, the broil
burner turns off after five seconds. The broiler
turns back on automatically once the door is
closed.
6
When broiling is finished, press Clear/Off.
NOTE
During any Broil function, it is normal for the
broiler to cycle on and off. The igniter for the broil
burner on the ceiling of the oven glows orange
periodically during normal broil operation.

32
OPERATION
Recommended Broiling Guide
The size, weight, thickness, starting temperature, and preference of doneness will affect broiling times. This
guide is based on meats at refrigerator temperature. For best results when broiling, use a pan designed for
broiling.
Food Quantity and/or Thickness
Rack
Position
First Side
(minutes)
Second
Side
(minutes)
Comments
Ground Beef 1 lb. (4 patties)
1
/
2
to
3
/
4
" thick
6 4-6 3-5
Space evenly. Up to 8 patties may be
broiled at once.
Beef Steaks
Rare 6 7 5
Steaks less than 1" thick cook
through before browning. Pan frying is
recommended. Slash fat.
1" thick
1 to 1
1
/
2
lbs.
Medium 6 12 5-6
Well Done 6 13 8-9
Rare
1
1
/
2
" thick
2 to 2
1
/
2
lbs.
4 10 6-7
Medium 4 12-15 10-12
Well Done 4 25 16-18
Toast
1 to 9 pieces
5 1-2 1-2
Chicken
1 whole 2 to 2
1
/
2
lbs.,
split lengthwise
4 bone-in breasts
2 35-40 25 Brush each side with melted butter.
Broil skin-side down.
2 25-30 10-15
Fish Fillets
1
/
4
to
1
/
2
" thick 5 7-8 6 Handle and turn very carefully.
Brush with lemon butter before and during
cooking, if desired.
Ham Slices
(precooked)
1" thick
1
/
2
" thick
3
4
10
7
5
4
Increase time 5 to 10 minutes per side for
1
1
/
2
" thick or home-cured ham.
Pork chops
Well Done
2 (
1
/
2
" thick) 4 10 8 Slash fat.
2 (1" thick) about 1lb. 4 13 8-9
Lamb Chops Slash fat.
Medium
2 (1" thick) about
10 to 12 oz.
5 6 4-7
Well Done 5 10 10
Medium
2 (
1
/
2
" thick) about 1lb.
5 10 4-6
Well done 5 17 12-14
Bacon
1
/
2
lb. (about 8 thin slices) 4 8 3 Arrange in single layer.
Lobster Tails 2-4
6 to 8 oz. each
3 13-16 Do not
turn over.
Cut through back of shell. Spread open.
Brush with melted butter before broiling
and after half of broiling time.
•
This guide is only for reference. Adjust cook time according to preference.
NOTE
The USDA advises that consuming raw or undercooked fish, meat, or poultry can increase the risk of food-
borne illness.
The USDA has indicated the following as safe minimum internal temperatures for consumption:
•
Ground beef : 160 °F (71.1 °C)
•
Poultry: 165 °F (73.9 °C)
•
Beef, veal, pork, or lamb: 145 °F (62.8 °C)
•
Fish / Seafood: 145 °F (62.8 °C)

33
MAINTENANCE
ENGLISH
MAINTENANCE
Gas Surface Burners
CAUTION
•
Do not clean this appliance with bleach.
•
To prevent burns, wait until the cooktop has
cooled down before touching any of its parts.
•
Always wear gloves when cleaning the cooktop.
Removing and Replacing the Gas
Surface Burners
Grates and burner heads/caps can be removed for
care and cleaning.
General burner
Burner cap is properly set.
Burner cap is NOT properly
set.
Cleaning Burner Heads/Caps
For even and unhampered flame, the slits in the
burner heads must be kept clean at all times.The
burner heads and caps (and the oval burner head
and cap assembly) can be lifted off. Do not attempt to
remove the oval burner cap.
•
Wash the burner caps in hot soapy water and rinse
with clean water. Run water through the oval burner
from the bottom stem to flush out debris.
•
Use care when cleaning the cooktop. The pointed
metal ends on the electrodes could cause injury.
Hitting an electrode with a hard object may damage
it.
•
To remove burnt-on food, soak the burner heads
in a solution of mild liquid detergent and hot water
for 20–30 minutes. For stubborn stains, use a
toothbrush or wire brush.
•
The burners will not operate properly if the burner
ports or electrodes are clogged or dirty.
•
Burner caps and heads should be cleaned routinely,
especially after excessive spillover.
•
Burners will not light if the cap is removed.
CAUTION
•
Do not hit the electrodes with anything hard.
Doing so could damage them.
•
Do not use steel wool or scouring powders to
clean the burners.
After Cleaning the Burner Heads/
Caps
Shake out any excess water and then let them dry
thoroughly. Placing the oval burner upside down will
allow the water to drain out more easily. Replace
the burner heads and caps over the electrodes on
the cooktop in the correct locations according to
their size. Make sure the hole in the burner head is
positioned over the electrode.

34
MAINTENANCE
Burner Grates
The range consists of three separate professional-
style grates. For maximum stability, these grates
should only be used when in their proper position.
The two side grates can be interchanged from left
to right and front to back. The center grate can be
interchanged from front to back.
Side grate
Center grate
Apply for models LRG3060,
LRG3061, LRG3193
Side grate Side grate
Center grate
Apply for model LRG3194
Side grate
NOTE
Do not operate a burner for an extended period
of time without cookware on the grate. The finish
on the grate may chip without cookware to absorb
the heat.
Cleaning the Burner Grates
CAUTION
•
Do not lift the grates out until they have cooled.
•
Grates should be washed regularly and after
spillovers.
•
Wash the grates in hot, soapy water and rinse with
clean water.
•
The grates are dishwasher safe.
•
After cleaning the grates, let them dry completely
and securely position them over the burners.
Cleaning the Cooktop Surface
CAUTION
•
To avoid burns, do not clean the cooktop
surface until it has cooled.
•
Do not lift the cooktop surface. Lifting the
cooktop surface can lead to damage and
improper operation of the range.
Foods with high acid or sugar content may cause a
dull spot if allowed to set. Wash and rinse soon after
the surface has cooled. For other spills such as oil/
grease spattering, etc., wash with soap and water
when the surface has cooled, then rinse and polish
with a dry cloth.
Oven Air Vents
Air openings are located at the rear of the cooktop,
at the top and bottom of the oven door, and at the
bottom of the range.
CAUTION
•
The edges of the range vent are sharp. Wear
gloves when cleaning the range to avoid injury.
•
Clean ventilating hoods frequently. Grease
should not be allowed to accumulate on the
hood or filter.
NOTE
Do not block the vents and air openings of the
range. They provide the air inlet and outlet that
are necessary for the range to operate properly
with correct combustion.

35
MAINTENANCE
ENGLISH
Control Panel
To prevent activating the control panel during
cleaning, unplug the range. Clean up splatters with
a damp cloth using a glass cleaner. Remove heavier
soil with warm, soapy water. Do not use abrasives of
any kind.
Front Manifold Panel and
Knobs
It is best to clean the manifold panel after each use
of the range. For cleaning, use a damp cloth and mild
soapy water or a 50/50 solution of vinegar and water.
For rinsing, use clean water and polish dry with a soft
cloth.
CAUTION
•
Do not use abrasive cleansers, strong liquid
cleaners, plastic scouring pads or oven
cleaners on the manifold panel. Doing so will
damage the finish.
•
Do not try to bend the knobs by pulling them
up or down, and do not hang a towel or other
objects on them. This can damage the gas
valve shaft.
•
The control knobs may be removed for easy
cleaning.
•
To clean the knobs, make sure that they are in
the Off position and pull them straight off the
stems.
•
To replace the knobs, make sure the knob has
the Off position centered at the top, and slide
the knob directly onto the stem.
NOTE
To prevent scratching, do not use abrasive
cleaners on any of these materials.
Cleaning the Exterior
Painted and Decorative Trim
For general cleaning, use a cloth with hot soapy
water. For more difficult soils and built-up grease,
apply a liquid detergent directly onto the soil. Leave it
on for 30 to 60 minutes. Rinse with a damp cloth and
dry. Do not use abrasive cleaners.
Stainless Steel Surfaces
To avoid scratches, do not use steel wool pads.
1
Place a small amount of stainless steel appliance
cleaner or polish on a damp cloth or paper towel.
2
Clean a small area, rubbing with the grain of the
stainless steel if applicable.
3
Dry and buff with a clean, dry paper towel or soft
cloth.
4
Repeat as necessary.
NOTE
•
Do not use a steel wool pad; it will scratch the
surface.
•
To clean the stainless steel surface, use warm
sudsy water or a stainless steel cleaner or
polish.
•
Always wipe in the direction of the metal
surface finish.
•
To purchase stainless steel appliance cleaner
or polish, or to locate a dealer near you, call our
toll-free customer service number:
1-800-243-0000 (USA),
1-888-542-2623(CANADA)
or visit our website at: www.lg.com
Oven Door
•
Use soapy water to thoroughly clean the oven door.
Rinse well. Do not immerse the door in water.
•
You may use a glass cleaner on the outside glass
of the oven door. Do not spray water or glass
cleaner on the door vents.
•
Do not use oven cleaners, cleaning powders, or
harsh abrasive cleaning materials on the outside of
the oven door.
•
Do not clean the oven door gasket. The oven door
gasket is made of a woven material that is essential
for a good seal. Care should be taken not to rub,
damage, or remove this gasket.
CAUTION
Do not use harsh cleaners or harsh abrasive
cleaning materials on the outside of the oven
door. Doing so can cause damage.
Don’t hand
clean oven
door gasket
Do hand
clean door

36
MAINTENANCE
Door Care Instructions
Most oven doors contain glass that can break.
CAUTION
•
Do not close the oven door until all the oven
racks are fully in place.
•
Do not hit the glass with pots, pans, or any
other object.
•
Scratching, hitting, jarring, or stressing the
glass may weaken its structure causing an
increased risk of breakage at a later time.
Oven Racks
1
Food spilled into the tracks could cause the
racks to become stuck. Clean racks with a mild,
abrasive cleaner.
2
Rinse with clean water and dry.
EasyClean
®
LG’s EasyClean
®
enamel technology provides two
cleaning options for the inside of the range. The
EasyClean
®
feature takes advantage of LG’s new
enamel to help lift soils without harsh chemicals, and
it runs using ONLY WATER for just 20 minutes (10
minutes for LRG3194) in low temperatures to help
loosen LIGHT soils before hand-cleaning.
While EasyClean
®
is quick and effective for small
and LIGHT soils, the Self Clean feature can be
used to remove HEAVY, built up soils. The intensity
and high heat of the Self Clean cycle may result in
smoke which will require the opening up of windows
to provide ventilation. Compared to the more intense
Self Clean process, your LG oven gives you the
option of cleaning with LESS HEAT, LESS TIME, and
virtually NO SMOKE OR FUMES.
Benefits of EasyClean
®
•
Helps loosen light soils before hand-cleaning
•
EasyClean
®
only uses water; no chemical cleaners
•
Makes for a better self-clean experience
- Delays the need for a self-clean cycle
- Minimizes smoke and odors
- Can allow shorter self-clean time
NOTE
Some models do not include a self-clean option.
The EasyClean
®
feature may not be effective in
removing heavy, built-up soils. If the range does
not include a self-clean option, clean the oven
regularly using the EasyClean
®
feature to prevent
heavy, burnt-on soil from building up in the oven.
When to Use EasyClean
®
Suggested
Cleaning Method
Example of Oven Soiling Soil Pattern
Types of
Soils
Common Food Items
That Can Soil Your Oven
EasyClean
®
Small drops or
spots
Cheese
or other
ingredients
Pizza
Light splatter Fat/grease
Steaks, broiled
Fish, broiled
Meat roasted at low
temperatures
Self Clean*
Medium to
heavy splatter
Fat/grease
Meat roasted at high
temperatures
Drops or spots
Filling or
sugar based
soils
Pies
Cream or
tomato
sauce
Casseroles
* The Self Clean cycle can be used for soil that has been built up over time.

37
MAINTENANCE
ENGLISH
EasyClean
®
Instruction Guide
1
Remove oven racks and accessories from the oven.
2
Scrape off and remove any burnt-on debris with a
plastic scraper.
Suggested plastic scrapers:
•
Hard plastic spatula
•
Plastic pan scraper
•
Plastic paint scraper
•
Old credit card
3
Fill a spray bottle with water and use the spray bottle
to thoroughly spray the inside surfaces of the oven.
4
Use at least
1
/
5
of the water in the bottle to
completely saturate the soil on both the walls and in
the corners of the oven.
5
Spray or pour the remaining water onto the bottom
center of the oven cavity. The indentation on the
oven bottom should be fully covered to submerge all
soils. Add water if necessary.
NOTE
If cleaning multiple ovens, use an entire bottle of water
to clean each oven. Do not spray water directly on the
door. Doing so will result in water dripping to the floor.
6
Close the oven door.
Press EasyClean
®
.
Press Start.
CAUTION
•
Some surfaces may be hot after the EasyClean®
cycle. Wear rubber gloves while cleaning to
prevent burns.
•
During the EasyClean® cycle, the oven becomes
hot enough to cause burns. Wait until the cycle is
over before wiping the inside surface of the oven.
Failure to do so may result in burns.
•
Avoid leaning or resting on the oven door glass
while cleaning the oven cavity.
7
A tone will sound at the end of the 20 minutes (10
minutes for LRG3194) cycle. Press Clear/Off to clear
the display and end the tone.
8
After the cleaning cycle and during hand-cleaning,
enough water should remain on the oven bottom to
completely submerge all soils. Add water if necessary.
Place a towel on the floor in front of the oven to capture
any water that may spill out during hand-cleaning.
9
Clean the oven cavity immediately after the
EasyClean
®
cycle by scrubbing with a wet, non-scratch
scouring sponge or pad. (The scouring side will not
scratch the finish.) Some water may spill into the
bottom vents while cleaning, but it will
be captured in a pan under the oven
cavity and will not hurt the burner.
NOTE
Do not use any steel scouring pads, abrasive pads
or cleaners as these materials can permanently
damage the oven surface.
10
Once the oven cavity is cleaned, wipe any excess
water with a clean dry towel. Replace racks and
any other accessories.
11
If some light soils remain, repeat the above
steps, making sure to thoroughly soak the soiled
areas. If stubborn soils remain after multiple
EasyClean
®
cycles.
NOTE
•
If you forget to saturate the inside of the oven with
water before starting EasyClean
®
, press Clear/
Off to end the cycle. Wait for the range to cool to
room temperature and then spray or pour water
into the oven and start another EasyClean
®
cycle.
•
The cavity gasket may be wet when the
EasyClean
®
cycle finishes. This is normal. Do not
clean the gasket.
•
If mineral deposits remain on the oven bottom
after cleaning, use a cloth or sponge soaked in
vinegar to remove them.
Cleaning Tips
•
Allow the oven to cool to room temperature before
using the EasyClean
®
cycle. If your oven cavity is
above 150 °F (65 °C), Hot will appear in the display,
and the EasyClean
®
cycle will not be activated until
the oven cavity cools down.
•
Using the rough side of a non-scratch scouring pad
may help to take off burnt-on stains better than a
soft sponge or towel.
•
Certain non-scratch scrubbing sponges, such as
those made of melamine foam, available at your
local stores, can also help improve cleaning.
•
The range should be level to ensure that the bottom
surface of the oven cavity is entirely covered by
water at the beginning of the EasyClean
®
cycle.
•
For best results, use distilled or filtered water. Tap
water may leave mineral deposits on the oven
bottom.
•
Soil baked on through several cooking cycles will
be more difficult to remove with the EasyClean
®
cycle.
•
Do not open the oven door during the EasyClean
®
cycle. Water will not get hot enough if the door is
opened during the cycle.

38
MAINTENANCE
Self Clean
(For Model : LRG3194)
The Self Clean cycle uses extremely hot temperatures
to clean the oven cavity. While running the Self Clean
cycle, you may notice smoking or an odor. This is
normal; especially if the oven is heavily soiled.
During Self Clean, the kitchen should be well
ventilated to minimize the odors from cleaning.
Before Starting Self Clean
•
Remove the oven racks, broiler pan, broiler grid, all
cookware, aluminum foil or any other material from
the oven.
•
The kitchen should be well ventilated to minimize
the odors from cleaning.
•
Wipe any heavy spillovers on the bottom of the
oven.
•
Make sure that the oven light bulb cover is in place
and the oven light is off.
•
The oven light cannot be turned on during a Self
Clean cycle. The oven light cannot be turned on
until the oven temperature has cooled below
500 ˚F (260 ˚C) after a Self Clean cycle is complete.
CAUTION
•
Do not leave small children unattended near
the appliance. During the Self Clean cycle, the
outside of the range can become very hot to
the touch.
•
If you have pet birds, move them to another
well-ventilated room. The health of some birds
is extremely sensitive to the fumes given off
during the Self Clean cycle of any range.
•
Do not line the oven walls, racks, bottom or any
other part of the range with aluminum foil or
any other material. Doing so will destroy heat
distribution, produce poor baking results and
cause permanent damage to the oven interior
(aluminum foil will melt to the interior surface of
the oven).
•
Do not force the door open. This can damage
the automatic door locking system. Use care
when opening the oven door after the Self
Clean cycle. Stand to the side of the oven when
opening the door to allow hot air or steam to
escape. The oven may still be VERY HOT.
During the Self Clean cycle, the cooktop elements
and warming drawer cannot be used.
NOTE
•
Remove oven racks and accessories before
starting the Self Clean cycle.
•
If oven racks are left in the oven cavity during
the Self Clean cycle, they will discolor and
become difficult to slide in and out.
•
Clean the frame of the oven and door with hot
soapy water. Rinse well.
•
Do not clean the gasket. The fiberglass material
of the oven door gasket cannot withstand
abrasion. It is essential for the gasket to remain
intact. If you notice it becoming worn or frayed,
replace it.
•
Wipe up any heavy spillovers on the oven
bottom.
•
Make sure that the oven light bulb cover is in
place and the oven light is off.
•
It is normal for the fan to operate during the Self
Clean cycle.
Setting Self Clean
The Self Clean function has cycle times of 2, 3, or 4
hours.
Self Clean Soil Guide
Soil Level Cycle Setting
Lightly Soiled Oven Cavity 2-Hour Self Clean
Moderately Soiled Oven Cavity 3-Hour Self Clean
Heavily Soiled Oven Cavity 4-Hour Self Clean
1
Remove all racks and accessories from the oven.
2
Press the Self Clean button. The oven defaults
to the recommended
three-hour self clean for a moderately soiled
oven. Press plus(+) or minus(-) to select a self
clean time from 2 to 4 hours.
3
Press Start.
4
Once the self-clean cycle is set, the oven door
locks automatically and the lock icon displays.
You will not be able to open the oven door
until the oven has cooled. The lock releases
automatically when the oven has cooled.
CAUTION
Do not force the oven door open when the lock
icon is displayed. The oven door remains locked
until the oven temperature has cooled. Forcing
the door open will damage the door.

39
MAINTENANCE
ENGLISH
Setting Self Clean with a Delayed
Start
1
Remove all racks and accessories from the
oven.
2
Turn the oven mode knob to select Self Clean.
The oven defaults to the recommended
three-hour self clean for a moderately soiled
oven. Press plus(+) or minus(-) to select a self
clean time from 2 to 4 hours.
3
Press Start Time.
4
Press plus(+) or minus(-) to enter the time of
day you would like the Self Clean to start.
5
Press Start.
NOTE
It may become necessary to cancel or interrupt a
Self Clean cycle due to excessive smoke or fire in
the oven. To cancel the Self Clean function, turn
the oven mode knob to the Off position.
During Self Clean
•
The Self Clean cycle uses extremely hot
temperatures to clean the oven cavity. While
running the Self Clean cycle, you may notice
smoking or an odor. This is normal, especially if the
oven is heavily soiled.
•
As the oven heats, you may hear sounds of metal
parts expanding and contracting. This is normal
and will not damage the oven.
•
Do not force the oven door open when the lock
is displayed. The oven door remains locked until
the oven temperature has cooled. Forcing the door
open will damage the door.
After the Self Clean Cycle
•
The oven door remains locked until the oven
temperature has cooled.
•
You may notice some white ash in the oven. Wipe it
off with a damp cloth or a soap-filled steel wool pad
after the oven cools. If the oven is not clean after
one self-clean cycle, repeat the cycle.
•
If oven racks were left in the oven and do not slide
smoothly after a self-clean cycle, wipe racks and
rack supports with a small amount of vegetable oil
to make them glide more easily.
•
Fine lines may appear in the porcelain because it
went through heating and cooling. This is normal
and will not affect performance.
NOTE
•
The Self Clean cycle cannot be started if the
Lockout feature is active.
•
Once the Self Clean cycle is set, the oven door
locks automatically. You will not be able to open
the oven door until the oven is cooled. The lock
releases automatically.
•
Once the door has been locked, the lock
indicator light stops flashing and remains on.
Allow about 15 seconds for the oven door lock
to activate.
•
If the clock is set for a 12-hour display (default)
the Delayed Self Clean can never be set to
start more than 12 hours in advance.
•
After the oven is turned off, the convection
fan keeps operating until the oven has cooled
down.

40
MAINTENANCE
Changing the Oven Light
The oven light is a standard 40-watt appliance bulb. It
turns on when the oven door is open. When the oven
door is closed, press Light to turn it on or off.
WARNING
•
Make sure that the oven and bulb are cool.
•
Disconnect the electrical power to the range at
the main fuse or circuit breaker panel. Failure
to do so can result in severe personal injury,
death, or electric shock.
1
Unplug the range or disconnect power.
2
Turn the glass bulb cover in the back of the oven
counterclockwise to remove.
3
Turn the bulb counterclockwise to remove it from
the socket.
4
Insert the new bulb and turn it clockwise.
5
Insert the glass bulb cover and turn it clockwise.
6
Plug in the range or reconnect the power.
Removing and Replacing
the Lift-Off Oven Doors and
Drawer
CAUTION
•
Be careful when removing and lifting the
door.
•
Do not lift the door by the handle. The door
is very heavy.
Removing the Door
1
Fully open the door.
2
Unlock the hinge locks, rotating them as far
toward the open door frame as they will go.
Slot
Lock
Unlock
Hinge
lock
3
Firmly grasp both sides of the door at the top.
4
Close the door to the removal position
(approximately five degrees) which is halfway
between the broil stop position and fully closed.
If the position is correct, the hinge arms will
move freely.
about 5°
5
Lift door up and out until the hinge arms are
clear of the slots.

41
MAINTENANCE
ENGLISH
Replacing the Door
1
Firmly grasp both sides of the door at the top.
2
With the door at the same angle as the removal
position, seat the indentation of the hinge arms
into the bottom edge of the hinge slots. The
notch in the hinge arms must be fully seated into
the bottom edge of the slots.
Hinge arm
Indentation
Bottom
edge of slot
3
Open the door fully. If the door will not open fully,
the indentation is not seated correctly in the
bottom edge of the slots.
4
Lock the hinge locks, rotating them back toward
the slots in the oven frame until they lock.
Hinge arm
Hinge lock
5
Close the oven door.
Removing the Drawer
CAUTION
Disconnect the electrical power to the range at
the main fuse or circuit breaker panel. Failure to
do so can result in severe personal injury, death,
or electric shock.
Most cleaning can be done with the drawer in place;
however, the drawer may be removed if further
cleaning is needed. Use warm water to thoroughly
clean.
1
Fully open the drawer.
2
Locate the glide lever on each side of the
drawer. Push down on the left glide lever and
pull up on the right glide lever.
Lever
Push down with nger Pull up with nger
Lever
3
Pull the drawer away from the range.
Replacing the Drawer
1
Pull the bearing glides to the front of the chassis
glide.
2
Align the glide on each side of the drawer with
the glide slots on the range.
3
Push the drawer into the range until levers click
(approximately 2 inch).
4
Pull the drawer open again to seat bearing glides
into position.

42
TROUBLESHOOTING
TROUBLESHOOTING
FAQs
What types of cookware are recommended for
use with the cooktop?
•
The pans must have a flat bottom and straight
sides.
•
Only use heavy-gauge pans.
•
The pan size must match the amount of food to be
prepared and the size of the surface element.
•
Use tight fitting lids.
•
Only use flat-bottom woks.
My new oven doesn’t cook like my old one. Is
there something wrong with the temperature
settings?
No, your oven has been factory tested and calibrated.
For the first few uses, follow your recipe times and
temperatures carefully. If you still think your new
oven is too hot or too cold, you can adjust the oven
temperature yourself to meet your specific cooking
needs. Refer to the Oven Temperature Adjustment
section in this manual for easy instructions on how to
adjust your thermostat.
Is it normal to hear a clicking noise coming from
the back of my oven when I am using it?
Your new range is designed to maintain a tighter
control over your oven’s temperature. You may hear
your oven’s heating elements click on and off more
frequently on your new oven. This is NORMAL.
Why is the time flashing?
This means that the product has just been plugged
in, or that it has experienced a power interruption. To
clear the flashing time, press any button and reset the
clock if needed.
Can I use aluminum foil to catch drippings in my
oven cavity?
Never use aluminum foil to line the bottom or sides of
the oven or the warming drawer. The foil will melt and
stick to the bottom surface of the oven and will not be
removable. Use a sheet pan placed on a lower oven
rack to catch drippings instead. (If foil has already
melted onto the bottom of the oven, it will not interfere
with the oven’s performance.)
Can I use aluminum foil on the racks?
Do not cover racks with aluminum foil. Covering
entire racks with foil restricts air flow, leading to poor
cooking results. Use a sheet pan lined with foil under
fruit pies or other acidic or sugary foods to prevent
spillovers from damaging the oven finish.
CAUTION
Foil may be used to wrap food in the oven or
warming drawer, but do not allow the foil to come
into contact with the exposed heating/broiling
elements in the oven. The foil could melt or ignite,
causing smoke, fire, or injury.
What should I do if my racks are sticky and have
become hard to slide in and out?
Over time, the racks may become hard to slide in
and out. Apply a small amount of olive oil to the ends
of the racks. This will work as a lubricant for easier
gliding.
What should I do for hard to remove stains on my
cooktop?
The cooktop should be cleaned after every use to
prevent permanent staining. When cooking foods with
high sugar content, such as tomato sauce, clean the
stain off with a scraper while the cooktop is still warm.
Use an oven mitt when scraping to prevent burns.
Refer to the MAINTENANCE section of this owner's
manual for further instruction.

43
TROUBLESHOOTING
ENGLISH
Why aren't the function buttons working?
Make sure that the range is not in Lockout mode.
LOCKED will show in the display if Lockout is
activated. To deactivate Lockout, press and hold
Clear/Off for three seconds.
My range is still dirty after running the
EasyClean
®
cycle. What else should I do?
The EasyClean
®
cycle only helps to loosen light soils
in your oven range to assist in hand-cleaning of your
oven. It does not automatically remove all soils after
the cycle. Some scrubbing of your oven range is
required after running the EasyClean
®
cycle.
I tried scrubbing my oven after running
EasyClean
®
, but some soils still remain. What can
I do?
The EasyClean
®
feature works best when the soils
are fully soaked and submerged in water before
running the cycle and during hand-cleaning. If soils
are not sufficiently soaked in water, it can negatively
affect the cleaning performance. Repeat the
EasyClean
®
process using sufficient water.
Sugar-based and certain greasy soils are especially
hard to clean.
Soils on my oven walls are not coming off. How
can I get my walls clean?
Soils on the side and rear walls of your oven range
may be more difficult to fully soak with water. Try
repeating the EasyClean
®
process with more than
the
1
/
5
of spray recommended.
Will EasyClean
®
get all of the soils and stains out
completely?
It depends on the soil type. Sugar-based and certain
grease stains are especially hard to clean. Also, if
stains are not sufficiently soaked in water, this can
negatively affect cleaning performance.
Do I need to use the full contents of the spray
bottle for EasyClean
®
?
Yes. It is highly recommended that
4
/
5
of water be
sprayed or poured on the bottom and an additional
1
/
5
of water be sprayed on walls and other soiled
areas to fully saturate the soils for better cleaning
performance.
I see smoke coming out of my oven range’s
cooktop vents during EasyClean
®
. Is this normal?
This is normal. This is not smoke. It is actually water
vapor (steam) from the water in the oven cavity. As
the oven heats briefly during EasyClean
®
, the water
in the cavity evaporates and escapes through the
oven vents.
How often should I use EasyClean
®
?
EasyClean
®
can be performed as often as you wish.
EasyClean
®
works best when your oven is LIGHTLY
soiled from such things as LIGHT grease splatter
and small drops of cheese. Please refer to the
EasyClean
®
section in your owner's manual for more
information.
What is required for EasyClean
®
?
A spray bottle filled with water, a scraper, a non-
scratch scrubbing pad and a towel. You should not
use abrasive scrubbers such as heavy-duty scouring
pads or steel wool.
Is it safe for water to spill into the oven bottom
vents during cleaning?
Some water spillage into the oven bottom vents (gas
range) is okay. However, it is recommended to try
avoid spilling too much water into the vents.

44
TROUBLESHOOTING
Before Calling for Service
Before you call for service, review this list. It may save you time and expense. The list includes common
occurrences that are not the result of defective workmanship or materials in this appliance.
Symptoms Possible Cause / Solutions
Top burners do not
light or do not burn
evenly.
•
Make sure that the electrical plug is inserted into a live, properly grounded outlet.
•
Remove the burners and clean them. Check the electrode area for burnt on food
or grease. See Cleaning Burner Heads/Caps in the MAINTENANCE section.
•
Make sure that the burner parts are installed correctly.
See Removing and Replacing the Gas Surface Burners in the MAINTENANCE
section.
Burner flames are
very large or yellow.
If the range is connected to LP gas, contact the technician who installed your
range or made the conversion.
Surface burners light
but the oven does not.
Make sure that the oven gas shut-off valve, located behind the range, is fully open.
Food does not bake
or roast properly.
•
Incorrect oven control settings. See Control Panel Overview in the OPERATION
section.
•
Incorrect rack position. See Removing and Replacing the Oven Racks in the
OPERATION section.
•
Incorrect cookware is being used. See Convection Bake in the OPERATION
section.
•
Oven thermostat needs adjustment.
•
See Adjusting the Oven Thermostat in the OPERATION section.
•
The Clock is not set correctly. See Changing Oven Settings in the OPERATION
section.
•
Aluminum foil used improperly in the oven. See Removing and Replacing the
Oven Racks.
Food does not broil
properly in the oven.
•
Incorrect oven control settings. See Control Panel Overview in the OPERATION
section.
•
The oven door is not closed. See Broil in the OPERATION section.
•
Aluminum foil used on the broiling pan and grid is not fitted properly.
Oven temperature is
too hot or too cold.
The oven thermostat needs adjustment. See Adjusting the Oven Thermostat in the
OPERATION section.
Clock and timer does
not work.
•
Make sure the electrical plug is inserted into a live, properly grounded outlet.
Replace the fuse or reset the circuit breaker.
•
Improper oven control settings. See Changing Oven Settings in the OPERATION
section.
Oven light does not
work.
•
The light bulb is loose or defective. Tighten or replace the bulb.
•
The plug on the range is not completely inserted in the electrical outlet. Make
sure the electrical plug is inserted into a live, properly grounded outlet.
Self Clean is not
working.
•
The oven temperature is too high to set a self clean operation. Allow the range to
cool down to room temperature and reset the controls.
•
Improper oven control settings. See Self Clean in the MAINTENANCE section.
“Crackling” or
“popping” sound.
•
This is the sound of the metal heating up and cooling down during both the
cooking and cleaning functions. This is normal.
Too much smoke
during the Self Clean
cycle.
Too much soil in the oven. Open the windows to get rid of the smoke from the
room. Turn the oven mode knob to select Self Clean. Wait until the light goes off
before trying to open the oven door. Wipe up the excess soil and reset the clean
cycle.

45
TROUBLESHOOTING
ENGLISH
Symptoms Possible Cause / Solutions
The oven door does
not open after a Self
Clean cycle.
The oven temperature is too high. Wait up to one hour for it to cool down.
The oven door is
not clean after a Self
Clean cycle.
•
Incorrect oven control settings. See Self Clean in the MAINTENANCE section.
•
The oven was heavily soiled. Clean up heavy spills before beginning the Self
Clean cycle. Heavily soiled ovens may need either a longer Self Clean or two
Self Clean cycles.
Clean and door flash
in the display
•
The self clean cycle has been selected, but the door is not closed.
- Close the oven door.
Oven control beeps
and displays an F
error code.
•
Check the main gas shut-off valve or
the oven gas shut-off valve and call
for service.
•
Remove the power from the range
for five minutes and then reconnect
the power. If the function error code
repeats, call for service.
CODE CAUSE
F-3 Key short error
F-9 Oven not heating
The oven racks were
cleaned in a Self
Clean cycle.
Apply a small amount of vegetable oil to a paper towel and wipe the edges of the
oven racks. Do not use lubricant sprays.
Clock is flashing.
Power outage or surge. Reset the clock. If the oven was in use, you must reset
it by pressing the oven mode knob to the Off position. Reset the clock and any
cooking function.
“Burning” or “oily”
odor emitting from the
vent.
This is normal in a new oven and will disappear with use. To speed the process,
set a Self Clean cycle for a minimum of three hours. See Self Clean in the
MAINTENANCE section.
Strong odor.
An odor from the insulation around the inside of the oven is normal for the first few
times the oven is used.
Fan noise
•
A convection fan may automatically turn on and off.
- This is normal.
Fan operation
It is normal for the fan to operate periodically throughout a normal bake cycle in the
oven. This is to ensure even baking results.
Burners are not
lighting properly after
cleaning the cooktop
surface.
Make sure that the burner heads and caps are completely dry and properly
positioned.
When lighting just one
burner, clicking noise
is heard from all the
burners.
This is normal. Electric spark igniters from the burners cause the clicking noise. All
the spark igniters on the cooktop will activate when igniting just one burner.
Light can be seen
through the oven air
vents.
While the Broil function is running, it is normal to see a light between the oven air
vents.

46
SMART DIAGNOSIS™ FUNCTION
SMART DIAGNOSIS™
FUNCTION
Should you experience any problems with the
appliance, it has the capability of transmitting data
via your telephone to the LG Customer Information
Center. NFC or Wi-Fi equipped models can also
transmit data to a smartphone using the LG
SmartThinQ application.
Smart Diagnosis™ through the
Customer Information Center
•
For appliances with the
or logo
This method allows you to speak directly to our
trained specialists. The specialist records the data
transmitted from the appliance and uses it to analyze
the issue, providing a fast and effective diagnosis.
1
Call the LG call center at: (LG U.S.) 1-800-243-
0000 (LG Canada) 1-888-542-2623.
2
When instructed to do so by the call center
agent, hold the mouthpiece of the phone over
the Smart Diagnosis™ logo on the machine.
Hold the phone no more than one inch from (but
not touching) the machine.
NOTE
Do not press any other buttons or icons on the
display screen.
3
Press and hold the Start button for three
seconds.
4
Keep the phone in place until the tone
transmission has finished. This takes about 6
seconds and the display will count down the
time.
5
Once the countdown is over and the tones have
stopped, resume your conversation with the call
center agent, who will then be able to assist you
in using the information transmitted for analysis.
NOTE
•
For best results, do not move the phone while
the tones are being transmitted.
•
If the call center agent is not able to get an
accurate recording of the data, you may be
asked to try again.
LG SmartThinQ Smart Diagnosis™
•
For appliances with the
or logo
Use the Smart Diagnosis feature in the LG
SmartThinQ application for help diagnosing issues
with the appliance without the assistance of the LG
Customer Information Center.
Follow the instructions in the LG SmartThinQ
application to perform a Smart Diagnosis using your
smartphone.
1
Download the LG SmartThinQ application
on your smart phone by searching for LG
SmartThinQ in the Google Play Store.
2
Open the LG SmartThinQ application on your
smart phone. Press Smart Diagnosis™ button to
advance to the next screen.
3
Follow the directions in the application. The
application will show how to use Audible
Diagnosis.
4
Press [ ] in the LG SmartThinQ application for
a more detailed guide on how to use the Smart
Diagnosis function.
NOTE
•
Smart Diagnosis™ cannot be activated unless
the appliance can be turned on using the
Power button. If the appliance cannot be turned
on, troubleshooting must be done without using
Smart Diagnosis™.
•
Call quality differences by region may affect the
function.
•
Use the home telephone for better
communication performance, resulting in better
service.
•
Bad call quality may result in poor data
transmission from your phone to the machine,
which could cause Smart Diagnosis™ to
malfunction.

47
LIMITED WARRANTY
ENGLISH
LIMITED WARRANTY (USA)
ARBITRATION NOTICE: THIS LIMITED WARRANTY CONTAINS AN ARBITRATION PROVISION THAT REQUIRES
YOU AND LG TO RESOLVE DISPUTES BY BINDING ARBITRATION INSTEAD OF IN COURT, UNLESS YOU
CHOOSE TO OPT OUT. IN ARBITRATION, CLASS ACTIONS AND JURY TRIALS ARE NOT PERMITTED. PLEASE
SEE THE SECTION TITLED “PROCEDURE FOR RESOLVING DISPUTES” BELOW.
Should your LG Gas Range ("Product") fail due to a defect in materials or workmanship under normal and proper use,
during the warranty period set forth below, LG Electronics (“LG”) will, at its option, repair or replace the Product. This
limited warranty is valid only to the original retail purchaser of the Product and applies only when purchased and used
within the United States including U.S. Territories.
Warranty Period Scope of Warranty HOW SERVICE IS HANDLED
One (1) year from date of
original retail purchase
Parts and Labor
(internal / functional parts only)
LG will provide, free of charge, all labor and
in-home service to replace defective part(s).
•
Replacement products and parts are warranted for the remaining portion of the original warranty period or ninety (90)
days, whichever is greater.
•
Replacement products and parts may be new, reconditioned, refurbished, or otherwise factory remanufactured.
•
Proof of original retail purchase specifying the Product model and date of purchase is required to obtain warranty
service under this limited warranty.
EXCEPT TO THE EXTENT PROHIBTED BY APPLICABLE LAW, ANY IMPLIED WARRANTY OF MERCHANTABILITY
OR FITNESS FOR A PARTICULAR PURPOSE ON THE PRODUCT IS LIMITED IN DURATION TO THE DURATION
OF THE ABOVE LIMITED WARRANTY. UNDER NO CIRCUMSTANCES SHALL LG OR ITS U.S. DISTRIBUTORS/
DEALERS BE LIABLE FOR ANY INDIRECT, INCIDENTAL, CONSEQUENTIAL, SPECIAL, OR PUNITIVE DAMAGES,
INCLUDING, WITHOUT LIMITATION, LOST GOODWILL, LOST REVENUES OR PROFITS, WORK STOPPAGE,
IMPAIRMENT OF OTHER GOODS, COST OF REMOVAL AND REINSTALLATION OF THE PRODUCT, LOSS OF
USE, OR ANY OTHER DAMAGES WHETHER BASED IN CONTRACT, TORT, OR OTHERWISE. LG’S TOTAL
LIABILITY, IF ANY, SHALL NOT EXCEED THE PURCHASE PRICE PAID BY YOU FOR THE PRODUCT.
Some states do not allow the exclusion or limitation of incidental or consequential damages or limitations on how long
an implied warranty lasts, so the above exclusions or limitations may not apply to you. This limited warranty gives you
specific legal rights and you may also have other rights that vary from state to state.
THIS LIMITED WARRANTY DOES NOT COVER:
•
Service trips to deliver, pick up, or install, educate how to operate, correct wiring, or correct unauthorized repairs.
•
Damage or failure of the Product to perform during power failures and interrupted or inadequate electrical service.
•
Damage or failure resulting from operating the Product in a corrosive atmosphere or contrary to the Product owner’s
manual.
•
Damage or failure to the Product caused by accidents, pests and vermin, lightning, wind, fire, floods, acts of God, or
any other causes beyond the control of LG.
•
Damage or failure caused by unauthorized modification or alteration, or if used for other than the intended purpose.
•
Damage or failure resulting from misuse, abuse, improper installation, repair, or maintenance. Improper repair
includes use of parts not authorized by LG. Improper installation or maintenance includes installation or maintenance
contrary to the Product owner’s manual.
•
Damage or failure caused by incorrect electrical current, voltage, or ventilation/plumbing codes.
•
Damage or failure caused by transportation and handling, including scratches, dents, chips, and/or other damage to
the finish of the Product, unless such damage is reported within one (1) week of delivery.
•
Damage or missing items to any display, open box, or discounted Product.
•
Refurbished Product or any Product sold “As Is”, “Where Is”, “With all Faults”, or similar disclaimer.
•
Products with original serial numbers that have been removed, altered, or cannot be readily determined.
•
Increases in utility costs and additional utility expenses.
•
Any noises associated with normal operation.
•
Use of accessories, components, or consumable cleaning products that are not authorized by LG.
•
Replacement of light bulbs, filters, fuses or any other consumable parts.
•
When Product is used for other than normal and proper household use (e.g. commercial or industrial use, offices,
and recreational facilities or vehicles) or contrary to the instructions outlined in the Product’s owner’s manual.
•
Costs associated with removal and reinstallation of your Product for repairs.
•
Cost of conversion of the Product from natural gas to LP gas or vice versa.
•
Shelves, drawers and accessories, except for internal/functional parts covered under this limited warranty.

48
LIMITED WARRANTY
Not Covered by this Limited Warranty
Problem Cause Prevention
•
Cooktop enamel
chipping off
Improper usage
•
Do not hit enamel cooktop
•
Burners do not light Clogged or dirty burner ports or electrodes will
not allow the burner to operate properly
•
Check and clean the gas
electrode.
OK Not working
Must be cleaned
•
Uneven flame 1. Improper burner cap installation
•
Check installation of burner
head and cap
Burner cap is
properly seated.
Burner cap is NOT
properly seated.
2. Burner ports clogged by food residue
•
Hardened residue should be
removed using a toothbrush.
Ports blocked by dirt Flames uneven
* Oval burner
•
Oval burner
1) Release 6 nuts
2) Clean residue using
toothbrush
To clean: Release 6 nuts
Clean outside edges with
toothbrush
•
Burner cap color
changes and
becomes dull
1. Scratching
2. Use of detergent or abrasive cleansers
•
Do not use steel wool or
abrasive cleansers to clean.
•
To remove burnt-on food,
soak the burner heads in hot
water for 20–30 minutes. (Do
not use detergent)
Shine is lost

49
LIMITED WARRANTY
ENGLISH
Problem Cause Prevention
•
Knobs melt Improper usage
•
Do not leave door at stop
position during Broil/Bake
mode or right after cooking.
•
Oven or racks are
stained after using
aluminum foil
Aluminum foil has melted in the oven
•
Never cover the oven bottom
or cover an entire rack with
materials such as aluminum
foil.
•
If the foil has already melted
onto the oven, it will not
affect the performance of the
oven.
•
Flame or power is
weak
Gas pressure may be weak
•
Check with gas supplier first
•
Surface is not level
•
Oven is tipping
1. Range not leveled
2. Anti-tip device not installed correctly
•
Check with installer first
Anti-tip bracket
Approximately
0.65"
(16.5 mm)
Level both sides of range
Screw must
enter wood or
concrete
Wall plate
1
2
Use carpenter’s level to
check level.
•
Oven shows error
code (F9, F19) but
cooktop burners are
working.
The gas pressure regulator valve is closed.
•
Check that the regulator
valve is in the open position.
•
If the regulator valve
is
closed, rotate the lever to
open the valve.
Lever’s closed position
Lever’s open
position
Lever’s closed
position

50
LIMITED WARRANTY
Problem Cause Prevention
•
Flames too big on
converted cooktop
(NP
LP)
The installer missed part of the conversion.
(Check 3 parts: regulator, cooktop nozzles,
broil/bake nozzles.)
•
Check with installer first
•
Refer to installation manual
regulator
cooktop nozzles broil/bake nozzles
17K burner needs choke.
•
Check with installer first
•
Refer to installation manual
choke
Burner
cap
Set Screw
Burner
base
Choke
•
Flame is too small or
too large
1. Variable gas pressure
2. Installer did not check
•
Check with installer first
Center adjustment screw
•
Gas smell Improper connection
•
Check with installer first
1
/
2
" Adapter
1
/
2
" Adapter
Pressure regulator
Flex connector
(6 ft. max.)
Adapter
Gas shut-off
valve
1
/
2
" or
3
/
4
" Gas
pipe
Gas Flow into Range
Flexible Connector Hookup
The cost of repair or replacement under the above excluded circumstances shall be borne by the
consumer.
TO OBTAIN WARRANTY SERVICE AND ADDITIONAL INFORMATION
Call 1-800-243-0000 and select the appropriate option from the menu.
Or visit our website at http://www.lg.com
Or by mail: LG Electronics Customer Service P.O. Box 240007 Huntsville, AL 35813 ATTN: CIC

51
LIMITED WARRANTY
ENGLISH
PROCEDURE FOR RESOLVING DISPUTES:
ALL DISPUTES BETWEEN YOU AND LG ARISING OUT OF OR RELATING IN ANY WAY TO THIS LIMITED
WARRANTY OR THE PRODUCT SHALL BE RESOLVED EXCLUSIVELY THROUGH BINDING ARBITRATION,
AND NOT IN A COURT OF GENERAL JURISDICTION. BINDING ARBITRATION MEANS THAT YOU AND LG
ARE EACH WAIVING THE RIGHT TO A JURY TRIAL AND TO BRING OR PARTICIPATE IN A CLASS ACTION.
Definitions. For the purposes of this section, references to “LG” mean LG Electronics U.S.A., Inc., its parents,
subsidiaries and affiliates, and each of their officers, directors, employees, agents, beneficiaries, predecessors
in interest, successors, assigns and suppliers; references to “dispute” or “claim” shall include any dispute,
claim or controversy of any kind whatsoever (whether based in contract, tort, statute, regulation, ordinance,
fraud, misrepresentation or any other legal or equitable theory) arising out of or relating in any way to the sale,
condition or performance of the product or this Limited Warranty.
Notice of Dispute. In the event you intend to commence an arbitration proceeding, you must first notify LG in
writing at least 30 days in advance of initiating the arbitration by sending a letter to LG at LG Electronics, USA,
Inc. Attn: Legal Department- Arbitration 1000 Sylvan Ave, Englewood Cliffs 07632. You and LG agree to engage
in good faith discussions in an attempt to amicably resolve your claim. The notice must provide your name,
address, and telephone number; identify the product that is the subject of the claim; and describe the nature of
the claim and the relief being sought. If you and LG are unable to resolve the dispute within 30 days, either party
may proceed to file a claim for arbitration.
Agreement to Binding Arbitration and Class Action Waiver. Upon failure to resolve the dispute during the
30 day period after sending written notice to LG, you and LG agree to resolve any claims between us only by
binding arbitration on an individual basis, unless you opt out as provided below. Any dispute between you and
LG shall not be combined or consolidated with a dispute involving any other person’s or entity’s product or
claim. More specifically, without limitation of the foregoing, any dispute between you and LG shall not under any
circumstances proceed as part of a class or representative action. Instead of arbitration, either party may bring
an individual action in small claims court, but that small claims court action may not be brought on a class or
representative basis.
Arbitration Rules and Procedures. To begin arbitration of a claim, either you or LG must make a written
demand for arbitration. The arbitration will be administered by the American Arbitration Association (“AAA”)
and will be conducted before a single arbitrator under the AAA’s Consumer Arbitration Rules that are in effect
at the time the arbitration is initiated (referred to as the “AAA Rules”) and under the procedures set forth in this
section. The AAA Rules are available online at www.adr.org/consumer. Send a copy of your written demand for
arbitration, as well as a copy of this provision, to the AAA in the manner described in the AAA Rules. You must
also send a copy of your written demand to LG at LG Electronics, USA, Inc. Attn: Legal Department- Arbitration
1000 Sylvan Avenue Englewood Cliffs, NJ 07632. If there is a conflict between the AAA Rules and the rules set
forth in this section, the rules set forth in this section will govern. This arbitration provision is governed by the
Federal Arbitration Act. Judgment may be entered on the arbitrator’s award in any court of competent jurisdiction.
All issues are for the arbitrator to decide, except that issues relating to the scope and enforceability of the
arbitration provision and to the arbitrability of the dispute are for the court to decide. The arbitrator is bound by
the terms of this provision.
Governing Law. The law of the state of your residence shall govern this Limited Warranty and any disputes
between us except to the extent that such law is preempted by or inconsistent with applicable federal law.
Fees/Costs. You do not need to pay any fee to begin an arbitration. Upon receipt of your written demand for
arbitration, LG will promptly pay all arbitration filing fees to the AAA unless you seek more than $25,000 in
damages, in which case the payment of these fees will be governed by the AAA Rules. Except as otherwise
provided for herein, LG will pay all AAA filing, administration and arbitrator fees for any arbitration initiated in
accordance with the AAA Rules and this arbitration provision. If you prevail in the arbitration, LG will pay your
attorneys’ fees and expenses as long as they are reasonable, by considering factors including, but not limited to,
the purchase amount and claim amount. Notwithstanding the foregoing, if applicable law allows for an award of
reasonable attorneys’ fees and expenses, an arbitrator can award them to the same extent that a court would. If
the arbitrator finds either the substance of your claim or the relief sought in the demand is frivolous or brought for
an improper purpose (as measured by the standards set forth in Federal Rule of Civil Procedure 11(b)), then the
payment of all arbitration fees will be governed by the AAA Rules. In such a situation, you agree to reimburse LG
for all monies previously disbursed by it that are otherwise your obligation to pay under the AAA Rules. Except
as otherwise provided for, LG waives any rights it may have to seek attorneys’ fees and expenses from you if LG
prevails in the arbitration.

52
LIMITED WARRANTY
Hearings and Location. If your claim is for $25,000 or less, you may choose to have the arbitration conducted
solely on the basis of (1) documents submitted to the arbitrator, (2) through a telephonic hearing, or (3) by
an in-person hearing as established by the AAA Rules. If your claim exceeds $25,000, the right to a hearing
will be determined by the AAA Rules. Any in-person arbitration hearings will be held at a location within the
federal judicial district in which you reside unless we both agree to another location or we agree to a telephonic
arbitration.
Opt Out. You may opt out of this dispute resolution procedure. If you opt out, neither you nor LG can require the
other to participate in an arbitration proceeding. To opt out, you must send notice to LG no later than 30 calendar
days from the date of the first consumer purchaser’s purchase of the product by either: (i) sending an e-mail to
[email protected], with the subject line: “Arbitration Opt Out” or (ii) calling 1-800-980-2973. You must include in
the opt out e-mail or provide by telephone: (a) your name and address; (b) the date on which the product was
purchased; (c) the product model name or model number; and (d) the serial number (the serial number can be
found (i) on the product; or (ii) online by accessing https://www.lg.com/us/support/repair-service/schedule-repair-
continued and clicking on “Find My Model & Serial Number”).
You may only opt out of the dispute resolution procedure in the manner described above (that is, by e-mail or
telephone); no other form of notice will be effective to opt out of this dispute resolution procedure. Opting out of
this dispute resolution procedure will not affect the coverage of the Limited Warranty in any way, and you will
continue to enjoy the full benefits of the Limited Warranty. If you keep this product and do not opt out, then you
accept all terms and conditions of the arbitration provision described above.

ESPAÑOL
www.lg.com
MANUAL DEL PROPIETARIO
ESTUFA DE GAS
Lea detenidamente el manual del usuario antes de poner el aparato en
funcionamiento y consérvelo a mano en todo momento para su referencia.
•
No almacene ni use gasolina ni ningún otro tipo de vapores o líquidos inflamables
cerca de este aparato ni de ningún otro aparato.
•
QUÉ HACER SI HUELE GAS
- No intente encender ningún aparato.
- No toque ningún interruptor eléctrico.
- No use ningún teléfono en su edificio.
- Llame a su compañía de gas inmediatamente desde el teléfono de un vecino. Siga
las instrucciones de la compañía de gas.
- Si no puede comunicarse con su compañía de gas, llame al departamento de
bomberos.
•
La instalación y el mantenimiento deben ser realizados por un instalador, una
agencia de mantenimiento o una compañía de gas calificados.
Si no sigue con exactitud la información de este manual, un incendio o descarga
eléctrica podrían ser causados, daños a la propiedad, lesiones personales o la
muerte.
ADVERTENCIA
MFL33029628
Copyright © 2017 - 2018 LG Electronics Inc. Todos los Derechos Reservados.
LRG3060** LRG3061** LRG3193** LRG3194**

2 ÍNDICE
ÍNDICE
3
CARACTERÍSTICAS DEL
PRODUCTO
4
INSTRUCCIONES IMPORTANTES
DE SEGURIDAD
12
DESCRIPCIÓN GENERAL DEL
PRODUCTO
12 Piezas
12 Accesorios
13
INSTALACIÓN
13 Antes de instalar la estufa
14 Instalación de la estufa
16 Cómo brindar el suministro adecuado de gas
16 Conexión de la estufa al gas
17 Conexiones eléctricas
18 Sellado de aberturas
18 Ensamblaje de los quemadores de superficie
18 Verificación de encendido de los quemadores de
superficie
19 Nivelación de la estufa
19 Colocación del dispositivo antivuelco
20
FUNCIONAMIENTO
20 Quemadores de superficie a gas
20 Ubicaciones de los quemadores
21 Uso de los quemadores de gas de
superficie
21 Ajuste del tamaño de llama
21 En caso de apagón
21 Batería de cocina para la superficie de la
estufa
22 Uso de un wok
22 Uso de las rejillas en superficie
22 Uso de la parrilla
23 El horno
24 Descripción general del panel de control
25 Cambio de las configuraciones del horno
25 Clock (Reloj)
25 Oven Light (Luz del horno)
25 Configuraciones mínimas y máximas
predeterminadas
26 Timer On/Off (Temporizador encendido/
apagado)
26 Settings (Ajustes)
-
Configuración del modo de hora
-
Ajuste del termostato del horno
-
Encendido/apagado de la luz de alarma
de precalentamiento
-
Ajuste del volumen del indicador sonoro
-
Selección de grados Fahrenheit o Celsius
-
Como Fijar la función de Auto Conversion
de Convección del horno Inferior (Para el
modelo: LRG3193, LRG3194)
28 Lockout (Bloqueo)
28 Cook Time [Timed Cook] (Tiempo de
cocción [Cocción temporizada])
28 Extracción y colocación de los estantes del
horno
29 Guía de recomendaciones para hornear y
rostizar
29 Bake (Hornear)
30 Horneado por Convección (Para el modelo:
LRG3193, LRG3194)
31 Broil (Asar)
33
MANTENIMIENTO
33 Hornallas de Gas
34 Rejillas de los quemadores
34 Limpieza de la superficie de la placa de cocción
34 Ventilación de aire del horno
35 Panel de control
35 Perillas y panel del múltiple delantero
35 Limpieza del exterior
36 Instrucciones para el cuidado de la puerta
36 EasyClean
®
38 Self Clean (Autolimpieza)
(Para el modelo : LRG3194)
40 Cambio de la luz del horno
40 Retirar y reemplazar la puerta removible del
horno y el cajón
42
SOLUCIÓN DE PROBLEMAS
42 PREGUNTAS FRECUENTES
44 Antes de llamar al servicio técnico
46
FUNCIÓN SMART DIAGNOSIS™
(DIAGNÓSTICO INTELIGENTE)
47
GARANTÍA LIMITADA

3CARACTERÍSTICAS DEL PRODUCTO
ESPAÑOL
CARACTERÍSTICAS DEL PRODUCTO
Varios tamaños de quemadores de gas
Elija un quemador que coincida con el tamaño de su batería de cocina.
Es posible cocinar varias cosas a la vez si utiliza más de un quemador.
Estufa de gas segura y confiable
Brinda seguridad y confiabilidad para cocinar.
Sistema de auto limpieza (Self Clean) & EasyClean
®
Útil para una limpieza sencilla.

4 INSTRUCCIONES IMPORTANTES DE SEGURIDAD
INSTRUCCIONES IMPORTANTES DE SEGURIDAD
Lea y siga todas las instrucciones cuando utilice la estufa para evitar riesgos de incendios, descargas
eléctricas, lesiones personales o daños. Esta guía no incluye todas las situaciones posibles que
podrían ocurrir. Siempre comuníquese con su agente de servicio técnico o con el fabricante cuando
haya problemas que no comprenda.
Descargue este manual del propietario en: http://www.lg.com
Este es el símbolo de alerta de seguridad. Este símbolo le advierte sobre posibles riesgos
que pueden ocasionar daños materiales, lesiones personales graves o la muerte.
El símbolo de alerta de seguridad siempre estará acompañado de las palabras
"ADVERTENCIA" o "PRECAUCIÓN". Estos términos significan lo siguiente:
ADVERTENCIA
-
Indica una situación peligrosa que, de no evitarse, podría causar
lesiones graves o la muerte.
PRECAUCIÓN
-
Indica una situación peligrosa que, de no evitarse, podría causar
lesiones menores o moderadas.
DISPOSITIVO DE SEGURIDAD ANTIVUELCO
ADVERTENCIA
•
TODAS LAS ESTUFAS PUEDEN INCLINARSE Y CAER
•
LO QUE PODRÍA CAUSAR LESIONES PERSONALES
•
INSTALE LOS DISPOSITIVOS ANTIVUELCO QUE INCLUYE ESTA ESTUFA
•
CONSULTE LAS INSTRUCCIONES DE INSTALACIÓN
•
Un niño o adulto puede volcar la estufa y morir.
•
Instale el dispositivo anti-vuelco en la estructura y/o estufa. Verifique que el dispositivo anti-
vuelco haya sido instalado y acoplado correctamente siguiendo la guía del soporte anti-vuelco.
•
Enganche la estufa al dispositivo anti-vuelco siguiendo la guía del soporte anti-vuelco.
Asegúrese que el dispositivo anti-vuelco se vuelva a acoplar cuando se mueve la estufa
siguiendo la guía del soporte anti-vuelco.
•
Vuelva a enganchar el dispositivo anti-vuelco si mueve la estufa. No opere la estufa sin el
dispositivo anti-vuelco en su lugar y enganchado.
•
Vea las instrucciones de instalación para detalles.
•
De no seguir estas instrucciones puede ocasionar la muerte o quemaduras graves en niños o
adultos.
•
Para evitar vuelcos, no se pare ni se siente sobre la puerta. Instale el soporte antivuelco que incluye
esta estufa.
- La estufa podría inclinarse y usted podría sufrir lesiones por líquidos calientes derramados,
alimentos calientes o la estufa misma.
- Si separa la estufa de la pared para tareas de limpieza, mantenimiento o por cualquier otra razón,
asegúrese de volver a colocar el dispositivo antivuelco cuando empuje la estufa para acercarla a
la pared.
Soporte antivuelco
Aproximadamente
0,65" (16,5 mm)
El tornillo debe
atravesar la madera
o el hormigón
Placa de pared

5INSTRUCCIONES IMPORTANTES DE SEGURIDAD
ESPAÑOL
•
Para reducir el riesgo de vuelco, debe asegurar la estufa de manera adecuada mediante la
instalación de los dispositivos antivuelco.
•
Para verificar que el dispositivo antivuelco esté instalado correctamente: Quite todos los objetos
que estén sobre la placa de cocción. Sujete la protección del borde superior trasero de la estufa
e intente inclinarla hacia adelante con cuidado. Verifique que los dispositivos antivuelco estén
colocados.
•
Retire los cajones calentadores o de almacenamiento e inspeccione visualmente que la pata de
nivelación trasera esté insertada por completo en el soporte antivuelco.
•
Consulte el manual de instalación para ver la instalación adecuada del soporte antivuelco.
AVISO IMPORTANTE DE SEGURIDAD
Los aparatos de gas causan exposición mínima a cuatro de estas sustancias: benceno, monóxido
de carbono, formaldehido y hollín, causados primordialmente por la combustión incompleta de gas
natural o gas LP (Propano). Los quemadores bien ajustados, indicados por una llama azul en vez de
una llama amarilla, minimizarán la combustión incompleta. La exposición a estas sustancias puede
minimizarse ventilando con una ventana abierta o usando un ventilador o una campana de ventilación.
ADVERTENCIA
•
Nunca use su estufa para calentar el ambiente como un calentador. Hacerlo podría causar
envenenamiento por monóxido de carbono y sobrecalentamiento del horno.
•
Nunca vista ropa suelta o una prenda que cuelgue mientras use este aparato. Tenga cuidado al
tomar objetos ubicados en los gabinetes sobre la estufa. Los materiales inflamables se podrían
encender si tuvieran contacto con llamas o superficies calientes del horno y podrían causar
quemaduras graves.
•
No guarde ni use materiales combustibles, gasolina u otros vapores o líquidos cerca de este o
cualquier otro aparato.
•
No coloque materiales inflamables en el horno ni cerca de la placa de cocción.
•
No deje grasa de estufa u otros materiales inflamables dentro de la estufa o cerca de ella.
•
No utilice agua para apagar incendios provocados por grasa. Nunca toque una sartén en
llamas. Apague los controles. Coloque un sartén en llamas sobre un quemador cubriendo
completamente el sartén con una tapa que quede ajustada, una placa para hornear o una
bandeja plana. Use un extintor de sustancia química seca multiuso o de tipo espuma.
La grasa en llamas fuera de un sartén se puede extinguir cubriéndola con bicarbonato de sodio
o, si estuviera disponible, mediante un extintor de sustancia química seca multiuso o de tipo
espuma.
Las llamas en el horno o cajón de almacenamiento se pueden apagar por completo si se cierra
la puerta del horno o cajón de almacenamiento y se apaga el horno o si se usa un extintor
multiuso de sustancia química seca o de tipo espuma.
•
No utilice el horno ni el cajón para almacenar objetos.
•
Deje que las rejillas de los quemadores y otras superficies se enfríen antes de tocarlas.
•
Nunca obstruya los respiraderos (aberturas de aire) de la estufa. Estas proporcionan la entrada
y la salida de aire necesarias para que la estufa funcione adecuadamente con una combustión
correcta. Las aberturas de aire están ubicadas en la parte posterior de la placa de cocción, en
las partes superior e inferior de la puerta del horno y en el fondo de la estufa.

6 INSTRUCCIONES IMPORTANTES DE SEGURIDAD
ADVERTENCIA
•
Nunca obstruya el flujo del aire de combustión y de ventilación al bloquear la ventilación del
horno o las entradas de aire. Al hacerlo, se restringe la entrada de aire al quemador y esto
puede provocar envenenamiento por monóxido de carbono.
•
Nunca cubra ranuras, aberturas ni conductos del fondo del horno ni un estante completo con
materiales como papel de aluminio. Al hacerlo, se bloquea la corriente de aire a través del horno
y esto puede provocar envenenamiento por monóxido de carbono. El revestimiento de papel
metálico también puede concentrar calor, generando un peligro de incendio.
•
Las raspaduras o los impactos grandes en las puertas de vidrio pueden causar que los vidrios
se rompan.
•
Pararse, apoyarse o sentarse sobre las puertas o los cajones de esta estufa podría causar
lesiones personales graves y daños a la estufa. No permita que los niños trepen a la estufa o
jueguen cerca de ella. El peso de un niño sobre una puerta abierta podría hacer que la estufa se
inclinase, lo que causaría quemaduras graves u otras lesiones.
•
La prueba para detectar fugas del aparato se debe realizar según las instrucciones del
fabricante.
•
Pueden producirse fugas de gas en el sistema y generar un riesgo grave. Las fugas de gas
pueden no detectarse solo con el sentido del olfato. Los proveedores de gas recomiendan que
compre e instale un detector de gas aprobado por UL. Instale el detector y úselo según las
instrucciones del fabricante del detector de gas.
•
No use limpiadores comerciales para horno sobre el acabado del horno ni alrededor de ninguna
pieza del horno. Dañarán el acabado del aparato.
•
Para prevenir manchas o decoloración, limpie el aparato después de cada uso.
•
No intente abrir ni cerrar la puerta ni encender el horno hasta que la puerta esté instalada
correctamente.
•
Nunca coloque los dedos entre la bisagra y el bastidor frontal del horno. Los brazos de las
bisagras están montados con resortes. Si se golpeara por accidente, la bisagra se cerraría de
pronto contra el bastidor frontal y lesionaría los dedos.
PRECAUCIÓN
•
No guarde objetos de interés para los niños en los gabinetes que están arriba de la estufa o
sobre la protección trasera; si los niños subieran a la estufa para alcanzar algo que buscan,
podrían sufrir lesiones graves.
•
No deje a los niños solos o desatendidos donde haya una estufa caliente o en operación.
Pueden sufrir quemaduras graves.
•
No permita que nadie se suba, se pare ni se cuelgue de la puerta del horno, del cajón calentador
ni de la placa de cocción. Podrían causar daños a la estufa e incluso volcarla, lo que generaría
lesiones personales graves.
•
Use guantes al limpiar la estufa para evitar lesiones o quemaduras.
•
No utilice el horno para guardar alimentos o batería de cocina.
•
Para prevenir daños a la puerta del horno, no intente abrirla cuando aparezca Bloqueo en
pantalla.
•
No apoye ni coloque peso excesivo sobre una puerta abierta. Esto podría inclinar la estufa,
romper la puerta o lesionar al usuario.
•
No use horneado retardado para alimentos altamente perecederos como productos lácteos,
cerdo, aves o comida de mar.

7INSTRUCCIONES IMPORTANTES DE SEGURIDAD
ESPAÑOL
PRECAUCIONES DE SEGURIDAD PARA LA INSTALACIÓN
Pida que el instalador le muestre el lugar de la válvula que corta el gas de la estufa y cómo apagarla
si fuera necesario.
ADVERTENCIA
•
Haga que un instalador calificado instale y conecte a tierra su estufa de acuerdo con las
Instrucciones de instalación. Cualquier ajuste o servicio debe ser completado solo por
instaladores de estufas de gas calificados o técnicos de servicio.
•
Asegúrese de que su estufa sea ajustada correctamente por un técnico de servicio o un
instalador calificado para el tipo de gas (natural o LP) que se usará. Su estufa se puede convertir
para uso con cualquier tipo de gas. Consulte las instrucciones de instalación.
•
Estos ajustes deben ser completados por un técnico de servicio calificado de acuerdo con las
instrucciones del fabricante y todos los códigos y requisitos de la autoridad que tiene jurisdicción.
El incumplimiento de estas instrucciones podría causar lesiones graves o daños a la propiedad.
La agencia calificada que realice este trabajo asume la responsabilidad de la conversión.
•
Desconecte el suministro eléctrico antes de realizar mantenimiento al aparato.
•
Nunca use la puerta de la estufa como escalón o asiento, ya que esto puede inclinar la estufa y
producir lesiones graves.
•
Este producto no se debe instalar debajo de sistemas de ventilación de tipo campana que
dirijan el aire hacia abajo. Hacerlo podría causar problemas de encendido y combustión
en los quemadores de gas, lo que puede generar lesiones personales y podrían afectar el
funcionamiento de la unidad.
•
Enchufe su estufa a una toma de corriente de pared conectada a tierra de 120 voltios. No quite
la punta redonda de conexión a tierra del enchufe. Si existen dudas acerca del a conexión
de tierra del sistema eléctrico de la casa, es su responsabilidad personal y su obligación
reemplazarla por un tomacorriente adecuado para tres puntas con conexión a tierra de acuerdo
con el National Electrical Code (Código Eléctrico Nacional). No use un cable de extensión ni un
adaptador con esta estufa.
•
Para prevenir riesgos de incendio o descarga eléctrica, no use un adaptador ni retire la punta
con conexión a tierra del enchufe eléctrico. El incumplimiento de estas advertencias podría
causar lesiones, incendio o incluso la muerte.
•
Sitúe la estufa fuera de las áreas muy transitadas de la cocina y fuera de lugares ventilados para
evitar circulación de aire inadecuada.
•
No intente reparar ni reemplazar ninguna pieza de su estufa, excepto en caso de que este
manual lo mencione específicamente. Un técnico calificado debe estar a cargo de todas las
demás tareas de mantenimiento.
•
Asegúrese de quitar todos los materiales de empaque de la estufa antes de operarla para evitar
incendio o daños del humo si los materiales de empaque se encendieran.

8 INSTRUCCIONES IMPORTANTES DE SEGURIDAD
ADVERTENCIA
•
Si desea cerrar el paso del gas a la estufa, cierre la válvula de la tubería principal de gas
girándola hacia la derecha.
1
/
2
"
Adaptador
1
/
2
"
Adaptador
Regulador de
presión
Válvula de corte de gas
Flujo de gas a la estufa
Instalador: Informe al consumidor la ubicación de la válvula de corte del gas.
•
Después del uso prolongado de la estufa, se pueden producir temperaturas altas en el piso.
Muchos recubrimientos del suelo no resisten este tipo de uso.
•
Nunca instale la estufa sobre baldosas de vinilo o linóleo porque no pueden resistir este uso.
Nunca la instale directamente sobre alfombras de cocina.
QUEMADORES DE SUPERFICIE
ADVERTENCIA
•
Incluso si la llama del quemador superior se apaga, el gas sigue saliendo hacia el quemador
hasta que la perilla se coloque en la posición Off. Si huele a gas, abra la ventana de inmediato
y ventile el área durante cinco minutos antes de volver a usar el quemador. No deje los
quemadores encendidos sin supervisión.
•
Use el tamaño adecuado de sartén. No use sartenes inestables o que puedan volcarse con
facilidad. Seleccione ollas con fondo plano del tamaño suficiente para cubrir las rejillas del
quemador. Para evitar derrames, asegúrese de que la olla tenga el tamaño suficiente para
contener los alimentos de manera adecuada. Esto ahorrará tiempo de limpieza y evitará la
acumulación riesgosa de alimentos, ya que las salpicaduras o los derrames que quedan en la
estufa pueden encenderse. Use sartenes con mangos que se puedan sostener con facilidad y
que permanezcan fríos.

9INSTRUCCIONES IMPORTANTES DE SEGURIDAD
ESPAÑOL
PRECAUCIÓN
•
Asegúrese de que todos los controles de superficie estén en la posición Off antes de suministrar
gas a la estufa.
•
Nunca deje los quemadores de superficie sin supervisión en ajustes de altas temperaturas. Las
salpicaduras o los derrames dejados sobre la estufa pueden arder.
•
Coloque siempre las perillas en la posición Lite al encender los quemadores superiores y
asegúrese de que se hayan encendido.
•
Ajuste el tamaño de la llama del quemador de superficie para que no se extienda sobre el borde
de la olla. Las llamas excesivas son peligrosas.
•
Use solo agarraderas secas, las agarraderas húmedas o mojadas sobre superficies calientes
podrían producir quemaduras por vapor. No deje que las agarraderas se acerquen a las llamas
al levantar una olla u otra pieza de la batería de cocina. No use una toalla u otro paño abultado.
Use siempre agarraderas.
•
Al usar recipientes de vidrio, asegúrese de que estén diseñados para la cocción sobre la estufa.
•
Para minimizar la posibilidad de incendio de materiales inflamables y derrames, coloque
los mangos de las ollas hacia la parte de atrás de la estufa sin que se extiendan sobre los
quemadores adyacentes.
•
Nunca deje objetos sobre la placa de cocción. El aire caliente de la ventilación puede hacer que
los objetos inflamables ardan y aumente la presión de los recipientes cerrados, lo que puede
hacer que estallen.
•
Vigile con atención los alimentos que se frían en llama alta.
•
Siempre caliente la grasa lentamente y vigile mientras aumenta la temperatura.
•
Si freirá una combinación de aceites y grasas, mézclelos antes de calentarlos.
•
Si es posible, utilice un termómetro para frituras para evitar que la grasa se caliente por encima
del punto de humeo.
•
Utilice la menor cantidad posible de grasa para fritura profunda. Llenar el sartén con demasiada
grasa podría causar derrames al agregar los alimentos.
•
No cocine los alimentos directamente sobre llama abierta en la placa de cocción.
•
No use ollas metálicas (tipo “wok”) en los quemadores de superficie si la olla metálica tiene un
anillo que se coloca sobre la rejilla del quemador para sostener el wok. Este anillo actúa como
trampa de calor, el cual puede dañar la rejilla del quemador y el cabezal del quemador. También
podría hacer que el quemador no funcione correctamente. Esto puede causar que el nivel de
monóxido de carbono sea superior a los estándares actuales permitidos, lo que generaría un
peligro para la salud.
•
Los alimentos para freír deben estar tan secos como sea posible. La escarcha o la humedad
sobre los alimentos pueden hacer que la grasa caliente burbujee y se derrame por los costados
del recipiente.
•
Nunca trate de mover un sartén de grasa caliente, en especial una freidora profunda. Espere
hasta que la grasa de enfríe.
•
No deje artículos de plástico sobre la superficie, se pueden derretir si se dejan muy cerca de la
ventilación.
•
Aleje todos los artículos plásticos de los quemadores de superficie.
•
Para prevenir quemaduras, siempre asegúrese de que los controles para todos los quemadores
estén en la posición Off y que todas las rejillas estén frías antes de tratar de quitarlas.
•
Si huele a gas, apague el gas de la estufa y llame a un técnico calificado. Nunca use una llama
viva para encontrar una fuga.
•
Coloque siempre las perillas en posición Off antes de quitar las ollas de la estufa.
•
No levante la placa de cocción. Esto puede provocar daños y un funcionamiento inadecuado de
la estufa.
•
Si la estufa está localizada cerca de una ventana, no cuelgue cortinas largas que pudieran
levantarse sobre los quemadores de superficie y encenderse.
•
Limpie la placa de cocción con cuidado. Los extremos de metal puntiagudos de los electrodos
de chispa pueden producir lesiones.

10 INSTRUCCIONES IMPORTANTES DE SEGURIDAD
ASADOR
Siempre use una asadera con rejilla para drenar el exceso de grasa. Esto ayuda a reducir las
salpicaduras, el humo y las llamaradas ocasionales.
ADVERTENCIA
Al usar el asador, la temperatura interior del horno será muy elevada. Tome precauciones para
evitar posibles quemaduras. Para ello, debe hacer lo siguiente:
•
Mantener la puerta cerrada mientras está asando alimentos (consulte la sección Asador de este manual)
•
Usar siempre guantes para horno al colocar o retirar alimentos
MODO CORRECTO DE COCINAR CARNES Y AVES
Para evitar enfermedades transmitidas por los alimentos, cocine bien las carnes rojas y las aves. La
carne molida a una temperatura INTERNA mínima de 160 °F, las aves a una temperatura INTERNA
mínima de 165 °F y la carne de vaca, cerdo, ternera y cordero a una temperatura INTERNA mínima
de 145 °F.
AUTOLIMPIEZA DEL HORNO
Asegúrese de quitar los derrames en exceso antes de iniciar la función de auto limpieza.
PRECAUCIÓN
•
No deje comida, utensilios de cocina, estantes, etcétera, dentro del horno durante el ciclo de
auto limpieza.
•
No utilice limpiadores de horno. No debe utilizarse ningún limpiador comercial de horno ni
revestimiento de protección de horno de ningún tipo dentro ni alrededor de ninguna parte del
horno. Los residuos producidos por los limpiadores de horno dañan la parte interior del horno
cuando se está utilizando el ciclo de auto limpieza.
•
Extraiga los estantes del horno y cualquier otro elemento de los hornos superior e inferior antes
de iniciar el ciclo de auto limpieza.
•
Sólo limpie las piezas enumeradas en este manual.
•
No limpie la junta de la puerta. La junta de la puerta resulta necesaria para lograr un buen
sellado. Tenga cuidado de no frotar, dañar o mover la junta.
•
Si el modo de auto limpieza funciona mal, apague la estufa y desconecte el suministro de
energía. Haga revisar el aparato por un técnico de servicio autorizado.
•
Es normal que las piezas del horno se calienten durante el ciclo de auto limpieza.
•
Evite tocar la puerta, ventana o área de ventilación del horno durante el ciclo de limpieza.
HORNO
Al abrir la puerta del horno caliente, manténgase alejado de la estufa. El aire caliente y el vapor que
salen del horno pueden causar quemaduras en las manos, el rostro y los ojos.
ADVERTENCIA
•
Nunca cubra ranuras, aberturas, conductos del fondo del horno ni una bandeja completa con
materiales como papel de aluminio. Al hacerlo, se bloquea la corriente de aire a través del horno
y esto puede provocar envenenamiento por monóxido de carbono. El revestimiento de papel
metálico puede concentrar calor, generando peligro de incendio.
•
No caliente alimentos en recipientes cerrados. La presión dentro del recipiente podría aumentar
y podría hacerlo estallar causando lesiones.

11INSTRUCCIONES IMPORTANTES DE SEGURIDAD
ESPAÑOL
ADVERTENCIA
•
No recubra las paredes internas del horno ni el fondo con papel de aluminio ni permita que
entren en contacto con elementos calentadores expuestos en el horno. Esto podría causar
riesgo de incendio o daños a la estufa.
•
No utilice el horno para guardar objetos. Los objetos almacenados podrían incendiarse.
•
Mantenga el horno libre de acumulación de grasa.
•
Acomode los estantes del horno en la posición deseada solo cuando el horno esté frío.
•
Para prevenir quemaduras al retirar alimentos, deslice los estantes hacia afuera hasta que el
tope se trabe, luego retire los alimentos. Esto podría protegerlo de quemarse al tocar superficies
calientes de la puerta o las paredes del horno.
•
Al colocar o retirar una parrilla, use siempre guantes para horno.
•
Al usar bolsas para hornear o asar en el horno, siga las instrucciones del fabricante.
•
Use solo recipientes de vidrio recomendados para hornos de gas.
•
Siempre quite la bandeja del asador del horno apenas termine de asar. La grasa dejada en la
bandeja se puede encender si se usa el horno sin quitar la grasa de la bandeja del asador.
•
Si la carne está demasiado cerca de la llama, la grasa puede encenderse. Corte la grasa
excesiva para evitar llamas altas.
•
Asegúrese de que la bandeja del asador esté colocada correctamente para reducir la posibilidad
de incendios causados por la grasa.
•
Si hubiera un incendio causado por la grasa en la bandeja del asador, Presione el Clear/Off y
mantenga cerrada la puerta del horno para contener el fuego hasta que se apague.
•
Por seguridad y para lograr una mejor cocción, siempre hornee y ase con la puerta del horno
cerrada. Hornear o asar con la puerta abierta puede dañar las perillas o las válvulas.
No deje la puerta abierta durante la cocción o mientras el horno se esté enfriando.
SUGERENCIAS PARA AHORRAR ENERGÍA
•
Cocinar en varios estantes ahorra tiempo y energía. Siempre que sea posible, cocine alimentos que
requieran la misma temperatura de cocción en un único horno.
•
Para un desempeño óptimo y ahorro de energía, siga las pautas de la página 29 para colocar
correctamente los estantes y las bandejas.
•
Utilice piezas de la batería de cocina proporcionadas para la cantidad de alimentos que va a cocinar
y así ahorrar energía al calentarlos. Calentar
1
/
2
litro de agua requiere más energía en una olla de
tres litros, que en una de un litro.
•
Utilice piezas de la batería de cocina con fondos planos para lograr el mejor contacto posible con la
superficie de la placa de cocción al cocinar en la placa de cocción de vitrocerámica.
•
Haga coincidir el tamaño del quemador o la hornalla de la placa de cocción con el tamaño del
recipiente en uso. Utilizar una hornalla grande para un sartén pequeño desperdicia energía térmica,
y la superficie expuesta de la hornalla es un riesgo de quemadura o incendio.
•
Reduzca el uso de energía al limpiar la suciedad ligera del horno con la función EasyClean
®
, en
lugar del autolimpiante.
•
Evite abrir la puerta del horno más de lo necesario durante el uso. Esto ayuda a que el horno
mantenga la temperatura, evita la pérdida innecesaria de calor y ahorra el consumo de energía.
Lea todas las instrucciones antes de usar el aparato.
GUARDE ESTAS INSTRUCCIONES

12 DESCRIPCIÓN GENERAL DEL PRODUCTO
DESCRIPCIÓN GENERAL DEL PRODUCTO
Piezas
Rejillas
Panel de control del horno
Placa de cocción
Interruptor de luz automática
del horno
Junta
Soporte Anti-vuelco
Ventilación del horno
Placa de modelo y número
de serie
Perilla de control del
quemador
Estante
Puerta del horno
Cajón de
almacenamiento
Accesorios
Accesorios incluidos
Estante estándar (2 c/u) Parrilla (1 c/u)
(LRG3061, LRG3193, LRG3194)
Manual del usuario (1 c/u)
Kit antivuelco
Soporte antivuelco (1 c/u) Tornillos (4 c/u) Anclajes (4 c/u) Plantilla (1 c/u)
Kit de conversión para boquilla de LP
Accesorios opcionales
Asadera
Rejilla
Boquilla de placa de
cocción (5 c/u)
Boquillas de horno
(2 c/u)
Ahogador
(1 c/u)
Tornillo de ajuste
(1 c/u)
Kit EasyClean
®
(LRG3061, LRG3193)
Botella rociadora
(1 c/u)
Esponja limpiadora que no raya
(1 c/u)
NOTA
•
Comuníquese con el Servicio de atención al cliente de LG al 1-800-243-0000 (1-888-542-2623 en Canadá) si falta algún
accesorio.
•
Para su seguridad y para extender la vida útil del producto, solo debe utilizar componentes autorizados.
•
El fabricante no es responsable del mal funcionamiento del producto ni de accidentes causados por el uso de componentes
o piezas no autorizados y comprados por separado.
•
Las imágenes de esta guía podrían ser diferentes a los componentes y accesorios reales, que están sujetos a cambios a
discreción del fabricante, sin previo aviso, con fines de mejorar el producto.

13INSTALACIÓN
ESPAÑOL
INSTALACIÓN
Antes de instalar la estufa
Haga que un instalador calificado instale y conecte a tierra su estufa de acuerdo con las Instrucciones de instalación. Cualquier
ajuste o servicio debe ser completado solo por instaladores de estufas de gas calificados o técnicos de servicio.
En el Commonwealth de Massachusetts
•
Un plomero certificado o un instalador de gas deben instalar este producto.
•
Cuando utilice válvulas de bola para corte de gas, deben ser del tipo de manija en T.
•
Cuando use un conector de gas flexible, no debe superar los 3 pies de longitud.
Preparación para instalación
Herramientas necesarias
Destornillador phillips
Llave de boca o ajustable
Lápiz y regla
Nivel
Destornillador plano
Llave de tubos (2)
(uno para soporte)
Destornillador plano
(Ajuste de simmer)
Diámetro: 3/32" (2.4 mm)
L: 3" (76.2 mm)
L
Materiales que podría necesitar
•
Válvula de corte de línea de gas
•
Sellador de juntas de tubería que resista la acción del gas natural y LP
•
Conector de artefacto metálico flexible (
3
/
4
" o
1
/
2
" NPT x
1
/
2
" D. I.)
Nunca use un conector viejo cuando instale una estufa nueva.
•
Adaptador de unión abocardada para conexión a línea de suministro de gas (
3
/
4
" o
1
/
2
" NPT x
1
/
2
" D. I.)
•
Adaptador de unión abocardada para conexión al regulador de presión de la estufa (
1
/
2
" NPT x
1
/
2
" D. I.)
•
Detector líquido de fugas o agua jabonosa
•
Tirafondo o casquillo de anclaje de
1
/
2
" D. E. (solo para pisos de concreto)

14 INSTALACIÓN
Instalación de la estufa
Desembalaje y traslado de la estufa
PRECAUCIÓN
•
Se necesitan dos o más personas para mover e
instalar la estufa (peligro de peso excesivo). Si no
se cumple con esto, se pueden producir lesiones en la
espalda u otras lesiones.
•
No utilice las manijas de la puerta para empujar
ni para tirar de la estufa durante la instalación
o al mover la estufa para tareas de limpieza o
reparaciones. Hacerlo podría causar daños graves a la
puerta de la estufa.
Retire el material de embalaje, la cinta y cualquier etiqueta
temporal de la estufa, antes de usarla. No retire las etiquetas
de advertencia, la etiqueta de modelo y número de serie ni la
hoja técnica ubicada en la parte posterior de la estufa.
Para quitar la cinta o el pegamento restantes, frote el área con
fuerza utilizando el dedo pulgar. También es sencillo retirar el
residuo de cinta o pegamento frotando una pequeña cantidad
de detergente para vajilla sobre el adhesivo con los dedos.
Enjuague con agua tibia y seque.
No utilice instrumentos filosos, alcohol para frotar, líquidos
inflamables ni limpiadores abrasivos para quitar cinta o
pegamento. Estos productos pueden dañar la superficie de la
estufa.
La estufa es pesada y puede instalarse sobre revestimientos
blandos para pisos como vinilo acolchado o piso alfombrado.
Tenga cuidado al mover la estufa sobre este tipo de pisos.
Utilice una correa al mover la estufa, para evitar dañar el piso.
O deslice la estufa sobre un cartón o madera contrachapada
para evitar dañar el revestimiento del piso.
Elección de la ubicación adecuada
No instale la estufa donde podría estar sujeta a fuertes
corrientes de aire. Debe sellar todas las aberturas del piso o
la pared que están detrás de la estufa. Asegúrese de que las
aberturas alrededor de la base de la estufa que brindan aire
fresco para la combustión y la ventilación no estén obstruidas
por alfombras o madera.
La estufa, como otras unidades del hogar, es pesada y puede
instalarse sobre revestimientos blandos para pisos como
vinilo acolchado o piso alfombrado. Tenga cuidado al mover la
estufas sobre este tipo de pisos.
Este aparato no se debe instalar con un sistema de ventilación
que envíe aire hacia abajo en dirección a la estufa.
Este tipo de sistema de ventilación podría causar problemas
de encendido y combustión en el aparato, que pueden generar
lesiones personales y un funcionamiento incorrecto.
Cuando el revestimiento del piso termine frente a la estufa,
el área donde se instalará la estufa se debe elevar con
madera contrachapada al mismo nivel o más elevada que el
revestimiento del piso. Esto permitirá mover la estufa para
tareas de limpieza y mantenimiento, además de brindar un
adecuado flujo de aire para la cocina.
Además, asegúrese de que el revestimiento del piso resista
temperaturas mínimas de 167 °F (75 °C). Consulte las
Instrucciones de seguridad de instalación incluidas en este
manual.
Asegúrese de que los revestimientos de las paredes que
rodeen su estufa puedan resistir el calor de hasta 194 °F
(90 °C) generado por la estufa. Consulte las Instrucciones de
seguridad de instalación incluidas en este manual.
Ubicaciones de la tubería de gas y el
tomacorriente eléctrico
30"
(76,2 cm)
3"
(7,6 cm)
24
1
/
32
"
(61 cm)
12
1
/
32
"
(30,6 cm)
2"
(5,1 cm)
10
7
/
16
"
(26,5 cm)

15INSTALACIÓN
ESPAÑOL
Dimensiones y espacios libres
Deje suficiente espacio entre la estufa y las superficies combustibles adyacentes. Se deben cumplir estas dimensiones para usar
de manera segura su estufa. La ubicación del tomacorriente y la abertura de la tubería (consulte Ubicaciones de tubería de gas y
tomacorriente eléctrico en la página 14) se deben ajustar para cumplir los requisitos específicos. Se debe instalar la estufa dejando
un espacio de 0" (al ras) de la pared posterior.
Profundidad
máxima para
gabinetes
ubicados sobre
la encimera
Espacio
mínimo a
la pared
izquierda
Mínimo a
los armarios
situados en
ambos lados
de la estufa
de gas
Espacio
mínimo a la
pared derecha
Borde frontal
del panel
lateral de
la estufa
delante del
gabinete
Para gabinetes
debajo de la placa
de cocción y en la
parte posterior de
la estufa
Profundidad con la puerta cerrada
(incluye manija de la puerta)
30"
(76,2 cm)
30" (76,2 cm)
Mínimo
18"
(45,72 cm)
5"
5" (12,7 cm)
1
/
4
"
(0,6 cm)
27
9
/
16
"
(70 cm)
36
1
/
32
"
(91,5 cm)
Altura
47
7
/
16
"
(120,5 cm)
Profundidad con la puerta abierta
46
5
/
16
"
(117,5 cm)
30"
(76,2 cm)
13" (33 cm)
0"
Dimensiones
Espacios libres de instalación
36"
(91,4 cm)

16 INSTALACIÓN
Instalación del dispositivo antivuelco
Soporte
antivuelco
Placa de pared
El tornillo debe
atravesar la
madera o el
hormigón
Se incluye un soporte antivuelco con una plantilla de
instalación. Las instrucciones incluyen la información
necesaria para completar la instalación. Lea y siga la hoja de
instrucciones de instalación de la estufa.
ADVERTENCIA
•
Se debe asegurar la estufa con un dispositivo antivuelco
aprobado.
•
La estufa puede inclinarse si una persona se para, se
sienta o se apoya en la puerta abierta y el dispositivo
antivuelco no está instalado de manera adecuada.
•
Después de instalar el dispositivo antivuelco, intente
inclinar la estufa hacia adelante para verificar que el
dispositivo esté bien instalado.
•
Esta estufa está diseñada para cumplir todos los
estándares de vuelco reconocidos por la industria para
todas las condiciones normales.
•
La instalación del dispositivo antivuelco debe cumplir
con todos los códigos legales para asegurar el aparato.
•
El uso de este dispositivo no impide que la estufa se
caiga cuando no está bien instalado.
•
Un niño o adulto puede volcar la estufa y morir.
•
Instale el dispositivo anti-vuelco en la estructura y/o
estufa. Verifique que el dispositivo anti-vuelco haya sido
instalado y acoplado correctamente siguiendo la guía
del soporte anti-vuelco.
•
Enganche la estufa al dispositivo anti-vuelco siguiendo la
guía del soporte anti-vuelco. Asegúrese que el dispositivo
anti-vuelco se vuelva a acoplar cuando se mueve la
estufa siguiendo la guía del soporte anti-vuelco.
•
Vuelva a enganchar el dispositivo anti-vuelco si mueve
la estufa. No opere la estufa sin el dispositivo anti-
vuelco en su lugar y enganchado.
•
Vea las instrucciones de instalación para detalles.
•
De no seguir estas instrucciones puede ocasionar la
muerte o quemaduras graves en niños o adultos.
Cómo brindar el suministro
adecuado de gas
Su estufa está diseñada para funcionar con una presión de 5"
de columna de agua a gas natural o 10" de columna de agua a
L P.
Asegúrese de suministrar a su estufa el tipo de gas para el
cual está configurada.
Esta estufa es convertible para uso con gas natural o LP. Al
usar la estufa con gas LP, un instalador de gas LP calificado
debe realizar la conversión antes de intentar hacer funcionar la
estufa.
Para un funcionamiento adecuado, la presión del gas natural
suministrada al regulador debe estar entre 5" y 13" de columna
de agua.
Para usar con gas LP, la presión suministrada al regulador
debe estar entre 10" y 13" de columna de agua. Al verificar el
funcionamiento correcto del regulador, la presión de entrada
debe ser, como mínimo, 1" más que la presión operativa (del
colector) según se indica anteriormente.
El regulador de presión ubicado en la entrada de la estufa debe
permanecer en la línea de suministro, independientemente de
qué tipo de gas se utilice.
Un conector metálico flexible utilizado para unir la estufa al
suministro de gas debe tener un diámetro interior de
5
/
8
" y una
longitud máxima de 5 pies. En Canadá, los conectores flexibles
deben ser conectores metálicos de pared simple de menos de
6 pies de longitud.
Conexión de la estufa al gas
Corte el suministro de gas a la estufa con la válvula antes
de retirar la estufa antigua y déjela de ese modo hasta que
se haya completado la instalación nueva.
Debido a que las tuberías rígidas restringen el movimiento de
la estufa, se debe utilizar un conector metálico flexible con
certificación internacional CSA, excepto en caso de que los
códigos locales requieran una conexión de tubería rígida.
Se debe instalar una válvula manual en una ubicación
accesible en la tubería de gas externa a la estufa con el fin de
abrir o cerrar el suministro de gas a la estufa.
Nunca reutilice un conector viejo cuando instale una estufa
nueva.
Para prevenir las fugas de gas, use un sellador de juntas de
tuberías calificado en todas las roscas externas.
1
Instale un adaptador de unión abocardada macho de
1
/
2
" o
3
/
4
" a la rosca interna NPT de la válvula de corte
manual con cuidado de sujetar la válvula de corte para
que no gire.
2
Instale un adaptador de unión abocardada macho de
1
/
2
"
a la rosca interna de
1
/
2
" NPT en la entrada del regulador
de presión. Use una llave de sujeción en el accesorio del
regulador de presión para evitar daños.
Cheque que el regulador de la valvula de gas este en posicion
de abierta.
Posición abierta de
la palanca
Posición cerrada
de la palanca

17INSTALACIÓN
ESPAÑOL
NOTA
•
El regulador esta en posición abierta desde fabrica. Si
la estufa no funciona, asegúrese que el regulador de la
válvula este en posición abierta.
3
Coloque un conector metálico flexible al adaptador de la
estufa. Posicione la estufa para permitir la conexión en la
válvula de corte.
4
Cuando todas las conexiones hayan sido realizadas,
asegúrese que todas las perillas estén en posicion de
apagado (OFF) y el regulador de presión este en posición
abierta antes de abrir el paso principal de gas. Las fugas
de gas podrian ocurrir y crear un situación peligrosa. Las
fugas de gas no pueden ser determinadas sólo por el olor.
Verifique todas las juntas y los accesorios para detectar
fugas con un fluido de detección de fugas no corrosivo y
luego retírelo.
Los proveedores de gas recomiendan que compre e
instale un detector de gas aprobado por UL. Instale el
detector y úselo según las instrucciones de instalación.
ADVERTENCIA
•
No use una llama para detectar fugas de gas.
•
Aísle la estufa del sistema de suministro de gas
cerrando la válvula de corte individual durante cualquier
prueba de presión del sistema de gas a presiones de
prueba iguales o inferiores a
1
/
2
" psig (3,5 kPa).
Montaje del conector flexible
1
/
2
"
Adaptador
1
/
2
"
Adaptador
Regulador de presión
Conector exible
(6 pies máximo)
Adaptador
Válvula de corte
de gas
Tubería de gas de
1
/
2
"o
3
/
4
"
Flujo de gas a la estufa
Instalador: Informe al consumidor la ubicación de la válvula de corte
del gas
.
Posición del regulador de presión.
Regulador de presión
Conexiones eléctricas
Requisitos eléctricos
Circuito exclusivo conectado a tierra de forma adecuada de
120 V CA y 60 Hz protegido por interruptor de circuito de 15 o
20 A o fusibles de fusión lenta.
Si se utiliza una fuente eléctrica externa, cuando se instala el
electrodoméstico se debe contar con una conexión a tierra que
cumpla los códigos locales o, en ausencia de estos, según lo
establecido en el Código Eléctrico Nacional, ANSI/NFPA 70.
Conexión a tierra
IMPORTANTE: POR RAZONES DE SEGURIDAD PERSONAL,
ESTE APARATO DEBE CONTAR CON UNA CONEXIÓN A
TIERRA ADECUADA.
El cable de alimentación de este aparato está equipado con
un enchufe de 3 puntas redondas (de conexión a tierra) que
coincide con un receptáculo de pared estándar para enchufes
de 3 puntas, para minimizar la posibilidad de descarga
eléctrica desde el aparato.
El cliente debe solicitar que un electricista calificado verifique
el receptáculo y el circuito para asegurarse de que la conexión
a tierra sea adecuada.
Si encontrara un receptáculo de pared estándar para dos
puntas, es responsabilidad personal y obligación del cliente
reemplazarlo por uno con tres puntas con conexión a tierra
adecuada.
EN NINGUNA CIRCUNSTANCIA, CORTE NI RETIRE LA
TERCERA PUNTA (DE CONEXIÓN A TIERRA) DEL CABLE
DE ALIMENTACIÓN.
Nota acerca de GFCI: no se requieren ni se recomiendan GFCI
para receptáculos de estufa de gas.
Los circuitos protegidos con interruptores de descarga a tierra
(GFCI) son dispositivos que detectan la fuga de corriente en
un circuito y cortan el suministro eléctrico automáticamente
cuando se detecta un nivel de umbral de fuga. El cliente
debe restablecer estos dispositivos manualmente. El Código
Eléctrico Nacional requiere el uso de GFCI en receptáculos
de estufa instalados para funcionar en las superficies de las
encimeras.
El rendimiento de la estufa no se verá afectado si funciona
en un circuito protegido con GFCI, pero la necesidad de
restablecer el circuito puede resultar molesta.
Asegúrese de contar
con una buena
conexión a tierra antes
de usar la estufa
Método preferido
PRECAUCIÓN
El cliente debe solicitar que un electricista calificado
verifique el circuito para asegurarse de que el receptáculo
tenga la conexión a tierra adecuada.

18 INSTALACIÓN
No utilice un enchufe adaptador. Desconectar el cable de
alimentación genera tensión indebida en el adaptador y genera
una falla eventual en la terminal a tierra del adaptador.
La instalación debe cumplir los códigos locales o, en ausencia
de estos, según lo establecido en el Código Nacional de Gas
Combustible, ANSI Z223.1/NFPA 54.
La instalación de aparatos para casas móviles debe cumplir
con el Estándar de construcción y seguridad de casas
prefabricadas, título 24 CFR, parte 3280 (anteriormente el
Estándar federal de construcción y seguridad de casas móviles,
título 24, parte 280 del HUD), o cuando ese estándar no sea
aplicable, debe ajustarse al Estándar de instalaciones para
casas prefabricadas de edición más reciente (Manufactured
Home Sites, Communities and Set-Ups), ANSI A225.1, o a los
códigos locales. En Canadá, la instalación en casas móviles
debe cumplir el Código de Instalación para Casas Móviles
CAN/CSA Z240/MH.
Sellado de aberturas
Selle todas las aberturas en la pared y el piso después de
completar los suministros eléctrico y de gas.
Ensamblaje de los
quemadores de superficie
PRECAUCIÓN
No haga funcionar los quemadores sin todas las piezas
colocadas.
Coloque las tapas de los quemadores y los cabezales sobre la
placa de cocción. Asegúrese de que las tapas y los cabezales
estén en las ubicaciones correctas. Hay una tapa y un cabezal
de quemador de tamaño pequeño, uno mediano, uno grande y
uno extra grande.
Quemador central
(En algunos modelos)
Juego de quemador
con cabezal/tapa
ovalado (central)
Quemador
pequeño con
cabezal y tapa
Quemador
mediano
con
cabezal y
tapa
Quemador grande
con cabezal y tapa
Frente de la
estufa
Quemador extra grande
con cabezal y tapa
Abertura
Electrodo
Asegúrese de que el agujero del cabezal del quemador esté
ubicado sobre el electrodo.
Verificación de encendido de
los quemadores de superficie
Encendido eléctrico
Seleccione la perilla de un quemador de superficie y empuje
mientras gira hasta la posición Lite. Oirá un clic que indica el
funcionamiento correcto del módulo de chispa.
Cuando el aire de las líneas de suministro se haya purgado,
el quemador debe encenderse en 4 segundos. Después de
que se encienda el quemador, gire la perilla para retirarla de
la posición Lite. Pruebe con cada quemador sucesivamente
hasta verificarlos todos.
Calidad de las llamas
Debe confirmar visualmente la calidad de combustión de las
llamas de los quemadores.
A Llamas amarillas- Solicite mantenimiento.
B Puntas amarillas en conos externos-
Esto es normal para el gas LP.
C Llamas azul claro- Esto es normal para
gas natural.
NOTA
•
Con gas LP, es normal detectar algunas puntas
amarillentas en los conos externos.
Ajuste del quemador de supercie en
la conguración Llama baja (Fuego
lento)
1
Encienda todos los quemadores de superficie.
2
Gire la perilla del quemador que está ajustando hasta la
posición Lo.
3
Retire la perilla.
4
Inserte un destornillador de punta plana con un largo
mínimo de 3" (76.2 mm) y un diámetro de 3/32" (2.4 mm)
en el eje de la válvula.
Eje de la valvula
Tornillo de ajuste central
NOTA
Sostenga el eje de la válvula con una mano mientras gira
el tornillo para ajustar con la otra.

19INSTALACIÓN
ESPAÑOL
5
Vuelva a colocar la perilla.
6
Pruebe la estabilidad de la llama.
Prueba 1: Gire la perilla de Hi a Lo con rapidez. Si la
llama se apaga, aumente el tamaño de la llama y vuelva
a probar.
Prueba 2: Con el quemador en la configuración Lo, abra
y cierre la puerta del horno rápido. Si la llama se apaga
por la corriente de aire creada por el movimiento de la
puerta, aumente la altura de la llama y vuelva a probar.
7
Repita los pasos del 1 al 6 para cada quemador de
superficie.
Vericación de funcionamiento de los
quemadores para hornear / asar
Para verificar el encendido del quemador para hornear, siga
los pasos a continuación:
1
Retire todos los materiales de embalaje del interior de la
cavidad del horno.
2
Presione el Bake. 350 °F aparece en la pantalla.
3
Presione el Start.
El quemador podría tardar de 30 a 90 segundos para
comenzar a calentar.
Para verificar el encendido del quemador para asar, siga los
pasos a continuación:
1
Presione el Broil. Hi aparece en pantalla.
2
Asegúrese de que la puerta esté cerrada.
3
Presione el Start.
El quemador podría tardar de 30 a 90 segundos para
comenzar a calentar.
NOTA
No intente encender los quemadores de Hornear o
Asar durante un apagón. La estufa tiene un sistema de
encendido eléctrico y no se puede utilizar sin energía
eléctrica.
Ajuste de los obturadores de aire (para
conversiones a gas propano)
La estufa viene de fábrica con los obturadores de aire
ajustados para el flujo de aire adecuado para gas natural.
Si la estufa se convierte a gas LP, siga las instrucciones
del kit de conversión para ajustar los obturadores de aire
adecuadamente. Un técnico calificado debe realizar la
conversión a gas LP.
Nivelación de la estufa
Nivele la estufa ajustando las patas de nivelación. Si extiende
las patas ligeramente, podría ser más fácil insertar la pata
trasera en el soporte antivuelco.
Nivelador del
pie de apoyo
Rango de
elevación
Rango
inferior
Utilice un nivelador para verificar sus ajustes. Ubique el
nivelador en diagonal sobre el estante el horno y verifique en
todas direcciones para nivelar.
Primero verifique la dirección
.
Luego verifique la dirección
. Si el nivelador no queda
equilibrado sobre el estante, ajuste las patas de nivelación.
1
2
Colocación del dispositivo
antivuelco
Soporte
antivuelco
Pata de
nivelación
1
Deslice la estufa contra la pared y asegúrese de que
la pata trasera se deslice y enganche en el soporte
antivuelco.
2
Verifique la instalación adecuada al sujetar el borde
frontal de la placa de cocción e intente inclinar la estufa
hacia adelante.

20 FUNCIONAMIENTO
FUNCIONAMIENTO
Quemadores de superficie a gas
Antes de usar
Lea todas las instrucciones antes de usar.
Asegúrese de que todos los quemadores estén ubicados
adecuadamente.
Asegúrese de que todas las rejillas estén bien colocadas
antes de usar el quemador.
PRECAUCIÓN
No haga funcionar el quemador durante mucho tiempo sin
una olla en la rejilla.
El acabado de la rejilla puede saltarse cuando no hay una
olla que absorba el calor.
Asegúrese de que los quemadores y las rejillas estén fríos
antes de tocarlos o de colocar una agarradera, un paño de
limpieza u otros materiales sobre ellos.
Tocar las rejillas antes de que se enfríen puede causar
quemaduras.
PRECAUCIÓN
QUÉ HACER SI HUELE A GAS
•
Abra las ventanas.
•
No intente encender ningún aparato.
•
No toque ningún interruptor eléctrico.
•
No use ningún teléfono en su edificio.
•
Llame a su compañía de gas inmediatamente desde
el teléfono de un vecino. Siga las instrucciones de la
compañía de gas.
•
Si no puede comunicarse con su compañía de gas,
llame al departamento de bomberos.
NOTA
Los encendedores con chispa eléctrica de los quemadores
causan un sonido de clic. Todos los encendedores de
chispa de la placa de cocción se activarán cuando se
encienda solo un quemador.
Ubicaciones de los quemadores
La placa de cocción de su estufa de gas tiene cuatro o cinco
quemadores a gas sellados, según el modelo. Estos se pueden
ensamblar y separar. Siga la guía a continuación.
1
4
2
3
1
Quemadores mediano y grande
Los quemadores mediano y grande son los principales
para la mayoría de las cocciones. Estos quemadores
para fines generales se pueden regular de Hi a Lo
para adaptarse a una amplia variedad de necesidades
culinarias.
2
Quemador pequeño
El quemador más pequeño se utiliza para alimentos
delicados como salsas o los que requieren calor bajo
durante un período prolongado de tiempo de cocción.
3
Quemador extra grande
El quemador extra grande es el quemador de máxima
salida. Al igual que los otros cuatro quemadores, se
puede regular de Hi a Lo para adaptarse a una amplia
gama de aplicaciones culinarias. Este quemador también
está diseñado para hacer hervir grandes cantidades de
líquido en poco tiempo. No se debe usar con ollas de
10 pulgadas o más de diámetro.
4
Quemador ovalado
El quemador central ovalado se utiliza para cocinar con
parrilla u ollas ovaladas.

21FUNCIONAMIENTO
ESPAÑOL
Uso de los quemadores de gas de
supercie
1
Asegúrese de que todos los quemadores de superficie y
las rejillas estén colocados en las posiciones adecuadas.
2
Coloque la batería de cocina sobre la rejilla.
3
Empuje la perilla de control y gire hacia la posición Lite.
El sistema de encendido por chispa eléctrica hace un
clic. Una vez encendido el quemador, gire el mando en
sentido anti horario hasta la posición HI para dejar de oír
el ruido del clic.
4
Gire la perilla de control para regular el tamaño de llama.
PRECAUCIÓN
No intente desensamblar o limpiar alrededor de un
quemador mientras otro esté encendido. Todos los
quemadores hacen chispas cuando cualquiera de ellos
está en la posición Lite. Una descarga eléctrica podría
hacer que usted pueda entrar en contacto repentinamente
con un utensilio caliente.
Ajuste del tamaño de llama
Mire la llama, no la perilla mientras reduce el calor. Haga
coincidir el tamaño de la llama con la olla que usará para
calentar más rápido.
PRECAUCIÓN
Nunca permita que las llamas se extiendan hacia arriba
sobre los costados de la olla.
NOTA
•
Las llamas de los quemadores de superficie pueden
volverse amarillas si hay un alto grado de humedad, por
ejemplo si el día es lluvioso o si hay un humidificador
cerca.
•
Despues de la conversión a gas LP, las llamas pueden
ser más grandes de lo normal cuando coloque una olla
en la superficie del quemador.
En caso de apagón
En caso de corte de energía eléctrica, puede encender los
quemadores de superficie de su estufa con una cerilla.
Los quemadores de superficie que estaban en uso al
producirse el apagón seguirán funcionando normalmente.
1
Sostenga una cerilla encendida cerca del quemador,
luego empuje la perilla.
2
Gire la perilla de control hasta llegar a la posición Lo.
PRECAUCIÓN
Tenga mucho cuidado al encender los quemadores con
una cerilla. Esto puede causar quemaduras u otros daños.
Batería de cocina para la supercie de
la estufa
Aluminio
Se recomienda el uso de batería de
cocina de peso medio porque se calienta
más rápido y de manera pareja. La
mayoría de los alimentos se doran
uniformemente en un sartén de aluminio.
Use sartenes con tapas que ajusten bien
cuando cocine con cantidades mínimas
de agua.
Hierro fundido
Si se calienta lentamente, la mayoría
de los sartenes darán resultados
satisfactorios.
Acero inoxidable
Este metal por sí solo tiene propiedades
de calentamiento deficientes y, en
general, se combina con cobre,
aluminio u otros metales para mejorar
la distribución de calor. Los sartenes
de combinación de metales funcionan
bien si se usan con calor medio según
recomienda el fabricante.
Batería de cocina
esmaltada
En ciertas condiciones, el esmalte de la
batería de cocina podría derretirse. Siga
las recomendaciones del fabricante de
la batería de cocina para conocer los
mejores métodos de cocción.
Vidrio
Hay dos tipos de batería de cocina de
vidrio. Para uso en horno y para usar en
la superficie de la estufa.
Vitrocerámica
refractaria
Se puede usar para cocinar en los
quemadores o en el horno. Conduce el
calor lentamente y se enfría del mismo
modo. Verifique las instrucciones del
fabricante de la batería de cocina para
asegurarse de que puedan usarse con
las estufas de gas.

22 FUNCIONAMIENTO
Uso de un wok
Si utiliza un wok, use uno de 14 pulgadas o menos con fondo
plano. Asegúrese de que la base del wok quede nivelada sobre
la rejilla.
Use ollas con fondo
plano
PRECAUCIÓN
No utilice un anillo de soporte para el wok. Si coloca el
anillo sobre el quemador o la rejilla, el quemador podría
funcionar mal, lo que generaría niveles de monóxido de
carbono superiores a los estándares permitidos. Esto
puede ser riesgoso para su salud.
Uso de las rejillas en supercie
No coloque rejillas sobre el quemador.
PRECAUCIÓN
No use rejillas sobre los quemadores de superficie. Si usa
una rejilla sobre el quemador de superficie, la combustión
sería incompleta, lo que generaría niveles de monóxido
de carbono superiores a los estándares permitidos. Esto
puede ser riesgoso para su salud.
Uso de la parrilla
La parrilla recubierta antiadherente brinda una superficie
de cocción extra grande para carnes, panqueques u otros
alimentos que, en general, se preparan en sartén de freír.
NOTA
Es normal que la parrilla se decolore con el tiempo.
Cómo colocar la parrilla: La parrilla solo puede usarse con el
quemador central. La parrilla se debe ubicar correctamente en
la rejilla central, como se indica a continuación.
Frente
PRECAUCIÓN
•
No retire la rejilla central cuando use la parrilla.
•
No retire la placa de la parrilla hasta que las rejillas,
las superficies y la placa de la parrilla estén totalmente
frías.
•
La placa de la parrilla puede calentarse mucho al usar
la placa de cocción, el horno o los sistemas para asar.
Use siempre guantes para horno al colocar o retirar la
placa de la parrilla.
Precaliente la parrilla según la guía a continuación y ajuste
para lograr la configuración deseada.
Tipo de alimentos
Condiciones de
precalentamiento
Ajuste de
cocción
Calentar tortillas - ALTO
Panqueques ALTO 10 min ALTO
Hamburguesas ALTO 10 min ALTO
Huevos fritos ALTO 5 min ALTO
Tocino ALTO 10 min ALTO
Salchichas para el
desayuno
ALTO 10 min ALTO
Sándwiches calientes ALTO 10 min ALTO
NOTA
Después de utilizar la parrilla durante mucho tiempo,
ajuste la configuración de la temperatura de parrilla como
el calor retenido en la parilla.
NOTAS IMPORTANTES
•
Evite cocinar alimentos demasiado grasosos, ya que podría
producirse un derrame de grasa.
•
La parrilla puede calentarse cuando los quemadores
circundantes están en uso.
•
No sobrecaliente la parrilla. Esto puede dañar el
revestimiento antiadherente.
•
No use utensilios metálicos que puedan dañar la superficie.
No utilice la parrilla como tabla para cortar.
•
No coloque ni almacene objetos en la parrilla.

23FUNCIONAMIENTO
ESPAÑOL
El horno
Antes de usar
Lea todas las instrucciones antes de usar.
Asegúrese de que el cable de alimentación y la válvula de
gas estén bien conectados.
Confirme el uso correcto de la estufa para el tipo de
alimento que desee cocinar.
Asegúrese de saber cómo usar el horno (configuración de
temperatura, configuración de tiempo y receta) para mejores
resultados.
PRECAUCIÓN
QUÉ HACER SI HUELE GAS
•
Abra las ventanas.
•
No intente encender ningún aparato.
•
No toque ningún interruptor eléctrico.
•
No use ningún teléfono en su edificio.
•
Llame a su compañía de gas inmediatamente desde
el teléfono de un vecino. Siga las instrucciones de la
compañía de gas.
•
Si no puede comunicarse con su compañía de gas,
llame al departamento de bomberos.
NOTA
Si usa un termómetro en la cavidad del horno, las
temperaturas podrían diferir de la temperatura del horno
configurada con todos los modos.
En caso de apagón, no utilice el horno.
El horno y el asador no se pueden usar durante un apagón.
Si el horno está en uso cuando se produce un apagón, el
quemador del horno se cierra y no puede volver a encenderse
hasta que se restablezca la electricidad. Cuando se haya
restaurado la energía, deberá restablecer el horno (o la función
Asar).
Apagón
PRECAUCIÓN
No intente hacer funcionar el encendido eléctrico durante
un apagón.
No bloquee, toque ni coloque elementos alrededor de la
ventilación del horno durante la cocción.
Su horno se ventila a través de conductos en el centro sobre el
quemador. No bloquee la ventilación del horno cuando cocine
para permitir un flujo de aire adecuado. No toque las aberturas
de ventilación ni las superficies cercanas durante cualquier
operación de la estufa.
– NUNCA bloquee esta ventila.
VENTILA
No cubra la superficie de la placa de cocción con papel
de aluminio. Bloquear la ventila del horno puede dañar el
panel de control.
PRECAUCIÓN
•
No coloque objetos plásticos ni inflamables sobre la
placa de cocción. Se pueden derretir si se dejan muy
cerca de la ventilación.
•
No coloque recipientes cerrados sobre la placa de
cocción. La presión en los recipientes cerrados podría
aumentar, lo que podría hacerlos explotar.
•
Los objetos metálicos se calentarán mucho si los deja
sobre la estufa y podrían causar quemaduras.
•
Los mangos de las ollas y los sartenes podrían
calentarse si se dejan muy cerca de la ventilación.
No cubra las rejillas ni el fondo del horno con papel de
aluminio.
Podría notar condensación en el vidrio de la puerta del
horno.
A medida que el horno se calienta, el aire caliente del horno
puede hacer que aparezca condensación en el vidrio de la
puerta del horno. Estas gotas de agua son inofensivas y se
evaporarán a medida que el horno siga calentándose.

24 FUNCIONAMIENTO
Descripción general del panel de control
Para el modelo : LRG3060**, LRG3061**
1
6 7 8 9 10 11
2 3 4 5
Para el modelo: LRG3193**
1
12 7 8 9 6 11
2 3 4 5
Para el modelo: LRG3194**
12
2 6 8 7 13 11
1 3 4 5

25FUNCIONAMIENTO
ESPAÑOL
1
Bake
Presione el botón para activar la función de horneado normal.
2
Broil
Presiónelo para escoger la función de parrilla.
3
Cook Time
•
Presione y después use los botones + y – para ajustar la
cantidad de tiempo que desee emplear en la cocción de sus
alimentos.
•
El horno se apagara una vez transcurrido el tiempo de cocción.
•
Mantenga presionado el botón durante tres segundos para
configurar la hora del día (Para el modelo: LRG3194)
4
Timer On/Off
•
Presiónelo para escoger una función temporizada.
•
Mantenga presionado el botón durante tres segundos para
seleccionar y configurar los ajustes del horno (Para el
modelo: LRG3194).
5
START
Debe presionarlo para iniciar cualquier función de cocción o
limpieza.
6
Oven Light
Presione el botón para prender o apagar la luz del horno.
7
EasyClean
®
Limpia la suciedad liviana del horno automáticamente.
Consulte “Limpieza Fácil” en la sección “Cuidado y limpieza“.
8
+/–
Introduce o cambia el tiempo y la temperatura del horno. Ajusta
la parrilla en HI o LO (alta o baja).
9
Clock
•
Mantenga presionado el botón por tres segundos, después
use los botones + y – para fijar la hora del día.
•
Mantenga pulsado el tecla durante 3 segundos para cambiar
los ajustes especiales. (para el modelo: LRG3193)
10
Setting
Presione la tecla Settings varias veces para ir cambiando entre
las diferentes configuraciones del horno y modificarlas.
11
CLEAR OFF / Lockout
•
Presione para cancelar todas las funciones del horno
excepto el reloj y el temporizador.
•
Mantenga presionado el botón durante 3 segundos para
activar/desactivar la función de bloqueo del horno.
12
Conv. Bake (Para el modelo: LRG3193, LRG3194)
Presione el botón para escoger la función de horneado por
convección.
13
Self Clean (Autolimpieza) (Para el modelo: LRG3194)
Presione el botón para escoger la función de autolimpieza.
Cambio de las configuraciones
del horno
Clock (Reloj)
El reloj se debe configurar en la hora correcta del día para
que las funciones automáticas del temporizador del horno
funcionen de manera adecuada.
1
Presione Clock (Para el modelo: LRG3060, LRG3061,
LRG3193).
Mantenga presionado el Cook Time botón durante tres
segundos (Para el modelo: LRG3194).
2
Presione el botón +/– para seleccionar la hora del día.
3
Presione Start.
NOTA
•
No se puede cambiar la hora del día durante un
proceso de horneado con temporizador.
•
Si no presiona otras teclas dentro de los 25 segundos
de haber presionado Clock, la pantalla regresa a la
configuración original.
•
Si la hora en pantalla parpadea, podría haber habido
una falla en el suministro eléctrico. Restablezca la hora.
Oven Light (Luz del horno)
La luz interior del horno se enciende de forma automática
cuando se abre la puerta. Presione el Light para encender la
luz del horno de forma manual.
Conguraciones mínimas y máximas
predeterminadas
Todas las funciones detalladas tienen un ajuste mínimo y máximo
de tiempo o temperatura que puede ingresarse en el control.
Cada vez que se presiona una tecla de control, suena un pitido.
Si la entrada de temperatura o tiempo está por debajo de la
configuración mínima o por encima de la máxima para esa
función, suenan dos tonos cortos.
Función
Temp. /
tiempo mín.
Temp. /
tiempo máx.
Valor
predeterminado
Clock (Reloj)
12 h
1:00
h / min
12:59
h / min
24 h
0:00
h / min
23:59
h / min
Timer
(Temporizador)
12 h
0:10
min / seg
11:59
h / min
24 h
0:10
min / seg
11:59
h / min
Cook Time
(Tiempo de
cocción)
12 h
0:01
h / min
11:59
h / min
24 h
0:01
h / min
11:59
h / min
Broil (Asar) Bajo Alto
Bake (Hornear)
170 °F /
80 °C
500 °F /
260 °C
350 °F /
175 °C
EasyClean
®
20 min
(10 min para
LRG3194)
Self Clean
(Autolimpieza)
(Para el modelo
: LRG3194)
2 h 4 h 3 h

26 FUNCIONAMIENTO
Timer On/Off (Temporizador
encendido/apagado)
La función Temporizador encendido/apagado sirve de
temporizador adicional en la estufa y emite un tono cuando
el tiempo configurado se ha agotado. No inicia ni detiene la
cocción.
La función Temporizador encendido/apagado se puede utilizar
durante cualquiera de las funciones de control del horno.
1
Presione el botón Timer On/Off una vez para establecer
el tiempo en horas y minutos, o presione el botón dos
veces para establecer el tiempo en minutos y segundos.
TIMER empezara a parpadear en la pantalla.
2
Presione el botón + o – hasta que aparezca el tiempo
correcto en la pantalla.
3
Presione Timer On/Off para iniciar el temporizador. La
cuenta regresiva del tiempo restante aparece en pantalla.
NOTA
Si no presiona Timer On/Off, la pantalla volverá a mostrar
la hora.
4
Al agotarse el tiempo ajustado, la pantalla mostrara el
mensaje END. El reloj emitirá avisos cada 15 segundos
hasta que presione el botón Timer On/Off.
NOTA
Si el tiempo restante no se indica en pantalla, consúltelo
pulsando el botón Timer On/Off.
Cancelación del Temporizador
1
Presione el Timer On/Off una vez.
La pantalla regresa a la hora del día.
Settings (Ajustes)
Para el modelo: LRG3193, LRG3194
Mantenga presionado Clock durante tres segundos. Luego,
presione la tecla Clock varias veces para ir cambiando entre
las diferentes configuraciones del horno y modificarlas (Para el
modelo: LRG3193).
Mantenga presionado Timer On/Off durante tres segundos.
Luego, presione la tecla Timer On/Off varias veces para ir
cambiando entre las diferentes configuraciones del horno y
modificarlas (Para el modelo: LRG3194).
Para el modelo: LRG3060, LRG3061
Presione la tecla Settings varias veces para ir cambiando
entre las diferentes configuraciones del horno y modificarlas.
La tecla Settings permite:
•
configure el modo de horas en el reloj (12 o 24 horas)
•
ajustar la temperatura del horno
•
activar/desactivar la luz de alarma de precalentamiento
•
configurar el volumen del indicador sonoro
•
cambiar la escala de temperatura entre Fahrenheit y Celsius
•
Fijar la función de Auto Conversion de Convección del horno
Inferior (Para el modelo: LRG3193)
Configuración del modo de hora
El control está configurado para usar un reloj de 12 horas.
Para restablecer el reloj al modo de 24 horas, siga los pasos a
continuación.
Para el modelo: LRG3193, LRG3194
1
Mantenga presionado el botón Clock durante 3 segundos
(Para el modelo: LRG3193).
Mantenga presionado el botón Timer On/Off durante 3
segundos (Para el modelo: LRG3194).
2
Presione el botón +/– o Cook Time para seleccionar entre
el reloj de 12 hrs y el de 24 hrs.
3
Presione el botón Start para aceptar el cambio deseado.
Para el modelo: LRG3060, LRG3061
1
Presione el Settings una vez.
2
Presione el botón +/– o Cook Time para seleccionar
entre el reloj de 12 hrs y el de 24 hrs.
3
Presione el botón Start para aceptar el cambio deseado.
Ajuste del termostato del horno
El horno nuevo podría cocinar de manera diferente a su
horno anterior. Use el horno nuevo durante algunas semanas
para familiarizarse con él antes de cambiar los ajustes de
temperatura. Si, después de familiarizarse con el horno nuevo,
sigue pensando que la temperatura es muy elevada o muy
baja, puede ajustar el termostato del horno.
NOTA
Para comenzar, suba o baje el termostato 15 °F (8 °C).
Pruebe el horno con la nueva configuración. Si el horno
aún necesita ajuste, suba o baje nuevamente el termostato
y utilice el primer ajuste como referencia medidora. Por
ejemplo, si el ajuste fue excesivo, suba o baje el termostato
10 °F (5 °C). Si el ajuste no fue suficiente, suba o baje el
termostato 20 °F (12 °C). Proceda de esta manera hasta
que el horno quede ajustado para su satisfacción.
Para el modelo: LRG3193, LRG3194
1
Mantenga presionado el botón Clock durante 3 segundos
(Para el modelo: LRG3193).
Mantenga presionado el botón Timer On/Off durante 3
segundos (Para el modelo: LRG3194).
2
Presione el Clock varias veces hasta que AdJU
aparezca en la pantalla (Para el modelo: LRG3193).
Presione el Timer On/Off varias veces hasta que AdJU
aparezca en la pantalla (Para el modelo: LRG3194).
3
Usando el botón +, introduzca la cantidad deseada para
incrementar la temperatura.
4
Usando el botón –, introduzca la cantidad deseada para
reducir la temperatura.
5
Presione el Start para aceptar el cambio.

27FUNCIONAMIENTO
ESPAÑOL
Para el modelo: LRG3060, LRG3061
1
Presione el Settings varias veces hasta que AdJU
aparezca en la pantalla.
2
Usando el botón +, introduzca la cantidad deseada para
incrementar la temperatura.
3
Usando el botón –, introduzca la cantidad deseada para
reducir la temperatura.
4
Presione el Start para aceptar el cambio.
NOTA
•
Este ajuste no afecta a las temperaturas de asar. El
ajuste se retiene en la memoria después de una falla
eléctrica. Es posible subir (+) o bajar (-) el termostato
del horno hasta 35 °F o 19 °C.
•
Una vez que haya subido o bajado el termostato, la
pantalla mostrará la temperatura ajustada hasta que la
misma se vuelva a ajustar.
Encendido/apagado de la luz de alarma de
precalentamiento
Cuando el horno alcanza la temperatura programada, la luz de
alarma de precalentamiento parpadea 5 veces o hasta que se
abra la puerta del horno.
Puede activar o desactivar la luz de alarma de
precalentamiento.
Para el modelo: LRG3193, LRG3194
1
Mantenga presionado el botón Clock durante 3
segundos (Para el modelo: LRG3193).
Mantenga presionado el botón Timer On/Off durante 3
segundos (Para el modelo: LRG3194).
2
Presione Clock varias veces hasta que PrE aparezca en
pantalla (Para el modelo: LRG3193).
Presione Timer On/Off varias veces hasta que PrE
aparezca en pantalla (Para el modelo: LRG3194).
3
Presione el +/– para encender/apagar la luz.
4
Presione Start para aceptar el cambio.
Para el modelo: LRG3060, LRG3061
1
Presione Settings varias veces hasta que PrE aparezca
en pantalla.
2
Presione el +/– para encender/apagar la luz.
3
Presione Start para aceptar el cambio.
Ajuste del volumen del indicador sonoro
Para el modelo: LRG3193, LRG3194
1
Mantenga presionado el botón Clock durante 3 segundos
(Para el modelo: LRG3193).
Mantenga presionado el botón Timer On/Off durante 3
segundos (Para el modelo: LRG3194).
2
Presione el Clock varias veces hasta que Beep
aparezca en la pantalla (Para el modelo: LRG3193).
Presione el Timer On/Off varias veces hasta que Beep
aparezca en la pantalla (Para el modelo: LRG3194).
3
Presione el +/– para seleccionar Hi, Lo u Off.
4
Presione el Start para aceptar el cambio.
Para el modelo: LRG3060, LRG3061
1
Presione el Settings varias veces hasta que Beep
aparezca en la pantalla.
2
Presione el +/– para seleccionar Hi, Lo u Off.
3
Presione el Start para aceptar el cambio.
Selección de grados Fahrenheit o Celsius
Configure la visualización de la temperatura del horno para
que muestre unidades Fahrenheit (°F) o Celsius (°C). El ajuste
predeterminado del horno es en unidades Fahrenheit, a menos
que lo cambie el usuario.
Para el modelo: LRG3193, LRG3194
1
Mantenga presionado el botón Clock durante 3
segundos (Para el modelo: LRG3193).
Mantenga presionado el botón Timer On/Off durante 3
segundos (Para el modelo: LRG3194).
2
Presione el Clock varias veces hasta que Unit aparezca
en pantalla (Para el modelo: LRG3193).
Presione el Timer On/Off varias veces hasta que Unit
aparezca en pantalla (Para el modelo: LRG3194).
3
Presione el +/– para seleccionar F (Fahrenheit) o C
(Celsius).
4
Presione el Start para aceptar el cambio.
Para el modelo: LRG3060, LRG3061
1
Presione el Settings varias veces hasta que Unit
aparezca en pantalla.
2
Presione el +/– para seleccionar F (Fahrenheit) o C
(Celsius).
3
Presione el Start para aceptar el cambio.

28 FUNCIONAMIENTO
Como Fijar la función de Auto Conversion de Convección
del horno Inferior (Para el modelo: LRG3193, LRG3194)
Cuando use el horneado por convección, la característica de
funcionamiento de auto conversión, convertirá automáticamente
las temperaturas regulares a temperaturas de convección.
Esta característica de funcionamiento es activada para que la
pantalla muestre la temperatura actual auto convertida. Por
ejemplo, si se introduce una temperatura regular de alguna
receta de 350°F y se toque el tecla q , la pantalla mostrará la
temperatura convertida de 325˚F.
1
Mantenga presionado el botón Clock durante 3 segundos
(Para el modelo: LRG3193).
Mantenga presionado el botón Timer On/Off durante 3
segundos (Para el modelo: LRG3194).
2
Presione el Clock varias veces hasta que Auto aparezca
en la pantalla (Para el modelo: LRG3193).
Presione el Timer On/Off varias veces hasta que Auto
aparezca en la pantalla (Para el modelo: LRG3194).
3
Presione el botón +/- para seleccionar la auto conversión
HABILITAR o DESHABILITAR. .
4
Presione el botón START para confirmar los cambios.
Lockout (Bloqueo)
La función de Lockout (Bloqueo) deshabilita la mayoría de los
controles del horno. No deshabilita el temporizador ni la luz del
horno ni el bloqueo de la puerta.
1
Presione y mantenga presionado el botón Clear/Off por
tres segundos. Sonará un tono, en la pantalla.
2
Para desactivar la característica de bloqueo, presione
y mantenga presionado el botón Clear/Off por tres
segundos.
Cook Time [Timed Cook] (Tiempo de
cocción [Cocción temporizada])
Configure el horno para que realice la cocción durante un período
específico de tiempo mediante la función Cocción temporizada.
Esta función solo puede usarse junto con los modos Bake.
Configuración de la Cocción temporizada
1
Presione el Cook Time.
2
Presione el botón +/– para seleccionar la hora del día.
3
Presione el botón Start. El reloj será fijado, y la pantalla
mostrará el cambio realizado después de un ligero
retraso.
Extracción y colocación de los
estantes del horno
PRECAUCIÓN
•
Coloque los estantes del horno antes de encenderlo
para evitar quemaduras.
•
No cubra los estantes con papel de aluminio ni ningún
otro material, ni coloque nada sobre el fondo del horno.
Si lo hace, podría generar un proceso de horneado
deficiente y dañar la base del horno.
•
Acomode los estantes del horno solo cuando el horno
esté frío.
Extracción de los estantes
1
Con los guantes puestos, sujete el estante del horno*.
2
Tire del estante hacia afuera, sin inclinarlo, hasta que se
detenga.
3
Levante el frente del estante.
4
Tire del estante.
* Siempre que sea posible, ajuste los estantes del horno
antes de usarlo. Use siempre guantes para horno si ajusta los
estantes cuando el horno está encendido.
Colocación de los estantes
1
Con los guantes puestos, coloque el extremo del estante
sobre el soporte*.
2
Incline el extremo frontal del estante hacia arriba.
3
Empuje el estante hacia adentro.
4
Verifique que el estante haya quedado bien colocado.
*Siempre que sea posible, ajuste los estantes del horno antes
de usarlo. Use siempre guantes para horno si ajusta los
estantes cuando el horno está encendido.

29FUNCIONAMIENTO
ESPAÑOL
Guía de recomendaciones para
hornear y rostizar
•
Centre los recipientes para horno sobre los estantes para
lograr mejores resultados de horneado. Si hornea en más de
un recipiente, colóquelos de modo tal que cada uno tenga un
espacio libre de 1" a 1
1
/
2
", como mínimo, a su alrededor. No
permita que los recipientes toquen las paredes del horno.
•
Si está cocinando en un solo estante, coloque el estante
estándar en la posición recomendada en los cuadros que
se muestran en las siguientes páginas. Centre el recipiente
como se indica en la imagen del estante superior de uso
multiple.
•
Si está cocinando en varios estantes en el horno, coloque
los estantes estándar en las posiciones 3 y 5. Para obtener
el mejor resultado, coloque los recipientes como se muestra
en la imagen con varios estantes.
Horneado en varios estantes
Para el modelo: LRG3193, LRG3194
Estante estándar
(Posición 3)
Estante estándar
(Posición 5)
Para el modelo: LRG3060, LRG3061
Estante estándar
(Posición 3)
Estante estándar
(Posición 5)
Horneado en un solo estante
Estante estándar
Bake (Hornear)
La función Hornear se utiliza para preparar alimentos como
pasteles, panes y estofados. Es posible programar el horno
para hornear a cualquier temperatura entre 170 °F (80 °C) y
500 °F (260 °C). La temperatura predeterminada es 350 °F
(175 °C).
Configuración de la función Hornear (por ejemplo, a
375 °F)
1
Presione el botón Bake. Aparecerá en la pantalla 350° y
parpadeará el indicador BAKE.
2
Escoja la temperatura del horno. Presione o mantenga
presionado los botones + o –.
•
Presione el botón + para aumentar la temperatura.
•
Presione el botón – para reducir la temperatura.
3
Presione el botón Start para aceptar el cambio de
temperatura.
A medida que el horno se precalienta, la temperatura
aparece en pantalla y se eleva en incrementos de
5 grados. Una vez que el horno alcanza la temperatura
configurada, suena un tono y la luz del horno se
enciende y se apaga.
4
Cuando la cocción esté completa, Presione el Clear/Off.
5
Retire los alimentos del horno.
Para Cambiar la Temperatura del Horneado durante la
Cocción
1
Presione el botón Bake.
2
A continuación, Pulse el botón + o – hasta que se
muestre la temperatura deseada.
3
Presione el botón Start.

30 FUNCIONAMIENTO
Horneado por Convección (Para el
modelo: LRG3193, LRG3194)
La función de conveccón le permite también cocinar y obtener
excelentes resultados usando multiples parrillas al mismo
tiempo. También puede reducir el tiempo de cocina.
Beneficios del modo CONVECCIÓN HORNEADO
•
Horneado parejo usando múltiples bandejas.
•
Tiempo de cocinado más rapido.
Configuración de la función CONVECTION BAKE
(por ejemplo, 375° F):
1
Presione el botón Conv. Bake. Aparecerá en la pantalla
350° y parpadeará el indicador BAKE.
2
Selecione la temperatura de la estufa. Presione o
mantenga presionado + y - en la pantalla tactil hasta que
la pantalla muestre 375°F.
3
Pulse el botón START para aceptar el cambio de
temperatura.
4
Cuando la cocción ha finalizado o para cancelar,
presione el botón CLEAR OFF.
A medida que el horno se precaliente, la pantalla mostrará la
temperatura que aumenta de a 5 grados. Una vez que el horno
alcance la temperatura configurada, sonará un tono y la luz del
horno parpadeará.
La pantalla mostrará la temperatura del horno convertida
automáticamente a 350°F, CONV.
NOTA
•
Cuando cocine con un ciclo de convección, la
temperatura del horno será automáticamente
reducida en 25°F posteriormente la pantalla mostrara
la temperatura cambiada. Esta característica de
funcionamiento es llamada AUTO CONVERSIÓN. Su
estufa viene con esta característica de funcionamiento
habilitada. Para deshabilitar la característica de auto
conversión, vea “Cómo activar la función de auto
conversión del modo de convección“ en la sección de
“Instrucciones de funcionamiento”.
•
Escuchará un ventilador mientras cocine con
convección. El ventilador parará cuando la puerta
se abra, pero el calor permanecerá encendido. El
ventilador no comenzará a funcionar hasta que el horno
haya alcanzado la temperatura de precalentado.
Cuadro de horneado
Este cuadro solo sirve como referencia y se puede usar para el
horno. Ajuste el tiempo de cocción según su receta.
Tipo de Alimento Posición de la
Bandeja
Tortas congeladas (en bandeja) 2 o 3
Bizcocho, bundt o pasteles 3
Bisquet, mantecada, brownies, galletas,
quequitos, tortas por capas, pays
4
Estofados 4
Asado 1 o 2
NOTA
•
Como la temperatura del horno es cíclica, el termómetro
que esté dentro de la cavidad del horno podría no
indicar la misma temperatura que está configurada.

31FUNCIONAMIENTO
ESPAÑOL
Broil (Asar)
Su horno está diseñado para asar con la puerta cerrada. Al
asar, usa una radiación de calor intensa desde el quemador de
gas superior.
La función Broil funciona mejor cuando se asan cortes de
carne tiernos y finos (1" o menos), aves o pescado.
PRECAUCIÓN
•
No utilice una asadera sin rejilla. El aceite puede
provocar un incendio causado por grasa.
•
No cubra la rejilla ni la asadera con papel de aluminio.
Si lo hace, se prenderá fuego.
•
Siempre use una asadera con rejilla para drenar el
exceso de grasa. Esto ayuda a reducir las salpicaduras,
el humo y las llamaradas ocasionales.
•
Nunca utilice una asadera que no esté bien limpia y
a temperatura ambiente. Si la asadera está dañada,
torcida o tiene suciedad muy adherida, considere
reemplazarla para reducir la cantidad de humo que se
produce durante el asado.
NOTA
•
Use la función Asar en Lo para asar alimentos como
aves y cortes gruesos de carne.
•
Retire la asadera del horno para dejarla enfriar y
limpiarla más fácilmente.
•
Para obtener mejores resultados, utilice una asadera
diseñada para asar, como se muestra a continuación.
La asadera recoge los derrames de grasa y la rejilla
ayuda a evitar salpicaduras de grasa.
Rejilla
Asadera
Cuando asa en un estante, colóquelo en la posición según la
guía de recomendaciones para asar.
Configuración del horno para asar
1
Presione el Broil una vez para Hi y dos veces para Lo.
2
Presione el Start.
3
Permita que el asador se precaliente durante cinco
minutos.
4
Coloque los alimentos en el horno.
5
Cierre la puerta del horno. La puerta del horno debe
estar cerrada mientras está asando.
ADVERTENCIA
Al utilizar su asador, la temperatura dentro del horno es
extremadamente alta. Tome precauciones para evitar
posibles quemaduras. Para ello, debe hacer lo siguiente:
•
Mantener la puerta cerrada al asar.
•
Utilizar siempre guantes para horno al colocar y retirar
alimentos.
El uso incorrecto del asador puede provocar humo
excesivo o un incendio causado por grasa. Las
condiciones de uso incorrecto incluyen, entre otras:
•
Colocar el asador en un nivel de potencia superior al
recomendado.
•
Usar asaderas sucias o grasosas.
•
Asar durante un tiempo de cocción superior al
recomendado.
NOTA
•
Esta área está diseñada para asar a puerta cerrada.
Cierre la puerta para configurar la función Asar. Si
la puerta está abierta, la función Asar no se puede
configurar, y la door se desplaza en la pantalla.
Cierre la puerta y restablezca la función Asar. Abrir
la puerta durante el proceso de asar, hace que se
apague el quemador. Si la puerta se abre durante el
proceso de asar, el quemador se apaga luego de cinco
segundos. El quemador para asar se vuelve a encender
automáticamente una vez cerrada la puerta.
6
Una vez que haya terminado de asar, Presione el Clear/
Off.
NOTA
Durante cualquier función Asar, es normal que el
quemador se encienda y se apague. El encendedor del
quemador del asador en el techo del horno se enciende
de color naranja periódicamente durante la operación de
asado normal.

32 FUNCIONAMIENTO
Guía de recomendaciones para asar
El tamaño, el peso, el espesor, la temperatura inicial y su preferencia de cocción afectarán el tiempo de asado. Esta guía se basa
en carnes a temperatura de refrigerador. Para obtener mejores resultados al asar, use una bandeja especial para asar.
Alimento Cantidad y/o espesor
Posición
del
estante
Primer
lado
(minutos)
Segundo
lado
(minutos)
Comentarios
Carne de vaca
molida
1 lb (4 hamburguesas)
1
/
2
a
3
/
4
" de espesor
6 4-6 3-5
Espaciar de manera uniforme. Se pueden
asar hasta 8 hamburguesas.
Bistecs de carne de
vaca
Poco cocidos
6 7 5
Los bistecs de menos de 1" de espesor se
cocinan totalmente antes de dorarse. Se
recomienda usar un sartén. Corte la grasa.
1" de espesor
1 a 1
1
/
2
lb
Medias 6 12 5-6
Bien cocidos 6 13 8-9
Poco cocidos
1
1
/
2
" de espesor
2 a 2
1
/
2
lb
4 10 6-7
Medias 4 12-15 10-12
Bien cocidos 4 25 16-18
Tostados
1 a 9 piezas
5 1-2 1-2
Pollo 1 entero de hasta
2 a 2
1
/
2
lb, cortado a lo largo
4 pechugas con hueso
2 35-40 25 Pincele ambos lados con mantequilla
derretida.
Ase con el lado de la piel hacia abajo.
2 25-30 10-15
Filetes de pescado
1
/
4
a
1
/
2
" de espesor 5 7-8 6 Mueva y voltee con mucho cuidado.
Pincele con mantequilla y limón antes de la
cocción y durante la cocción si lo desea.
Fetas de jamón
(precocidas)
1" de grosor
1
/
2
" de grosor
3
4
10
7
5
4
Aumente el tiempo de 5 a 10 minutos por lado
para un grosor de 1
1
/
2
" o para jamón ahumado
casero.
Chuletas de cerdo
Bien cocidas
2 (
1
/
2
" de espesor) 4 10 8 Corte la grasa.
2 (1" de espesor) de
alrededor de 1 lb
4 13 8-9
Chuletas de cordero Corte la grasa.
Medias
2 (1" de espesor) de
10 a 12 oz aprox.
5 6 4-7
Bien cocidas 5 10 10
Medias
2 (
1
/
2
" de espesor) alrededor
de 1 lb
5 10 4-6
Bien cocidas 5 17 12-14
Tocino
1
/
2
lb (8 fetas finas aprox.) 4 8 3 Acomode en una sola capa.
Colas de langosta 2-4
6 a 8 oz cada una
3 13-16 No voltee. Corte la parte trasera del caparazón. Abra
bien. Pincele con mantequilla derretida antes
de asar y a la mitad de la cocción.
•
Esta guía es meramente de referencia. Ajuste el tiempo de cocción según su preferencia.
NOTA
La USDA explica que consumir carne, aves o pescado crudos o poco cocinados puede aumentar el riesgo de sufrir
intoxicaciones alimentarias.
La USDA ha indicado las siguientes como las temperaturas internas mínimas de seguridad para el consumo:
•
Carne molida : 160 °F (71,1 °C)
•
Aves: 165 °F (73,9 °C)
•
Carne de vaca, ternera, cerdo o cordero: 145 °F (62,8 °C)
•
Pescado/mariscos: 145 °F (62,8 °C)

33MANTENIMIENTO
ESPAÑOL
MANTENIMIENTO
Hornallas de Gas
PRECAUCIÓN
•
No limpie este electrodoméstico con blanqueador.
•
Para evitar quemaduras, espere hasta que la placa de
cocción se haya enfriado antes de tocarla.
•
Siempre utilice guantes para limpiar la placa de cocción.
Retiro y colocación de los quemadores
de supercie de gas
Es posible retirar las rejillas y las tapas y los cabezales de los
quemadores para limpiarlos y brindarles mantenimiento.
Quemador general
La tapa del quemador está
bien colocada.
La tapa del quemador NO
está bien colocada.
Limpieza de las tapas/los cabezales
del quemador
Para lograr que la llama salga pareja y libremente, las
aberturas en los cabezales de los quemadores deben estar
siempre limpias. Las tapas y los cabezales del quemador (y
el conjunto de tapa y cabezal del quemador oval) se pueden
levantar. No intente retirar la tapa del quemador oval.
•
Lave las tapas del quemador con agua jabonosa caliente
y enjuáguelas con agua limpia. Deje correr el agua sobre
el quemador oval desde el vástago inferior para eliminar la
suciedad.
•
Limpie la placa de cocción con cuidado. Los extremos de
metal puntiagudos de los electrodos de chispa pueden
producir lesiones. Golpear un electrodo con un objeto rígido
puede dañarlo.
•
Para limpiar alimentos quemados, sumerja los cabezales
del quemador en una solución de agua caliente y detergente
líquido suave durante 20 a 30 minutos. Si las manchas son
difíciles de sacar, use un cepillo de dientes o un cepillo de
alambre.
•
Los quemadores no funcionarán bien si los electrodos o los
puertos del quemador están obstruidos o sucios.
•
Los cabezales y las tapas del quemador se deben limpiar
regularmente, especialmente después de derrames
excesivos.
•
Los quemadores no se encenderán si ha retirado la tapa.
PRECAUCIÓN
•
No golpee los electrodos con nada duro. Hacerlo podría
dañarlos.
•
No use lana de acero ni polvos abrasivos para limpiar
los quemadores.
Después de la limpieza de las tapas/los
cabezales del quemador
Sacuda los restos de agua y deje que se sequen bien. Colocar
el quemador oval al revés permitirá que el agua drene con
más facilidad. Vuelva a colocar las tapas y los cabezales de
los quemadores sobre los electrodos en la placa de cocción,
en el lugar correcto de acuerdo a su tamaño. Asegúrese de
que el agujero del cabezal del quemador esté ubicado sobre el
electrodo.

34 MANTENIMIENTO
Rejillas de los quemadores
La estufa incluye tres rejillas profesionales independientes.
Para lograr la estabilidad máxima, estas rejillas solo se deben
usar en la posición correcta. Las dos rejillas laterales se
pueden intercambiar de izquierda a derecha y del frente a la
parte posterior. La rejilla central se puede intercambiar del
frente a la parte posterior.
Para el modelo LRG3060,
LRG3061, LRG3193
Para el modelo LRG3194
Rejilla
lateral
Rejilla
central
Rejilla
lateral
Rejilla
lateral
Rejilla
central
Rejilla
lateral
NOTA
No haga funcionar un quemador durante un período
prolongado sin colocar recipientes sobre la rejilla. El
acabado de la rejilla puede saltarse cuando no hay una
olla que absorba el calor.
Limpieza de las rejillas de los
quemadores
PRECAUCIÓN
•
No levante las rejillas hasta que se hayan enfriado.
•
Las rejillas se deben lavar regularmente y después de
derrames.
•
Lave las rejillas con agua jabonosa caliente y enjuáguelas
con agua limpia.
•
Las rejillas son aptas para lavavajillas.
•
Después de limpiar las rejillas, deje que se sequen
completamente y colóquelas bien sobre los quemadores.
Limpieza de la superficie de la
placa de cocción
PRECAUCIÓN
•
Para evitar quemaduras, no limpie la superficie de la
placa de cocción hasta que se haya enfriado.
•
No levante la superficie de la placa de cocción. Levantar
la superficie de la placa de cocción puede dañar la
estufa o hacer que funcione de forma incorrecta.
Los alimentos con alto contenido de ácido o azúcares pueden
quitar el brillo si se asientan. Lave y enjuague estas manchas
inmediatamente después de que la superficie se haya enfriado.
Si se trata de otros derrames, como salpicaduras de aceite,
grasa, etc., lave con agua y jabón cuando la superficie se haya
enfriado; luego, enjuague y lustre con un paño seco.
Ventilación de aire del horno
Las aberturas de aire están ubicadas en la parte posterior de la
placa de cocción, en las partes superior e inferior de la puerta
del horno y en el fondo de la estufa.
PRECAUCIÓN
•
Los bordes de la ventilación de la estufa son
filosos. Para evitar sufrir lesiones, use guantes cuando
limpie la estufa.
•
Limpie las tapas de ventilación regularmente. No debe
dejar que se acumule grasa en la tapa o el filtro.
NOTA
No bloquee las ventilaciones ni las aberturas de aire
de la estufa. Proporcionan la entrada y la salida de aire
necesario para que la estufa funcione de forma adecuada
con la combustión correcta.

35MANTENIMIENTO
ESPAÑOL
Panel de control
Para evitar que el panel de control se active durante la
limpieza, desenchufe la estufa. Limpie las salpicaduras con
un paño húmedo usando un limpiador para vidrios. Elimine la
suciedad más pesada con una solución de agua tibia jabonosa.
No use ningún tipo de abrasivo.
Perillas y panel del múltiple
delantero
Es mejor limpiar el panel del múltiple cada vez después de
usar el horno. Para limpiarlo, use un paño húmedo y una
solución de agua jabonosa suave o una solución mitad agua y
mitad vinagre. Para enjuagar, use agua limpia y lustre con un
paño suave.
PRECAUCIÓN
•
No use limpiadores abrasivos, limpiadores líquidos
fuertes, esponjas abrasivas plásticas o limpiadores
para horno en el panel del múltiple. Hacerlo dañará el
acabado.
•
No intente doblar las perillas moviéndolas hacia arriba
o hacia abajo y no cuelgue toallas ni otros objetos de
ellas. Puede dañar el eje de la válvula de gas.
•
Las perillas de control se pueden quitar para limpiarlas
fácilmente.
•
Para limpiar las perillas, asegúrese de que estén en la
posición Off y sáquelas de los vástagos.
•
Para volver a colocarlas, asegúrese de que la perilla
esté colocada en la posición Off centrada en la parte
superior y deslice la perilla directamente sobre el
vástago.
NOTA
Para evitar las rayas, no use limpiadores abrasivos en
ninguno de estos materiales.
Limpieza del exterior
Reborde decorativo y pintado
Para la limpieza general, use un paño con agua jabonosa
caliente. En el caso de suciedad más difícil y grasa acumulada,
aplique detergente líquido directamente sobre la suciedad.
Déjelo reposar allí entre 30 y 60 minutos. Enjuague con un
paño húmedo y seque. No use limpiadores abrasivos.
Supercies de acero inoxidable
Para evitar hacer rayones, no use esponjas de lana de acero.
1
Coloque una pequeña cantidad de limpiador o pulimento
para electrodomésticos de acero inoxidable en un paño o
una toalla de papel húmedos.
2
Limpie un área pequeña y friegue siguiendo el grano del
acero inoxidable si corresponde.
3
Seque y saque brillo con un paño suave o una toalla de
papel secos y limpios.
4
Repita si fuera necesario.
NOTA
•
No utilice una esponja de lana de acero, ya que rayará
la superficie.
•
Para limpiar la superficie de acero inoxidable, utilice
agua tibia jabonosa o un limpiador o pulimento para
acero inoxidable.
•
Limpie siempre en la dirección del acabado de la
superficie de metal.
•
Para averiguar dónde comprar un limpiador o pulimento
para acero inoxidable, o para saber la ubicación del
distribuidor más cercano, comuníquese con el servicio
de atención al cliente al número de teléfono gratuito:
1-800-243-0000 (EE. UU.) 1-888-542-2623 (Canadá)
o visite nuestro sitio web en: www.lg.com
Puerta del horno
•
Use agua jabonosa para limpiar bien la puerta del horno.
Enjuague bien. No sumerja la puerta en agua.
•
Puede usar un limpiador para vidrios en la parte externa de
la puerta del horno. No rocíe agua ni limpiador para vidrios
en las ventilaciones de la puerta.
•
No use limpiadores para horno, polvos limpiadores ni
materiales abrasivos de limpieza en el exterior de la puerta
del horno.
•
No limpie la junta de la puerta del horno. La junta está hecha
de material tejido que es fundamental para lograr un buen
sellado. Se debe tener cuidado de no frotar, dañar ni quitar
esta junta.
PRECAUCIÓN
No use limpiadores fuertes ni materiales abrasivos de
limpieza en el exterior de la puerta del horno. Si lo hace,
puede dañarlo.
No limpie
manualmente
la junta de
la puerta del
horno
No limpie
manualmente
la puerta

36 MANTENIMIENTO
Instrucciones para el cuidado
de la puerta
La mayoría de las puertas de hornos contienen un vidrio que
puede romperse.
PRECAUCIÓN
•
No cierre la puerta del horno hasta que todos los
estantes estén bien colocados en su lugar.
•
No golpee el vidrio con ollas, sartenes ni con ningún
otro objeto.
•
Si se raya, golpea, hace vibrar o fuerza el vidrio, se
puede debilitar su estructura, lo que aumenta el riesgo
de rotura más adelante.
Estantes del horno
1
Los alimentos derramados en las guías pueden atascar
los estantes. Limpie con un limpiador abrasivo suave.
2
Enjuague con agua limpia y seque.
EasyClean
®
La tecnología esmaltada de LG EasyClean
®
ofrece dos
opciones de limpieza para el interior de la estufa. La función
EasyClean
®
se beneficia con el nuevo esmalte de LG, ya que
ayuda a despegar la suciedad sin usar químicos fuertes, y
funciona SOLAMENTE CON AGUA durante apenas 20 minutos
(10 minutos para LRG3194) a baja temperatura para aflojar la
suciedad LEVE antes de la limpieza manual.
Si bien la función EasyClean
®
es rápida y eficaz para la
suciedad LEVE y pequeña, la función Autolimpieza se puede
usar para quitar suciedad DIFÍCIL acumulada. La intensidad y
la alta temperatura del ciclo de Autolimpieza pueden producir
humo, por lo que habrá que abrir las ventanas para ventilar.
En comparación con el proceso más intenso de Autolimpieza,
el horno LG le brinda la opción de limpiar con MENOS
CALOR, en MENOS TIEMPO y, prácticamente, SIN HUMO NI
VAPORES.
Beneficios de EasyClean
®
•
Ayuda a aflojar la suciedad leve antes de la limpieza manual
•
EasyClean
®
solo usa agua; no usa limpiadores químicos.
•
Favorece una mejor experiencia de autolimpieza
- Demora la necesidad de un ciclo de autolimpieza
- Minimiza el humo y los olores
- Puede acortar el tiempo de la autolimpieza
NOTA
Algunos modelos no proveen la opción para la función
Self Clean y solo proveen la función de Easy Clean. La
función Easy Clean puede no ser efectiva para quitar
suciedades EXCESIVAS. Si su estufa no provee la función
Self Clean, use la función Easy Clean y limpie su horno
continuamente antes de que se generen suciedades
EXCESIVAS.
Cuándo usar EasyClean
®
Método sugerido de
limpieza
Ejemplo de suciedad en el horno
Forma de la
suciedad
Tipos de
suciedad
Alimentos comunes que
pueden ensuciar el horno
EasyClean
®
Gotitas o
manchitas
Queso u otros
ingredientes
Pizza
Salpicadura leve Grasa/aceite
Bistecs, asados
Pescado, asado
Carne rostizada a baja
temperatura
Self Clean*
(Autolimpieza)
Salpicadura
mediana a
grande
Grasa/aceite
Carne rostizada a alta
temperatura
Gotas o
manchas
Relleno o
suciedad de
alimentos con
azúcar
Tartas
Crema o salsa
de tomate
Estofados
* El ciclo Autolimpieza puede usarse para suciedad que se haya acumulado con el tiempo.

37MANTENIMIENTO
ESPAÑOL
Guía de instrucciones de EasyClean
®
1
Quite los estantes y los accesorios del horno.
2
Raspe y retire los residuos quemados con un raspador
plástico.
Raspadores plásticos sugeridos:
•
Espátula de plástico dura
•
Raspador plástico para bandejas
•
Raspador plástico para pintura
•
Tarjeta de crédito vieja
3
Llene el bote con agua y use el atomizador las superficies
laterales dentro de la cavidad del horno.
4
Use al menos
1
/
5
de agua del bote para mojar las parte
sucias de las superficies laterales y en las esquinas de la
estufa.
5
Atomice o eche
4
/
5
de agua abajo, en el centro de la
cavidad. La superficie abajo de la estufa debe estar
completamente cubierta para mojar todos los residuos.
Añade agua si es necesario.
NOTA
Si limpia varias estufas, use del bote entero lleno de agua
para limpiar cada estufa. No rocíe agua directamente en
la puerta. Si lo hace, el agua chorreará al piso.
6
Cierre la puerta del horno.
Presione el EasyClean
®
.
Presione el Start.
PRECAUCIÓN
•
Algunas superficies pueden quedar calientes después
del ciclo EasyClean
®
. Use guantes de goma cuando
limpie para evitar quemaduras.
•
Durante el ciclo EasyClean
®
, el horno se calienta lo
suficiente como para provocar quemaduras. Espere
hasta que el ciclo termine antes de limpiar la superficie
interna del horno. Si no espera, podría quemarse.
•
Evite apoyarse o recargarse en el vidrio de la puerta del
horno mientras limpia la cavidad del horno.
7
Sonará un tono al final del ciclo de 20 minutos (10
minutos para LRG3194). Presione el Clear/Off para
borrar la pantalla y finalizar el tono.
8
Después del ciclo de limpieza y durante la limpieza
manual, debe quedar suficiente agua en la base del
horno para sumergir completamente la suciedad.
Agregue agua si fuera necesario. Coloque una toalla en
el piso frente al horno para absorber el agua que pueda
derramarse durante la limpieza manual.
9
Limpie la cavidad del horno inmediatamente después del
ciclo EasyClean
®
. Para ello, friegue con una esponja o
un paño de limpieza húmedos que no rayen. (El lado
para refregar no rayará el acabado.) Se puede derramar
un poco de agua en las ventilaciones de la base cuando
se realice la limpieza, pero se
recogerá en una bandeja que está
debajo de la cavidad del horno y no
dañará el quemador.
NOTA
No use esponjas de acero ni paños o limpiadores
abrasivos, ya que estos materiales pueden dañar en
forma permanente la superficie del horno.
10
Una vez que haya limpiado la cavidad del horno, quite
el exceso de agua con una toalla limpia y seca. Vuelva
a colocar los estantes y los demás accesorios.
11
Si queda alguna suciedad leve, repita los pasos
anteriores y asegúrese de empapar bien las áreas
sucias. Si queda suciedad rebelde después de varios
ciclos EasyClean
®
.
NOTA
•
Si olvida saturar el interior del horno con agua antes
de comenzar con EasyClean
®
, toque Clear/Off para
finalizar el ciclo. Espere que la estufa se enfríe a
temperatura ambiente y, luego, rocíe o vierta agua en el
horno y comience otro ciclo EasyClean
®
.
•
La junta de la cavidad puede quedar mojada cuando
termine el ciclo EasyClean
®
. Esto es normal. No limpie
la junta.
•
Si quedan depósitos minerales en la base del horno
después de la limpieza, use un paño o una esponja
impregnada en vinagre para quitarlos.
Consejos de limpieza
•
Permita que el horno se enfríe a temperatura ambiente antes
de usar el ciclo EasyClean
®
. Si la cavidad del horno alcanza
una temperatura superior a 150 °F (65 °C), Hot aparecerá
en la pantalla y el ciclo EasyClean
®
no se activará hasta
que la cavidad del horno se enfríe.
•
Puede resultar de ayuda usar el lado áspero de una esponja
que no raye para quitar manchas quemadas mejor que con
una esponja blanda o una toalla.
•
Algunas esponjas que no rayan, como las hechas de
espuma de melamina, disponibles en las tiendas locales,
también pueden ayudar a mejorar la limpieza.
•
La estufa debe estar nivelada para asegurar que la superficie
inferior de la cavidad del horno esté completamente cubierta
con agua al comienzo del ciclo EasyClean
®
.
•
Para obtener mejores resultados, use agua destilada o
filtrada. El agua del grifo puede dejar depósitos minerales en
la base del horno.
•
La suciedad quemada en varios ciclos de cocción será más
difícil de quitar con el ciclo EasyClean
®
.
•
No abra la puerta del horno durante el ciclo EasyClean
®
. El
agua no se calienta lo suficiente si se abre la puerta durante
este ciclo.

38 MANTENIMIENTO
Self Clean (Autolimpieza)
(Para el modelo : LRG3194)
El ciclo de Autolimpieza usa temperaturas sumamente altas
para limpiar la cavidad del horno. Mientras se ejecute el ciclo
de Autolimpieza, es posible que perciba humo u olor. Esto es
normal, especialmente si el horno está muy sucio.
Durante el ciclo de Autolimpieza, se debe ventilar bien la
cocina para minimizar los olores de la limpieza.
Antes de comenzar la autolimpieza
•
Quite los estantes del horno, la asadera, la rejilla de la
asadera, cualquier recipiente, el papel aluminio y cualquier
otro material del horno.
•
La cocina debe estar bien ventilada para minimizar los
olores de la limpieza.
•
Limpie los derrames notorios de la base del horno.
•
Asegúrese de que la tapa de la bombilla de la luz del horno
esté en su lugar y de que la luz esté apagada.
•
La luz de horno no puede encenderse durante un ciclo de
Autolimpieza. La luz del horno no puede encenderse hasta
que la temperatura haya descendido a menos de
500 ˚F (260 ˚C) después de que se haya completado un
ciclo de Autolimpieza.
PRECAUCIÓN
•
No deje a niños pequeños sin supervisión cerca del
aparato. Durante el ciclo de Autolimpieza, el exterior de
la cocina puede estar muy caliente al tacto.
•
Si tiene aves domésticas, llévelas a otra sala bien
ventilada. La salud de algunas aves es muy sensible
a los vapores que emanan durante el ciclo de
Autolimpieza de cualquier cocina.
•
No recubra las paredes del horno, los estantes, el fondo
ni ninguna otra parte de la cocina con papel de aluminio
ni con ningún otro material. Hacer esto destruye la
distribución de calor, produce resultados de horneado
deficientes y causa daños permanentes al interior del
horno (el papel de aluminio se fundiría en la superficie
interior del horno).
•
No fuerce la puerta del horno para abrirla. Podría dañar
el sistema automático de bloqueo de la puerta. Tenga
cuidado cuando abra la puerta del horno después
del ciclo de autolimpieza. Póngase al lado del horno
cuando abra la puerta para dejar que salgan el aire y
el vapor calientes. El horno todavía puede estar MUY
CALIENTE.
Durante el ciclo de Autolimpieza, no se pueden usar las
hornallas de la placa de cocción ni el cajón calentador.
NOTA
•
Quite los estantes del horno y los accesorios antes de
iniciar el ciclo de Autolimpieza.
•
Si se dejan los estantes en la cavidad del horno durante
el ciclo de Autolimpieza, cambiarán de color y será
difícil deslizarlos para ponerlos o sacarlos.
•
Limpie el marco del horno y la puerta con agua
jabonosa caliente. Enjuague bien.
•
No limpie la junta. La fibra de vidrio de la junta de la
puerta no resiste la abrasión. Es fundamental que la
junta permanezca intacta. Si nota que está gastada o
deshilachada, reemplácela.
•
Limpie los derrames notorios que haya en la base del
horno.
•
Asegúrese de que la tapa de la bombilla de la luz del
horno esté en su lugar y de que la luz esté apagada.
•
Es normal que el ventilador funcione durante el ciclo
Autolimpieza.
Ajuste de autolimpieza
La función Autolimpieza tiene ciclos de 2, 3, o 4 horas.
Guía de suciedad para autolimpieza
Nivel de suciedad Ajuste del ciclo
Cavidad del horno levemente sucia
Autolimpieza de
2 horas
Cavidad del horno moderadamente
sucia
Autolimpieza de
3 horas
Cavidad del horno muy sucia
Autolimpieza de
4 horas
1
Quite todos los estantes y los accesorios del horno.
2
Presione el botón Self Clean. El horno comienza, de
manera predeterminada, la limpieza automática de tres
horas recomendada para un horno moderadamente
sucio. Presione los botones más(+) o menos(-) para
seleccionar el tiempo de autolimpieza de 2 a 4 horas.
3
Presione Start.
4
Una vez que esté configurado el ciclo de autolimpieza,
la puerta del horno se traba automáticamente y aparece
el icono del candado. No podrá abrir la puerta del horno
hasta que el horno se haya enfriado. El bloqueo se abrirá
automáticamente cuando el horno se haya enfriado.
PRECAUCIÓN
No fuerce la puerta del horno para abrirla cuando vea el
icono del candado. La puerta permanece trabada hasta
que baja la temperatura del horno. Si abre la puerta a la
fuerza, se dañará.

39MANTENIMIENTO
ESPAÑOL
Conguración de Autolimpieza con
inicio retardado
1
Quite todos los estantes y los accesorios del horno.
2
Gire la perilla de modo del horno hasta seleccionar
el modo Self Clean. El horno comienza, de manera
predeterminada, la limpieza automática de tres
horas recomendada para un horno moderadamente
sucio. Presione los botones más(+) o menos(-) para
seleccionar un tiempo de autolimpieza de 2 a 4 horas.
3
Presione Start Time.
4
Presione los botones más(+) o menos(-) para ingresar la
hora del día en que desea que inicie la autolimpieza.
5
Presione Start.
NOTA
Puede que sea necesario cancelar o interrumpir el ciclo de
Autolimpieza debido a exceso de humo o la presencia de
fuego en el horno. Para cancelar la función Autolimpieza,
gire la perilla de modo del horno hasta la posición Off.
Durante la Autolimpieza
•
El ciclo de Autolimpieza usa temperaturas sumamente altas
para limpiar la cavidad del horno. Mientras se ejecute el
ciclo de Autolimpieza, es posible que perciba humo u olor.
Esto es normal; especialmente si el horno está muy sucio.
•
A medida que el horno se calienta, es posible que escuche
ruido de la expansión y contracción de las piezas metálicas.
Es normal y no dañará el horno.
•
No fuerce la puerta del horno para abrirla cuando vea el
icono del candado
. La puerta permanece trabada hasta
que baja la temperatura del horno. Si abre la puerta a la
fuerza, se dañará.
Después del ciclo de Autolimpieza
•
La puerta permanece trabada hasta que baja la temperatura
del horno.
•
Es posible que note un poco de ceniza blanca en el horno.
Límpiela con un paño húmedo o una esponja de lana de
acero con jabón después de que el horno se enfríe. Si el
horno no está limpio después de un ciclo de autolimpieza,
repita el ciclo.
•
Si se dejaron los estantes en el horno y no se deslizan bien
después de un ciclo de autolimpieza, aplique a los estantes
y sus soportes un poco de aceite vegetal para que se
desplacen con facilidad.
•
Pueden aparecer líneas finas en la porcelana porque fue
sometida al calentamiento y enfriado. Esto normal y no
afecta su desempeño.
NOTA
•
No se puede iniciar un ciclo de Autolimpieza si está
activa la función Bloqueo.
•
Una vez que se haya configurado el ciclo de
Autolimpieza, la puerta del horno se traba
automáticamente. No podrá abrir la puerta del horno
hasta que el horno se haya enfriado. El bloqueo se
libera automáticamente.
•
Una vez que la puerta se haya trabado, la luz
indicadora de bloqueo
dejará de parpadear y
quedará encendida. Espere unos 15 segundos para
que se active la traba de la puerta del horno.
•
Si el reloj está configurado para una visualización de
12 horas (predeterminado), la autolimpieza retardada
nunca se puede iniciar con más de 12 horas de
anticipación.
•
Luego de que se apague el horno, el ventilador de
convección seguirá funcionando hasta que el horno se
haya enfriado.

40 MANTENIMIENTO
Cambio de la luz del horno
La luz del horno es una bombilla estándar para
electrodomésticos de 40 vatios. Se enciende cuando se abre
la puerta del horno. Cuando la puerta del horno está cerrada,
presione el botón Light para encenderla o apagarla.
ADVERTENCIA
•
Asegúrese de que el horno y la bombilla estén fríos.
•
Desconecte la energía eléctrica de la estufa desde
el fusible principal o el panel disyuntor. El no hacerlo
podría causar lesiones graves, descargas eléctricas o
la muerte.
1
Desenchufe la estufa o desconecte la electricidad.
2
Para quitar la tapa de vidrio de la bombilla, que se
encuentra en la parte trasera del horno, gírela hacia la
izquierda.
3
Gire la bombilla hacia la izquierda para quitarla del
receptáculo.
4
Inserte la bombilla nueva y gírela hacia la derecha.
5
Inserte la tapa de vidrio de la bombilla y gírela hacia la
derecha.
6
Enchufe la estufa o vuelva a conectar la electricidad.
Retirar y reemplazar la puerta
removible del horno y el cajón
PRECAUCIÓN
•
Tenga cuidado cuando quite y levante la puerta.
•
No levante la puerta de la manija. La puerta es muy
pesada.
Retirar la puerta.
1
Abra totalmente la puerta.
2
Desbloquee las trabas de las bisagras. Para ello, gírelas
alejándolas lo más posible del marco de la puerta
abierta.
Ranura
Traba
Destraba
Traba de
la bisagra
3
Tome firmemente ambos lados de la puerta desde la
parte superior.
4
Cierre la puerta hasta la posición de remoción
(aproximadamente cinco grados), que es a mitad de
la distancia entre la posición de tope del asador y
totalmente cerrada. Si la posición es correcta, los brazos
de las bisagras se moverán libremente.
aprox. 5º
5
Levante la puerta y tire hacia fuera hasta que los brazos
de las bisagras salgan de las ranuras.

41MANTENIMIENTO
ESPAÑOL
Colocación de la puerta
1
Tome firmemente ambos lados de la puerta desde la
parte superior.
2
Con la puerta en el mismo ángulo que la posición de
removido, apoye la hendidura de los brazos de las
bisagras en el borde inferior de las ranuras de las
bisagras. Las muescas de los brazos de las bisagras
deben estar totalmente apoyadas en el borde inferior de
las ranuras.
Brazo de la
bisagra
Hendidura
Borde inferior
de la ranura
3
Abra totalmente la puerta. Si la puerta no se abre
completamente, la hendidura no está bien apoyada en el
borde inferior de la ranura.
4
Bloquee las trabas. Para ello, gírelas nuevamente hacia
las ranuras del marco del horno hasta que traben.
Brazo de la bisagra
Traba de la bisagra
5
Cierre la puerta del horno.
Retirar el cajón
PRECAUCIÓN
Desconecte la energía eléctrica de la estufa desde el
fusible principal o el panel disyuntor. El no hacerlo podría
causar lesiones graves, descargas eléctricas o la muerte.
La mayor parte de la limpieza se puede realizar con el cajón
puesto; sin embargo, el cajón puede extraerse si se necesita
realizar una limpieza adicional. Use agua caliente para limpiar
a fondo.
1
Abra totalmente el cajón.
2
Localice las palancas de deslizamiento a ambos
lados del cajón. Presione la palanca de deslizamiento
izquierda hacia abajo y tire hacia arriba la palanca de
deslizamiento derecha.
Palanca
Empuje hacia abajo con
el dedo
Levante con el dedo
Palanca
3
Retire el cajón de la estufa.
Reemplazo del cajón
1
Lleve las correderas de apoyo a la parte delantera de la
corredera del chasis.
2
Alinee las correderas de cada lado del cajón con las
ranuras de las correderas de la estufa.
3
Empuje el cajón en la estufa hasta que las palancas
hagan clic (aproximadamente 2 pulgadas).
4
Tire nuevamente del cajón para abrirlo y encajar las
correderas de apoyo en su lugar.

42 SOLUCIÓN DE PROBLEMAS
SOLUCIÓN DE
PROBLEMAS
PREGUNTAS FRECUENTES
¿Qué tipo de batería de cocina se recomienda para usar
con la placa de cocción?
•
Los sartenes deben tener fondo plano y laterales rectos.
•
Use solamente sartenes gruesos.
•
El tamaño del sartén debe coincidir con la cantidad de
comida que se preparará y el tamaño de la hornalla.
•
Use tapas herméticas.
•
Use solamente woks de fondo plano.
Mi nuevo horno no cocina como el que tenía antes. ¿Hay
algo mal con los ajustes de temperatura?
No, su horno fue probado y calibrado en la fábrica. Durante
los primeros usos, siga cuidadosamente los tiempos y las
temperaturas de su receta. Si todavía piensa que el horno
nuevo es muy caliente o muy frío, puede ajustar usted la
temperatura del horno para adecuarla a sus necesidades
específicas de cocción. Consulte la sección de Ajuste
de temperatura del horno de este manual para obtener
instrucciones fáciles sobre cómo ajustar el termostato.
¿Es normal que se escuche un chasquido que proviene de
la parte trasera del horno cuando lo uso?
Su nueva estufa está diseñada para mantener un control
estricto de la temperatura del horno. Es posible que escuche
los elementos calentadores del horno hacer un chasquido
al encenderse y apagarse con más frecuencia en su horno
nuevo. Esto es NORMAL.
¿Por qué la hora parpadea?
Esto significa que el producto acaba de enchufarse o que ha
habido una interrupción del suministro eléctrico. Para borrar la
hora que parpadea, presione cualquier botón y restablezca el
reloj si es necesario.
¿Puedo usar papel de aluminio para que recolecte las
gotas en la cavidad del horno?
Nunca utilice papel de aluminio para revestir la base o los
costados del horno o el cajón calentador. El papel se derretirá
y se pegará a la superficie del fondo del horno y no se podrá
quitar. En lugar de eso, coloque una bandeja sobre un estante
inferior del horno y úsela para recolectar las gotas. (Si ya se
ha derretido papel de aluminio en el fondo del horno, esto no
interferirá con el rendimiento del horno).
¿Puedo usar papel de aluminio en los estantes?
No cubra los estantes con papel de aluminio. Cubrir estantes
por completo con papel de aluminio restringe el flujo de aire, lo
que se traduce en resultados de cocción deficientes. Coloque
una bandeja cubierta con papel de aluminio debajo de tartas
de frutas u otros alimentos ácidos o dulces para evitar que los
derrames dañen el acabado del horno.
PRECAUCIÓN
Puede utilizarse papel de aluminio para envolver los
alimentos dentro del horno o el cajón de calentamiento,
pero no permita que el papel de aluminio entre en contacto
con los elementos calentadores del horno expuestos. El
papel de aluminio podría derretirse o prenderse fuego, lo
que ocasionaría humo, un incendio o lesiones.
¿Qué debo hacer si los estantes están pegajosos y es
difícil deslizarlos hacia dentro y hacia fuera?
Con el tiempo, se puede hacer difícil deslizar los estantes.
Aplique una pequeña cantidad de aceite de oliva en los
extremos de los estantes. Este actuará como lubricante para
un deslizamiento mejor.
¿Qué debo hacer para quitar manchas difíciles de la placa
de cocción?
La placa de cocción debe limpiarse después de cada uso para
evitar que queden manchas permanentes. Cuando cocine
alimentos con alto contenido de azúcar, como salsa de tomate,
se recomienda limpiar la mancha con una espátula mientras
la placa de cocción todavía esté tibia. Use un guante para
horno cuando raspe para evitar quemarse. Consulte la sección
MANTENIMIENTO del presente manual del usuario para
obtener más instrucciones.

43SOLUCIÓN DE PROBLEMAS
ESPAÑOL
¿Por qué no funcionan los botones de función?
Asegúrese de que la estufa no esté en modo Bloqueo. El
LOCKED aparecerá en la pantalla si el modo de bloqueo
está activado. Para desactivarlo, presione el Clear/Off y
manténgalo presionado durante tres segundos.
Mi estufa todavía está sucia después de ejecutar el ciclo
EasyClean
®
. ¿Qué más debo hacer?
El ciclo EasyClean
®
solo ayuda a aflojar la suciedad leve de la
estufa con horno para ayudar en la limpieza manual del horno.
No quita automáticamente toda la suciedad después del ciclo.
Es posible que necesite fregar la estufa con horno después de
haber ejecutado el ciclo EasyClean
®
.
Probé fregar el horno después de ejecutar EasyClean
®
,
pero hay suciedad que queda. ¿Qué puedo hacer?
La función EasyClean
®
tiene un mejor resultado cuando la
suciedad se empapa y sumerge totalmente en agua antes de
ejecutar el ciclo y durante la limpieza manual. Si la suciedad
no está muy empapada en agua, puede afectar negativamente
el desempeño de la limpieza. Repita el proceso EasyClean
®
utilizando suficiente agua.
La suciedad de azúcar y algunos residuos grasosos son
particularmente difíciles de limpiar.
La suciedad de las paredes del horno no sale. ¿Cómo
puedo dejar limpias las paredes?
La suciedad en las paredes laterales y traseras de su estufa
con horno puede resultar más difícil de empapar con agua.
Intente repetir el proceso EasyClean
®
se recomienda con más
de
1
/
5
de capacidad en el atomizador.
¿EasyClean
®
quita toda la suciedad y las manchas
completamente?
Depende del tipo de suciedad. Las manchas de azúcar y
algunas de grasa son particularmente difíciles de limpiar.
Además, si las manchas no están muy empapadas en agua,
esto puede afectar negativamente el desempeño de la
limpieza.
¿Debo usar toda el contenido del atomizador para realizar
el ciclo de EasyClean
®
?
Sí. Es recomendable rociar o verter
4
/
5
de agua en la base y
el resto del agua (
1
/
5
) en las paredes, para un mejor resultado
de limpieza, verter sobre las otras áreas sucias para saturar
totalmente la suciedad
Veo humo que sale de las ventilaciones de la placa de
cocción de la estufa durante el ciclo de EasyClean
®
. ¿Es
normal?
Esto es normal. No es humo. En realidad, es vapor de agua
del agua que está en la cavidad del horno. Cuando el horno
se calienta brevemente durante EasyClean
®
, el agua de la
cavidad se evapora y sale por las ventilaciones del horno.
¿Con cuánta frecuencia debo usar EasyClean
®
?
EasyClean
®
se puede usar las veces que desee. EasyClean
®
funciona mejor cuando el horno está LEVEMENTE sucio, por
ejemplo, con salpicaduras de grasa LEVES y gotitas de queso.
Consulte la sección EasyClean
®
del manual del propietario
para obtener más información.
¿Qué se necesita para EasyClean™?
El atomizador con agua, una espátula, una esponja anti-
ralladuras y una toalla. No debe usar esponjas abrasivas como
las de trabajo pesado ni lana de acero.
¿Es seguro derramar agua en las ventilaciones del fondo
del horno durante la limpieza?
No hay problema si se derrama un poco de agua en las
ventilaciones del fondo del horno (estufa de gas). Sin embargo,
se recomienda intentar evitar derramar demasiada agua en las
ventilaciones.

44 SOLUCIÓN DE PROBLEMAS
Antes de llamar al servicio técnico
Antes de llamar para solicitar servicio, revise esta lista. Puede ahorrarle tiempo y gastos. La lista incluye sucesos comunes que no
son consecuencia de problemas de fabricación ni de los materiales de este aparato.
Síntomas Causas / soluciones posibles
Los quemadores
superiores no se
encienden o no arden de
forma pareja.
•
Asegúrese de que el enchufe esté conectado a un toma funcional y conectado a tierra.
•
Quite los quemadores y límpielos. Revise el área de los electrodos en búsqueda de alimentos
o grasa quemada. Consulte Limpieza de las tapas/los cabezales del quemador en la sección
MANTENIMIENTO.
•
Asegúrese de que las partes del quemador estén bien instaladas.
Consulte Retiro y colocación de los quemadores de superficie de gas en la sección
MANTENIMIENTO.
Las llamas del quemador
son muy altas o amarillas.
Si la cocina está conectada a gas LP, comuníquese con el técnico que instaló la cocina o que
realizó la conversión.
Los quemadores de la
superficie se encienden,
pero el horno no lo hace.
Asegúrese de que la válvula de corte de gas del horno, ubicada detrás de la cocina, este
totalmente abierta.
La comida no se hornea ni
se rostiza correctamente.
•
Los controles del horno están mal configurados. Consulte Descripción general del panel de
control en la sección FUNCIONAMIENTO.
•
Los estantes están mal posicionados. Consulte Extracción y colocación de los estantes del
horno en la sección FUNCIONAMIENTO.
•
Está usando recipientes incorrectos. Consulte Horneado por convección en la sección
FUNCIONAMIENTO.
•
Debe ajustar el termostato del horno.
•
Consulte Ajuste del termostato del horno en la sección FUNCIONAMIENTO.
•
El reloj no está bien configurado. Consulte Cambio de las configuraciones del horno en la
sección FUNCIONAMIENTO.
•
El papel de aluminio se usa de forma incorrecta en el horno. Consulte Extracción y colocación
de los estantes del horno.
Los alimentos no se
asan correctamente en el
horno.
•
Los controles del horno están mal configurados. Consulte Descripción general del panel de
control en la sección FUNCIONAMIENTO.
•
La puerta del horno no está cerrada. Consulte Asar en la sección FUNCIONAMIENTO.
•
Se usó papel de aluminio en la asadera y la rejilla no se colocó correctamente.
La temperatura del horno
es muy alta o muy baja.
Debe ajustar el termostato del horno. Consulte Ajuste del termostato del horno en la sección
FUNCIONAMIENTO.
El reloj y el temporizador
no funcionan.
•
Asegúrese de que el enchufe esté conectado a un toma funcional y conectado a tierra.
Reemplace el fusible o restablezca el interruptor de corriente.
•
Los controles del horno están mal configurados. Consulte Cambio de las configuraciones del
horno en la sección FUNCIONAMIENTO.
La luz del horno no
funciona.
•
La bombilla de la luz está floja o tiene algún defecto. Ajuste o reemplace la bombilla.
•
El enchufe de la cocina no está insertado completamente en el tomacorriente. Asegúrese de
que el enchufe esté conectado a un toma funcional y conectado a tierra.
La función Autolimpieza
no funciona.
•
La temperatura del horno es muy alta para configurar la operación de autolimpieza. Espere
que la cocina se enfríe a temperatura ambiente y restablezca los controles.
•
Los controles del horno están mal configurados. Consulte Autolimpieza en la sección
MANTENIMIENTO.
Sonido de “crujido” o
“explosión”.
•
Es el sonido del metal que se calienta y se enfría durante las funciones de cocción y de
limpieza. Esto es normal.

45SOLUCIÓN DE PROBLEMAS
ESPAÑOL
Síntomas Causas / soluciones posibles
Demasiado humo durante
el ciclo de Autolimpieza.
Demasiada suciedad en el horno. Abra las ventanas para que el humo salga del ambiente. Gire
la perilla de modo del horno hasta seleccionar el modo Autolimpieza. Espere a que la luz se
apague antes de intentar abrir la puerta del horno. Limpie el exceso de suciedad y reinicie el
ciclo de limpieza.
La puerta del horno no se
abre después de un ciclo
de Autolimpieza.
La temperatura del horno es demasiado alta. Espere una hora hasta que se enfríe.
La puerta del horno no
está limpia después de un
ciclo de Autolimpieza.
•
Los controles del horno están mal configurados. Consulte Autolimpieza en la sección
MANTENIMIENTO.
•
El horno estaba muy sucio. Limpie los derrames importantes antes de comenzar el ciclo de
Autolimpieza. Los hornos muy sucios pueden necesitar un ciclo de autolimpieza más largo o
dos ciclos de Autolimpieza.
Limpiar y la puerta
parpadean en la pantalla.
•
Se ha seleccionado el ciclo de autolimpieza, pero la puerta no está cerrada.
- Cierre la puerta del horno.
El control del horno suena
y muestra un código de
error F.
•
Revise la válvula de corte de gas principal
o la válvula de corte de gas del horno y
solicite servicio.
•
Desconecte la cocina durante cinco minutos
y vuelva a conectarla. Si el código de error
de función se repite, solicite servicio.
CÓDIGO CAUSA
F-3 Clave de error de cortocircuito
F-9 El horno no calienta
Los estantes del horno se
limpiaron en un ciclo de
Autolimpieza.
Aplique una pequeña cantidad de aceite vegetal a una toalla de papel y pásela por los bordes de
los estantes del horno. No utilice rociadores lubricantes.
El reloj parpadea.
Apagón o sobrecarga eléctrica. Restablezca la hora. Si se estaba usando el horno, deberá
restablecerlo presionando la perilla de modo del horno y colocándola en la posición Off.
Restablezca el reloj y cualquier función de cocción.
Sale olor a quemado o a
aceite de la ventilación.
Esto es normal en un horno nuevo y desaparecerá a medida que se use. Para acelerar el
proceso, programe un ciclo de Autolimpieza durante un mínimo de tres horas. Consulte
Autolimpieza en la sección MANTENIMIENTO.
Olor fuerte.
Sentir un olor fuerte desde el aislamiento alrededor del horno es normal las primeras veces que
se usa el horno.
Ruido del ventilador
•
El ventilador de convección se puede encender y apagar automáticamente.
- Esto es normal.
El funcionamiento del
ventilador
Es normal que el ventilador de funcione periódicamente durante un ciclo normal de horneado en
el horno. Esto sucede para asegurar resultados parejos de horneado.
Los quemadores no se
encienden correctamente
después de haber
limpiado la superficie de
la placa de cocción.
Asegúrese de que las tapas y los cabezales de los quemadores estén bien secos y ubicados
correctamente.
Cuando se enciende solo
un quemador, se escucha
un ruido de chasquido
que proviene de todos los
quemadores.
Esto es normal. Los encendedores de chispa eléctricos de los quemadores provocan este ruido
de chasquido. Todos los encendedores de chispa de la placa de cocción se activarán cuando se
encienda solo un quemador.
La luz puede ser vista a
través de las rejillas de
ventilación del horno.
Mientras la función de Asar se está ejecutando, es normal ver una luz entre las rejillas de
ventilación del horno.

46 SMART DIAGNOSIS™
FUNCIÓN SMART
DIAGNOSIS™
(DIAGNÓSTICO INTELIGENTE)
En caso de experimentar algún problema con el aparato,
el mismo tiene la capacidad de transmitir datos a través
de su teléfono al Centro de información del cliente de LG.
Los modelos equipados con NFC o Wi-Fi pueden también
transmitir datos a un teléfono inteligente usando la aplicación
LG SmartThinQ.
Smart Diagnosis™ a través del Centro
de información al cliente
•
Para electrodomésticos con el o logo
Este método le permite hablar directamente con uno de
nuestros especialistas calificados. El especialista registra los
datos transmitidos desde el aparato y los usa para analizar el
problema, así le brinda un diagnostico efectivo y rápido.
1
Llame al centro de atención de LG al:
(LG EE. UU.) 1-800-243-0000
(LG Canadá) 1-888-542-2623.
2
Cuando el agente del centro de atención se lo indique,
sostenga el micrófono de su teléfono sobre el logotipo
Smart Diagnosis™ de la máquina. Sostenga el teléfono
a no más de una pulgada de la máquina (pero sin
presionarla).
NOTA
No presione ningún otro botón ni icono de la pantalla.
3
Presione el botón Start y manténgalo presionado durante
tres segundos.
4
Mantenga el teléfono allí hasta que la transmisión de
tonos haya terminado. Demora unos 6 segundos y la
pantalla mostrará una cuenta regresiva.
5
Una vez que la cuenta regresiva haya terminado y se
hayan detenido los tonos, reanude su conversación con
el agente del centro de atención, que podrá ayudarlo a
usar la información transmitida para un análisis.
NOTA
•
Para obtener resultados óptimos, no mueva el teléfono
mientras se transmitan los tonos.
•
Si el agente del centro de atención no puede obtener
una grabación precisa de los datos, es posible que le
pida que lo intente nuevamente.
LG SmartThinQ Smart Diagnosis™
•
Para electrodomésticos con el o logo
Use la función de diagnóstico inteligente en la aplicación LG
SmartThinQ para ayudar a diagnosticar problemas sin la ayuda
del Centro de información del cliente de LG.
Siga las instrucciones en la aplicación LG SmartThinQ
para realizar un diagnóstico inteligente usando su teléfono
inteligente.
1
Descargue la aplicación LG SmartThinQ en el teléfono al
buscar LG SmartThinQ en la aplicación de Play Store.
2
Abra la aplicación LG SmartThinQ en el teléfono.
Presione el botón Smart Diagnosis™ para pasar a la
siguiente pantalla.
3
Siga las indicaciones de la aplicación. La aplicación
mostrará cómo usar el Diagnóstico audible.
4
Presione [ ] en la aplicación LG SmartThinQ para
obtener orientación más detallada sobre cómo usar la
función Smart Diagnosis.
NOTA
•
Smart Diagnosis™ no puede activarse a menos
que el electrodoméstico se encienda usando el
botón Encendido. Si no es posible encender el
electrodoméstico, entonces la resolución de problemas
debe llevarse a cabo sin usar Smart Diagnosis™.
•
Las diferencias en la calidad del llamado según la
región pueden afectar la función.
•
Use el teléfono del hogar para una mejor comunicación,
lo que permitirá un mejor servicio.
•
La mala calidad de la llamada puede producir una mala
transmisión de los datos de su teléfono a la máquina, lo
que podría hacer que Smart Diagnosis™ funcione mal.

47GARANTÍA LIMITADA
ESPAÑOL
GARANTÍA LIMITADA (EE. UU.)
AVISO DE ARBITRAJE: ESTA GARANTÍA LIMITADA CONTIENE UNA CLÁUSULA DE ARBITRAJE QUE LE DEMANDA A USTED Y A
LG RESOLVER CONFLICTOS A TRAVÉS DE UN ARBITRAJE VINCULANTE EN LUGAR DE HACERLO EN LA CORTE, A MENOS QUE
USTED DECIDA NO PARTICIPAR. EN EL ARBITRAJE NO ESTÁN PERMITIDAS LAS ACCIONES COLECTIVAS NI LOS JUICIOS CON
JURADO. POR FAVOR, VEA A CONTINUACIÓN LA SECCIÓN TITULADA “PROCEDIMIENTO PARA RESOLVER CONFLICTOS”.
En caso de que su cocina a gas LG (“Producto”) presente alguna falla por defectos de materiales o de fabricación bajo uso apropiado y
normal durante el período de garantía establecido más abajo, el mismo será reparado o reemplazado por LG Electrónicos ("LG"), a su
opción. Esta garantía limitada es válida únicamente para el comprador final original del producto, y únicamente cuando el producto ha sido
comprado y utilizado dentro de los Estados Unidos, incluidos los territorios norteamericanos.
Período de garantía Alcance de la garantía CÓMO SE MANEJA EL SERVICIO TÉCNICO
Un (1) año a partir de la fecha
de compra minorista original
Piezas y mano de obra
(solo partes internas / funcionales)
LG proporcionará, de forma gratuita, todo el trabajo y el servicio a
domicilio para reemplazar las piezas defectuosas.
•
Los productos y las piezas de repuesto están garantizados durante el tiempo restante del período original de garantía o noventa (90)
días, lo que resulte mayor.
•
Los productos y las piezas de repuesto pueden ser nuevos, reparados, reacondicionados, o reconstruidos por la fábrica.
•
Es necesario presentar prueba de la compra minorista especificando el modelo del producto y la fecha de compra para obtener el servicio
de garantía bajo esta garantía limitada.
SALVO LO PROHIBIDO POR LA LEY, TODA GARANTÍA DE COMERCIALIZACIÓN O IDONEIDAD IMPLÍCITA, PARA UN PROPÓSITO
PARTICULAR EN EL PRODUCTO, ESTÁ LIMITADA A LA DURACIÓN DE LA GARANTÍA ARRIBA EXPRESADA. BAJO NINGUNA
CIRCUNSTANCIA DEBERÁ LG O SUS DISTRIBUIDORES/REPRESENTANTES SER RESPONSABLE POR CUALQUIER DAÑO
INDIRECTO, INCIDENTAL, CONSECUENTE, ESPECIAL, O PUNITIVO, LO CUAL INCLUYE PERO NO SE LIMITA A, PÉRDIDA DE
FONDOS DEL COMERCIO, GANANCIAS PERDIDAS, INTERRUPCIÓN DEL TRABAJO, DETERIORO DE OTROS BIENES, COSTO
DE REMOVER Y REINSTALAR EL PRODUCTO, PÉRDIDA DE USO, O CUALQUIER OTRO DAÑO YA SEA BASADO EN CONTRATO,
PERJUICIO, U OTROS. LA RESPONSABILIDAD TOTAL DE LG, EN CASO EXISTA, NO EXCEDERÁ EL PRECIO QUE USTED PAGÓ
POR ADQUIRIR EL PRODUCTO.
Algunos estados no permiten la exclusión o limitación de daños incidentales o emergentes, o limitaciones a la duración de la garantía
implícita, por lo que la exclusión o limitación anteriormente mencionada podrían no corresponder en su caso. Esta garantía limitada le
otorga derechos legales específicos y es posible que usted cuente con otros derechos que varían según el estado.
ESTA GARANTÍA LIMITADA NO CUBRE LO SIGUIENTE:
•
Viajes del servicio técnico para entregar, buscar o instalar el producto, instruir al cliente sobre la operación del mismo, corregir el
cableado o las reparaciones/instalaciones no autorizadas.
•
Daño o fallo del producto al operar durante fallas e interrupciones del suministro eléctrico, o resultado de un servicio eléctrico inadecuado.
•
Daño o fallo resultantes de operar el producto en una atmósfera corrosiva o contraria a las instrucciones detalladas en el manual del
propietario del producto.
•
Daños o fallos del producto causados por accidentes, pestes y alimañas, rayos, viento, incendio, inundaciones, hechos de fuerza mayor,
o cualquier otra causa fuera del control de LG.
•
Daños o fallos causados por modificaciones o alteraciones no autorizadas, o si se usa para otro fin que no sea el previsto.
•
Daños o fallos resultantes de mal uso, abuso, instalación, reparación o mantenimiento incorrectos. Una reparación incorrecta incluye
el uso de piezas no autorizadas, aprobadas o especificadas por LG. La instalación o el mantenimiento inadecuado incluye aquellos
contrarios a lo especificado en el manual del usuario del producto.
•
Daños o fallos causados por corriente o voltaje eléctrico incorrecto, o códigos de ventilación / fontanería.
•
Daños o fallos causados por el transporte y el manejo, incluye rayas, muescas, astillados y/u otros daños al acabado del producto, a
menos que tales daños se informen dentro del plazo de una (1) semana de la entrega.
•
Daños o artículos faltantes a productos comprados con descuento, con la caja abierta o que hayan estado en exhibición.
•
Productos reacondicionados o cualquier producto vendido con los avisos “En el estado actual”, “En el sitio actual”, “Con todos sus
defectos” o similares.
•
Productos cuyos números de serie originales hayan sido retirados, alterados o no se puedan determinar fácilmente.
•
Aumentos en los costos de los servicios públicos y otros gastos adicionales de dichos servicios.
•
Cualquier ruido asociado con la operación normal.
•
Uso de accesorios, componentes, o productos de limpieza consumibles que no estén autorizados por LG.
•
Reemplazo de focos, filtros o cualquier parte consumible.
•
Cuando el producto se use de otra forma que no sea uso doméstico usual y normal (p. ej., uso comercial o industrial, en oficinas e
instalaciones recreativas o vehículos) o uso contrario a las instrucciones detalladas en el manual del propietario del producto.
•
Costos asociados con el retiro y la reinstalación de su producto para realizar reparaciones.
•
Costo de conversión del producto de Gas Natural a Gas LP o viceversa.
•
Estantes, cajones y accesorios, excepto partes internas / funcionales cubiertas bajo esta garantía limitada.

48 GARANTÍA LIMITADA
No cubierto por esta garantía limitada
Problema Causa Prevención
•
El esmalte de la cubierta
está saltado.
Uso inadecuado
•
No golpee el esmalte de la cubierta.
•
Los quemadores no
encienden
Los puertos o electrodos del quemador que estén sucios u
obstruidos impedirán el funcionamiento correcto del quemador.
•
Revise y limpie el electrodo de gas.
OK No funciona
Debe limpiarse
•
Llama desigual 1. Instalación incorrecta de la tapa del quemador
•
Revise la instalación de la cabeza y
la tapa del quemador.
La cabeza del quemador
está asentada
adecuadamente.
La cabeza del quemador
NO está asentada
adecuadamente.
2. Los puertos del quemador están obstruidos con restos de
alimentos.
•
Los residuos endurecidos deben
removerse con un cepillo de dientes.
Los puertos están
bloqueados por suciedad. Llamas desiguales
* Quemador oval
•
Quemador oval
1) Retire 6 tuercas
2) Limpie los residuos con un cepillo
de dientes.
Para limpiar: retire 6 tuercas
Limpie la parte roja con un
cepillo de dientes.
•
La tapa del quemador
cambió de color y perdió
brillo.
1. Rayones
2. Uso de detergente o limpiadores abrasivos
•
No use esponjas metálicas ni
limpiadores abrasivos para limpiar.
•
Para remover los alimentos
quemados, sumerja las cabezas de
los quemadores en agua caliente
durante 20 a 30 minutos. (No use
detergente).
Se pierde el brillo

49GARANTÍA LIMITADA
ESPAÑOL
Problema Causa Prevención
•
Perillas derretidas Uso inadecuado
•
No deje la puerta en la posición
de paro durante del modo Asar/
Hornear ni inmediatamente después
de cocinar.
•
Los hornos o los estantes
están manchados tras usar
hojas de aluminio.
La hoja de aluminio se derritió en el horno.
•
Nunca cubra el fondo del horno
ni cubra un estante entero con
materiales como hojas de aluminio.
•
Si la hoja de aluminio ya se derritió
en el horno, eso no afectará el
rendimiento de este.
•
La llama o la energía es
débil.
La presión de gas puede ser baja.
•
Consulte primero con su proveedor
de gas.
•
La superficie es dispareja.
•
El horno está inclinado.
1. La estufa no está nivelada.
2. El dispositivo antivolcadura no se instaló correctamente.
•
Verifique primero con el instalador.
Abrazadera antivolcaduras
Aproximadamente
0.65 pulgadas
(16.5 mm)
Nivele ambos lados de la estufa.
El tornillo debe
penetrar la madera
o el cemento
Placa de
pared.
1
2
Use un nivel de burbuja
para comprobar la
nivelación.
•
El horno muestra un código
de error (F9, F19), pero
los quemadores del anafe
están funcionando.
La válvula reguladora está cerrada.
•
Cheque que el regulador de la
válvula este en posición abierta.
•
Si el regulador esta en posición
cerrada, rote la palanca a la
posición abierta.
Posición cerrada de la palanca.
Posición abierta
de la palanca.
Posición cerrada
de la palanca.

50 GARANTÍA LIMITADA
Problema Causa Prevención
•
Las llamas son demasiado
grandes en la cubierta
convertido
(NP
LP)
El instalador no realizó parte de la conversión.
(Revise 3 partes: regulador, Boquilla de la cubierta, Boquilla
de asar/hornear).
•
Consulte primero con el instalador.
•
Consulte el manual de instalación.
Regulador
Boquilla de anafe
Boquilla de asar/hornear
Quemador de 17K necesita ahogador.
•
Consulte primero con el instalador.
•
Consulte el manual de instalación.
Ahogador
Tapa de
quemador
Tornillo de
ajuste
Base de
quemador
Ahogador
•
La llama es demasiado
pequeña o demasiado
grande.
1. Presión de gas variable.
2. El instalador no verificó.
•
Consulte primero con el instalador.
Tornillo de ajuste central
•
Olor a gas Conexión incorrecta
•
Consulte primero con el instalador.
Adaptador 1/2"
Regulador de presión
Conector ex.
(6 pies máx.)
Adaptador
Válvula de
corte de gas
Tubo de gas de
1/2'' o 3/4''
Flujo de gas a la estufa
Conexión del conector flexible
Adaptador 1/2"
El costo de reparación o reemplazo bajo las circunstancias excluidas anteriores correrá a cargo del consumidor.
PARA OBTENER SERVICIO EN GARANTÍA E INFORMACIÓN ADICIONAL
Llame al 1-800-243-0000 y seleccione la opción apropiada desde el menú.
O visite nuestro sitio web en http://www.lg.com
O por correo: LG Electronics Customer Service P.O. Box 240007 Huntsville, AL 35813 ATTN: CIC

51GARANTÍA LIMITADA
ESPAÑOL
PROCEDIMIENTO PARA RESOLVER CONFLICTOS:
TODOS LOS CONFLICTOS ENTRE USTED Y LG QUE SURJAN FUERA DE O RELACIONADOS DE ALGUNA MANERA CON ESTA
GARANTÍA LIMITADA O CON EL PRODUCTO, SE RESOLVERÁN EXCLUSIVAMENTE A TRAVÉS DE UN ARBITRAJE VINCULANTE
Y NO EN UNA CORTE DE JURISDICCIÓN GENERAL. ARBITRAJE VINCULANTE SIGNIFICA QUE USTED Y LG RENUNCIAN AL
DERECHO DE UN JUICIO CON JURADO Y A REALIZAR O PARTICIPAR EN UNA DEMANDA COLECTIVA.
Definiciones. Para el propósito de esta sección, las referencias a “LG” significan: LG Electronics U.S.A., Inc., sus empresas matrices,
subsidiarias y filiales y cada uno de sus directivos, directores, empleados, agentes, beneficiarios, predecesores en interés, sucesores,
cesionarios y proveedores; las referencias a “conflicto” o “reclamación” incluirán cualquier conflicto, reclamo o controversia de cualquier tipo,
sin importar (ya sea basado en contrato, agravio, estatuto, regulación, ordenanza, fraude, falsa representación o cualquier teoría legal o
equitativa) que surja de o esté relacionada con cualquier forma de venta, condición o desempeño del producto o de esta Garantía Limitada.
Aviso de disputa. En caso de que usted desee iniciar un procedimiento de arbitraje, primero debe notificar a LG por escrito al menos 30
días antes de iniciar el arbitraje enviando una carta a LG a LG Electronics, USA, Inc. Atención: Legal Department- Arbitration 1000 Sylvan
Ave, Englewood Cliffs 07632. Usted y LG aceptan participar en discusiones de buena fe en un intento de resolver su reclamo de manera
amistosa. En la carta debe proporcionar su nombre, dirección y número de teléfono; identificar el producto que es objeto de la reclamación;
y describir la naturaleza del reclamo y el remedio que busca. Si usted y LG no pueden resolver la disputa dentro de 30 días, cualquiera de
las partes pueden proceder a presentar una demanda de arbitraje.
Acuerdo de arbitraje vinculante y renuncia de demanda colectiva. En caso de no resolver la disputa durante el período de 30 días
después de enviar una notificación por escrito a LG, Usted y LG se comprometen a resolver cualquier reclamo entre nosotros, solamente a
través de arbitraje vinculante sobre una base individual, a menos que usted se excluya, conforme a lo dispuesto a continuación. Cualquier
conflicto entre usted y LG no estarán combinados o consolidados con una controversia relacionada con cualquier otro producto o reclamo
de otra persona o entidad. Más específicamente y sin prejuicio de lo anterior, no procederá bajo ninguna circunstancia cualquier disputa
entre usted y LG como parte de una acción colectiva o representativa. En lugar del arbitraje, cualquiera de las partes podrá iniciar una
acción individual en la corte de reclamos menores, pero tales acciones en la corte de reclamos menores no podrán ser realizadas en una
acción colectiva o representativa.
Normas y procedimientos de arbitraje. Para comenzar con el arbitraje de un reclamo, usted o LG deben realizar una demanda escrita
para arbitraje. El arbitraje será administrado por la Asociación Americana de Arbitraje (AAA) y se llevará a cabo ante un árbitro único bajo las
Normas de Arbitraje del Consumidor de la AAA, que tienen efecto al momento de inicio del arbitraje (en adelante “Normas de la AAA”) y bajo
los procedimientos establecidos en esta sección. Las Normas de la AAA están disponibles en línea en www.adr.org/consumer. Envíe una
copia de su solicitud de arbitraje por escrito, así como una copia de esta disposición, a la AAA de la forma descrita en las Normas de la AAA.
También debe enviar una copia de su solicitud por escrito a LG en LG Electronics, USA, Inc. Atención: Legal Department- Arbitration 1000
Sylvan Ave, Englewood Cliffs 07632. Si hay un conflicto entre las Normas de la AAA y las reglas establecidas en esta sección, prevalecerán
dichas reglas de esta sección. Esta disposición de arbitraje se rige por la Ley Federal de Arbitraje. El juicio se pueden introducir en el laudo
arbitral en cualquier tribunal de jurisdicción competente. Todos son temas para que el árbitro tome sus decisiones, excepto aquellos asuntos
relativos al alcance y aplicabilidad de la cláusula de arbitraje y de la capacidad de arbitraje de la controversia para que el tribunal decida. El
árbitro se regirá por los términos de esta disposición.
Legislación vigente. La legislación del estado de su residencia regirá esta Garantía Limitada, así como todas las disputas entre nosotros,
salvo que sea invalidada o inconsistente con leyes federales aplicables.
Tarifas / Costos. Usted no debe pagar ninguna tarifa para comenzar un arbitraje. Al recibir su solicitud de arbitraje por escrito, LG pagará
todos los gastos administrativos rápidamente a la AAA, a menos que usted solicite más de $25,000.00 por daños, en cuyo caso el pago de
estos gastos se regirá por las Normas de la AAA. Salvo disposición contraria prevista en el presente documento, LG pagará a la AAA todos
los gastos documentales, administrativos y de arbitraje para cualquier arbitraje iniciado, de conformidad con las Normas de la AAA y esta
disposición de arbitraje. Si usted prevalece en el arbitraje, LG pagará los honorarios y gastos de sus abogados, siempre y cuando sean
razonables, considerando factores que incluyen, entre otros, el monto de la compra y el monto del reclamo. No obstante lo anterior, si la ley
aplicable permite una adjudicación de honorarios y gastos razonables de abogados, un árbitro pueden otorgarlos en la misma medida que lo
haría un tribunal. Si el árbitro considera que la sustancia de su reclamo o la reparación solicitada en la demanda es frívola o se utiliza para
un propósito inadecuado (calificado según las normas establecidas en la Norma Federal de Procedimiento Civil 11 (b)), el pago de todos
los honorarios de arbitraje se regirá por las Normas de la AAA. En tal situación usted se compromete a reembolsar a LG todos los fondos
erogados previamente por ella, cuyo pago es, por otra parte, su obligación, según las Normas de la AAA. Salvo disposición contraria, LG
renuncia a cualquier derecho que pudiera tener para solicitarle los honorarios y gastos de sus abogados, si LG prevalece en el arbitraje.
Audiencias y ubicación. Si su reclamo es por $25,000 o menos, usted pueden optar que el arbitraje sea realizado únicamente sobre
la base de: (1) documentos presentados al árbitro, (2) a través de una audiencia telefónica o (3) por una audiencia en persona, según lo
establecido por las Normas de la AAA. Si su reclamo excede $25,000, el derecho a una audiencia estará determinado por las Normas de la
AAA. Cualquier audiencia de arbitraje en persona se realizará en un lugar dentro del distrito judicial federal en el cual resida, a menos que
ambos acuerden otra ubicación o estemos de acuerdo con el arbitraje telefónico.
Exclusión. Usted pueden quedarse fuera de este procedimiento de resolución de la disputa. Si se excluye, ni usted ni LG pueden solicitar
al otro que participe en un procedimiento de arbitraje. Para excluirse usted debe enviar una notificación a LG, en un lapso de hasta 30 días
continuos, contados a partir de la fecha de la primera compra del consumidor del producto, ya sea por: (i) el envío de un correo electrónico
a [email protected] con el siguiente Asunto: “Exclusión del arbitraje” o (ii) llamada al 1-800-980-2973. Debe incluir en el correo electrónico de
exclusión o suministrar por teléfono: (a) su nombre y dirección; (b) la fecha en la cual el producto fue comprado; (c) el nombre o el número
del modelo del producto; y (d) el número del serial (el número del serial pueden ser hallado (i) en el producto, o (ii) en la dirección de https://
www.lg.com/us/support/repair-service/schedule-repair-continued al hacer clic en “Find My Model & Serial Number”).
Sólo pueden excluirse del procedimiento de resolución de conflictos en la forma descrita anteriormente (es decir, por correo electrónico o
por teléfono); ninguna otra forma de notificación será efectiva para hacerlo. Excluirse de este procedimiento de resolución de controversias
no afectará de ninguna manera la cobertura de la Garantía Limitada, por lo que usted continuará disfrutando de todos sus beneficios. Si
conserva este producto y no se excluye, usted acepta todos los términos y condiciones de la cláusula de arbitraje descrita anteriormente.

LG Customer Information Center
Register your product Online!
www.lg.com
1-800-243-0000
USA
1-888-542-2623
CANADA
Printed in Mexico
-
 1
1
-
 2
2
-
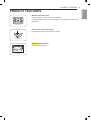 3
3
-
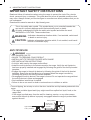 4
4
-
 5
5
-
 6
6
-
 7
7
-
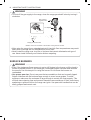 8
8
-
 9
9
-
 10
10
-
 11
11
-
 12
12
-
 13
13
-
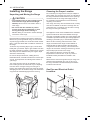 14
14
-
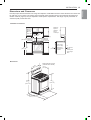 15
15
-
 16
16
-
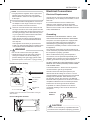 17
17
-
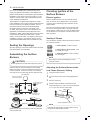 18
18
-
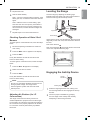 19
19
-
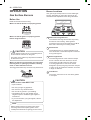 20
20
-
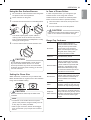 21
21
-
 22
22
-
 23
23
-
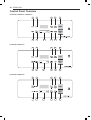 24
24
-
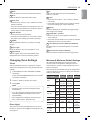 25
25
-
 26
26
-
 27
27
-
 28
28
-
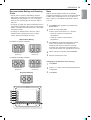 29
29
-
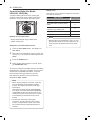 30
30
-
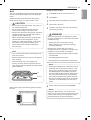 31
31
-
 32
32
-
 33
33
-
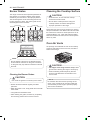 34
34
-
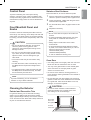 35
35
-
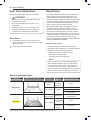 36
36
-
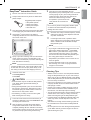 37
37
-
 38
38
-
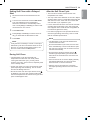 39
39
-
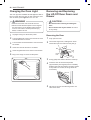 40
40
-
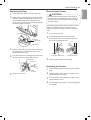 41
41
-
 42
42
-
 43
43
-
 44
44
-
 45
45
-
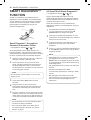 46
46
-
 47
47
-
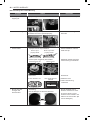 48
48
-
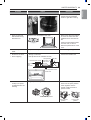 49
49
-
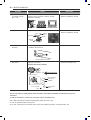 50
50
-
 51
51
-
 52
52
-
 53
53
-
 54
54
-
 55
55
-
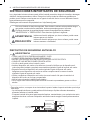 56
56
-
 57
57
-
 58
58
-
 59
59
-
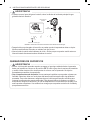 60
60
-
 61
61
-
 62
62
-
 63
63
-
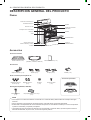 64
64
-
 65
65
-
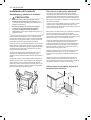 66
66
-
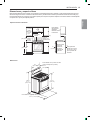 67
67
-
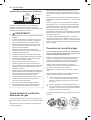 68
68
-
 69
69
-
 70
70
-
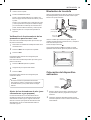 71
71
-
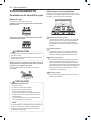 72
72
-
 73
73
-
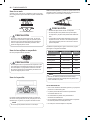 74
74
-
 75
75
-
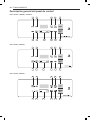 76
76
-
 77
77
-
 78
78
-
 79
79
-
 80
80
-
 81
81
-
 82
82
-
 83
83
-
 84
84
-
 85
85
-
 86
86
-
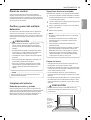 87
87
-
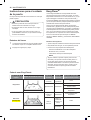 88
88
-
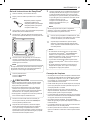 89
89
-
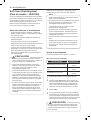 90
90
-
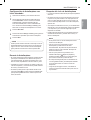 91
91
-
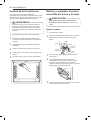 92
92
-
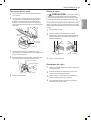 93
93
-
 94
94
-
 95
95
-
 96
96
-
 97
97
-
 98
98
-
 99
99
-
 100
100
-
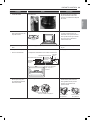 101
101
-
 102
102
-
 103
103
-
 104
104


LG LRG3194BM Manual de usuario
- Categoría
- Cocinas
- Tipo
- Manual de usuario
- Este manual también es adecuado para
en otros idiomas
- English: LG LRG3194BM User manual