Samsung SWA-9200S Wireless Rear Speaker Kits Manual de usuario
- Categoría
- Equipo de música suplementario
- Tipo
- Manual de usuario

USER MANUAL
SWA-9200S

ENG - 2
SAFETY INFORMATION
Thank you for purchasing this
product (SWA-9200S).
CAUTION
RISK OF ELECTRIC SHOCK. DO
NOT OPEN.
CAUTION: TO REDUCE THE RISK OF ELECTRIC SHOCK,
DO NOT REMOVE THE COVER (OR BACK). NO USER-
SERVICEABLE PARTS ARE INSIDE. REFER SERVICING
TO QUALIFIED SERVICE PERSONNEL. Refer to the
table below for an explanation of symbols which may
be on your Samsung product.
This symbol indicates that high voltage is
present inside. It is dangerous to make any
kind of contact with any internal part of
this product.
This symbol indicates that this product has
included important literature concerning
operation and maintenance.
Class II product : This symbol indicates that
it does not require a safety connection to
electrical earth (ground).
If this symbol is not present on a product
with a power cord, the product MUST have
a reliable connection to protective earth
(ground).
AC voltage : This symbol indicates that the
rated voltage marked with the symbol is
AC voltage.
DC voltage : This symbol indicates that the
rated voltage marked with the symbol is
DC voltage.
Caution, Consult instructions for use :
This symbol instructs the user to consult
the user manual for further safety related
information.
• The slots and openings in the cabinet and in the back
or bottom are provided for necessary ventilation. To
ensure reliable operation of this apparatus, and to
protect it from overheating, these slots and openings
must never be blocked or covered.
‒ Donotplacethisapparatusinaconnedspace,
such as a bookcase, or built-in cabinet, unless
proper ventilation is provided.
‒ Do not place this apparatus near or over a radiator
or heat register, or where it is exposed to direct
sunlight.
‒ Do not place vessels (vases etc.) containing water
onthisapparatus.Awaterspillcancauseareor
electric shock.
• Do not expose this apparatus to rain or place it
near water (near a bathtub, washbowl, kitchen
sink, or laundry tub, in a wet basement, or near a
swimming pool, etc.). If this apparatus accidentally
gets wet, unplug it and contact an authorized dealer
immediately.
• Do not overload wall outlets, extension cords or
adaptors beyond their capacity, since this can result
inreorelectricshock.
• Route power-supply cords so that they are not likely
to be walked on or pinched by items placed on or
against them. Pay particular attention to cords at the
plug end, at wall outlets, and the point where they
exit from the apparatus.
• To protect this apparatus from a lightning storm,
or when it is left unattended and unused for long
periods of time, unplug it from the wall outlet and
disconnect the antenna or cable system. This will
prevent damage to the set due to lightning and
power line surges.
• Before connecting the AC power cord to the DC
adaptor outlet, make sure the voltage designation
of the DC adaptor corresponds to the local electrical
supply.
• Never insert anything metallic into the open parts
of this apparatus. Doing so may create a danger of
electric shock.
English

ENG - 3
• To avoid electric shock, never touch the inside of this
apparatus.Onlyaqualiedtechnicianshouldopen
this apparatus.
• Makesuretoplugthepowercordinuntilitisrmly
seated. When unplugging the power cord from a wall
outlet, always pull on the power cord’s plug. Never
unplug by pulling on the power cord. Do not touch
the power cord with wet hands.
• If this apparatus does not operate normally - in
particular, if there are any unusual sounds or smells
coming from it - unplug it immediately and contact
an authorized dealer or service centre.
• Maintenance of Cabinet.
‒ Before connecting other components to this
product, be sure to turn them off.
• Be sure to pull the power plug out of the outlet if
the product is to remain unused or if you are leaving
the house for an extended period of time (especially
when children, elderly, or disabled people will be left
alone in the house).
‒ Accumulated dust can cause an electric shock,
anelectricleakage,orarebycausingthepower
cord to generate sparks and heat or the insulation
to deteriorate.
• Contact an authorized service centre for information
if you intend to install your product in a location with
heavy dust, high or low temperatures, high humidity,
chemical substances, or where it will operate 24
hours a day such as in an airport, a train station, etc.
Failing to do so may cause serious damage to your
product.
• Use only a properly grounded plug and wall outlet.
‒ An improper ground may cause electric shock or
equipment damage. (Class l Equipment only.)
• To turn this apparatus off completely, you must
disconnect it from the wall outlet. Consequently, the
wall outlet and power plug must be readily accessible
at all times.
• Do not allow children to hang on the product.
• Store the accessories (battery, etc.) in a location
safely out of the reach of children.
• Do not install the product in an unstable location
suchasashakyself,aslantedoor,oralocation
exposed to vibration.
• Do not drop or strike the product. If the product is
damaged, disconnect the power cord and contact a
service centre.
• To clean this apparatus, unplug the power cord from
the wall outlet, and then wipe the product using a
soft, dry cloth. Do not use any chemicals such as wax,
benzene, alcohol, thinners, insecticide, air fresheners,
lubricants, or detergent. These chemicals can
damage the appearance of the product or erase the
printing on the product.
• Do not expose this apparatus to dripping or
splashing.Donotputobjectslledwithliquids,such
as vases, on the apparatus.
• Do not plug multiple electric devices into the same
wall socket. Overloading a socket can cause it to
overheat,resultinginare.
WARNING
• TO PREVENT THE SPREAD OF FIRE,
KEEP CANDLES AND OTHER ITEMS WITH
OPEN FLAMES AWAY FROM
THIS PRODUCT AT ALL TIMES.
• Toreducetheriskofreorelectricshock,donot
expose this appliance to rain or moisture.

ENG - 4
Precautions
1. Ensure that the AC or DC power supply in your house
complies with the power requirements listed on
theidenticationstickerlocatedontherearofyour
product.
Install your product horizontally, on a suitable
base (furniture), with enough space around it for
ventilation (7~10 cm). Make sure the ventilation slots
arenotcovered.Donotplacetheunitonampliers
or other equipment which may become hot. This unit
is designed for continuous use. To fully turn off the
unit, disconnect the AC plug from the wall outlet.
2. Do not expose the unit to direct sunlight or other
heat sources. This could lead to overheating and
cause the unit to malfunction.
3. Unplug the Power cord from the AC wall socket if
the unit malfunctions. Your product is not intended
for industrial use. It is for personal use only.
Condensation may occur if your product has been
stored in cold temperatures. If transporting the unit
during the winter, wait approximately 2 hours until
the unit has reached room temperature before using
it.
4. If the electricity supplied to your home is rated at
240V AC, use a suitable plug adapter to connect this
unit to your electrical outlets.
Important Safety Instructions
Read these operating instructions carefully before using
the unit. Follow all the safety instructions listed below.
Keep these operating instructions handy for future
reference.
1. Read these instructions.
2. Keep these instructions.
3. Heed all warnings.
4. Follow all instructions.
5. Do not use this apparatus near water.
6. Clean only with a dry cloth.
7. Do not block any ventilation openings. Install in
accordance with the manufacturer’s instructions.
8. Do not install near any heat sources such as radiators,
heat registers, stoves, or other apparatus (including
AV receivers) that produce heat.
9. Do not defeat the safety purpose of the polarized or
grounding-type plug. A polarized plug has two blades
with one wider than the other. A grounding type plug
has two blades and a third grounding prong. The
wide blade or the third prong are provided for your
safety.Iftheprovidedplugdoesnottintoyour
outlet, consult an electrician for replacement of the
obsolete outlet.
10. Protect the power cord from being walked on
or pinched particularly at plugs, convenience
receptacles, and the point where it exits the
apparatus.
11. Onlyuseattachments/accessoriesspeciedbythe
manufacturer.
12. Use only with the cart, stand, tripod,
bracket,ortablespeciedbythe
manufacturer, or sold with the
apparatus. When a cart is used, use
caution when moving the cart/
apparatus combination to avoid injury
from tip-over.
13. Unplug this apparatus during lightning storms or
when you intend to leave it unused for long periods
of time.
14. Referallservicingtoqualiedservicepersonnel.
Servicing is required when the apparatus has been
damaged in any way, such as when the power-supply
cord or plug is damaged, liquid has been spilled or
objects have fallen into the apparatus, the apparatus
has been exposed to rain or moisture, does not
operate normally, or has been dropped.

ENG - 5
01 CHECKING THE
COMPONENTS
Surround Speaker X 2 / Speaker Cable / AC/DC
Adapter / Power Cord
NOTE
• For more information about the power supply and
power consumption, refer to the label attached to the
product. (Label: Rear of the Main Unit)
• Designandspecicationsaresubjecttochange
without prior notice.
02 CONNECTING THE
SWA-9200S TO A
SOUNDBAR
1. Connect the Surround speaker cables
Use the speaker cables to connect the two surround
sound speakers.
• When connecting the speaker cable, connect the core
wire to the speaker.
• Insert the wire fully, taking care not to insert beyond
the wire insulation.
Insert the wire fully.
+ : Red
- : Black
• When connecting the speaker cables to the surround
speakers, follow these steps:
‒ Insert the red and black colored ends of each
speaker cable into the red and black jacks of the
appropriate speaker.
‒ The labels are on the backs of the speakers.
Audio cable
‒ The length of the speaker audio cable: 6 m
2. Turn on the Surround speakers
Plug the Surround speakers’ power cord into an
electrical outlet to turn on the Surround speakers. The
LINK LED indicator(blue LED) on the rear of left surround
speaker will blink quickly.
If the LINK LED does not blink, please see step 6.
LINK STANDBY
ID SET
Rear of Left
Surround
LINK STANDBY
ID SET
LINK STANDBY
ID SET
Rear of Left Surround
"Blue
blinking"
3. Turn off the Soundbar
If the Soundbar is turned on, please turn off the
Soundbar by pressing the (Power) button on the
Soundbar or remote control.
SOUND
MODE
PAIR
BYE
OR
Red BlinksX3
• The image of the Soundbar may differ from your
Soundbar, depending on the model.

ENG - 6
4. Connect Soundbar and Surround Speakers
Press the Up button on the remote control for more than
5 seconds until the “ID SET” message appears on the
Soundbar’s display. The message will disappear shortly.
(If your Soundbar does not have a display window and
only LED indicators, please refer to the LED information
below.)
• After the ID SET process is successful, the Soundbar
will turn on automatically.
OR
SOUND
MODE
PAIR
5 sec
ID SET
Red → Green →
Blue Blinks
• The image of the Soundbar may differ from your
Soundbar, depending on the model.
5. Check the connection complete
The LINK LED stops blinking and changes to solid
blue when the Soundbar and surround speakers are
successfully linked.
Please turn off the Soundbar and turn it back on.
ConrmthattheLINK LED is blue.
(It may take a minute depending on the environment.)
LINK STANDBY
ID SET
LINK STANDBY
ID SET
Rear of Left Surround
“Blue is On”
• If the LINK LED does not turn to solid blue in a
minute, please repeat from step 2 through 5 referring
to step 6 (LED indicator’s status).
6. LED Indicator’s status
LINK (Blue) On : Connected with the Soundbar.
LINK (Blue) Blinking fast (at an interval of around
0.5 second) : Surround speakers are in ID SET mode.
• Check if the Soundbar is turned on and in ID SET
mode.
• Repeat steps 3 through 5.
LINK (Blue) Blinking slow (at an interval of around
1 second) : Previously connected to a Soundbar but
cannotcurrentlyndit.
• Check if the Soundbar is turned on.
• If the LINK LED keeps blinking slowly even when
the Soundbar is turned on,
1. Press the ID SET button on the rear of the left
surround for more than 5 seconds until the LINK
LED starts blinking fast in blue.
LINK STANDBY
ID SET
LINK STANDBY
ID SET
5 sec
Rear of Left Surround
2. Repeat steps 3 through 5.
STANDBY (Red) On : When the Soundbar turns off or
connection has failed.
• Follow the instructions for “Link (Blue) Blinking
slow (at an interval of around 1 second)” above.
Others : Errors
• Contact a Samsung Service Centre.

ENG - 7
03 TROUBLE SHOOTING
There is no sound from Surround Speakers
• If the Surround speakers are successfully paired
and connected to a Soundbar, the LINK LED
indicator on the rear of the Left Surround is on and
solid blue. Please reconnect the Surround speakers
to your Soundbar referring to 02-6, LED Indicator’s
status.
• Other devices sending radio frequency signals in
proximity may interrupt the connection. Please
keep your speaker away from such devices.
• The content you are playing may have no surround
track but only stereo. Please change the sound
mode to Surround by pressing SOUND MODE
button on the remote control.
There is sound jitter, delays, noise or dropout from the
sound of Surround Speakers.
• There may be sound jitter or delays when the
Surround Speakers are far from the Soundbar.
Please place them near the Soundbar.
• There may be sound jitter or delays when the
Soundbar is near an electrical device that can
cause radio interference. Please place the
Soundbar far from such devices that can cause
radio interference
(e.g. wireless router).
• Please change the TV network connection status
from wireless to wired.
The volume of Surround Speakers is too low
• Please increase the rear level referring to the
manual of your Soundbar.
(You can download the manual of your Soundbar
from www.samsung.com/support)
04 MOUNTING ON A WALL
LINK STANDBY
8.2 mm
4.2 mm
7.9 mm
4.6 mm
4.0 mm
• Be sure the wall is stable. If the wall is weak,
reinforce it before installation.
• Take care not to install the speakers sideways or
upside down.
• Samsung Electronics is not liable for any damage to
the product due to improper installation.
• Wall mounts aren’t sold by Samsung Electronics.
05 COMPATIBLE MODELS
• Compatible with select Samsung Soundbar. Please
visit the Soundbar product page at www.samsung.
com/support for more information.
• Compatible model list is subject to change without
further notice.

ENG - 8
06 OPEN SOURCE LICENSE
NOTICE
To send inquiries and requests for questions regarding
open sources, contact Samsung Open Source
(http://opensource.samsung.com)
07 IMPORTANT NOTES
ABOUT SERVICE
• An administration fee may be charged if either
(a) an engineer is called out at your request and there
is no defect with the product (i.e. where the user
manual has not been read).
(b) you bring the unit to a repair centre and there is
no defect with the product (i.e. where the user
manual has not been read).
• You will be informed of the administration fee
amount before a technician visits.
08 SPECIFICATIONS AND
GUIDE
Specications
Subwoofer Name
SWA-9200S (LEFT/RIGHT)
Weight
1.7 kg
Dimensions (W x H x D)
105.0 x 152.8 x 109.0 mm
Operating Temperature
Range
10℃to40℃
Operating Humidity Range
10 % ~ 80 %,
non-condensing
AMPLIFIER
Rated Output power
60 W x 2
Overall Standby Power Consumption (W)
0.5 W
WIRELESS DEVICE OUTPUT POWER
SRD max transmitter power
25mW at 5.725GHz – 5.825GHz
NOTE
• Samsung Electronics Co., Ltd reserves the right to
changethespecicationswithoutnotice.
• Weight and dimensions are approximate.
• Hereby, Samsung declares that this radio equipment
is in compliance with Directive 2014/53/EU and the
relevant UK statutory requirements.
The full text of the declaration of conformity is
available at the following internet address:
http://www.samsung.com go to Support and enter
the model name.
This equipment may be operated in all EU countries
and in the UK.
Correct Disposal of This Product
(Waste Electrical & Electronic Equipment)
(Applicable in countries with separate collection
systems)
This marking on the product, accessories or literature
indicates that the product and its electronic
accessories (e.g. charger, headset, USB cable) should
not be disposed of with other household waste at the
end of their working life. To prevent possible harm to
the environment or human health from uncontrolled
waste disposal, please separate these items from
other types of waste and recycle them responsibly to
promote the sustainable reuse of material resources.
Household users should contact either the retailer
where they purchased this product, or their local
governmentofce,fordetailsofwhereandhow
they can take these items for environmentally safe
recycling.
Business users should contact their supplier and check
the terms and conditions of the purchase contract.
This product and its electronic accessories should not
be mixed with other commercial wastes for disposal.
For information on Samsung’s environmental
commitmentsandproductspecicregulatory
obligations e.g. REACH, WEEE, Batteries, visit:
www.samsung.com/uk/aboutsamsung/sustainability/
environment/our-commitment/data/

FRA - 9
INFORMATIONS DE SÉCURITÉ
Merci d’avoir acheté ce produit
(SWA-9200S).
ATTENTION
RISQUE DE CHOC ÉLECTRIQUE. NE
PAS OUVRIR.
ATTENTION : POUR LIMITER LE RISQUE DE CHOC
ÉLECTRIQUE, NE RETIREZ PAS LE CACHE (OU LE DOS).
L’INTÉRIEUR NE CONTIENT AUCUNE PIÈCE RÉPARABLE
PAR L’UTILISATEUR. CONFIEZ TOUTE RÉPARATION AU
PERSONNEL D’ENTRETIEN QUALIFIÉ. Reportez-vous au
tableau ci-dessous pour une explication des symboles
Ce symbole indique que ce produit est
de toucher la moindre pièce située à l’intérieur
de ce produit.
Ce symbole indique qu’une documentation
importante relative au fonctionnement et à
l’entretien est fournie avec le produit.
Produit de classe II : ce symbole indique
qu'aucun raccordement de sécurité (prise de
terre) n'est requis.
Si ce symbole n’est pas présent sur un produit
avec un cordon d’alimentation, le produit DOIT
terre.
Tension AC : ce symbole indique que la tension
nominale qu'il mentionne est une tension AC.
Tension DC : ce symbole indique que la tension
nominale qu'il mentionne est une tension DC.
Attention, consulter le mode d’emploi : ce
symbole avertit l’utilisateur qu’il doit consulter
le manuel utilisateur pour plus d’informations
relatives à la sécurité.
•
ainsi qu’à l’arrière et en dessous de l’appareil assurent
fonctionnement de l’appareil et d’éviter les risques de
surchauffe, ces fentes et ouvertures ne doivent être ni
obstruées ni couvertes.
Ne placez pas l’appareil dans un environnement clos
tel qu’une bibliothèque ou une armoire encastrée,
sauf si une ventilation adéquate est prévue.
Ne placez pas l’appareil à proximité ou au-dessus d’un
endroit exposé à la lumière directe du soleil.
Ne placez pas de récipients contenant de l’eau (vases,
etc.) sur l’appareil. Un déversement d’eau pourrait
• N’exposez pas l’appareil à la pluie et ne le placez pas à
sous-sol humide, une piscine, etc. Si l’appareil vient à être
mouillé par inadvertance, débranchez-le et contactez
•
• Disposez les cordons d’alimentation de telle manière
qu’ils ne puissent pas être écrasés en marchant dessus ou
par des objets qui seraient posés dessus ou contre eux.
Faites particulièrement attention aux cordons au niveau
l’appareil.
•
débranchez celui-ci de la prise murale et débranchez
Ces précautions permettent d’éviter que l’appareil ne soit
•
ce dernier correspond bien à la tension délivrée par le
réseau électrique local
• N’insérez jamais d’objet métallique dans les parties
ouvertes de l’appareil au risque de recevoir un choc
électrique.
Français

FRA - 10
•
• Veillez à brancher le cordon d’alimentation de manière
à ce qu’il soit bien inséré. Lorsque vous débranchez le
cordon d’alimentation d’une prise murale, tirez toujours
jamais le cordon d’alimentation en tirant dessus. Ne
mouillées.
• Si l’appareil ne fonctionne pas normalement, en
particulier s’il émet des odeurs ou des sons anormaux,
débranchez-le immédiatement et contactez un revendeur
•
Avant de connecter ce produit à d’autres éléments,
assurez-vous que ces derniers soient éteints.
• Si vous prévoyez de ne pas utiliser le produit ou de
personnes handicapées restent seuls à la maison).
L’accumulation de poussière peut amener le cordon
d’alimentation à produire des étincelles et de la
un risque de fuite électrique, d’électrocution et
d’incendie.
•
votre produit dans un lieu exposé à la poussière, à des
températures élevées ou faibles, à une humidité élevée
ou à des substances chimiques, ou bien dans un lieu où
il fonctionnera en permanence, comme un aéroport,
•
correctement mises à la terre.
(appareils de classe I uniquement).
• Pour mettre l’appareil complètement hors tension, vous
devez le débrancher de la prise murale. En conséquence,
facilement accessibles en permanence.
• Ne laissez pas les enfants se suspendre à l’appareil.
•
hors de portée des enfants.
• N’installez pas l’appareil à un endroit instable, comme
endroit exposé à des vibrations.
• Ne faites pas tomber le produit et ne le soumettez à
débranchez le cordon d’alimentation et contactez un
centre de service après-vente.
• Pour nettoyer l’appareil, débranchez le cordon
d’alimentation de la prise murale, puis essuyez le produit
à l’aide d’un chiffon doux et sec. N’utilisez pas de produits
chimiques comme de la cire, du benzène, de l’alcool,
des diluants, des insecticides, des désodorisants, des
éléments imprimés dessus.
•
éclaboussures. Ne posez pas sur l’appareil des objets
contenant des liquides, tels que des vases.
• Ne branchez pas plusieurs appareils électriques sur la
une surchauffe, voire un incendie.
AVERTISSEMENT
• POUR ÉVITER TOUTE PROPAGATION
DU FEU, TENEZ TOUJOURS CE PRODUIT À
L’ÉCART DES BOUGIES OU
DE TOUTE AUTRE FLAMME NUE.
• Pour réduire le risque d’incendie ou de choc électrique,
n’exposez pas cet appareil à la pluie ou à l’humidité.

FRA - 11
Précautions
1.
matière d’alimentation mentionnées sur l’étiquette
Installez le produit horizontalement, sur un support
couvertes. Ne placez pas l’unité sur des haut-parleurs ou
sur tout autre équipement susceptible de devenir chaud.
Cette unité a été conçue pour une utilisation continue.
Pour l’éteindre complètement, débranchez la prise AC de
la prise murale.
2. N’exposez pas l’unité à la lumière directe du soleil ou à
surchauffe et des dysfonctionnements.
3. Débranchez le cordon d’alimentation de la prise
murale AC si l’unité présente un dysfonctionnement. Le
produit n’a pas été conçu pour une utilisation industrielle,
mais pour une utilisation personnelle uniquement. De la
condensation peut se former si le produit a été stocké à
basse température. Si vous transportez l’unité en hiver,
attendez environ 2 heures avant de l’utiliser, le temps
4. Si l’électricité fournie à votre domicile est du 240 V AC,
utilisez un adaptateur secteur adéquat pour brancher
cette unité à vos prises murales.
Consignes de sécurité importantes
Lisez attentivement ces instructions d’utilisation avant de
sécurité ci-dessous. Conservez ce manuel pour pouvoir le
consulter ultérieurement.
1. Lisez attentivement ces instructions.
2. Conservez ces instructions.
3. Prenez en compte tous les avertissements.
4. Suivez toutes les instructions.
5. N’utilisez pas cet appareil à proximité d’un point d’eau.
6. Nettoyez-le avec un chiffon sec uniquement.
7.
l’appareil en suivant les instructions du fabricant.
8. N’installez pas l’appareil près de sources de chaleur
chauffantes ou tout autre appareil qui produit de la
chaleur (récepteurs AV compris).
9.
une troisième, reliée à la terre. Ces dispositifs sont conçus
correspond pas à vos prises murales, il se peut que ces
dernières soient obsolètes : consultez un électricien pour
les remplacer.
10. Veillez à ce que le cordon d’alimentation ne soit pas
prises murales et du point de sortie de l’appareil.
11. Utilisez uniquement les pièces et accessoires indiqués
par le fabricant.
12. Manipulez l’appareil uniquement avec le
chariot, le socle, le trépied, le support ou
la table que mentionne le fabricant, ou
vendu(e) avec le produit. Lorsque vous
toute blessure.
13.
l’intention de ne pas l’utiliser pendant une période
14.
ou une chute d’objet sur l’appareil, une exposition de
celui-ci à la pluie ou à l’humidité, un dysfonctionnement
ou une chute du produit.

FRA - 12
01 VÉRIFICATION DES
COMPOSANTS
CC / Cordon d'alimentation
REMARQUE
• Pour plus d’informations sur l’alimentation et la
consommation électriques, reportez-vous à l’étiquette
collée sur le produit. (Étiquette : arrière de l’unité
principale)
•
02 CONNEXION DE LA
SWA-9200S À UNE
SOUNDBAR
1. Branchez les câbles de l’enceinte surround
enceintes surround.
•
central à l’enceinte.
•
Insérez le l entièrement.
+ : rouge
- : noir
• Lors du branchement des câbles d’enceinte aux enceintes
surround, procédez comme suit :
l’enceinte.
Les étiquettes se trouvent à l’arrière des enceintes.
Câble audio
2. Allumez les enceintes surround
Branchez le cordon d’alimentation des enceintes surround
à une prise électrique pour allumer celles-ci. Le voyant LED
LINK
rapidement.
Si le voyant LED LINK
LINK STANDBY
ID SET
Arrière de l'enceinte
surround gauche
LINK STANDBY
ID SET
LINK STANDBY
ID SET
Arrière de l'enceinte surround
gauche
« Clignote
en bleu »
3. Éteignez la Soundbar
le bouton (Alimentation) de la Soundbar ou de la
télécommande.
SOUND
MODE
PAIR
BYE
OU
Clignote en rouge 3x
• L’aspect de votre Soundbar peut être différent de
l’illustration, selon le modèle.

FRA - 13
4. Branchez la Soundbar et les enceintes surround
Appuyez sur le bouton Haut de la télécommande pendant
ID SET »
mais seulement de voyants LED, veuillez vous reporter aux
indications ci-dessous.)
• Une fois le processus ID SET terminé, la Soundbar
s’allume automatiquement.
OU
SOUND
MODE
PAIR
5 sec
ID SET
Clignote en rouge
→ vert → bleu
• L’aspect de votre Soundbar peut être différent de
l’illustration, selon le modèle.
5. Vériez que la connexion est établie
Le voyant LED LINK
bleu quand la Soundbar et les enceintes surround sont bien
connectées.
LED LINK est allumé en bleu.
(Cela peut prendre une minute en fonction de
l’environnement.)
LINK STANDBY
ID SET
LINK STANDBY
ID SET
Arrière de l'enceinte surround
gauche
« Allumé en
bleu »
• Si le voyant LED LINK ne s’allume pas en bleu au bout
d’une minute, répétez les étapes 2 à 5 en vous reportant à
État des voyants LED).
6. État des voyants LED
Voyant LINK (bleu) allumé : connectées à la Soundbar.
Voyant LINK (bleu) clignotant rapidement (intervalle
d'environ 0,5 seconde) : enceintes surround en mode
ID SET.
•
ID SET.
• Répétez les étapes 3 à 5.
Voyant LINK (bleu) clignotant lentement (intervalle
d'environ 1 seconde) : connectées auparavant à une
Soundbar actuellement introuvable.
•
• Si le voyant LED LINK
alors que la Soundbar est allumée :
1. Appuyez sur le bouton ID SET à l'arrière de l'enceinte
ce que le voyant LED LINK
rapidement en bleu.
LINK STANDBY
ID SET
LINK STANDBY
ID SET
5 sec
Arrière de l'enceinte surround
gauche
2. Répétez les étapes 3 à 5.
Voyant STANDBY (rouge) allumé : quand la Soundbar est
éteinte ou que la connexion à échoué.
• « Voyant LINK
(bleu) clignotant lentement (intervalle d’environ
1 seconde) » ci-dessus.
Autres : erreurs
•

FRA - 14
03 DÉPANNAGE
Les enceintes surround n'émettent aucun son
• Si les enceintes surround sont bien jumelées et
connectées à une Soundbar, le voyant LED LINK à
en bleu. Rebranchez les enceintes surround à votre
Soundbar en vous reportant à l'étape 02-6 État des
voyants LED.
•
appareils à proximité peuvent interrompre la
appareils.
• Ce que vous écoutez est peut-être de l'audio stéréo,
enceintes surround en appuyant sur le bouton SOUND
MODE de la télécommande.
Le son des enceintes surround est dénaturé par une
instabilité, des décalages, des parasites ou des coupures
• Le son peut être instable ou décalé si les enceintes
surround sont loin de la Soundbar. Veuillez les placer à
proximité de la Soundbar.
• Le son peut être instable ou décalé si la Soundbar est
proche d'un appareil électrique susceptible de causer
des interférences radio. Veuillez placer la Soundbar loin
des appareils susceptibles de créer des interférences
radio
• Veuillez passer le statut de la connexion réseau du
Le volume des enceintes surround est trop faible
•
du manuel de votre Soundbar.
04 MONTAGE MURAL
LINK STANDBY
8,2 mm
4,2 mm
7,9 mm
4,6 mm
4,0 mm
•
solide, renforcez-le avant d’installer le support.
• Veillez à ne pas monter les enceintes sur le côté ou à
l’envers.
•
inappropriée.
•
Electronics.
05 MODÈLES COMPATIBLES
•
www.
samsung.com/support pour plus d’informations.
• La liste des modèles compatibles est sujette à

FRA - 15
06 AVIS CONCERNANT LES
LICENCES LIBRES
07 REMARQUES
IMPORTANTES RELATIVES
AU SERVICE
• Des frais d’administration peuvent vous être facturés si
(a) un technicien intervient à votre demande alors que le
produit ne présente aucun défaut (c.-à-d. vous n’avez
pas lu le manuel utilisateur).
(b) vous amenez le produit dans un centre de réparation
alors que le produit ne présente aucun défaut (c.-à-d.
vous n’avez pas lu le manuel utilisateur).
• Le montant des frais d’administration vous sera
communiqué avant la visite du technicien.
08 CARACTÉRISTIQUES
TECHNIQUES ET GUIDE
Caractéristiques techniques
Nom du subwoofer
SWA-9200S (GAUCHE/DROITE)
Poids
Dimensions (L x H x P)
105,0 x 152,8 x 109,0 mm
Plage de température de
fonctionnement
Plage d’humidité de
fonctionnement
10 % ~ 80 %,
sans condensation
HAUTS-PARLEURS
Puissance nominale de sortie
Consommation d'énergie globale en veille (W)
0,5 W
PUISSANCE DE SORTIE DE L'APPAREIL SANS FIL
Puissance de transmission SRD max.
REMARQUE
•
• Le poids et les dimensions sont donnés à titre
approximatif.
•
radio est conforme à la directive 2014/53/UE et répond à
Le texte complet de la déclaration de conformité est
accessible à l’adresse :
saisissez le nom du modèle.
Cet équipement peut fonctionner dans tous les pays de
l’UE et au Royaume-Uni.
Les bons gestes de mise au rebut de ce
produit
(Déchets d’équipements électriques et
électroniques)
(Applicable aux pays disposant de systèmes de collecte
séparés)
Ce symbole sur le produit, ses accessoires ou sa
documentation indique que ni le produit, ni ses accessoires
USB, etc.) ne peuvent être jetés avec les autres déchets
présentant des risques environnementaux et de santé
publique, veuillez séparer vos produits et accessoires
développement durable.
Les entreprises et particuliers sont invités à contacter
leurs fournisseurs et à consulter les conditions de leur
contrat de vente. Ce produit et ses accessoires ne peuvent
être jetés avec les autres déchets.
REACH, DEEE, batteries), rendez-vous sur :
environment/our-commitment/data/

ITA -
INFORMAZIONI SULLA
SICUREZZA
Grazie per aver acquistato questo
prodotto (SWA-9200S).
ATTENZIONE
RISCHIO DI SCARICHE
ELETTRICHE. NON APRIRE.
ATTENZIONE: PER RIDURRE IL RISCHIO DI SCARICHE
ELETTRICHE, NON RIMUOVERE IL COPERCHIO (O IL
PANNELLO POSTERIORE). ALL'INTERNO NON SONO
PRESENTI PARTI RIPARABILI DALL'UTENTE. PER
ASSISTENZA, RIVOLGERSI A UN TECNICO QUALIFICATO.
Per una descrizione dei simboli che è possibile trovare sul
Questo simbolo indica la presenza di alta
tensione all'interno. È pericoloso toccare
in qualsiasi modo le parti interne di questo
prodotto.
Questo simbolo indica che il prodotto include
documentazione importante relativa al
funzionamento e alla manutenzione.
Prodotto di classe II: questo simbolo indica che
a una messa a terra elettrica.
Se questo simbolo non è presente su un
prodotto dotato di cavo di alimentazione, ciò
protezione.
Tensione CA: questo simbolo indica che la
simbolo è di tipo CA.
Tensione CC: questo simbolo indica che la
simbolo è di tipo CC.
Attenzione, Consultare le Istruzioni per
l'uso: questo simbolo indica la necessità di
consultare il manuale utente per ottenere
ulteriori informazioni sulla sicurezza.
• Sul retro o sul fondo del telaio sono presenti aperture
di ventilazione. Per evitare il surriscaldamento del
non ostruire o coprire in nessun caso le aperture di
ventilazione.
Non posizionare il prodotto all’interno di uno spazio
limitato, come per esempio una libreria o un vano a
Non posizionare questa apparecchio sopra o in
prossimità di un calorifero o di una valvola di
del sole.
Non posizionare recipienti (vasi e così via) contenenti
acqua sopra al dispositivo. Una fuoriuscita d’acqua
può causare un incendio o una scossa elettrica.
•
vicino a una fonte d’acqua (per esempio nei pressi di una
vasca, un lavabo, un lavello, un lavatoio, una piscina,
•
incendio e scosse elettriche.
• I cavi di alimentazione dovrebbero essere posizionati
alle prese a parete, nonché ai cavi che fuoriescono dal
dispositivo.
•
è stato lasciato incustodito o non utilizzato per un
fulmini e picchi di corrente.
•
•
dell’apparecchio. La mancata osservanza di questa
precauzione può causare scosse elettriche.
Italiano

ITA -
• Per evitare il pericolo di scosse elettriche, non toccare mai
le parti interne dell’apparecchio. L’apparecchio può essere
• Assicurarsi di inserire il cavo di alimentazione
alimentazione da una presa a parete, estrarlo sempre
tirandolo dalla spina. e mai dal cavo stesso. Non toccare il
• Se il dispositivo non funziona normalmente, in
immediatamente e contattare un rivenditore autorizzato
o il centro servizi.
• Manutenzione del pannello.
• Se il prodotto rimane inutilizzato per diverso tempo, e in
presa di corrente.
La polvere accumulata può causare scosse
elettriche, perdite di corrente o incendio a causa del
• Contattare un centro servizi autorizzato per ricevere
informazioni qualora si intenda installare il prodotto in un
molto umido o in cui sono presenti sostanze chimiche,
via. In caso contrario, potrebbero causarsi seri danni al
prodotto.
• Utilizzare soltanto una spina e una presa a parete
elettriche o danni al prodotto. (Solo dispositivi di
Classe I.)
•
presa a parete e il cavo di alimentazione devono essere
prontamente accessibili in qualsiasi momento.
•
prodotto.
•
lontano dalla portata dei bambini.
• Non installare il prodotto in una posizione instabile, come
• Non far cadere o colpire il prodotto. Se il prodotto dovesse
•
il prodotto con un panno morbido e asciutto. Non
utilizzare prodotti chimici come cera, benzene, alcol,
•
esempio vasi, sul dispositivo.
•
a parete. Il sovraccarico di una presa può provocarne il
AVVERTENZA
• PER EVITARE IL PERICOLO DI INCENDIO,
NON AVVICINARE MAI AL PRODOTTO
CANDELE ACCESE O
AD ALTRI PRODOTTI CON FIAMME LIBERE.
• Per ridurre il rischio di incendio o scariche elettriche, non

ITA - 18
Precauzioni
1. Assicurarsi che l’alimentazione CA o CC della propria
abitazione sia conforme ai requisiti di alimentazione
posteriore del prodotto.
Installare il prodotto in posizione orizzontale su una
base idonea (ad es., un mobile), assicurandosi che ci sia
cm). Assicurarsi che le fessure di areazione non siano
apparecchiature che potrebbero surriscaldarsi. Questa
a parete.
2. Non esporre l’unità alla luce solare diretta o ad altre
dell’unità.
3.
di alimentazione dalla presa a parete CA. Il prodotto
non è destinato all’utilizzo industriale. È esclusivamente
riservato all’utilizzo personale. Se il prodotto è stato
conservato a basse temperature, potrebbe formarsi della
condensa. In caso di trasporto nei mesi invernali, prima di
4. Se l’elettricità fornita a casa è stimata a 240 V CA,
questa unità alle prese elettriche.
Istruzioni importanti di sicurezza
futuro.
1.
2.
3. Prestare attenzione a tutte le avvertenze.
4.
5. Non utilizzare questo dispositivo vicino all’acqua.
6. Pulire solo con un panno asciutto.
7. Non ostruire le bocchette di ventilazione. Installare
secondo le istruzioni del produttore.
8. Non installare vicino a fonti di calore quali caloriferi,
(inclusi i ricevitori AV) che producono calore.
9.
polarizzata o di messa a terra. Una spina polarizzata è
di messa a terra è dotata di due lame e un terzo polo di
a scopo di sicurezza. Se non è possibile inserire la spina
in dotazione nella presa, consultare un elettricista per
sostituire la presa obsoleta.
10.
calpestato o schiacciato, in particolare in prossimità
dispositivo.
11.
12. Utilizzare solo con il carrello, il supporto, il
dal produttore o venduti insieme al
dispositivo. Se si utilizza un carrello,
prestare attenzione durante lo
spostamento del dispositivo sul carrello
per evitare lesioni da ribaltamento.
13.
14.
esempio quando il cavo di alimentazione o la spina sono
normalmente o quando è caduto.

ITA - 19
01 VERIFICA DEI
COMPONENTI
Altoparlante surround x 2 / Cavo dell'altoparlante /
Adattatore CA/CC / Cavo di alimentazione
NOTA
• Per ulteriori informazioni sull’alimentazione e il consumo
(Etichetta: parte posteriore dell’unità)
•
preavviso.
02 CONNESSIONE DI
SWA-9200S ALLA
SOUNDBAR
1. Connessione dei cavi dell’altoparlante surround
È possibile connettere i due altoparlanti del surround
• Quando si connette il cavo dell’altoparlante, connettere il
cavo con anima all’altoparlante.
•
inserirlo oltre l’isolante.
Inserire completamente
il lo.
+ : Rosso
- : Nero
• Per connettere i cavi degli altoparlanti agli altoparlanti
surround, attenersi alle seguenti istruzioni:
Inserire le estremità rossa e nera di ciascun cavo
dell’altoparlante nei jack rosso e nero dell’altoparlante
corrispondente.
Cavo audio
2. Accensione degli altoparlanti surround
a una presa CA per accenderli. L’indicatore LED LINK (LED
rapidamente.
Se il LED LINK
LINK STANDBY
ID SET
Altoparlante
surround posteriore o
sinistro
LINK STANDBY
ID SET
LINK STANDBY
ID SET
Altoparlante surround posteriore
o sinistro
"Blu
lampeggiante"
3. Spegnimenti della soundbar
(Tasto di accensione) sulla soundbar o sul telecomando.
SOUND
MODE
PAIR
BYE
OPPURE
Rosso lampeggia
3 volte
•
soundbar, a seconda del modello.

ITA - 20
4. Connessione della soundbar e degli altoparlanti
surround
Tenere premuto il pulsante Su sul telecomando per più di
“ID SET
scompare.
e ha solo indicatori LED, fare riferimento alle informazioni sui
• Una volta completata correttamente la procedura ID SET,
la soundbar si accenderà automaticamente.
OPPURE
SOUND
MODE
PAIR
5 sec
ID SET
Lampeggia rosso →
verde → blu
•
soundbar, a seconda del modello.
5. Verica dell’avvenuto collegamento
Il LED LINK
quando viene stabilita una corretta connessione tra la
LINK sia blu.
Questa operazione potrebbe richiedere un minuto a seconda
dell’ambiente.
LINK STANDBY
ID SET
LINK STANDBY
ID SET
Altoparlante surround posteriore
o sinistro
"Luce blu
accesa"
• Se il LED LINK
(Stato dell’indicatore LED).
6. Stato dell’indicatore LED
LINK (blu) attivo : connessione effettuata alla soundbar.
LINK (blu) lampeggia rapidamente (a intervalli di circa
0,5 secondi)
ID SET.
• ID SET.
•
LINK (blu) lampeggia lentamente (a intervalli di circa
1 secondo) : connessione precedente a una soundbar, ma
attualmente non viene rilevata.
• Assicurarsi che la soundbar sia accesa.
• Se il LED LINK
anche se la soundbar è accesa,
1. Premere il tasto ID SET sul retro dell'altoparlante
LED LINK
LINK STANDBY
ID SET
LINK STANDBY
ID SET
5 sec
Altoparlante surround posteriore
o sinistro
2.
STANDBY (Rosso) attivo
la connessione non riesce.
• "LINK (blu) lampeggia
lentamente (a intervalli di circa 1 secondo)" sopra.
Altri: errori
•

ITA - 21
03 RISOLUZIONE DEI
PROBLEMI
Gli altoparlanti surround non riproducono alcun suono
•
e connessi correttamente a una soundbar, l'indicatore
LED LINK sul retro dell'altoparlante surround sinistro
surround alla soundbar come descritto in 02-6, Stato
dell’indicatore LED.
•
nelle vicinanze potrebbero interrompere il
dispositivi.
• Il contenuto in riproduzione potrebbe non avere
modalità audio in surround premendo il tasto SOUND
MODE sul telecomando.
Vi sono effetti jitter, ritardi, rumori o interruzioni nel
suono degli altoparlanti surround.
•
altoparlanti surround sono lontani dalla soundbar.
Posizionarli accanto alla Soundbar.
•
la soundbar è posizionata accanto a un dispositivo
elettrico che possono causare interferenze radio.
Posizionare la soundbar lontano da dispositivi che
potrebbero causare interferenze radio
(ad esempio, router wireless).
•
wireless a cablato.
Il volume degli altoparlanti della soundbar è troppo
basso.
• Alzare il livello posteriore come indicato nel manuale
della soundbar.
È possibile scaricare il manuale della soundbar
04 MONTAGGIO A PARETE
LINK STANDBY
8,2 mm
4,2 mm
7,9 mm
4,6 mm
4,0 mm
•
• Non installare i diffusori di traverso o sottosopra.
•
danni al prodotto a causa di un’installazione errata.
•
Electronics.
05 MODELLI COMPATIBILI
•
all’indirizzo www.samsung.com/support.
•
senza ulteriore avviso.

ITA - 22
06 AVVISO DI LICENZA PER IL
SOFTWARE OPEN SOURCE
Per inviare domande e richieste di informazioni su fonti
07 NOTE IMPORTANTI SUL
SERVIZIO
• Potrebbe venire addebitato un costo amministrativo nei
(a) l’utente richiede l’assistenza di un tecnico e non viene
rilevato alcun difetto nel prodotto (ovvero, l’utente
non ha letto il manuale utente).
(b) l’utente porta l’unità in un centro di riparazione e
non viene rilevato alcun difetto nel prodotto (ovvero,
l’utente non ha letto il manuale utente).
• Prima della visita di un tecnico, l’utente viene informato
dell’importo del costo amministrativo.
08 SPECIFICHE E GUIDA
Speciche
Nome subwoofer
SWA-9200S (SINISTRA/DESTRA)
Peso
Dimensioni (L x A x P)
105,0 x 152,8 x 109,0 mm
Intervallo di temperatura
di esercizio
Intervallo di umidità
operativa
10% ~ 80%,
senza condensa
AMPLIFICATORE
Potenza di uscita nominale
Consumo di energia complessivo in standby (W)
0,5 W
POTENZA DI USCITA DISPOSITIVO WIRELESS
Potenza max trasmettitore SRD
NOTA
•
• Il peso e le dimensioni sono approssimativi.
•
apparecchiatura radio è conforme alla Direttiva 2014/53/
Il testo completo della dichiarazione di conformità è
immettere il nome del modello.
L’uso di questa apparecchiatura è consentito in tutti i
Corretto smaltimento del prodotto
(riuti elettrici ed elettronici)
(Applicabile nei Paesi con sistemi di raccolta differenziata)
documentazione indica che il prodotto e i relativi accessori
evitare eventuali danni all’ambiente o alla salute causati
locali.
desidera smaltire al rivenditore, al momento dell’acquisto
di una nuova apparecchiatura di tipo equivalente. Presso i
almeno 400m
2
dimensioni inferiori a 25cm.
Gli utenti professionali (imprese e professionisti) sono invitati
condizioni del contratto di acquisto. Questo prodotto e i relativi
accessori elettronici non devono essere smaltiti unitamente ad
environment/our-commitment/data/

POR - 23
INFORMAÇÕES DE
SEGURANÇA
Obrigado por ter adquirido este
produto (SWA-9200S).
CUIDADO
RISCO DE CHOQUE ELÉTRICO.
NÃO ABRIR.
ATENÇÃO: PARA REDUZIR O RISCO DE CHOQUE ELÉTRICO,
NÃO RETIRAR A TAMPA (OU A PARTE POSTERIOR).
NÃO EXISTEM PEÇAS NO INTERIOR QUE POSSAM SER
REPARARAS PELO UTILIZADOR. A MANUTENÇÃO DEVE
SER DEIXADA A CARGO DE PESSOAL QUALIFICADO DE
SERVIÇOS DE ASSISTÊNCIA. Consulte a tabela abaixo para
uma explicação dos símbolos que poderão estar no seu
Este símbolo indica a presença de alta tensão
qualquer tipo de contacto com as peças
existentes no interior do produto.
Este símbolo indica a existência de
documentação importante relativa ao
funcionamento e manutenção deste produto
(fornecida com o mesmo).
Produto de classe II: Este símbolo indica que
Se este símbolo não se encontrar num produto
com um cabo de alimentação, o produto
Tensão CA: este símbolo indica que a
tensão nominal indicada por este símbolo
corresponde à tensão CA.
Tensão CC: este símbolo indica que a
tensão nominal indicada por este símbolo
corresponde à tensão CC.
Cuidado. Consultar as instruções de utilização:
este símbolo aconselha o utilizador a consultar
o manual do utilizador quanto a informações
• As ranhuras e as aberturas na caixa e na parte traseira ou
inferior do aparelho permitem a ventilação necessária.
aberturas nunca devem ser bloqueadas ou cobertas.
Não coloque o aparelho num espaço apertado, como
por exemplo, uma estante ou armário embutido, salvo
se existir ventilação adequada.
Não coloque o aparelho perto ou por cima de
um radiador ou de uma saída de ar do sistema
diretamente exposto à luz solar.
Não coloque recipientes (vasos, etc.) que contenham
pode causar um incêndio ou um choque elétrico.
• Não permita que o aparelho apanhe chuva nem o
lava-loiças ou tanque de lavar roupa, numa cave com
humidade ou perto de uma piscina, etc.). Se molhar
contacte um fornecedor autorizado imediatamente.
• Não submeta as tomadas de parede, as extensões
respetivas capacidades; caso contrário, pode provocar um
incêndio ou choque elétrico.
•
prevenir que sejam pisados ou apertados por objetos
colocados sobre ou contra eles. Relativamente aos cabos,
deve ter especial cuidado com as extremidades, na
tomada de parede e no local de saída do aparelho.
•
o sistema de cabo. Deste modo, previne que o aparelho
•
tensão do transformador CC corresponde à alimentação
elétrica local.
• Nunca introduza peças metálicas nas aberturas do
aparelho. Caso contrário, existe o risco de choque elétrico.
Português

POR - 24
• Para evitar choques elétricos, nunca toque no interior do
aparelho. Este aparelho apenas deve ser aberto por um
•
alimentação de uma tomada de parede, puxe-o sempre
molhadas.
• Se o aparelho não funcionar normalmente, especialmente
fornecedor autorizado ou um centro de assistência
técnica.
• Manutenção da caixa.
•
alimentação da tomada caso não vá utilizar o produto
com que o cabo de alimentação produza faíscas e
calor ou ao deteriorar o isolamento.
• Caso pretenda instalar o produto num local com muito
24 horas por dia, como por exemplo num aeroporto ou
numa estação de comboios, entre em contacto com
um centro de assistência técnica autorizado para obter
no produto.
• Utilize apenas um cabo e uma tomada de parede
Um aterramento não adequado pode provocar
(Apenas Equipamento de Classe l.)
•
parede e o cabo de alimentação devem estar sempre
facilmente acessíveis.
• Não permita que as crianças se apoiem no produto.
•
• Não instale o produto num local instável, como uma
prateleira instável, um piso inclinado ou um local sujeito
a vibração.
• Não deixe cair nem sujeite o produto a impactos.
alimentação e contacte um centro de assistência técnica.
•
com um pano macio e seco. Não utilize químicos como,
por exemplo, cera, benzeno, álcool, diluentes, inseticida,
eliminar as letras no produto.
•
objetos com líquidos, como jarros, sobre o aparelho.
•
sobreaquecimento, resultando em incêndio.
AVISO
• PARA EVITAR QUE O FOGO SE ALASTRE,
MANTENHA SEMPRE AS VELAS E OUTROS
OBJETOS COM CHAMAS
LONGE DESTE PRODUTO.
• Para reduzir o risco de incêndio ou choque elétrico, não
exponha este aparelho a chuva ou humidade.

POR - 25
Precauções
1.
sua residência está em conformidade com os requisitos
elétricos indicados no autocolante de características na
parte traseira do produto.
Instale o produto na horizontal, numa base adequada
não estão cobertas. Não coloque a unidade sobre
quente. A unidade foi concebida para utilização contínua.
CA da tomada de parede.
2. Não exponha a unidade a luz solar direta ou outras fontes
avaria na unidade.
3.
da tomada de parede CA. O produto não foi concebido
para utilização industrial. É apenas para utilização
pessoal. Se o produto for armazenado a baixas
temperaturas, poderá ocorrer condensação. Se
transportar a unidade durante o inverno, espere
aproximadamente 2 horas até a unidade ter alcançado a
temperatura ambiente antes de a utilizar.
4. Se a eletricidade fornecida na sua casa for de 240 V CA,
unidade às tomadas elétricas.
Instruções Importantes de Segurança
Leia cuidadosamente estas instruções de funcionamento
funcionamento à mão para referência futura.
1. Leia estas instruções.
2. Guarde estas instruções.
3. Preste atenção a todos os avisos.
4.
5.
6. Limpe apenas com um pano seco.
7. Não bloqueie nenhuma abertura de ventilação. Instale de
acordo com as instruções do fabricante.
8. Não instale perto de qualquer fonte de calor, como
radiadores, saídas de ar do sistema de aquecimento,
produzam calor.
9.
eletricista para substituir a tomada obsoleta.
10. Proteja o cabo de alimentação para que este não seja
11.
12. Utilize apenas o carrinho, o suporte, o
tripé, a abraçadeira ou a mesa
com o aparelho. Se utilizar um carrinho,
tenha cuidado nas deslocações com o
carrinho e o aparelho para evitar lesões
decorrentes de quedas.
13.
14.
reparar o aparelho se este for alvo de qualquer tipo
de danos, como quando existem danos no cabo de
ou tenham caído objetos sobre o aparelho, quando o
aparelho tenha sido exposto a chuva ou humidade, não
funcione corretamente ou tenha caído.

POR -
01 VERIFICAR OS
COMPONENTES
2 altifalantes surround / Cabo do altifalante /
Transformador de CA/CC / Cabo de alimentação
NOTA
• Para obter mais informações sobre a fonte de
no produto. (Etiqueta: parte posterior da unidade
principal)
•
sem aviso prévio.
02 LIGAR SWA-9200S A UM
SOUNDBAR
1. Ligar os cabos do altifalante Surround
de som surround.
•
ao altifalante.
• Insira totalmente o cabo, tendo cuidado para não inserir
para além do isolamento do cabo.
Insira totalmente o cabo.
+ : Vermelho
- : Preto
• Ao ligar os cabos de altifalante aos altifalantes surround,
siga os seguintes passos:
Insira as extremidades vermelha e preta de cada
cabo de altifalante nas entradas vermelha e preta do
altifalante apropriado.
As etiquetas encontram-se na parte posterior dos
altifalantes.
Cabo de áudio
2. Ligar os altifalantes Surround
LINK (LED
azul) na parte posterior do altifalante surround esquerdo
piscará rapidamente.
Se o LED LINK
LINK STANDBY
ID SET
Parte posterior do
Surround Esquerdo
LINK STANDBY
ID SET
LINK STANDBY
ID SET
Parte posterior do Surround Esquerdo
"Azul
intermitente"
3. Desligar o Soundbar
(Ligar/Desligar) no Soundbar ou no telecomando.
SOUND
MODE
PAIR
BYE
OU
Vermelho pisca 3 vezes
•
Soundbar, consoante o modelo.

POR -
4. Ligar o Soundbar e os Altifalantes Surround
Mantenha premido o botão Para cima no telecomando
ID SET”
(Se o Soundbar não tiver um ecrã, apenas indicadores LED,
consulte as informações sobre LED abaixo.)
• ID SET ser concluído com êxito, o
OU
SOUND
MODE
PAIR
5 s
ID SET
Pisca a Vermelho →
Verde → Azul
•
Soundbar, consoante o modelo.
5. Vericar se a ligação foi concluída
O indicador LED LINK deixa de estar intermitente e muda
com êxito entre o Soundbar e os altifalantes surround.
LINK está azul.
(Pode demorar um minuto consoante o ambiente.)
LINK STANDBY
ID SET
LINK STANDBY
ID SET
Parte posterior do Surround Esquerdo
“Azul aceso”
• Se o LED LINK
dentro de um minuto, repita o processo do passo 2 ao 5,
Estado do indicador LED).
6. Estado do indicador LED
LINK (Azul) Ligado
LINK (Azul) a piscar rapidamente (com um intervalo de
cerca de 0,5 segundos): os altifalantes surround estão no
modo ID SET.
• ID SET.
• Repita os passos 3 a 5.
LINK (Azul) a piscar lentamente (com um intervalo de
cerca de 1 segundo)
mas impossível de encontrar de momento.
•
• Se o LED LINK continuar a piscar lentamente mesmo
1. Mantenha premido o botão ID SET na parte posterior
do altifalante surround esquerdo durante mais
LINK começar a piscar
rapidamente a azul.
LINK STANDBY
ID SET
LINK STANDBY
ID SET
5 s
Parte posterior do Surround Esquerdo
2. Repita os passos 3 a 5.
STANDBY (Vermelho) Ligado: quando o Soundbar se
• “LINK (Azul) a piscar
lentamente (com um intervalo de cerca de 1 segundo)”
acima.
Outros: erros
•

POR - 28
03 RESOLUÇÃO DE
PROBLEMAS
Sem som nos Altifalantes Surround
• Se os altifalantes Surround estiverem emparelhados
LINK na parte posterior do Surround Esquerdo está
Surround ao Soundbar, consultando as instruções 02-6,
Estado do indicador LED.
•
que se encontrem a emitir sinais de radiofrequência
nas proximidades. Mantenha o altifalante afastado
desses dispositivos.
• O conteúdo que está a reproduzir pode não ser
compatível com som surround, apenas estéreo. Altere
o modo de som para Surround ao premir o botão
SOUND MODE no telecomando.
Existe instabilidade do som, atrasos, ruídos ou cortes no
som dos Altifalantes Surround.
• Se os Altifalantes Surround estiverem afastados
do Soundbar, pode ocorrer instabilidade do som ou
atrasos. Coloque-os perto do Soundbar.
•
elétrico que pode provocar interferências
radioelétricas, pode ocorrer instabilidade do som ou
que podem causar interferências radioelétricas
•
O volume dos Altifalantes Surround está demasiado baixo
• Consulte o manual do Soundbar e aumente o volume
na parte posterior.
04 MONTAR NUMA PAREDE
LINK STANDBY
8,2 mm
4,2 mm
7,9 mm
4,6 mm
4,0 mm
•
• Tenha atenção para não instalar as colunas na lateral ou
ao contrário.
•
quaisquer danos no produto devido a instalação
inadequada.
•
05 MODELOS COMPATÍVEIS
•
www.samsung.com/
support para obter mais informações.
• A lista de modelos compatíveis está sujeita a alterações
sem aviso prévio.

POR - 29
06 AVISO DE LICENÇA DE
CÓDIGO ABERTO
Para enviar dúvidas ou pedidos para questões relacionadas
07 NOTAS IMPORTANTES
SOBRE A ASSISTÊNCIA
• Será cobrada uma taxa administrativa se:
(a) solicitar a assistência de um técnico e não existir
qualquer defeito no produto (ou seja, se não tiver lido o
manual do utilizador).
(b) levar a unidade a um centro de reparação e não existir
qualquer defeito no produto (ou seja, se não tiver lido
o manual do utilizador).
• Será informado do montante da taxa administrativa antes
da visita de um técnico.
08 ESPECIFICAÇÕES E GUIA
Características técnicas
Nome do Subwoofer
SWA-9200S (ESQUERDO/DIREITO)
Peso
Dimensões (L x A x P)
105,0 x 152,8 x 109,0 mm
Intervalo de temperatura
de funcionamento
Intervalo de humidade de
funcionamento
10% ~ 80%,
sem condensação
AMPLIFICADOR
Potência de saída nominal
Consumo global de energia em espera (W)
0,5 W
POTÊNCIA DE SAÍDA DO DISPOSITIVO SEM FIOS
Potência máx. do transmissor SRD
NOTA
•
• Os valores do peso e das dimensões são aproximados.
•
de rádio está em conformidade com a Diretiva 2014/53/
O texto completo da declaração de conformidade está
nome do modelo.
Este equipamento pode ser utilizado em todos os países
da UE e no Reino Unido.
Eliminação Correcta Deste Produto
(Resíduos de Equipamentos Eléctricos e
Electrónicos)
(Aplicável a países cujos sistemas de recolha sejam
separados)
cabo USB) não deverão ser eliminados juntamente com
útil. Para impedir danos ao ambiente ou à saúde humana
causados pela eliminação incontrolada de resíduos, deverá
separar estes equipamentos de outros tipos de resíduos
e reciclá-los de forma responsável, para promover uma
reutilização sustentável dos recursos materiais.
Os utilizadores domésticos deverão contactar o
estabelecimento onde adquiriram este produto ou as
ambientais.
fornecedor e consultar os termos e condições do contrato
não deverão ser misturados com outros resíduos
comerciais para eliminação.
Para obter informações sobre os compromissos ambientais
REACH, REEE, Pilhas, visite:
environment/our-commitment/data/

SPA - 30
INFORMACIÓN DE
SEGURIDAD
Gracias por adquirir este producto
(SWA-9200S).
PRECAUCIÓN
PELIGRO DE DESCARGA
ELÉCTRICA. NO ABRIR.
PRECAUCIÓN: PARA REDUCIR EL RIESGO DE DESCARGA
ELÉCTRICA, ABSTÉNGASE DE RETIRAR LA CARCASA (O LA
PARTE POSTERIOR). EN EL INTERIOR NO HAY NINGUNA
PIEZA QUE PUEDA REPARAR EL USUARIO. REMITA LAS
TAREAS DE REPARACIÓN A PERSONAL CUALIFICADO.
de los símbolos que pueden aparecer en su producto
Este símbolo indica la presencia de alto voltaje
con cualquier pieza interior de este producto.
Este símbolo indica que con este producto
correspondiente al funcionamiento y
mantenimiento.
Producto de Clase II: Este símbolo indica que
toma de tierra eléctrica.
Si este símbolo no está presente en un
tierra.
de AC.
de DC.
Este símbolo informa de que se debe consultar
el manual del usuario para obtener más
• Las ranuras y aberturas existentes en la unidad y en la
parte posterior o inferior se facilitan para proporcionar la
estas ranuras y aberturas nunca deben bloquearse ni
cubrirse.
No coloque este aparato en un espacio cerrado, como
una librería, o un armario empotrado, a menos que se
No coloque el aparato cerca de un radiador o una
•
ni junto a una piscina, etc.). Si este aparato se moja
inmediatamente con un distribuidor autorizado.
•
los adaptadores por encima de su capacidad, ya que esto
•
puedan pisarse ni doblarse por colocar objetos sobre ellos
a los cables en el extremo del enchufe, en las tomas de
corriente y en el punto donde salen del aparato.
•
eléctrica o cuando no lo utilice durante periodos
desconecte la antena o el cable del sistema. Esto evitará
línea eléctrica.
•
corresponda con la red eléctrica local.
•
Español

SPA - 31
•
abrir este aparato.
•
• Desenchufe el aparato de inmediato si no funciona
correctamente, y especialmente si emite sonidos u olores
autorizado o un centro de servicio técnico.
• Mantenimiento de la unidad.
Antes de conectar otros componentes a este producto,
• Desenchufe el producto de la toma de corriente si no
lo va a utilizar o si va ausentarse durante un periodo
el aislamiento se deteriore.
•
altas o muy bajas, un ambiente húmedo o presencia
de sustancias químicas, así como en casos en que el
aparato deba funcionar 24 horas al día, como por ejemplo
en aeropuertos, estaciones, etc. De no obrar como le
indicamos, puede estropear el producto.
• Use únicamente enchufes y tomas de corriente de pared
que incluyan toma de tierra.
Una toma a tierra inadecuada puede producir
(Solo equipos de Clase l.)
•
desconectarlo de la toma de corriente de pared. Por tanto,
tanto la toma de corriente de pared como el cable de
•
•
•
expuesto a vibraciones.
•
en contacto con un centro de servicio.
• Para limpiar este aparato, desenchufe el cable de
disolvente, insecticida, ambientador, lubricante ni
aspecto externo del producto, o borrar el texto impreso
sobre él.
•
(como, por ejemplo, jarrones) sobre el aparato.
• No enchufe varios aparatos eléctricos en la misma toma
que se sobrecaliente y provocar un incendio.
ADVERTENCIA
• PARA EVITAR LA PROPAGACIÓN DEL FUEGO
MANTENGA LAS VELAS Y OTROS ARTÍCULOS
CON LLAMAS ABIERTAS LEJOS DE ESTE
PRODUCTO EN TODO MOMENTO.
•

SPA - 32
Precauciones
1.
indicadas en la etiqueta adhesiva situada en la parte
posterior del producto.
Instale el producto horizontalmente en una base
otros aparatos que puedan calentarse. Esta unidad se
completamente la unidad, desconecte el cable de CA de
la toma de la pared.
2.
fuentes de calor. Eso podría causar sobrecalentamiento y
problemas de funcionamiento de la unidad.
3.
corriente de AC si la unidad funciona mal. El producto
producto se ha almacenado a baja temperatura. Si se
transporta la unidad durante el invierno, espere 2 horas
aproximadamente hasta que la unidad haya alcanzado la
temperatura ambiente antes de usarla.
4. Si el suministro eléctrico de su casa es de 240 V AC, utilice
un adaptador de enchufe adecuado para conectar esta
unidad a sus tomas de corriente.
Instrucciones importantes de
seguridad
Lea atentamente estas instrucciones de uso antes de utilizar
uso para poder consultarlas en el futuro.
1. Lea estas instrucciones.
2. Conserve estas instrucciones.
3.
4.
5.
6.
7.
acuerdo con las instrucciones del fabricante.
8. No lo instale cerca de fuentes de calor como radiadores,
los receptores AV) que produzcan calor.
9.
polarizado o con toma de tierra. Un enchufe polarizado
tiene dos hojas, una más ancha que la otra. Un enchufe
con toma de tierra tiene dos hojas y una tercera clavija
suministrado no encaja en su toma de corriente, consulte
a un electricista para que sustituya la toma obsoleta.
10.
se presione, especialmente en los enchufes, las tomas de
corriente y el punto en el que sale del aparato.
11.
fabricante.
12. Solo debe usarse con el carro, soporte,
por el fabricante, o vendidos con el
aparato para evitar lesiones por vuelco.
13. Desenchufe este aparato durante las tormentas eléctricas
o cuando pretenda dejarlo sin usar durante mucho
tiempo.
14.
Será necesario repararlo cuando el aparato sufra
dentro del aparato, el aparato haya estado expuesto a la
lluvia o a la humedad, no funcione con normalidad o se
haya caído.

SPA - 33
01 COMPROBACIÓN DE LOS
COMPONENTES
Altavoces traseros X 2 / Cable de altavoz / Adaptador AC/
NOTA
•
la unidad principal)
•
previo aviso.
02 CONEXIÓN DEL SWA-9200S
A LA SOUNDBAR
1. Conecte los cables de los altavoces traseros
Use los cables de altavoz para conectar los dos altavoces
traseros.
• Al conectar el cable del altavoz, conecte el cable principal
al altavoz.
• Inserte el cable completamente, con cuidado de no
insertarlo a más profundidad que el aislamiento del
cable.
Inserte el cable
completamente.
+ : Rojo
- : Negro
• Al conectar los cables de los altavoces a los altavoces
traseros, siga estos pasos:
del altavoz correspondiente.
Las etiquetas están en la parte posterior de los
altavoces.
Cable de audio
2. Encienda los altavoces traseros
a una toma eléctrica para encender los altavoces traseros.
El indicador LED LINK (LED azul) de la parte posterior del
altavoz trasero izquierdo parpadeará rápidamente.
Si el LED LINK
LINK STANDBY
ID SET
Posterior del altavoz
trasero izquierdo
LINK STANDBY
ID SET
LINK STANDBY
ID SET
Posterior del altavoz trasero izquierdo
"Azul
parpadeando"
3. Apague la Soundbar
(Encendido) en la Soundbar o el mando a
distancia.
SOUND
MODE
PAIR
BYE
O
Rojo parpadea X3
•
dependiendo del modelo.

SPA - 34
4. Conecte la Soundbar y los altavoces traseros
Arriba del mando a distancia durante más
ID SET” en la
pantalla de la Soundbar. El mensaje aparecerá brevemente.
(Si su Soundbar no tiene pantalla y solo dispone de
• Una vez completado el proceso de ID SET, la Soundbar se
encenderá automáticamente.
O
SOUND
MODE
PAIR
5 s
ID SET
Rojo → Verde →
Azul parpadea
•
dependiendo del modelo.
5. Compruebe que la conexión se ha completado
El indicador LED LINK deja de parpadear y pasa a lucir de
están correctamente vinculados.
LED LINK se pone azul.
LINK STANDBY
ID SET
LINK STANDBY
ID SET
Posterior del altavoz trasero izquierdo
"Azul
encendido"
• Si el LED LINK
Estado del
indicador LED).
6. Estado del indicador LED
LINK (azul) encendido: Conectado con la Soundbar.
Link (azul) parpadeando rápidamente (a un intervalo de
en torno a 0,5 segundos): Los altavoces traseros están en
modo ID SET.
• Compruebe que la Soundbar esté encendida y en modo
ID SET.
• Repita los pasos del 3 al 5.
Link (azul) parpadeando lentamente (a un intervalo de en
torno a 1 segundo): Ha estado conectado previamente a
una Soundbar pero actualmente no la encuentra.
• Compruebe que la Soundbar esté encendida.
• Si el LED LINK
aunque la Soundbar esté encendida,
1.ID SET en la parte posterior del altavoz
que el LED LINK empiece a parpadear rápidamente
en azul.
LINK STANDBY
ID SET
LINK STANDBY
ID SET
5 s
Posterior del altavoz trasero izquierdo
2. Repita los pasos del 3 al 5.
STANDBY (rojo) encendido
• "Link (azul) parpadeando
lentamente (a un intervalo de en torno a 1 segundo)"
Otros: Errores
•

SPA - 35
03 SOLUCIÓN DE
PROBLEMAS
Los altavoces traseros no emiten sonido
• Si los altavoces traseros están correctamente
emparejados y conectados con la Soundbar, el
indicador LED LINK de la parte posterior del altavoz
Vuelva a conectar los altavoces traseros a la Soundbar
02-6, Estado del indicador LED.
•
• Es posible que el contenido que está reproduciendo no
SOUND
MODE del mando a distancia.
Hay interferencias, retardos, ruidos o interrupciones en el
sonido de los altavoces traseros.
• Podrían producirse interferencias o retardos si los
altavoces traseros están alejados de la Soundbar.
• Podrían producirse interferencias o retardos si la
Soundbar está cerca de un dispositivo eléctrico que
pueda causar interferencias de radio. Coloque la
Soundbar lejos de este tipo de dispositivos que pueden
causar interferencias de radio
(p. ej. un router inalámbrico).
•
inalámbrico a por cable.
El volumen de los altavoces traseros es demasiado bajo
•
su Soundbar.
04 INSTALACIÓN EN UNA
PARED
LINK STANDBY
8,2 mm
4,2 mm
7,9 mm
4,6 mm
4,0 mm
• Compruebe que la pared sea estable. Si la pared no es
• No instale los altavoces de lado ni boca abajo.
•
•
05 MODELOS COMPATIBLES
•
en www.samsung.com/support para obtener más
• La lista de modelos compatibles está sujeta a cambios sin
previo aviso.

SPA -
06 AVISO SOBRE LICENCIAS
DE CÓDIGO ABIERTO
Si desea enviar consultas y solicitudes relativas a cuestiones
07 NOTAS IMPORTANTES
SOBRE EL SERVICIO
TÉCNICO
• Se le puede cobrar una tarifa administrativa si se da
el manual del usuario).
(b) Lleva la unidad al centro de reparaciones y el producto
leído el manual del usuario).
• Se le comunicará la tarifa administrativa antes de que le
visite el técnico.
08 ESPECIFICACIONES Y GUÍA
Especicaciones
Nombre del subwoofer
SWA-9200S (IZQUIERDA/DERECHA)
Peso
Dimensiones (an. × al. × pr.)
105,0 x 152,8 x 109,0 mm
Rango de temperaturas de
funcionamiento
Rango de humedades de
funcionamiento
del 10 % al 80 % ,
AMPLIFICADOR
Potencia nominal de salida
Consumo de energía total en espera (W)
0,5 W
POTENCIA DE SALIDA DEL DISPOSITIVO INALÁMBRICO
Potencia máxima del transmisor SRD
NOTA
•
• El peso y las dimensiones son aproximados.
•
equipo de radio cumple con la Directiva 2014/53/UE y los
el nombre del modelo.
Este equipo puede funcionar en todos los países de la UE
y en el Reino Unido.
Eliminación correcta de este producto
(Residuos de aparatos eléctricos y
electrónicos)
(Se aplica en países con sistemas de recolección por
separado)
La presencia de este símbolo en el producto, accesorios
eliminarse junto con otros residuos domésticos. Para
residuos, separe estos productos de otros tipos de residuos
y recíclelos correctamente. De esta forma se promueve la
Los usuarios particulares pueden contactar con el
establecimiento donde adquirieron el producto o con las
autoridades locales pertinentes para informarse sobre
Los usuarios comerciales pueden contactar con su
proveedor y consultar las condiciones del contrato de
deben eliminarse junto a otros residuos comerciales.
ejemplo, REACH, RAEE y sobre baterías), visite la
sustainability/environment/our-commitment/data/

Esta página
se ha dejado
intencionadamente
en blanco.

Esta página
se ha dejado
intencionadamente
en blanco.

Esta página
se ha dejado
intencionadamente
en blanco.

© 2022 Samsung Electronics Co., Ltd. All rights reserved.
Contact SAMSUNG WORLD WIDE
If you have any questions or comments relating to Samsung products, please contact the
SAMSUNG customer care Centre.
Country Samsung Service Centre
Web Site
UK 0333 000 0333
support
IRELAND
(EIRE)
support
GERMANY
support
FRANCE
support
ITALIA 800-SAMSUNG
support
SPAIN
support
PORTUGAL
nacional
Dias úteis das 9h às 20h
support
LUXEMBURG
support
NETHERLANDS
088 90 90 100
support
BELGIUM
02-201-24-18
support (Dutch)
support (French)
NORWAY
support
DENMARK
support
FINLAND
support
SWEDEN
support
POLAND
operatora)
pl/support/
HUNGARY
support
AUSTRIA
(0800-SAMSUNG)
support
Country Samsung Service Centre
Web Site
SWITZERLAND
support (German)
support (French)
CZECH 800 - SAMSUNG
support
SLOVAKIA 0800 - SAMSUNG
support
CROATIA
support
BOSNIA 055 233 999
support
North
Macedonia
support
MONTENEGRO
020 405 888
SLOVENIA
številka)
support
SERBIA
support
Kosovo 038 40 30 90
ALBANIA
support
BULGARIA
support
ROMANIA
support
CYPRUS 8009 4000 only from
landline, toll free
support
GREECE
mobile and land line
LITHUANIA
support
LATVIA
support
ESTONIA
support
-
 1
1
-
 2
2
-
 3
3
-
 4
4
-
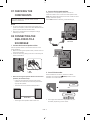 5
5
-
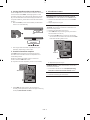 6
6
-
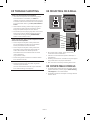 7
7
-
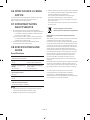 8
8
-
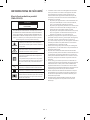 9
9
-
 10
10
-
 11
11
-
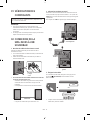 12
12
-
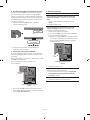 13
13
-
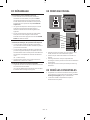 14
14
-
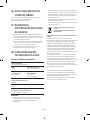 15
15
-
 16
16
-
 17
17
-
 18
18
-
 19
19
-
 20
20
-
 21
21
-
 22
22
-
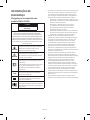 23
23
-
 24
24
-
 25
25
-
 26
26
-
 27
27
-
 28
28
-
 29
29
-
 30
30
-
 31
31
-
 32
32
-
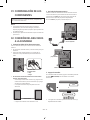 33
33
-
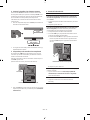 34
34
-
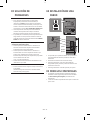 35
35
-
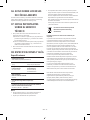 36
36
-
 37
37
-
 38
38
-
 39
39
-
 40
40


Samsung SWA-9200S Wireless Rear Speaker Kits Manual de usuario
- Categoría
- Equipo de música suplementario
- Tipo
- Manual de usuario