SW-Motech GPT.02.059.65000/B Mounting instructions
- Tipo
- Mounting instructions

ANBAUANLEITUNG
mounting instructions • instructions de montage • instrucciones de montaje • istruzioni di montaggio
beinhaltet • contains • contient • contiene • contiene
GPT.02.059.65000/B
GPT.02.059.19000/B
GPT.00.152.36200/B
HSK.00.745.11000/B
LOC.00.745.10000

Art.-Nr.: GPT.02.059.19000/B Revision: 00 · Datum: 08 - 2023
ADVENTURE-RACK Gepäckträger
~ 0.5 h. LEICHT SCHWER
DEUTSCH · Vielen Dank, dass Sie sich für dieses Premium-Produkt von SW-
MOTECH entschieden haben. Besuchen Sie unseren Webshop für weitere
Informationen (z. B. Modellzuweisungen). Erforderliche Dokumente (z. B.
ABE) stehen Ihnen dort als Download zur Verfügung.
Bitte lesen und verstehen Sie alle Anweisungen, Sicherheitshinweise und
Warnungen in dieser Anbauanleitung vor Montage und Nutzung des
Produkts, um Verletzungen und Schäden zu vermeiden. Bewahren Sie diese
Anbauanleitung als Referenz auf.
Dieses Produkt wurde für Fahrzeuge im Werkszustand entwickelt. Die
Kompatibilität mit Original-Zubehörteilen bzw. den Zubehörteilen anderer
Hersteller kann nicht gewährleistet werden.
Diese Anbauanleitung ist nach unserem derzeitigen Kenntnisstand verfasst
worden. Rechtliche Ansprüche auf Richtigkeit bestehen nicht. Fehler und
Irrtümer vorbehalten. Technische und gestalterische Änderungen sind
vorbehalten. Das Urheberrecht liegt bei SW-MOTECH.
SICHERHEITSWARNUNGSSYMBOL
Dieses Warnsymbol wird in dieser Anbauanleitung verwendet, um vor
tödlichen Gefahren, Verletzungen oder anderen Gefahren zu warnen. Die
Wörter GEFAHR, WARNUNG oder VORSICHT werden mit diesem
Warnsymbol verwendet, um wichtige Sicherheitshinweise und
Informationen in Bezug auf die Montage und Nutzung dieses Produkts zu
übermitteln. Diese Wörter zusammen mit dem Sicherheitswarnsymbol
bedeuten:
GEFAHR: Weist auf eine gefährliche Situation hin, die zum Tod oder zu
schweren Verletzungen führt, wenn sie nicht vermieden wird!
WARNUNG: Weist auf eine gefährliche Situation hin, die zum Tod oder zu
schweren Verletzungen führen kann, wenn sie nicht vermieden wird!
VORSICHT: Weist auf eine gefährliche Situation hin, die zu leichten oder
mittelschweren Verletzungen führen kann, wenn sie nicht vermieden wird!
HINWEIS: Wichtige Informationen, jedoch nicht in Bezug auf Todes- oder
Verletzungsgefahr (nur Sachschäden)!
ALLGEMEINE HINWEISE
WARNUNG: Die Montage und/oder Wartung dieses Produkts erfordert
fortgeschrittene technische Fähigkeiten, geeignetes Werkzeug und ein
gutes Verständnis der Werkzeugnutzung und Drehmomentangaben. Zu
Ihrer eigenen Sicherheit empfiehlt SW-MOTECH, die Montage und/oder
Wartung von einer qualifizierten und zertifizierten Zweiradwerkstatt
durchführen zu lassen.
WARNUNG: Wenn Sie sich für die Eigenmontage dieses Produkts
entscheiden, lesen Sie vor Montage und Nutzung die Anbauanleitung
sorgfältig und vollständig durch und befolgen Sie alle Anweisungen, um
schwere oder tödliche Verletzungen zu vermeiden. Beachten Sie bei der
Montage und Verwendung auch alle relevanten Informationen im
Fahrzeughandbuch. WENN SIE EINEN TEIL DIESER ANBAUANLEITUNG
NICHT VERSTEHEN ODER EINE ERKLÄRUNG EINER ANWEISUNG
BENÖTIGEN, VERSUCHEN SIE NICHT DIESES PRODUKT ZU MONTIERN,
OHNE SW-MOTECH UM HILFE ZU FRAGEN!
VORBEREITUNG: Lesen Sie die Anbauanleitung aufmerksam und stellen Sie
sicher, dass alle Teile der Stückliste vorhanden sind.
VORSICHT: Achten Sie auf den sicheren Stand Ihres Fahrzeugs.
Schalten Sie den Motor ab und ziehen Sie den Zündschlüssel. Lassen Sie
den Motor/Auspuff bei Bedarf abkühlen. Klemmen Sie die Batterie bei
Arbeiten an der Elektrik ab. Verwenden Sie nur geeignetes Werkzeug und
tragen Sie während der Montage und Wartung immer eine Schutzbrille
und Handschuhe. Lassen Sie sich bei der Montage und Wartung von einer
zweiten Person helfen.
MONTAGE: Alle vom Fahrzeug entfernten Teile und Verbindungen müssen
gemäß den Angaben des Fahrzeugherstellers wieder eingebaut oder durch
von SW-MOTECH gelieferte Teile und Hardware ersetzt werden.
WARNUNG: Sichern Sie alle Gewinde, sofern nicht anders angegeben,
mit mittelstarker, flüssiger Schraubensicherung.
GEFAHR: Von SW-MOTECH nicht definierte Anzugsdrehmomente
müssen Sie vom Fahrzeughersteller oder von einer zertifizierten
Motorradwerkstatt beziehen.
FUNKTIONSKONTROLLE: Stellen Sie nach der Montage sicher, dass keine
beweglichen Teile blockiert sind und die Funktion des Fahrzeugs nicht
gestört wird. Kabel und Schläuche dürfen nicht scheuern und/oder
geklemmt werden.
WARNUNG: Führen Sie vor Fahrtbeginn eine umfassende
Funktionskontrolle durch. Prüfen Sie nach den ersten 50 km und dann
regelmäßig das Anzugsmoment aller Verbindungen und den festen Sitz
des Produkts. Montiertes Zubehör kann das Fahrverhalten und die
Stabilität des Fahrzeugs verändern.
ANBAUANLEITUNG · ANBAUANLEITUNG LESEN UND AUFBEWAHREN!
SW-MOTECH GmbH & Co. KG
Ernteweg 7-10
35282 Rauschenberg
Deutschland
www.sw-motech.com
Die inhaltliche Übersetzung erfolgt automatisiert.
© SW-MOTECH GmbH & Co. KG
Irrtümer und Änderungen vorbehalten.
Technische und Design-Änderungen vorbehalten.
1

Beachten Sie in dem Abschnitt MONTAGE
vorkommenden Symbole und deren Bedeutung.
Wenn im Abschnitt MONTAGE die Bezeichnung OEM
vorkommt, müssten die Vorgaben des
Fahrzeugherstellers beachtet und angewandt
werden.
Bei Fragen steht Ihnen unser Kundendienst sowie unsere
Distributoren gerne zur Verfügung. Unsere
Telefonnummer sowie eine Liste unserer Distributoren
finden Sie in unserem Webshop:
www.sw-motech.com
Schraubensicherung verwenden: Weist darauf hin,
dass ein Gewinde mit flüssiger Schraubensicherung
bestrichen werden muss. H (HIGH): hohe Festigkeit;
M (MEDIUM): mittlere Festigkeit; L (LOW): niedrige
Festigkeit.
Anziehen / Anzugsmomentangabe beachten: Weist auf
das von SW-MOTECH bzw. vom Fahrzeughersteller (OEM)
vorgegeben Anzugsmoment eines Teils hin.
LEGENDENüBERSICHT · ANBAUANLEITUNG LESEN UND AUFBEWAHREN!
Die inhaltliche Übersetzung erfolgt automatisiert.
© SW-MOTECH GmbH & Co. KG
Irrtümer und Änderungen vorbehalten.
Technische und Design-Änderungen vorbehalten.
2

STüCKLISTE · ANBAUANLEITUNG LESEN UND AUFBEWAHREN!
Die inhaltliche Übersetzung erfolgt automatisiert.
© SW-MOTECH GmbH & Co. KG
Irrtümer und Änderungen vorbehalten.
Technische und Design-Änderungen vorbehalten.
3
11
GPT.02.059.001.11
1/1
2
M6 x 20; DIN 7991
SC.ST.06.020.48.7991.109
4/4
3
Ø 20 / ø 6,4 / h 8
DB.ST.0200.0064.0080.02
4/4
24
GPT.00.152.002.11
1/1
5
M6 x 16; ISO 7380
SC.ST.06.016.02.7380.109
4/4
6
ø 6,4; DIN 9021
US.ST.064.02.9021
4/4

1
1×1
2×4
M 9,6 Nm
3×4
WARNUNG: Tragen Sie immer Augen- und Handschutz!
WARNUNG: Verwenden Sie immer geeignetes Werkzeug!
Montieren Sie das Anbaublech (1) auf dem Gepäckträger.
WARNUNG: Verwenden Sie flüssige Schraubensicherung!
Ziehen Sie die Schrauben wie in der Anbauanleitung vorgegeben an.
ANBAUSCHRITT · ANBAUANLEITUNG LESEN UND AUFBEWAHREN!
Die inhaltliche Übersetzung erfolgt automatisiert.
© SW-MOTECH GmbH & Co. KG
Irrtümer und Änderungen vorbehalten.
Technische und Design-Änderungen vorbehalten.
4

2
4×1
5×4
M 8 Nm
6×4
HINWEIS: Verschrauben Sie den Gepäckträger je nach Platzangebot an der
markierten Anbauposition (A) oder (B), wie in der Detailzeichnung gezeigt.
Montieren Sie den Gepäckträger (4) auf dem Anbaublech (1).
WARNUNG: Verwenden Sie flüssige Schraubensicherung!
Ziehen Sie die Schrauben wie in der Anbauanleitung vorgegeben an.
ANBAUSCHRITT · ANBAUANLEITUNG LESEN UND AUFBEWAHREN!
Die inhaltliche Übersetzung erfolgt automatisiert.
© SW-MOTECH GmbH & Co. KG
Irrtümer und Änderungen vorbehalten.
Technische und Design-Änderungen vorbehalten.
5

PRODUKTSPEZIFISCHE HINWEISE
WARNUNG: Die angegebene maximale Zuladung beinhaltet das Gewicht
von Koffer/Gepäck und Adapterplatte/Adapterkit! Es gilt die vom
Fahrzeughersteller genannte, maximale Zuladung des Fahrzeugs!
7,5 KG ( 16,5 lbs) 130 km/h ( 80mph)
HINWEIS: Beachten Sie alle landesspezifischen Vorschriften für Zulassung und
Betrieb Ihres Fahrzeugs sowie anwendbare TüV-Vorschriften. Lassen Sie
eintragungspflichtige Teile nach Montage durch Ihre Prüfstelle in die
Fahrzeugpapiere eintragen.
PRODUKTHINWEISE · ANBAUANLEITUNG LESEN UND AUFBEWAHREN!
Die inhaltliche Übersetzung erfolgt automatisiert.
© SW-MOTECH GmbH & Co. KG
Irrtümer und Änderungen vorbehalten.
Technische und Design-Änderungen vorbehalten.
6

Item number: GPT.02.059.19000/B Revision: 00 · Date: 08 - 2023
ADVENTURE RACK
~ 0.5 h. EASY DIFFICULT
ENGLISH ·Thank you for choosing this premium product from SW-MOTECH.
Visit our online shop for more information (e.g. model assignments). Required
documents (e.g. national type approval) are available there for you to
download.
Please read and understand all the instructions, safety information and
warnings in these mounting instructions before mounting and using the
product in order to avoid injury and damage. Keep these mounting
instructions for reference.
This product was developed for vehicles in factory condition. Compatibility
with original accessories or accessories from other manufacturers cannot
be guaranteed.
These mounting instructions have been prepared to the best of our current
knowledge. No legal claims relating to accuracy can be made. Errors and
omissions excepted. We reserve the right to make technical and design
changes. The copyright is held by SW-MOTECH.
SAFETY WARNING SYMBOL
This warning symbol is used in these mounting instructions to warn of
deadly dangers, injuries or other hazards. The words DANGER, WARNING or
CAUTION are used as part of this warning symbol to convey important safety
messages and information relating to the installation and use of this
product. These words, together with the safety warning symbol, mean:
DANGER: Indicates a hazardous situation which, if not avoided, will result
in death or serious injury!
WARNING: Indicates a hazardous situation which, if not avoided, may
result in death or serious injury!
CAUTION: Indicates a hazardous situation which, if not avoided, may result
in minor or moderate injury!
NOTE: Important information, but not relating to a risk of death or injury
(property damage only)!
GENERAL INFORMATION
WARNING: Assembly and/or maintenance of this product requires
advanced technical skill, appropriate tools, and a good understanding of tool
usage and torque specifications. For your own safety, SW-MOTECH
recommends having the assembly and/or maintenance carried out by a
qualified and certified motorcycle workshop.
WARNING: If you do choose to assemble this product yourself, carefully
and fully read the mounting instructions before assembly and use, and
follow all instructions to avoid serious injury or death. Also observe all
relevant information in the vehicle manual when mounting or using the
product. IF YOU DO NOT UNDERSTAND ANY PART OF THESE MOUNTING
INSTRUCTIONS OR NEED AN EXPLANATION AS TO A SPECIFIC
INSTRUCTION, DO NOT ATTEMPT TO INSTALL THIS PRODUCT WITHOUT
CONSULTING SW-MOTECH FOR ASSISTANCE!
PREPARATION: Read the mounting instructions carefully and make sure
that all parts on the parts list are available.
CAUTION: Ensure that your vehicle is standing securely. Switch off the
engine and remove the ignition key. Allow the engine/exhaust to cool
down if necessary. Disconnect the battery when working on the electrical
system. Only use proper tools and always wear safety goggles and gloves
during assembly and maintenance. Have a second person help you with
assembly and maintenance.
ASSEMBLY: All parts and connections removed from the vehicle must be
reinstalled according to the vehicle manufacturer's specifications or
replaced with parts and hardware supplied by SW-MOTECH.
WARNING: Secure all threads with a medium-strength liquid
threadlocker, unless otherwise specified.
DANGER: Tightening torques not defined by SW-MOTECH must be
obtained from the vehicle manufacturer or a certified motorbike
workshop.
FUNCTIONAL CHECK:After mounting the product, ensure that no moving
parts are obstructed and that the function of the vehicle is not impeded.
Cables and hoses must not rub against each other and/or be hindered in any
way.
WARNING: Carry out a comprehensive functionality check before you
start to drive. Check the tightening torque of all connections and the tight
fit of the product after the first 50 km and then at regular intervals.
Mounted accessories can change the handling and stability of the vehicle.
MOUNTING INSTRUCTIONS · READ AND KEEP MOUNTING INSTRUCTIONS!
SW-MOTECH GmbH & Co. KG
Ernteweg 7-10
35282 Rauschenberg
Germany
www.sw-motech.com
The content translation is automated.
© SW-MOTECH GmbH & Co. KG
Errors and omissions excepted
Subject to technical and design changes.
1

Take note of the symbols and what they mean in the
ASSEMBLY section. If the term OEM appears in the
ASSEMBLY section, the vehicle manufacturer's
specifications must be observed and applied.
If you have any questions, please don't hesitate to contact
our Customer Service team or our distributors. You can
find our telephone number and a list of our distributors in
our online shop:
www.sw-motech.com
Use thread locker: Indicates that a thread must be
coated with liquid thread locker. H (HIGH): high
strength; M (MEDIUM): medium strength; L (LOW):
low strength.
Tighten/note the tightening torque information:
Indicates the tightening torque of a part specified by SW-
MOTECH or the vehicle manufacturer (OEM).
LEGEND OVERVIEW · READ AND KEEP MOUNTING INSTRUCTIONS!
The content translation is automated.
© SW-MOTECH GmbH & Co. KG
Errors and omissions excepted
Subject to technical and design changes.
2

PARTS LIST · READ AND KEEP MOUNTING INSTRUCTIONS!
The content translation is automated.
© SW-MOTECH GmbH & Co. KG
Errors and omissions excepted
Subject to technical and design changes.
3
11
GPT.02.059.001.11
1/1
2
M6 x 20; DIN 7991
SC.ST.06.020.48.7991.109
4/4
3
Ø 20 / ø 6,4 / h 8
DB.ST.0200.0064.0080.02
4/4
24
GPT.00.152.002.11
1/1
5
M6 x 16; ISO 7380
SC.ST.06.016.02.7380.109
4/4
6
ø 6.4; DIN 9021
US.ST.064.02.9021
4/4

1
1×1
2×4
M 9.6 Nm
3×4
WARNING: Always wear eye and hand protection!
WARNING: Always use the proper tools!
Mount the mounting bracket (1) on the rack.
WARNING: Use a liquid threadlocker!
Tighten the screws as specified in the mounting instructions.
MOUNTING STEP · READ AND KEEP MOUNTING INSTRUCTIONS!
The content translation is automated.
© SW-MOTECH GmbH & Co. KG
Errors and omissions excepted
Subject to technical and design changes.
4

2
4×1
5×4
M 8 Nm
6×4
NOTE: Depending on the space available, screw the luggage rack to the
marked attachment position (A) or (B) as shown in the detailed drawing.
Mount the luggage rack (4) on the mounting plate (1).
WARNING: Use a liquid threadlocker!
Tighten the screws as specified in the mounting instructions.
MOUNTING STEP · READ AND KEEP MOUNTING INSTRUCTIONS!
The content translation is automated.
© SW-MOTECH GmbH & Co. KG
Errors and omissions excepted
Subject to technical and design changes.
5

PRODUCT-SPECIFIC NOTES
WARNING: The specified maximum load includes the weight of the
case/luggage and adapter plate/adapter kit! The maximum vehicle load
specified by the vehicle manufacturer applies!
7.5KG ( 16.5 lbs) 130 km/h ( 80 mph)
NOTE: Ensure you adhere to country-specific regulations regarding the
registration and operation of your vehicle or any applicable TÜV regulations. After
assembly, parts that are subject to registration should be entered in the vehicle
documents by your test center.
PRODUCT INFORMATION · READ AND KEEP MOUNTING INSTRUCTIONS!
The content translation is automated.
© SW-MOTECH GmbH & Co. KG
Errors and omissions excepted
Subject to technical and design changes.
6

Número de artículo: GPT.02.059.19000/B Revisión: 00 · Fecha: 08 - 2023
Portaequipaje ADVENTURE RACK
~ 0.5 h. FÁCIL COMPLICADO
ESPAÑOL · Gracias por elegir este producto de primera calidad de SW-
MOTECH. Visite nuestra tienda online para obtener más información (p. ej.,
sobre el uso de los modelos). Desde esa página podrá descargar los
documentos que necesite (por ejemplo, la homologación nacional de tipo).
Para evitar lesiones y daños, asegúrese de leer y comprender todas las
instrucciones, advertencias de seguridad y precauciones de este manual
antes de montar y utilizar el producto. Guarde estas instrucciones de
montaje como referencia.
Este producto ha sido desarrollado para vehículos en condiciones de
fábrica. No se garantiza la compatibilidad con los accesorios originales o de
otros fabricantes.
Estas instrucciones de montaje se han redactado de acuerdo con nuestros
conocimientos actuales. No hay reclamaciones legales de corrección. Salvo
errores y omisiones. Nos reservamos el derecho a realizar cambios
técnicos y de diseño. Los derechos de autor pertenecen a SW-MOTECH.
SÍMBOLO DE ADVERTENCIA DE SEGURIDAD
Este símbolo de advertencia se utiliza en estas instrucciones de montaje
para advertir de peligros mortales, lesiones u otros riesgos. Las palabras
PELIGRO, ATENCIÓN o PRECAUCIÓN se utilizan con este símbolo de
advertencia para transmitir importantes avisos de seguridad e información
relacionada con el montaje y uso de este producto. Estas palabras, junto con
el símbolo de advertencia de seguridad, significan:
PELIGRO: Indica una situación de peligro que, si no se evita, provoca
lesiones graves o incluso la muerte.
ATENCIÓN: Indica una situación de peligro que, si no se evita, puede
provocar lesiones graves o incluso la muerte.
PRECAUCIÓN: Indica una situación de peligro que, si no se evita, puede
provocar lesiones leves o de gravedad media.
NOTA: Información importante, pero que no está relacionada con un
riesgo de lesiones o muerte (solo daños materiales).
INDICACIONES GENERALES
ATENCIÓN: El montaje y/o mantenimiento de este producto requiere
conocimientos técnicos avanzados, las herramientas apropiadas, un buen
manejo de dichas herramientas y conocer las especificaciones de los pares
de apriete. Por su propia seguridad, SW-MOTECH recomienda que el
montaje y/o el mantenimiento los realice un taller de motocicletas
cualificado y certificado.
ATENCIÓN: Si elige ensamblar este producto usted mismo, antes de
montarlo y usarlo, lea las instrucciones de montaje detenidamente y en su
totalidad, y siga todas las indicaciones para evitar lesiones graves o
mortales. Cuando monte y utilice el producto, tenga también en cuenta toda
la información relevante que figure en el manual del vehículo. SI NO
ENTIENDE ALGUNA PARTE DE ESTAS INSTRUCCIONES DE MONTAJE O
NECESITA ALGUNA ACLARACIÓN, NO INTENTE INSTALAR ESTE PRODUCTO
SIN CONSULTAR A SW-MOTECH PARA OBTENER AYUDA.
PREPARACIÓN: Lea atentamente las instrucciones de montaje y asegúrese
de que todas las piezas de la lista de piezas están presentes.
PRECAUCIÓN:Asegúrese de que su vehículo esté estacionado de
manera segura. Apague el motor y retire la llave de encendido. Deje que el
motor o el escape se enfríen si es necesario. Desconecte la batería cuando
trabaje en el sistema eléctrico. Utilice únicamente las herramientas
adecuadas y use siempre gafas de seguridad y guantes al realizar el
montaje y las tareas de mantenimiento. Pida a otra persona que le ayude
con el montaje y el mantenimiento.
MONTAJE: Todas las piezas y conexiones retiradas del vehículo deben ser
reinstaladas de acuerdo con las especificaciones del fabricante del vehículo
o sustituidas por piezas y herrajes suministrados por SW-MOTECH.
ATENCIÓN: Asegure todas las roscas con fijador de roscas líquido de
resistencia media, a menos que se especifique lo contrario.
PELIGRO: Los pares de apriete no definidos por SW-MOTECH deben
obtenerse del fabricante del vehículo o de un taller de motocicletas
certificado.
COMPROBACIÓN FUNCIONAL:Después del montaje, asegúrese de que no
haya piezas móviles bloqueadas y de que no se altere el funcionamiento del
vehículo. Los cables y tubos no deben rozarse ni quedar pinzados.
ATENCIÓN: Realice una comprobación exhaustiva del funcionamiento
antes de iniciar la marcha. Tras los primeros 50 km y, después, con
regularidad, compruebe el par de apriete de todas las conexiones y que el
producto está firmemente sujeto. Los accesorios instalados pueden
cambiar el comportamiento de conducción y la estabilidad del vehículo.
INSTRUCCIONES DE MONTAJE · LEE Y CONSERVA LAS INSTRUCCIONES DE MONTAJE!
SW-MOTECH GmbH & Co. KG
Ernteweg 7-10
35282 Rauschenberg
Alemania
www.sw-motech.com
La traducción del contenido es automática
© SW-MOTECH GmbH & Co. KG
Salvo errores y omisiones
Sujeto a cambios técnicos y de diseño.
1

Preste atención a los símbolos que figuran en la
sección de MONTAJE y su significado. Cuando, en la
sección de MONTAJE, aparecen las siglas OEM, se
deberán seguir y aplicar las especificaciones del
fabricante del vehículo.
Si tiene alguna pregunta, nuestro servicio de atención al
cliente y nuestros distribuidores estarán encantados de
prestarle ayuda. Encontrará nuestro número de teléfono
y una lista de nuestros distribuidores en nuestra tienda
online:
www.sw-motech.com
Usar fijador de roscas: Indica que una rosca debe
recubrirse con fijador de roscas líquido. H (HIGH):
resistencia alta; M (MEDIUM): resistencia media; L
(LOW): resistencia baja.
Respete la información del par de apriete: Indica el par
de apriete de una pieza especificada por SW-MOTECH o el
fabricante del vehículo (OEM).
RESUMEN DE LA LEYENDA · LEE Y CONSERVA LAS INSTRUCCIONES DE MONTAJE!
La traducción del contenido es automática
© SW-MOTECH GmbH & Co. KG
Salvo errores y omisiones
Sujeto a cambios técnicos y de diseño.
2

LISTA DE PIEZAS · LEE Y CONSERVA LAS INSTRUCCIONES DE MONTAJE!
La traducción del contenido es automática
© SW-MOTECH GmbH & Co. KG
Salvo errores y omisiones
Sujeto a cambios técnicos y de diseño.
3
11
GPT.02.059.001.11
1/1
2
M6 x 20; DIN 7991
SC.ST.06.020.48.7991.109
4/4
3
Ø 20 / ø 6,4 / h 8
DB.ST.0200.0064.0080.02
4/4
24
GPT.00.152.002.11
1/1
5
M6 x 16; ISO 7380
SC.ST.06.016.02.7380.109
4/4
6
ø 6,4; DIN 9021
US.ST.064.02.9021
4/4

1
1×1
2×4
M 9,6 Nm
3×4
ATENCIÓN: ¡Use siempre protección de ojos y manos!
ATENCIÓN: ¡Utilice siempre herramientas adecuadas!
Monte la placa de fijación (1) en el portaequipaje.
ATENCIÓN: ¡Utilice fijador de roscas líquido!
Apriete los tornillos tal y como se indica en las instrucciones de montaje.
PASO DE FIJACIóN · LEE Y CONSERVA LAS INSTRUCCIONES DE MONTAJE!
La traducción del contenido es automática
© SW-MOTECH GmbH & Co. KG
Salvo errores y omisiones
Sujeto a cambios técnicos y de diseño.
4

2
4×1
5×4
M 8 Nm
6×4
NOTA: Dependiendo del espacio disponible, atornille el portaequipaje en la
posición de fijación marcada (A) o (B), como se muestra en el dibujo de detalle.
Monte el portaequipaje (4) en la placa de fijación (1).
ATENCIÓN: ¡Utilice fijador de roscas líquido!
Apriete los tornillos tal y como se indica en las instrucciones de montaje.
PASO DE FIJACIóN · LEE Y CONSERVA LAS INSTRUCCIONES DE MONTAJE!
La traducción del contenido es automática
© SW-MOTECH GmbH & Co. KG
Salvo errores y omisiones
Sujeto a cambios técnicos y de diseño.
5

INDICACIONES ESPECÍFICAS DEL PRODUCTO
ATENCIÓN: ¡La carga adicional máxima indicada incluye el peso de la
maleta/equipaje y la placa adaptadora/kit adaptador! ¡Se aplica la carga
adicional máxima del vehículo especificada por el fabricante del mismo!
7,5 kg ( 16,5 libras) 130 km/h ( 80 mph)
NOTA: Deben respetarse todas las normas nacionales para la
matriculación/uso del vehículo y las normas de inspección técnica vigentes. En
caso de piezas con registro obligatorio, su organismo de inspección debe
registrarlas en los documentos del vehículo tras el montaje.
INFORMACIóN SOBRE LOS PRODUCTOS · LEE Y CONSERVA LAS INSTRUCCIONES DE MONTAJE!
La traducción del contenido es automática
© SW-MOTECH GmbH & Co. KG
Salvo errores y omisiones
Sujeto a cambios técnicos y de diseño.
6

Numéro d‘article: GPT.02.059.19000/B Révision: 00 · Date: 08 - 2023
Porte-bagages ADVENTURE RACK
~ 0.5 h. FACILE DIFFICILE
FRANÇAIS · Nous vous remercions d'avoir choisi ce produit haut de gamme
de SW-MOTECH. Visitez notre boutique en ligne pour plus d'informations (par
exemple affectation des modèles). Les documents nécessaires (par exemple
ABE) y sont disponibles en téléchargement.
Veuillez lire et prendre en compte toutes les instructions, les consignes de
sécurité et les avertissements contenus dans ce manuel de montage avant
de monter et d'utiliser le produit afin d'éviter toute blessure ou tout
dommage. Veuillez conserver la notice d'utilisation pour référence.
Ce produit a été développé pour des véhicules en configuration d'usine.
Nous ne sommes pas en mesure d'assurer la compatibilité avec les pièces
de rechange originales ou les pièces de rechange d'autres fabricants.
La présente notice d'installation a été élaborée conformément à nos
connaissances actuelles. Il n'existe aucun droit juridique à l'exactitude des
informations qu'elle contient. Sous réserve d'erreurs et de fautes. Sous
réserve de modifications techniques et conceptuelles. SW-MOTECH détient
les droits d'auteur.
SYMBOLE D'AVERTISSEMENT DE SÉCURITÉ
Ce symbole d'avertissement est utilisé dans ces instructions de montage
pour mettre en garde contre des dangers mortels, de blessures ou d'autres
risques. Les mots DANGER, ATTENTION ou RECOMMANDATION sont utilisés
avec ce symbole d'avertissement pour transmettre des consignes de
sécurité et des informations importantes concernant le montage et
l'utilisation de ce produit. Ces mots, associés au symbole d'avertissement
de sécurité, signifient :
DANGER : signale une situation dangereuse pouvant entraîner la mort ou
des blessures graves si elle n'est pas évitée !
ATTENTION : signale une situation dangereuse pouvant entraîner la mort
ou des blessures graves si elle n'est pas évitée !
PRUDENCE : Indique une situation dangereuse susceptible d'entraîner des
blessures de gravité réduite ou moyenne si elle se présente !
REMARQUE : Informations importantes, mais qui n'entraînent pas de
risque de décès ou de blessure (dommages matériels uniquement).
REMARQUES GÉNÉRALES
ATTENTION : le montage et/ou l'entretien de ce produit nécessite des
compétences techniques avancées, des outils appropriés et une bonne
compréhension de l'utilisation des outils et des indications de réglage. Pour
votre propre sécurité, SW-MOTECH recommande de confier le montage
et/ou l'entretien à un atelier de réparation de deux-roues qualifié et
certifié.
ATTENTION : si vous décidez de monter vous-même ce produit, lisez
attentivement et intégralement les instructions de montage avant le
montage et l'utilisation et suivez toutes les instructions afin d'éviter des
blessures graves ou mortelles. Lors du montage et de l'utilisation, tenez
également compte de toutes les informations pertinentes du manuel du
véhicule. SI VOUS NE COMPRENEZ PAS UNE PARTIE DE CE MANUEL
D'INSTALLATION OU SI VOUS AVEZ BESOIN D'EXPLICATIONS CONCERNANT
UNE INSTRUCTION, N'ESSAYEZ PAS D'INSTALLER CE PRODUIT SANS
DEMANDER DE L'AIDE À SW-MOTECH !
PRÉPARATION : Veuillez lire attentivement les instructions de montage et
assurez-vous que tous les éléments de la liste de pièces sont présents.
PRUDENCE : veillez à ce que votre véhicule soit bien stable. Éteignez le
moteur et retirez la clé de contact. Laissez refroidir le
moteur/l'échappement si nécessaire. Débranchez la batterie lorsque vous
travaillez sur le système électrique. Utilisez uniquement des outils
appropriés et portez toujours des lunettes de protection et des gants
pendant le montage et l'entretien. Faites-vous aider par une deuxième
personne lors du montage et de l'entretien.
MONTAGE : Toutes les pièces et connexions retirées du véhicule doivent
être réinstallées conformément aux instructions du fabricant du véhicule ou
remplacées par des pièces et du matériel fournis par SW-MOTECH.
ATTENTION Sauf indication contraire, sécurisez tous les filetages avec
du frein filet liquide de force moyenne.
DANGER : Les couples de serrage non définis par SW-MOTECH doivent
être obtenus auprès du constructeur du véhicule ou d'un atelier de
réparation de motos certifié.
CONTRÔLE DU FONCTIONNEMENT : Après le montage, assurez-vous
qu'aucune pièce mobile n'est bloquée et que le fonctionnement du véhicule
n'est pas perturbé. Les câbles et les tuyaux ne doivent pas frotter et/ou être
coincés.
ATTENTION : Effectuez un contrôle de fonctionnement complet avant
de commencer à rouler. Après les 50 premiers kilomètres, puis
régulièrement, vérifiez le couple de serrage de tous les raccords et la
bonne fixation du produit. Les accessoires montés peuvent modifier le
comportement sur la route et la stabilité du véhicule.
INSTRUCTIONS DE MONTAGE · LIRE ET CONSERVER LES INSTRUCTIONS DE MONTAGE!
SW-MOTECH GmbH & Co. KG
Ernteweg 7-10
35282 Rauschenberg
Allemagne
www.sw-motech.com
La traduction du contenu est automatisée.
© SW-MOTECH GmbH & Co. KG
Sous réserve d'erreurs et de modifications
Sous réserve de modifications techniques et de design.
1

Vous trouverez les symboles et leur signification
dans la section MONTAGE. Si le terme OEM apparaît
dans la section MONTAGE, il faut respecter et
appliquer les consignes du fabricant du véhicule.
Si vous avez des questions, notre service clientèle ainsi
que nos distributeurs se tiennent à votre disposition. Vous
trouverez notre numéro de téléphone ainsi que la liste de
nos distributeurs sur notre boutique en ligne :
www.sw-motech.com
Utilisez du frein filet : Indique qu'un filetage doit être
enduit de frein filet liquide. H (HIGH) : haute
résistance ; M (MEDIUM) : force moyenne ; L (LOW) :
faible résistance.
Serrer en respectant les instructions de couple de
serrage : indique le couple de serrage d'une pièce
prescrit par SW-MOTECH ou par le fabricant du véhicule
(OEM).
APERçU DES LéGENDES · LIRE ET CONSERVER LES INSTRUCTIONS DE MONTAGE!
La traduction du contenu est automatisée.
© SW-MOTECH GmbH & Co. KG
Sous réserve d'erreurs et de modifications
Sous réserve de modifications techniques et de design.
2

LISTE DES PIèCES · LIRE ET CONSERVER LES INSTRUCTIONS DE MONTAGE!
La traduction du contenu est automatisée.
© SW-MOTECH GmbH & Co. KG
Sous réserve d'erreurs et de modifications
Sous réserve de modifications techniques et de design.
3
11
GPT.02.059.001.11
1/1
2
M6 x 20; DIN 7991
SC.ST.06.020.48.7991.109
4/4
3
Ø 20 / ø 6,4 / h 8
DB.ST.0200.0064.0080.02
4/4
24
GPT.00.152.002.11
1/1
5
M6 x 16; ISO 7380
SC.ST.06.016.02.7380.109
4/4
6
ø 6,4; DIN 9021
US.ST.064.02.9021
4/4

1
1×1
2×4
M 9,6 Nm
3×4
ATTENTION : portez toujours des lunettes et des gants de protection !
ATTENTION : Utilisez toujours des outils appropriés !
Fixez le support de fixation (1) sur le porte-bagages.
ATTENTION : utilisez du frein filet liquide !
Serrez les vis comme indiqué dans les instructions de montage.
PHASE DE MONTAGE · LIRE ET CONSERVER LES INSTRUCTIONS DE MONTAGE!
La traduction du contenu est automatisée.
© SW-MOTECH GmbH & Co. KG
Sous réserve d'erreurs et de modifications
Sous réserve de modifications techniques et de design.
4

2
4×1
5×4
M 8 Nm
6×4
REMARQUE : En fonction de la place disponible, vissez le porte-bagages aux
positions de fixation marquées (A) ou (B), comme indiqué sur le dessin détaillé.
Montez le porte-bagages (4) sur la plaque de montage (1).
ATTENTION : utilisez du frein filet liquide !
Serrez les vis comme indiqué dans les instructions de montage.
PHASE DE MONTAGE · LIRE ET CONSERVER LES INSTRUCTIONS DE MONTAGE!
La traduction du contenu est automatisée.
© SW-MOTECH GmbH & Co. KG
Sous réserve d'erreurs et de modifications
Sous réserve de modifications techniques et de design.
5

REMARQUES SPÉCIFIQUES AU PRODUIT
ATTENTION : la charge maximale indiquée comprend le poids de la
valise/du bagage et de la platine d’adaptation/du kit d’adaptation ! La charge
maximale indiquée par le constructeur du véhicule s’applique !
7,5 KG ( 16,5 lbs) 130 km/h ( 80mph)
REMARQUE : respectez toutes les réglementations spécifiques à chaque pays
pour l’immatriculation et l'utilisation de votre véhicule ainsi que les
réglementations TÜV applicables. Après le montage, faites ajouter les pièces
soumises à enregistrement dans les documents du véhicule par votre centre de
contrôle.
INFORMATIONS SUR LES PRODUITS · LIRE ET CONSERVER LES INSTRUCTIONS DE MONTAGE!
La traduction du contenu est automatisée.
© SW-MOTECH GmbH & Co. KG
Sous réserve d'erreurs et de modifications
Sous réserve de modifications techniques et de design.
6

Numero di articolo: GPT.02.059.19000/B Revisione: 00 · Data: 08 - 2023
Portabagagli ADVENTURE RACK
~ 0.5 h. FACILE DIFFICILE
ITALIANO ·Grazie per aver scelto questo prodotto premium di SW-MOTECH.
Visita il nostro negozio online per ulteriori informazioni (ad es. per la
compatibilità con i vari modelli). I documenti richiesti (ad es. certificato di
omologazione nazionale) possono essere scaricati qui.
Si prega di leggere attentamente le avvertenze di sicurezza e le istruzioni
per il montaggio prima di montare e utilizzare il prodotto, al fine di evitare
eventuali lesioni e danni. Conserva queste istruzioni per il montaggio come
riferimento futuro.
Questo prodotto è stato sviluppato per veicoli in condizioni di fabbrica. La
compatibilità con gli accessori originali o di altri produttori non può essere
garantita.
Queste istruzioni per il montaggio sono state redatte in base alle nostre
conoscenze attuali. Non sussistono pretese di correttezza giuridiche. Salvo
errori ed omissioni. Ci riserviamo il diritto di apportare modifiche tecniche e
di design. Copyright SW-MOTECH.
SIMBOLO DI SICUREZZA
Questo simbolo di avvertenza è usato nelle presenti istruzioni di
montaggio per segnalare pericoli mortali, rischio di lesioni o altri pericoli.
Le parole "PERICOLO", "AVVERTENZA" O "ATTENZIONE" sono utilizzate con
questo simbolo di avvertenza per trasmettere importanti istruzioni di
sicurezza e informazioni relative al montaggio e all'uso di questo prodotto.
Queste parole, utilizzate insieme al simbolo di avvertenza, significano:
PERICOLO: indica una situazione di pericolo che, se non evitata, può
causare morte o lesioni gravi!
AVVERTENZA: indica una situazione di pericolo che, se non evitata, può
causare morte o lesioni gravi!
ATTENZIONE: indica una situazione di pericolo che, se non evitata, può
provocare lesioni lievi o di entità moderata!
AVVISO: indica informazioni importanti che non riguardano il rischio di
morte o di lesioni (riguardano unicamente il rischio di danni materiali)!
INFORMAZIONI GENERALI
AVVERTENZA: il montaggio e/o la manutenzione di questo prodotto
richiedono competenze tecniche avanzate, strumenti adeguati e una buona
conoscenza dell'uso della strumentazione e delle indicazioni relative alle
coppie di serraggio. Per ragioni di sicurezza, SW-MOTECH raccomanda di
far eseguire il montaggio e/o la manutenzione presso un'officina per
motociclette qualificata e certificata.
AVVERTENZA: se si decide di installare questo prodotto in autonomia,
leggere attentamente le istruzioni per il montaggio prima del montaggio e
dell'uso e seguire tutte le avvertenze per evitare lesioni gravi o mortali.
Durante il montaggio e l'uso, seguire anche tutte le istruzioni pertinenti
contenute nel manuale del veicolo. SE NON SI COMPRENDONO TALI
ISTRUZIONI, ANCHE SOLO IN PARTE, O SE SONO NECESSARI CHIARIMENTI,
NON CERCARE DI MONTARE IL PRODOTTO IN AUTONOMIA SENZA CHIEDERE
IL SUPPORTO DI SW-MOTECH!
PREPARAZIONE: leggere attentamente le istruzioni per il montaggio e
assicurarsi che siano disponibili tutti i componenti contenuti nella lista.
ATTENZIONE: assicurarsi che il veicolo sia perfettamente fermo.
Spegnere il motore e togliere la chiave. Se necessario, lasciar raffreddare
il motore/lo scarico. Scollegare la batteria quando si interviene
sull'impianto elettrico. Usare esclusivamente strumenti idonei e indossare
sempre occhiali e guanti protettivi durante le operazioni di montaggio e
manutenzione. Chiedere aiuto a una seconda persona durante le fasi di
montaggio e manutenzione.
MONTAGGIO: tutti i componenti e i collegamenti rimossi dal veicolo devono
essere reinstallati secondo le specifiche del produttore del veicolo o
sostituiti con componenti e attrezzatura forniti da SW-MOTECH.
AVVERTENZA: fissare tutte le filettature con frenafiletti liquido a
media resistenza, se non diversamente specificato.
PERICOLO: le coppie di serraggio non definite da SW-MOTECH devono
essere richieste al costruttore del veicolo o a un'officina certificata.
CONTROLLO DI FUNZIONALITÀ: dopo il montaggio accertarsi che non vi
siano parti mobili bloccate e che il funzionamento del veicolo non sia
compromesso. I cavi e i tubi flessibili non devono sfregare e/o essere
schiacciati.
AVVERTENZA: eseguire un controllo completo delle funzioni prima di
mettersi alla guida. Controllare la coppia di serraggio di tutti i
collegamenti e la tenuta del prodotto dopo i primi 50 km e in seguito
regolarmente. Gli accessori montati possono modificare la
maneggevolezza e la stabilità del veicolo.
ISTRUZIONI PER IL MONTAGGIO · LEGGI E CONSERVA LE ISTRUZIONI DI MONTAGGIO!
SW-MOTECH GmbH & Co. KG
Ernteweg 7-10
35282 Rauschenberg
Germania
www.sw-motech.com
La traduzione dei contenuti è automatizzata.
© SW-MOTECH GmbH & Co. KG
Salvo errori e omissioni.
Soggetto a modifiche tecniche e di design.
1

Consultare i simboli e il loro significato nella sezione
MONTAGGIO. Se nella sezione montaggio compare la
sigla OEM, è necessario rispettare e applicare le
specifiche del produttore del veicolo.
Per qualsiasi domanda, non esitare a contattare il nostro
servizio clienti o i nostri distributori. Il nostro numero di
telefono e l'elenco dei nostri distributori sono disponibili
nel nostro negozio online:
www.sw-motech.com
Usare un frenafiletti: indica che la filettatura deve
essere rivestita con un frenafiletti liquido. H (ALTA):
alta resistenza; M (MEDIA): media resistenza; L
(BASSO): bassa resistenza.
Serraggio / rispetto delle specifiche sulla coppia di
serraggio: indica la coppia di serraggio di un componente
specificata da SW-MOTECH o dal produttore del veicolo
(OEM).
LEGENDA · LEGGI E CONSERVA LE ISTRUZIONI DI MONTAGGIO!
La traduzione dei contenuti è automatizzata.
© SW-MOTECH GmbH & Co. KG
Salvo errori e omissioni.
Soggetto a modifiche tecniche e di design.
2

ELENCO DELLE PARTI · LEGGI E CONSERVA LE ISTRUZIONI DI MONTAGGIO!
La traduzione dei contenuti è automatizzata.
© SW-MOTECH GmbH & Co. KG
Salvo errori e omissioni.
Soggetto a modifiche tecniche e di design.
3
11
GPT.02.059.001.11
1/1
2
M6 x 20; DIN 7991
SC.ST.06.020.48.7991.109
4/4
3
Ø 20 / ø 6,4 / h 8
DB.ST.0200.0064.0080.02
4/4
24
GPT.00.152.002.11
1/1
5
M6 x 16; ISO 7380
SC.ST.06.016.02.7380.109
4/4
6
ø 6,4; DIN 9021
US.ST.064.02.9021
4/4

1
1×1
2×4
M 9,6 Nm
3×4
AVVERTENZA: indossare sempre le protezioni per gli occhi e per le mani!
AVVERTENZA: Utilizzare sempre strumenti adeguati!
Montare la staffa di montaggio (1) sul portabagagli.
AVVERTENZA: Usare un frenafiletti liquido!
Serrare le viti come indicato nelle istruzioni per il montaggio.
FASE DI MONTAGGIO · LEGGI E CONSERVA LE ISTRUZIONI DI MONTAGGIO!
La traduzione dei contenuti è automatizzata.
© SW-MOTECH GmbH & Co. KG
Salvo errori e omissioni.
Soggetto a modifiche tecniche e di design.
4

2
4×1
5×4
M 8 Nm
6×4
AVVISO: a seconda dello spazio disponibile, avvitare il portabagagli
in corrispondenza della posizione di montaggio contrassegnata (A) o (B), come
mostrato in dettaglio nell'illustrazione.
Montare il portabagagli (4) sulla staffa di montaggio (1).
AVVERTENZA: Usare un frenafiletti liquido!
Serrare le viti come indicato nelle istruzioni per il montaggio.
FASE DI MONTAGGIO · LEGGI E CONSERVA LE ISTRUZIONI DI MONTAGGIO!
La traduzione dei contenuti è automatizzata.
© SW-MOTECH GmbH & Co. KG
Salvo errori e omissioni.
Soggetto a modifiche tecniche e di design.
5

AVVERTENZE SPECIFICHE DEL PRODOTTO
AVVERTENZA: il carico massimo specificato comprende il peso della
valigia/bagaglio e della piastra di adattamento/kit adattatore! Si applica il
carico massimo del veicolo specificato dal costruttore del veicolo!
7,5 KG ( 16,5 libbre) 130 km/h ( 80 mph)
AVVISO: rispettare le normative specifiche del paese per
l'immatricolazione/l'uso del veicolo, come le normative TÜV applicabili. Dopo il
montaggio, far inserire le parti soggette a omologazione nei documenti del veicolo
dal proprio centro di test.
INFORMAZIONI SUI PRODOTTI · LEGGI E CONSERVA LE ISTRUZIONI DI MONTAGGIO!
La traduzione dei contenuti è automatizzata.
© SW-MOTECH GmbH & Co. KG
Salvo errori e omissioni.
Soggetto a modifiche tecniche e di design.
6

Art.-Nr.: GPT.00.152.36200/B Revision: 00 · Datum: 08 - 2023
Adapterkit für ADVENTURE-RACK Gepäckträger
~ 0.25 h. LEICHT SCHWER
DEUTSCH · Vielen Dank, dass Sie sich für dieses Premium-Produkt von SW-
MOTECH entschieden haben. Besuchen Sie unseren Webshop für weitere
Informationen (z. B. Modellzuweisungen). Erforderliche Dokumente (z. B.
ABE) stehen Ihnen dort als Download zur Verfügung.
Bitte lesen und verstehen Sie alle Anweisungen, Sicherheitshinweise und
Warnungen in dieser Anbauanleitung vor Montage und Nutzung des
Produkts, um Verletzungen und Schäden zu vermeiden. Bewahren Sie diese
Anbauanleitung als Referenz auf.
Dieses Produkt wurde für Fahrzeuge im Werkszustand entwickelt. Die
Kompatibilität mit Original-Zubehörteilen bzw. den Zubehörteilen anderer
Hersteller kann nicht gewährleistet werden.
Diese Anbauanleitung ist nach unserem derzeitigen Kenntnisstand verfasst
worden. Rechtliche Ansprüche auf Richtigkeit bestehen nicht. Fehler und
Irrtümer vorbehalten. Technische und gestalterische Änderungen sind
vorbehalten. Das Urheberrecht liegt bei SW-MOTECH.
SICHERHEITSWARNUNGSSYMBOL
Dieses Warnsymbol wird in dieser Anbauanleitung verwendet, um vor
tödlichen Gefahren, Verletzungen oder anderen Gefahren zu warnen. Die
Wörter GEFAHR, WARNUNG oder VORSICHT werden mit diesem
Warnsymbol verwendet, um wichtige Sicherheitshinweise und
Informationen in Bezug auf die Montage und Nutzung dieses Produkts zu
übermitteln. Diese Wörter zusammen mit dem Sicherheitswarnsymbol
bedeuten:
GEFAHR: Weist auf eine gefährliche Situation hin, die zum Tod oder zu
schweren Verletzungen führt, wenn sie nicht vermieden wird!
WARNUNG: Weist auf eine gefährliche Situation hin, die zum Tod oder zu
schweren Verletzungen führen kann, wenn sie nicht vermieden wird!
VORSICHT: Weist auf eine gefährliche Situation hin, die zu leichten oder
mittelschweren Verletzungen führen kann, wenn sie nicht vermieden wird!
HINWEIS: Wichtige Informationen, jedoch nicht in Bezug auf Todes- oder
Verletzungsgefahr (nur Sachschäden)!
ALLGEMEINE HINWEISE
WARNUNG: Die Montage und/oder Wartung dieses Produkts erfordert
fortgeschrittene technische Fähigkeiten, geeignetes Werkzeug und ein
gutes Verständnis der Werkzeugnutzung und Drehmomentangaben. Zu
Ihrer eigenen Sicherheit empfiehlt SW-MOTECH, die Montage und/oder
Wartung von einer qualifizierten und zertifizierten Zweiradwerkstatt
durchführen zu lassen.
WARNUNG: Wenn Sie sich für die Eigenmontage dieses Produkts
entscheiden, lesen Sie vor Montage und Nutzung die Anbauanleitung
sorgfältig und vollständig durch und befolgen Sie alle Anweisungen, um
schwere oder tödliche Verletzungen zu vermeiden. Beachten Sie bei der
Montage und Verwendung auch alle relevanten Informationen im
Fahrzeughandbuch. WENN SIE EINEN TEIL DIESER ANBAUANLEITUNG
NICHT VERSTEHEN ODER EINE ERKLÄRUNG EINER ANWEISUNG
BENÖTIGEN, VERSUCHEN SIE NICHT DIESES PRODUKT ZU MONTIERN,
OHNE SW-MOTECH UM HILFE ZU FRAGEN!
VORBEREITUNG: Lesen Sie die Anbauanleitung aufmerksam und stellen Sie
sicher, dass alle Teile der Stückliste vorhanden sind.
VORSICHT: Achten Sie auf den sicheren Stand Ihres Fahrzeugs.
Schalten Sie den Motor ab und ziehen Sie den Zündschlüssel. Lassen Sie
den Motor/Auspuff bei Bedarf abkühlen. Klemmen Sie die Batterie bei
Arbeiten an der Elektrik ab. Verwenden Sie nur geeignetes Werkzeug und
tragen Sie während der Montage und Wartung immer eine Schutzbrille
und Handschuhe. Lassen Sie sich bei der Montage und Wartung von einer
zweiten Person helfen.
MONTAGE: Alle vom Fahrzeug entfernten Teile und Verbindungen müssen
gemäß den Angaben des Fahrzeugherstellers wieder eingebaut oder durch
von SW-MOTECH gelieferte Teile und Hardware ersetzt werden.
WARNUNG: Sichern Sie alle Gewinde, sofern nicht anders angegeben,
mit mittelstarker, flüssiger Schraubensicherung.
GEFAHR: Von SW-MOTECH nicht definierte Anzugsdrehmomente
müssen Sie vom Fahrzeughersteller oder von einer zertifizierten
Motorradwerkstatt beziehen.
FUNKTIONSKONTROLLE: Stellen Sie nach der Montage sicher, dass keine
beweglichen Teile blockiert sind und die Funktion des Fahrzeugs nicht
gestört wird. Kabel und Schläuche dürfen nicht scheuern und/oder
geklemmt werden.
WARNUNG: Führen Sie vor Fahrtbeginn eine umfassende
Funktionskontrolle durch. Prüfen Sie nach den ersten 50 km und dann
regelmäßig das Anzugsmoment aller Verbindungen und den festen Sitz
des Produkts. Montiertes Zubehör kann das Fahrverhalten und die
Stabilität des Fahrzeugs verändern.
ANBAUANLEITUNG · ANBAUANLEITUNG LESEN UND AUFBEWAHREN!
SW-MOTECH GmbH & Co. KG
Ernteweg 7-10
35282 Rauschenberg
Deutschland
www.sw-motech.com
Die inhaltliche Übersetzung erfolgt automatisiert.
© SW-MOTECH GmbH & Co. KG
Irrtümer und Änderungen vorbehalten.
Technische und Design-Änderungen vorbehalten.
1

Beachten Sie in dem Abschnitt MONTAGE
vorkommenden Symbole und deren Bedeutung.
Wenn im Abschnitt MONTAGE die Bezeichnung OEM
vorkommt, müssten die Vorgaben des
Fahrzeugherstellers beachtet und angewandt
werden.
Bei Fragen steht Ihnen unser Kundendienst sowie unsere
Distributoren gerne zur Verfügung. Unsere
Telefonnummer sowie eine Liste unserer Distributoren
finden Sie in unserem Webshop:
www.sw-motech.com
Schraubensicherung verwenden: Weist darauf hin,
dass ein Gewinde mit flüssiger Schraubensicherung
bestrichen werden muss. H (HIGH): hohe Festigkeit;
M (MEDIUM): mittlere Festigkeit; L (LOW): niedrige
Festigkeit.
Anziehen / Anzugsmomentangabe beachten: Weist auf
das von SW-MOTECH bzw. vom Fahrzeughersteller (OEM)
vorgegeben Anzugsmoment eines Teils hin.
LEGENDENüBERSICHT · ANBAUANLEITUNG LESEN UND AUFBEWAHREN!
Die inhaltliche Übersetzung erfolgt automatisiert.
© SW-MOTECH GmbH & Co. KG
Irrtümer und Änderungen vorbehalten.
Technische und Design-Änderungen vorbehalten.
2

STüCKLISTE · ANBAUANLEITUNG LESEN UND AUFBEWAHREN!
Die inhaltliche Übersetzung erfolgt automatisiert.
© SW-MOTECH GmbH & Co. KG
Irrtümer und Änderungen vorbehalten.
Technische und Design-Änderungen vorbehalten.
3
11
HSK.00.745.025.35GR
1/1
2
M6 x 14; ISO 7380
SC.ST.06.014.02.7380.109
2/2
3
GPT.00.152.035.02
4/4
4
GPT.00.152.010.35
2/2
5
M6 x 25; DIN 7991
SC.ST.06.025.02.7991.088
2/2

1
1×1
2×2
M 9 Nm
3×4
4×2
5×2
M 9 Nm
WARNUNG: Tragen Sie immer Augen- und Handschutz!
WARNUNG: Verwenden Sie immer geeignetes Werkzeug!
Montieren Sie die gezeigten Teile an Ihrem Gepäckträger.
WARNUNG: Verwenden Sie flüssige Schraubensicherung!
Ziehen Sie die Schrauben wie in der Anbauanleitung vorgegeben an.
ANBAUSCHRITT · ANBAUANLEITUNG LESEN UND AUFBEWAHREN!
Die inhaltliche Übersetzung erfolgt automatisiert.
© SW-MOTECH GmbH & Co. KG
Irrtümer und Änderungen vorbehalten.
Technische und Design-Änderungen vorbehalten.
4

PRODUKTSPEZIFISCHE HINWEISE
HINWEIS: Beachten Sie die landesspezifischen Vorschriften für
Zulassung/Betrieb Ihres Fahrzeugs bzw. anwendbare TÜV-Vorschriften. Lassen
Sie eintragungspflichtige Teile nach Montage durch Ihre Prüfstelle in die
Fahrzeugpapiere eintragen.
PRODUKTHINWEISE · ANBAUANLEITUNG LESEN UND AUFBEWAHREN!
Die inhaltliche Übersetzung erfolgt automatisiert.
© SW-MOTECH GmbH & Co. KG
Irrtümer und Änderungen vorbehalten.
Technische und Design-Änderungen vorbehalten.
5

Item number: GPT.00.152.36200/B Revision: 00 · Date: 08 - 2023
Adapter kit for ADVENTURE-RACK
~ 0.25 h. EASY DIFFICULT
ENGLISH ·Thank you for choosing this premium product from SW-MOTECH.
Visit our online shop for more information (e.g. model assignments). Required
documents (e.g. national type approval) are available there for you to
download.
Please read and understand all the instructions, safety information and
warnings in these mounting instructions before mounting and using the
product in order to avoid injury and damage. Keep these mounting
instructions for reference.
This product was developed for vehicles in factory condition. Compatibility
with original accessories or accessories from other manufacturers cannot
be guaranteed.
These mounting instructions have been prepared to the best of our current
knowledge. No legal claims relating to accuracy can be made. Errors and
omissions excepted. We reserve the right to make technical and design
changes. The copyright is held by SW-MOTECH.
SAFETY WARNING SYMBOL
This warning symbol is used in these mounting instructions to warn of
deadly dangers, injuries or other hazards. The words DANGER, WARNING or
CAUTION are used as part of this warning symbol to convey important safety
messages and information relating to the installation and use of this
product. These words, together with the safety warning symbol, mean:
DANGER: Indicates a hazardous situation which, if not avoided, will result
in death or serious injury!
WARNING: Indicates a hazardous situation which, if not avoided, may
result in death or serious injury!
CAUTION: Indicates a hazardous situation which, if not avoided, may result
in minor or moderate injury!
NOTE: Important information, but not relating to a risk of death or injury
(property damage only)!
GENERAL INFORMATION
WARNING: Assembly and/or maintenance of this product requires
advanced technical skill, appropriate tools, and a good understanding of tool
usage and torque specifications. For your own safety, SW-MOTECH
recommends having the assembly and/or maintenance carried out by a
qualified and certified motorcycle workshop.
WARNING: If you do choose to assemble this product yourself, carefully
and fully read the mounting instructions before assembly and use, and
follow all instructions to avoid serious injury or death. Also observe all
relevant information in the vehicle manual when mounting or using the
product. IF YOU DO NOT UNDERSTAND ANY PART OF THESE MOUNTING
INSTRUCTIONS OR NEED AN EXPLANATION AS TO A SPECIFIC
INSTRUCTION, DO NOT ATTEMPT TO INSTALL THIS PRODUCT WITHOUT
CONSULTING SW-MOTECH FOR ASSISTANCE!
PREPARATION: Read the mounting instructions carefully and make sure
that all parts on the parts list are available.
CAUTION: Ensure that your vehicle is standing securely. Switch off the
engine and remove the ignition key. Allow the engine/exhaust to cool
down if necessary. Disconnect the battery when working on the electrical
system. Only use proper tools and always wear safety goggles and gloves
during assembly and maintenance. Have a second person help you with
assembly and maintenance.
ASSEMBLY: All parts and connections removed from the vehicle must be
reinstalled according to the vehicle manufacturer's specifications or
replaced with parts and hardware supplied by SW-MOTECH.
WARNING: Secure all threads with a medium-strength liquid
threadlocker, unless otherwise specified.
DANGER: Tightening torques not defined by SW-MOTECH must be
obtained from the vehicle manufacturer or a certified motorbike
workshop.
FUNCTIONAL CHECK:After mounting the product, ensure that no moving
parts are obstructed and that the function of the vehicle is not impeded.
Cables and hoses must not rub against each other and/or be hindered in any
way.
WARNING: Carry out a comprehensive functionality check before you
start to drive. Check the tightening torque of all connections and the tight
fit of the product after the first 50 km and then at regular intervals.
Mounted accessories can change the handling and stability of the vehicle.
MOUNTING INSTRUCTIONS · READ AND KEEP MOUNTING INSTRUCTIONS!
SW-MOTECH GmbH & Co. KG
Ernteweg 7-10
35282 Rauschenberg
Germany
www.sw-motech.com
The content translation is automated.
© SW-MOTECH GmbH & Co. KG
Errors and omissions excepted
Subject to technical and design changes.
1

Take note of the symbols and what they mean in the
ASSEMBLY section. If the term OEM appears in the
ASSEMBLY section, the vehicle manufacturer's
specifications must be observed and applied.
If you have any questions, please don't hesitate to contact
our Customer Service team or our distributors. You can
find our telephone number and a list of our distributors in
our online shop:
www.sw-motech.com
Use thread locker: Indicates that a thread must be
coated with liquid thread locker. H (HIGH): high
strength; M (MEDIUM): medium strength; L (LOW):
low strength.
Tighten/note the tightening torque information:
Indicates the tightening torque of a part specified by SW-
MOTECH or the vehicle manufacturer (OEM).
LEGEND OVERVIEW · READ AND KEEP MOUNTING INSTRUCTIONS!
The content translation is automated.
© SW-MOTECH GmbH & Co. KG
Errors and omissions excepted
Subject to technical and design changes.
2

PARTS LIST · READ AND KEEP MOUNTING INSTRUCTIONS!
The content translation is automated.
© SW-MOTECH GmbH & Co. KG
Errors and omissions excepted
Subject to technical and design changes.
3
11
HSK.00.745.025.35GR
1/1
2
M6 x 14; ISO 7380
SC.ST.06.014.02.7380.109
2/2
3
GPT.00.152.035.02
4/4
4
GPT.00.152.010.35
2/2
5
M6 x 25; DIN 7991
SC.ST.06.025.02.7991.088
2/2

1
1×1
2×2
M 9 Nm
3×4
4×2
5×2
M 9 Nm
WARNING: Always wear eye and hand protection!
WARNING: Always use the proper tools!
Mount the parts shown to your rack.
WARNING: Use a liquid threadlocker!
Tighten the screws as specified in the mounting instructions.
MOUNTING STEP · READ AND KEEP MOUNTING INSTRUCTIONS!
The content translation is automated.
© SW-MOTECH GmbH & Co. KG
Errors and omissions excepted
Subject to technical and design changes.
4

PRODUCT-SPECIFIC NOTES
NOTE: Observe the country-specific regulations for the registration/operation of
your vehicle or applicable TÜV regulations. After assembly, have parts that are
subject to registration entered in the vehicle documents by your test centre.
PRODUCT INFORMATION · READ AND KEEP MOUNTING INSTRUCTIONS!
The content translation is automated.
© SW-MOTECH GmbH & Co. KG
Errors and omissions excepted
Subject to technical and design changes.
5

Número de artículo: GPT.00.152.36200/B Revisión: 00 · Fecha: 08 - 2023
Kit de adaptadores para ADVENTURE-RACK
~ 0.25 h. FÁCIL COMPLICADO
ESPAÑOL · Gracias por elegir este producto de primera calidad de SW-
MOTECH. Visite nuestra tienda online para obtener más información (p. ej.,
sobre el uso de los modelos). Desde esa página podrá descargar los
documentos que necesite (por ejemplo, la homologación nacional de tipo).
Para evitar lesiones y daños, asegúrese de leer y comprender todas las
instrucciones, advertencias de seguridad y precauciones de este manual
antes de montar y utilizar el producto. Guarde estas instrucciones de
montaje como referencia.
Este producto ha sido desarrollado para vehículos en condiciones de
fábrica. No se garantiza la compatibilidad con los accesorios originales o de
otros fabricantes.
Estas instrucciones de montaje se han redactado de acuerdo con nuestros
conocimientos actuales. No hay reclamaciones legales de corrección. Salvo
errores y omisiones. Nos reservamos el derecho a realizar cambios
técnicos y de diseño. Los derechos de autor pertenecen a SW-MOTECH.
SÍMBOLO DE ADVERTENCIA DE SEGURIDAD
Este símbolo de advertencia se utiliza en estas instrucciones de montaje
para advertir de peligros mortales, lesiones u otros riesgos. Las palabras
PELIGRO, ATENCIÓN o PRECAUCIÓN se utilizan con este símbolo de
advertencia para transmitir importantes avisos de seguridad e información
relacionada con el montaje y uso de este producto. Estas palabras, junto con
el símbolo de advertencia de seguridad, significan:
PELIGRO: Indica una situación de peligro que, si no se evita, provoca
lesiones graves o incluso la muerte.
ATENCIÓN: Indica una situación de peligro que, si no se evita, puede
provocar lesiones graves o incluso la muerte.
PRECAUCIÓN: Indica una situación de peligro que, si no se evita, puede
provocar lesiones leves o de gravedad media.
NOTA: Información importante, pero que no está relacionada con un
riesgo de lesiones o muerte (solo daños materiales).
INDICACIONES GENERALES
ATENCIÓN: El montaje y/o mantenimiento de este producto requiere
conocimientos técnicos avanzados, las herramientas apropiadas, un buen
manejo de dichas herramientas y conocer las especificaciones de los pares
de apriete. Por su propia seguridad, SW-MOTECH recomienda que el
montaje y/o el mantenimiento los realice un taller de motocicletas
cualificado y certificado.
ATENCIÓN: Si elige ensamblar este producto usted mismo, antes de
montarlo y usarlo, lea las instrucciones de montaje detenidamente y en su
totalidad, y siga todas las indicaciones para evitar lesiones graves o
mortales. Cuando monte y utilice el producto, tenga también en cuenta toda
la información relevante que figure en el manual del vehículo. SI NO
ENTIENDE ALGUNA PARTE DE ESTAS INSTRUCCIONES DE MONTAJE O
NECESITA ALGUNA ACLARACIÓN, NO INTENTE INSTALAR ESTE PRODUCTO
SIN CONSULTAR A SW-MOTECH PARA OBTENER AYUDA.
PREPARACIÓN: Lea atentamente las instrucciones de montaje y asegúrese
de que todas las piezas de la lista de piezas están presentes.
PRECAUCIÓN:Asegúrese de que su vehículo esté estacionado de
manera segura. Apague el motor y retire la llave de encendido. Deje que el
motor o el escape se enfríen si es necesario. Desconecte la batería cuando
trabaje en el sistema eléctrico. Utilice únicamente las herramientas
adecuadas y use siempre gafas de seguridad y guantes al realizar el
montaje y las tareas de mantenimiento. Pida a otra persona que le ayude
con el montaje y el mantenimiento.
MONTAJE: Todas las piezas y conexiones retiradas del vehículo deben ser
reinstaladas de acuerdo con las especificaciones del fabricante del vehículo
o sustituidas por piezas y herrajes suministrados por SW-MOTECH.
ATENCIÓN: Asegure todas las roscas con fijador de roscas líquido de
resistencia media, a menos que se especifique lo contrario.
PELIGRO: Los pares de apriete no definidos por SW-MOTECH deben
obtenerse del fabricante del vehículo o de un taller de motocicletas
certificado.
COMPROBACIÓN FUNCIONAL:Después del montaje, asegúrese de que no
haya piezas móviles bloqueadas y de que no se altere el funcionamiento del
vehículo. Los cables y tubos no deben rozarse ni quedar pinzados.
ATENCIÓN: Realice una comprobación exhaustiva del funcionamiento
antes de iniciar la marcha. Tras los primeros 50 km y, después, con
regularidad, compruebe el par de apriete de todas las conexiones y que el
producto está firmemente sujeto. Los accesorios instalados pueden
cambiar el comportamiento de conducción y la estabilidad del vehículo.
INSTRUCCIONES DE MONTAJE · LEE Y CONSERVA LAS INSTRUCCIONES DE MONTAJE!
SW-MOTECH GmbH & Co. KG
Ernteweg 7-10
35282 Rauschenberg
Alemania
www.sw-motech.com
La traducción del contenido es automática
© SW-MOTECH GmbH & Co. KG
Salvo errores y omisiones
Sujeto a cambios técnicos y de diseño.
1

Preste atención a los símbolos que figuran en la
sección de MONTAJE y su significado. Cuando, en la
sección de MONTAJE, aparecen las siglas OEM, se
deberán seguir y aplicar las especificaciones del
fabricante del vehículo.
Si tiene alguna pregunta, nuestro servicio de atención al
cliente y nuestros distribuidores estarán encantados de
prestarle ayuda. Encontrará nuestro número de teléfono
y una lista de nuestros distribuidores en nuestra tienda
online:
www.sw-motech.com
Usar fijador de roscas: Indica que una rosca debe
recubrirse con fijador de roscas líquido. H (HIGH):
resistencia alta; M (MEDIUM): resistencia media; L
(LOW): resistencia baja.
Respete la información del par de apriete: Indica el par
de apriete de una pieza especificada por SW-MOTECH o el
fabricante del vehículo (OEM).
RESUMEN DE LA LEYENDA · LEE Y CONSERVA LAS INSTRUCCIONES DE MONTAJE!
La traducción del contenido es automática
© SW-MOTECH GmbH & Co. KG
Salvo errores y omisiones
Sujeto a cambios técnicos y de diseño.
2

LISTA DE PIEZAS · LEE Y CONSERVA LAS INSTRUCCIONES DE MONTAJE!
La traducción del contenido es automática
© SW-MOTECH GmbH & Co. KG
Salvo errores y omisiones
Sujeto a cambios técnicos y de diseño.
3
11
HSK.00.745.025.35GR
1/1
2
M6 x 14; ISO 7380
SC.ST.06.014.02.7380.109
2/2
3
GPT.00.152.035.02
4/4
4
GPT.00.152.010.35
2/2
5
M6 x 25; DIN 7991
SC.ST.06.025.02.7991.088
2/2

1
1×1
2×2
M 9 Nm
3×4
4×2
5×2
M 9 Nm
ATENCIÓN: ¡Use siempre protección de ojos y manos!
ATENCIÓN: ¡Utilice siempre herramientas adecuadas!
Monte las piezas indicadas en el portaequipaje.
ATENCIÓN: ¡Utilice fijador de roscas líquido!
Apriete los tornillos tal y como se indica en las instrucciones de montaje.
PASO DE FIJACIóN · LEE Y CONSERVA LAS INSTRUCCIONES DE MONTAJE!
La traducción del contenido es automática
© SW-MOTECH GmbH & Co. KG
Salvo errores y omisiones
Sujeto a cambios técnicos y de diseño.
4

INDICACIONES ESPECÍFICAS DEL PRODUCTO
NOTA: Tenga en cuenta las normas específicas del país para la
matriculación/uso de su vehículo o las normas aplicables de la ITV. En caso de
piezas con registro obligatorio, su organismo de inspección debe registrarlas tras
el montaje en los documentos del vehículo.
INFORMACIóN SOBRE LOS PRODUCTOS · LEE Y CONSERVA LAS INSTRUCCIONES DE MONTAJE!
La traducción del contenido es automática
© SW-MOTECH GmbH & Co. KG
Salvo errores y omisiones
Sujeto a cambios técnicos y de diseño.
5

Numéro d‘article: GPT.00.152.36200/B Révision: 00 · Date: 08 - 2023
Kit d'adaptation pour porte-bagages ADVENTURE-RACK
~ 0.25 h. FACILE DIFFICILE
FRANÇAIS · Nous vous remercions d'avoir choisi ce produit haut de gamme
de SW-MOTECH. Visitez notre boutique en ligne pour plus d'informations (par
exemple affectation des modèles). Les documents nécessaires (par exemple
ABE) y sont disponibles en téléchargement.
Veuillez lire et prendre en compte toutes les instructions, les consignes de
sécurité et les avertissements contenus dans ce manuel de montage avant
de monter et d'utiliser le produit afin d'éviter toute blessure ou tout
dommage. Veuillez conserver la notice d'utilisation pour référence.
Ce produit a été développé pour des véhicules en configuration d'usine.
Nous ne sommes pas en mesure d'assurer la compatibilité avec les pièces
de rechange originales ou les pièces de rechange d'autres fabricants.
La présente notice d'installation a été élaborée conformément à nos
connaissances actuelles. Il n'existe aucun droit juridique à l'exactitude des
informations qu'elle contient. Sous réserve d'erreurs et de fautes. Sous
réserve de modifications techniques et conceptuelles. SW-MOTECH détient
les droits d'auteur.
SYMBOLE D'AVERTISSEMENT DE SÉCURITÉ
Ce symbole d'avertissement est utilisé dans ces instructions de montage
pour mettre en garde contre des dangers mortels, de blessures ou d'autres
risques. Les mots DANGER, ATTENTION ou RECOMMANDATION sont utilisés
avec ce symbole d'avertissement pour transmettre des consignes de
sécurité et des informations importantes concernant le montage et
l'utilisation de ce produit. Ces mots, associés au symbole d'avertissement
de sécurité, signifient :
DANGER : signale une situation dangereuse pouvant entraîner la mort ou
des blessures graves si elle n'est pas évitée !
ATTENTION : signale une situation dangereuse pouvant entraîner la mort
ou des blessures graves si elle n'est pas évitée !
PRUDENCE : Indique une situation dangereuse susceptible d'entraîner des
blessures de gravité réduite ou moyenne si elle se présente !
REMARQUE : Informations importantes, mais qui n'entraînent pas de
risque de décès ou de blessure (dommages matériels uniquement).
REMARQUES GÉNÉRALES
ATTENTION : le montage et/ou l'entretien de ce produit nécessite des
compétences techniques avancées, des outils appropriés et une bonne
compréhension de l'utilisation des outils et des indications de réglage. Pour
votre propre sécurité, SW-MOTECH recommande de confier le montage
et/ou l'entretien à un atelier de réparation de deux-roues qualifié et
certifié.
ATTENTION : si vous décidez de monter vous-même ce produit, lisez
attentivement et intégralement les instructions de montage avant le
montage et l'utilisation et suivez toutes les instructions afin d'éviter des
blessures graves ou mortelles. Lors du montage et de l'utilisation, tenez
également compte de toutes les informations pertinentes du manuel du
véhicule. SI VOUS NE COMPRENEZ PAS UNE PARTIE DE CE MANUEL
D'INSTALLATION OU SI VOUS AVEZ BESOIN D'EXPLICATIONS CONCERNANT
UNE INSTRUCTION, N'ESSAYEZ PAS D'INSTALLER CE PRODUIT SANS
DEMANDER DE L'AIDE À SW-MOTECH !
PRÉPARATION : Veuillez lire attentivement les instructions de montage et
assurez-vous que tous les éléments de la liste de pièces sont présents.
PRUDENCE : veillez à ce que votre véhicule soit bien stable. Éteignez le
moteur et retirez la clé de contact. Laissez refroidir le
moteur/l'échappement si nécessaire. Débranchez la batterie lorsque vous
travaillez sur le système électrique. Utilisez uniquement des outils
appropriés et portez toujours des lunettes de protection et des gants
pendant le montage et l'entretien. Faites-vous aider par une deuxième
personne lors du montage et de l'entretien.
MONTAGE : Toutes les pièces et connexions retirées du véhicule doivent
être réinstallées conformément aux instructions du fabricant du véhicule ou
remplacées par des pièces et du matériel fournis par SW-MOTECH.
ATTENTION Sauf indication contraire, sécurisez tous les filetages avec
du frein filet liquide de force moyenne.
DANGER : Les couples de serrage non définis par SW-MOTECH doivent
être obtenus auprès du constructeur du véhicule ou d'un atelier de
réparation de motos certifié.
CONTRÔLE DU FONCTIONNEMENT : Après le montage, assurez-vous
qu'aucune pièce mobile n'est bloquée et que le fonctionnement du véhicule
n'est pas perturbé. Les câbles et les tuyaux ne doivent pas frotter et/ou être
coincés.
ATTENTION : Effectuez un contrôle de fonctionnement complet avant
de commencer à rouler. Après les 50 premiers kilomètres, puis
régulièrement, vérifiez le couple de serrage de tous les raccords et la
bonne fixation du produit. Les accessoires montés peuvent modifier le
comportement sur la route et la stabilité du véhicule.
INSTRUCTIONS DE MONTAGE · LIRE ET CONSERVER LES INSTRUCTIONS DE MONTAGE!
SW-MOTECH GmbH & Co. KG
Ernteweg 7-10
35282 Rauschenberg
Allemagne
www.sw-motech.com
La traduction du contenu est automatisée.
© SW-MOTECH GmbH & Co. KG
Sous réserve d'erreurs et de modifications
Sous réserve de modifications techniques et de design.
1

Vous trouverez les symboles et leur signification
dans la section MONTAGE. Si le terme OEM apparaît
dans la section MONTAGE, il faut respecter et
appliquer les consignes du fabricant du véhicule.
Si vous avez des questions, notre service clientèle ainsi
que nos distributeurs se tiennent à votre disposition. Vous
trouverez notre numéro de téléphone ainsi que la liste de
nos distributeurs sur notre boutique en ligne :
www.sw-motech.com
Utilisez du frein filet : Indique qu'un filetage doit être
enduit de frein filet liquide. H (HIGH) : haute
résistance ; M (MEDIUM) : force moyenne ; L (LOW) :
faible résistance.
Serrer en respectant les instructions de couple de
serrage : indique le couple de serrage d'une pièce
prescrit par SW-MOTECH ou par le fabricant du véhicule
(OEM).
APERçU DES LéGENDES · LIRE ET CONSERVER LES INSTRUCTIONS DE MONTAGE!
La traduction du contenu est automatisée.
© SW-MOTECH GmbH & Co. KG
Sous réserve d'erreurs et de modifications
Sous réserve de modifications techniques et de design.
2

LISTE DES PIèCES · LIRE ET CONSERVER LES INSTRUCTIONS DE MONTAGE!
La traduction du contenu est automatisée.
© SW-MOTECH GmbH & Co. KG
Sous réserve d'erreurs et de modifications
Sous réserve de modifications techniques et de design.
3
11
HSK.00.745.025.35GR
1/1
2
M6 x 14; ISO 7380
SC.ST.06.014.02.7380.109
2/2
3
GPT.00.152.035.02
4/4
4
GPT.00.152.010.35
2/2
5
M6 x 25; DIN 7991
SC.ST.06.025.02.7991.088
2/2

1
1×1
2×2
M 9 Nm
3×4
4×2
5×2
M 9 Nm
ATTENTION : portez toujours des lunettes et des gants de protection !
ATTENTION : Utilisez toujours des outils appropriés !
Montez les pièces indiquées sur votre porte-bagages.
ATTENTION : utilisez du frein filet liquide !
Serrez les vis comme indiqué dans les instructions de montage.
PHASE DE MONTAGE · LIRE ET CONSERVER LES INSTRUCTIONS DE MONTAGE!
La traduction du contenu est automatisée.
© SW-MOTECH GmbH & Co. KG
Sous réserve d'erreurs et de modifications
Sous réserve de modifications techniques et de design.
4

REMARQUES SPÉCIFIQUES AU PRODUIT
REMARQUE :Respectez les réglementations spécifiques au pays pour
l'immatriculation/l'exploitation de votre véhicule ou les réglementations TÜV
applicables. Après le montage, faites inscrire les pièces soumises à
immatriculation dans les papiers du véhicule par votre centre de contrôle.
INFORMATIONS SUR LES PRODUITS · LIRE ET CONSERVER LES INSTRUCTIONS DE MONTAGE!
La traduction du contenu est automatisée.
© SW-MOTECH GmbH & Co. KG
Sous réserve d'erreurs et de modifications
Sous réserve de modifications techniques et de design.
5

Numero di articolo: GPT.00.152.36200/B Revisione: 00 · Data: 08 - 2023
Kit adattatore per portabagagli ADVENTURE-RACK
~ 0.25 h. FACILE DIFFICILE
ITALIANO ·Grazie per aver scelto questo prodotto premium di SW-MOTECH.
Visita il nostro negozio online per ulteriori informazioni (ad es. per la
compatibilità con i vari modelli). I documenti richiesti (ad es. certificato di
omologazione nazionale) possono essere scaricati qui.
Si prega di leggere attentamente le avvertenze di sicurezza e le istruzioni
per il montaggio prima di montare e utilizzare il prodotto, al fine di evitare
eventuali lesioni e danni. Conserva queste istruzioni per il montaggio come
riferimento futuro.
Questo prodotto è stato sviluppato per veicoli in condizioni di fabbrica. La
compatibilità con gli accessori originali o di altri produttori non può essere
garantita.
Queste istruzioni per il montaggio sono state redatte in base alle nostre
conoscenze attuali. Non sussistono pretese di correttezza giuridiche. Salvo
errori ed omissioni. Ci riserviamo il diritto di apportare modifiche tecniche e
di design. Copyright SW-MOTECH.
SIMBOLO DI SICUREZZA
Questo simbolo di avvertenza è usato nelle presenti istruzioni di
montaggio per segnalare pericoli mortali, rischio di lesioni o altri pericoli.
Le parole "PERICOLO", "AVVERTENZA" O "ATTENZIONE" sono utilizzate con
questo simbolo di avvertenza per trasmettere importanti istruzioni di
sicurezza e informazioni relative al montaggio e all'uso di questo prodotto.
Queste parole, utilizzate insieme al simbolo di avvertenza, significano:
PERICOLO: indica una situazione di pericolo che, se non evitata, può
causare morte o lesioni gravi!
AVVERTENZA: indica una situazione di pericolo che, se non evitata, può
causare morte o lesioni gravi!
ATTENZIONE: indica una situazione di pericolo che, se non evitata, può
provocare lesioni lievi o di entità moderata!
AVVISO: indica informazioni importanti che non riguardano il rischio di
morte o di lesioni (riguardano unicamente il rischio di danni materiali)!
INFORMAZIONI GENERALI
AVVERTENZA: il montaggio e/o la manutenzione di questo prodotto
richiedono competenze tecniche avanzate, strumenti adeguati e una buona
conoscenza dell'uso della strumentazione e delle indicazioni relative alle
coppie di serraggio. Per ragioni di sicurezza, SW-MOTECH raccomanda di
far eseguire il montaggio e/o la manutenzione presso un'officina per
motociclette qualificata e certificata.
AVVERTENZA: se si decide di installare questo prodotto in autonomia,
leggere attentamente le istruzioni per il montaggio prima del montaggio e
dell'uso e seguire tutte le avvertenze per evitare lesioni gravi o mortali.
Durante il montaggio e l'uso, seguire anche tutte le istruzioni pertinenti
contenute nel manuale del veicolo. SE NON SI COMPRENDONO TALI
ISTRUZIONI, ANCHE SOLO IN PARTE, O SE SONO NECESSARI CHIARIMENTI,
NON CERCARE DI MONTARE IL PRODOTTO IN AUTONOMIA SENZA CHIEDERE
IL SUPPORTO DI SW-MOTECH!
PREPARAZIONE: leggere attentamente le istruzioni per il montaggio e
assicurarsi che siano disponibili tutti i componenti contenuti nella lista.
ATTENZIONE: assicurarsi che il veicolo sia perfettamente fermo.
Spegnere il motore e togliere la chiave. Se necessario, lasciar raffreddare
il motore/lo scarico. Scollegare la batteria quando si interviene
sull'impianto elettrico. Usare esclusivamente strumenti idonei e indossare
sempre occhiali e guanti protettivi durante le operazioni di montaggio e
manutenzione. Chiedere aiuto a una seconda persona durante le fasi di
montaggio e manutenzione.
MONTAGGIO: tutti i componenti e i collegamenti rimossi dal veicolo devono
essere reinstallati secondo le specifiche del produttore del veicolo o
sostituiti con componenti e attrezzatura forniti da SW-MOTECH.
AVVERTENZA: fissare tutte le filettature con frenafiletti liquido a
media resistenza, se non diversamente specificato.
PERICOLO: le coppie di serraggio non definite da SW-MOTECH devono
essere richieste al costruttore del veicolo o a un'officina certificata.
CONTROLLO DI FUNZIONALITÀ: dopo il montaggio accertarsi che non vi
siano parti mobili bloccate e che il funzionamento del veicolo non sia
compromesso. I cavi e i tubi flessibili non devono sfregare e/o essere
schiacciati.
AVVERTENZA: eseguire un controllo completo delle funzioni prima di
mettersi alla guida. Controllare la coppia di serraggio di tutti i
collegamenti e la tenuta del prodotto dopo i primi 50 km e in seguito
regolarmente. Gli accessori montati possono modificare la
maneggevolezza e la stabilità del veicolo.
ISTRUZIONI PER IL MONTAGGIO · LEGGI E CONSERVA LE ISTRUZIONI DI MONTAGGIO!
SW-MOTECH GmbH & Co. KG
Ernteweg 7-10
35282 Rauschenberg
Germania
www.sw-motech.com
La traduzione dei contenuti è automatizzata.
© SW-MOTECH GmbH & Co. KG
Salvo errori e omissioni.
Soggetto a modifiche tecniche e di design.
1

Consultare i simboli e il loro significato nella sezione
MONTAGGIO. Se nella sezione montaggio compare la
sigla OEM, è necessario rispettare e applicare le
specifiche del produttore del veicolo.
Per qualsiasi domanda, non esitare a contattare il nostro
servizio clienti o i nostri distributori. Il nostro numero di
telefono e l'elenco dei nostri distributori sono disponibili
nel nostro negozio online:
www.sw-motech.com
Usare un frenafiletti: indica che la filettatura deve
essere rivestita con un frenafiletti liquido. H (ALTA):
alta resistenza; M (MEDIA): media resistenza; L
(BASSO): bassa resistenza.
Serraggio / rispetto delle specifiche sulla coppia di
serraggio: indica la coppia di serraggio di un componente
specificata da SW-MOTECH o dal produttore del veicolo
(OEM).
LEGENDA · LEGGI E CONSERVA LE ISTRUZIONI DI MONTAGGIO!
La traduzione dei contenuti è automatizzata.
© SW-MOTECH GmbH & Co. KG
Salvo errori e omissioni.
Soggetto a modifiche tecniche e di design.
2

ELENCO DELLE PARTI · LEGGI E CONSERVA LE ISTRUZIONI DI MONTAGGIO!
La traduzione dei contenuti è automatizzata.
© SW-MOTECH GmbH & Co. KG
Salvo errori e omissioni.
Soggetto a modifiche tecniche e di design.
3
11
HSK.00.745.025.35GR
1/1
2
M6 x 14; ISO 7380
SC.ST.06.014.02.7380.109
2/2
3
GPT.00.152.035.02
4/4
4
GPT.00.152.010.35
2/2
5
M6 x 25; DIN 7991
SC.ST.06.025.02.7991.088
2/2

1
1×1
2×2
M 9 Nm
3×4
4×2
5×2
M 9 Nm
AVVERTENZA: indossare sempre le protezioni per gli occhi e per le mani!
AVVERTENZA: Utilizzare sempre strumenti adeguati!
Montare le parti mostrate sul portabagagli.
AVVERTENZA: Usare un frenafiletti liquido!
Serrare le viti come indicato nelle istruzioni per il montaggio.
FASE DI MONTAGGIO · LEGGI E CONSERVA LE ISTRUZIONI DI MONTAGGIO!
La traduzione dei contenuti è automatizzata.
© SW-MOTECH GmbH & Co. KG
Salvo errori e omissioni.
Soggetto a modifiche tecniche e di design.
4

AVVERTENZE SPECIFICHE DEL PRODOTTO
AVVISO :Rispettare le normative specifiche del paese per
l'immatricolazione/l'uso del veicolo o le normative TÜV applicabili. Dopo il
montaggio, far inserire le parti soggette a omologazione nei documenti del veicolo
dal proprio centro di test.
INFORMAZIONI SUI PRODOTTI · LEGGI E CONSERVA LE ISTRUZIONI DI MONTAGGIO!
La traduzione dei contenuti è automatizzata.
© SW-MOTECH GmbH & Co. KG
Salvo errori e omissioni.
Soggetto a modifiche tecniche e di design.
5

Art.-Nr.: HSK.00.745.11000/B Revision: 03 · Datum: 09 - 2023
DUSC L
~ 0.25 h. LEICHT SCHWER
DEUTSCH · Vielen Dank, dass Sie sich für dieses Premium-Produkt von SW-
MOTECH entschieden haben. Besuchen Sie unseren Webshop für weitere
Informationen (z. B. Modellzuweisungen). Erforderliche Dokumente (z. B.
ABE) stehen Ihnen dort als Download zur Verfügung.
Bitte lesen und verstehen Sie alle Anweisungen, Sicherheitshinweise und
Warnungen in dieser Anbauanleitung vor Montage und Nutzung des
Produkts, um Verletzungen und Schäden zu vermeiden. Bewahren Sie diese
Anbauanleitung als Referenz auf.
Dieses Produkt wurde für Fahrzeuge im Werkszustand entwickelt. Die
Kompatibilität mit Original-Zubehörteilen bzw. den Zubehörteilen anderer
Hersteller kann nicht gewährleistet werden.
Diese Anbauanleitung ist nach unserem derzeitigen Kenntnisstand verfasst
worden. Rechtliche Ansprüche auf Richtigkeit bestehen nicht. Fehler und
Irrtümer vorbehalten. Technische und gestalterische Änderungen sind
vorbehalten. Das Urheberrecht liegt bei SW-MOTECH.
SICHERHEITSWARNUNGSSYMBOL
Dieses Warnsymbol wird in dieser Anbauanleitung verwendet, um vor
tödlichen Gefahren, Verletzungen oder anderen Gefahren zu warnen. Die
Wörter GEFAHR, WARNUNG oder VORSICHT werden mit diesem
Warnsymbol verwendet, um wichtige Sicherheitshinweise und
Informationen in Bezug auf die Montage und Nutzung dieses Produkts zu
übermitteln. Diese Wörter zusammen mit dem Sicherheitswarnsymbol
bedeuten:
GEFAHR: Weist auf eine gefährliche Situation hin, die zum Tod oder zu
schweren Verletzungen führt, wenn sie nicht vermieden wird!
WARNUNG: Weist auf eine gefährliche Situation hin, die zum Tod oder zu
schweren Verletzungen führen kann, wenn sie nicht vermieden wird!
VORSICHT: Weist auf eine gefährliche Situation hin, die zu leichten oder
mittelschweren Verletzungen führen kann, wenn sie nicht vermieden wird!
HINWEIS: Wichtige Informationen, jedoch nicht in Bezug auf Todes- oder
Verletzungsgefahr (nur Sachschäden)!
ALLGEMEINE HINWEISE
WARNUNG: Die Montage und/oder Wartung dieses Produkts erfordert
fortgeschrittene technische Fähigkeiten, geeignetes Werkzeug und ein
gutes Verständnis der Werkzeugnutzung und Drehmomentangaben. Zu
Ihrer eigenen Sicherheit empfiehlt SW-MOTECH, die Montage und/oder
Wartung von einer qualifizierten und zertifizierten Zweiradwerkstatt
durchführen zu lassen.
WARNUNG: Wenn Sie sich für die Eigenmontage dieses Produkts
entscheiden, lesen Sie vor Montage und Nutzung die Anbauanleitung
sorgfältig und vollständig durch und befolgen Sie alle Anweisungen, um
schwere oder tödliche Verletzungen zu vermeiden. Beachten Sie bei der
Montage und Verwendung auch alle relevanten Informationen im
Fahrzeughandbuch. WENN SIE EINEN TEIL DIESER ANBAUANLEITUNG
NICHT VERSTEHEN ODER EINE ERKLÄRUNG EINER ANWEISUNG
BENÖTIGEN, VERSUCHEN SIE NICHT DIESES PRODUKT ZU MONTIERN,
OHNE SW-MOTECH UM HILFE ZU FRAGEN!
VORBEREITUNG: Lesen Sie die Anbauanleitung aufmerksam und stellen Sie
sicher, dass alle Teile der Stückliste vorhanden sind.
VORSICHT: Achten Sie auf den sicheren Stand Ihres Fahrzeugs.
Schalten Sie den Motor ab und ziehen Sie den Zündschlüssel. Lassen Sie
den Motor/Auspuff bei Bedarf abkühlen. Klemmen Sie die Batterie bei
Arbeiten an der Elektrik ab. Verwenden Sie nur geeignetes Werkzeug und
tragen Sie während der Montage und Wartung immer eine Schutzbrille
und Handschuhe. Lassen Sie sich bei der Montage und Wartung von einer
zweiten Person helfen.
MONTAGE: Alle vom Fahrzeug entfernten Teile und Verbindungen müssen
gemäß den Angaben des Fahrzeugherstellers wieder eingebaut oder durch
von SW-MOTECH gelieferte Teile und Hardware ersetzt werden.
WARNUNG: Sichern Sie alle Gewinde, sofern nicht anders angegeben,
mit mittelstarker, flüssiger Schraubensicherung.
GEFAHR: Von SW-MOTECH nicht definierte Anzugsdrehmomente
müssen Sie vom Fahrzeughersteller oder von einer zertifizierten
Motorradwerkstatt beziehen.
FUNKTIONSKONTROLLE: Stellen Sie nach der Montage sicher, dass keine
beweglichen Teile blockiert sind und die Funktion des Fahrzeugs nicht
gestört wird. Kabel und Schläuche dürfen nicht scheuern und/oder
geklemmt werden.
WARNUNG: Führen Sie vor Fahrtbeginn eine umfassende
Funktionskontrolle durch. Prüfen Sie nach den ersten 50 km und dann
regelmäßig das Anzugsmoment aller Verbindungen und den festen Sitz
des Produkts. Montiertes Zubehör kann das Fahrverhalten und die
Stabilität des Fahrzeugs verändern.
ANBAUANLEITUNG · ANBAUANLEITUNG LESEN UND AUFBEWAHREN!
SW-MOTECH GmbH & Co. KG
Ernteweg 7-10
35282 Rauschenberg
Deutschland
www.sw-motech.com
Die inhaltliche Übersetzung erfolgt automatisiert.
© SW-MOTECH GmbH & Co. KG
Irrtümer und Änderungen vorbehalten.
Technische und Design-Änderungen vorbehalten.
1

Beachten Sie in dem Abschnitt MONTAGE
vorkommenden Symbole und deren Bedeutung.
Wenn im Abschnitt MONTAGE die Bezeichnung OEM
vorkommt, müssten die Vorgaben des
Fahrzeugherstellers beachtet und angewandt
werden.
Bei Fragen steht Ihnen unser Kundendienst sowie unsere
Distributoren gerne zur Verfügung. Unsere
Telefonnummer sowie eine Liste unserer Distributoren
finden Sie in unserem Webshop:
www.sw-motech.com
Keine Schraubensicherung verwenden: Weist
darauf hin, dass an der Stelle keine flüssige
Schraubensicherung notwendig ist.
Handfest anziehen: Weist darauf hin, dass das Anbauteil
vorsichtig mit der Hand angezogen werden muss.
LEGENDENüBERSICHT · ANBAUANLEITUNG LESEN UND AUFBEWAHREN!
Die inhaltliche Übersetzung erfolgt automatisiert.
© SW-MOTECH GmbH & Co. KG
Irrtümer und Änderungen vorbehalten.
Technische und Design-Änderungen vorbehalten.
2

STüCKLISTE · ANBAUANLEITUNG LESEN UND AUFBEWAHREN!
Die inhaltliche Übersetzung erfolgt automatisiert.
© SW-MOTECH GmbH & Co. KG
Irrtümer und Änderungen vorbehalten.
Technische und Design-Änderungen vorbehalten.
3
11
HSK.00.745.80000/B
1/1
22
HSK.00.745.027.02
2/2
33
HSK.00.745.047.02
1/1
4
4 x 10; WN 1452
SC.ST.040.010.48.1452.109
2/2
5
T20
TRX.T20
1/1

1
1×1
WARNUNG: Tragen Sie immer Augen- und Handschutz!
WARNUNG: Verwenden Sie immer geeignetes Werkzeug!
Öffnen des Deckels
1.1 - Drücken Sie den Entriegelungsknopf des DUSC (1) und ziehen Sie den
Spannverschluss des Deckels in die offene Position.
1.2 - Entfernen Sie den Spannverschluss vom Spannverschlussbügel und
öffnen Sie den Deckel.
ANBAUSCHRITT · ANBAUANLEITUNG LESEN UND AUFBEWAHREN!
Die inhaltliche Übersetzung erfolgt automatisiert.
© SW-MOTECH GmbH & Co. KG
Irrtümer und Änderungen vorbehalten.
Technische und Design-Änderungen vorbehalten.
4

2
2×2
Montage der Deckelbegrenzer
2.1 - Stecken Sie die Deckelbegrenzer (2) mit den großen Öffnungen auf die
dafür vorgesehenen Haltepilze
HINWEIS: Achten Sie auf den Verwendungszweck des DUSC (1): Topcase oder
Sidecase. Befestigen Sie die Deckelbegrenzer (2) an den jeweiligen Haltepilzen
des DUSC (1).
2.2 - Ziehen Sie die Deckelbegrenzer (2) in die Befestigungsposition.
HINWEIS: Vor dem ersten Verschluss des Deckels müssen die
Deckelbegrenzer (2) ein wenig gestaucht werden. Achten Sie beim Schließen des
Deckels darauf, dass die Deckelbegrenzer (2) nicht zwischen Deckel und Korpus
geklemmt werden.
ANBAUSCHRITT · ANBAUANLEITUNG LESEN UND AUFBEWAHREN!
Die inhaltliche Übersetzung erfolgt automatisiert.
© SW-MOTECH GmbH & Co. KG
Irrtümer und Änderungen vorbehalten.
Technische und Design-Änderungen vorbehalten.
5

3
3×1
4×2
5×1
Verschlussgehäusestecker verbauen
HINWEIS: Falls Sie sich für den Schloss-Satz für DUSC entschieden haben,
entfällt dieser Montageschritt. Montieren Sie stattdessen den Schloss-Satz.
3.1 - Öffnen Sie den Spannverschluss des DUSC (1) und positionieren Sie den
Verschlussgehäusestecker (3) wie gezeigt.
HINWEIS: Stellen Sie sicher, dass sich die Schließlasche in der entriegelten
Position befindet (oben)! Gegebenenfalls muss die Schließlasche nach oben in die
entriegelte Position gedrückt werden!
3.2 - Drücken Sie den Verschlussgehäusestecker (3) nach unten, bis dieser
einrastet.
3.3 - Verschrauben Sie den Verschlussgehäusestecker (3) mit den Schrauben
(4) und dem Torxschlüssel (5). Ziehen Sie die Schrauben vorsichtig und
handfest an.
WARNUNG: Ein zu festes Anziehen der Schrauben kann das
Schlossgehäuse beschädigen!
HINWEIS: Überprüfen Sie die Funktion des Verriegelungsmechanismus!
ANBAUSCHRITT · ANBAUANLEITUNG LESEN UND AUFBEWAHREN!
Die inhaltliche Übersetzung erfolgt automatisiert.
© SW-MOTECH GmbH & Co. KG
Irrtümer und Änderungen vorbehalten.
Technische und Design-Änderungen vorbehalten.
6

4
Befestigung des DUSC als Topcase
4.1 - Drücken Sie den Entriegelungsknopf des DUSC (1) und ziehen Sie den
Spannverschluss des Verriegelungssystems in die offene Position.
4.2 - Drücken Sie den DUSC (1) mit den beiden Arretierungsöffnungen auf die
Haltepilze Ihres SW-MOTECH Gepäckträgers.
4.3 - Drücken Sie den DUSC (1) mit der Verriegelungsöffnung auf die
Schlossnase Ihres SW-MOTECH Gepäckträgers.
WARNUNG: Achten Sie auf das hörbare Einrastgeräusch!
4.4 - Drücken Sie den Spannverschluss des Verriegelungssystems in die
geschlossene Position.
WARNUNG: Überprüfen Sie den festen Sitz des DUSC!
WARNUNG: Achten Sie darauf, dass keine Komponenten des DUSC (1) mit
heißen und beweglichen Teilen des Fahrzeugs in Kontakt kommen können!
Achten Sie des Weiteren darauf, dass alle Komponenten mindestens 5 cm
Abstand zu heißen Teilen sowie dem heißen Abgasstrom des Auspuffs
haben!
Stellen Sie nach der Montage sicher, dass dieser Abstand in jedem
Federzustand des Fahrzeugs eingehalten wird!
ANBAUSCHRITT · ANBAUANLEITUNG LESEN UND AUFBEWAHREN!
Die inhaltliche Übersetzung erfolgt automatisiert.
© SW-MOTECH GmbH & Co. KG
Irrtümer und Änderungen vorbehalten.
Technische und Design-Änderungen vorbehalten.
7

5
Befestigung des DUSC als Sidecase
5.1 - Drücken Sie den Entriegelungsknopf des DUSC (1) und ziehen Sie den
Spannverschluss des Verriegelungssystems in die offene Position.
5.2 - Drücken Sie den DUSC (1) mit den beiden Arretierungsöffnungen auf die
Haltepilze Ihres SW-MOTECH Seitenträgers.
5.3 - Drücken Sie den DUSC (1) mit der Verriegelungsöffnung auf die
Schlossnase Ihres SW-MOTECH Seitenträgers.
WARNUNG: Achten Sie auf das hörbare Einrastgeräusch!
5.4 - Drücken Sie den Spannverschluss des Verriegelungssystems in die
geschlossene Position.
WARNUNG: Überprüfen Sie den festen Sitz des DUSC!
WARNUNG: Achten Sie darauf, dass keine Komponenten des DUSC (1) mit
heißen und beweglichen Teilen des Fahrzeugs in Kontakt kommen können!
Achten Sie des Weiteren darauf, dass alle Komponenten mindestens 5 cm
Abstand zu heißen Teilen sowie dem heißen Abgasstrom des Auspuffs
haben!
Stellen Sie nach der Montage sicher, dass dieser Abstand in jedem
Federzustand des Fahrzeugs eingehalten wird!
ANBAUSCHRITT · ANBAUANLEITUNG LESEN UND AUFBEWAHREN!
Die inhaltliche Übersetzung erfolgt automatisiert.
© SW-MOTECH GmbH & Co. KG
Irrtümer und Änderungen vorbehalten.
Technische und Design-Änderungen vorbehalten.
8

6
Beladung
WARNUNG: Achten Sie auf die gleichmäßige Verteilung der Ladung!
Stellen Sie sicher, dass die Ladung während der Fahrt gegen Verrutschen
gesichert ist!
HINWEIS: Achten Sie darauf, niemals scharfkantige, spitze oder ähnliche
Gegenstände zu verstauen, welche Verletzungen an Personen bzw.
Beschädigungen am Fahrzeug/DUSC verursachen könnten! Achten Sie besonders
darauf, die in den Deckel integrierte Überdruckmembran nicht zu beschädigen!
Pflege
Verwenden Sie zur Reinigung NUR eine weiche Textilbürste, ein Tuch oder
Schwamm und warme Seifenlauge! Spülen Sie anschließend mit klarem
Wasser nach.
Verwenden Sie KEINE scharfen Reinigungsmittel, raue Putzutensilien oder
einen Hochdruckreiniger! Reinigen Sie den DUSC unbedingt nach
Winterfahrten, um Schäden durch das Salz zu vermeiden.
HINWEIS: Oberflächenmaterialien können bei längerer und intensiver
Sonneneinstrahlung und Umwelteinflüssen (z. B. SMOG, saurer Regen, etc.)
Farbveränderungen (Ausbleichen) unterliegen! Dafür übernimmt SW-MOTECH
keine Haftung!
ANBAUSCHRITT · ANBAUANLEITUNG LESEN UND AUFBEWAHREN!
Die inhaltliche Übersetzung erfolgt automatisiert.
© SW-MOTECH GmbH & Co. KG
Irrtümer und Änderungen vorbehalten.
Technische und Design-Änderungen vorbehalten.
9

PRODUKTSPEZIFISCHE HINWEISE
HINWEIS: Beachten Sie die landesspezifischen Vorschriften für
Zulassung/Betrieb Ihres Fahrzeugs bzw. anwendbare TÜV-Vorschriften. Lassen
Sie eintragungspflichtige Teile nach Montage durch Ihre Prüfstelle in die
Fahrzeugpapiere eintragen.
GEFAHR: Führen Sie vor Fahrtbeginn eine umfassende
Funktionskontrolle durch!
GEFAHR: Überprüfen Sie vor Fahrtbeginn und bei jeder Rast (alle 200 km)
den ordnungsgemäßen Sitz des Produkts!
GEFAHR: Das Fahr-/Bremsverhalten des Motorrads verändert sich nach
Befestigung dieses Produkts merklich!
GEFAHR: Die Schräglagen- und Bodenfreiheit kann durch dieses Produkt
eingeschränkt werden!
GEFAHR: Die vom Fahrzeughersteller definierte maximale Zuladung des
Fahrzeugs darf NICHT überschritten werden!
Die maximal zulässige Zuladung des SW-MOTECH
Gepäckträgers/Seitenträgers darf unter Berücksichtigung des
Eigengewichts des Produkts NICHT überschritten werden!
Eigengewicht DUSC M: 3,9 kg (8,6 lbs)
Eigengewicht DUSC L: 4,1 kg (9 lbs)
Zuladung bei Nutzung als Topcase:
5 KG ( 11 lbs) 130 km/h ( 80mph)
Zuladung bei Nutzung als Sidecase:
10 KG ( 22 lbs) 130 km/h ( 80mph)
PRODUKTHINWEISE · ANBAUANLEITUNG LESEN UND AUFBEWAHREN!
Die inhaltliche Übersetzung erfolgt automatisiert.
© SW-MOTECH GmbH & Co. KG
Irrtümer und Änderungen vorbehalten.
Technische und Design-Änderungen vorbehalten.
10

Item number: HSK.00.745.11000/B Revision: 03 · Date: 09 - 2023
DUSC L
~ 0.25 h. EASY DIFFICULT
ENGLISH ·Thank you for choosing this premium product from SW-MOTECH.
Visit our online shop for more information (e.g. model assignments). Required
documents (e.g. national type approval) are available there for you to
download.
Please read and understand all the instructions, safety information and
warnings in these mounting instructions before mounting and using the
product in order to avoid injury and damage. Keep these mounting
instructions for reference.
This product was developed for vehicles in factory condition. Compatibility
with original accessories or accessories from other manufacturers cannot
be guaranteed.
These mounting instructions have been prepared to the best of our current
knowledge. No legal claims relating to accuracy can be made. Errors and
omissions excepted. We reserve the right to make technical and design
changes. The copyright is held by SW-MOTECH.
SAFETY WARNING SYMBOL
This warning symbol is used in these mounting instructions to warn of
deadly dangers, injuries or other hazards. The words DANGER, WARNING or
CAUTION are used as part of this warning symbol to convey important safety
messages and information relating to the installation and use of this
product. These words, together with the safety warning symbol, mean:
DANGER: Indicates a hazardous situation which, if not avoided, will result
in death or serious injury!
WARNING: Indicates a hazardous situation which, if not avoided, may
result in death or serious injury!
CAUTION: Indicates a hazardous situation which, if not avoided, may result
in minor or moderate injury!
NOTE: Important information, but not relating to a risk of death or injury
(property damage only)!
GENERAL INFORMATION
WARNING: Assembly and/or maintenance of this product requires
advanced technical skill, appropriate tools, and a good understanding of tool
usage and torque specifications. For your own safety, SW-MOTECH
recommends having the assembly and/or maintenance carried out by a
qualified and certified motorcycle workshop.
WARNING: If you do choose to assemble this product yourself, carefully
and fully read the mounting instructions before assembly and use, and
follow all instructions to avoid serious injury or death. Also observe all
relevant information in the vehicle manual when mounting or using the
product. IF YOU DO NOT UNDERSTAND ANY PART OF THESE MOUNTING
INSTRUCTIONS OR NEED AN EXPLANATION AS TO A SPECIFIC
INSTRUCTION, DO NOT ATTEMPT TO INSTALL THIS PRODUCT WITHOUT
CONSULTING SW-MOTECH FOR ASSISTANCE!
PREPARATION: Read the mounting instructions carefully and make sure
that all parts on the parts list are available.
CAUTION: Ensure that your vehicle is standing securely. Switch off the
engine and remove the ignition key. Allow the engine/exhaust to cool
down if necessary. Disconnect the battery when working on the electrical
system. Only use proper tools and always wear safety goggles and gloves
during assembly and maintenance. Have a second person help you with
assembly and maintenance.
ASSEMBLY: All parts and connections removed from the vehicle must be
reinstalled according to the vehicle manufacturer's specifications or
replaced with parts and hardware supplied by SW-MOTECH.
WARNING: Secure all threads with a medium-strength liquid
threadlocker, unless otherwise specified.
DANGER: Tightening torques not defined by SW-MOTECH must be
obtained from the vehicle manufacturer or a certified motorbike
workshop.
FUNCTIONAL CHECK:After mounting the product, ensure that no moving
parts are obstructed and that the function of the vehicle is not impeded.
Cables and hoses must not rub against each other and/or be hindered in any
way.
WARNING: Carry out a comprehensive functionality check before you
start to drive. Check the tightening torque of all connections and the tight
fit of the product after the first 50 km and then at regular intervals.
Mounted accessories can change the handling and stability of the vehicle.
MOUNTING INSTRUCTIONS · READ AND KEEP MOUNTING INSTRUCTIONS!
SW-MOTECH GmbH & Co. KG
Ernteweg 7-10
35282 Rauschenberg
Germany
www.sw-motech.com
The content translation is automated.
© SW-MOTECH GmbH & Co. KG
Errors and omissions excepted
Subject to technical and design changes.
1

Take note of the symbols and what they mean in the
ASSEMBLY section. If the term OEM appears in the
ASSEMBLY section, the vehicle manufacturer's
specifications must be observed and applied.
If you have any questions, please don't hesitate to contact
our Customer Service team or our distributors. You can
find our telephone number and a list of our distributors in
our online shop:
www.sw-motech.com
Do not use thread lock: Indicates that no liquid
thread lock should be used at this point.
Tighten by hand: Indicates that the attachment must be
carefully tightened by hand.
LEGEND OVERVIEW · READ AND KEEP MOUNTING INSTRUCTIONS!
The content translation is automated.
© SW-MOTECH GmbH & Co. KG
Errors and omissions excepted
Subject to technical and design changes.
2

PARTS LIST · READ AND KEEP MOUNTING INSTRUCTIONS!
The content translation is automated.
© SW-MOTECH GmbH & Co. KG
Errors and omissions excepted
Subject to technical and design changes.
3
11
HSK.00.745.80000/B
1/1
22
HSK.00.745.027.02
2/2
33
HSK.00.745.047.02
1/1
4
4 x 10; WN 1452
SC.ST.040.010.48.1452.109
2/2
5
T20
TRX.T20
1/1

1
1×1
WARNING: Always wear eye and hand protection!
WARNING: Always use the proper tools!
Opening the lid
1.1 - Press the DUSC release button (1) and pull the lid latch buckle to the
open position.
1.2 - Remove the latch buckle from the corresponding bracket and open the
lid.
MOUNTING STEP · READ AND KEEP MOUNTING INSTRUCTIONS!
The content translation is automated.
© SW-MOTECH GmbH & Co. KG
Errors and omissions excepted
Subject to technical and design changes.
4

2
2×2
Installing the lid limiter
2.1 - Place the lid limiters (2) with the large openings on the mushroom-
shaped supports provided
NOTE: Pay attention to the proper use of the DUSC (1):top case or side case.
Fasten the lid limiters (2) to the respective mushroom-shaped DUSC (1).
2.2 - Pull the lid limiters (2) into fixed position.
NOTE: Before closing the lid for the first time, the lid limiters (2) must be
slightly compressed. When closing the lid, make sure that the lid limiters (2) are
not trapped between the lid and the case body.
MOUNTING STEP · READ AND KEEP MOUNTING INSTRUCTIONS!
The content translation is automated.
© SW-MOTECH GmbH & Co. KG
Errors and omissions excepted
Subject to technical and design changes.
5

3
3×1
4×2
5×1
Installing lock casing connector
NOTE: If you have opted for the DUSC lock set, this step is not necessary.
Install the lock set instead.
3.1 - Open the DUSC latch buckle (1) and position the latch housing connector
(3) as shown.
NOTE: Make sure the locking tab is in the unlocked (up) position. If necessary,
the locking tab must be pushed up into the unlocked position.
3.2 - Push the latch housing connector (3) down until it clicks into place.
3.3 - Screw in the latch housing connector (3) using the screws (4) and the
torx key (5). Carefully tighten the screws by hand.
WARNING: Over-tightening the screws may damage the lock casing!
NOTE: Ensure that the locking mechanism is in working order!
MOUNTING STEP · READ AND KEEP MOUNTING INSTRUCTIONS!
The content translation is automated.
© SW-MOTECH GmbH & Co. KG
Errors and omissions excepted
Subject to technical and design changes.
6

4
Attaching the DUSC to a top case
4.1 - Press the DUSC release button (1) and pull the fastening system latch
buckle to the open position.
4.2 - Press the DUSC (1) with the two locking openings onto the mushroom-
shaped supports of your SW-MOTECH rack.
4.3 - Press the DUSC (1) with the locking opening onto the locking lug of your
SW-MOTECH rack.
WARNING: You should be able to hear a clicking sound!
4.4 - Press the system latch buckle to closed position.
WARNING: Ensure the DUSC is firmly positioned!
WARNING: Make sure that no components of the DUSC (1) can come into
contact with any hot and moving parts on the vehicle!
Also ensure that all components are at least 5 cm away from hot parts as
well as hot gas coming from the exhaust!
After assembly, make sure that this distance is maintained in all vehicle
positions!
MOUNTING STEP · READ AND KEEP MOUNTING INSTRUCTIONS!
The content translation is automated.
© SW-MOTECH GmbH & Co. KG
Errors and omissions excepted
Subject to technical and design changes.
7

5
Attaching the DUSC to a side case
5.1 - Press the DUSC release button (1) and pull the system latch buckle to
the open position.
5.2 - Press the DUSC (1) with the two locking openings onto the mushroom-
shaped supports of your SW-MOTECH side carrier.
5.3 - Press the DUSC (1) with the locking opening onto the locking lug of your
SW-MOTECH side carrier.
WARNING: You should be able to hear a clicking sound!
5.4 - Press the system latch buckle to closed position.
WARNING: Ensure the DUSC is firmly positioned!
WARNING: Make sure that no components of the DUSC (1) can come into
contact with any hot and moving parts on the vehicle!
Also ensure that all components are at least 5 cm away from hot parts as
well as hot gas coming from the exhaust!
After assembly, make sure that this distance is maintained in all vehicle
positions!
MOUNTING STEP · READ AND KEEP MOUNTING INSTRUCTIONS!
The content translation is automated.
© SW-MOTECH GmbH & Co. KG
Errors and omissions excepted
Subject to technical and design changes.
8

6
Loading
WARNING: Ensure that the load is evenly distributed! Ensure that the
load will not slip while driving!
NOTE: Make sure never to store sharp-edged, pointed or similar objects that
could cause personal injury or damage to the vehicle/DUSC! Be particularly
careful not to damage the overpressure membrane built into the lid!
Care
Use ONLY a soft textile brush, cloth or sponge and warm soapy water for
cleaning! Then rinse with clean water.
Do NOT use any harsh cleaning agents, utensils or pressure washer! Be sure
to clean the DUSC after winter driving to avoid salt damage.
NOTE: Surface materials may be subject to fluctuations in color (fading) in the
event of prolonged and intensive exposure to sunlight and the elements (e.g.
smog, acid rain, etc.)! SW-MOTECH is not responsible for this type of wear!
MOUNTING STEP · READ AND KEEP MOUNTING INSTRUCTIONS!
The content translation is automated.
© SW-MOTECH GmbH & Co. KG
Errors and omissions excepted
Subject to technical and design changes.
9

PRODUCT-SPECIFIC NOTES
NOTE: Observe the country-specific regulations for registering/operating your
vehicle or the applicable TÜV regulations. After assembly, have parts that are
subject to registration entered in the vehicle documents by your test centre.
DANGER: Carry out a comprehensive function check before driving!
DANGER: Check that the product is properly positioned before departure
and at every rest stop (every 200 km)!
DANGER: The driving/braking behavior of the motorcycle changes
noticeably after the attachment of this product!
DANGER: Lean angle and ground clearance may be restricted by this
product!
DANGER: The maximum vehicle load defined by the vehicle manufacturer
may NOT be exceeded.
The maximum permissible load of the SW-MOTECH rack/side rack may NOT
be exceeded; make sure to take into account the dead weight of the product.
Dead weight of DUSC M: 3.9 kg (8.6 lbs)
Dead weight of DUSC L: 4.1 kg (9 lbs)
Payload when used as a top case:
5 kg ( 11 lbs) 130km/h ( 80mph)
Payload when used as a side case:
10KG ( 22 lbs) 130km/h ( 80mph)
PRODUCT INFORMATION · READ AND KEEP MOUNTING INSTRUCTIONS!
The content translation is automated.
© SW-MOTECH GmbH & Co. KG
Errors and omissions excepted
Subject to technical and design changes.
10

Número de artículo: HSK.00.745.11000/B Revisión: 03 · Fecha: 09 - 2023
DUSC L
~ 0.25 h. FÁCIL COMPLICADO
ESPAÑOL · Gracias por elegir este producto de primera calidad de SW-
MOTECH. Visite nuestra tienda online para obtener más información (p. ej.,
sobre el uso de los modelos). Desde esa página podrá descargar los
documentos que necesite (por ejemplo, la homologación nacional de tipo).
Para evitar lesiones y daños, asegúrese de leer y comprender todas las
instrucciones, advertencias de seguridad y precauciones de este manual
antes de montar y utilizar el producto. Guarde estas instrucciones de
montaje como referencia.
Este producto ha sido desarrollado para vehículos en condiciones de
fábrica. No se garantiza la compatibilidad con los accesorios originales o de
otros fabricantes.
Estas instrucciones de montaje se han redactado de acuerdo con nuestros
conocimientos actuales. No hay reclamaciones legales de corrección. Salvo
errores y omisiones. Nos reservamos el derecho a realizar cambios
técnicos y de diseño. Los derechos de autor pertenecen a SW-MOTECH.
SÍMBOLO DE ADVERTENCIA DE SEGURIDAD
Este símbolo de advertencia se utiliza en estas instrucciones de montaje
para advertir de peligros mortales, lesiones u otros riesgos. Las palabras
PELIGRO, ATENCIÓN o PRECAUCIÓN se utilizan con este símbolo de
advertencia para transmitir importantes avisos de seguridad e información
relacionada con el montaje y uso de este producto. Estas palabras, junto con
el símbolo de advertencia de seguridad, significan:
PELIGRO: Indica una situación de peligro que, si no se evita, provoca
lesiones graves o incluso la muerte.
ATENCIÓN: Indica una situación de peligro que, si no se evita, puede
provocar lesiones graves o incluso la muerte.
PRECAUCIÓN: Indica una situación de peligro que, si no se evita, puede
provocar lesiones leves o de gravedad media.
NOTA: Información importante, pero que no está relacionada con un
riesgo de lesiones o muerte (solo daños materiales).
INDICACIONES GENERALES
ATENCIÓN: El montaje y/o mantenimiento de este producto requiere
conocimientos técnicos avanzados, las herramientas apropiadas, un buen
manejo de dichas herramientas y conocer las especificaciones de los pares
de apriete. Por su propia seguridad, SW-MOTECH recomienda que el
montaje y/o el mantenimiento los realice un taller de motocicletas
cualificado y certificado.
ATENCIÓN: Si elige ensamblar este producto usted mismo, antes de
montarlo y usarlo, lea las instrucciones de montaje detenidamente y en su
totalidad, y siga todas las indicaciones para evitar lesiones graves o
mortales. Cuando monte y utilice el producto, tenga también en cuenta toda
la información relevante que figure en el manual del vehículo. SI NO
ENTIENDE ALGUNA PARTE DE ESTAS INSTRUCCIONES DE MONTAJE O
NECESITA ALGUNA ACLARACIÓN, NO INTENTE INSTALAR ESTE PRODUCTO
SIN CONSULTAR A SW-MOTECH PARA OBTENER AYUDA.
PREPARACIÓN: Lea atentamente las instrucciones de montaje y asegúrese
de que todas las piezas de la lista de piezas están presentes.
PRECAUCIÓN:Asegúrese de que su vehículo esté estacionado de
manera segura. Apague el motor y retire la llave de encendido. Deje que el
motor o el escape se enfríen si es necesario. Desconecte la batería cuando
trabaje en el sistema eléctrico. Utilice únicamente las herramientas
adecuadas y use siempre gafas de seguridad y guantes al realizar el
montaje y las tareas de mantenimiento. Pida a otra persona que le ayude
con el montaje y el mantenimiento.
MONTAJE: Todas las piezas y conexiones retiradas del vehículo deben ser
reinstaladas de acuerdo con las especificaciones del fabricante del vehículo
o sustituidas por piezas y herrajes suministrados por SW-MOTECH.
ATENCIÓN: Asegure todas las roscas con fijador de roscas líquido de
resistencia media, a menos que se especifique lo contrario.
PELIGRO: Los pares de apriete no definidos por SW-MOTECH deben
obtenerse del fabricante del vehículo o de un taller de motocicletas
certificado.
COMPROBACIÓN FUNCIONAL:Después del montaje, asegúrese de que no
haya piezas móviles bloqueadas y de que no se altere el funcionamiento del
vehículo. Los cables y tubos no deben rozarse ni quedar pinzados.
ATENCIÓN: Realice una comprobación exhaustiva del funcionamiento
antes de iniciar la marcha. Tras los primeros 50 km y, después, con
regularidad, compruebe el par de apriete de todas las conexiones y que el
producto está firmemente sujeto. Los accesorios instalados pueden
cambiar el comportamiento de conducción y la estabilidad del vehículo.
INSTRUCCIONES DE MONTAJE · LEE Y CONSERVA LAS INSTRUCCIONES DE MONTAJE!
SW-MOTECH GmbH & Co. KG
Ernteweg 7-10
35282 Rauschenberg
Alemania
www.sw-motech.com
La traducción del contenido es automática
© SW-MOTECH GmbH & Co. KG
Salvo errores y omisiones
Sujeto a cambios técnicos y de diseño.
1

Preste atención a los símbolos que figuran en la
sección de MONTAJE y su significado. Cuando, en la
sección de MONTAJE, aparecen las siglas OEM, se
deberán seguir y aplicar las especificaciones del
fabricante del vehículo.
Si tiene alguna pregunta, nuestro servicio de atención al
cliente y nuestros distribuidores estarán encantados de
prestarle ayuda. Encontrará nuestro número de teléfono
y una lista de nuestros distribuidores en nuestra tienda
online:
www.sw-motech.com
No usar fijador de roscas: Indica que no es necesario
usar fijador de roscas líquido en este punto.
Apretar a mano: Indica que el componente se debe
apretar cuidadosamente a mano.
RESUMEN DE LA LEYENDA · LEE Y CONSERVA LAS INSTRUCCIONES DE MONTAJE!
La traducción del contenido es automática
© SW-MOTECH GmbH & Co. KG
Salvo errores y omisiones
Sujeto a cambios técnicos y de diseño.
2

LISTA DE PIEZAS · LEE Y CONSERVA LAS INSTRUCCIONES DE MONTAJE!
La traducción del contenido es automática
© SW-MOTECH GmbH & Co. KG
Salvo errores y omisiones
Sujeto a cambios técnicos y de diseño.
3
11
HSK.00.745.80000/B
1/1
22
HSK.00.745.027.02
2/2
33
HSK.00.745.047.02
1/1
4
4 x 10; WN 1452
SC.ST.040.010.48.1452.109
2/2
5
T20
TRX.T20
1/1

1
1×1
ATENCIÓN: ¡Use siempre protección de ojos y manos!
ATENCIÓN: ¡Utilice siempre herramientas adecuadas!
Apertura de la tapa
1.1. Presione el botón de liberación del DUSC (1) y tire del obturador de
tensión de la tapa para abrirlo.
1.2. Retire el obturador de tensión del enganche y abra la tapa.
PASO DE FIJACIóN · LEE Y CONSERVA LAS INSTRUCCIONES DE MONTAJE!
La traducción del contenido es automática
© SW-MOTECH GmbH & Co. KG
Salvo errores y omisiones
Sujeto a cambios técnicos y de diseño.
4

2
2×2
Instalación de los limitadores de tapa
2.1. Coloque los limitadores de tapa (2) insertando los orificios grandes en los
enganches de sujeción correspondientes.
NOTA: Tenga en cuenta que el DUSC (1) está pensado para utilizarse como
topcase o como maletas laterales. Fije los limitadores de tapa (2) a los
enganches de sujeción correspondientes del DUSC (1).
2.2. Tire de los limitadores de tapa (2) para que queden fijados en su sitio.
NOTA: Antes de cerrar la tapa por primera vez, los limitadores de tapa (2)
deben comprimirse ligeramente. Al cerrar la tapa, asegúrese de que los
limitadores (2) no queden atrapados entre la tapa y el cuerpo.
PASO DE FIJACIóN · LEE Y CONSERVA LAS INSTRUCCIONES DE MONTAJE!
La traducción del contenido es automática
© SW-MOTECH GmbH & Co. KG
Salvo errores y omisiones
Sujeto a cambios técnicos y de diseño.
5

3
3×1
4×2
5×1
Instalación del conector de cierre de la caja
NOTA: Si ha escogido el juego de bombín para el DUSC, este paso de montaje
no es necesario. No obstante, deberá instalar el juego de bombín.
3.1. Abra el obturador de tensión del DUSC (1) y coloque el conector de cierre
de la caja (3) como se muestra en la imagen.
NOTA: ¡Asegúrese de que la lengüeta de bloqueo esté desbloqueada (hacia
arriba)! Si es necesario, la lengüeta de bloqueo debe empujarse hacia arriba para
colocarla en la posición de desbloqueo.
3.2. Empuje el conector de cierre de la caja (3) hacia abajo hasta que encaje
en su sitio.
3.3. Atornille el conector de cierre de la caja (3) con los tornillos (4) y la llave
torx (5). Apriete los tornillos a mano con cuidado.
ATENCIÓN: ¡Apretar demasiado los tornillos puede dañar la caja de la
cerradura!
NOTA: Compruebe el funcionamiento del mecanismo de bloqueo.
PASO DE FIJACIóN · LEE Y CONSERVA LAS INSTRUCCIONES DE MONTAJE!
La traducción del contenido es automática
© SW-MOTECH GmbH & Co. KG
Salvo errores y omisiones
Sujeto a cambios técnicos y de diseño.
6

4
Instalación del DUSC como topcase
4.1. Presione el botón de liberación del DUSC (1) y tire del obturador de
tensión del sistema de cierre para abrirlo.
4.2. Presione el DUSC (1) colocando los dos orificios de bloqueo sobre los
enganches de sujeción del portaequipaje de SW-MOTECH.
4.3. Presione el DUSC (1) con el orificio de cierre sobre la boca de bloqueo del
portaequipaje de SW-MOTECH.
ATENCIÓN: Deberá escuchar un chasquido para asegurarse de que la
instalación es correcta.
4.4. Presione el obturador de tensión del sistema de cierre para colocarlo en
posición cerrada.
ATENCIÓN: Asegúrese de que el DUSC quede bien sujeto.
ATENCIÓN: Asegúrese de que ninguna pieza del DUSC (1) pueda entrar
en contacto con las piezas calientes y móviles del vehículo.
Asegúrese también de que todas las piezas estén a una distancia mínima de
5 cm de las piezas calientes y de la corriente de gas caliente procedente del
tubo de escape.
Después del montaje, compruebe que esta distancia se mantenga
independientemente de cómo esté el resorte del vehículo.
PASO DE FIJACIóN · LEE Y CONSERVA LAS INSTRUCCIONES DE MONTAJE!
La traducción del contenido es automática
© SW-MOTECH GmbH & Co. KG
Salvo errores y omisiones
Sujeto a cambios técnicos y de diseño.
7

5
Instalación del DUSC como maleta lateral
5.1. Presione el botón de liberación del DUSC (1) y tire del obturador de
tensión del sistema de cierre para abrirlo.
5.2. Presione el DUSC (1) colocando los dos orificios de bloqueo sobre los
enganches de sujeción del soporte lateral de SW-MOTECH.
5.3. Presione el DUSC (1) con el orificio de cierre sobre la boca de bloqueo del
soporte lateral de SW-MOTECH.
ATENCIÓN: Deberá escuchar un chasquido para asegurarse de que la
instalación es correcta.
5.4. Presione el obturador de tensión del sistema de cierre para colocarlo en
posición cerrada.
ATENCIÓN: Asegúrese de que el DUSC quede bien sujeto.
ATENCIÓN: Asegúrese de que ninguna pieza del DUSC (1) pueda entrar
en contacto con las piezas calientes y móviles del vehículo.
Asegúrese también de que todas las piezas estén a una distancia mínima de
5 cm de las piezas calientes y de la corriente de gas caliente procedente del
tubo de escape.
Después del montaje, compruebe que esta distancia se mantenga
independientemente de cómo esté el resorte del vehículo.
PASO DE FIJACIóN · LEE Y CONSERVA LAS INSTRUCCIONES DE MONTAJE!
La traducción del contenido es automática
© SW-MOTECH GmbH & Co. KG
Salvo errores y omisiones
Sujeto a cambios técnicos y de diseño.
8

6
Carga
ATENCIÓN: Asegúrese de distribuir la carga de manera uniforme y de
que esta esté bien sujeta para que no resbale durante la conducción.
NOTA: Nunca guarde objetos afilados, puntiagudos o similares que puedan
causar lesiones personales o daños al vehículo o al DUSC. Tenga especial cuidado
de no dañar la membrana de sobrepresión integrada en la tapa.
Cuidado
Use ÚNICAMENTE un cepillo suave para tela, un paño o una esponja y agua
jabonosa tibia para limpiar el DUSC. A continuación, enjuague con agua
limpia.
NO deben usarse detergentes agresivos, útiles de limpieza ásperos ni
limpiadores de presión. Asegúrese de limpiar el DUSC después de conducir
en invierno para evitar que se produzcan daños por la sal.
NOTA: Los materiales de la superficie pueden sufrir cambios de color
(decoloración) en caso de una exposición prolongada e intensa a la luz solar y a
las influencias ambientales (p. ej., smog, lluvia ácida, etc.). SW-MOTECH no
asume ninguna responsabilidad por ello.
PASO DE FIJACIóN · LEE Y CONSERVA LAS INSTRUCCIONES DE MONTAJE!
La traducción del contenido es automática
© SW-MOTECH GmbH & Co. KG
Salvo errores y omisiones
Sujeto a cambios técnicos y de diseño.
9

INDICACIONES ESPECÍFICAS DEL PRODUCTO
NOTA: Deben respetarse las normas nacionales para la matriculación/uso del
vehículo y las normas de inspección técnica vigentes. En caso de piezas con
registro obligatorio, su organismo de inspección debe registrarlas en los
documentos del vehículo tras el montaje.
PELIGRO: ¡Efectúe una comprobación exhaustiva del funcionamiento
antes de iniciar la conducción!
PELIGRO: ¡Compruebe que el producto esté colocado correctamente antes
de iniciar la marcha y en cada parada de descanso (cada 200 km)!
PELIGRO: ¡El comportamiento de conducción/frenado de la motocicleta
cambia notablemente después de fijar este producto!
PELIGRO: ¡Este producto puede limitar el ángulo de inclinación y la
distancia al suelo!
PELIGRO: ¡NO se debe exceder la carga máxima del vehículo establecida
por el fabricante del vehículo!
¡NO se debe exceder la carga máxima permitida del portaequipajes/soporte
lateral de SW-MOTECH, teniendo en cuenta el propio peso en vacío del
producto!
Peso en vacío DUSC M: 3,9 kg (8,6 libras)
Peso en vacío DUSC L: 4,1 kg (9 libras)
Carga útil cuando se utiliza como topcase:
5 KG ( 11 libras) 130 km/h ( 80 mph)
Carga útil cuando se utiliza como maleta lateral:
10 kg ( 22 libras) 130 km/h ( 80 mph)
INFORMACIóN SOBRE LOS PRODUCTOS · LEE Y CONSERVA LAS INSTRUCCIONES DE MONTAJE!
La traducción del contenido es automática
© SW-MOTECH GmbH & Co. KG
Salvo errores y omisiones
Sujeto a cambios técnicos y de diseño.
10

Numéro d‘article: HSK.00.745.11000/B Révision: 03 · Date: 09 - 2023
DUSC L
~ 0.25 h. FACILE DIFFICILE
FRANÇAIS · Nous vous remercions d'avoir choisi ce produit haut de gamme
de SW-MOTECH. Visitez notre boutique en ligne pour plus d'informations (par
exemple affectation des modèles). Les documents nécessaires (par exemple
ABE) y sont disponibles en téléchargement.
Veuillez lire et prendre en compte toutes les instructions, les consignes de
sécurité et les avertissements contenus dans ce manuel de montage avant
de monter et d'utiliser le produit afin d'éviter toute blessure ou tout
dommage. Veuillez conserver la notice d'utilisation pour référence.
Ce produit a été développé pour des véhicules en configuration d'usine.
Nous ne sommes pas en mesure d'assurer la compatibilité avec les pièces
de rechange originales ou les pièces de rechange d'autres fabricants.
La présente notice d'installation a été élaborée conformément à nos
connaissances actuelles. Il n'existe aucun droit juridique à l'exactitude des
informations qu'elle contient. Sous réserve d'erreurs et de fautes. Sous
réserve de modifications techniques et conceptuelles. SW-MOTECH détient
les droits d'auteur.
SYMBOLE D'AVERTISSEMENT DE SÉCURITÉ
Ce symbole d'avertissement est utilisé dans ces instructions de montage
pour mettre en garde contre des dangers mortels, de blessures ou d'autres
risques. Les mots DANGER, ATTENTION ou RECOMMANDATION sont utilisés
avec ce symbole d'avertissement pour transmettre des consignes de
sécurité et des informations importantes concernant le montage et
l'utilisation de ce produit. Ces mots, associés au symbole d'avertissement
de sécurité, signifient :
DANGER : signale une situation dangereuse pouvant entraîner la mort ou
des blessures graves si elle n'est pas évitée !
ATTENTION : signale une situation dangereuse pouvant entraîner la mort
ou des blessures graves si elle n'est pas évitée !
PRUDENCE : Indique une situation dangereuse susceptible d'entraîner des
blessures de gravité réduite ou moyenne si elle se présente !
REMARQUE : Informations importantes, mais qui n'entraînent pas de
risque de décès ou de blessure (dommages matériels uniquement).
REMARQUES GÉNÉRALES
ATTENTION : le montage et/ou l'entretien de ce produit nécessite des
compétences techniques avancées, des outils appropriés et une bonne
compréhension de l'utilisation des outils et des indications de réglage. Pour
votre propre sécurité, SW-MOTECH recommande de confier le montage
et/ou l'entretien à un atelier de réparation de deux-roues qualifié et
certifié.
ATTENTION : si vous décidez de monter vous-même ce produit, lisez
attentivement et intégralement les instructions de montage avant le
montage et l'utilisation et suivez toutes les instructions afin d'éviter des
blessures graves ou mortelles. Lors du montage et de l'utilisation, tenez
également compte de toutes les informations pertinentes du manuel du
véhicule. SI VOUS NE COMPRENEZ PAS UNE PARTIE DE CE MANUEL
D'INSTALLATION OU SI VOUS AVEZ BESOIN D'EXPLICATIONS CONCERNANT
UNE INSTRUCTION, N'ESSAYEZ PAS D'INSTALLER CE PRODUIT SANS
DEMANDER DE L'AIDE À SW-MOTECH !
PRÉPARATION : Veuillez lire attentivement les instructions de montage et
assurez-vous que tous les éléments de la liste de pièces sont présents.
PRUDENCE : veillez à ce que votre véhicule soit bien stable. Éteignez le
moteur et retirez la clé de contact. Laissez refroidir le
moteur/l'échappement si nécessaire. Débranchez la batterie lorsque vous
travaillez sur le système électrique. Utilisez uniquement des outils
appropriés et portez toujours des lunettes de protection et des gants
pendant le montage et l'entretien. Faites-vous aider par une deuxième
personne lors du montage et de l'entretien.
MONTAGE : Toutes les pièces et connexions retirées du véhicule doivent
être réinstallées conformément aux instructions du fabricant du véhicule ou
remplacées par des pièces et du matériel fournis par SW-MOTECH.
ATTENTION Sauf indication contraire, sécurisez tous les filetages avec
du frein filet liquide de force moyenne.
DANGER : Les couples de serrage non définis par SW-MOTECH doivent
être obtenus auprès du constructeur du véhicule ou d'un atelier de
réparation de motos certifié.
CONTRÔLE DU FONCTIONNEMENT : Après le montage, assurez-vous
qu'aucune pièce mobile n'est bloquée et que le fonctionnement du véhicule
n'est pas perturbé. Les câbles et les tuyaux ne doivent pas frotter et/ou être
coincés.
ATTENTION : Effectuez un contrôle de fonctionnement complet avant
de commencer à rouler. Après les 50 premiers kilomètres, puis
régulièrement, vérifiez le couple de serrage de tous les raccords et la
bonne fixation du produit. Les accessoires montés peuvent modifier le
comportement sur la route et la stabilité du véhicule.
INSTRUCTIONS DE MONTAGE · LIRE ET CONSERVER LES INSTRUCTIONS DE MONTAGE!
SW-MOTECH GmbH & Co. KG
Ernteweg 7-10
35282 Rauschenberg
Allemagne
www.sw-motech.com
La traduction du contenu est automatisée.
© SW-MOTECH GmbH & Co. KG
Sous réserve d'erreurs et de modifications
Sous réserve de modifications techniques et de design.
1

Vous trouverez les symboles et leur signification
dans la section MONTAGE. Si le terme OEM apparaît
dans la section MONTAGE, il faut respecter et
appliquer les consignes du fabricant du véhicule.
Si vous avez des questions, notre service clientèle ainsi
que nos distributeurs se tiennent à votre disposition. Vous
trouverez notre numéro de téléphone ainsi que la liste de
nos distributeurs sur notre boutique en ligne :
www.sw-motech.com
Ne pas utiliser de frein filet : signifie que l'utilisation
d'un frein filet liquide n'est pas nécessaire à ce
stade.
Serrer manuellement : indique que la pièce de montage
doit être serrée à la main avec précaution.
APERçU DES LéGENDES · LIRE ET CONSERVER LES INSTRUCTIONS DE MONTAGE!
La traduction du contenu est automatisée.
© SW-MOTECH GmbH & Co. KG
Sous réserve d'erreurs et de modifications
Sous réserve de modifications techniques et de design.
2

LISTE DES PIèCES · LIRE ET CONSERVER LES INSTRUCTIONS DE MONTAGE!
La traduction du contenu est automatisée.
© SW-MOTECH GmbH & Co. KG
Sous réserve d'erreurs et de modifications
Sous réserve de modifications techniques et de design.
3
11
HSK.00.745.80000/B
1/1
22
HSK.00.745.027.02
2/2
33
HSK.00.745.047.02
1/1
4
4 x 10; WN 1452
SC.ST.040.010.48.1452.109
2/2
5
T20
TRX.T20
1/1

1
1×1
ATTENTION : portez toujours des lunettes et des gants de protection !
ATTENTION : Utilisez toujours des outils appropriés !
Ouverture du couvercle
1.1 - Appuyez sur le bouton de déverrouillage du DUSC (1) et tirez le verrou
du couvercle en position ouverte.
1.2 - Retirez le verrou de son support et ouvrez le couvercle.
PHASE DE MONTAGE · LIRE ET CONSERVER LES INSTRUCTIONS DE MONTAGE!
La traduction du contenu est automatisée.
© SW-MOTECH GmbH & Co. KG
Sous réserve d'erreurs et de modifications
Sous réserve de modifications techniques et de design.
4

2
2×2
Installation des limiteurs d'ouverture du couvercle
2.1 - Insérez les limiteurs d'ouverture de couvercle (2) avec les grandes
ouvertures sur les cales de maintien prévues à cet effet
REMARQUE : faites attention à l'utilisation prévue du DUSC (1) : topcase ou
valise latérale. Fixez les limiteurs d'ouverture de couvercle (2) aux cales de
maintien respectives du DUSC (1).
2.2 - Tirez les limiteurs d'ouverture de couvercle (2) en position de fixation.
REMARQUE : avant la première fermeture du couvercle, les limiteurs
d'ouverture de couvercle (2) doivent être légèrement comprimés. Lors de la
fermeture du couvercle, assurez-vous que les limiteurs de couvercle (2) ne soient
pas coincés entre le couvercle et le boîtier.
PHASE DE MONTAGE · LIRE ET CONSERVER LES INSTRUCTIONS DE MONTAGE!
La traduction du contenu est automatisée.
© SW-MOTECH GmbH & Co. KG
Sous réserve d'erreurs et de modifications
Sous réserve de modifications techniques et de design.
5

3
3×1
4×2
5×1
Installer le bloc de fermeture
REMARQUE : Si vous avez opté pour le kit de serrures pour DUSC, cette étape
de montage n'est pas nécessaire. Installez le kit de serrures à la place.
3.1 - Ouvrez le verrou du DUSC (1) et positionnez le bloc de fermeture (3)
comme indiqué.
REMARQUE : Assurez-vous que la languette de verrouillage est en position
déverrouillée (vers le haut) ! Si nécessaire, la languette de verrouillage doit être
poussée vers le haut en position déverrouillée !
3.2 - Poussez le bloc de fermeture (3) vers le bas jusqu'à ce qu'il s'enclenche.
3.3 - Vissez le bloc de fermeture (3) avec les vis (4) et la clé Torx (5). Serrez
les vis manuellement avec précaution.
ATTENTION : Un serrage excessif des vis peut endommager le boîtier de
la serrure !
REMARQUE : Vérifiez le fonctionnement du mécanisme de verrouillage !
PHASE DE MONTAGE · LIRE ET CONSERVER LES INSTRUCTIONS DE MONTAGE!
La traduction du contenu est automatisée.
© SW-MOTECH GmbH & Co. KG
Sous réserve d'erreurs et de modifications
Sous réserve de modifications techniques et de design.
6

4
Installation du DUSC en top case
4.1 - Appuyez sur le bouton de déverrouillage du DUSC (1) et tirez le verrou
du système de verrouillage en position ouverte.
4.2 - Appuyez le DUSC (1) avec les deux orifices de verrouillage sur les cales
de maintien de votre porte-bagages SW-MOTECH.
4.3 - Appuyez le DUSC (1) avec l'ouverture de verrouillage sur le bouton de
verrouillage de votre porte-bagages SW-MOTECH.
ATTENTION : soyez attentif au déclic d'enclenchement bien audible !
4.4 - Poussez le verrou du système de verrouillage en position fermée.
ATTENTION : vérifiez que le DUSC soit bien fixé !
ATTENTION : assurez-vous qu'aucun composant du DUSC (1) ne puisse
entrer en contact avec des pièces chaudes et mobiles du véhicule !
Assurez-vous également que tous les composants soient à une distance
d'au moins 5 cm des pièces chaudes, ainsi que du flux d'échappement chaud
du pot l'échappement !
Après le montage, assurez-vous que cette distance soit respectée, quel que
soit la position du véhicule !
PHASE DE MONTAGE · LIRE ET CONSERVER LES INSTRUCTIONS DE MONTAGE!
La traduction du contenu est automatisée.
© SW-MOTECH GmbH & Co. KG
Sous réserve d'erreurs et de modifications
Sous réserve de modifications techniques et de design.
7

5
Installation du DUSC en valise latérale
5.1 - Appuyez sur le bouton de déverrouillage du DUSC (1) et tirez le verrou
du système de verrouillage en position ouverte.
5.2 - Appuyez le DUSC (1) avec les deux ouvertures d'arrêt sur les cales de
maintien de votre support latéral SW-MOTECH.
5.3 - Appuyez le DUSC (1) avec l'ouverture de verrouillage sur le bouton de
verrouillage de votre support latéral SW-MOTECH.
ATTENTION : soyez attentif au déclic d'enclenchement bien audible !
5.4 - Poussez le verrou du système de verrouillage en position fermée.
ATTENTION : vérifiez que le DUSC soit bien fixé !
ATTENTION : assurez-vous qu'aucun composant du DUSC (1) ne puisse
entrer en contact avec des pièces chaudes et mobiles du véhicule !
Assurez-vous également que tous les composants soient à une distance
d'au moins 5 cm des pièces chaudes, ainsi que du flux d'échappement chaud
du pot l'échappement !
Après le montage, assurez-vous que cette distance soit respectée, quel que
soit la position du véhicule !
PHASE DE MONTAGE · LIRE ET CONSERVER LES INSTRUCTIONS DE MONTAGE!
La traduction du contenu est automatisée.
© SW-MOTECH GmbH & Co. KG
Sous réserve d'erreurs et de modifications
Sous réserve de modifications techniques et de design.
8

6
Charge
ATTENTION : veillez à ce que la charge soit répartie uniformément !
Assurez-vous que le chargement soit bien fixé pour éviter de glisser
pendant le trajet !
REMARQUE : assurez-vous de ne jamais stocker d'objets tranchants, pointus
ou similaires qui pourraient blesser des personnes ou endommager le véhicule/le
DUSC ! Faites particulièrement attention à ne pas endommager la membrane de
surpression intégrée au couvercle !
Entretien
Pour le nettoyage, utilisez UNIQUEMENT une brosse textile douce, un chiffon
ou une éponge et de l'eau chaude savonneuse ! Rincez ensuite à l'eau claire.
N'utilisez PAS de produits détergents agressifs, d'ustensiles de nettoyage
durs ou un nettoyeur haute pression ! Nettoyez impérativement le DUSC
après la conduite hivernale pour éviter les dommages causés par le sel.
REMARQUE : Les matériaux de surface peuvent subir des changements de
couleur (décoloration) en cas d'exposition prolongée et intensive au soleil et aux
influences environnementales (par ex. SMOG, pluies acides, etc.) ! SW-MOTECH
décline toute responsabilité à cet égard !
PHASE DE MONTAGE · LIRE ET CONSERVER LES INSTRUCTIONS DE MONTAGE!
La traduction du contenu est automatisée.
© SW-MOTECH GmbH & Co. KG
Sous réserve d'erreurs et de modifications
Sous réserve de modifications techniques et de design.
9

REMARQUES SPÉCIFIQUES AU PRODUIT
REMARQUE : Respectez les réglementations spécifiques au pays pour
l'immatriculation/l'utilisation de votre véhicule ou les réglementations TÜV
applicables. Après le montage, faites inscrire les pièces soumises à
immatriculation dans les papiers du véhicule par votre centre de contrôle.
DANGER : Effectuez un contrôle de fonctionnement complet avant de
prendre la route !
DANGER : Vérifiez lle bon positionnement du produit avant de démarrer et
à chaque halte (tous les 200 km) !
DANGER : Le comportement de conduite/freinage de la moto change
sensiblement après la fixation de ce produit !
DANGER : La capcité d'inclinaison et la garde au sol peuvent être réduites
par ce produit !
DANGER : la charge maximale du véhicule définie par le constructeur du
véhicule ne doit PAS être dépassée !
La charge maximale autorisée du porte-bagages/porte-bagages latéral SW-
MOTECH ne doit PAS être dépassée, en tenant compte du poids propre du
produit !
Poids à vide DUSC M : 3,9 kg (8,6 lb)
Poids à vide DUSC L : 4,1 kg (9 lb)
Charge utile lorsqu'elle est utilisée comme topcase :
5 KG ( 11 lbs) 130 km/h ( 80mph)
Charge utile lorsqu'elle est utilisée comme valise latérale :
10 KG ( 22 lbs) 130 km/h ( 80mph)
INFORMATIONS SUR LES PRODUITS · LIRE ET CONSERVER LES INSTRUCTIONS DE MONTAGE!
La traduction du contenu est automatisée.
© SW-MOTECH GmbH & Co. KG
Sous réserve d'erreurs et de modifications
Sous réserve de modifications techniques et de design.
10

Numero di articolo: HSK.00.745.11000/B Revisione: 03 · Data: 09 - 2023
DUSC L
~ 0.25 h. FACILE DIFFICILE
ITALIANO ·Grazie per aver scelto questo prodotto premium di SW-MOTECH.
Visita il nostro negozio online per ulteriori informazioni (ad es. per la
compatibilità con i vari modelli). I documenti richiesti (ad es. certificato di
omologazione nazionale) possono essere scaricati qui.
Si prega di leggere attentamente le avvertenze di sicurezza e le istruzioni
per il montaggio prima di montare e utilizzare il prodotto, al fine di evitare
eventuali lesioni e danni. Conserva queste istruzioni per il montaggio come
riferimento futuro.
Questo prodotto è stato sviluppato per veicoli in condizioni di fabbrica. La
compatibilità con gli accessori originali o di altri produttori non può essere
garantita.
Queste istruzioni per il montaggio sono state redatte in base alle nostre
conoscenze attuali. Non sussistono pretese di correttezza giuridiche. Salvo
errori ed omissioni. Ci riserviamo il diritto di apportare modifiche tecniche e
di design. Copyright SW-MOTECH.
SIMBOLO DI SICUREZZA
Questo simbolo di avvertenza è usato nelle presenti istruzioni di
montaggio per segnalare pericoli mortali, rischio di lesioni o altri pericoli.
Le parole "PERICOLO", "AVVERTENZA" O "ATTENZIONE" sono utilizzate con
questo simbolo di avvertenza per trasmettere importanti istruzioni di
sicurezza e informazioni relative al montaggio e all'uso di questo prodotto.
Queste parole, utilizzate insieme al simbolo di avvertenza, significano:
PERICOLO: indica una situazione di pericolo che, se non evitata, può
causare morte o lesioni gravi!
AVVERTENZA: indica una situazione di pericolo che, se non evitata, può
causare morte o lesioni gravi!
ATTENZIONE: indica una situazione di pericolo che, se non evitata, può
provocare lesioni lievi o di entità moderata!
AVVISO: indica informazioni importanti che non riguardano il rischio di
morte o di lesioni (riguardano unicamente il rischio di danni materiali)!
INFORMAZIONI GENERALI
AVVERTENZA: il montaggio e/o la manutenzione di questo prodotto
richiedono competenze tecniche avanzate, strumenti adeguati e una buona
conoscenza dell'uso della strumentazione e delle indicazioni relative alle
coppie di serraggio. Per ragioni di sicurezza, SW-MOTECH raccomanda di
far eseguire il montaggio e/o la manutenzione presso un'officina per
motociclette qualificata e certificata.
AVVERTENZA: se si decide di installare questo prodotto in autonomia,
leggere attentamente le istruzioni per il montaggio prima del montaggio e
dell'uso e seguire tutte le avvertenze per evitare lesioni gravi o mortali.
Durante il montaggio e l'uso, seguire anche tutte le istruzioni pertinenti
contenute nel manuale del veicolo. SE NON SI COMPRENDONO TALI
ISTRUZIONI, ANCHE SOLO IN PARTE, O SE SONO NECESSARI CHIARIMENTI,
NON CERCARE DI MONTARE IL PRODOTTO IN AUTONOMIA SENZA CHIEDERE
IL SUPPORTO DI SW-MOTECH!
PREPARAZIONE: leggere attentamente le istruzioni per il montaggio e
assicurarsi che siano disponibili tutti i componenti contenuti nella lista.
ATTENZIONE: assicurarsi che il veicolo sia perfettamente fermo.
Spegnere il motore e togliere la chiave. Se necessario, lasciar raffreddare
il motore/lo scarico. Scollegare la batteria quando si interviene
sull'impianto elettrico. Usare esclusivamente strumenti idonei e indossare
sempre occhiali e guanti protettivi durante le operazioni di montaggio e
manutenzione. Chiedere aiuto a una seconda persona durante le fasi di
montaggio e manutenzione.
MONTAGGIO: tutti i componenti e i collegamenti rimossi dal veicolo devono
essere reinstallati secondo le specifiche del produttore del veicolo o
sostituiti con componenti e attrezzatura forniti da SW-MOTECH.
AVVERTENZA: fissare tutte le filettature con frenafiletti liquido a
media resistenza, se non diversamente specificato.
PERICOLO: le coppie di serraggio non definite da SW-MOTECH devono
essere richieste al costruttore del veicolo o a un'officina certificata.
CONTROLLO DI FUNZIONALITÀ: dopo il montaggio accertarsi che non vi
siano parti mobili bloccate e che il funzionamento del veicolo non sia
compromesso. I cavi e i tubi flessibili non devono sfregare e/o essere
schiacciati.
AVVERTENZA: eseguire un controllo completo delle funzioni prima di
mettersi alla guida. Controllare la coppia di serraggio di tutti i
collegamenti e la tenuta del prodotto dopo i primi 50 km e in seguito
regolarmente. Gli accessori montati possono modificare la
maneggevolezza e la stabilità del veicolo.
ISTRUZIONI PER IL MONTAGGIO · LEGGI E CONSERVA LE ISTRUZIONI DI MONTAGGIO!
SW-MOTECH GmbH & Co. KG
Ernteweg 7-10
35282 Rauschenberg
Germania
www.sw-motech.com
La traduzione dei contenuti è automatizzata.
© SW-MOTECH GmbH & Co. KG
Salvo errori e omissioni.
Soggetto a modifiche tecniche e di design.
1

Consultare i simboli e il loro significato nella sezione
MONTAGGIO. Se nella sezione montaggio compare la
sigla OEM, è necessario rispettare e applicare le
specifiche del produttore del veicolo.
Per qualsiasi domanda, non esitare a contattare il nostro
servizio clienti o i nostri distributori. Il nostro numero di
telefono e l'elenco dei nostri distributori sono disponibili
nel nostro negozio online:
www.sw-motech.com
Non utilizzare il frenafiletti: segnala di non dover
utilizzare il frenafiletti liquido in quel determinato
punto.
Serrare a mano: indica che l'elemento di fissaggio deve
essere serrato a mano con cautela.
LEGENDA · LEGGI E CONSERVA LE ISTRUZIONI DI MONTAGGIO!
La traduzione dei contenuti è automatizzata.
© SW-MOTECH GmbH & Co. KG
Salvo errori e omissioni.
Soggetto a modifiche tecniche e di design.
2

ELENCO DELLE PARTI · LEGGI E CONSERVA LE ISTRUZIONI DI MONTAGGIO!
La traduzione dei contenuti è automatizzata.
© SW-MOTECH GmbH & Co. KG
Salvo errori e omissioni.
Soggetto a modifiche tecniche e di design.
3
11
HSK.00.745.80000/B
1/1
22
HSK.00.745.027.02
2/2
33
HSK.00.745.047.02
1/1
4
4 x 10; WN 1452
SC.ST.040.010.48.1452.109
2/2
5
T20
TRX.T20
1/1

1
1×1
AVVERTENZA: indossare sempre le protezioni per gli occhi e per le mani!
AVVERTENZA: Utilizzare sempre strumenti adeguati!
Apertura del coperchio
1.1 - Premere il pulsante di rilascio del sistema DUSC (1) e tirare la chiusura
di bloccaggio del coperchio in posizione aperta.
1.2 - Rimuovere la chiusura di bloccaggio dalla relativa staffa e aprire il
coperchio.
FASE DI MONTAGGIO · LEGGI E CONSERVA LE ISTRUZIONI DI MONTAGGIO!
La traduzione dei contenuti è automatizzata.
© SW-MOTECH GmbH & Co. KG
Salvo errori e omissioni.
Soggetto a modifiche tecniche e di design.
4

2
2×2
Montaggio dei limitatori di apertura del coperchio
2.1 - Inserire i limitatori di apertura del coperchio (2) con le aperture grandi
rivolte sugli appositi funghi di contenimento
AVVISO: prestare attenzione alla destinazione d'uso degli accessori DUSC (1):
bauletto oppure valigia laterale. Fissare i limitatori di apertura del coperchio (2)
al rispettivo fungo di contenimento del sistema DUSC (1).
2.2 - Tirare i limitatori di apertura del coperchio (2) in posizione di fissaggio.
AVVISO: prima di chiudere il coperchio per la prima volta, i relativi limitatori di
apertura (2) devono essere leggermente ricalcati. Al momento della chiusura del
coperchio, assicurarsi che i limitatori di apertura del coperchio (2) non siano
bloccati tra il coperchio e il corpo.
FASE DI MONTAGGIO · LEGGI E CONSERVA LE ISTRUZIONI DI MONTAGGIO!
La traduzione dei contenuti è automatizzata.
© SW-MOTECH GmbH & Co. KG
Salvo errori e omissioni.
Soggetto a modifiche tecniche e di design.
5

3
3×1
4×2
5×1
Installare il connettore dell'alloggiamento della serratura
AVVISO: se si è optato per il kit serrature per sistemi DUSC, questa fase di
montaggio non è necessaria. Procedere piuttosto con il montaggio del kit
serratura.
3.1 - Aprire la chiusura di bloccaggio del sistema DUSC (1) e posizionare il
connettore dell'alloggiamento della chiusura (3) come indicato.
AVVISO: assicurarsi che la linguetta di chiusura sia in posizione di sblocco
(verso l'alto)! Se necessario, la linguetta di chiusura deve essere spinta verso
l'alto in posizione di sblocco!
3.2 - Spingere verso il basso il connettore dell'alloggiamento della chiusura
(3) finché non scatta in posizione.
3.3 - Avvitare il connettore dell'alloggiamento della chiusura (3) utilizzando le
viti (4) e la chiave torx (5). Serrare le viti con cura e a mano.
AVVERTENZA: un serraggio eccessivo delle viti potrebbe danneggiare
l'alloggiamento della serratura!
AVVISO: controllare il funzionamento del meccanismo di bloccaggio!
FASE DI MONTAGGIO · LEGGI E CONSERVA LE ISTRUZIONI DI MONTAGGIO!
La traduzione dei contenuti è automatizzata.
© SW-MOTECH GmbH & Co. KG
Salvo errori e omissioni.
Soggetto a modifiche tecniche e di design.
6

4
Fissaggio del sistema DUSC come bauletto
4.1 - Premere il pulsante di rilascio del sistema DUSC (1) e tirare la chiusura
di bloccaggio del sistema di bloccaggio in posizione aperta.
4.2 - Premere il DUSC (1) con i due fori di bloccaggio rivolti sui funghi di
contenimento del portabagagli SW-MOTECH.
4.3 - Premere il DUSC (1) con il foro di bloccaggio rivolto sul nottolino della
serratura del portabagagli SW-MOTECH.
AVVERTENZA: prestare attenzione al clic di innesto udibile!
4.4 - Premere la chiusura di bloccaggio del sistema di bloccaggio in posizione
di chiusura.
AVVERTENZA: controllare che il sistema DUSC sia adeguatamente
fissato!
AVVERTENZA: assicurarsi che nessun componente del sistema DUSC (1)
possa entrare in contatto con altre parti calde e mobili del veicolo!
Assicurarsi inoltre che tutti i componenti si trovino ad almeno 5 cm di
distanza dalle parti calde e dal flusso di gas di scarico!
Una volta terminato il montaggio, assicurarsi che tale distanza sia
mantenuta indipendentemente dallo stato delle sospensioni del veicolo!
FASE DI MONTAGGIO · LEGGI E CONSERVA LE ISTRUZIONI DI MONTAGGIO!
La traduzione dei contenuti è automatizzata.
© SW-MOTECH GmbH & Co. KG
Salvo errori e omissioni.
Soggetto a modifiche tecniche e di design.
7

5
Fissaggio del sistema DUSC come valigia laterale
5.1 - Premere il pulsante di rilascio del sistema DUSC (1) e tirare la chiusura
di bloccaggio del sistema di chiusura in posizione aperta.
5.2 - Premere il DUSC (1) con i due fori di bloccaggio rivolti sui funghi di
contenimento del telaio laterale SW-MOTECH.
5.3 - Premere il DUSC (1) con l'apertura di bloccaggio rivolta sul nottolino
della serratura del telaio laterale SW-MOTECH.
AVVERTENZA: prestare attenzione al clic di innesto udibile!
5.4 - Premere la chiusura di bloccaggio del sistema di chiusura in posizione
di chiusura.
AVVERTENZA: controllare che il sistema DUSC sia adeguatamente
fissato!
AVVERTENZA: assicurarsi che nessun componente del sistema DUSC (1)
possa entrare in contatto con altre parti calde e mobili del veicolo!
Assicurarsi inoltre che tutti i componenti si trovino ad almeno 5 cm di
distanza dalle parti calde e dal flusso di gas di scarico!
Una volta terminato il montaggio, assicurarsi che tale distanza sia
mantenuta indipendentemente dallo stato delle sospensioni del veicolo!
FASE DI MONTAGGIO · LEGGI E CONSERVA LE ISTRUZIONI DI MONTAGGIO!
La traduzione dei contenuti è automatizzata.
© SW-MOTECH GmbH & Co. KG
Salvo errori e omissioni.
Soggetto a modifiche tecniche e di design.
8

6
Carico
AVVERTENZA: assicurarsi che il carico sia distribuito in modo uniforme!
Assicurarsi che il carico sia assicurato contro lo scivolamento durante la
guida!
AVVISO: assicurarsi di nontrasportare mai oggetti affilati, appuntiti o simili che
potrebberocausare lesioni alle persone o danni al veicolo/DUSC!
Prestareparticolare attenzione a non danneggiare la membrana
disovrappressione integrata nel coperchio!
Cura
Per la pulizia, utilizzare ESCLUSIVAMENTE una spazzola morbida per tessuti,
un panno o una spugna imbevuta di acqua calda e sapone! Quindi
risciacquare con acqua pulita.
NON utilizzare detergenti aggressivi, utensili per la pulizia ruvidi o
un'idropulitrice! Assicurarsi di pulire il sistema DUSC dopo gli spostamenti in
inverno per evitare i danni causati dal sale.
AVVISO: i materiali delle superfici possono subire variazioni di colore
(scolorimento) in caso di prolungata e intensa esposizione ai raggi solari e agli
agenti ambientali (ad es. SMOG, piogge acide, ecc.)! SW-MOTECH non si assume
alcuna responsabilità al riguardo!
FASE DI MONTAGGIO · LEGGI E CONSERVA LE ISTRUZIONI DI MONTAGGIO!
La traduzione dei contenuti è automatizzata.
© SW-MOTECH GmbH & Co. KG
Salvo errori e omissioni.
Soggetto a modifiche tecniche e di design.
9

AVVERTENZE SPECIFICHE DEL PRODOTTO
AVVISO: Osservare le normative specifiche del paese per l'immatricolazione/il
funzionamento del veicolo o le norme TÜV applicabili. Dopo l'assemblaggio, far
inserire le parti soggette a omologazione nei documenti del veicolo dal proprio
centro di test.
PERICOLO: prima di mettersi in viaggio, eseguire un controllo completo di
tutte le funzionalità!
PERICOLO: prima di mettersi in viaggio e ad ogni fermata intermedia (ogni
200 km), verificare il corretto posizionamento del prodotto!
PERICOLO: il comportamento di guida e il controllo della frenata della
moto cambiano sensibilmente dopo il montaggio di questo prodotto!
PERICOLO: questo prodotto può limitare l'angolo di inclinazione e la
distanza dal suolo!
PERICOLO: il carico utile massimo del veicolo definito dal costruttore NON
deve essere superato!
Il carico massimo consentito del portabagagli/telaio laterale SW-MOTECH
NON deve essere superato, tenendo conto del peso specifico del prodotto!
Peso specifico DUSC M: 3,9 kg (8,6 libbre)
Peso specifico DUSC L: 4,1 kg (9 libbre)
Carico utile se utilizzato come bauletto:
5 kg ( 11 lb) 130 km/h ( 80mph)
Carico utile se utilizzato come valigia laterale:
10KG ( 22 libbre) 130 km/h ( 80mph)
INFORMAZIONI SUI PRODOTTI · LEGGI E CONSERVA LE ISTRUZIONI DI MONTAGGIO!
La traduzione dei contenuti è automatizzata.
© SW-MOTECH GmbH & Co. KG
Salvo errori e omissioni.
Soggetto a modifiche tecniche e di design.
10

Art.-Nr.: LOC.00.745.10000 Revision: 00 · Datum: 08 - 2023
Schloss-Satz für DUSC
~ 0.25 h. LEICHT SCHWER
DEUTSCH · Vielen Dank, dass Sie sich für dieses Premium-Produkt von SW-
MOTECH entschieden haben. Besuchen Sie unseren Webshop für weitere
Informationen (z. B. Modellzuweisungen). Erforderliche Dokumente (z. B.
ABE) stehen Ihnen dort als Download zur Verfügung.
Bitte lesen und verstehen Sie alle Anweisungen, Sicherheitshinweise und
Warnungen in dieser Anbauanleitung vor Montage und Nutzung des
Produkts, um Verletzungen und Schäden zu vermeiden. Bewahren Sie diese
Anbauanleitung als Referenz auf.
Dieses Produkt wurde für Fahrzeuge im Werkszustand entwickelt. Die
Kompatibilität mit Original-Zubehörteilen bzw. den Zubehörteilen anderer
Hersteller kann nicht gewährleistet werden.
Diese Anbauanleitung ist nach unserem derzeitigen Kenntnisstand verfasst
worden. Rechtliche Ansprüche auf Richtigkeit bestehen nicht. Fehler und
Irrtümer vorbehalten. Technische und gestalterische Änderungen sind
vorbehalten. Das Urheberrecht liegt bei SW-MOTECH.
SICHERHEITSWARNUNGSSYMBOL
Dieses Warnsymbol wird in dieser Anbauanleitung verwendet, um vor
tödlichen Gefahren, Verletzungen oder anderen Gefahren zu warnen. Die
Wörter GEFAHR, WARNUNG oder VORSICHT werden mit diesem
Warnsymbol verwendet, um wichtige Sicherheitshinweise und
Informationen in Bezug auf die Montage und Nutzung dieses Produkts zu
übermitteln. Diese Wörter zusammen mit dem Sicherheitswarnsymbol
bedeuten:
GEFAHR: Weist auf eine gefährliche Situation hin, die zum Tod oder zu
schweren Verletzungen führt, wenn sie nicht vermieden wird!
WARNUNG: Weist auf eine gefährliche Situation hin, die zum Tod oder zu
schweren Verletzungen führen kann, wenn sie nicht vermieden wird!
VORSICHT: Weist auf eine gefährliche Situation hin, die zu leichten oder
mittelschweren Verletzungen führen kann, wenn sie nicht vermieden wird!
HINWEIS: Wichtige Informationen, jedoch nicht in Bezug auf Todes- oder
Verletzungsgefahr (nur Sachschäden)!
ALLGEMEINE HINWEISE
WARNUNG: Die Montage und/oder Wartung dieses Produkts erfordert
fortgeschrittene technische Fähigkeiten, geeignetes Werkzeug und ein
gutes Verständnis der Werkzeugnutzung und Drehmomentangaben. Zu
Ihrer eigenen Sicherheit empfiehlt SW-MOTECH, die Montage und/oder
Wartung von einer qualifizierten und zertifizierten Zweiradwerkstatt
durchführen zu lassen.
WARNUNG: Wenn Sie sich für die Eigenmontage dieses Produkts
entscheiden, lesen Sie vor Montage und Nutzung die Anbauanleitung
sorgfältig und vollständig durch und befolgen Sie alle Anweisungen, um
schwere oder tödliche Verletzungen zu vermeiden. Beachten Sie bei der
Montage und Verwendung auch alle relevanten Informationen im
Fahrzeughandbuch. WENN SIE EINEN TEIL DIESER ANBAUANLEITUNG
NICHT VERSTEHEN ODER EINE ERKLÄRUNG EINER ANWEISUNG
BENÖTIGEN, VERSUCHEN SIE NICHT DIESES PRODUKT ZU MONTIERN,
OHNE SW-MOTECH UM HILFE ZU FRAGEN!
VORBEREITUNG: Lesen Sie die Anbauanleitung aufmerksam und stellen Sie
sicher, dass alle Teile der Stückliste vorhanden sind.
VORSICHT: Achten Sie auf den sicheren Stand Ihres Fahrzeugs.
Schalten Sie den Motor ab und ziehen Sie den Zündschlüssel. Lassen Sie
den Motor/Auspuff bei Bedarf abkühlen. Klemmen Sie die Batterie bei
Arbeiten an der Elektrik ab. Verwenden Sie nur geeignetes Werkzeug und
tragen Sie während der Montage und Wartung immer eine Schutzbrille
und Handschuhe. Lassen Sie sich bei der Montage und Wartung von einer
zweiten Person helfen.
MONTAGE: Alle vom Fahrzeug entfernten Teile und Verbindungen müssen
gemäß den Angaben des Fahrzeugherstellers wieder eingebaut oder durch
von SW-MOTECH gelieferte Teile und Hardware ersetzt werden.
WARNUNG: Sichern Sie alle Gewinde, sofern nicht anders angegeben,
mit mittelstarker, flüssiger Schraubensicherung.
GEFAHR: Von SW-MOTECH nicht definierte Anzugsdrehmomente
müssen Sie vom Fahrzeughersteller oder von einer zertifizierten
Motorradwerkstatt beziehen.
FUNKTIONSKONTROLLE: Stellen Sie nach der Montage sicher, dass keine
beweglichen Teile blockiert sind und die Funktion des Fahrzeugs nicht
gestört wird. Kabel und Schläuche dürfen nicht scheuern und/oder
geklemmt werden.
WARNUNG: Führen Sie vor Fahrtbeginn eine umfassende
Funktionskontrolle durch. Prüfen Sie nach den ersten 50 km und dann
regelmäßig das Anzugsmoment aller Verbindungen und den festen Sitz
des Produkts. Montiertes Zubehör kann das Fahrverhalten und die
Stabilität des Fahrzeugs verändern.
ANBAUANLEITUNG · ANBAUANLEITUNG LESEN UND AUFBEWAHREN!
SW-MOTECH GmbH & Co. KG
Ernteweg 7-10
35282 Rauschenberg
Deutschland
www.sw-motech.com
Die inhaltliche Übersetzung erfolgt automatisiert.
© SW-MOTECH GmbH & Co. KG
Irrtümer und Änderungen vorbehalten.
Technische und Design-Änderungen vorbehalten.
1

Beachten Sie in dem Abschnitt MONTAGE
vorkommenden Symbole und deren Bedeutung.
Wenn im Abschnitt MONTAGE die Bezeichnung OEM
vorkommt, müssten die Vorgaben des
Fahrzeugherstellers beachtet und angewandt
werden.
Bei Fragen steht Ihnen unser Kundendienst sowie unsere
Distributoren gerne zur Verfügung. Unsere
Telefonnummer sowie eine Liste unserer Distributoren
finden Sie in unserem Webshop:
www.sw-motech.com
LEGENDENüBERSICHT · ANBAUANLEITUNG LESEN UND AUFBEWAHREN!
Die inhaltliche Übersetzung erfolgt automatisiert.
© SW-MOTECH GmbH & Co. KG
Irrtümer und Änderungen vorbehalten.
Technische und Design-Änderungen vorbehalten.
2

STüCKLISTE · ANBAUANLEITUNG LESEN UND AUFBEWAHREN!
Die inhaltliche Übersetzung erfolgt automatisiert.
© SW-MOTECH GmbH & Co. KG
Irrtümer und Änderungen vorbehalten.
Technische und Design-Änderungen vorbehalten.
3
21
HSK.00.745.500.04
1/1
2
T20
TRX.T20
1/1
3
ALK.00.165.A63
2/2

1
WARNUNG: Tragen Sie immer Augen- und Handschutz!
WARNUNG: Verwenden Sie immer geeignetes Werkzeug!
Öffnen des Deckels
1.1 - Drücken Sie den Entriegelungsknopf des DUSC (*) und ziehen Sie den
Spannverschluss des Deckels in die offene Position.
1.2 - Entfernen Sie den Spannverschluss vom Spannverschlussbügel und
öffnen Sie den Deckel.
ANBAUSCHRITT · ANBAUANLEITUNG LESEN UND AUFBEWAHREN!
Die inhaltliche Übersetzung erfolgt automatisiert.
© SW-MOTECH GmbH & Co. KG
Irrtümer und Änderungen vorbehalten.
Technische und Design-Änderungen vorbehalten.
4

2
1×1
2×1
3×2
DUSC-Schloss verbauen
2.1 - Öffnen Sie den Spannverschluss des DUSC (*) und positionieren Sie das
Schloss (1) wie gezeigt.
HINWEIS: NUR DUSC L: Stellen Sie sicher, dass sich die Schließlasche (rot
hervorgehoben) in der entriegelten Position befindet (oben)! Gegebenenfalls muss
die Schließlasche nach oben in die entriegelte Position gedrückt werden!
2.2 - Drücken Sie das Schloss (1) nach unten, bis dieses einrastet.
2.3 - Verschrauben Sie das Schloss (1) mit den dem DUSC beiliegenden
Schrauben (*) und dem Torxschlüssel (2). Ziehen Sie die Schrauben vorsichtig
und handfest an.
WARNUNG: Ein zu festes Anziehen der Schrauben kann das
Schlossgehäuse beschädigen!
HINWEIS: Überprüfen Sie die Funktion des Verriegelungsmechanismus!
HINWEIS: NIEMALS den Schließzylinder mit Öl schmieren! Verwenden Sie nur
Graphitpulver!
ANBAUSCHRITT · ANBAUANLEITUNG LESEN UND AUFBEWAHREN!
Die inhaltliche Übersetzung erfolgt automatisiert.
© SW-MOTECH GmbH & Co. KG
Irrtümer und Änderungen vorbehalten.
Technische und Design-Änderungen vorbehalten.
5

PRODUKTSPEZIFISCHE HINWEISE
HINWEIS: Beachten Sie die landesspezifischen Vorschriften für
Zulassung/Betrieb Ihres Fahrzeugs bzw. anwendbare TÜV-Vorschriften. Lassen
Sie eintragungspflichtige Teile nach Montage durch Ihre Prüfstelle in die
Fahrzeugpapiere eintragen.
PRODUKTHINWEISE · ANBAUANLEITUNG LESEN UND AUFBEWAHREN!
Die inhaltliche Übersetzung erfolgt automatisiert.
© SW-MOTECH GmbH & Co. KG
Irrtümer und Änderungen vorbehalten.
Technische und Design-Änderungen vorbehalten.
6

Item number: LOC.00.745.10000 Revision: 00 · Date: 08 - 2023
Hard case lock set
~ 0.25 h. EASY DIFFICULT
ENGLISH ·Thank you for choosing this premium product from SW-MOTECH.
Visit our online shop for more information (e.g. model assignments). Required
documents (e.g. national type approval) are available there for you to
download.
Please read and understand all the instructions, safety information and
warnings in these mounting instructions before mounting and using the
product in order to avoid injury and damage. Keep these mounting
instructions for reference.
This product was developed for vehicles in factory condition. Compatibility
with original accessories or accessories from other manufacturers cannot
be guaranteed.
These mounting instructions have been prepared to the best of our current
knowledge. No legal claims relating to accuracy can be made. Errors and
omissions excepted. We reserve the right to make technical and design
changes. The copyright is held by SW-MOTECH.
SAFETY WARNING SYMBOL
This warning symbol is used in these mounting instructions to warn of
deadly dangers, injuries or other hazards. The words DANGER, WARNING or
CAUTION are used as part of this warning symbol to convey important safety
messages and information relating to the installation and use of this
product. These words, together with the safety warning symbol, mean:
DANGER: Indicates a hazardous situation which, if not avoided, will result
in death or serious injury!
WARNING: Indicates a hazardous situation which, if not avoided, may
result in death or serious injury!
CAUTION: Indicates a hazardous situation which, if not avoided, may result
in minor or moderate injury!
NOTE: Important information, but not relating to a risk of death or injury
(property damage only)!
GENERAL INFORMATION
WARNING: Assembly and/or maintenance of this product requires
advanced technical skill, appropriate tools, and a good understanding of tool
usage and torque specifications. For your own safety, SW-MOTECH
recommends having the assembly and/or maintenance carried out by a
qualified and certified motorcycle workshop.
WARNING: If you do choose to assemble this product yourself, carefully
and fully read the mounting instructions before assembly and use, and
follow all instructions to avoid serious injury or death. Also observe all
relevant information in the vehicle manual when mounting or using the
product. IF YOU DO NOT UNDERSTAND ANY PART OF THESE MOUNTING
INSTRUCTIONS OR NEED AN EXPLANATION AS TO A SPECIFIC
INSTRUCTION, DO NOT ATTEMPT TO INSTALL THIS PRODUCT WITHOUT
CONSULTING SW-MOTECH FOR ASSISTANCE!
PREPARATION: Read the mounting instructions carefully and make sure
that all parts on the parts list are available.
CAUTION: Ensure that your vehicle is standing securely. Switch off the
engine and remove the ignition key. Allow the engine/exhaust to cool
down if necessary. Disconnect the battery when working on the electrical
system. Only use proper tools and always wear safety goggles and gloves
during assembly and maintenance. Have a second person help you with
assembly and maintenance.
ASSEMBLY: All parts and connections removed from the vehicle must be
reinstalled according to the vehicle manufacturer's specifications or
replaced with parts and hardware supplied by SW-MOTECH.
WARNING: Secure all threads with a medium-strength liquid
threadlocker, unless otherwise specified.
DANGER: Tightening torques not defined by SW-MOTECH must be
obtained from the vehicle manufacturer or a certified motorbike
workshop.
FUNCTIONAL CHECK:After mounting the product, ensure that no moving
parts are obstructed and that the function of the vehicle is not impeded.
Cables and hoses must not rub against each other and/or be hindered in any
way.
WARNING: Carry out a comprehensive functionality check before you
start to drive. Check the tightening torque of all connections and the tight
fit of the product after the first 50 km and then at regular intervals.
Mounted accessories can change the handling and stability of the vehicle.
MOUNTING INSTRUCTIONS · READ AND KEEP MOUNTING INSTRUCTIONS!
SW-MOTECH GmbH & Co. KG
Ernteweg 7-10
35282 Rauschenberg
Germany
www.sw-motech.com
The content translation is automated.
© SW-MOTECH GmbH & Co. KG
Errors and omissions excepted
Subject to technical and design changes.
1

Take note of the symbols and what they mean in the
ASSEMBLY section. If the term OEM appears in the
ASSEMBLY section, the vehicle manufacturer's
specifications must be observed and applied.
If you have any questions, please don't hesitate to contact
our Customer Service team or our distributors. You can
find our telephone number and a list of our distributors in
our online shop:
www.sw-motech.com
LEGEND OVERVIEW · READ AND KEEP MOUNTING INSTRUCTIONS!
The content translation is automated.
© SW-MOTECH GmbH & Co. KG
Errors and omissions excepted
Subject to technical and design changes.
2

PARTS LIST · READ AND KEEP MOUNTING INSTRUCTIONS!
The content translation is automated.
© SW-MOTECH GmbH & Co. KG
Errors and omissions excepted
Subject to technical and design changes.
3
21
HSK.00.745.500.04
1/1
2
T20
TRX.T20
1/1
3
ALK.00.165.A63
2/2

1
WARNING: Always wear eye and hand protection!
WARNING: Always use the proper tools!
Opening the lid
1.1 - Press the DUSC release button (*) and pull the lid latch buckle into the
open position.
1.2 - Remove the latch buckle from the corresponding bracket and open the
lid.
MOUNTING STEP · READ AND KEEP MOUNTING INSTRUCTIONS!
The content translation is automated.
© SW-MOTECH GmbH & Co. KG
Errors and omissions excepted
Subject to technical and design changes.
4

2
1×1
2×1
3×2
Install DUSC lock
2.1 - Open the DUSC (*) latch buckle and position the lock (1) as shown.
NOTE: DUSC L ONLY: Make sure the locking tab (highlighted in red) is in the
unlocked position (up)! If necessary, the locking tab must be pushed up into the
unlocked position!
2.2 - Push the lock (1) down until it clicks into place.
2.3 - Screw in the lock (1) using the screws (*) supplied with the DUSC and the
torx key (2). Carefully tighten the screws by hand.
WARNING: Over-tightening the screws may damage the lock casing!
NOTE: Ensure that the locking mechanism is in working order!
NOTE: NEVER lubricate the lock cylinder with oil! Only use graphite powder!
MOUNTING STEP · READ AND KEEP MOUNTING INSTRUCTIONS!
The content translation is automated.
© SW-MOTECH GmbH & Co. KG
Errors and omissions excepted
Subject to technical and design changes.
5

PRODUCT-SPECIFIC NOTES
NOTE: Observe the country-specific regulations for the registration/operation of
your vehicle or applicable TÜV regulations. After assembly, have parts that are
subject to registration entered in the vehicle documents by your test centre.
PRODUCT INFORMATION · READ AND KEEP MOUNTING INSTRUCTIONS!
The content translation is automated.
© SW-MOTECH GmbH & Co. KG
Errors and omissions excepted
Subject to technical and design changes.
6

Número de artículo: LOC.00.745.10000 Revisión: 00 · Fecha: 08 - 2023
Juego de bombín para maletín rígido
~ 0.25 h. FÁCIL COMPLICADO
ESPAÑOL · Gracias por elegir este producto de primera calidad de SW-
MOTECH. Visite nuestra tienda online para obtener más información (p. ej.,
sobre el uso de los modelos). Desde esa página podrá descargar los
documentos que necesite (por ejemplo, la homologación nacional de tipo).
Para evitar lesiones y daños, asegúrese de leer y comprender todas las
instrucciones, advertencias de seguridad y precauciones de este manual
antes de montar y utilizar el producto. Guarde estas instrucciones de
montaje como referencia.
Este producto ha sido desarrollado para vehículos en condiciones de
fábrica. No se garantiza la compatibilidad con los accesorios originales o de
otros fabricantes.
Estas instrucciones de montaje se han redactado de acuerdo con nuestros
conocimientos actuales. No hay reclamaciones legales de corrección. Salvo
errores y omisiones. Nos reservamos el derecho a realizar cambios
técnicos y de diseño. Los derechos de autor pertenecen a SW-MOTECH.
SÍMBOLO DE ADVERTENCIA DE SEGURIDAD
Este símbolo de advertencia se utiliza en estas instrucciones de montaje
para advertir de peligros mortales, lesiones u otros riesgos. Las palabras
PELIGRO, ATENCIÓN o PRECAUCIÓN se utilizan con este símbolo de
advertencia para transmitir importantes avisos de seguridad e información
relacionada con el montaje y uso de este producto. Estas palabras, junto con
el símbolo de advertencia de seguridad, significan:
PELIGRO: Indica una situación de peligro que, si no se evita, provoca
lesiones graves o incluso la muerte.
ATENCIÓN: Indica una situación de peligro que, si no se evita, puede
provocar lesiones graves o incluso la muerte.
PRECAUCIÓN: Indica una situación de peligro que, si no se evita, puede
provocar lesiones leves o de gravedad media.
NOTA: Información importante, pero que no está relacionada con un
riesgo de lesiones o muerte (solo daños materiales).
INDICACIONES GENERALES
ATENCIÓN: El montaje y/o mantenimiento de este producto requiere
conocimientos técnicos avanzados, las herramientas apropiadas, un buen
manejo de dichas herramientas y conocer las especificaciones de los pares
de apriete. Por su propia seguridad, SW-MOTECH recomienda que el
montaje y/o el mantenimiento los realice un taller de motocicletas
cualificado y certificado.
ATENCIÓN: Si elige ensamblar este producto usted mismo, antes de
montarlo y usarlo, lea las instrucciones de montaje detenidamente y en su
totalidad, y siga todas las indicaciones para evitar lesiones graves o
mortales. Cuando monte y utilice el producto, tenga también en cuenta toda
la información relevante que figure en el manual del vehículo. SI NO
ENTIENDE ALGUNA PARTE DE ESTAS INSTRUCCIONES DE MONTAJE O
NECESITA ALGUNA ACLARACIÓN, NO INTENTE INSTALAR ESTE PRODUCTO
SIN CONSULTAR A SW-MOTECH PARA OBTENER AYUDA.
PREPARACIÓN: Lea atentamente las instrucciones de montaje y asegúrese
de que todas las piezas de la lista de piezas están presentes.
PRECAUCIÓN:Asegúrese de que su vehículo esté estacionado de
manera segura. Apague el motor y retire la llave de encendido. Deje que el
motor o el escape se enfríen si es necesario. Desconecte la batería cuando
trabaje en el sistema eléctrico. Utilice únicamente las herramientas
adecuadas y use siempre gafas de seguridad y guantes al realizar el
montaje y las tareas de mantenimiento. Pida a otra persona que le ayude
con el montaje y el mantenimiento.
MONTAJE: Todas las piezas y conexiones retiradas del vehículo deben ser
reinstaladas de acuerdo con las especificaciones del fabricante del vehículo
o sustituidas por piezas y herrajes suministrados por SW-MOTECH.
ATENCIÓN: Asegure todas las roscas con fijador de roscas líquido de
resistencia media, a menos que se especifique lo contrario.
PELIGRO: Los pares de apriete no definidos por SW-MOTECH deben
obtenerse del fabricante del vehículo o de un taller de motocicletas
certificado.
COMPROBACIÓN FUNCIONAL:Después del montaje, asegúrese de que no
haya piezas móviles bloqueadas y de que no se altere el funcionamiento del
vehículo. Los cables y tubos no deben rozarse ni quedar pinzados.
ATENCIÓN: Realice una comprobación exhaustiva del funcionamiento
antes de iniciar la marcha. Tras los primeros 50 km y, después, con
regularidad, compruebe el par de apriete de todas las conexiones y que el
producto está firmemente sujeto. Los accesorios instalados pueden
cambiar el comportamiento de conducción y la estabilidad del vehículo.
INSTRUCCIONES DE MONTAJE · LEE Y CONSERVA LAS INSTRUCCIONES DE MONTAJE!
SW-MOTECH GmbH & Co. KG
Ernteweg 7-10
35282 Rauschenberg
Alemania
www.sw-motech.com
La traducción del contenido es automática
© SW-MOTECH GmbH & Co. KG
Salvo errores y omisiones
Sujeto a cambios técnicos y de diseño.
1

Preste atención a los símbolos que figuran en la
sección de MONTAJE y su significado. Cuando, en la
sección de MONTAJE, aparecen las siglas OEM, se
deberán seguir y aplicar las especificaciones del
fabricante del vehículo.
Si tiene alguna pregunta, nuestro servicio de atención al
cliente y nuestros distribuidores estarán encantados de
prestarle ayuda. Encontrará nuestro número de teléfono
y una lista de nuestros distribuidores en nuestra tienda
online:
www.sw-motech.com
RESUMEN DE LA LEYENDA · LEE Y CONSERVA LAS INSTRUCCIONES DE MONTAJE!
La traducción del contenido es automática
© SW-MOTECH GmbH & Co. KG
Salvo errores y omisiones
Sujeto a cambios técnicos y de diseño.
2

LISTA DE PIEZAS · LEE Y CONSERVA LAS INSTRUCCIONES DE MONTAJE!
La traducción del contenido es automática
© SW-MOTECH GmbH & Co. KG
Salvo errores y omisiones
Sujeto a cambios técnicos y de diseño.
3
21
HSK.00.745.500.04
1/1
2
T20
TRX.T20
1/1
3
ALK.00.165.A63
2/2

1
ATENCIÓN: ¡Use siempre protección de ojos y manos!
ATENCIÓN: ¡Utilice siempre herramientas adecuadas!
Apertura de la tapa
1.1. Presione el botón de liberación del DUSC (*) y tire del obturador de
tensión de la tapa para abrirlo.
1.2. Retire el obturador de tensión del enganche y abra la tapa.
PASO DE FIJACIóN · LEE Y CONSERVA LAS INSTRUCCIONES DE MONTAJE!
La traducción del contenido es automática
© SW-MOTECH GmbH & Co. KG
Salvo errores y omisiones
Sujeto a cambios técnicos y de diseño.
4

2
1×1
2×1
3×2
Instalación de la cerradura del DUSC
2.1. Abra el obturador de tensión del DUSC (*) y coloque la cerradura (1)
como se muestra en la imagen.
NOTA: SOLO PARA EL DUSC L: ¡Asegúrese de que la lengüeta de bloqueo
(resaltada en rojo) esté desbloqueada (hacia arriba)! Si es necesario, la lengüeta
de bloqueo debe empujarse hacia arriba para colocarla en la posición de
desbloqueo.
2.2. Empuje la cerradura (1) hacia abajo hasta que encaje en su lugar.
2.3. Atornille la cerradura (1) utilizando los tornillos (*) suministrados con el
DUSC y la llave torx (2). Apriete los tornillos a mano con cuidado.
ATENCIÓN: ¡Apretar demasiado los tornillos puede dañar la caja de la
cerradura!
NOTA: Compruebe el funcionamiento del mecanismo de bloqueo.
NOTA: ¡NUNCA lubrique el bombín con aceite! ¡Utilice únicamente polvo de
grafito!
PASO DE FIJACIóN · LEE Y CONSERVA LAS INSTRUCCIONES DE MONTAJE!
La traducción del contenido es automática
© SW-MOTECH GmbH & Co. KG
Salvo errores y omisiones
Sujeto a cambios técnicos y de diseño.
5

INDICACIONES ESPECÍFICAS DEL PRODUCTO
NOTA: Tenga en cuenta las normas específicas del país para la
matriculación/uso de su vehículo o las normas aplicables de la ITV. En caso de
piezas con registro obligatorio, su organismo de inspección debe registrarlas tras
el montaje en los documentos del vehículo.
INFORMACIóN SOBRE LOS PRODUCTOS · LEE Y CONSERVA LAS INSTRUCCIONES DE MONTAJE!
La traducción del contenido es automática
© SW-MOTECH GmbH & Co. KG
Salvo errores y omisiones
Sujeto a cambios técnicos y de diseño.
6

Numéro d‘article: LOC.00.745.10000 Révision: 00 · Date: 08 - 2023
Kit de serrures pour valises rigides
~ 0.25 h. FACILE DIFFICILE
FRANÇAIS · Nous vous remercions d'avoir choisi ce produit haut de gamme
de SW-MOTECH. Visitez notre boutique en ligne pour plus d'informations (par
exemple affectation des modèles). Les documents nécessaires (par exemple
ABE) y sont disponibles en téléchargement.
Veuillez lire et prendre en compte toutes les instructions, les consignes de
sécurité et les avertissements contenus dans ce manuel de montage avant
de monter et d'utiliser le produit afin d'éviter toute blessure ou tout
dommage. Veuillez conserver la notice d'utilisation pour référence.
Ce produit a été développé pour des véhicules en configuration d'usine.
Nous ne sommes pas en mesure d'assurer la compatibilité avec les pièces
de rechange originales ou les pièces de rechange d'autres fabricants.
La présente notice d'installation a été élaborée conformément à nos
connaissances actuelles. Il n'existe aucun droit juridique à l'exactitude des
informations qu'elle contient. Sous réserve d'erreurs et de fautes. Sous
réserve de modifications techniques et conceptuelles. SW-MOTECH détient
les droits d'auteur.
SYMBOLE D'AVERTISSEMENT DE SÉCURITÉ
Ce symbole d'avertissement est utilisé dans ces instructions de montage
pour mettre en garde contre des dangers mortels, de blessures ou d'autres
risques. Les mots DANGER, ATTENTION ou RECOMMANDATION sont utilisés
avec ce symbole d'avertissement pour transmettre des consignes de
sécurité et des informations importantes concernant le montage et
l'utilisation de ce produit. Ces mots, associés au symbole d'avertissement
de sécurité, signifient :
DANGER : signale une situation dangereuse pouvant entraîner la mort ou
des blessures graves si elle n'est pas évitée !
ATTENTION : signale une situation dangereuse pouvant entraîner la mort
ou des blessures graves si elle n'est pas évitée !
PRUDENCE : Indique une situation dangereuse susceptible d'entraîner des
blessures de gravité réduite ou moyenne si elle se présente !
REMARQUE : Informations importantes, mais qui n'entraînent pas de
risque de décès ou de blessure (dommages matériels uniquement).
REMARQUES GÉNÉRALES
ATTENTION : le montage et/ou l'entretien de ce produit nécessite des
compétences techniques avancées, des outils appropriés et une bonne
compréhension de l'utilisation des outils et des indications de réglage. Pour
votre propre sécurité, SW-MOTECH recommande de confier le montage
et/ou l'entretien à un atelier de réparation de deux-roues qualifié et
certifié.
ATTENTION : si vous décidez de monter vous-même ce produit, lisez
attentivement et intégralement les instructions de montage avant le
montage et l'utilisation et suivez toutes les instructions afin d'éviter des
blessures graves ou mortelles. Lors du montage et de l'utilisation, tenez
également compte de toutes les informations pertinentes du manuel du
véhicule. SI VOUS NE COMPRENEZ PAS UNE PARTIE DE CE MANUEL
D'INSTALLATION OU SI VOUS AVEZ BESOIN D'EXPLICATIONS CONCERNANT
UNE INSTRUCTION, N'ESSAYEZ PAS D'INSTALLER CE PRODUIT SANS
DEMANDER DE L'AIDE À SW-MOTECH !
PRÉPARATION : Veuillez lire attentivement les instructions de montage et
assurez-vous que tous les éléments de la liste de pièces sont présents.
PRUDENCE : veillez à ce que votre véhicule soit bien stable. Éteignez le
moteur et retirez la clé de contact. Laissez refroidir le
moteur/l'échappement si nécessaire. Débranchez la batterie lorsque vous
travaillez sur le système électrique. Utilisez uniquement des outils
appropriés et portez toujours des lunettes de protection et des gants
pendant le montage et l'entretien. Faites-vous aider par une deuxième
personne lors du montage et de l'entretien.
MONTAGE : Toutes les pièces et connexions retirées du véhicule doivent
être réinstallées conformément aux instructions du fabricant du véhicule ou
remplacées par des pièces et du matériel fournis par SW-MOTECH.
ATTENTION Sauf indication contraire, sécurisez tous les filetages avec
du frein filet liquide de force moyenne.
DANGER : Les couples de serrage non définis par SW-MOTECH doivent
être obtenus auprès du constructeur du véhicule ou d'un atelier de
réparation de motos certifié.
CONTRÔLE DU FONCTIONNEMENT : Après le montage, assurez-vous
qu'aucune pièce mobile n'est bloquée et que le fonctionnement du véhicule
n'est pas perturbé. Les câbles et les tuyaux ne doivent pas frotter et/ou être
coincés.
ATTENTION : Effectuez un contrôle de fonctionnement complet avant
de commencer à rouler. Après les 50 premiers kilomètres, puis
régulièrement, vérifiez le couple de serrage de tous les raccords et la
bonne fixation du produit. Les accessoires montés peuvent modifier le
comportement sur la route et la stabilité du véhicule.
INSTRUCTIONS DE MONTAGE · LIRE ET CONSERVER LES INSTRUCTIONS DE MONTAGE!
SW-MOTECH GmbH & Co. KG
Ernteweg 7-10
35282 Rauschenberg
Allemagne
www.sw-motech.com
La traduction du contenu est automatisée.
© SW-MOTECH GmbH & Co. KG
Sous réserve d'erreurs et de modifications
Sous réserve de modifications techniques et de design.
1

Vous trouverez les symboles et leur signification
dans la section MONTAGE. Si le terme OEM apparaît
dans la section MONTAGE, il faut respecter et
appliquer les consignes du fabricant du véhicule.
Si vous avez des questions, notre service clientèle ainsi
que nos distributeurs se tiennent à votre disposition. Vous
trouverez notre numéro de téléphone ainsi que la liste de
nos distributeurs sur notre boutique en ligne :
www.sw-motech.com
APERçU DES LéGENDES · LIRE ET CONSERVER LES INSTRUCTIONS DE MONTAGE!
La traduction du contenu est automatisée.
© SW-MOTECH GmbH & Co. KG
Sous réserve d'erreurs et de modifications
Sous réserve de modifications techniques et de design.
2

LISTE DES PIèCES · LIRE ET CONSERVER LES INSTRUCTIONS DE MONTAGE!
La traduction du contenu est automatisée.
© SW-MOTECH GmbH & Co. KG
Sous réserve d'erreurs et de modifications
Sous réserve de modifications techniques et de design.
3
21
HSK.00.745.500.04
1/1
2
T20
TRX.T20
1/1
3
ALK.00.165.A63
2/2

1
ATTENTION : portez toujours des lunettes et des gants de protection !
ATTENTION : Utilisez toujours des outils appropriés !
Ouverture du couvercle
1.1 - Appuyez sur le bouton de déverrouillage de la DUSC (*) et placez le
verrou du couvercle en position ouverte.
1.2 - Retirez le verrou de son support et ouvrez le couvercle.
PHASE DE MONTAGE · LIRE ET CONSERVER LES INSTRUCTIONS DE MONTAGE!
La traduction du contenu est automatisée.
© SW-MOTECH GmbH & Co. KG
Sous réserve d'erreurs et de modifications
Sous réserve de modifications techniques et de design.
4

2
1×1
2×1
3×2
Montage de la serrure de la DUSC
2.1 - Ouvrez le verrou de la DUSC (*) et positionnez la serrure (1) comme
indiqué.
REMARQUE : DUSC L UNIQUEMENT : Assurez-vous que la patte de fermeture
(indiquée en rouge) est en position déverrouillée (vers le haut) ! Si nécessaire, la
patte de fermeture doit être relevée en position déverrouillée !
2.2 - Pressez la serrure (1) vers le bas jusqu'à ce qu'elle s'enclenche.
2.3 - Vissez la serrure (1) à l'aide des vis (*) et de la clé torx (2) fournies avec
la DUSC. Serrez les vis manuellement avec précaution.
ATTENTION : Un serrage excessif des vis peut endommager le boîtier de
la serrure !
REMARQUE : Vérifiez le fonctionnement du mécanisme de verrouillage !
REMARQUE : NE JAMAIS lubrifier le cylindre de serrure avec de l'huile !
N'utilisez que de la poudre de graphite !
PHASE DE MONTAGE · LIRE ET CONSERVER LES INSTRUCTIONS DE MONTAGE!
La traduction du contenu est automatisée.
© SW-MOTECH GmbH & Co. KG
Sous réserve d'erreurs et de modifications
Sous réserve de modifications techniques et de design.
5

REMARQUES SPÉCIFIQUES AU PRODUIT
REMARQUE :Respectez les réglementations spécifiques au pays pour
l'immatriculation/l'exploitation de votre véhicule ou les réglementations TÜV
applicables. Après le montage, faites inscrire les pièces soumises à
immatriculation dans les papiers du véhicule par votre centre de contrôle.
INFORMATIONS SUR LES PRODUITS · LIRE ET CONSERVER LES INSTRUCTIONS DE MONTAGE!
La traduction du contenu est automatisée.
© SW-MOTECH GmbH & Co. KG
Sous réserve d'erreurs et de modifications
Sous réserve de modifications techniques et de design.
6

Numero di articolo: LOC.00.745.10000 Revisione: 00 · Data: 08 - 2023
Kit serratura bauletti rigidi
~ 0.25 h. FACILE DIFFICILE
ITALIANO ·Grazie per aver scelto questo prodotto premium di SW-MOTECH.
Visita il nostro negozio online per ulteriori informazioni (ad es. per la
compatibilità con i vari modelli). I documenti richiesti (ad es. certificato di
omologazione nazionale) possono essere scaricati qui.
Si prega di leggere attentamente le avvertenze di sicurezza e le istruzioni
per il montaggio prima di montare e utilizzare il prodotto, al fine di evitare
eventuali lesioni e danni. Conserva queste istruzioni per il montaggio come
riferimento futuro.
Questo prodotto è stato sviluppato per veicoli in condizioni di fabbrica. La
compatibilità con gli accessori originali o di altri produttori non può essere
garantita.
Queste istruzioni per il montaggio sono state redatte in base alle nostre
conoscenze attuali. Non sussistono pretese di correttezza giuridiche. Salvo
errori ed omissioni. Ci riserviamo il diritto di apportare modifiche tecniche e
di design. Copyright SW-MOTECH.
SIMBOLO DI SICUREZZA
Questo simbolo di avvertenza è usato nelle presenti istruzioni di
montaggio per segnalare pericoli mortali, rischio di lesioni o altri pericoli.
Le parole "PERICOLO", "AVVERTENZA" O "ATTENZIONE" sono utilizzate con
questo simbolo di avvertenza per trasmettere importanti istruzioni di
sicurezza e informazioni relative al montaggio e all'uso di questo prodotto.
Queste parole, utilizzate insieme al simbolo di avvertenza, significano:
PERICOLO: indica una situazione di pericolo che, se non evitata, può
causare morte o lesioni gravi!
AVVERTENZA: indica una situazione di pericolo che, se non evitata, può
causare morte o lesioni gravi!
ATTENZIONE: indica una situazione di pericolo che, se non evitata, può
provocare lesioni lievi o di entità moderata!
AVVISO: indica informazioni importanti che non riguardano il rischio di
morte o di lesioni (riguardano unicamente il rischio di danni materiali)!
INFORMAZIONI GENERALI
AVVERTENZA: il montaggio e/o la manutenzione di questo prodotto
richiedono competenze tecniche avanzate, strumenti adeguati e una buona
conoscenza dell'uso della strumentazione e delle indicazioni relative alle
coppie di serraggio. Per ragioni di sicurezza, SW-MOTECH raccomanda di
far eseguire il montaggio e/o la manutenzione presso un'officina per
motociclette qualificata e certificata.
AVVERTENZA: se si decide di installare questo prodotto in autonomia,
leggere attentamente le istruzioni per il montaggio prima del montaggio e
dell'uso e seguire tutte le avvertenze per evitare lesioni gravi o mortali.
Durante il montaggio e l'uso, seguire anche tutte le istruzioni pertinenti
contenute nel manuale del veicolo. SE NON SI COMPRENDONO TALI
ISTRUZIONI, ANCHE SOLO IN PARTE, O SE SONO NECESSARI CHIARIMENTI,
NON CERCARE DI MONTARE IL PRODOTTO IN AUTONOMIA SENZA CHIEDERE
IL SUPPORTO DI SW-MOTECH!
PREPARAZIONE: leggere attentamente le istruzioni per il montaggio e
assicurarsi che siano disponibili tutti i componenti contenuti nella lista.
ATTENZIONE: assicurarsi che il veicolo sia perfettamente fermo.
Spegnere il motore e togliere la chiave. Se necessario, lasciar raffreddare
il motore/lo scarico. Scollegare la batteria quando si interviene
sull'impianto elettrico. Usare esclusivamente strumenti idonei e indossare
sempre occhiali e guanti protettivi durante le operazioni di montaggio e
manutenzione. Chiedere aiuto a una seconda persona durante le fasi di
montaggio e manutenzione.
MONTAGGIO: tutti i componenti e i collegamenti rimossi dal veicolo devono
essere reinstallati secondo le specifiche del produttore del veicolo o
sostituiti con componenti e attrezzatura forniti da SW-MOTECH.
AVVERTENZA: fissare tutte le filettature con frenafiletti liquido a
media resistenza, se non diversamente specificato.
PERICOLO: le coppie di serraggio non definite da SW-MOTECH devono
essere richieste al costruttore del veicolo o a un'officina certificata.
CONTROLLO DI FUNZIONALITÀ: dopo il montaggio accertarsi che non vi
siano parti mobili bloccate e che il funzionamento del veicolo non sia
compromesso. I cavi e i tubi flessibili non devono sfregare e/o essere
schiacciati.
AVVERTENZA: eseguire un controllo completo delle funzioni prima di
mettersi alla guida. Controllare la coppia di serraggio di tutti i
collegamenti e la tenuta del prodotto dopo i primi 50 km e in seguito
regolarmente. Gli accessori montati possono modificare la
maneggevolezza e la stabilità del veicolo.
ISTRUZIONI PER IL MONTAGGIO · LEGGI E CONSERVA LE ISTRUZIONI DI MONTAGGIO!
SW-MOTECH GmbH & Co. KG
Ernteweg 7-10
35282 Rauschenberg
Germania
www.sw-motech.com
La traduzione dei contenuti è automatizzata.
© SW-MOTECH GmbH & Co. KG
Salvo errori e omissioni.
Soggetto a modifiche tecniche e di design.
1

Consultare i simboli e il loro significato nella sezione
MONTAGGIO. Se nella sezione montaggio compare la
sigla OEM, è necessario rispettare e applicare le
specifiche del produttore del veicolo.
Per qualsiasi domanda, non esitare a contattare il nostro
servizio clienti o i nostri distributori. Il nostro numero di
telefono e l'elenco dei nostri distributori sono disponibili
nel nostro negozio online:
www.sw-motech.com
LEGENDA · LEGGI E CONSERVA LE ISTRUZIONI DI MONTAGGIO!
La traduzione dei contenuti è automatizzata.
© SW-MOTECH GmbH & Co. KG
Salvo errori e omissioni.
Soggetto a modifiche tecniche e di design.
2

ELENCO DELLE PARTI · LEGGI E CONSERVA LE ISTRUZIONI DI MONTAGGIO!
La traduzione dei contenuti è automatizzata.
© SW-MOTECH GmbH & Co. KG
Salvo errori e omissioni.
Soggetto a modifiche tecniche e di design.
3
21
HSK.00.745.500.04
1/1
2
T20
TRX.T20
1/1
3
ALK.00.165.A63
2/2

1
AVVERTENZA: indossare sempre le protezioni per gli occhi e per le mani!
AVVERTENZA: Utilizzare sempre strumenti adeguati!
Apertura del coperchio
1.1 - Premere il pulsante di rilascio del sistema DUSC (*) e tirare la chiusura
di bloccaggio del coperchio in posizione aperta.
1.2 - Rimuovere la chiusura di bloccaggio dalla relativa staffa e aprire il
coperchio.
FASE DI MONTAGGIO · LEGGI E CONSERVA LE ISTRUZIONI DI MONTAGGIO!
La traduzione dei contenuti è automatizzata.
© SW-MOTECH GmbH & Co. KG
Salvo errori e omissioni.
Soggetto a modifiche tecniche e di design.
4

2
1×1
2×1
3×2
Installazione della serratura del DUSC
2.1 - Aprire la chiusura di bloccaggio del sistema DUSC (*) e posizionare la
serratura (1) come indicato.
AVVISO: SOLO PER DUSC L: assicurarsi che la linguetta di chiusura
(evidenziata in rosso) sia in posizione di sblocco (verso l'alto)! Se necessario, la
linguetta di chiusura deve essere spinta verso l'alto in posizione di sblocco!
2.2 - Spingere la serratura (1) verso il basso fino a innestarla.
2.3 - Avvitare la serratura (1) utilizzando la chiavi torx (2) e le viti (*) fornite
con il DUSC. Serrare le viti con cura e a mano.
AVVERTENZA: un serraggio eccessivo delle viti potrebbe danneggiare
l'alloggiamento della serratura!
AVVISO: controllare il funzionamento del meccanismo di bloccaggio!
AVVISO: non lubrificare MAI il cilindro di bloccaggio con olio! Utilizzare
esclusivamente polvere di grafite!
FASE DI MONTAGGIO · LEGGI E CONSERVA LE ISTRUZIONI DI MONTAGGIO!
La traduzione dei contenuti è automatizzata.
© SW-MOTECH GmbH & Co. KG
Salvo errori e omissioni.
Soggetto a modifiche tecniche e di design.
5

AVVERTENZE SPECIFICHE DEL PRODOTTO
AVVISO :Rispettare le normative specifiche del paese per
l'immatricolazione/l'uso del veicolo o le normative TÜV applicabili. Dopo il
montaggio, far inserire le parti soggette a omologazione nei documenti del veicolo
dal proprio centro di test.
INFORMAZIONI SUI PRODOTTI · LEGGI E CONSERVA LE ISTRUZIONI DI MONTAGGIO!
La traduzione dei contenuti è automatizzata.
© SW-MOTECH GmbH & Co. KG
Salvo errori e omissioni.
Soggetto a modifiche tecniche e di design.
6
-
 1
1
-
 2
2
-
 3
3
-
 4
4
-
 5
5
-
 6
6
-
 7
7
-
 8
8
-
 9
9
-
 10
10
-
 11
11
-
 12
12
-
 13
13
-
 14
14
-
 15
15
-
 16
16
-
 17
17
-
 18
18
-
 19
19
-
 20
20
-
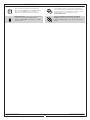 21
21
-
 22
22
-
 23
23
-
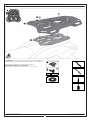 24
24
-
 25
25
-
 26
26
-
 27
27
-
 28
28
-
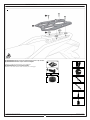 29
29
-
 30
30
-
 31
31
-
 32
32
-
 33
33
-
 34
34
-
 35
35
-
 36
36
-
 37
37
-
 38
38
-
 39
39
-
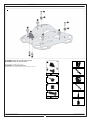 40
40
-
 41
41
-
 42
42
-
 43
43
-
 44
44
-
 45
45
-
 46
46
-
 47
47
-
 48
48
-
 49
49
-
 50
50
-
 51
51
-
 52
52
-
 53
53
-
 54
54
-
 55
55
-
 56
56
-
 57
57
-
 58
58
-
 59
59
-
 60
60
-
 61
61
-
 62
62
-
 63
63
-
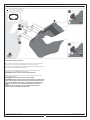 64
64
-
 65
65
-
 66
66
-
 67
67
-
 68
68
-
 69
69
-
 70
70
-
 71
71
-
 72
72
-
 73
73
-
 74
74
-
 75
75
-
 76
76
-
 77
77
-
 78
78
-
 79
79
-
 80
80
-
 81
81
-
 82
82
-
 83
83
-
 84
84
-
 85
85
-
 86
86
-
 87
87
-
 88
88
-
 89
89
-
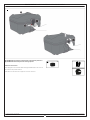 90
90
-
 91
91
-
 92
92
-
 93
93
-
 94
94
-
 95
95
-
 96
96
-
 97
97
-
 98
98
-
 99
99
-
 100
100
-
 101
101
-
 102
102
-
 103
103
-
 104
104
-
 105
105
-
 106
106
-
 107
107
-
 108
108
-
 109
109
-
 110
110
-
 111
111
-
 112
112
-
 113
113
-
 114
114
-
 115
115
-
 116
116
-
 117
117
-
 118
118
-
 119
119
-
 120
120
-
 121
121
-
 122
122
-
 123
123
-
 124
124
-
 125
125
-
 126
126
-
 127
127
-
 128
128
-
 129
129
-
 130
130
-
 131
131
-
 132
132
-
 133
133
-
 134
134
-
 135
135
-
 136
136


SW-Motech GPT.02.059.65000/B Mounting instructions
- Tipo
- Mounting instructions
en otros idiomas
- français: SW-Motech GPT.02.059.65000/B
- italiano: SW-Motech GPT.02.059.65000/B
- English: SW-Motech GPT.02.059.65000/B
- Deutsch: SW-Motech GPT.02.059.65000/B
Artículos relacionados
-
 SW-Motech GPT.06.148.65000/B Mounting instructions
-
 SW-Motech GPT.01.086.65000/B Mounting instructions
-
 SW-Motech MSS.07.975.10200/S Mounting instructions
-
 SW-Motech GPT.05.876.70000/S Mounting instructions
-
 SW-Motech GPT.05.846.16000/B Mounting instructions
-
 SW-Motech GPT.05.846.60000/B Mounting instructions
-
 SW-Motech KFT.01.052.65000/B Mounting instructions
-
 SW-Motech KFT.01.070.65100/B Mounting instructions
-
 SW-Motech KFT.22.995.30100/B Mounting instructions
-
 SW-Motech GPT.05.440.65000/B Mounting instructions


